Media Lancia Ypsilon 2013 Owner handbook (in English)
[x] Cancel search | Manufacturer: LANCIA, Model Year: 2013, Model line: Ypsilon, Model: Lancia Ypsilon 2013Pages: 315, PDF Size: 13.18 MB
Page 10 of 315

SPEEDOMETER (SPEED INDICATOR)
Shows the car speed (speedometer).
REV COUNTER
This indicates the engine rpm.
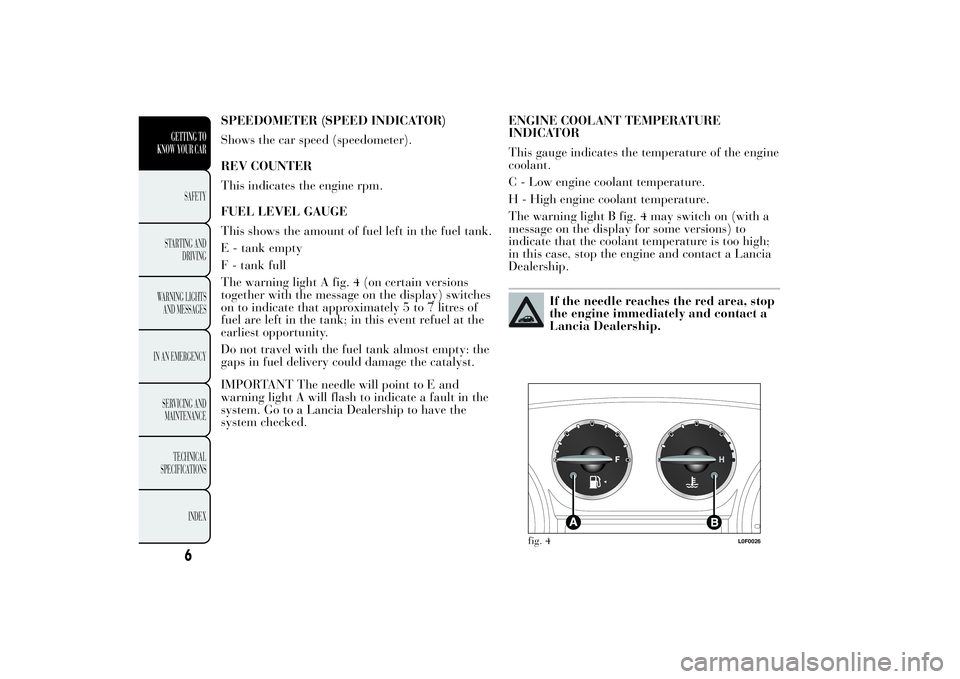
FUEL LEVEL GAUGE
This shows the amount of fuel left in the fuel tank.
E - tank empty
F - tank full
The warning light A fig. 4 (on certain versions
together with the message on the display) switches
on to indicate that approximately 5 to 7 litres of
fuel are left in the tank; in this event refuel at the
earliest opportunity.
Do not travel with the fuel tank almost empty: the
gaps in fuel delivery could damage the catalyst.
IMPORTANT The needle will point to E and
warning light A will flash to indicate a fault in the
system. Go to a Lancia Dealership to have the
system checked.ENGINE COOLANT TEMPERATURE
INDICATOR
This gauge indicates the temperature of the engine
coolant.
C - Low engine coolant temperature.
H - High engine coolant temperature.
The warning light B fig. 4 may switch on (with a
message on the display for some versions) to
indicate that the coolant temperature is too high;
in this case, stop the engine and contact a Lancia
Dealership.
If the needle reaches the red area, stop
the engine immediately and contact a
Lancia Dealership.
fig. 4
L0F0026
6
GETTING TO
KNOW YOUR CAR
SAFETY
STARTING AND
DRIVING
WARNING LIGHTS
AND MESSAGES
IN AN EMERGENCY
SERVICING AND
MAINTENANCE
TECHNICAL
SPECIFICATIONS
INDEX
Page 13 of 315

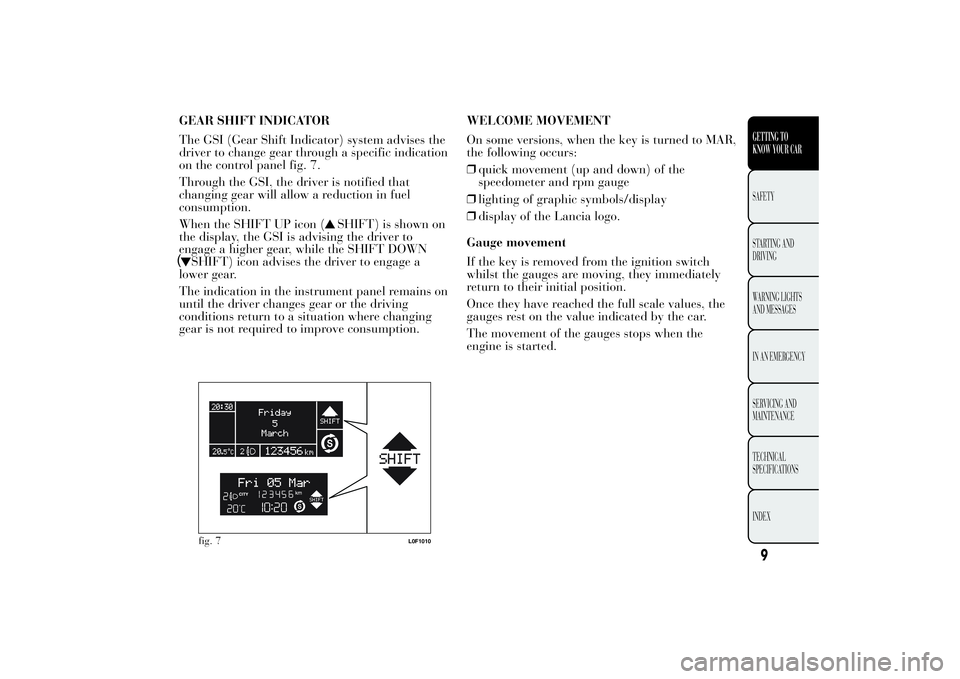
GEAR SHIFT INDICATOR
The GSI (Gear Shift Indicator) system advises the
driver to change gear through a specific indication
on the control panel fig. 7.
Through the GSI, the driver is notified that
changing gear will allow a reduction in fuel
consumption.
When the SHIFT UP icon (
SHIFT) is shown on
the display, the GSI is advising the driver to
engage a higher gear, while the SHIFT DOWN
SHIFT) icon advises the driver to engage a
lower gear.
The indication in the instrument panel remains on
until the driver changes gear or the driving
conditions return to a situation where changing
gear is not required to improve consumption.WELCOME MOVEMENT
On some versions, when the key is turned to MAR,
the following occurs:
❒quick movement (up and down) of the
speedometer and rpm gauge
❒lighting of graphic symbols/display
❒display of the Lancia logo.
Gauge movement
If the key is removed from the ignition switch
whilst the gauges are moving, they immediately
return to their initial position.
Once they have reached the full scale values, the
gauges rest on the value indicated by the car.
The movement of the gauges stops when the
engine is started.fig. 7
L0F1010
9GETTING TO
KNOW YOUR CARSAFETY
STARTING AND
DRIVING
WARNING LIGHTS
AND MESSAGES
IN AN EMERGENCY
SERVICING AND
MAINTENANCE
TECHNICAL
SPECIFICATIONS
INDEX
(
Page 16 of 315

MENU ITEMSMenu
This item allows you to access the Setup Menu.
Press the
or
button to select the various
Menu items. Hold down the
button to return to
the standard screen.
Lighting (Interior light adjustment) (with side
lights on only)
With the side lights on, this function is used to set
the brightness of the instrument panel, radio
controls and automatic climate control system
controls (for versions/markets where provided) to
8 levels.
Proceed as follows to adjust the brightness:
briefly press button
, the previously set level will
flash on the display;
press button
or
to adjust the brightness
level;
briefly press buttonto return to the menu screen
or hold the button down to return to the standard
screen without saving.Speed Beep (Speed limit)
This function is used to set the car speed limit
(km/h or mph); the driver is immediately alerted
when this limit is exceeded.
To set the desired speed limit, proceed as follows:
❒briefly press button
: the display will show the
wording "Speed Beep";
❒press button
or
to select speed limit
activation (On) or deactivation (Off);
❒if the function is on, press
or
to select
the required speed limit and then press
to
confirm.
NoteSetting is possible between 30 and 200
km/h, or 20 and 125 mph, according to the
previously set unit. See the "Measurement unit
adjustment (Measurement unit)" paragraph
described below. The setting will increase/decrease
by five units each time button
/
is
pressed. Hold down the
/
button to
automatically increase/decrease the setting
rapidly. Complete the setting by briefly pressing
the button when you approach the required value.
❒press the
button briefly to return to the menu
screen or hold the button down to return to the
standard screen without storing.
12GETTING TO
KNOW YOUR CAR
SAFETY
STARTING AND
DRIVING
WARNING LIGHTS
AND MESSAGES
IN AN EMERGENCY
SERVICING AND
MAINTENANCE
TECHNICAL
SPECIFICATIONS
INDEX
Page 50 of 315

towards the front seat feet area diffusers. Due
to the natural tendency of heat to rise, this
type of distribution warms the passenger
compartment up as quickly as possible,
providing an immediate feeling of warmth.+
distribution between feet area diffusers
(warmest air) and dashboard vents
(coolest air).
+
distribution between feet area diffusers
and windscreen/front side window
diffusers. This type of distribution
achieves effective heating of the
passenger compartment and prevents
the windows from misting up.
Button B MAX
- MAX-DEF function
activation
When theMAXbutton
is pressed, the system
activates all the functions required for fast
demisting/defrosting, that is:
❒compressor on (if the weather conditions are
suitable)
❒air recirculation off
❒maximum air temperature setting (HI)
❒fan speed determined according to the coolant
temperature
❒air flow conveyed to the windscreen and front
side windows❒Button C
- Climate control compressor
activation/deactivation
When the
symbol is lit on the display, press
button C to switch off the compressor.
When the compressor is deactivated:
❒the system will deactivate air recirculation to
prevent the windows from misting up;
❒it is not possible to convey air to the passenger
compartment with a temperature below the
outside temperature (the temperature indicated
on the display will flash when the system cannot
guarantee the required comfort conditions);
❒the fan speed can be manually reset (with
compressor enabled, ventilation cannot go
below a bar shown on the display).
46GETTING TO
KNOW YOUR CAR
SAFETY
STARTING AND
DRIVING
WARNING LIGHTS
AND MESSAGES
IN AN EMERGENCY
SERVICING AND
MAINTENANCE
TECHNICAL
SPECIFICATIONS
INDEX
Page 81 of 315

Opening
Press and hold down button C. The front glass
panel will move to the spoiler position.
Press the button again, holding it down for more
than half a second to automatically move the
sun roof to an intermediate position (“Comfort”
position).
After opening in spoiler position, press button B
once again for more than half a second to bring
the roof automatically to fully open position.
Closing
Press button B from the fully open position. If the
button is pressed for more than half a second,
the roof will automatically move to spoiler
position.
After opening in spoiler position, press button B
again for more than half a second to bring the roof
automatically to fully closed position.
Use the sunroof only at “spoiler”
position if a transverse roof rack is
fitted. Do not open the sunroof if there
is snow or ice on it: you may damage it.
fig. 53
L0F0152
77GETTING TO
KNOW YOUR CARSAFETY
STARTING AND
DRIVING
WARNING LIGHTS
AND MESSAGES
IN AN EMERGENCY
SERVICING AND
MAINTENANCE
TECHNICAL
SPECIFICATIONS
INDEX
Page 82 of 315

WARNING
When leaving the vehicle, always
remove the key from the ignition to
avoid the risk of injury to those still inside
the car due to accidental operation of the
sunroof. Improper use of the roof can be
dangerous. Before and during operation,
always check that no-one is exposed to the
risk of being injured by the moving sunroof
or by objects getting caught or hit by it.
ANTI-PINCH SAFETY DEVICE
The sun roof has an anti-pinch safety system
capable of detecting the presence of an obstacle
whilst the roof is closing: if this happens, the
system intervenes and the movement of the glass
is immediately reversed.EMERGENCY OPERATION
If the control buttons fail to operate, the sun roof
can be moved manually proceeding as described
below:
❒remove the protective cap located on the
internal lining, between the two sun blinds
fig. 54;
❒take the Allen key provided and located in the
tool box in the luggage compartment or,
depending on the version, inside the glove
compartment;
❒introduce the key provided into housing A
fig. 54 and turn it clockwise to open the roof or
anticlockwise to close the roof.
fig. 54
L0F0299
78GETTING TO
KNOW YOUR CAR
SAFETY
STARTING AND
DRIVING
WARNING LIGHTS
AND MESSAGES
IN AN EMERGENCY
SERVICING AND
MAINTENANCE
TECHNICAL
SPECIFICATIONS
INDEX
Page 89 of 315

Front and rear passenger doors
(for versions/markets, where provided)
On the passenger side front door control panel,
and on some versions also on the rear doors,
buttons are provided to control the associated
windows.
Anti-crush safety device
The car is equipped with an anti-crush function
for the raising of the front and rear windows. This
safety system detects the presence of an obstacle
during the window closing travel and intervenes
by stopping and reversing the window travel,
depending on its position.
This device is also useful if the windows are
activated accidentally by children on board the
car.
The anti-crush safety function is active both
during the manual and the automatic operation of
the window. When the anti-crush system is
activated the window travel is immediately
interrupted and then reversed. The window
cannot be operated in any way during this
operation.
IMPORTANT If the anti-crush protection
intervenes 3 consecutive times within 1 minute or
is faulty, the automatic closing operation of the
window is inhibited, only allowing it in steps
of half a second; the button is released for the
subsequent manoeuvre. In order to restore the
correct operation of the system, the relevant
window must be lowered.IMPORTANT With ignition key at STOP or
removed, the electric windows remain active for
about 3 minutes and are deactivated when a door
is opened.
IMPORTANT Where the anti-crush function is
present, pressing button
on the remote control
for more than 2 seconds opens the windows for as
long as the button is pressed. Pressing the
button for more than 2 seconds closes the
windows.
The system conforms to the 2000/4/EC
standard concerning the safety of
passengers leaning out of the passenger
compartment.
85GETTING TO
KNOW YOUR CARSAFETY
STARTING AND
DRIVING
WARNING LIGHTS
AND MESSAGES
IN AN EMERGENCY
SERVICING AND
MAINTENANCE
TECHNICAL
SPECIFICATIONS
INDEX
Page 113 of 315

The frequency of the acoustic signal:
❒increases as the distance between the car and
the obstacle decreases;
❒becomes continuous when the distance between
the car and the obstacle is less than 30 cm and
stops immediately if the distance increases;
❒is constant if the distance is unchanged.
If several obstacles are detected by the sensors,
only the nearest one is considered.
FAULT INDICATION
Any parking sensor faults will be indicated when
reverse is engaged by the
warning light on
the instrument panel together with the message in
the multifunction display (for versions/markets,
where provided) (see “Warning lights and
messages” section).OPERATION WITH TRAILER
Sensor operation is deactivated automatically
when the trailer's electric cable plug is fitted into
the car's tow hook socket.
The sensors are automatically reactivated when
the trailer's cable plug is removed.
For correct operation, sensors must
always be clean from mud, dirt, snow
or ice. Be careful not to scratch or
damage the sensors while cleaning them.
Avoid using dry, rough or hard cloths. The
sensors must be washed using clean water,
with the addition of car shampoo if necessary.
When using special washing equipment such
as high pressure jets or steam cleaning, clean
the sensors very quickly keeping the jet more
than 10 cm away.
109GETTING TO
KNOW YOUR CARSAFETY
STARTING AND
DRIVING
WARNING LIGHTS
AND MESSAGES
IN AN EMERGENCY
SERVICING AND
MAINTENANCE
TECHNICAL
SPECIFICATIONS
INDEX
Page 122 of 315

❒If a parking manoeuvre is being carried out
between two parked vehicles alongside the
pavement, the Magic Parking system may cause
the car to mount the pavement.
❒Some manoeuvres at very tight bends may not
be carried out.
❒Take great care to ensure that conditions do not
change during the parking manoeuvre (e.g. if
there are persons and/or animals in the parking
area, moving cars, etc.) and intervene
immediately if necessary.
❒During parking manoeuvres, pay attention to
cars approaching from the opposite direction.
Always follow the Highway Code.
IMPORTANT Correct system operation is not
guaranteed if snow chains or emergency wheels
are fitted.
IMPORTANT The correct positioning of the car
inside the parking space detected by the system
depends on various factors, in particular the
circumference of the wheels. For example,
if wheels with a 14" diameter are fitted, the
position of the car inside the parking area could
be slightly different.MESSAGES ON THE DISPLAY
Search in progress:the Magic Parking system is
searching for a suitable parking space.
Parking found:the Magic Parking system has
found a suitable parking space.
Drive forward:the Magic Parking system
requests the driver to proceed slowly to bring the
car to the correct position before starting the
semi-automatic manoeuvre or, during the
semi-automatic manoeuvre, the system requests
the driver to engage the forward gear to continue
the manoeuvre.
Engaging reverse:a suitable parking place has
been found and the position is correct for starting
the parking manoeuvre. Stop and engage reverse.
Disengage reverse:when the Magic Parking
activation button is pressed, reverse gear must be
released for the system to be switched on.
Magic Parking: steering wheel being usedThe
manoeuvre is about to begin, the driver is
requested to release the steering wheel.
Drive backwards - Magic Parking: steering
wheel being used:The manoeuvre has started,
the driver can accelerate and release the clutch (in
the case of a manual gearbox) to enter the parking
space. The system manages the steering
automatically.
118GETTING TO
KNOW YOUR CAR
SAFETY
STARTING AND
DRIVING
WARNING LIGHTS
AND MESSAGES
IN AN EMERGENCY
SERVICING AND
MAINTENANCE
TECHNICAL
SPECIFICATIONS
INDEX
Page 125 of 315

When reverse gear is released, the front and rear
sensors remain activated until a speed of around
15 km/h is exceeded to allow the parking
manoeuvre to be completed.
The sensors are deactivated by pressing the PARK
button again or when a speed of 15 km/h is
exceeded: the LED in the button is off when the
system is not active.
When the sensors are activated, the system starts
to produce acoustic signals from the front or
rear buzzers as soon as an obstacle is detected
with the frequency increasing as the obstacle gets
closer. When the obstacle is less than about 30
cm away, the sound becomes continuous.
Depending on the position of the obstacle (front or
rear) the sound is produced by the corresponding
buzzers (front or rear). The obstacle closest to
the car is signalled.
The acoustic signal stops immediately if the
distance of the obstacle increases. The sound cycle
remains constant if the distance measured by the
centre sensors remains unchanged, while if this
situation occurs for the side sensors, the signal is
interrupted after about 3 seconds (for example, to
prevent signals in the case of manoeuvres
alongside walls).
WARNING
Parking manoeuvres are always the
driver’s responsibility. When making
these manoeuvres, always make sure that no
people (especially children) or animals are
present in your manoeuvring space. The
parking sensors serve to assist the driver.
The driver must never allow his or her
attention to lapse during potentially
dangerous manoeuvres, even those executed
at low speeds.
121GETTING TO
KNOW YOUR CARSAFETY
STARTING AND
DRIVING
WARNING LIGHTS
AND MESSAGES
IN AN EMERGENCY
SERVICING AND
MAINTENANCE
TECHNICAL
SPECIFICATIONS
INDEX