window Lancia Ypsilon 2014 Owner handbook (in English)
[x] Cancel search | Manufacturer: LANCIA, Model Year: 2014, Model line: Ypsilon, Model: Lancia Ypsilon 2014Pages: 315, PDF Size: 13.18 MB
Page 151 of 315

AIRBAGThe car is fitted with front airbags for driver and
passenger, front side bags for driver and passenger
chest-shoulder protection (for versions/markets,
where provided), and window bags for protecting
the heads of front occupants.
FRONT AIRBAGS
The front (driver and passenger) airbags protect
the front seat occupants in the event of head-on
impacts of medium-high severity, by placing
the bag between the occupant and the steering
wheel or dashboard.
Therefore non-deployment in other types of
impacts (side impacts, rear shunts, roll-overs, etc.)
does not indicate a system malfunction.
Front (driver and passenger) air bags are not a
replacement of but complementary to the seat
belts, which you are recommended to always wear,
as specified by law in Europe and most non-
European countries.
In the event of an impact, those not wearing a seat
belt move forward and may come into contact
with the bag which is still inflating. The protection
offered by the bag is reduced in these
circumstances.Front airbags may not activate in the following
situations:
❒frontal impacts against highly deformable
objects not involving the front surface of the car
(e.g. wing collision against guard rail, etc.);
❒car wedging under other vehicles or protective
barriers (e.g. trucks or guard rails);
they may not provide any additional protection
compared with seat belts, so their deployment
would be inappropriate. In these cases, non-
deployment does not indicate a system
malfunction.
WARNING
Do not apply stickers or other objects
on the steering wheel, on the
dashboard in the passenger side airbag area,
on side upholstery on roof and on the seats.
Never put objects (e.g. mobile phones) on the
passenger side of the dashboard since they
could interfere with correct inflation of
the passenger airbag and also cause serious
injury to the passengers.
147GETTING TO KNOW
YOUR CARSAFETYSTARTING AND
DRIVING
WARNING LIGHTS
AND MESSAGES
IN AN EMERGENCY
SERVICING AND
MAINTENANCE
TECHNICAL
SPECIFICATIONS
INDEX
Page 153 of 315

Deactivation of passenger side front airbag
and side bag for chest/pelvis protection (for
versions/markets, where provided)
If a child must be carried on the front seat,
deactivate the front passenger side airbag and side
bags for chest/shoulder protection (for versions/
markets where provided). With the airbags
deactivated, the
warning light switches on in
the instrument panel.
IMPORTANT To deactivate the airbags see the
description in the "Getting to know your car"
chapter, "Menu Options" paragraph.
SIDE BAGS (Side bag - Window bag)
Side bag
(for versions/markets, where provided)
These comprise two types of bags located in the
front seat backrests fig. 110 which protect the
chest and shoulder area of the occupants in the
event of a side impact of medium-high severity.
fig. 110
L0F0203
149GETTING TO KNOW
YOUR CARSAFETYSTARTING AND
DRIVING
WARNING LIGHTS
AND MESSAGES
IN AN EMERGENCY
SERVICING AND
MAINTENANCE
TECHNICAL
SPECIFICATIONS
INDEX
Page 154 of 315

Window bag
This consists of two "curtain" bags housed behind
the side upholstery of the roof fig. 111 and
covered with finishing elements, which protect the
heads of front occupants in the event of a side
impact thanks to a wide bag deployment area.
The deployment of side bags in the event of side
impacts of low severity is not required.
In the event of a side impact, the system provides
best protection if the passenger sits on the seat
in a correct position, thus allowing correct window
bag deployment.
IMPORTANT Do not affix rigid objects to the
garment hooks or support handles.IMPORTANT Do not rest your head, arms or
elbows on the door, windows or the area in which
the window bag is located to avoid possible injury
during airbag inflation.
IMPORTANT Never lean your head, arms or
elbows out of the window.
fig. 111
L0F0226
150
GETTING TO KNOW
YOUR CAR
SAFETY
STARTING AND
DRIVING
WARNING LIGHTS
AND MESSAGES
IN AN EMERGENCY
SERVICING AND
MAINTENANCE
TECHNICAL
SPECIFICATIONS
INDEX
Page 163 of 315

Electrical devices
Only use electrical devices for the amount of time
needed. The heated rear window, additional
headlights, windscreen wipers and heater fan need
a considerable amount of energy, therefore
increasing fuel consumption (by up to 25% in the
urban cycle).
Climate control system
The use of the climate control system leads to
higher fuel consumption. If the temperature
outside permits, try to use ventilation only.
Devices for aerodynamic control
The use of non-certified devices for aerodynamic
control may adversely affect air drag and fuel
consumption.
DRIVING STYLE
Starting
Do not warm the engine with the car at a
standstill or at idle or high speed: under these
conditions the engine warms up much more
slowly, increasing consumption and emissions. It is
therefore advisable to move off immediately,
slowly, avoiding high speeds: in this way
the engine will warm up more quickly.
159GETTING TO KNOW
YOUR CAR
SAFETYSTARTING AND
DRIVINGWARNING LIGHTS
AND MESSAGES
IN AN EMERGENCY
SERVICING AND
MAINTENANCE
TECHNICAL
SPECIFICATIONS
INDEX
SAVING FUELHere are some suggestions which can help you to
save fuel and lower harmful emissions.
GENERAL CONSIDERATIONS
Car maintenance
Have checks and adjustments carried out in
accordance with the “Scheduled Servicing Plan”.
Tyres
Check the tyre pressure at least once every 4
weeks: if the pressure is too low, consumption
levels increase as resistance to rolling is higher.
Unnecessary loads
Do not travel with an overloaded boot. The weight
of the car and its arrangement greatly affect fuel
consumption and stability.
Roof rack/ski rack
Remove the roof rack or the ski rack from the roof
after use. These accessories lower aerodynamic
penetration and adversely affect consumption
levels. When transporting particularly large
objects, use a trailer if possible.
Page 167 of 315

STORING THE CARIf the car is to be left inactive for longer than a
month, the following precautions should be
observed:
❒park the car in covered, dry and if possible
well-ventilated premises and slightly open
the windows;
❒engage a gear and check that the handbrake is
not engaged;
❒disconnect the negative battery terminal (for
versions with Start&Stop system refer to the
paragraph "Start&Stop system" in the chapter
"Knowing your car"); If the battery is not
disconnected the from the electrical system,
check its charge every thirty days;
❒clean and protect the painted parts using
protective wax;
❒clean and protect the shiny metal parts using
special compounds available commercially;
❒sprinkle talcum powder on the rubber
windscreen and rear window wiper blades and
lift them off the glass;
❒cover the car with a cloth or perforated plastic
sheet. Do not use sheets of non-perforated
plastic as they do not allow moisture on the car
body to evaporate;
❒inflate tyres to +0.5 bar above the standard
specified pressure and check it at intervals;
❒do not drain the engine cooling system.
163GETTING TO KNOW
YOUR CAR
SAFETYSTARTING AND
DRIVINGWARNING LIGHTS
AND MESSAGES
IN AN EMERGENCY
SERVICING AND
MAINTENANCE
TECHNICAL
SPECIFICATIONS
INDEX
SNOW CHAINSThe use of snow chains should be in compliance
with local regulations.
The snow chains may be applied only onto the
front wheel tyres (drive wheels).
Check the tension of the snow chains after the first
few metres have been driven.
IMPORTANT Snow chains cannot be fitted to the
space-saver wheel (for versions/markets, where
provided). If the front tyre has a puncture, replace
a rear wheel with the sapce-saver wheel and
move the rear wheel to the front axle. This way
with two normal drive wheels, snow chains can be
fitted to them to solve an emergency.
Keep your speed down when snow
chains are fitted; do not exceed 50
km/h. Avoid potholes, steps and
pavements and avoid driving for long
distances on roads not covered with snow to
prevent damaging the car and the roadbed.
Page 210 of 315

FUSE LOCATION
Engine compartment fuse box
This is located by the side of the battery fig. 154:
to access the fuses, proceed as follows:
❒move the cover A fig. 152 aside;
❒undo screw A fig. 153, release tabs B and
remove cover C by pulling upwards.The number identifying the electrical component
corresponding to each fuse is shown on the cover.
After replacing the fuse, make sure that you
have closed cover C correctly on the fuse box.
If you need to wash the engine
compartment, take care not to directly
hit the fuse box and the window wiper
motors with the water jet.
fig. 152
L0F0170
fig. 153
L0F0094
206
GETTING TO KNOW
YOUR CAR
SAFETY
STARTING AND
DRIVING
WARNING LIGHTS
AND MESSAGESIN AN EMERGENCYSERVICING AND
MAINTENANCE
TECHNICAL
SPECIFICATIONS
INDEX
Page 215 of 315

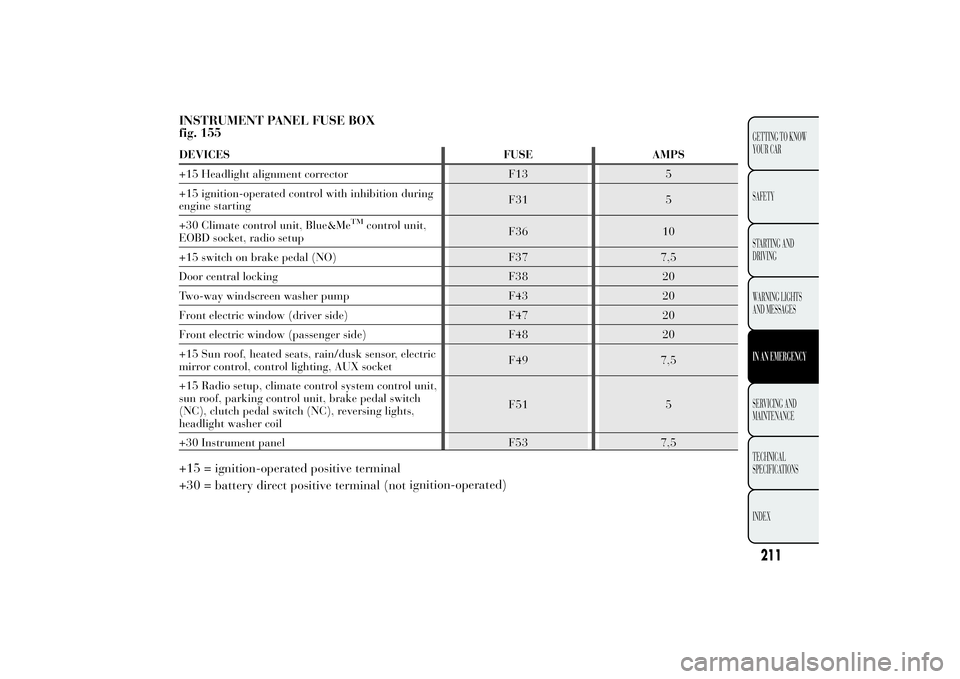
INSTRUMENT PANEL FUSE BOX
fig. 155DEVICES FUSE AMPS
+15 Headlight alignment corrector F13 5
+15 ignition-operated control with inhibition during
engine startingF31 5
+30 Climate control unit, Blue&Me
TM
control unit,
EOBD socket, radio setupF36 10
+15 switch on brake pedal (NO) F37 7,5
Door central locking F38 20
Two-way windscreen washer pump F43 20
Front electric window (driver side) F47 20
Front electric window (passenger side) F48 20
+15 Sun roof, heated seats, rain/dusk sensor, electric
mirror control, control lighting, AUX socketF49 7,5
+15 Radio setup, climate control system control unit,
sun roof, parking control unit, brake pedal switch
(NC), clutch pedal switch (NC), reversing lights,
headlight washer coilF51 5
+30 Instrument panel F53 7,5
+15 = ignition-operated positive terminal
+30 = battery direct positive terminal (notignition-operated)
211GETTING TO KNOW
YOUR CAR
SAFETY
STARTING AND
DRIVING
WARNING LIGHTS
AND MESSAGESIN AN EMERGENCYSERVICING AND
MAINTENANCE
TECHNICAL
SPECIFICATIONS
INDEX
Page 216 of 315

LUGGAGE COMPARTMENT JUNCTION UNIT
fig. 157DEVICES FUSE AMPS
BOSE HI-FI system F60 20
Free F61 -
Heated seats F62 15
Rear right electric window F63 20
Rear left electric window F64 20
Alarm setup supply F65 7,5
212
GETTING TO KNOW
YOUR CAR
SAFETY
STARTING AND
DRIVING
WARNING LIGHTS
AND MESSAGESIN AN EMERGENCYSERVICING AND
MAINTENANCE
TECHNICAL
SPECIFICATIONS
INDEX
Page 222 of 315

SCHEDULED SERVICING PLANPETROL VERSIONS
Services must be performed every 30,000 km or 24 months.Thousands of miles 18 36 54 72 90 108
Thousands of km 30 60 90 120 150 180
Months 24 48 72 96 120 144
Check tyre condition/wear and adjust pressure, if necessary●●●●●●
Check operation of lighting system (headlamps, direction indicators, hazard
warning lights, luggage compartment, passenger compartment, glove●●●●●●
Check operation of windscreen washer system and adjust jets if necessary.●●●●●●
Check windscreen/rear window wiper blade position/wear●●●●●●
Check cleanliness of bonnet and tailgate locks and cleanliness and
tion of linkages●●●●●●
Visually inspect condition of: exterior bodywork, underbody protection,
pipes and hoses (exhaust - fuel system - brakes), rubber elements (boots,
sleeves, bushes, etc.)●●●●●●
Check front disc brake pad condition and wear●●●●●●
Check rear drum brake lining condition and wear●●●
Check and, if necessary, top-up fluid levels (engine cooling, hydraulic
clutch/brakes, windscreen washer, battery, etc.)●●●●●●
Visually inspect conditions of the accessory drive belt(s)●●
Check tensioning of accessory drive belt (versions without automatic ten-
sioner) (or every 24 months)●●
218
GETTING TO KNOW
YOUR CAR
SAFETY
STARTING AND
DRIVING
WARNING LIGHTS
AND MESSAGES
IN AN EMERGENCYSERVICING AND
MAINTENANCE
TECHNICAL
SPECIFICATIONS
INDEX
lubrica compartment, instrument panel warning lights, etc.)
Page 224 of 315

DIESEL VERSIONS
Services must be performed every 35,000 km or24 months.Thousands of miles 21 42 63 84 105
Thousands of km 35 70 105 140 175
Months 24 48 72 96 120
Check tyre condition/wear and adjust pressure, if necessary●●●●●
Check operation of lighting system (headlamps, direction indicators, hazard
warning lights, luggage compartment, passenger compartment, glove●●●●●
Check operation of windscreen washer system and adjust jets if necessary.●●●●●
Check windscreen/rear window wiper blade position/wear●●●●●
Check cleanliness of bonnet and tailgate locks and cleanliness and
●●●●●
Visually inspect condition of: exterior bodywork, underbody protection,
pipes and hoses (exhaust - fuel system - brakes), rubber elements (boots,
sleeves, bushes, etc.)●●●●●
Check front disc brake pad condition and wear●●●●●
Check rear drum brake seal condition and wear●●
Check and, if necessary, top-up fluid levels (engine cooling, hydraulic
clutch/brakes, windscreen washer, battery, etc.)●●●●●
Visually inspect conditions of the accessory drive belt(s)●●
Check handbrake lever travel and adjust, if required●●●●●
Check exhaust gas emissions/smokiness●●●●●
220
GETTING TO KNOW
YOUR CAR
SAFETY
STARTING AND
DRIVING
WARNING LIGHTS
AND MESSAGES
IN AN EMERGENCYSERVICING AND
MAINTENANCE
TECHNICAL
SPECIFICATIONS
INDEX
compartment, instrument panel warning lights, etc.)
lubrication of linkages