ECU Lancia Ypsilon 2020 Owner handbook (in English)
[x] Cancel search | Manufacturer: LANCIA, Model Year: 2020, Model line: Ypsilon, Model: Lancia Ypsilon 2020Pages: 200, PDF Size: 4.53 MB
Page 16 of 200
REAR SEATS
11)5)
Extending the boot
Proceed as follows:
Remove the head restraints by
pulling them upwards as described in
the "Headrests" paragraph in this
chapter;
move the seat belts to the side,
making sure that they are correctly
extended and not twisted;
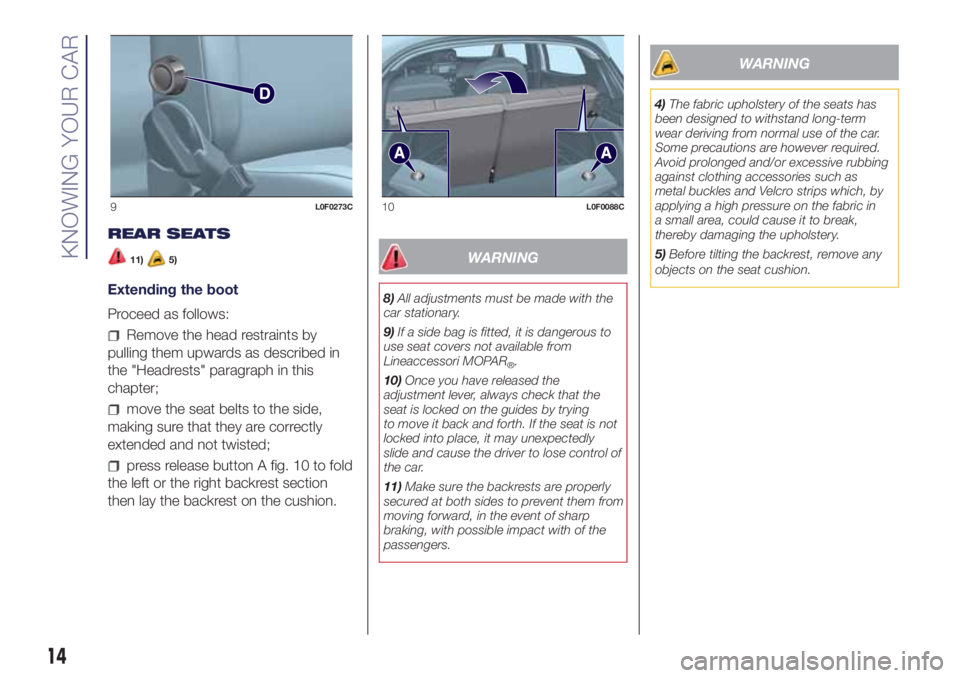
press release button A fig. 10 to fold
the left or the right backrest section
then lay the backrest on the cushion.
WARNING
8)All adjustments must be made with the
car stationary.
9)If a side bag is fitted, it is dangerous to
use seat covers not available from
Lineaccessori MOPAR
®.
10)Once you have released the
adjustment lever, always check that the
seat is locked on the guides by trying
to move it back and forth. If the seat is not
locked into place, it may unexpectedly
slide and cause the driver to lose control of
the car.
11)Make sure the backrests are properly
secured at both sides to prevent them from
moving forward, in the event of sharp
braking, with possible impact with of the
passengers.
WARNING
4)The fabric upholstery of the seats has
been designed to withstand long-term
wear deriving from normal use of the car.
Some precautions are however required.
Avoid prolonged and/or excessive rubbing
against clothing accessories such as
metal buckles and Velcro strips which, by
applying a high pressure on the fabric in
a small area, could cause it to break,
thereby damaging the upholstery.
5)Before tilting the backrest, remove any
objects on the seat cushion.
9L0F0273C10L0F0088C
14
KNOWING YOUR CAR
Page 35 of 200
WARNING
26)A heavy load that has not been
secured may cause serious injuries to
passengers in the event of an accident.
27)If you are travelling in an area with
limited opportunities for vehicle refuelling
and you wish to bring petrol with you in
a petrol can, you must do so in compliance
with current regulations and using an
approved can, appropriately secured to the
load securing attachments. In the event of
a collision the fire risk is increased all the
same.
28)Be careful not to hit objects on the
storage shelf when you open the tailgate.
VERSION WITH LPG
SYSTEM
INTRODUCTION
29)14) 15)
The LPG version features two fuel
supply systems: one for petrol and one
for LPG.
Although the LPG system has
numerous safety features, it is advisable
to proceed as follows every time the
car is not in use for a long period or
moved in an emergency as a result of a
breakdown or accident:
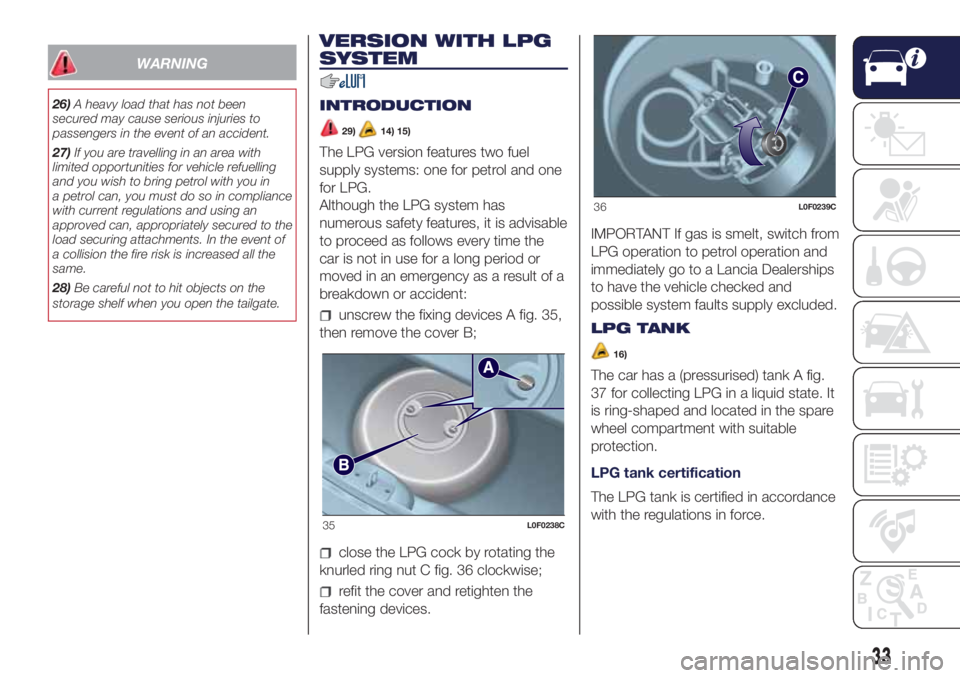
unscrew the fixing devices A fig. 35,
then remove the cover B;
close the LPG cock by rotating the
knurled ring nut C fig. 36 clockwise;
refit the cover and retighten the
fastening devices.IMPORTANT If gas is smelt, switch from
LPG operation to petrol operation and
immediately go to a Lancia Dealerships
to have the vehicle checked and
possible system faults supply excluded.
LPG TANK
16)
The car has a (pressurised) tank A fig.
37 for collecting LPG in a liquid state. It
is ring-shaped and located in the spare
wheel compartment with suitable
protection.
LPG tank certification
The LPG tank is certified in accordance
with the regulations in force.
35L0F0238C
36L0F0239C
33
Page 72 of 200
DRIVING
ASSISTANCE
SYSTEMS
iTPMS System (indirect
Tyre Pressure
Monitoring System)
(for versions/markets, where provided)
67) 68) 69) 70) 71) 72)
The car can be equipped with the
iTPMS (indirect Tire Pressure
Monitoring System) which monitors the
tyre inflation status thanks to wheel
speed sensors.
The system warns the driver if one or
more tyres are flat by the
warning
light continuously lit on the instrument
panel and a dedicated warning
message on the display.
If one tyre only is flat, the system can
indicate its position: it is in any case
recommended to check the pressure
on all four tyres.
The system does not recognise the tyre
pressure value, but it is able to indicate
if the pressure of one or more tyres
falls below a certain pressure threshold.
This indication is displayed also when
turning the engine off and on again until
the RESET procedure is carried out.Reset procedure
The iTPMS needs an initial "self-
learning" phase (with length depending
on the driving style and road conditions:
optimal conditions being driving on a
straight road at 80 km/h for at least 20
minutes) which starts when the Reset
procedure is carried out.
The Reset procedure must be carried
out:
each time tyre pressure is modified;
when even only one tyre is changed;
when tyres are rotated/inverted;
when the space-saver wheel is
fitted.
Before carrying out the Reset
procedure, inflate the tyres to the rated
pressure values specified in the inflation
pressure table (see "Wheels" paragraph
in the "Technical specifications"
chapter).
If the Reset procedure is not carried
out, in all above cases, the
warning
light may give false indications on
one or more tyres.
To carry out the RESET procedure, with
the car stopped and the ignition device
at MAR, use the Main Menu as follows:
briefly press thebutton: the
display will show Reset;
press thebutton or the
button to select ("Yes" or "No");
briefly press thebutton: the
display will show "Confirm";
pressbutton orto select
("Yes" to Reset or "No" to exit the video
page);
press thebutton again to return
to the standard screen or to the main
menu according to where you are in the
menu.
At the end of the Reset procedure the
display will show the "Reset saved"
message, indicating that the self-
learning has been started and you will
hear an acoustic warning beep.
If the iTPMS self-learning is not properly
executed, the message is not
displayed, and no beep is heard.
Operating conditions
The system is active for speeds above
15 km/h.
In a few situations such as sporty
driving, particular conditions of the road
surface (e.g. icy, snowy, unsurfaced
roads...) the signalling may be delayed
or partial in detecting the contemporary
deflation of more than one tyre.
70
SAFETY
Page 79 of 200
Children must be seated safely and
comfortably. Depending on the
characteristics of the child restraint
systems used, you are advised to keep
children in rearward facing child
restraint systems for as long as
possible (at least until 3-4 years old),
since this is the most protected position
in the event of an impact.
The choice of the most suitable child
restraint system depends on the weight
and size of the child. There are various
types of child restraint systems, which
can be secured to the vehicle by means
of the seat belts or with the ISOFIX
anchorages.
It is recommended to always choose
the restraint system most suitable
for the child; for this reason always refer
to the Owner Handbook provided with
the child restraint system, to be sure
that it is of the right type for the children
it is intended for.
In Europe the characteristics of child
restraint systems are ruled by the
regulation ECE-R44, dividing them into
five weight groups:
Group Weight groups
Group 0up to 10 kg in
weight
Group 0+up to 13 kg in
weight
Group Weight groups
Group 1 9-18 kg
Group 2 15-25 kg
Group 3 22 - 36 kg
All restraint devices must bear the
certification data, together with the
control mark, on a label solidly fixed to
the child restraint system which must
never be removed.
Lineaccessori MOPAR
®includes child
restraint systems for each weight
group. These devices are
recommended having been specifically
designed for Lancia cars.
FITTING A CHILD
RESTRAINT SYSTEM
WITH SEAT BELTS
84) 85) 86)
The Universal child restraint systems
installed with the seat belts only are
type-approved on the basis of the ECE
R44 standard and are divided into
various weight groups.
IMPORTANT The figures are indicative
and provided for assembly purposes
only. Fit the child restraint system
according to the instructions, which
must be included.IMPORTANT Following an accident of a
certain importance, it is recommended
to replace both the child restraint
system and the seat belt to which it
was bound.
Group 0 and 0+
Infants up to 13 kg must be carried with
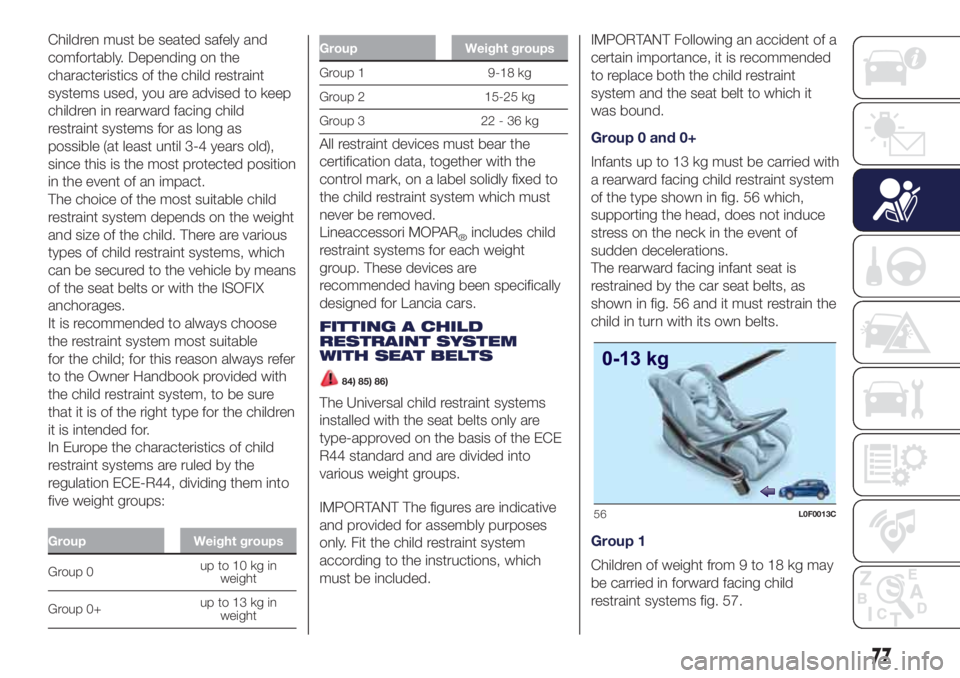
a rearward facing child restraint system
of the type shown in fig. 56 which,
supporting the head, does not induce
stress on the neck in the event of
sudden decelerations.
The rearward facing infant seat is
restrained by the car seat belts, as
shown in fig. 56 and it must restrain the
child in turn with its own belts.
Group 1
Children of weight from 9 to 18 kg may
be carried in forward facing child
restraint systems fig. 57.
56L0F0013C
77
Page 82 of 200
FITTING AN ISOFIX
CHILD RESTRAINT
SYSTEM
87) 88) 89) 90)
The vehicle is equipped with ISOFIX
anchorages, a new standard which
makes fitting a child restraint system
quick, simple and safe.
The ISOFIX system allows the ISOFIX
child restraint systems to be fitted,
without using the vehicle's seat belt,
but directly securing the child restraint
system to three anchorages present on
the vehicle. Traditional child restraint
systems can be fitted alongside ISOFIX
child restraint systems on different
seats in the same vehicle.
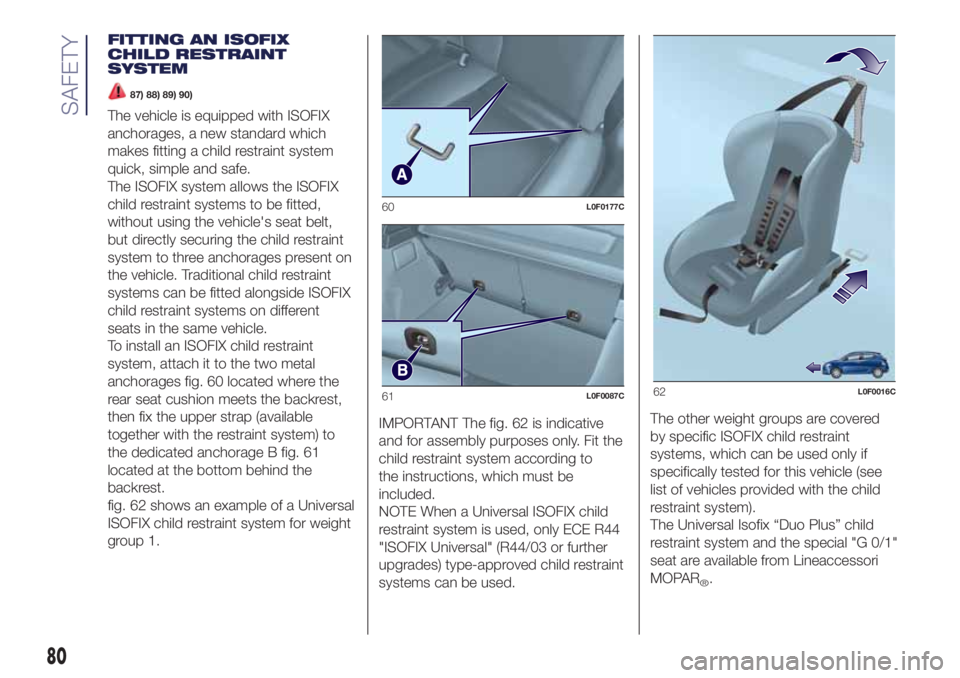
To install an ISOFIX child restraint
system, attach it to the two metal
anchorages fig. 60 located where the
rear seat cushion meets the backrest,
then fix the upper strap (available
together with the restraint system) to
the dedicated anchorage B fig. 61
located at the bottom behind the
backrest.
fig. 62 shows an example of a Universal
ISOFIX child restraint system for weight
group 1.IMPORTANT The fig. 62 is indicative
and for assembly purposes only. Fit the
child restraint system according to
the instructions, which must be
included.
NOTE When a Universal ISOFIX child
restraint system is used, only ECE R44
"ISOFIX Universal" (R44/03 or further
upgrades) type-approved child restraint
systems can be used.The other weight groups are covered
by specific ISOFIX child restraint
systems, which can be used only if
specifically tested for this vehicle (see
list of vehicles provided with the child
restraint system).
The Universal Isofix “Duo Plus” child
restraint system and the special "G 0/1"
seat are available from Lineaccessori
MOPAR
®.
60L0F0177C
61L0F0087C62L0F0016C
80
SAFETY
Page 88 of 200

Main recommendations to carry
children safely
Install the child restraint systems on
the rear seat, which is the most
protected position in the event of an
impact.
Keep children in rearward facing
child restraint systems for as long as
possible, until 3–4 years old if possible.
Should a rearward facing child
restraint system be installed on the rear
seats, it is advisable to position it as
far forward as the position of the front
seat allows.
If the passenger's front airbag is
deactivated always check the
permanent switching-on of the
dedicated warning light on the
instrument panel to make sure that it
has actually been deactivated.
Carefully follow the instructions
supplied with the child restraint system.
Keep the instructions in the vehicle
along with the other documents and
this handbook. Do not use second-
hand child restraint systems without
instructions.
Only one child is to be strapped into
each restraint system; never carry two
children using one child restraint
system.
Always check that the seat belts do
not rest on the child’s neck.
Always check that the seat belt is
well fastened by pulling on it.
While travelling, do not let the child
sit incorrectly or unfasten the belts.
Never allow a child to put the belt's
diagonal section under an arm or
behind their back.
Never carry children on your lap,
even newborns. No one can hold
a child in the case of an accident.
In the event of an accident, replace
the child restraint system with a new
one.
If child seats facing forward are
used, adjust the headrest of the vehicle
seat in the highest setting position.
WARNING
80)SEVERE DANGER When a front
passenger airbag is fitted, do not install
rearward facing child restraint systems on
the front passenger seat. Deployment of
the airbag in an accident could cause fatal
injuries to the child regardless of the
severity of the collision. It is advisable to
always carry children in a child restraint
system on the rear seat, which is the most
protected position in the event of a
collision.81)On the sun visor there is a label with
suitable symbols reminding the user that it
is compulsory to deactivate the airbag if
a rearward facing child restraint system is
fitted. Always comply with the instructions
on the passenger side sun visor (see the
"Supplementary Restraint System (SRS)
- Airbag" paragraph).
82)Should it be absolutely necessary to
carry a child on the front seat in a
backwards-facing craddle seat, the
passenger's front and side airbags must be
deactivated through the Setup menu.
Deactivation should be verified by checking
the
warning light on the instrument
panel. Move the passenger's seat as far
back as possible to avoid contact between
the child seat and the dashboard.
83)Do not move the front or rear seat if a
child is seated on it or on the dedicated
child restraint system.
84)Incorrect fitting of the child restraint
system may result in an inefficient
protection system. In the event of an
accident the child restraint system may
become loose and the child may be
injured, even fatally. When fitting a restraint
system for newborns or children, strictly
comply with the instructions provided
by the Manufacturer.
85)When the child restraint system is not
used, secure it with the seat belt or with
the ISOFIX anchorages, or remove it from
the vehicle. Do not leave it unsecured
inside the passenger compartment. In this
way, in the case of sudden braking or an
accident, it will not cause injuries to the
occupants.
86
SAFETY
Page 89 of 200
86)After installing a child restraint system,
do not move the seat: always remove
the child restraint system before making
any adjustment.
87)Always make sure that the chest
section of the seat belt does not pass
under the arms or behind the back of the
child. In the event of an accident the seat
belt will not be able to secure the child,
with the risk of injury, including fatal injury.
Therefore the child must always wear
the seat belt correctly.
88)Do not use the same lower anchorage
to install more than one child restraint
system.
89)If a Universal ISOFIX child restraint
system is not fixed to all three anchorages,
it will not be able to protect the child
correctly. In a crash, the child could be
seriously or fatally injured.
90)Fit the child restraint system when the
car is stationary. The child restraint system
is correctly fixed to the brackets when
you hear the click. Follow the instructions
for assembly, disassembly and positioning
that the Manufacturer must supply with
the child restraint system.SUPPLEMENTARY
RESTRAINT SYSTEM
(SRS) - AIRBAG
The vehicle may be equipped with:
front driver airbag;
front passenger airbag;
front side bags for pelvis, chest and
shoulder protection of driver and
passenger (for versions/markets, where
provided);
side bags for head protection of
front seat passengers and rear side
seat passengers (window bag).
FRONT AIRBAGS
91)
The front (driver and passenger) airbags
protect the front seat occupants in the
event of head-on crashes of medium-
high severity, by placing the cushion
between the occupant and the steering
wheel or dashboard.
Therefore non-activation of airbags in
other types of collisions (side impacts,
rear shunts, roll-overs, etc.) does not
indicate a system malfunction.
Driver and passenger front airbags are
not a replacement of but
complementary to the seat belts, which
should always be worn, as specified
by law in Europe and most non-
European countries.In the event of impact, those not
wearing a seat belt are projected
forwards and may come into contact
with the bag which is still inflating. The
protection offered by the bag is
compromised in these circumstances.
The front airbags may not activate in
the following cases: frontal impact
against highly deformable objects not
involving the front surface of the vehicle
(e.g. wing collision against guard rail);
in the case of the vehicle wedging
under other vehicles or protective
barriers (e.g. under trucks or guard
rails).
Failure to activate in the conditions
described above is due to the fact that
they may not provide any additional
protection compared with seat belts, so
their activation would be inappropriate.
In these cases, non-deployment does
not indicate a system malfunction.
Driver's side front airbag
92)
This consists of an instantly inflating
cushion contained in a special
compartment in the centre of the
steering wheel fig. 63.
87
Page 104 of 200
WARNING
118)Parking manoeuvres, however, are
always the driver’s responsibility. While
carrying out these manoeuvres, always
make sure that no people (especially
children) or animals are in the area
concerned. The parking sensors are used
to assist the driver, who must never allow
his attention to lapse during potentially
dangerous manoeuvres, even those
executed at low speeds.
WARNING
44)For correct operation of the system,
sensors must always be clean from mud,
dirt, snow or ice. Be careful not to scratch
or damage the sensors while cleaning
them. Avoid using dry, rough or hard
cloths. The sensors must be washed using
clean water, with the addition of vehicle
shampoo if necessary. When using special
washing equipment such as high pressure
jets or steam cleaning, clean the sensors
very quickly keeping the jet more than
10 cm away. Also, do not apply stickers to
the sensors.
45)Have interventions on the bumper in
the area of the sensors carried out only by
a Lancia Dealership. Interventions on the
bumper that are not carried out properly
may compromise the operation of the
parking sensors.
TOWING TRAILERS
119) 120)
IMPORTANT NOTES
For towing caravans or trailers the
vehicle must be fitted with an approved
tow hook and an adequate electrical
system. Installation must be carried out
by a specialist.
Install any specific and/or additional
door mirrors as specified by the
Highway Code.
Remember that when towing a trailer,
steep hills are harder to climb, braking
distances increase and overtaking
takes longer depending on the overall
weight of the trailer.
Engage a low gear when driving
downhill, rather than constantly using
the brake.
The weight the trailer exerts on the
vehicle tow hook reduces the vehicle's
loading capacity by the same amount.
To make sure that the maximum
towable weight is not exceeded (given
in the vehicle registration document)
account should be taken of the fully
laden trailer, including accessories and
luggage.Do not exceed the speed limits specific
to each country you are driving in, in
the case of vehicles towing trailers.
In any case, the top speed must not
exceed 100 km/h.
Any electric brake must be powered
directly by the battery through a cable
with a cross-section of no less than 2.5
mm
2.
In addition to the electrical branches,
the vehicle electrical system can only
be connected to the supply cable for an
electric brake and to the cable for an
internal light for the trailer, not
exceeding 15 W. For connections, use
the preset control unit with a battery
cable with section not less than 2.5
mm
2.
IMPORTANT The use of auxiliary loads
other than external lights (electric brake,
etc.) must take place with engine
running.
IMPORTANT To install a tow hook
contact a Lancia Dealership.
102
STARTING AND DRIVING
Page 123 of 200
INFLATION PROCEDURE
141) 142) 143) 144)
Proceed as follows:
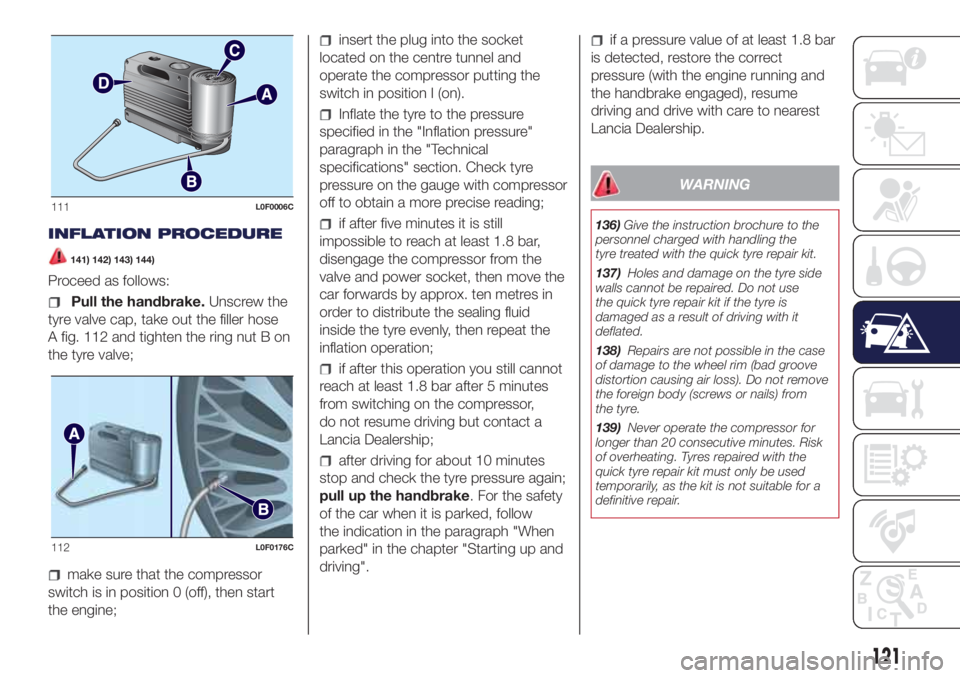
Pull the handbrake.Unscrew the
tyre valve cap, take out the filler hose
A fig. 112 and tighten the ring nut B on
the tyre valve;
make sure that the compressor
switch is in position 0 (off), then start
the engine;
insert the plug into the socket
located on the centre tunnel and
operate the compressor putting the
switch in position I (on).
Inflate the tyre to the pressure
specified in the "Inflation pressure"
paragraph in the "Technical
specifications" section. Check tyre
pressure on the gauge with compressor
off to obtain a more precise reading;
if after five minutes it is still
impossible to reach at least 1.8 bar,
disengage the compressor from the
valve and power socket, then move the
car forwards by approx. ten metres in
order to distribute the sealing fluid
inside the tyre evenly, then repeat the
inflation operation;
if after this operation you still cannot
reach at least 1.8 bar after 5 minutes
from switching on the compressor,
do not resume driving but contact a
Lancia Dealership;
after driving for about 10 minutes
stop and check the tyre pressure again;
pull up the handbrake. For the safety
of the car when it is parked, follow
the indication in the paragraph "When
parked" in the chapter "Starting up and
driving".
if a pressure value of at least 1.8 bar
is detected, restore the correct
pressure (with the engine running and
the handbrake engaged), resume
driving and drive with care to nearest
Lancia Dealership.
WARNING
136)Give the instruction brochure to the
personnel charged with handling the
tyre treated with the quick tyre repair kit.
137)Holes and damage on the tyre side
walls cannot be repaired. Do not use
the quick tyre repair kit if the tyre is
damaged as a result of driving with it
deflated.
138)Repairs are not possible in the case
of damage to the wheel rim (bad groove
distortion causing air loss). Do not remove
the foreign body (screws or nails) from
the tyre.
139)Never operate the compressor for
longer than 20 consecutive minutes. Risk
of overheating. Tyres repaired with the
quick tyre repair kit must only be used
temporarily, as the kit is not suitable for a
definitive repair.
111L0F0006C
112L0F0176C
121