display Lancia Ypsilon 2021 Owner handbook (in English)
[x] Cancel search | Manufacturer: LANCIA, Model Year: 2021, Model line: Ypsilon, Model: Lancia Ypsilon 2021Pages: 200, PDF Size: 4.53 MB
Page 99 of 200
DUAL FUNCTION
SYSTEM GEARBOX
(for versions/markets, where provided)
The car may be equipped with an
electronically controlled manual
transmission known as "Dual FuNction
System" which allows two operating
logics: MANUAL and AUTO.
GEAR LEVER
41)
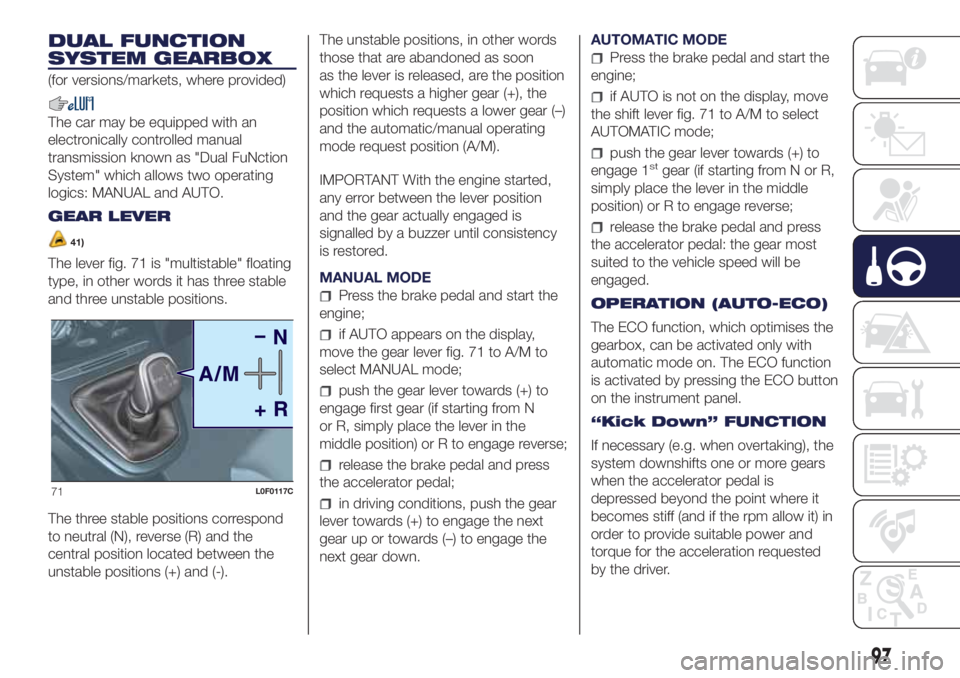
The lever fig. 71 is "multistable" floating
type, in other words it has three stable
and three unstable positions.
The three stable positions correspond
to neutral (N), reverse (R) and the
central position located between the
unstable positions (+) and (-).The unstable positions, in other words
those that are abandoned as soon
as the lever is released, are the position
which requests a higher gear (+), the
position which requests a lower gear (–)
and the automatic/manual operating
mode request position (A/M).
IMPORTANT With the engine started,
any error between the lever position
and the gear actually engaged is
signalled by a buzzer until consistency
is restored.
MANUAL MODE
Press the brake pedal and start the
engine;
if AUTO appears on the display,
move the gear lever fig. 71 to A/M to
select MANUAL mode;
push the gear lever towards (+) to
engage first gear (if starting from N
or R, simply place the lever in the
middle position) or R to engage reverse;
release the brake pedal and press
the accelerator pedal;
in driving conditions, push the gear
lever towards (+) to engage the next
gear up or towards (–) to engage the
next gear down.AUTOMATIC MODE
Press the brake pedal and start the
engine;
if AUTO is not on the display, move
the shift lever fig. 71 to A/M to select
AUTOMATIC mode;
push the gear lever towards (+) to
engage 1stgear (if starting from N or R,
simply place the lever in the middle
position) or R to engage reverse;
release the brake pedal and press
the accelerator pedal: the gear most
suited to the vehicle speed will be
engaged.
OPERATION (AUTO-ECO)
The ECO function, which optimises the
gearbox, can be activated only with
automatic mode on. The ECO function
is activated by pressing the ECO button
on the instrument panel.
“Kick Down” FUNCTION
If necessary (e.g. when overtaking), the
system downshifts one or more gears
when the accelerator pedal is
depressed beyond the point where it
becomes stiff (and if the rpm allow it) in
order to provide suitable power and
torque for the acceleration requested
by the driver.
71L0F0117C
97
Page 101 of 200
Thesymbol appears on the display
when the engine stops.
Restarting the engine
With manual gearbox: press the clutch
pedal.
With Dual FuNction System gearbox:if
the gear lever is in position N (Neutral),
place it in any other gear, otherwise
release the brake pedal or move the
gear lever to+,–or R (Reverse).
MANUAL SYSTEM
ACTIVATION/
DEACTIVATION
To activate/deactivate the system
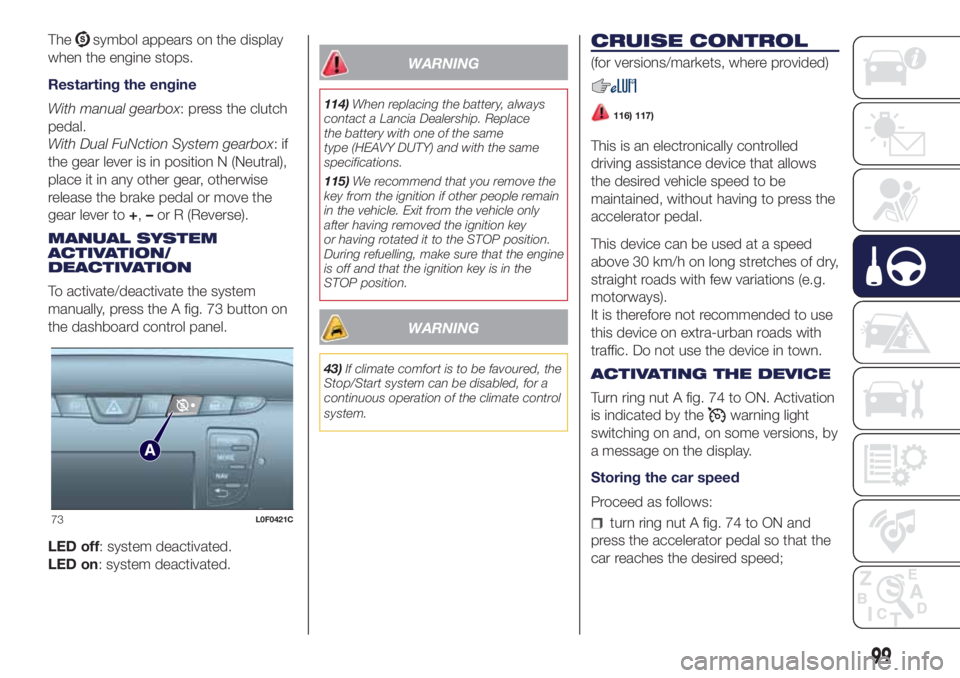
manually, press the A fig. 73 button on
the dashboard control panel.
LED off: system deactivated.
LED on: system deactivated.
WARNING
114)When replacing the battery, always
contact a Lancia Dealership. Replace
the battery with one of the same
type (HEAVY DUTY) and with the same
specifications.
115)We recommend that you remove the
key from the ignition if other people remain
in the vehicle. Exit from the vehicle only
after having removed the ignition key
or having rotated it to the STOP position.
During refuelling, make sure that the engine
is off and that the ignition key is in the
STOP position.
WARNING
43)If climate comfort is to be favoured, the
Stop/Start system can be disabled, for a
continuous operation of the climate control
system.
CRUISE CONTROL
(for versions/markets, where provided)
116) 117)
This is an electronically controlled
driving assistance device that allows
the desired vehicle speed to be
maintained, without having to press the
accelerator pedal.
This device can be used at a speed
above 30 km/h on long stretches of dry,
straight roads with few variations (e.g.
motorways).
It is therefore not recommended to use
this device on extra-urban roads with
traffic. Do not use the device in town.
ACTIVATING THE DEVICE
Turn ring nut A fig. 74 to ON. Activation
is indicated by the
warning light
switching on and, on some versions, by
a message on the display.
Storing the car speed
Proceed as follows:
turn ring nut A fig. 74 to ON and
press the accelerator pedal so that the
car reaches the desired speed;73L0F0421C
99
Page 126 of 200
FUEL CUT-OFF
SYSTEM
147)
FUEL CUT-OFF SYSTEM
This intervenes in the case of an impact
causing:
the interruption of the fuel supply
with the engine consequently cutting
out;
the automatic unlocking of the
doors;
turning on of the lights inside the
vehicle;
the switching on of the hazard
warning lights.
On some versions, the intervention of
the system is indicated by a message
shown on the display.
IMPORTANT Carefully check the vehicle
for fuel leaks, for instance in the engine
compartment, under the vehicle or
near the tank area. After an impact, turn
the ignition key to STOP to prevent the
battery from running down.
To restore the correct operation of the
vehicle, proceed as follows:
turn the ignition key to the MAR
position;
activate the right direction indicator;
deactivate the right direction
indicator;
activate the left direction indicator;
deactivate the left direction indicator;
activate the right direction indicator;
deactivate the right direction
indicator;
activate the left direction indicator;
deactivate the left direction indicator;
ignition key turned to the OFF
position;
turn the ignition key to the MAR-ON
position.
LPG / Natural Power versions:inthe
event of an impact, petrol supply is
immediately cut-off, the LPG safety
valves are closed and the injection is
interrupted, switching off the engine.
WARNING
147)If, after an impact, you smell fuel or
notice leaks from the fuel system, do
not reactivate the system to avoid the risk
of fire.
TOWING THE
VEHICLE
148) 149) 150) 151)
The tow hook, which is supplied with
the vehicle, is housed in the tool box,
under the carpet in the luggage
compartment.
ATTACHING THE TOW
RING
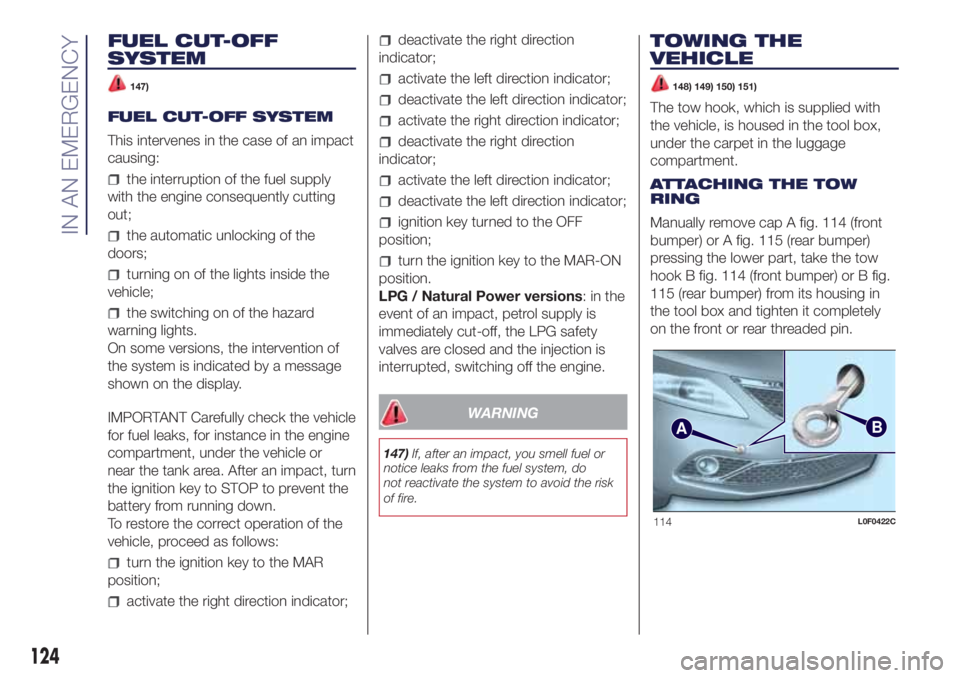
Manually remove cap A fig. 114 (front
bumper) or A fig. 115 (rear bumper)
pressing the lower part, take the tow
hook B fig. 114 (front bumper) or B fig.
115 (rear bumper) from its housing in
the tool box and tighten it completely
on the front or rear threaded pin.
AB
114L0F0422C
124
IN AN EMERGENCY
Page 170 of 200
TIPS, CONTROLS
AND GENERAL
INFORMATION
ROAD SAFETY
Learn how to use the various system
functions before setting off.
Read the instructions for the system
carefully before setting off.
172) 173)
RECEPTION CONDITIONS
Reception conditions change
constantly while driving. Reception may
be interfered with by the presence of
mountains, buildings or bridges,
especially when you are far away from
the broadcaster.
IMPORTANT The volume may be
increased when receiving traffic
information and news.CARE AND
MAINTENANCE
70) 71)
Observe the following precautions to
ensure the system is fully operational:
the display is sensitive to scratching,
liquids and detergents. The display
should not come into contact with
pointed or rigid objects which could
damage its surface. Do not press
on the display when cleaning it.
never use alcohol, petrols and
derivatives to clean the display lens.
prevent any liquid from entering the
system: this could damage it beyond
repair.
MEDIA DEVICES
IMPORTANT Some multimedia players
may not be compatible with the
Uconnect™ system.
ANTITHEFT PROTECTION
The system is equipped with an
anti-theft protection system based on
the exchange of information with the
electronic control unit (Body Computer)
on the vehicle.
This guarantees maximum safety and
prevents the secret code from being
entered after the power supply has
been disconnected.If the check has a positive outcome, the
system will start to operate, whereas if
the comparison codes are not the
same or if the electronic control unit
(Body Computer) is replaced, the
system will ask the user to enter the
secret code according to the procedure
described in the paragraph below.
Entering the secret code
When the system is switched on, if the
code is requested, the display will
show "Please enter Anti-Theft Code"
followed by the screen showing a
keypad to enter the secret code.
The secret code is made up of four
digits, from 0 to 9: to insert the code,
turn the "BROWSE ENTER" right knob
and press to confirm.
After inserting the fourth digit, move the
cursor to "OK" and press the
"BROWSE ENTER" right knob: the
system will start to operate.
If an incorrect code is entered, the
system displays "Incorrect Code" to
notify the user of the need to enter the
correct code.
After the 3 available attempts to enter
the code, the system displays
"Incorrect Code. Radio locked. Wait for
30 minutes". After the text has
disappeared it is possible to start the
code entering procedure again.
168
MULTIMEDIA
Page 171 of 200
Vehicle radio passport
This document certifies ownership of
the system. The vehicle radio passport
shows the system model, serial number
and secret code.
IMPORTANT Keep the vehicle radio
passport in a safe place so that you
can give the information to the relevant
authorities if the system is stolen.
In case of loss of the car radio
passport, contact the Lancia
Dealership, taking an ID document and
the car ownership documents.
IMPORTANT NOTES
Look at the screen only and when it is
necessary and safe. If you need to look
at the screen for a long time, pull over
to a safe place so as not to be
distracted while driving.
Immediately stop using the system in
the event of a fault. Otherwise the
system might be damaged. Contact a
Lancia Dealership as soon as possible
to have the system repaired.
WARNING
172)Follow the safety rules here below:
otherwise serious injuries may occur to the
occupants or the system may be
damaged.
173)If the volume is too loud this can be
dangerous. Adjust the volume so that
you can still hear background noises (e.g.
horns, ambulances, police vehicles, etc.).
WARNING
70)Only clean the front panel and the
display lens with a soft, clean, dry,
anti-static cloth. Cleaning and polishing
products may damage the surface. Never
use alcohol, petrols and derivatives.
71)Do not use the display as a base for
supports with suction pads or adhesives
for external navigators or smartphones
or similar devices.
169
Page 173 of 200
FRONT PANEL CONTROL SUMMARY TABLE
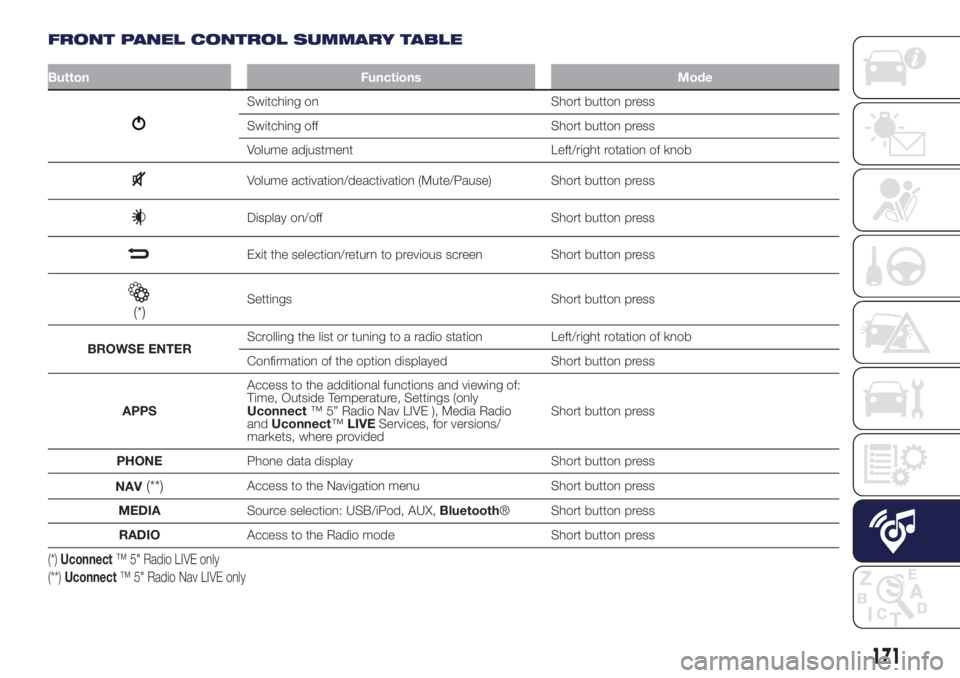
Button Functions Mode
Switching on Short button press
Switching off Short button press
Volume adjustment Left/right rotation of knob
Volume activation/deactivation (Mute/Pause) Short button press
Display on/off Short button press
Exit the selection/return to previous screen Short button press
(*)Settings Short button press
BROWSE ENTERScrolling the list or tuning to a radio station Left/right rotation of knob
Confirmation of the option displayed Short button press
APPSAccess to the additional functions and viewing of:
Time, Outside Temperature, Settings (only
Uconnect™ 5” Radio Nav LIVE ), Media Radio
andUconnect™LIVEServices, for versions/
markets, where providedShort button press
PHONEPhone data display Short button press
NAV
(**)Access to the Navigation menu Short button press
MEDIASource selection: USB/iPod, AUX,Bluetooth® Short button press
RADIOAccess to the Radio mode Short button press
(*)Uconnect™ 5" Radio LIVE only
(**)Uconnect™ 5" Radio Nav LIVE only
171
Page 176 of 200
SWITCHING THE SYSTEM
ON/OFF
The system is switched on/off by
pressing the
(ON/OFF) button/knob.
Turn the button/knob clockwise to
increase the radio volume or
anticlockwise to decrease it.
The system is equipped with the
following tuners: AM, FM and DAB (for
versions/markets, where provided).
RADIO MODE
Press the RADIO button on the front
panel to activate radio mode.
After the desired radio station is
selected, the following information is
shown on the display:
At the top: the list of radio stations
stored (preset) is displayed; the station
currently playing is highlighted.
In the middle: display of the name of
the current radio station and the
buttons for selecting the previous or
next radio station.
At the bottom: display of the following
buttons:
"Browse": list of the radio stations
available;
"AM/FM", "AM/DAB", "FM/DAB":
selection of the desired frequency band
(button reconfigurable according to
the band selected: AM, FM or DAB);
"Tune" : manual radio station tuning
(not available for DAB radios);
"Info": additional information on the
source being listened to;
"Audio": access to the "Audio
settings" screen.
Radio station selection
To search for the desired radio station
press buttons
oron the display
or use the steering wheel controls.
Previous/next radio station search
Briefly press buttons
oron
the display: when the button is released
the previous or the next radio station
is displayed.
Previous/next radio station fast
search
Hold down buttons
oron the
display to start fast search: when the
button is released, the first tunable
radio station can be heard.
Audio menu
To access the "Audio" menu press the
Audio" button located at the bottom
of the display.
The following adjustments can be
carried out using the "Audio" menu:
"Equaliser" (for versions/markets,
where provided);
"Balance/Fader" (left/right and
front/rear audio balance adjustment);
"Speed/Volume" (speed-dependent
automatic volume control);
"Loudness" (for versions/markets,
where provided);
"Auto-On Radio";
"Radio Off Delay".
To exit the "Audio" menu, press the
/Done button.
MEDIA MODE
Audio source selection
Press the "Source" button to select the
desired audio source among those
available: AUX, USB, iPod or
Bluetooth®.
NOTE Applications used on portable
devices may be not compatible with the
Uconnect™system
Track change
Briefly press the
button or turn the
BROWSE ENTER button/knob
clockwise to play the next track or
briefly press the
button or turn the
BROWSE ENTER button/knob
anticlockwise to return to the beginning
of the selected track or to the beginning
of the previous track if it has been
played for less than 3 seconds.
174
MULTIMEDIA
Page 177 of 200
Fast forward/rewind through tracks
Press and hold down the
button
to fast forward the selected track or
keep the
button pressed to fast
rewind the track.
Track selection (browse)
Use this function to scroll through and
select the tracks on the active device.
The choices available depend on the
device connected.
For example, on a USB/iPod or
Bluetooth® device you can also scroll
through the list of artists, genres and
albums available depending on the
information present on the same tracks.
NOTE A fewBluetooth® devices do
not offer the possibility of scrolling
tracks through all categories.
Within each list, the "ABC" button
allows the user to skip to the desired
letter in the list.
NOTE This button might be disabled for
someApple®devices.
NOTE The "Browse" button does not
allow any operation on the AUX device.
Press the "Browse" button to activate
this function on the source being
played.
Turn the BROWSE ENTER button/knob
to select the desired category and
then press the button/knob to confirm
the selection.Press the "X" button to cancel the
function.
Track information display
Press the "Info" button to display the
information on the track being listened
to for devices that support the function.
Press the "X" button to exit the screen.
Shuffle
Press the ">" button then the "Shuffle"
button to activate the function.
Press the "Shuffle" button again to
deactivate the function.
Repeat
Press the ">" button then the "Repeat"
button to activate the function.
Press the "Repeat" button again to
deactivate the function.
Bluetooth® SOURCE
PAIRING A Bluetooth®
AUDIO DEVICE
To pair aBluetooth® audio device,
proceed as follows:
activate theBluetooth® function on
the device;
press the MEDIA button on the front
panel;
if the "Media" source is active, press
the "Source" button;
select theBluetooth® Media
source;
press the "Add Device" button;
search forUconnect™on
theBluetooth® audio device (during
the pairing stage a screen is displayed
showing the progress of the operation);
when requested by the audio
device, enter the PIN code shown on
the system display or confirm on the
device the PIN displayed;
if the pairing procedure is completed
successfully, a screen is displayed.
Answer "Yes" to the question to pair the
Bluetooth® audio device as favourite
(the device will have priority over all
other devices to be paired
subsequently). If "No" is selected, the
priority is determined according to
the order of connection. The last device
connected will have the highest
priority;
an audio device can also be paired
by pressing the PHONE button on
the front panel and by selecting
"Settings" or, from the "Settings" menu,
selecting "Phone/Bluetooth".
IMPORTANT If theBluetooth®
connection between mobile phone and
system is lost, consult the mobile
phone Owner's handbook.
175
Page 178 of 200
NOTE After updating the phone
software, for proper operation, it is
recommended to remove the phone
from the list of devices linked to the
radio, delete the previous system
pairing also from the list ofBluetooth®
devices on the phone and make a
new pairing.
AUX SOURCE
To activate AUX mode, insert an
appropriate device in the AUX socket
on the vehicle.
When a device WITH AUX output is
inserted the system starts reproducing
the AUX source connected, if it is
already being played.
Adjust the volume using the
button/
knob on the front panel or using the
volume adjustment control on the
connected device.
For the "Audio source selection"
function, see the "Media mode"
chapter.
IMPORTANT NOTES
The functions of the device connected
with the AUX socket are directly
managed by the device itself: it is not
possible to change track/folder/playlist
or control playing start/end/pause
with the controls on the front panel or
on the steering wheel.Do not leave the cable of your portable
player connected to the AUX socket
after disconnection, to avoid possible
hiss from the speakers.
USB/iPod SOURCE
To activate the USB/iPod mode insert
the corresponding device (USB or iPod)
in the USB port located on the central
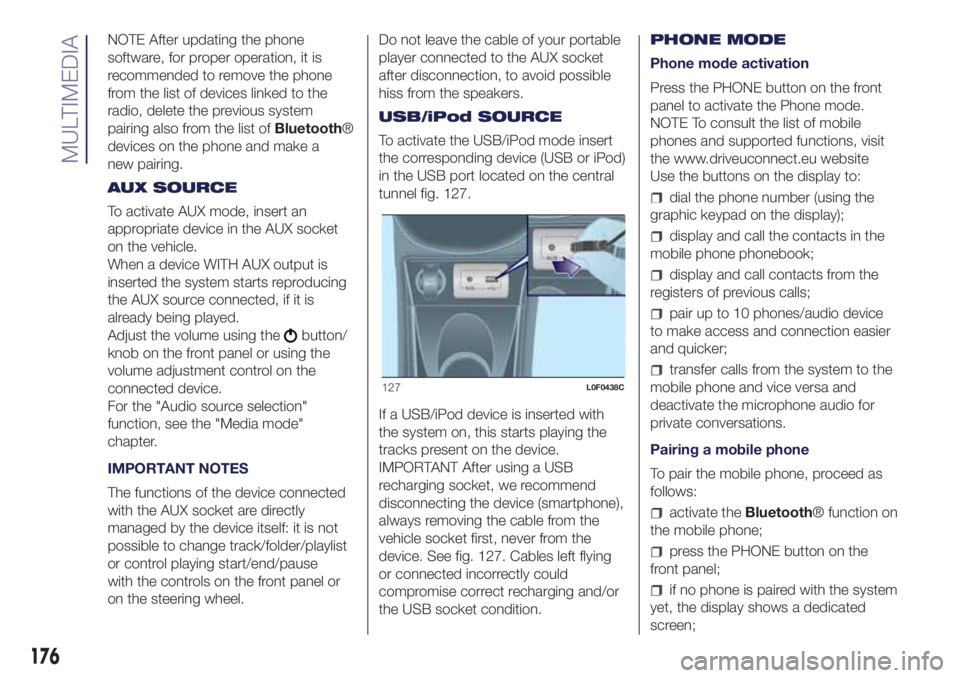
tunnel fig. 127.
If a USB/iPod device is inserted with
the system on, this starts playing the
tracks present on the device.
IMPORTANT After using a USB
recharging socket, we recommend
disconnecting the device (smartphone),
always removing the cable from the
vehicle socket first, never from the
device. See fig. 127. Cables left flying
or connected incorrectly could
compromise correct recharging and/or
the USB socket condition.PHONE MODE
Phone mode activation
Press the PHONE button on the front
panel to activate the Phone mode.
NOTE To consult the list of mobile
phones and supported functions, visit
the www.driveuconnect.eu website
Use the buttons on the display to:
dial the phone number (using the
graphic keypad on the display);
display and call the contacts in the
mobile phone phonebook;
display and call contacts from the
registers of previous calls;
pair up to 10 phones/audio device
to make access and connection easier
and quicker;
transfer calls from the system to the
mobile phone and vice versa and
deactivate the microphone audio for
private conversations.
Pairing a mobile phone
To pair the mobile phone, proceed as
follows:
activate theBluetooth® function on
the mobile phone;
press the PHONE button on the
front panel;
if no phone is paired with the system
yet, the display shows a dedicated
screen;
127L0F0438C
176
MULTIMEDIA
Page 179 of 200
select "Yes" to start the pairing
procedure, then search for the
Uconnect™ device on the mobile
phone (if "No" is selected, the Phone
main screen is displayed);
when prompted by the mobile
phone, use its keypad to enter the PIN
code shown on the system display
or confirm on the mobile phone the PIN
displayed;
from the "Phone" screen you can
always pair a mobile phone by pressing
the "Settings" button: press the "Add
Device" button and proceed as
described above;
during the pairing stage a screen is
displayed showing the progress of
the operation;
when the pairing procedure is
completed successfully, a screen is
displayed: answer "Yes" to the question
to pair the mobile phone as favourite
(the mobile phone will have priority over
all other mobile phones to be paired
subsequently). If no other devices are
paired, the system will consider the first
associated device as favourite.
Making a phone call
The operations described below can
only be accessed if supported by
the mobile phone in use.A call can be made by:
selecting theicon (mobile
phonebook);
selecting "Recent Calls";
selecting theicon;
pressing the "Redial" button.
Text message reader
The system can read the messages
received by the mobile phone.
To use this function the mobile phone
must support the SMS exchange
function throughBluetooth®.
If this function is not supported by the
phone, the corresponding graphic
button
is deactivated (greyed out).
When a text message is received,
the display will show a screen where
the options "Listen", "Call" or "Ignore"
can be selected.
You can access the SMS message list
received by the cell by pressing the
graphic
button (the list shows
a maximum of 60 received messages).
SMS message options
Default SMS messages are stored in
the system memory and can be sent to
answer a received message or as a
new message.
Yes.
No.
Okay.
I can't talk right now.
Call me.
I'll call you later.
I'm on my way.
Thanks.
I will be late.
Stuck in traffic.
Start without me.
Where are you?
Are you there yet?
I need directions.
I'm lost.
See you later.
I will be 5 (or 10, 15, 20, 25, 30, 45,
60)* minutes late.
See you in 5 (or 10, 15, 20, 25, 30,
45, 60)* minutes.
* Only use the numbers listed,
otherwise the system will not take the
message.
NOTE See the dedicated section for
details on how to send a text message
using the voice commands.
177
phone