key Lancia Ypsilon 2021 Owner handbook (in English)
[x] Cancel search | Manufacturer: LANCIA, Model Year: 2021, Model line: Ypsilon, Model: Lancia Ypsilon 2021Pages: 200, PDF Size: 4.53 MB
Page 106 of 200
Petrol and Diesel versions equipped
with "Smart Fuel" system
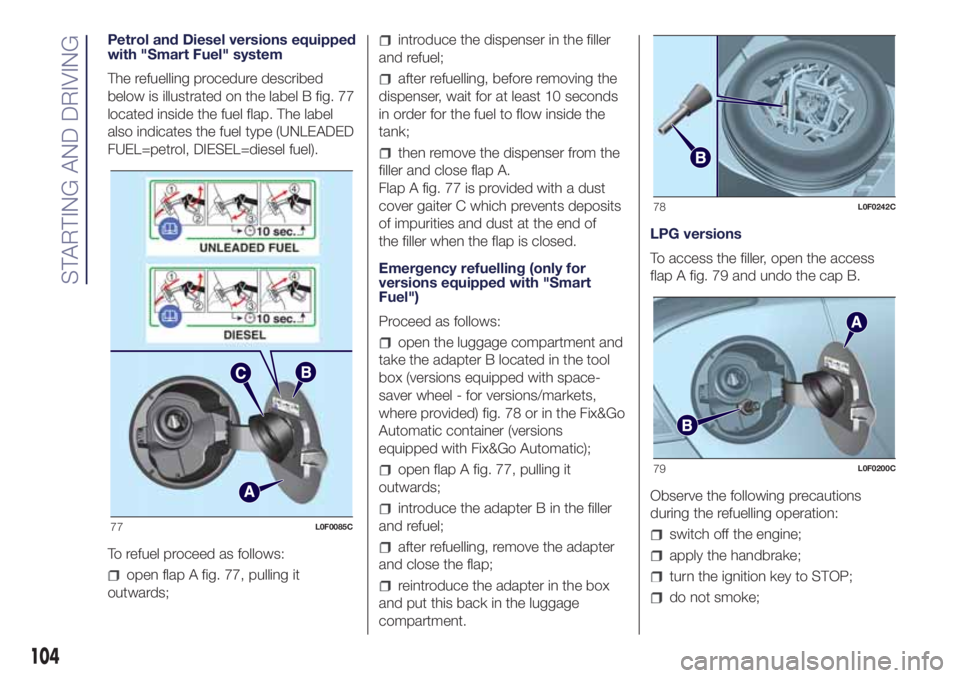
The refuelling procedure described
below is illustrated on the label B fig. 77
located inside the fuel flap. The label
also indicates the fuel type (UNLEADED
FUEL=petrol, DIESEL=diesel fuel).
To refuel proceed as follows:
open flap A fig. 77, pulling it
outwards;
introduce the dispenser in the filler
and refuel;
after refuelling, before removing the
dispenser, wait for at least 10 seconds
in order for the fuel to flow inside the
tank;
then remove the dispenser from the
filler and close flap A.
Flap A fig. 77 is provided with a dust
cover gaiter C which prevents deposits
of impurities and dust at the end of
the filler when the flap is closed.
Emergency refuelling (only for
versions equipped with "Smart
Fuel")
Proceed as follows:
open the luggage compartment and
take the adapter B located in the tool
box (versions equipped with space-
saver wheel - for versions/markets,
where provided) fig. 78 or in the Fix&Go
Automatic container (versions
equipped with Fix&Go Automatic);
open flap A fig. 77, pulling it
outwards;
introduce the adapter B in the filler
and refuel;
after refuelling, remove the adapter
and close the flap;
reintroduce the adapter in the box
and put this back in the luggage
compartment.LPG versions
To access the filler, open the access
flap A fig. 79 and undo the cap B.
Observe the following precautions
during the refuelling operation:
switch off the engine;
apply the handbrake;
turn the ignition key to STOP;
do not smoke;
77L0F0085C
78L0F0242C
79L0F0200C
104
STARTING AND DRIVING
Page 118 of 200
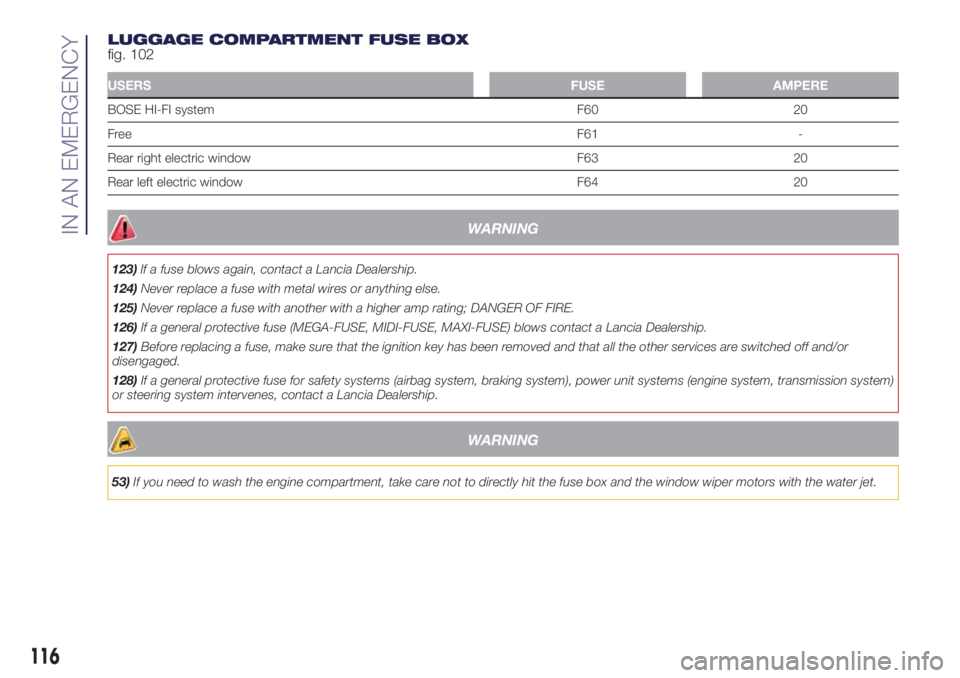
LUGGAGE COMPARTMENT FUSE BOX
fig. 102
USERSFUSE AMPERE
BOSE HI-FI system F60 20
FreeF61 -
Rear right electric window F63 20
Rear left electric window F64 20
WARNING
123)If a fuse blows again, contact a Lancia Dealership.
124)Never replace a fuse with metal wires or anything else.
125)Never replace a fuse with another with a higher amp rating; DANGER OF FIRE.
126)If a general protective fuse (MEGA-FUSE, MIDI-FUSE, MAXI-FUSE) blows contact a Lancia Dealership.
127)Before replacing a fuse, make sure that the ignition key has been removed and that all the other services are switched off and/or
disengaged.
128)If a general protective fuse for safety systems (airbag system, braking system), power unit systems (engine system, transmission system)
or steering system intervenes, contact a Lancia Dealership.
WARNING
53)If you need to wash the engine compartment, take care not to directly hit the fuse box and the window wiper motors with the water jet.
116
IN AN EMERGENCY
Page 126 of 200
FUEL CUT-OFF
SYSTEM
147)
FUEL CUT-OFF SYSTEM
This intervenes in the case of an impact
causing:
the interruption of the fuel supply
with the engine consequently cutting
out;
the automatic unlocking of the
doors;
turning on of the lights inside the
vehicle;
the switching on of the hazard
warning lights.
On some versions, the intervention of
the system is indicated by a message
shown on the display.
IMPORTANT Carefully check the vehicle
for fuel leaks, for instance in the engine
compartment, under the vehicle or
near the tank area. After an impact, turn
the ignition key to STOP to prevent the
battery from running down.
To restore the correct operation of the
vehicle, proceed as follows:
turn the ignition key to the MAR
position;
activate the right direction indicator;
deactivate the right direction
indicator;
activate the left direction indicator;
deactivate the left direction indicator;
activate the right direction indicator;
deactivate the right direction
indicator;
activate the left direction indicator;
deactivate the left direction indicator;
ignition key turned to the OFF
position;
turn the ignition key to the MAR-ON
position.
LPG / Natural Power versions:inthe
event of an impact, petrol supply is
immediately cut-off, the LPG safety
valves are closed and the injection is
interrupted, switching off the engine.
WARNING
147)If, after an impact, you smell fuel or
notice leaks from the fuel system, do
not reactivate the system to avoid the risk
of fire.
TOWING THE
VEHICLE
148) 149) 150) 151)
The tow hook, which is supplied with
the vehicle, is housed in the tool box,
under the carpet in the luggage
compartment.
ATTACHING THE TOW
RING
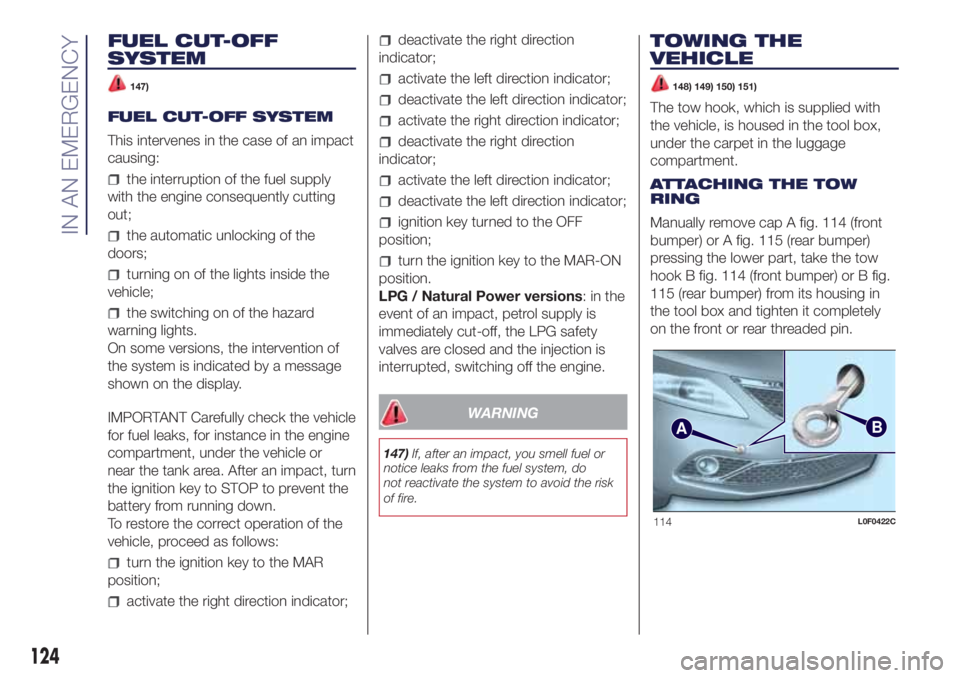
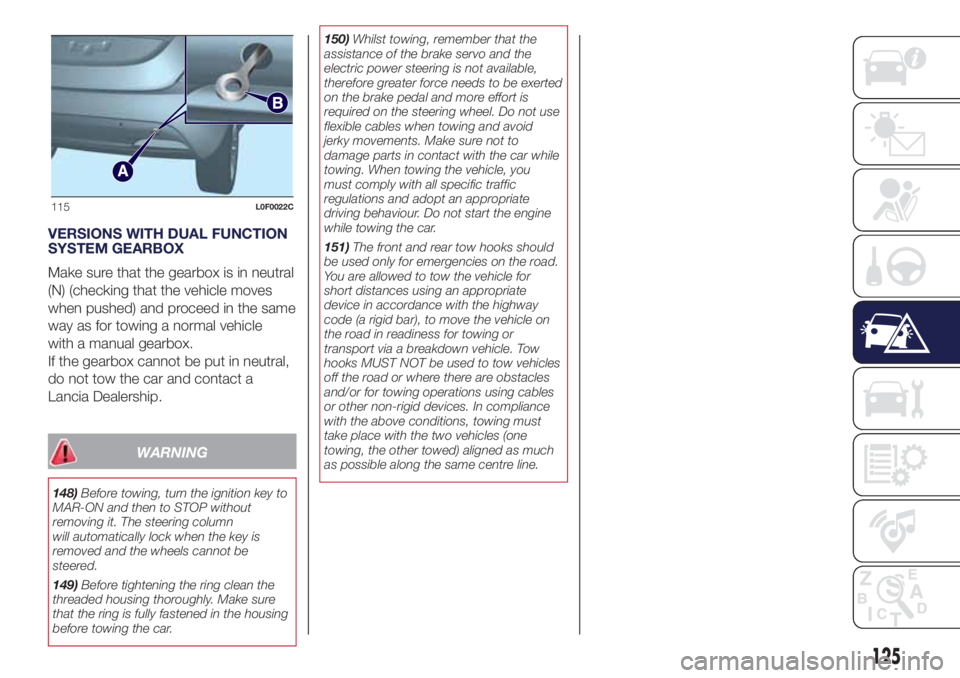
Manually remove cap A fig. 114 (front
bumper) or A fig. 115 (rear bumper)
pressing the lower part, take the tow
hook B fig. 114 (front bumper) or B fig.
115 (rear bumper) from its housing in
the tool box and tighten it completely
on the front or rear threaded pin.
AB
114L0F0422C
124
IN AN EMERGENCY
Page 127 of 200
VERSIONS WITH DUAL FUNCTION
SYSTEM GEARBOX
Make sure that the gearbox is in neutral
(N) (checking that the vehicle moves
when pushed) and proceed in the same
way as for towing a normal vehicle
with a manual gearbox.
If the gearbox cannot be put in neutral,
do not tow the car and contact a
Lancia Dealership.
WARNING
148)Before towing, turn the ignition key to
MAR-ON and then to STOP without
removing it. The steering column
will automatically lock when the key is
removed and the wheels cannot be
steered.
149)Before tightening the ring clean the
threaded housing thoroughly. Make sure
that the ring is fully fastened in the housing
before towing the car.150)Whilst towing, remember that the
assistance of the brake servo and the
electric power steering is not available,
therefore greater force needs to be exerted
on the brake pedal and more effort is
required on the steering wheel. Do not use
flexible cables when towing and avoid
jerky movements. Make sure not to
damage parts in contact with the car while
towing. When towing the vehicle, you
must comply with all specific traffic
regulations and adopt an appropriate
driving behaviour. Do not start the engine
while towing the car.
151)The front and rear tow hooks should
be used only for emergencies on the road.
You are allowed to tow the vehicle for
short distances using an appropriate
device in accordance with the highway
code (a rigid bar), to move the vehicle on
the road in readiness for towing or
transport via a breakdown vehicle. Tow
hooks MUST NOT be used to tow vehicles
off the road or where there are obstacles
and/or for towing operations using cables
or other non-rigid devices. In compliance
with the above conditions, towing must
take place with the two vehicles (one
towing, the other towed) aligned as much
as possible along the same centre line.
115L0F0022C
125
Page 144 of 200
64)Incorrect installation of electric and
electronic devices may cause severe
damage to your car. After purchasing your
car, if you wish to install any accessories
(car alarm, car phone etc.), contact a
Lancia Dealership, which will suggest the
most appropriate devices for your vehicle
and will, most importantly, advise you if
a highercapacity battery needs to be
installed.
WARNING
5)Used engine oil and oil filters contain
substances which are harmful to the
environment. You are advised to go to a
Lancia Dealership to have the oil and filters
replaced.
6)Used transmission fluid contains
substances that are harmful to the
environment. We advise going to a Lancia
Dealership to change the oil as they are
equipped to dispose of the used oil in
accordance with the legislation governing
the safeguarding of the environment.
7)Batteries contain substances which are
very dangerous for the environment. For
battery replacement, contact a Lancia
Dealership.
BATTERY
RECHARGING
163)
IMPORTANT The battery recharging
procedure is given as information only.
You are advised to go to a Lancia
Dealership to have this operation
performed.
IMPORTANT After turning the ignition
key to STOP and having closed the
driver's side door, wait at least one
minute before disconnecting and then
reconnecting the electrical supply to the
battery.
Low amperage slow recharging for
approximately 24 hours is advised.
Charging for a longer time may damage
the battery.
VERSIONS WITHOUT
START&STOP SYSTEM
(for versions/markets, where provided)
To recharge, proceed as follows:
disconnect the terminal from the
negative battery pole;
connect the charger cables to the
battery terminals, observing the polarity;
turn on the battery charger;
when it is recharged, turn the
charger off before disconnecting it from
the battery;
reconnect the terminal to the
negative battery pole.
VERSIONS WITH
START&STOP SYSTEM
(for versions/markets, where provided)
To recharge, proceed as follows:
disconnect the connector A fig. 119
(pressing the button B) from the sensor
C monitoring the battery conditions,
on the negative pole D of the battery;
connect the positive cable of the
battery charger to the positive battery
terminal E and the negative cable to
sensor terminal D as shown;
turn on the battery charger. At the
end of the charging process, switch the
battery charger off;
after having disconnected the
battery charger, reconnect connector A
fig. 119 to the sensor C as shown.
142
SERVICING AND CARE
Page 148 of 200

rinse well with water and dry with a
jet of air or a chamois.
Dry the less visible parts (e.g. door
frames, bonnet, headlight frames etc.)
with special care, as water may
stagnate more easily in these areas.
The car should not be taken to a closed
area immediately, but left outside so
that residual water can evaporate.
Do not wash the car after it has been
left in the sun or with the bonnet hot:
this may alter the shine of the
paintwork.
Exterior plastic parts must be cleaned
in the same way as the rest of the
vehicle.
Avoid parking under trees; the resin
dropped by trees makes the paintwork
go opaque and increases the possibility
of corrosion.
IMPORTANT Bird droppings must be
washed off immediately and thoroughly
as the acid they contain is particularly
aggressive.
66)8)
Windows
Use specific detergents and clean
cloths to prevent scratching or altering
the transparency.IMPORTANT Wipe the rear window
inside gently with a cloth following the
direction of the filaments to avoid
damaging the heating device.
Front headlights
Use a soft cloth soaked in water and
detergent for washing cars.
IMPORTANT Never use aromatic
substances (e.g. petrol) or ketones (e.g.
acetone) for cleaning the plastic lenses
of the headlights.
IMPORTANT When cleaning with a
pressure washer, keep the water jet at
least 20 cm away from the headlights.
Engine compartment
At the end of every winter, wash the
engine compartment thoroughly, taking
care not to aim the jet of water directly
at the electronic control units or at
the windscreen wiper motors. Have this
operation performed at a specialised
workshop.
IMPORTANT The washing should take
place with the engine cold and the
ignition key in the STOP position. After
the washing operation, make sure
that the various protections (e.g. rubber
caps and guards) have not been
removed or damaged.
WARNING
66)In order to preserve the aesthetic
appearance of the paint abrasive products
and/or polishes should not be used for
cleaning the vehicle.
WARNING
8)Detergents pollute the environment.
Only wash your vehicle in areas equipped
to collect and treat wastewater from this
type of activity.
146
SERVICING AND CARE
Page 170 of 200
TIPS, CONTROLS
AND GENERAL
INFORMATION
ROAD SAFETY
Learn how to use the various system
functions before setting off.
Read the instructions for the system
carefully before setting off.
172) 173)
RECEPTION CONDITIONS
Reception conditions change
constantly while driving. Reception may
be interfered with by the presence of
mountains, buildings or bridges,
especially when you are far away from
the broadcaster.
IMPORTANT The volume may be
increased when receiving traffic
information and news.CARE AND
MAINTENANCE
70) 71)
Observe the following precautions to
ensure the system is fully operational:
the display is sensitive to scratching,
liquids and detergents. The display
should not come into contact with
pointed or rigid objects which could
damage its surface. Do not press
on the display when cleaning it.
never use alcohol, petrols and
derivatives to clean the display lens.
prevent any liquid from entering the
system: this could damage it beyond
repair.
MEDIA DEVICES
IMPORTANT Some multimedia players
may not be compatible with the
Uconnect™ system.
ANTITHEFT PROTECTION
The system is equipped with an
anti-theft protection system based on
the exchange of information with the
electronic control unit (Body Computer)
on the vehicle.
This guarantees maximum safety and
prevents the secret code from being
entered after the power supply has
been disconnected.If the check has a positive outcome, the
system will start to operate, whereas if
the comparison codes are not the
same or if the electronic control unit
(Body Computer) is replaced, the
system will ask the user to enter the
secret code according to the procedure
described in the paragraph below.
Entering the secret code
When the system is switched on, if the
code is requested, the display will
show "Please enter Anti-Theft Code"
followed by the screen showing a
keypad to enter the secret code.
The secret code is made up of four
digits, from 0 to 9: to insert the code,
turn the "BROWSE ENTER" right knob
and press to confirm.
After inserting the fourth digit, move the
cursor to "OK" and press the
"BROWSE ENTER" right knob: the
system will start to operate.
If an incorrect code is entered, the
system displays "Incorrect Code" to
notify the user of the need to enter the
correct code.
After the 3 available attempts to enter
the code, the system displays
"Incorrect Code. Radio locked. Wait for
30 minutes". After the text has
disappeared it is possible to start the
code entering procedure again.
168
MULTIMEDIA
Page 178 of 200
NOTE After updating the phone
software, for proper operation, it is
recommended to remove the phone
from the list of devices linked to the
radio, delete the previous system
pairing also from the list ofBluetooth®
devices on the phone and make a
new pairing.
AUX SOURCE
To activate AUX mode, insert an
appropriate device in the AUX socket
on the vehicle.
When a device WITH AUX output is
inserted the system starts reproducing
the AUX source connected, if it is
already being played.
Adjust the volume using the
button/
knob on the front panel or using the
volume adjustment control on the
connected device.
For the "Audio source selection"
function, see the "Media mode"
chapter.
IMPORTANT NOTES
The functions of the device connected
with the AUX socket are directly
managed by the device itself: it is not
possible to change track/folder/playlist
or control playing start/end/pause
with the controls on the front panel or
on the steering wheel.Do not leave the cable of your portable
player connected to the AUX socket
after disconnection, to avoid possible
hiss from the speakers.
USB/iPod SOURCE
To activate the USB/iPod mode insert
the corresponding device (USB or iPod)
in the USB port located on the central
tunnel fig. 127.
If a USB/iPod device is inserted with
the system on, this starts playing the
tracks present on the device.
IMPORTANT After using a USB
recharging socket, we recommend
disconnecting the device (smartphone),
always removing the cable from the
vehicle socket first, never from the
device. See fig. 127. Cables left flying
or connected incorrectly could
compromise correct recharging and/or
the USB socket condition.PHONE MODE
Phone mode activation
Press the PHONE button on the front
panel to activate the Phone mode.
NOTE To consult the list of mobile
phones and supported functions, visit
the www.driveuconnect.eu website
Use the buttons on the display to:
dial the phone number (using the
graphic keypad on the display);
display and call the contacts in the
mobile phone phonebook;
display and call contacts from the
registers of previous calls;
pair up to 10 phones/audio device
to make access and connection easier
and quicker;
transfer calls from the system to the
mobile phone and vice versa and
deactivate the microphone audio for
private conversations.
Pairing a mobile phone
To pair the mobile phone, proceed as
follows:
activate theBluetooth® function on
the mobile phone;
press the PHONE button on the
front panel;
if no phone is paired with the system
yet, the display shows a dedicated
screen;
127L0F0438C
176
MULTIMEDIA
Page 179 of 200
select "Yes" to start the pairing
procedure, then search for the
Uconnect™ device on the mobile
phone (if "No" is selected, the Phone
main screen is displayed);
when prompted by the mobile
phone, use its keypad to enter the PIN
code shown on the system display
or confirm on the mobile phone the PIN
displayed;
from the "Phone" screen you can
always pair a mobile phone by pressing
the "Settings" button: press the "Add
Device" button and proceed as
described above;
during the pairing stage a screen is
displayed showing the progress of
the operation;
when the pairing procedure is
completed successfully, a screen is
displayed: answer "Yes" to the question
to pair the mobile phone as favourite
(the mobile phone will have priority over
all other mobile phones to be paired
subsequently). If no other devices are
paired, the system will consider the first
associated device as favourite.
Making a phone call
The operations described below can
only be accessed if supported by
the mobile phone in use.A call can be made by:
selecting theicon (mobile
phonebook);
selecting "Recent Calls";
selecting theicon;
pressing the "Redial" button.
Text message reader
The system can read the messages
received by the mobile phone.
To use this function the mobile phone
must support the SMS exchange
function throughBluetooth®.
If this function is not supported by the
phone, the corresponding graphic
button
is deactivated (greyed out).
When a text message is received,
the display will show a screen where
the options "Listen", "Call" or "Ignore"
can be selected.
You can access the SMS message list
received by the cell by pressing the
graphic
button (the list shows
a maximum of 60 received messages).
SMS message options
Default SMS messages are stored in
the system memory and can be sent to
answer a received message or as a
new message.
Yes.
No.
Okay.
I can't talk right now.
Call me.
I'll call you later.
I'm on my way.
Thanks.
I will be late.
Stuck in traffic.
Start without me.
Where are you?
Are you there yet?
I need directions.
I'm lost.
See you later.
I will be 5 (or 10, 15, 20, 25, 30, 45,
60)* minutes late.
See you in 5 (or 10, 15, 20, 25, 30,
45, 60)* minutes.
* Only use the numbers listed,
otherwise the system will not take the
message.
NOTE See the dedicated section for
details on how to send a text message
using the voice commands.
177
phone
Page 181 of 200
The App can by downloaded from "App
Store" or "Google play".
For safety reasons, the App cannot be
accessed when the phone is paired
with the radio.
Personal details (e-mail and password)
are required to access theUconnect™
LIVEradio services, therefore the
content of your personal accounts is
protected and can only be accessed by
the real user.
Connected services that can be
accessed on the vehicle
TheUconnect™LIVEservices
available in the radio menu can change
according to the market.
Theeco:Drive™ application is
developed to improve the customer's
driving experience and is available in all
countries where theUconnect™
LIVEservices can be accessed.
For further information visit the
www.driveuconnect.eu website.
If the navigation system is installed in
the radio, accessing theUconnect™
LIVEservices enables use of the
TomTom LIVE services. Further
information about the LIVE functions is
available in the dedicated chapter.eco:Drive™
Theeco:Drive™ application allows you
to display your driving behaviour in
real time, in order to help you reach a
more efficient driving style as far as
consumption and emissions are
concerned.
In addition, the data can be saved on
an USB stick, and the data analysis can
be made on your personal computer
with theeco:Drive™ desktop
application, available on www.fiat.it or
www.driveuconnect.eu.
Driving style is evaluated by means of
four indices which monitor the following
parameters:
Acceleration
Deceleration
Transmission
Speed
eco:Drive™ display
Press theeco:Drive™ button to
interact with the function.
A screen will be displayed on the radio,
showing the 4 indices described above.
These indices are grey until the system
has enough data to evaluate the driving
style.Once sufficient data are available, the
indices will have 5 colours depending
on the evaluation: dark green (very
good), light green, yellow, orange and
red (very bad).
"Current trip index" refers to the entire
value calculated in real time based
on the average of the described
indices. It represents eco-friendliness of
the driving style: from 0 (low) to 100
(high).
In the event of extended inactivity the
display will show the average of the
indexes until that moment (the "Average
index"), then the indexes will be
coloured again in real time as soon as
the vehicle is restarted.
To check the data average of previous
route (the "route" starts when the
ignition key is turned to MAR and stops
when it is turned to STOP), select the
"Previous route" button.
The details of the previous trip can also
be displayed by pressing the "Details"
button, in which journey duration (time
and mileage) and average speed will be
reported.
179