turbo LAND ROVER DEFENDER 1996 Workshop Manual
[x] Cancel search | Manufacturer: LAND ROVER, Model Year: 1996, Model line: DEFENDER, Model: LAND ROVER DEFENDER 1996Pages: 455, PDF Size: 6.44 MB
Page 19 of 455
GENERAL SPECIFICATION DATA
1
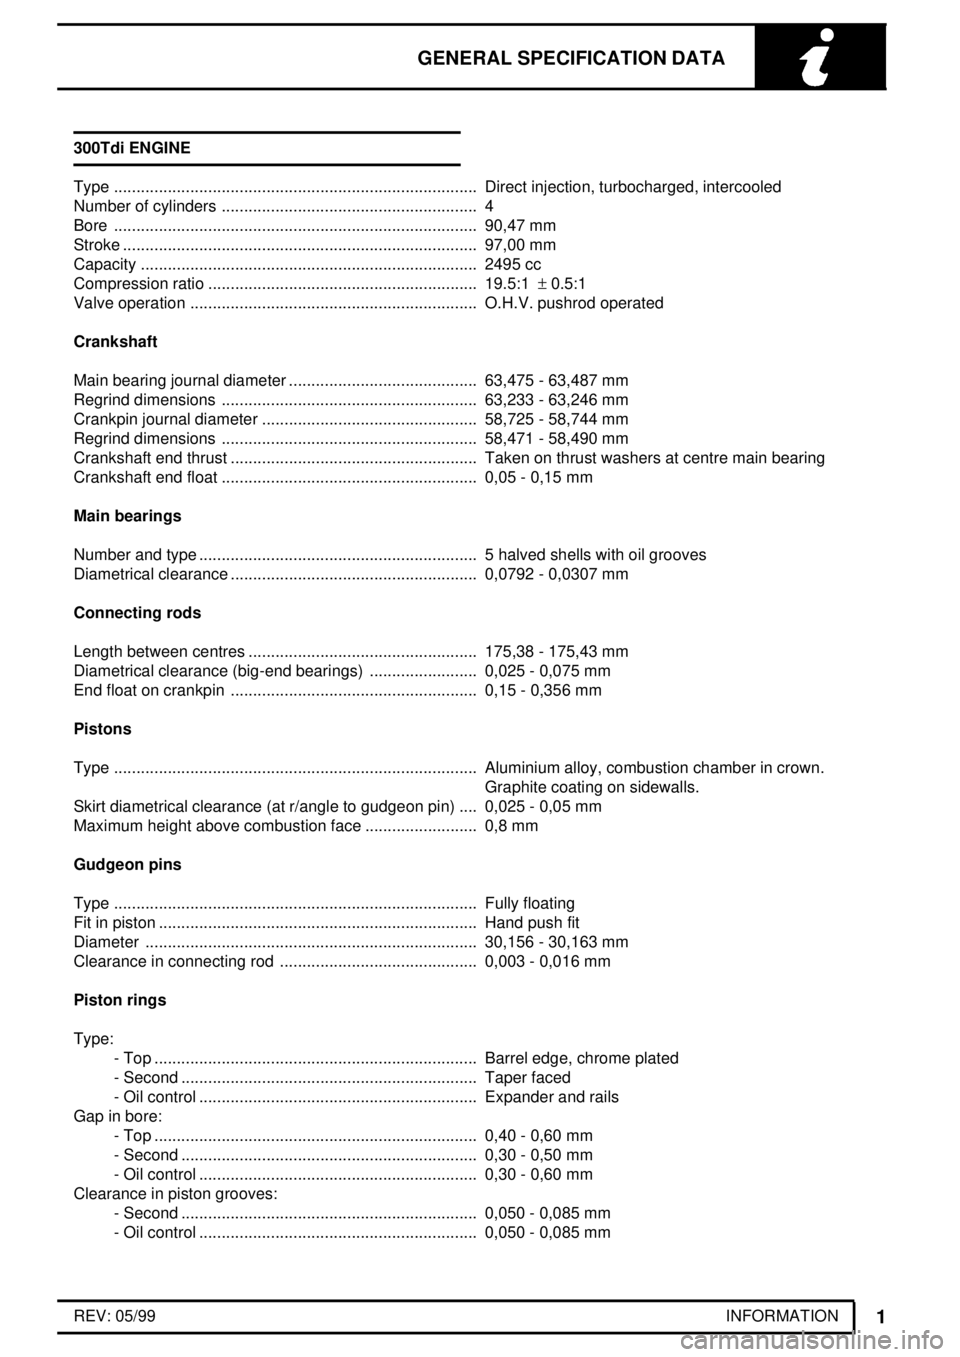
INFORMATION REV: 05/99 300Tdi ENGINE
Type Direct injection, turbocharged, intercooled.................................................................................
Number of cylinders 4.........................................................
Bore 90,47 mm.................................................................................
Stroke 97,00 mm...............................................................................
Capacity 2495 cc...........................................................................
Compression ratio 19.5:1±0.5:1 ............................................................
Valve operation O.H.V. pushrod operated................................................................
Crankshaft
Main bearing journal diameter 63,475 - 63,487 mm..........................................
Regrind dimensions 63,233 - 63,246 mm.........................................................
Crankpin journal diameter 58,725 - 58,744 mm................................................
Regrind dimensions 58,471 - 58,490 mm.........................................................
Crankshaft end thrust Taken on thrust washers at centre main bearing.......................................................
Crankshaft end float 0,05 - 0,15 mm.........................................................
Main bearings
Number and type 5 halved shells with oil grooves..............................................................
Diametrical clearance 0,0792 - 0,0307 mm.......................................................
Connecting rods
Length between centres 175,38 - 175,43 mm...................................................
Diametrical clearance (big-end bearings) 0,025 - 0,075 mm........................
End float on crankpin 0,15 - 0,356 mm.......................................................
Pistons
Type Aluminium alloy, combustion chamber in crown..................................................................................
Graphite coating on sidewalls.
Skirt diametrical clearance (at r/angle to gudgeon pin) 0,025 - 0,05 mm....
Maximum height above combustion face 0,8 mm.........................
Gudgeon pins
Type Fully floating.................................................................................
Fit in piston Hand push fit.......................................................................
Diameter 30,156 - 30,163 mm..........................................................................
Clearance in connecting rod 0,003 - 0,016 mm............................................
Piston rings
Type:
- Top Barrel edge, chrome plated........................................................................
- Second Taper faced..................................................................
- Oil control Expander and rails..............................................................
Gap in bore:
- Top 0,40 - 0,60 mm........................................................................
- Second 0,30 - 0,50 mm..................................................................
- Oil control 0,30 - 0,60 mm..............................................................
Clearance in piston grooves:
- Second 0,050 - 0,085 mm..................................................................
- Oil control 0,050 - 0,085 mm..............................................................
Page 21 of 455
GENERAL SPECIFICATION DATA
3
INFORMATION FUEL SYSTEM
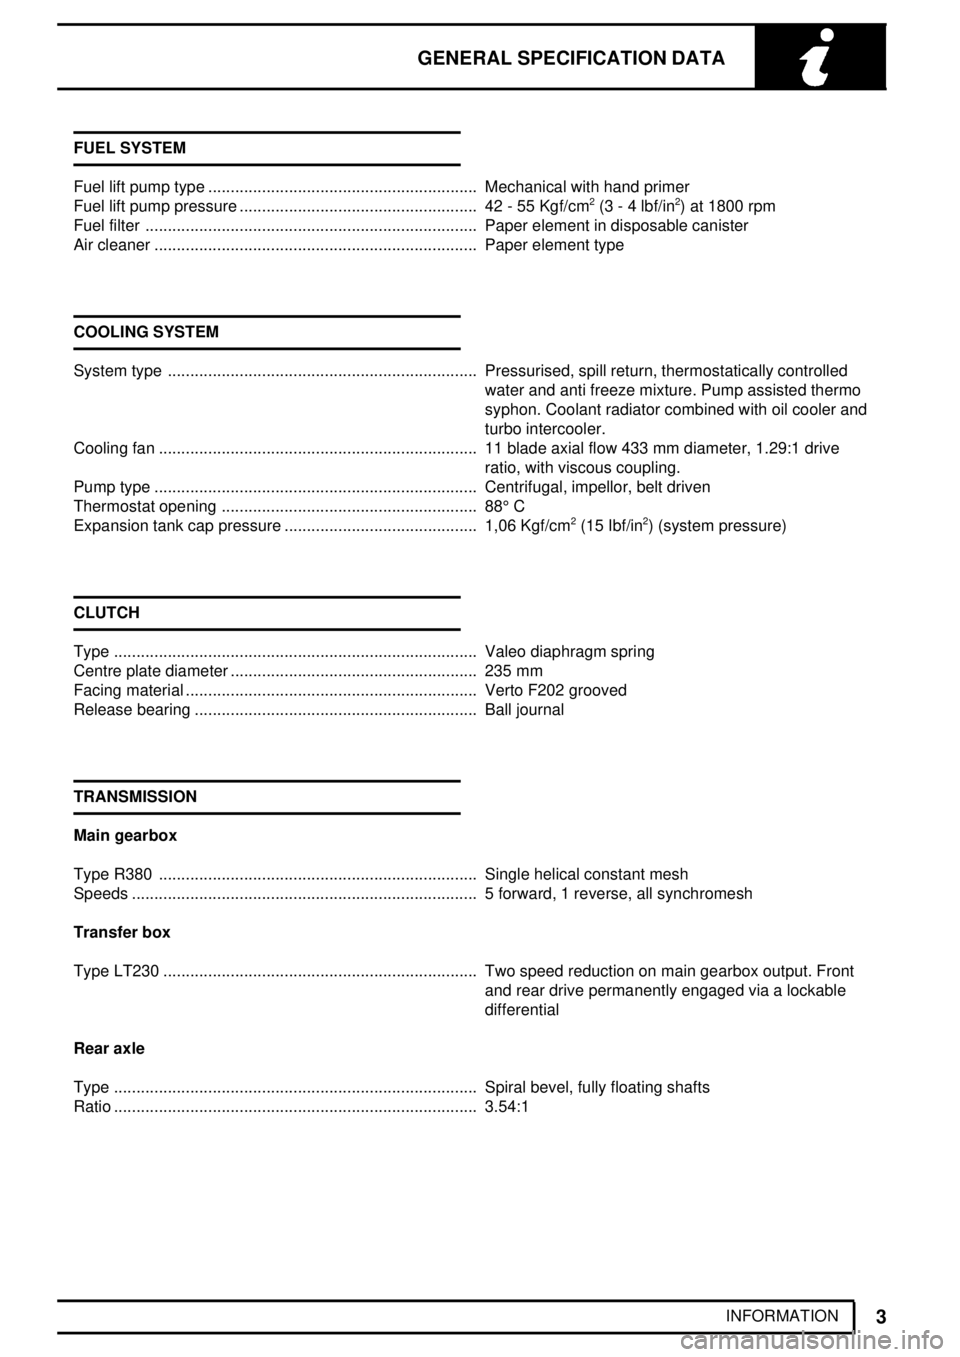
Fuel lift pump type Mechanical with hand primer............................................................
Fuel lift pump pressure 42 - 55 Kgf/cm
2(3 - 4 lbf/in2) at 1800 rpm .....................................................
Fuel filter Paper element in disposable canister..........................................................................
Air cleaner Paper element type........................................................................
COOLING SYSTEM
System type Pressurised, spill return, thermostatically controlled.....................................................................
water and anti freeze mixture. Pump assisted thermo
syphon. Coolant radiator combined with oil cooler and
turbo intercooler.
Cooling fan 11 blade axial flow 433 mm diameter, 1.29:1 drive.......................................................................
ratio, with viscous coupling.
Pump type Centrifugal, impellor, belt driven........................................................................
Thermostat opening 88°C .........................................................
Expansion tank cap pressure 1,06 Kgf/cm
2(15 Ibf/in2) (system pressure) ...........................................
CLUTCH
Type Valeo diaphragm spring.................................................................................
Centre plate diameter 235 mm.......................................................
Facing material Verto F202 grooved.................................................................
Release bearing Ball journal...............................................................
TRANSMISSION
Main gearbox
Type R380 Single helical constant mesh.......................................................................
Speeds 5 forward, 1 reverse, all synchromesh.............................................................................
Transfer box
Type LT230 Two speed reduction on main gearbox output. Front......................................................................
and rear drive permanently engaged via a lockable
differential
Rear axle
Type Spiral bevel, fully floating shafts.................................................................................
Ratio 3.54:1.................................................................................
Page 31 of 455
ENGINE TUNING DATA
1
INFORMATION 300 Tdi ENGINE
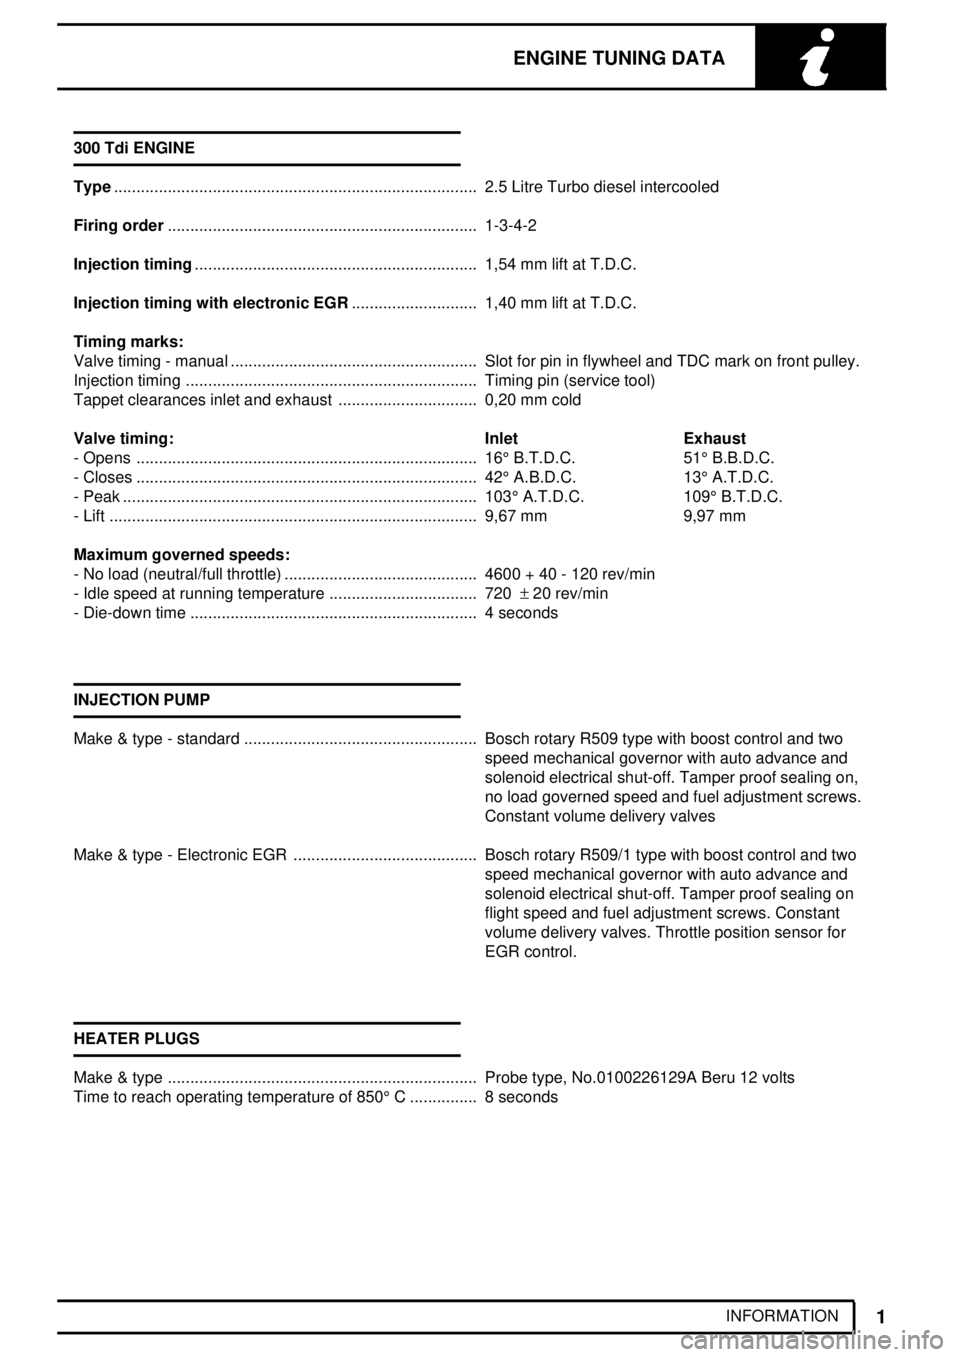
Type2.5 Litre Turbo diesel intercooled .................................................................................
Firing order1-3-4-2 .....................................................................
Injection timing1,54 mm lift at T.D.C. ...............................................................
Injection timing with electronic EGR1,40 mm lift at T.D.C. ............................
Timing marks:
Valve timing - manual Slot for pin in flywheel and TDC mark on front pulley........................................................
Injection timing Timing pin (service tool).................................................................
Tappet clearances inlet and exhaust 0,20 mm cold...............................
Valve timing: Inlet Exhaust
- Opens 16°B.T.D.C. ............................................................................ 51°B.B.D.C.
- Closes 42°A.B.D.C. ............................................................................ 13°A.T.D.C.
- Peak 103°A.T.D.C. ............................................................................... 109°B.T.D.C.
- Lift 9,67 mm.................................................................................. 9,97 mm
Maximum governed speeds:
- No load (neutral/full throttle) 4600 + 40 - 120 rev/min...........................................
- Idle speed at running temperature 720±20 rev/min .................................
- Die-down time 4 seconds................................................................
INJECTION PUMP
Make & type - standard Bosch rotary R509 type with boost control and two....................................................
speed mechanical governor with auto advance and
solenoid electrical shut-off. Tamper proof sealing on,
no load governed speed and fuel adjustment screws.
Constant volume delivery valves
Make & type - Electronic EGR Bosch rotary R509/1 type with boost control and two.........................................
speed mechanical governor with auto advance and
solenoid electrical shut-off. Tamper proof sealing on
flight speed and fuel adjustment screws. Constant
volume delivery valves. Throttle position sensor for
EGR control.
HEATER PLUGS
Make & type Probe type, No.0100226129A Beru 12 volts.....................................................................
Time to reach operating temperature of 850°C 8 seconds...............
Page 32 of 455
05ENGINE TUNING DATA
2
INFORMATION INJECTORS
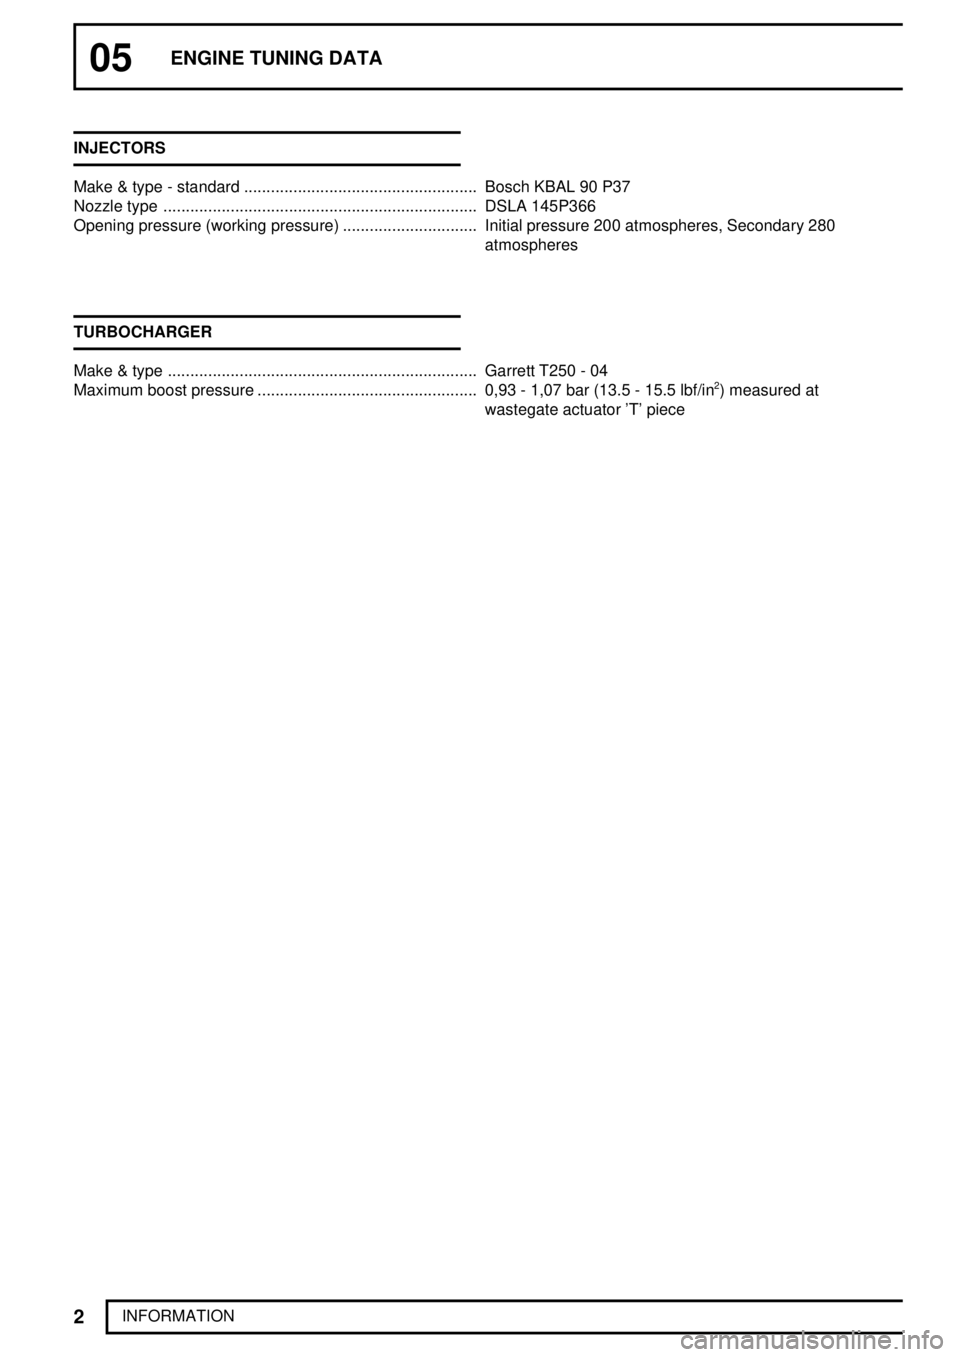
Make & type - standard Bosch KBAL 90 P37....................................................
Nozzle type DSLA 145P366......................................................................
Opening pressure (working pressure) Initial pressure 200 atmospheres, Secondary 280..............................
atmospheres
TURBOCHARGER
Make & type Garrett T250 - 04.....................................................................
Maximum boost pressure 0,93 - 1,07 bar (13.5 - 15.5 lbf/in
2) measured at .................................................
wastegate actuator 'T' piece
Page 48 of 455
MAINTENANCE
5
MAINTENANCE REV: 05/99 CHECK COOLING, INTERCOOLING AND HEATING
SYSTEMS
Check cooling, and heater systems for leaks and
pipes/hoses for security and condition. Refill or top up
as necessary.
CAUTION: It is important that the correct
procedure is followed when refilling or
topping up the cooling system to avoid
trapping air in the system.
WARNING: Do not remove caps and plugs
when engine is hot because cooling
system is pressurised and personal
scalding could result.
1.Remove plastic plugs from thermostat housing
and radiator.
2.Fill cooling system with correct concentration
and specification of anti-freeze.
See
LUBRICANTS, FLUIDS AND CAPACITIES,
Information, Recommended lubricants and
fluids
3.Fill from expansion tank until radiator is full, with
level in expansion tank the same as in radiator.
NOTE: Care should be taken to avoid
excess coolant spillage from radiator.
4.Fit plastic plug in radiator.
5.Add a further 1 litre (1.76 pints) of coolant to
expansion tank and allow to settle.
6.Refit expansion tank cap and thermostat
housing plug.
7.Run engine at idle speed for five minutes.
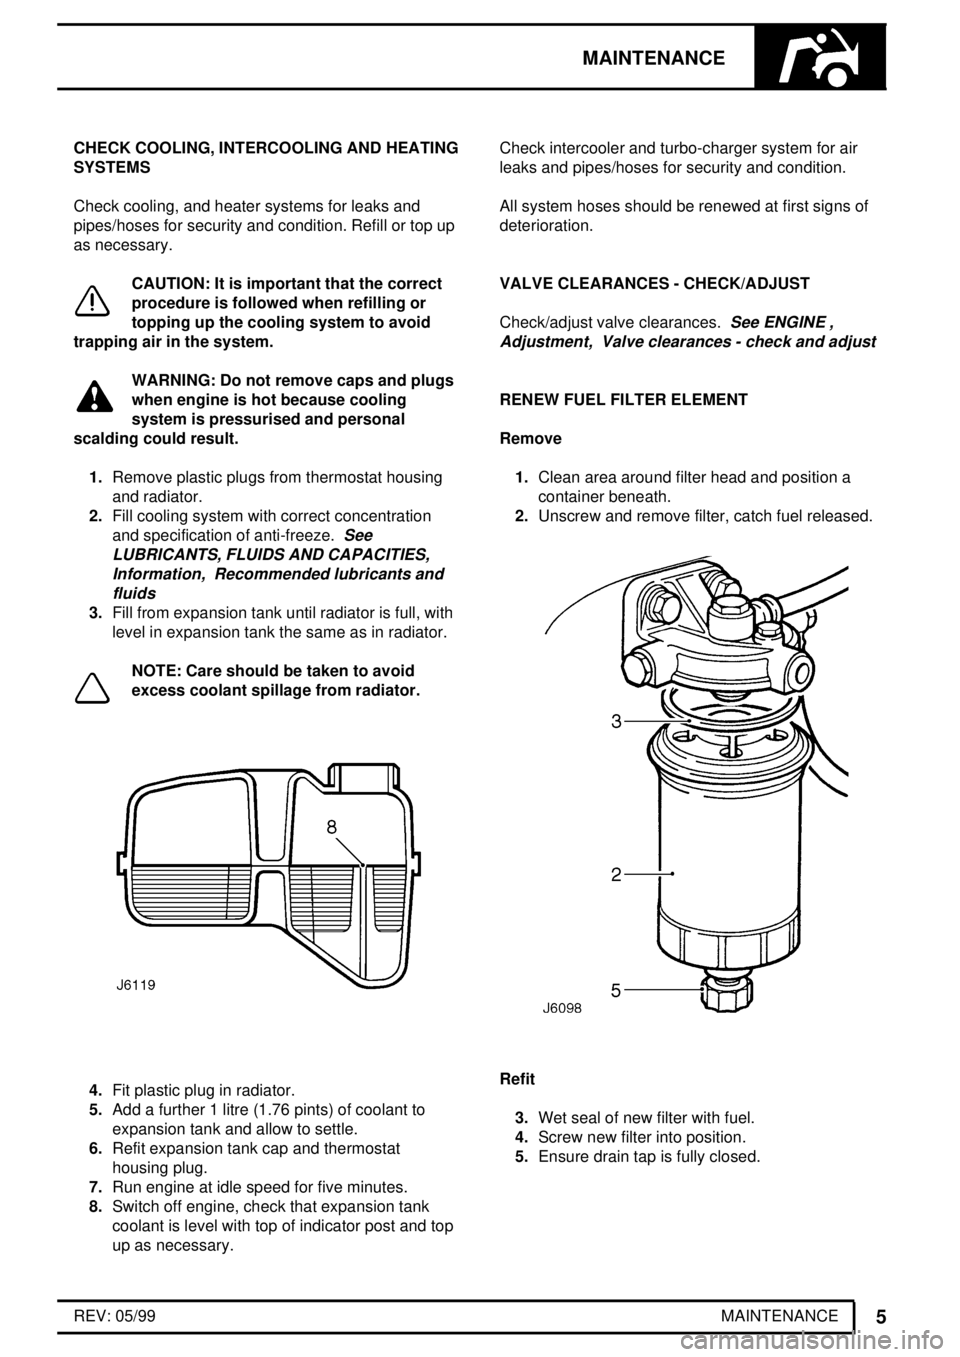
8.Switch off engine, check that expansion tank
coolant is level with top of indicator post and top
up as necessary.Check intercooler and turbo-charger system for air
leaks and pipes/hoses for security and condition.
All system hoses should be renewed at first signs of
deterioration.
VALVE CLEARANCES - CHECK/ADJUST
Check/adjust valve clearances.
See ENGINE ,
Adjustment, Valve clearances - check and adjust
RENEW FUEL FILTER ELEMENT
Remove
1.Clean area around filter head and position a
container beneath.
2.Unscrew and remove filter, catch fuel released.
Refit
3.Wet seal of new filter with fuel.
4.Screw new filter into position.
5.Ensure drain tap is fully closed.
Page 62 of 455
ENGINE
3
REPAIR ENGINE
Service repair no - 12.41.01
Remove
NOTE: A chassis undertray may be fitted
on some vehicle derivatives to conform to
legal requirements. When under chassis
remove and refit procedures are required, it may
be necessary to remove the undertray and/or
integral access panels.
See CHASSIS AND BODY, Repair, Front
undertray
orSee CHASSIS AND BODY, Repair,
Rear undertray
CAUTION: Seal all exposed pipe ends
against ingress of dirt after disconnection.
1.Ensure vehicle is level and apply park brake.
2.Disconnect battery.
NOTE: The vehicle may be fitted with an
alarm and immobilisation system using a
battery backed-up alarm sounder.
See ELECTRICAL, Repair, battery
3.Remove bonnet.
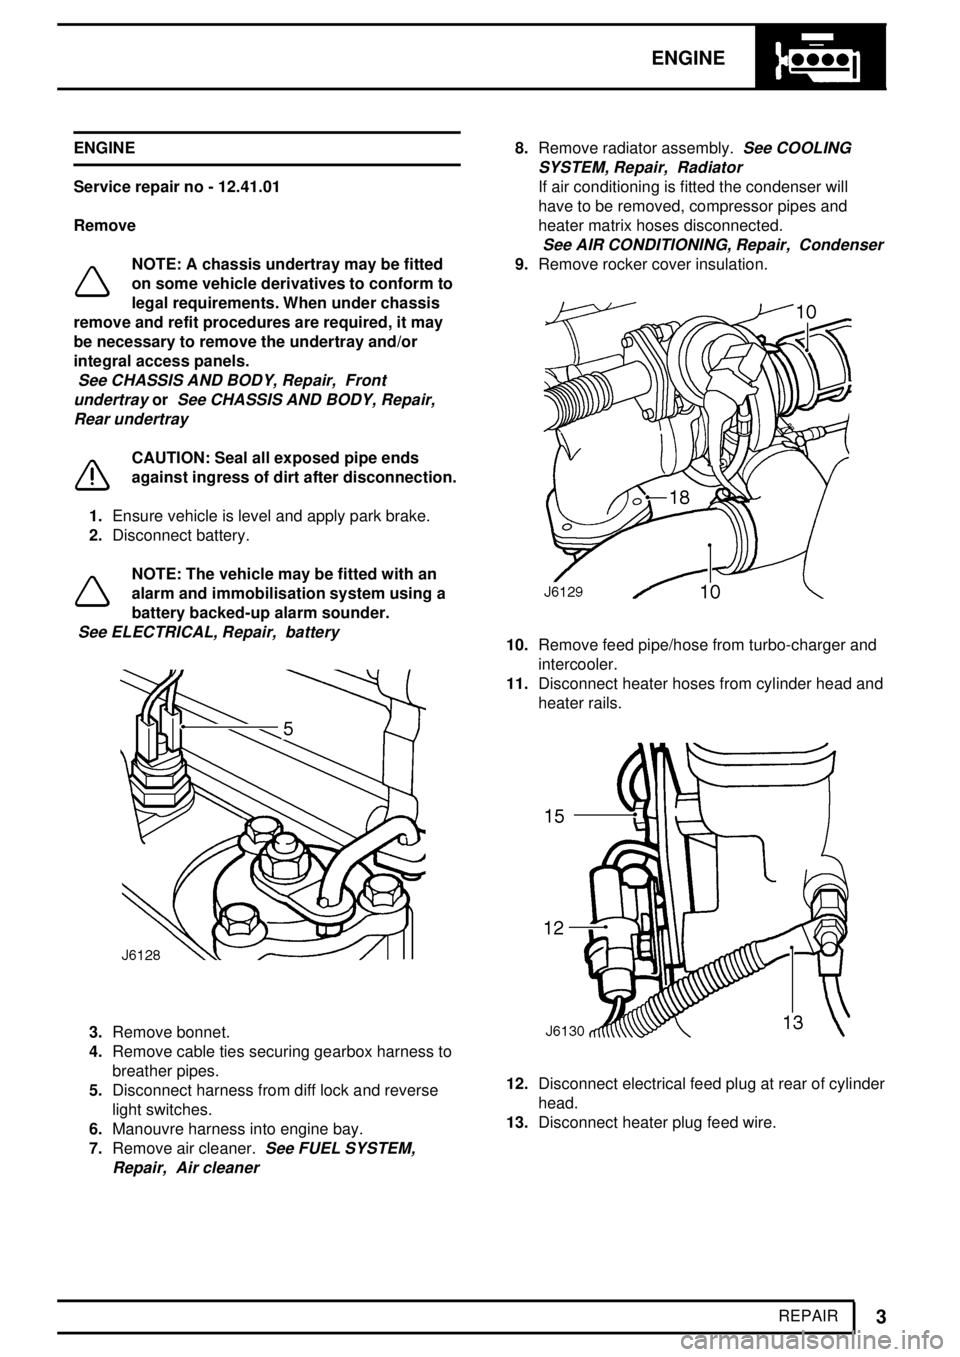
4.Remove cable ties securing gearbox harness to
breather pipes.
5.Disconnect harness from diff lock and reverse
light switches.
6.Manouvre harness into engine bay.
7.Remove air cleaner.
See FUEL SYSTEM,
Repair, Air cleaner
8.Remove radiator assembly.See COOLING
SYSTEM, Repair, Radiator
If air conditioning is fitted the condenser will
have to be removed, compressor pipes and
heater matrix hoses disconnected.
See AIR CONDITIONING, Repair, Condenser
9.Remove rocker cover insulation.
10.Remove feed pipe/hose from turbo-charger and
intercooler.
11.Disconnect heater hoses from cylinder head and
heater rails.
12.Disconnect electrical feed plug at rear of cylinder
head.
13.Disconnect heater plug feed wire.
Page 65 of 455
12ENGINE
6
REPAIR 42.Raise engine, and locate front engine mountings
to chassis.
43.Remove gearbox support and lower engine.
44.Tighten front engine mounting to chassis fixings
to
45 Nm (33 lbf/ft).
45.Release chains from engine lifting brackets and
remove hoist.
46.Connect oil cooler pipes to oil filter adaptor.
47.Fit vacuum hose to brake servo adaptor.
48.Secure fuel feed pipe in retaining clip on air
cleaner bracket.
49.Fit fuel lift pump pipes.
50.Connect feed and spill return pipes to injector
pump.
51.If fitted, reconnect hand throttle cable to
mounting bracket and injector pump.
52.Fit outer cable adjusting nut into injector pump
mounting bracket.
53.Fit inner throttle cable to injector pump and
secure with clevis and split pin.
54.Secure bleed hose in retaining clips on front
timing cover.
55.Fit bleed hose to thermostat housing.
56.Connect inlet and outlet hoses to power steering
pump.
57.Fit down pipe to exhaust manifold and secure
with 3 nuts.
58.Connect starter motor battery and fuse box
leads.
59.If fitted, connect EGR valve multi-plug and
vacuum pipe.
60.Secure breather pipe clip to cylinder head.
61.Connect engine harness multi-plug.
62.Fit heater plug feed wire.
63.Connect electrical feed plug at rear of cylinder
head.
64.Fit heater hoses to cylinder head and heater
rails.
65.Fit feed pipe/hose to turbo-charger and
intercooler.
66.Fit rocker cover insulation.
67.Fit radiator assembly.
See COOLING SYSTEM,
Repair, Radiator
If applicable, fit air
conditioning condenser, compressor pipes and
heater matrix hoses.
See AIR CONDITIONING,
Repair, Condenser
68.Fit bonnet.
69.Reconnect battery.CRANKSHAFT PULLEY
Service repair no - 12.21.01
Remove
1.Disconnect battery.
2.Drain coolant.
See COOLING SYSTEM,
Repair, Drain and refill cooling system
3.Remove top hose from radiator.
4.Remove intercooler to induction manifold hose.
5.Remove viscous coupling and fan.
See
COOLING SYSTEM, Repair, Viscous
coupling and fan
6.Remove fan cowl.See COOLING SYSTEM,
Repair, Fan cowl
7.Remove drive belt.See ELECTRICAL, Repair,
Auxiliary drive belt
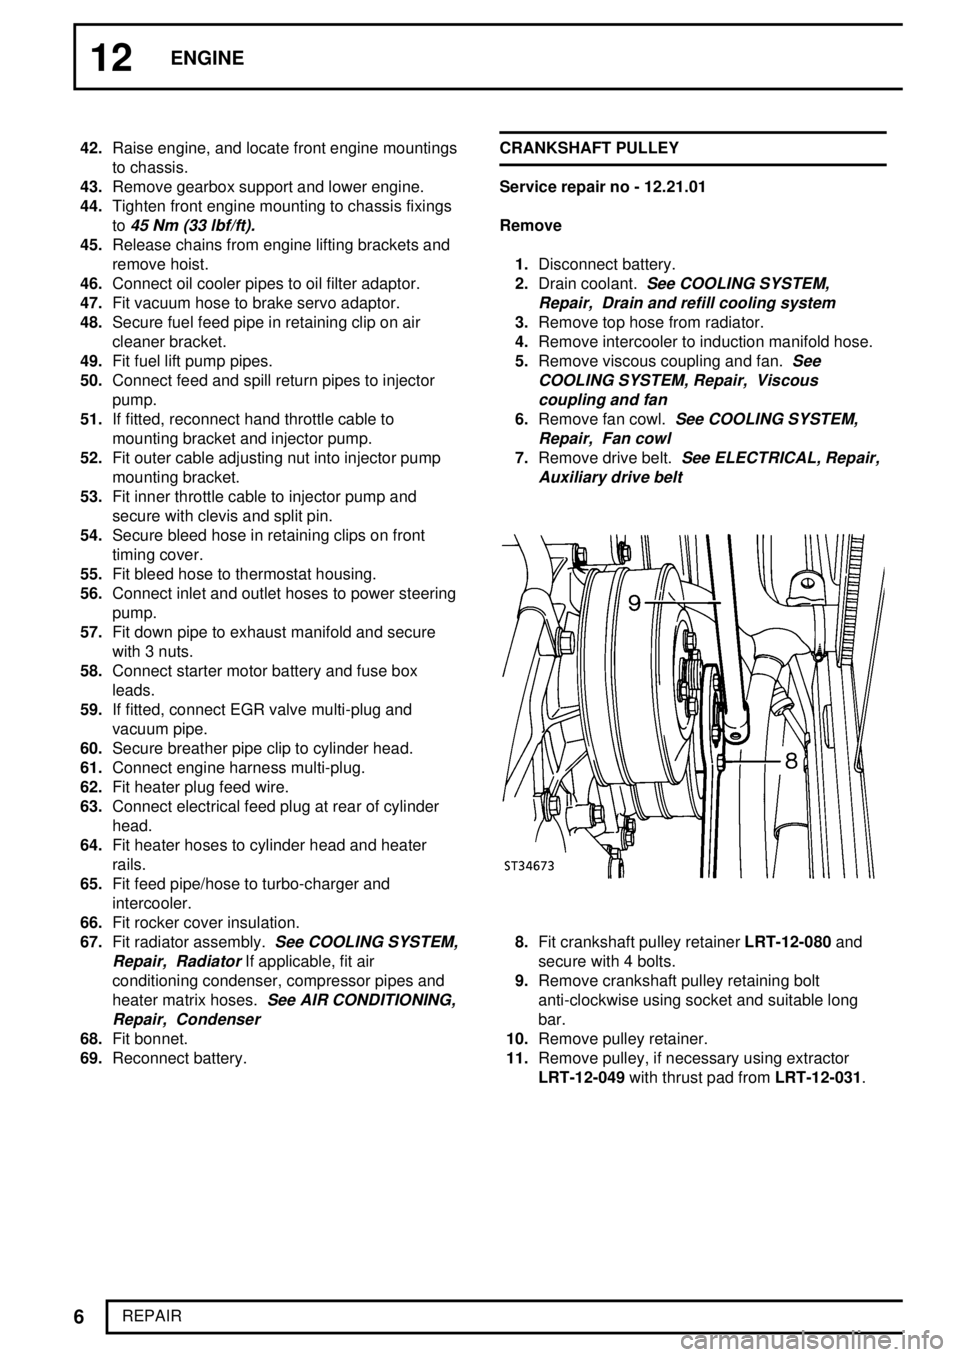
8.Fit crankshaft pulley retainerLRT-12-080and
secure with 4 bolts.
9.Remove crankshaft pulley retaining bolt
anti-clockwise using socket and suitable long
bar.
10.Remove pulley retainer.
11.Remove pulley, if necessary using extractor
LRT-12-049with thrust pad fromLRT-12-031.
Page 80 of 455
ENGINE
21
REPAIR 12.Remove induction manifold.
See MANIFOLD
AND EXHAUST SYSTEM, Repair, Induction
manifold
13.Remove exhaust manifold and turbocharger
assembly.
See MANIFOLD AND EXHAUST SYSTEM,
Repair, Exhaust manifold
14.Disconnect heater hose from water pump and
move heater rail aside.
15.Disconnect heater hose from rear of cylinder
head.
16.Remove bolt securing air cleaner mounting
bracket to support strut.
17.Remove bolt securing harness bracket to
cylinder head.
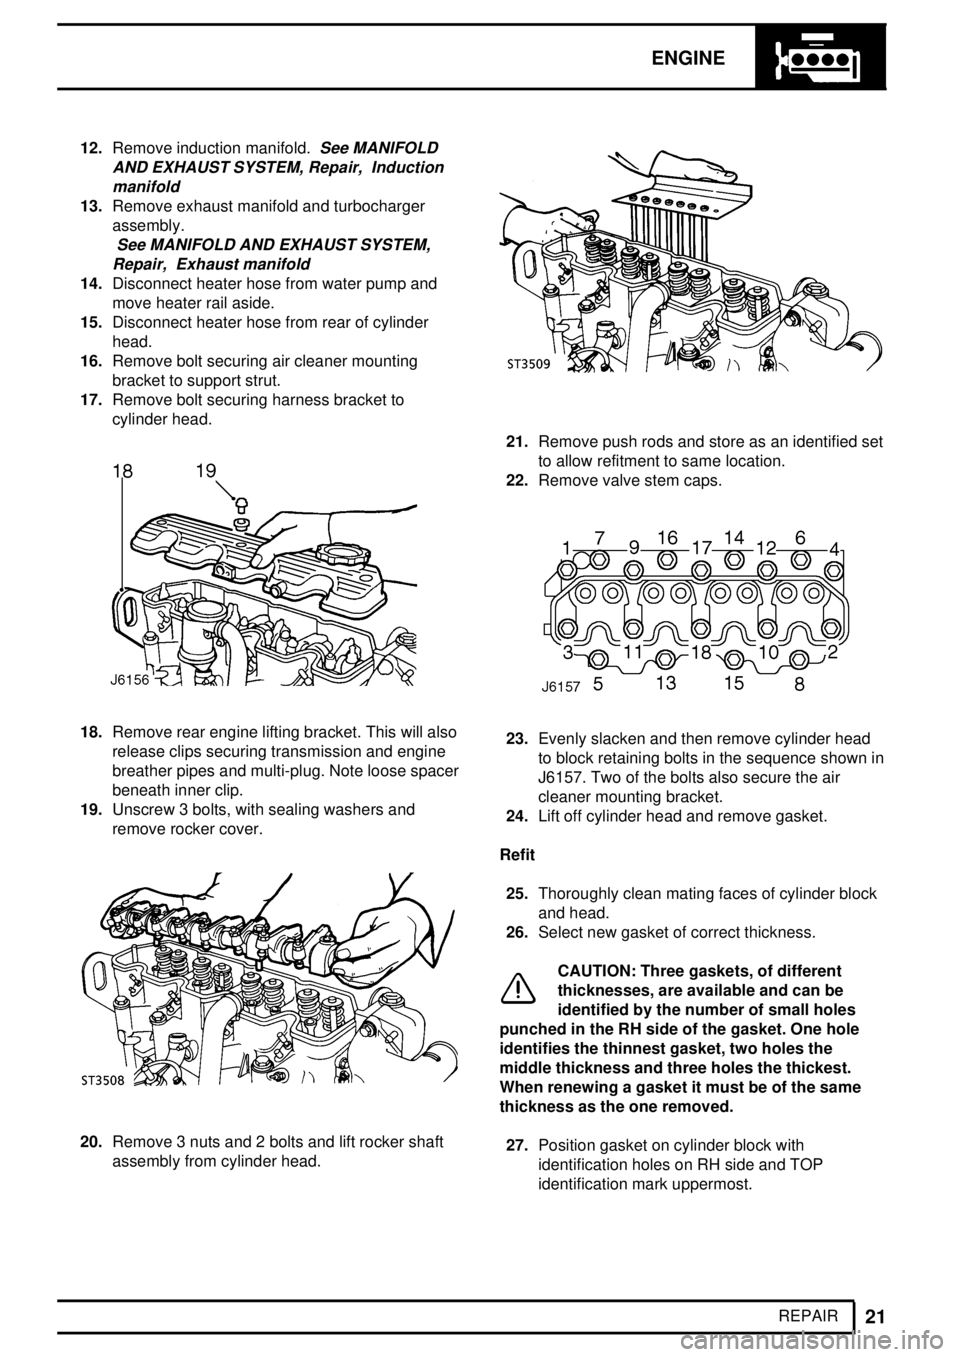
18.Remove rear engine lifting bracket. This will also
release clips securing transmission and engine
breather pipes and multi-plug. Note loose spacer
beneath inner clip.
19.Unscrew 3 bolts, with sealing washers and
remove rocker cover.
20.Remove 3 nuts and 2 bolts and lift rocker shaft
assembly from cylinder head.
21.Remove push rods and store as an identified set
to allow refitment to same location.
22.Remove valve stem caps.
23.Evenly slacken and then remove cylinder head
to block retaining bolts in the sequence shown in
J6157. Two of the bolts also secure the air
cleaner mounting bracket.
24.Lift off cylinder head and remove gasket.
Refit
25.Thoroughly clean mating faces of cylinder block
and head.
26.Select new gasket of correct thickness.
CAUTION: Three gaskets, of different
thicknesses, are available and can be
identified by the number of small holes
punched in the RH side of the gasket. One hole
identifies the thinnest gasket, two holes the
middle thickness and three holes the thickest.
When renewing a gasket it must be of the same
thickness as the one removed.
27.Position gasket on cylinder block with
identification holes on RH side and TOP
identification mark uppermost.
Page 82 of 455
ENGINE
23
REPAIR
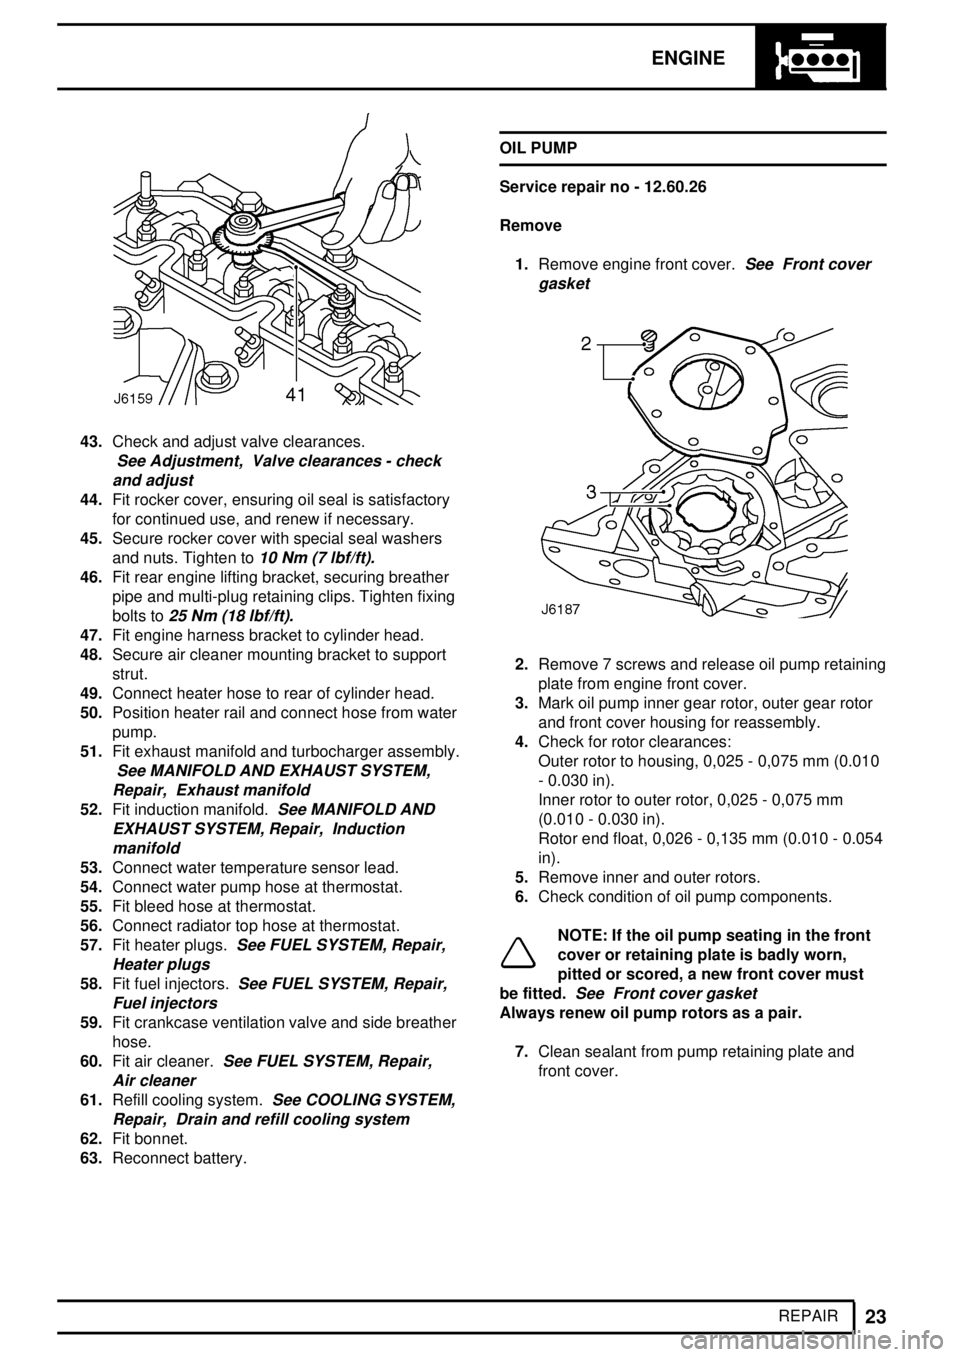
43.Check and adjust valve clearances.
See Adjustment, Valve clearances - check
and adjust
44.Fit rocker cover, ensuring oil seal is satisfactory
for continued use, and renew if necessary.
45.Secure rocker cover with special seal washers
and nuts. Tighten to
10 Nm (7 lbf/ft).
46.Fit rear engine lifting bracket, securing breather
pipe and multi-plug retaining clips. Tighten fixing
bolts to
25 Nm (18 lbf/ft).
47.Fit engine harness bracket to cylinder head.
48.Secure air cleaner mounting bracket to support
strut.
49.Connect heater hose to rear of cylinder head.
50.Position heater rail and connect hose from water
pump.
51.Fit exhaust manifold and turbocharger assembly.
See MANIFOLD AND EXHAUST SYSTEM,
Repair, Exhaust manifold
52.Fit induction manifold.See MANIFOLD AND
EXHAUST SYSTEM, Repair, Induction
manifold
53.Connect water temperature sensor lead.
54.Connect water pump hose at thermostat.
55.Fit bleed hose at thermostat.
56.Connect radiator top hose at thermostat.
57.Fit heater plugs.
See FUEL SYSTEM, Repair,
Heater plugs
58.Fit fuel injectors.See FUEL SYSTEM, Repair,
Fuel injectors
59.Fit crankcase ventilation valve and side breather
hose.
60.Fit air cleaner.
See FUEL SYSTEM, Repair,
Air cleaner
61.Refill cooling system.See COOLING SYSTEM,
Repair, Drain and refill cooling system
62.Fit bonnet.
63.Reconnect battery.OIL PUMP
Service repair no - 12.60.26
Remove
1.Remove engine front cover.
See Front cover
gasket
2.Remove 7 screws and release oil pump retaining
plate from engine front cover.
3.Mark oil pump inner gear rotor, outer gear rotor
and front cover housing for reassembly.
4.Check for rotor clearances:
Outer rotor to housing, 0,025 - 0,075 mm (0.010
- 0.030 in).
Inner rotor to outer rotor, 0,025 - 0,075 mm
(0.010 - 0.030 in).
Rotor end float, 0,026 - 0,135 mm (0.010 - 0.054
in).
5.Remove inner and outer rotors.
6.Check condition of oil pump components.
NOTE: If the oil pump seating in the front
cover or retaining plate is badly worn,
pitted or scored, a new front cover must
be fitted.
See Front cover gasket
Always renew oil pump rotors as a pair.
7.Clean sealant from pump retaining plate and
front cover.
Page 86 of 455
ENGINE
3
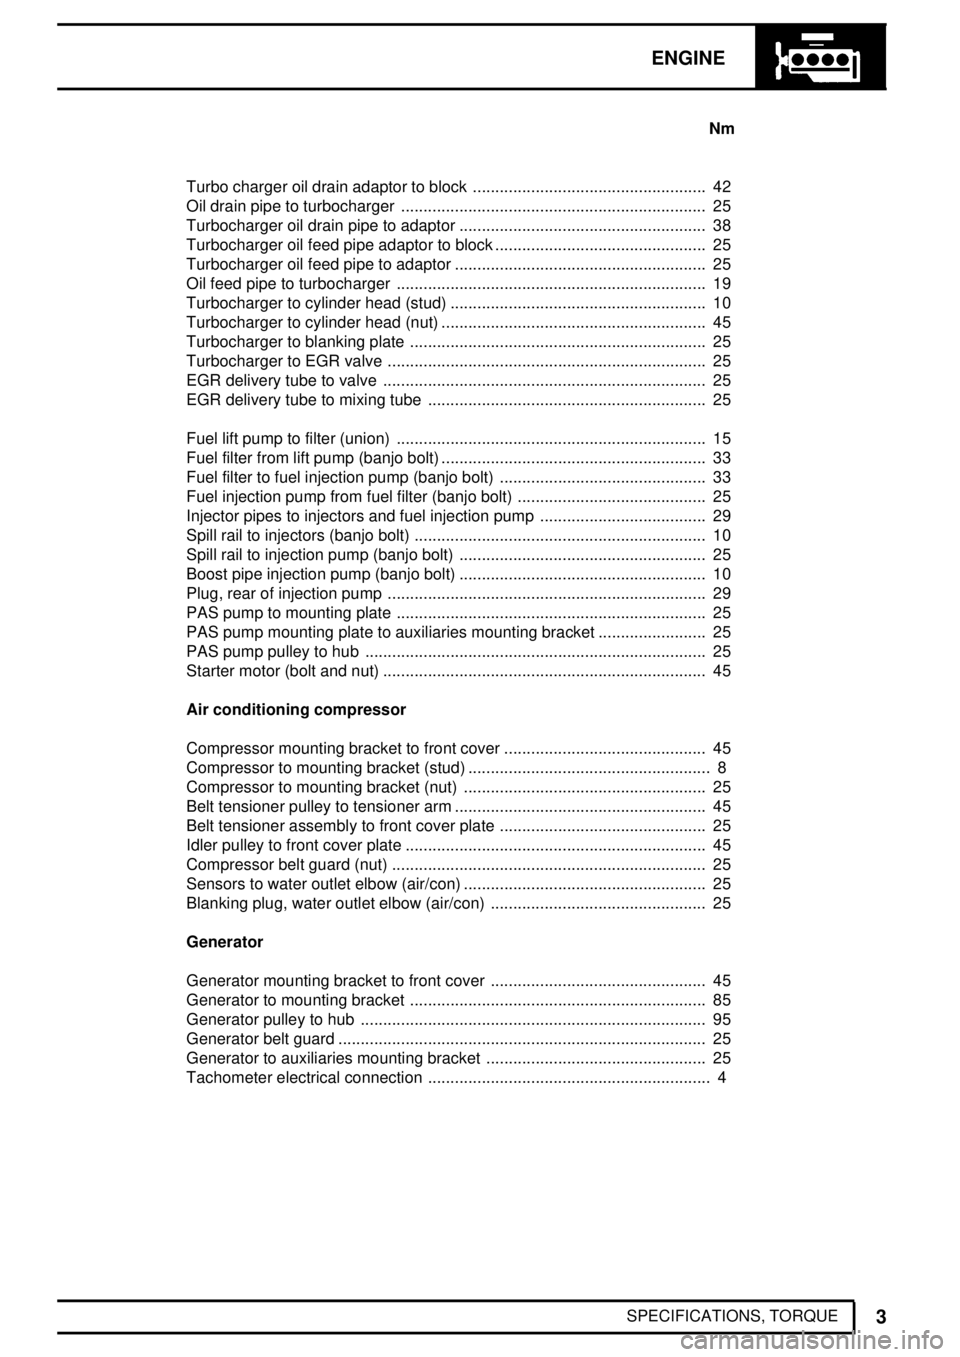
SPECIFICATIONS, TORQUENm
Turbo charger oil drain adaptor to block 42....................................................
Oil drain pipe to turbocharger 25....................................................................
Turbocharger oil drain pipe to adaptor 38.......................................................
Turbocharger oil feed pipe adaptor to block 25...............................................
Turbocharger oil feed pipe to adaptor 25........................................................
Oil feed pipe to turbocharger 19.....................................................................
Turbocharger to cylinder head (stud) 10.........................................................
Turbocharger to cylinder head (nut) 45...........................................................
Turbocharger to blanking plate 25..................................................................
Turbocharger to EGR valve 25.......................................................................
EGR delivery tube to valve 25........................................................................
EGR delivery tube to mixing tube 25..............................................................
Fuel lift pump to filter (union) 15.....................................................................
Fuel filter from lift pump (banjo bolt) 33...........................................................
Fuel filter to fuel injection pump (banjo bolt) 33..............................................
Fuel injection pump from fuel filter (banjo bolt) 25..........................................
Injector pipes to injectors and fuel injection pump 29.....................................
Spill rail to injectors (banjo bolt) 10.................................................................
Spill rail to injection pump (banjo bolt) 25.......................................................
Boost pipe injection pump (banjo bolt) 10.......................................................
Plug, rear of injection pump 29.......................................................................
PAS pump to mounting plate 25.....................................................................
PAS pump mounting plate to auxiliaries mounting bracket 25........................
PAS pump pulley to hub 25............................................................................
Starter motor (bolt and nut) 45........................................................................
Air conditioning compressor
Compressor mounting bracket to front cover 45.............................................
Compressor to mounting bracket (stud) 8......................................................
Compressor to mounting bracket (nut) 25......................................................
Belt tensioner pulley to tensioner arm 45........................................................
Belt tensioner assembly to front cover plate 25..............................................
Idler pulley to front cover plate 45...................................................................
Compressor belt guard (nut) 25......................................................................
Sensors to water outlet elbow (air/con) 25......................................................
Blanking plug, water outlet elbow (air/con) 25................................................
Generator
Generator mounting bracket to front cover 45................................................
Generator to mounting bracket 85..................................................................
Generator pulley to hub 95.............................................................................
Generator belt guard 25..................................................................................
Generator to auxiliaries mounting bracket 25.................................................
Tachometer electrical connection 4...............................................................