gearbox LAND ROVER DISCOVERY 1999 Workshop Manual
[x] Cancel search | Manufacturer: LAND ROVER, Model Year: 1999, Model line: DISCOVERY, Model: LAND ROVER DISCOVERY 1999Pages: 1529, PDF Size: 34.8 MB
Page 552 of 1529

TRANSFER BOX - LT230SE
REPAIRS 41-27
19. 03 Model Year onwards - if fitted: Release
and disconnect both differential lock warning
lamp switch multiplugs from main harness.
20.Remove cable tie and multi plug from bracket
on transfer box.
21.Release transfer box breather pipe from
bulkhead clip.
22.Remove 4 bolts from transfer box bottom plate,
position support plate LRT-99-010 to transfer
box and tighten bolts. 23.Position gearbox support jack and secure
support plate to jack using 4 bolts.
24.Remove 3 bolts securing transfer box to
gearbox.
25.Fit 3 guide studs LRT-41-009 through
transfer box bolt holes to support it during
removal.
26.Remove 2 bolts and nut securing transfer box
to gearbox.
CAUTION: If securing stud is removed
during this operation, it must be discarded
and a new stud fitted.
27.Position a jack to support gearbox and engine.
Page 553 of 1529

TRANSFER BOX - LT230SE
41-28 REPAIRS
28.Remove 4 bolts and nut, remove gearbox RH
mounting.
29.With assistance, remove transfer box from
gearbox.
30.Remove input shaft oil seal.
+ TRANSFER BOX - LT230SE,
REPAIRS, Oil seal - input shaft.
Refit
1.Fit new input shaft oil seal.
+ TRANSFER BOX - LT230SE,
REPAIRS, Oil seal - input shaft.
2.Clean transfer box to gearbox mating faces.
3.Raise transfer box on jack and align to guide
studs LRT-41-009.
4.Clean transfer box to gearbox bolt threads.
5.Apply sealant, Part No. STC 50552 to bolt and
stud threads.
6.Fit and lightly tighten 2 bolts and nut securing
transfer box to gearbox. If new stud is to be
fitted, apply sealant, Part No. STC 50552 to
stud threads and tighten to 45 Nm (33 lbf.ft).
7.Remove guide studs, fit and lightly tighten
remaining 3 bolts.
8.Tighten bolts and nut by diagonal selection to
45 Nm (33 lbf.ft).
9.Position gearbox RH mounting and tighten
bolts to 85 Nm (63 lbf.ft).
10.Tighten gearbox RH mounting nut to 48 Nm
(35 lbf.ft).
11.Remove 4 bolts securing support plate to
gearbox jack.
12.Remove 4 bolts securing support plate LRT-99-
010 to transfer box and remove plate.
13.Clean bottom plate bolt threads.
14.Apply sealant, Part No. STC 50552 to threads
of 4 bottom plate bolts.
15.Fit 4 bolts securing bottom plate to transfer box
and tighten to 25 Nm (18 lbf.ft).
16.Position breather pipe and secure to bulkhead
clip.
17.Connect multiplug to reverse light switch. 18. Up to 03 Model Year - if fitted : Connect
Lucars to differential lock switch and multiplugs
to high/low ratio switch and neutral sensor.
19. 03 Model Year onwards - if fitted: Connect
differential lock warning lamp multiplugs,
secure harness.
20.Position high/low ratio selector cable and
secure with clevis pin and 'C' clip.
21.Position differential lock selector cable to
differential lock selector cable abutment
bracket and tighten locknuts sufficiently to
retain cable.
22. If fitted: Fit differential lock selector cable to
transfer gearbox and secure with clevis pin.
23. If fitted: Adjust differential lock selector cable.
+ TRANSFER BOX - LT230SE,
ADJUSTMENTS, Cable - selector -
differential lock - adjust.
24. Models fitted with high/low shift interlock
solenoid: Position interlock solenoid harness
to high/low shift cable, fit sleeve around cable
and harness; secure sleeve.
25. Models fitted with high/low shift interlock
solenoid: Connect solenoid multiplug to main
harness and secure multiplug to bracket.
26.Clean handbrake and mating face.
27.Position handbrake back plate and tighten
bolts to 75 Nm (55 lbf.ft).
28.Clean handbrake drum.
29.Fit handbrake drum and tighten retaining
screw.
30.Fit front propeller shaft.
+ PROPELLER SHAFTS, REPAIRS,
Propeller shaft - front.
31.Fit rear propeller shaft.
+ PROPELLER SHAFTS, REPAIRS,
Propeller shaft - rear.
32.Clean exhaust silencer and mating face.
33.Position silencer, fit new gasket , connect
mounting rubbers and tighten nuts to 40 Nm
(30 lbf.ft).
34.Refill transfer box with oil.
+ MAINTENANCE, PROCEDURES,
Transfer box.
35.Fit front exhaust pipe.
+ MANIFOLDS AND EXHAUST
SYSTEMS - Td5, REPAIRS, Pipe - front.
Page 555 of 1529

TRANSFER BOX - LT230SE
41-30 REPAIRS
12. If fitted: Release and remove clevis pin
securing differential lock selector cable to
transfer gearbox.
13. If fitted: Loosen locknuts securing differential
lock selector cable to differential lock selector
cable abutment bracket.
14. If fitted: Release and remove differential lock
selector cable from differential lock selector
cable abutment bracket.
15.Remove clevis pin and 'C' clip securing high/
low ratio selector cable to selector lever and
release cable from abutment bracket.
16.Remove 2 cable ties securing cable to fuel
pipes. 17. If fitted: Disconnect 2 Lucars from oil
temperature sensor and disconnect reverse
lamp switch multiplug.
18.Remove banjo bolt securing breather pipe and
discard washers.
19. Up to 03 Model Year - if fitted: Disconnect 2
Lucars from differential lock switch and
multiplugs from high/low ratio switch and
neutral sensor.
20.Disconnect multiplug from reverse light switch.
Page 556 of 1529

TRANSFER BOX - LT230SE
REPAIRS 41-31
21. 03 Model Year onwards - if fitted: Release
and disconnect both differential lock warning
lamp switch multiplugs from main harness.
22.Remove 4 bolts from transfer box bottom plate,
position support plate LRT-99-010 to transfer
box and tighten bolts.
23.Position gearbox support jack and secure
support plate to jack using 4 bolts. 24.Remove 3 bolts securing transfer box to
gearbox.
25.Fit 3 guide studs LRT-41-009 through transfer
box bolt holes to support it during removal.
26.Remove 2 bolts and nut securing transfer box
to gearbox case.
CAUTION: If securing stud is removed
during this operation, it must be discarded
and a new stud fitted.
27.Position a jack to support gearbox and engine.
28.Remove 4 bolts and nut securing RH mounting
to body and transfer box.
29.Remove nut securing LH mounting to body.
30.Raise gearbox and remove RH mounting.
31.With assistance, remove transfer box from
gearbox.
32.Remove input shaft oil seal.
+ TRANSFER BOX - LT230SE,
REPAIRS, Oil seal - input shaft.
Page 557 of 1529

TRANSFER BOX - LT230SE
41-32 REPAIRS
Refit
1.Fit new input shaft oil seal.
+ TRANSFER BOX - LT230SE,
REPAIRS, Oil seal - input shaft.
2.Clean transfer box to gearbox mating faces.
3.Raise transfer box on jack and align to guide
studs LRT-41-009.
4.Clean transfer box to gearbox bolt threads.
5.Apply sealant, Part No. STC 50552 to bolt and
stud threads.
6.Fit and lightly tighten 2 bolts and nut securing
transfer box to gearbox. If new stud is to be
fitted, apply sealant, Part No. STC 50552 to
stud threads and tighten to 45 Nm (33 lbf.ft).
7.Remove guide studs, fit and lightly tighten 3
bolts.
8.Tighten bolts and nut by diagonal selection to
45 Nm (33 lbf.ft.
9.Position gearbox RH mounting and tighten
bolts to 85 Nm (63 lbf.ft).
10.Tighten gearbox RH mounting nut to 48 Nm
(35 lbf.ft).
11.Fit nut to LH mounting and tighten to 48 Nm (35
lbf.ft).
12.Remove 4 bolts securing support plate to
gearbox jack.
13.Remove 4 bolts securing support plate LRT-99-
010 to transfer box and remove plate.
14.Clean threads of bottom plate bolts.
15.Apply sealant, Part No. STC 50552 to threads
of 4 bottom plate bolts.
16.Fit 4 bolts securing bottom plate and tighten to
25 Nm (18 lbf.ft).
17.Using new washers position breather pipe and
tighten banjo bolt.
18.Connect multiplug to transfer box neutral switch
and secure harness.
19. Up to 03 Model Year - if fitted : Connect
Lucars to differential lock switch and multiplugs
to high/low ratio switch and neutral sensor.
20. 03 Model Year onwards - if fitted: Connect
differential lock warning lamp multiplugs,
secure harness.
21.Connect multiplug to reverse lamp switch.
22. If fitted: Connect Lucars to oil temperature
switch.
23.Position high/low ratio selector cable and
secure with 'C' clip and clevis pin.
24. If fitted: Position differential lock selector cable
to differential lock selector cable abutment
bracket and tighten locknuts sufficiently to
retain cable.
25. If fitted: Fit differential lock selector cable to
transfer gearbox and secure with clevis pin.
26. If fitted: Adjust differential lock selector cable.
+ TRANSFER BOX - LT230SE,
ADJUSTMENTS, Cable - selector -
differential lock - adjust.27. Models fitted with high/low shift interlock
solenoid: Position interlock solenoid harness
to high/low shift cable, fit sleeve around cable
and harness; secure sleeve.
28. Models fitted with high/low shift interlock
solenoid: Connect solenoid multiplug to main
harness and secure multiplug to bracket.
29.Secure cable to fuel pipes with new cable ties.
30.Clean handbrake back plate and mating face.
31.Position handbrake back plate, fit bolts and
tighten to 75 Nm (55 lbf.ft).
32.Clean handbrake drum.
33.Fit handbrake drum and tighten retaining
screw.
34.Fit front propeller shaft.
+ PROPELLER SHAFTS, REPAIRS,
Propeller shaft - front.
35.Fit rear propeller shaft.
+ PROPELLER SHAFTS, REPAIRS,
Propeller shaft - rear.
36.Clean exhaust silencer and tail pipe mating
faces.
37.Position silencer and secure on mountings,
using a new gasket align to tail pipe, fit nuts
and tighten to 25 Nm (18 lbf.ft).
38.Position rear cross member, fit bolts and
tighten to 26 Nm (19 lbf.ft).
39.Refill transfer box with oil.
+ MAINTENANCE, PROCEDURES,
Transfer box.
40.Fit front exhaust pipe.
+ MANIFOLDS AND EXHAUST
SYSTEMS - V8, REPAIRS, Front pipe.
Page 559 of 1529

TRANSFER BOX - LT230SE
41-34 REPAIRS
Switch - differential lock - Up to 03 MY
$% 41.20.34
Remove
1.Remove front propeller shaft.
+ PROPELLER SHAFTS, REPAIRS,
Propeller shaft - front.
2.Disconnect 2 Lucars from switch.
3.Remove switch and remove nut from switch.Refit
1.Clean switch and gearbox face.
2.Fit nut to switch with counterbore positioned
towards switch head. The nut acts as a spacer
to ensure that switch setting is correct.
Always ensure that nut is fully tightened to
switch head, (no gap).
3.Apply sealant, Part No. STC 50552 to switch
thread.
4.Position switch into front output housing until
nut bottoms out on housing.
5.Tighten nut securing differential lock switch to
11 Nm (8 lbf.ft)
6.Connect Lucars to switch.
7.Fit front propeller shaft.
+ PROPELLER SHAFTS, REPAIRS,
Propeller shaft - front.
Page 561 of 1529

TRANSFER BOX - LT230SE
41-36 REPAIRS
Oil seal - input shaft
$% 41.20.50
Remove
1.Remove transfer box.
+ TRANSFER BOX - LT230SE,
REPAIRS, Transfer box - V8.
+ TRANSFER BOX - LT230SE,
REPAIRS, Transfer box - Diesel.
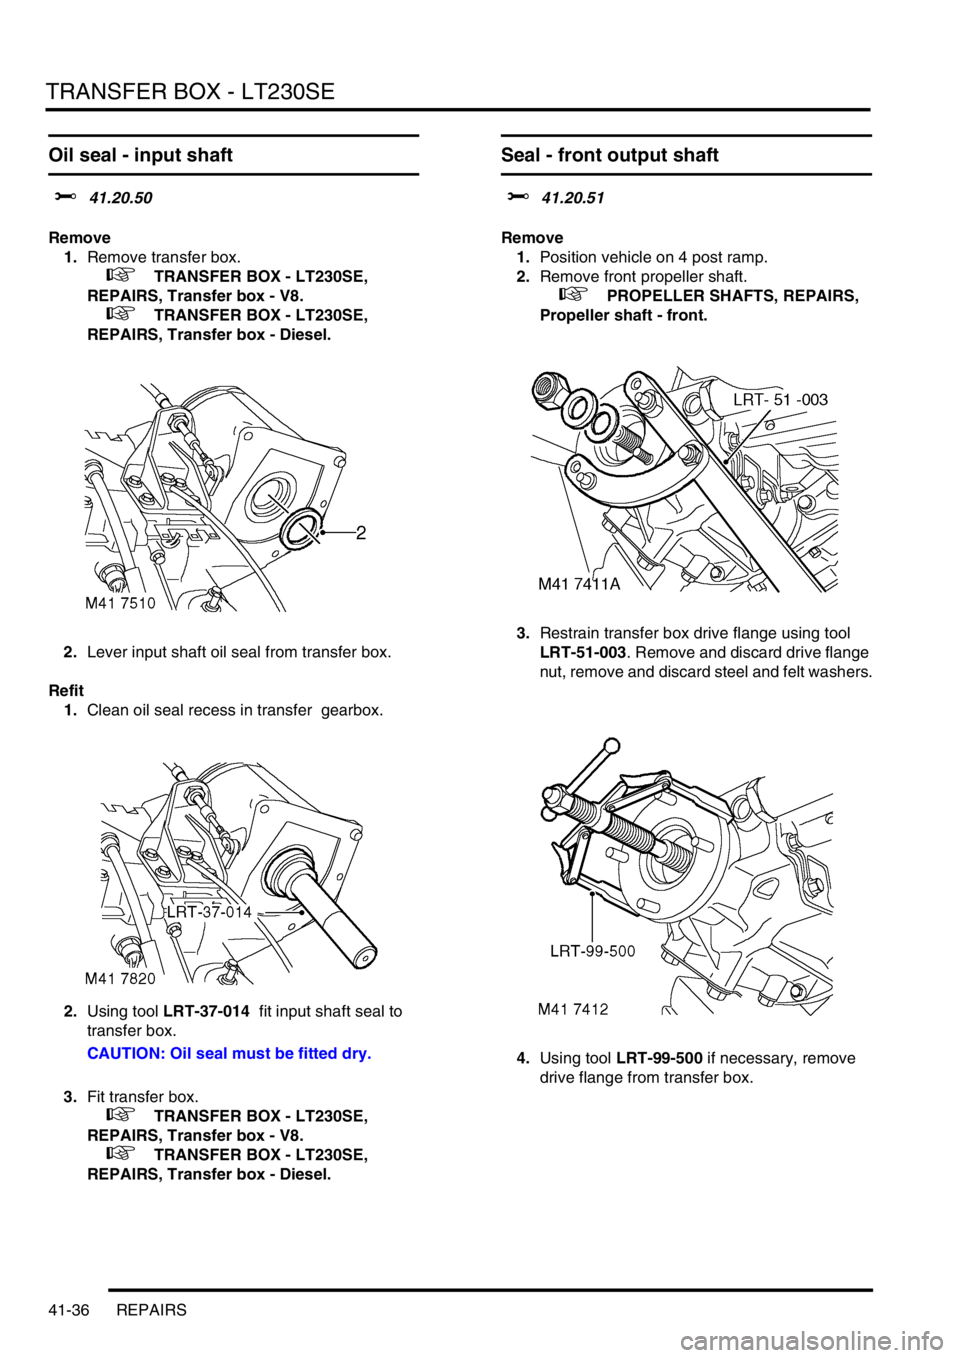
2.Lever input shaft oil seal from transfer box.
Refit
1.Clean oil seal recess in transfer gearbox.
2.Using tool LRT-37-014 fit input shaft seal to
transfer box.
CAUTION: Oil seal must be fitted dry.
3.Fit transfer box.
+ TRANSFER BOX - LT230SE,
REPAIRS, Transfer box - V8.
+ TRANSFER BOX - LT230SE,
REPAIRS, Transfer box - Diesel.
Seal - front output shaft
$% 41.20.51
Remove
1.Position vehicle on 4 post ramp.
2.Remove front propeller shaft.
+ PROPELLER SHAFTS, REPAIRS,
Propeller shaft - front.
3.Restrain transfer box drive flange using tool
LRT-51-003. Remove and discard drive flange
nut, remove and discard steel and felt washers.
4.Using tool LRT-99-500 if necessary, remove
drive flange from transfer box.
Page 564 of 1529

TRANSFER BOX - LT230SE
REPAIRS 41-39
Refit
1.Clean seal mating faces.
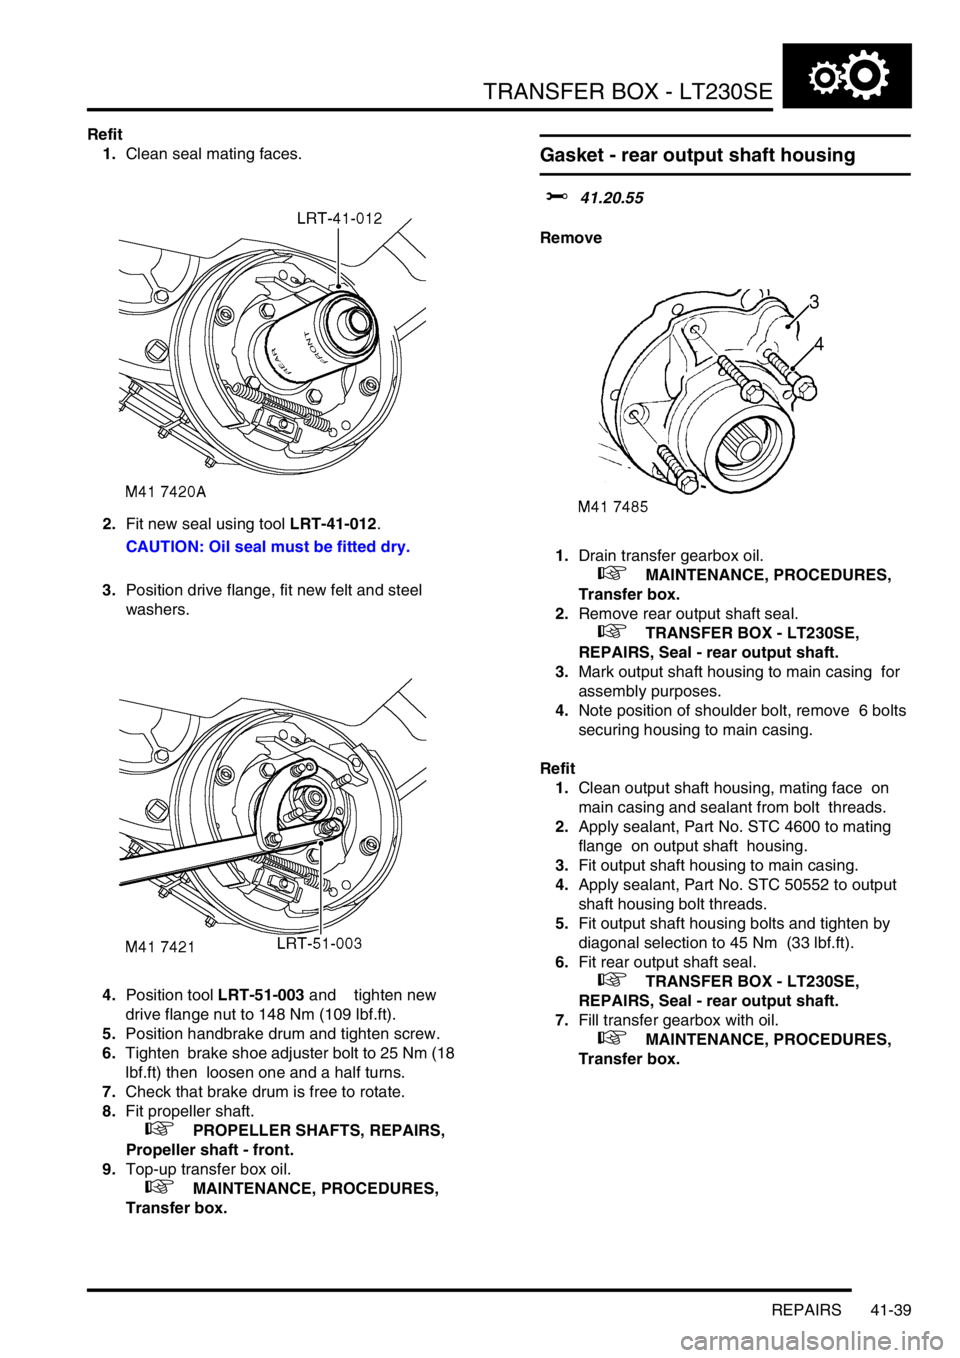
2.Fit new seal using tool LRT-41-012.
CAUTION: Oil seal must be fitted dry.
3.Position drive flange, fit new felt and steel
washers.
4.Position tool LRT-51-003 and tighten new
drive flange nut to 148 Nm (109 lbf.ft).
5.Position handbrake drum and tighten screw.
6.Tighten brake shoe adjuster bolt to 25 Nm (18
lbf.ft) then loosen one and a half turns.
7.Check that brake drum is free to rotate.
8.Fit propeller shaft.
+ PROPELLER SHAFTS, REPAIRS,
Propeller shaft - front.
9.Top-up transfer box oil.
+ MAINTENANCE, PROCEDURES,
Transfer box.
Gasket - rear output shaft housing
$% 41.20.55
Remove
1.Drain transfer gearbox oil.
+ MAINTENANCE, PROCEDURES,
Transfer box.
2.Remove rear output shaft seal.
+ TRANSFER BOX - LT230SE,
REPAIRS, Seal - rear output shaft.
3.Mark output shaft housing to main casing for
assembly purposes.
4.Note position of shoulder bolt, remove 6 bolts
securing housing to main casing.
Refit
1.Clean output shaft housing, mating face on
main casing and sealant from bolt threads.
2.Apply sealant, Part No. STC 4600 to mating
flange on output shaft housing.
3.Fit output shaft housing to main casing.
4.Apply sealant, Part No. STC 50552 to output
shaft housing bolt threads.
5.Fit output shaft housing bolts and tighten by
diagonal selection to 45 Nm (33 lbf.ft).
6.Fit rear output shaft seal.
+ TRANSFER BOX - LT230SE,
REPAIRS, Seal - rear output shaft.
7.Fill transfer gearbox with oil.
+ MAINTENANCE, PROCEDURES,
Transfer box.
Page 567 of 1529

TRANSFER BOX - LT230SE
41-42 REPAIRS
Switch - high low - warning
$% 41.30.05
Remove
1.Raise vehicle on a ramp.
2.Release switch multiplug from bracket on
transfer box and disconnect from harness.
3.Remove switch from transfer box and discard
sealing washer.
Refit
1.Ensure sealing washer, switch thread and
mating face on transfer box is clean.
2.Fit sealing washer to switch, fit and tighten
switch to transfer box to 25 Nm (18 lbf.ft) .
3.Connect multiplug to harness and fit multiplug
to bracket on transfer box.
4.Lower vehicle.
Switch(es) - differential lock warning
From 03 MY
$% 41.30.06
Remove
1.Remove front propeller shaft.
+ PROPELLER SHAFTS, REPAIRS,
Propeller shaft - front.
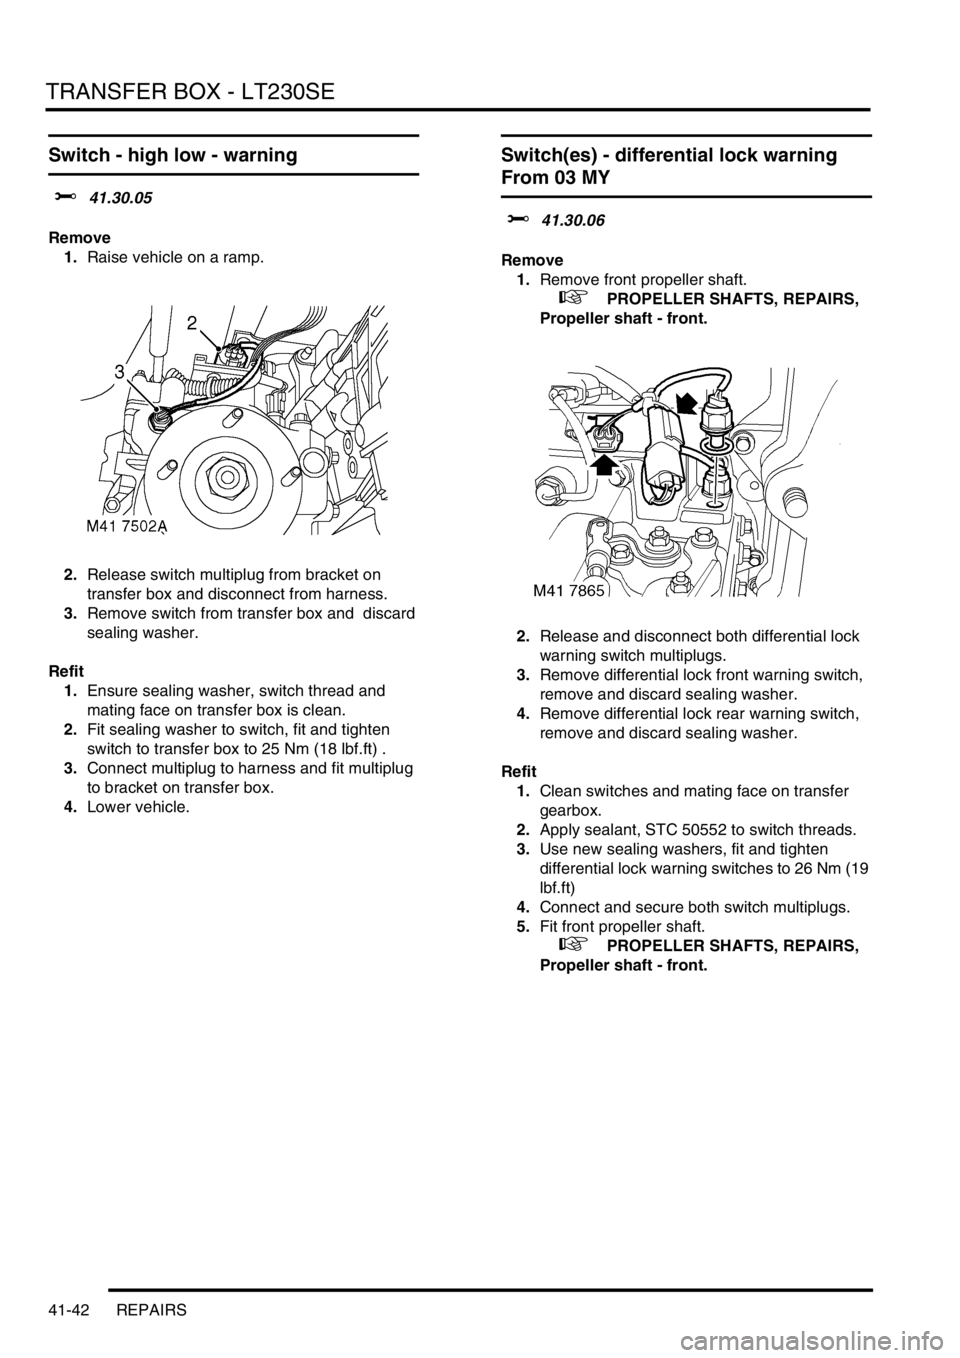
2.Release and disconnect both differential lock
warning switch multiplugs.
3.Remove differential lock front warning switch,
remove and discard sealing washer.
4.Remove differential lock rear warning switch,
remove and discard sealing washer.
Refit
1.Clean switches and mating face on transfer
gearbox.
2.Apply sealant, STC 50552 to switch threads.
3.Use new sealing washers, fit and tighten
differential lock warning switches to 26 Nm (19
lbf.ft)
4.Connect and secure both switch multiplugs.
5.Fit front propeller shaft.
+ PROPELLER SHAFTS, REPAIRS,
Propeller shaft - front.
Page 582 of 1529

TRANSFER BOX - LT230SE
OVERHAUL 41-57
Refit
1.Clean differential components. Remove all
traces of sealant from housings and bolts,
differential lock warning lamp switches and
detent plugs.
2.Lubricate components with gearbox oil.
3.Position differential in soft jawed vice and fit
front bearing using tool LRT-41-008. 4.Invert differential in soft jawed vice, and fit low
range gear with dog teeth facing uppermost.
5.Fit high/low hub ensuring that machined
groove on hub teeth faces towards low range
gear.
6.Fit high/low selector sleeve ensuring that
alignment marks on hub and sleeve are
together.
7.Fit bush to high range gear ensuring collar is
uppermost.
8.Fit high range gear and bush onto shaft.
9.Fit new rear bearing using tool LRT-41-008.