glove box LAND ROVER DISCOVERY 1999 User Guide
[x] Cancel search | Manufacturer: LAND ROVER, Model Year: 1999, Model line: DISCOVERY, Model: LAND ROVER DISCOVERY 1999Pages: 1529, PDF Size: 34.8 MB
Page 1173 of 1529
HEATING AND VENTILATION
80-16REPAIRS
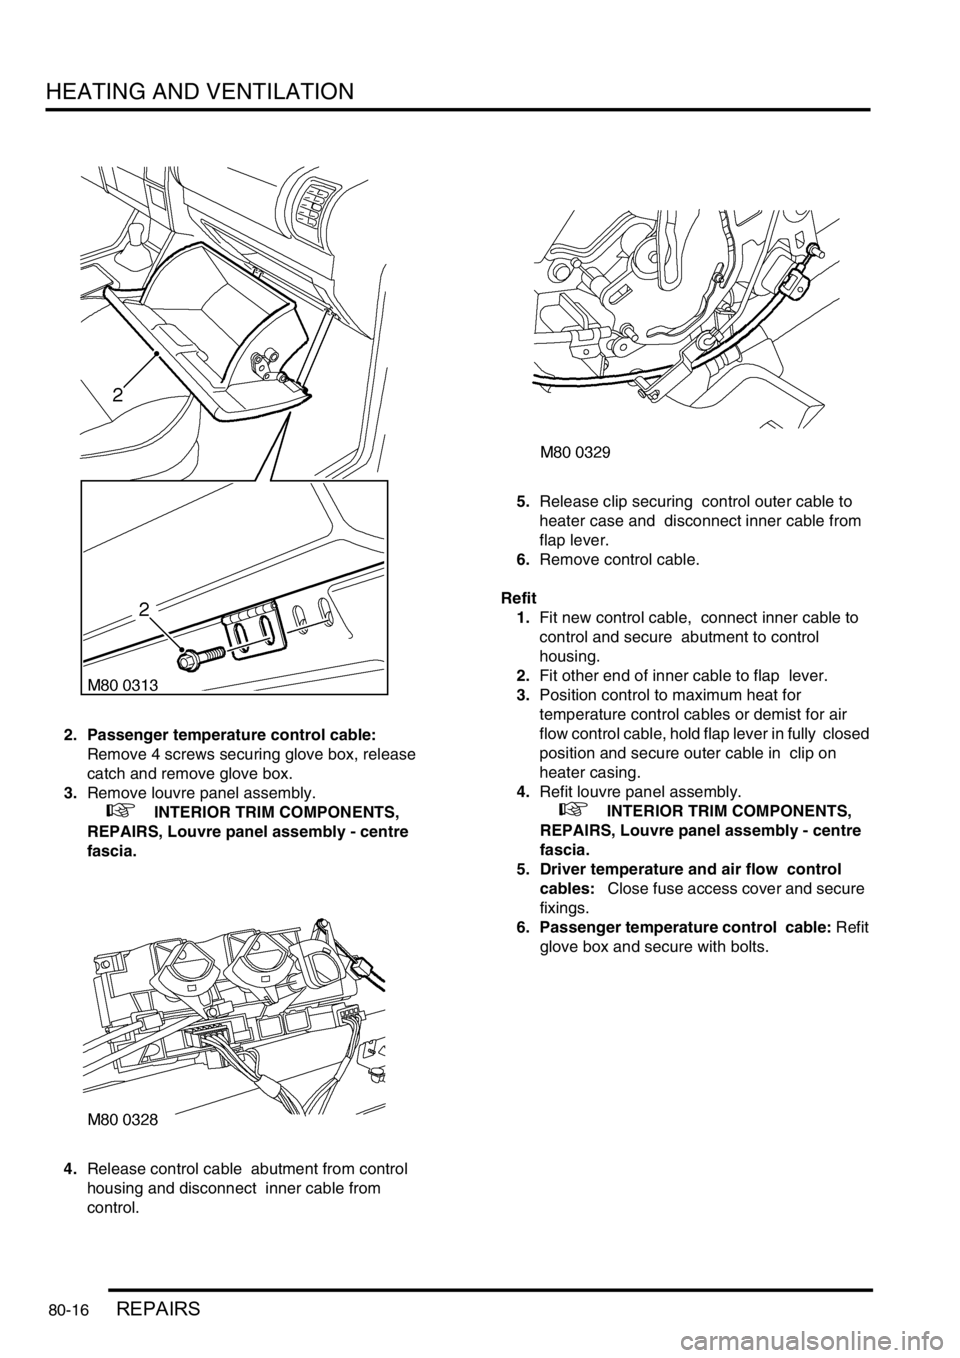
2. Passenger temperature control cable:
Remove 4 screws securing glove box, release
catch and remove glove box.
3.Remove louvre panel assembly.
+ INTERIOR TRIM COMPONENTS,
REPAIRS, Louvre panel assembly - centre
fascia.
4.Release control cable abutment from control
housing and disconnect inner cable from
control. 5.Release clip securing control outer cable to
heater case and disconnect inner cable from
flap lever.
6.Remove control cable.
Refit
1.Fit new control cable, connect inner cable to
control and secure abutment to control
housing.
2.Fit other end of inner cable to flap lever.
3.Position control to maximum heat for
temperature control cables or demist for air
flow control cable, hold flap lever in fully closed
position and secure outer cable in clip on
heater casing.
4.Refit louvre panel assembly.
+ INTERIOR TRIM COMPONENTS,
REPAIRS, Louvre panel assembly - centre
fascia.
5. Driver temperature and air flow control
cables: Close fuse access cover and secure
fixings.
6. Passenger temperature control cable: Refit
glove box and secure with bolts.
Page 1174 of 1529
HEATING AND VENTILATION
REPAIRS 80-17
Servo - recirculation flap
$% 80.10.18
Remove
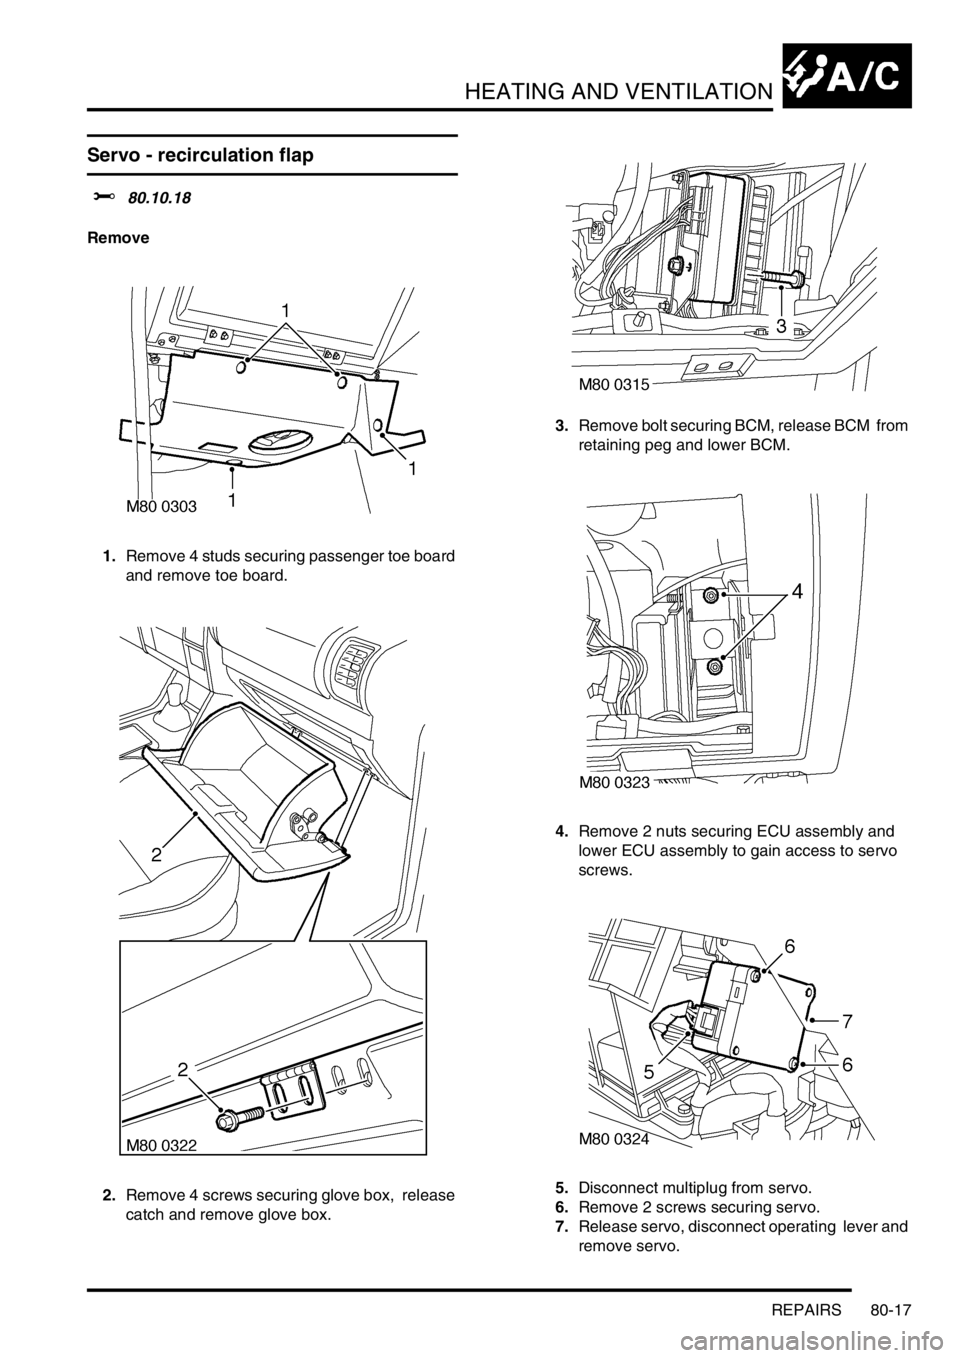
1.Remove 4 studs securing passenger toe board
and remove toe board.
2.Remove 4 screws securing glove box, release
catch and remove glove box. 3.Remove bolt securing BCM, release BCM from
retaining peg and lower BCM.
4.Remove 2 nuts securing ECU assembly and
lower ECU assembly to gain access to servo
screws.
5.Disconnect multiplug from servo.
6.Remove 2 screws securing servo.
7.Release servo, disconnect operating lever and
remove servo.
Page 1175 of 1529
HEATING AND VENTILATION
80-18REPAIRS
Refit
1.Position servo and connect operating lever.
2.Fit and tighten screws securing servo.
3.Connect multiplug to servo.
4.Position ECU assembly, fit and tighten nuts.
5.Position BCM, fit and tighten bolt.
6.Position toe board and secure with studs.
7.Position glove box, fit and tighten screws.
Switch - recirculation control
$% 80.10.21
Remove
1.Remove louvre panel assembly.
+ INTERIOR TRIM COMPONENTS,
REPAIRS, Louvre panel assembly - centre
fascia.
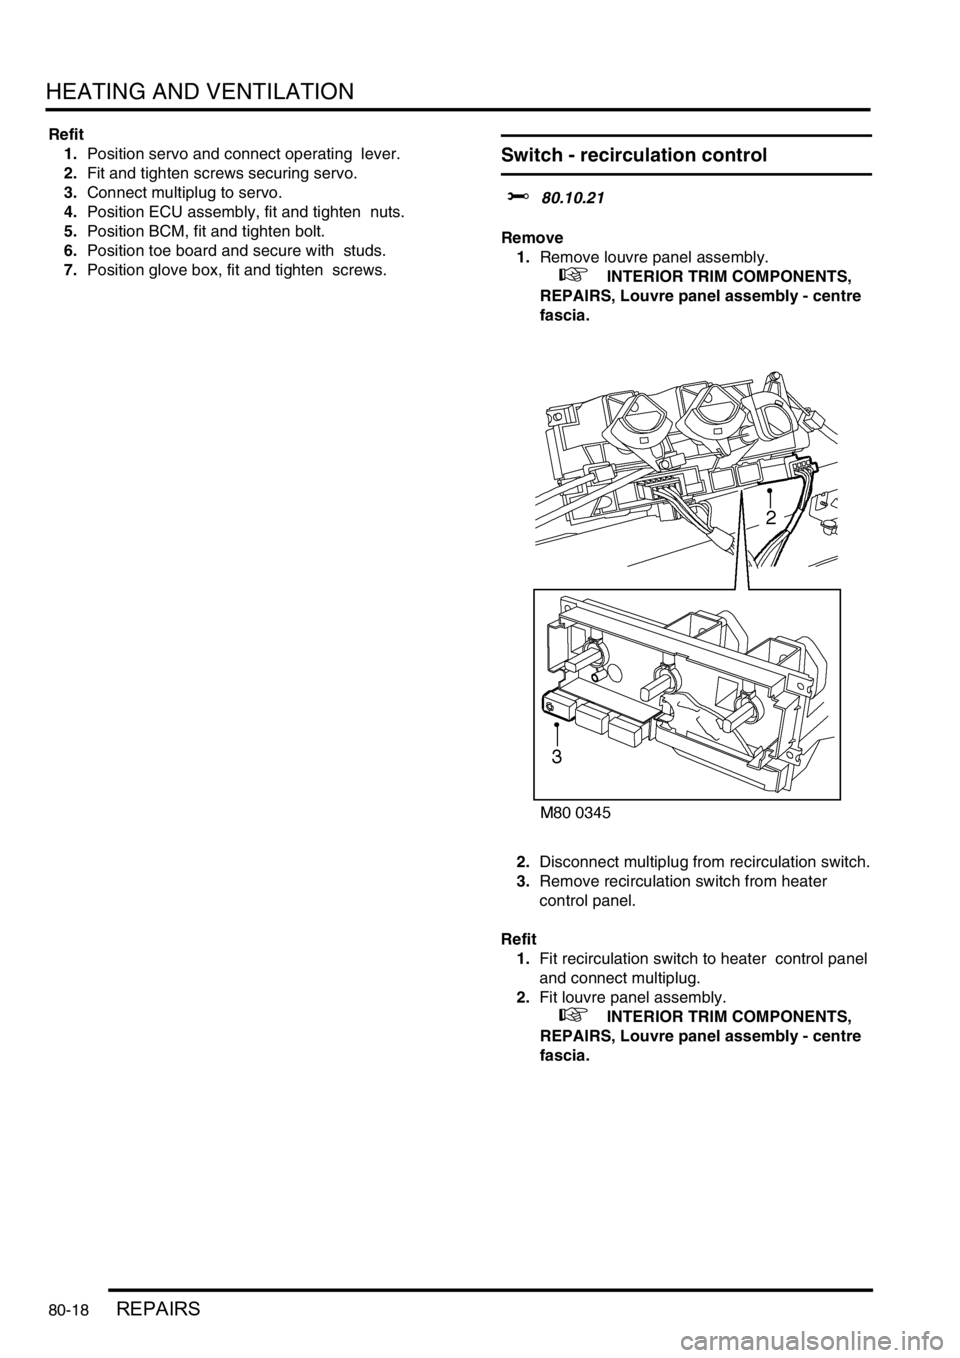
2.Disconnect multiplug from recirculation switch.
3.Remove recirculation switch from heater
control panel.
Refit
1.Fit recirculation switch to heater control panel
and connect multiplug.
2.Fit louvre panel assembly.
+ INTERIOR TRIM COMPONENTS,
REPAIRS, Louvre panel assembly - centre
fascia.
Page 1183 of 1529

HEATING AND VENTILATION
80-26REPAIRS
Blower assembly
$% 80.20.12
Remove
1.Remove 4 studs securing toe board and
remove toe board.
2.Remove 4 screws securing glove box, release
catch and remove glove box.
3.Disconnect battery earth lead.4.Disconnect multiplugs from blower motor.
5.Remove 8 bolts securing passenger side of
fascia panel.
6.Carefully ease fascia away from bulkhead
7.Remove 3 bolts securing blower motor support
bracket and remove bracket.
8.Remove 2 nuts securing motor assembly.
9.Release blower motor assembly from heater
and manoeuvre from under fascia.
Refit
1.Position blower motor assembly under fascia
and locate to heater casing.
2.Position support bracket, fit and tighten nuts
and bolts.
3.Align fascia, fit bolt to support bracket and
tighten to 26 Nm (19 lbf.ft).
4.Connect multiplugs to blower motor.
5.Connect battery earth lead.
6.Fit glove box, align hinges and tighten screws.
7.Position toe board and secure with studs.
Page 1184 of 1529

HEATING AND VENTILATION
REPAIRS 80-27
Motor - blower
$% 80.20.15
Remove
1.Remove 4 studs securing toe board and
remove toe board.
2.Remove 4 screws securing glove box, release
catch and remove glove box. 3.Remove screw securing harness to blower
motor and release harness.
4.Disconnect multiplug from blower motor.
5.Remove 3 screws securing blower motor to
casing and remove blower motor.
Refit
1.Position blower motor to casing and secure
with screws.
2.Connect multiplug to blower motor.
3.Position harness and secure clip with screw.
4.Fit glove box, align hinges and tighten screws.
5.Position toe board and secure with studs.
Page 1185 of 1529

HEATING AND VENTILATION
80-28REPAIRS
Resistor pack - power resistor A/C
$% 80.20.17
Remove
1.Remove 4 studs securing toe board and
remove toe board.
2.Remove 4 screws securing glove box, release
catch and remove glove box. 3.Disconnect multiplug from resistor.
4.Remove screws securing resistor, release and
remove resistor.
Refit
1.Position resistor and secure with screw.
2.Connect multiplug to resistor.
3.Position glove box, fit and tighten screws.
4.Position toe board and secure with studs.
Page 1243 of 1529

WIPERS AND WASHERS
84-8 DESCRIPTION AND OPERATION
Description
General
All markets have a common wiper system with headlamp powerwash as an option.
The wipers system comprises two front wipers and one rear wiper which are powered by electric motors. A washer
reservoir is located in the front left hand wheel arch and is fitted with two electric pumps. Each pump supplies washer
fluid to either the front or rear screens. On certain models, a third pump can be fitted to operate a headlamp power
wash function. Operation of the front and rear wipers and washers is controlled by the driver using switches located
on a steering column stalk and push button switches on the fascia.
Control of the wipers and washers is achieved by the following components:
lBCU.
lIDM.
lFront wiper relay.
lFront wash/ wipe switch.
lVariable delay switch.
lFront wiper motor assembly.
lFront washer pump motor.
lRear wiper relay.
lRear wiper switch.
lRear washer switch.
lRear wiper motor.
lRear washer pump motor.
Both the Body Control Unit (BCU) and the Intelligent Driver Module (IDM) control the wiper system. The BCU controls
the time delay function of the wiper system and is located below and behind the passenger glovebox. During engine
cranking the BCU prevents wiper functions. Two relays are located in the passenger compartment fusebox. The
relays control the delay operation of the front and rear wipers. The relays are an integral part of the fusebox and
cannot be renewed separately.
Power for the wiper system is supplied by the IDM, which is integral with the passenger fusebox and cannot be
renewed as a component. A serial communication link allows communication between the IDM and the BCU.
The system has diagnostic capabilities through TestBook.
Front wipers
The two front windscreen wipers are operated by a linkage assembly and an electric motor located under the plenum
grill below the windscreen. The linkage and motor assembly is handed for left and right hand drive vehicles. The motor
is an integral part of the linkage and cannot be replaced separately.
The linkage comprises a pressed steel mounting plate which provides for the attachment of a wheel box at each end.
The mounting plate is secured to the bulkhead with flanged nuts which attach to a stud plate located behind the
bulkhead. A link arm is attached to each wheel box by a short link and secured with circlips. The link arm has an
attachment hole centrally located along its length for the electric motor drive link.
The electric motor is mounted in a recess in the bulkhead below a sealed cover plate. The drive spindle of the motor
protrudes through the cover plate and is fitted with a link. The link is attached to a tapered spline on the motor spindle
and is secured with a lock washer and nut. The opposite end of the link is attached to the central attachment point on
the link arm and secured with a circlip.
Each wheel box has a taper splined shaft which allows for the attachment of the wiper arm which is secured with a
washer and nut. The shaft of each wheel box is passed through a rubber sealed aperture in the plenum. The wiper
arm attachment to the splined shaft has a pivot to which the remainder of the arm is attached. The two parts of the
arm are connected by a spring which controls the pressure of the blade on the screen to a predetermined amount.
The wiper blades are attached to the wiper arms with a clips that allow the blade to pivot. Each wiper blade comprises
a number of levers and yokes to which the rubber wiper is attached. The levers and yokes ensure that the pressure
applied by the arm spring is distributed evenly along the full length of the blade. The rubber wiper is held in the yokes
by a pair of stainless steel strips which also contribute to the even distribution of spring pressure along the blade. The
driver's side wiper blade is fitted with an aerofoil which presses the blade onto the screen at high speed. This prevents
the blade from lifting off the screen and maintains the wiping performance.
Page 1288 of 1529

BODY CONTROL UNIT
DESCRIPTION AND OPERATION 86-3-1
BODY CONTROL UNIT DESCRIPTION AND OPERAT ION
Description
General
The Body Control Unit (BCU) is located behind the passenger glovebox and is connected to the main harness by four
connectors on its bottom edge and an additional connector located on the side of the BCU casing. Mounting the BCU
behind the fascia makes it reasonably inaccessible for intruders to disable the anti-theft system.
The BCU uses solid-state microprocessor control to perform logical operations and timing functions for a variety of
the vehicle's electrically operated systems, these include:
lDoor locking.
lAnti-theft alarm and immobilisation system.
lExterior lighting including direction indicators and hazard warning lamps.
lCourtesy lighting.
lWipers and washers.
lElectric windows and sunroof.
lHeated windows.
The BCU also communicates with several other electronically controlled systems such as the EAT ECU and SLABS
ECU and also has a datalink between the Intelligent Driver Module (IDM) and the instrument pack. The datalink is a
low speed bus capable of transmitting and receiving messages at a data rate of 10,400 bits per second. Additional
inputs and outputs to peripheral devices are included which are necessary for determining vehicle status for particular
logical operations e.g. crank, ignition key inserted, fuel flap enable etc.
The BCU receives its power supply from the engine compartment fuse box, and is protected by a 10 A fuse.
The BCU communicates with the IDM to provide the control signals to perform power switching operations in
conjunction with dedicated relays.
IDM
The IDM is integrated into the passenger compartment fuse box, which is mounted behind the fascia below the
steering column. There are no harnesses between the fuse box and the IDM. The IDM performs the power switching
operations for several of the vehicle's electrical systems.
The IDM communicates with the BCU and the instrument pack via a serial interface. If the BCU or the IDM is replaced,
the communications link between the two units has to be re-established. This can be done either by switching on the
ignition and leaving it on for five minutes, or by using TestBook. The vehicle immobilisation will remain active until the
communications link between the BCU and IDM has been re-established.
Transit mode
To prevent excessive battery drain during transit to overseas markets, the vehicle is placed in a transit mode. The
following functions are disabled when the vehicle is in transit mode:
lVolumetric sensors.
lPassive immobilisation.
lImmobilisation of the vehicle by use of door lock.
lIgnition key interlock.
lElectric seat enable time-out with driver's door open.
Page 1322 of 1529
BODY CONTROL UNIT
REPAIRS 86-3-35
REPAIRS
Body control unit (BCU)
$% 86.55.75
Remove
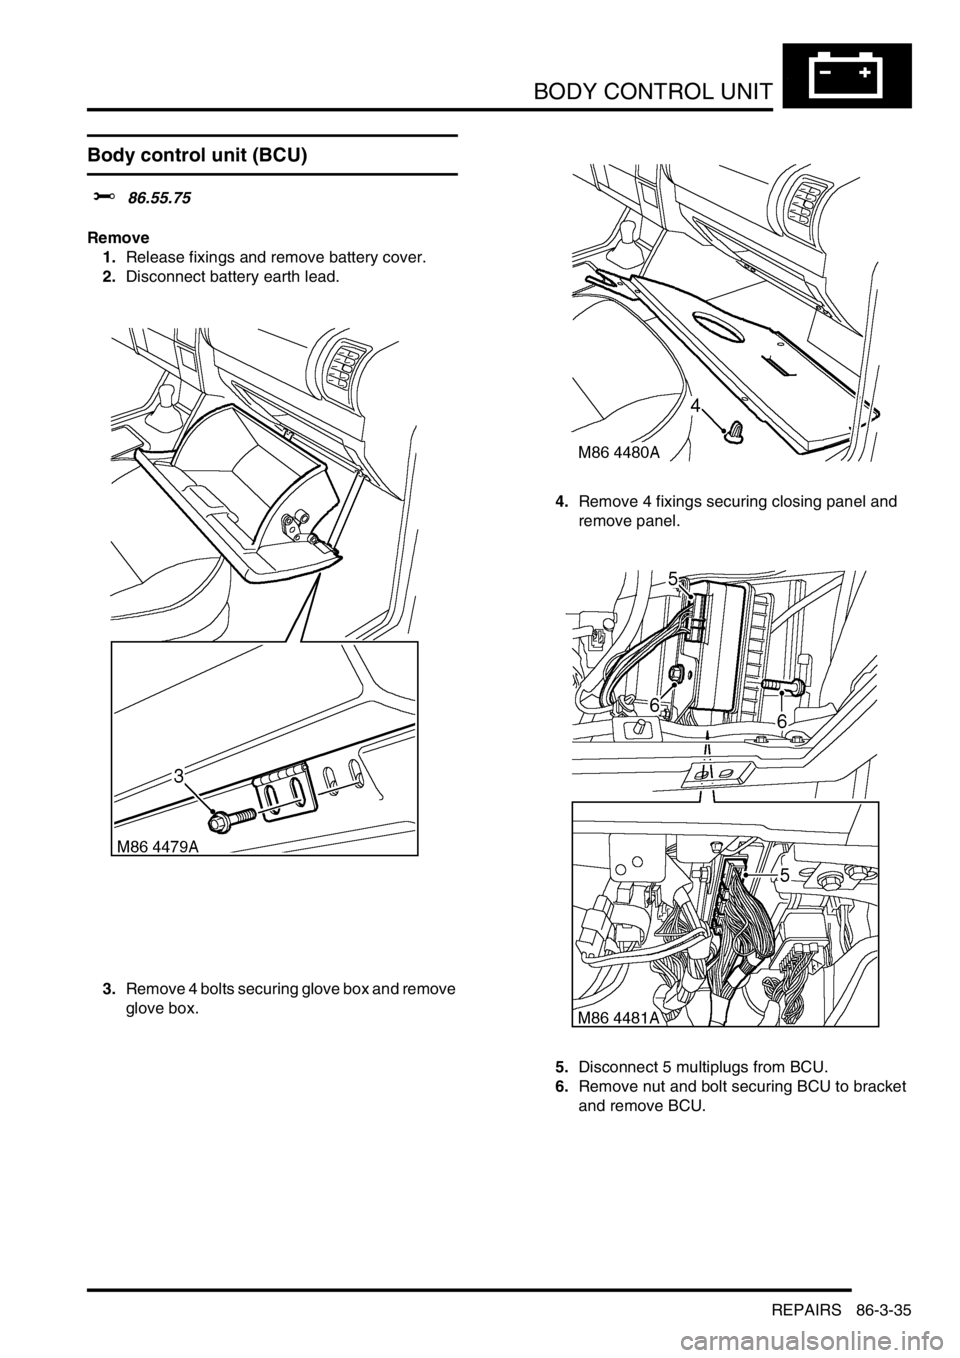
1.Release fixings and remove battery cover.
2.Disconnect battery earth lead.
3.Remove 4 bolts securing glove box and remove
glove box. 4.Remove 4 fixings securing closing panel and
remove panel.
5.Disconnect 5 multiplugs from BCU.
6.Remove nut and bolt securing BCU to bracket
and remove BCU.
Page 1323 of 1529
BODY CONTROL UNIT
86-3-36 REPAIRS
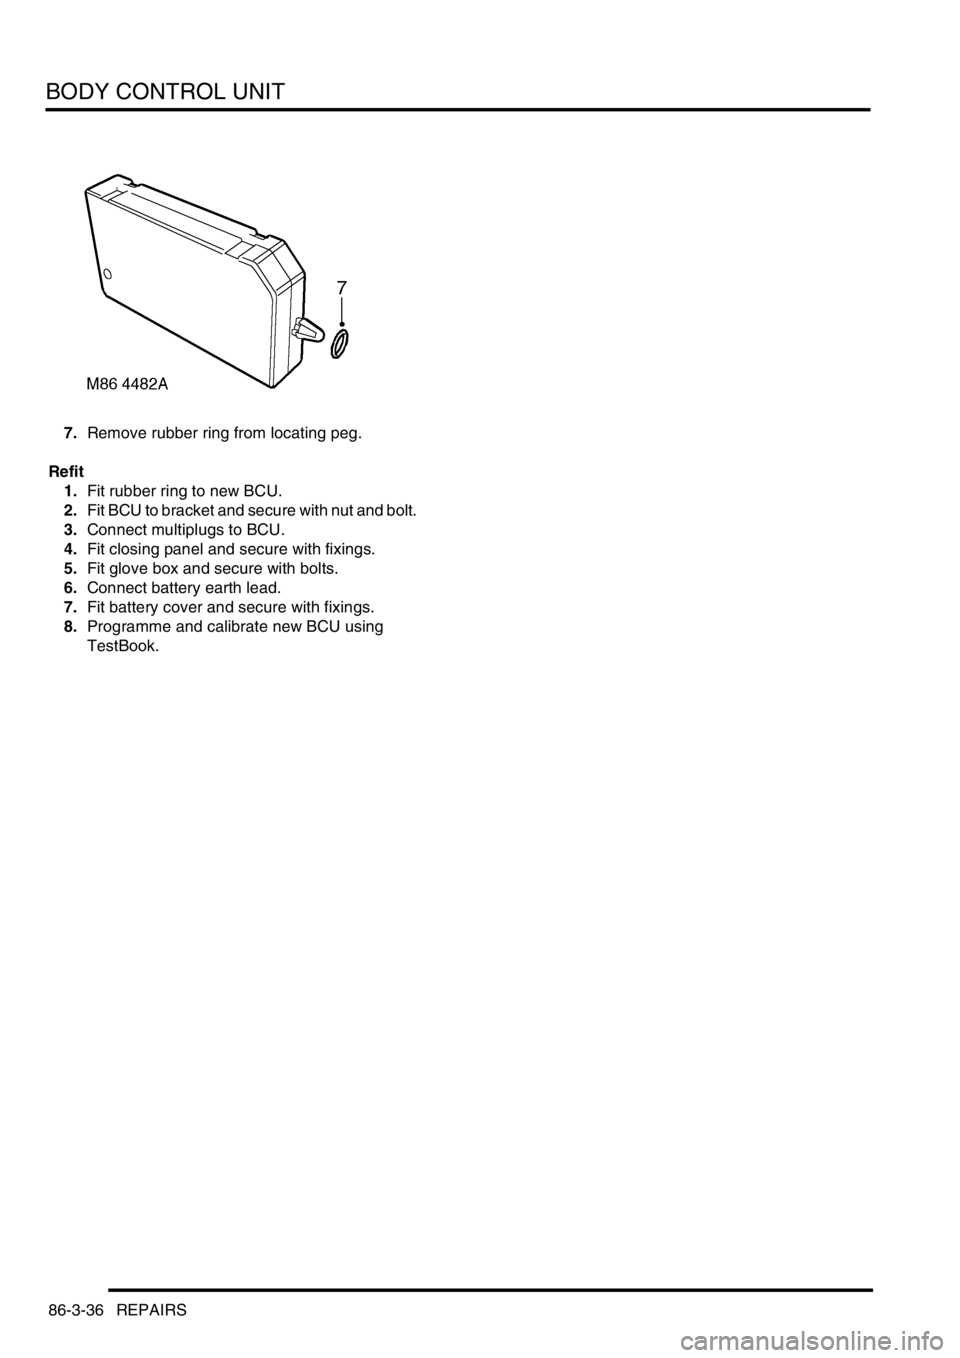
7.Remove rubber ring from locating peg.
Refit
1.Fit rubber ring to new BCU.
2.Fit BCU to bracket and secure with nut and bolt.
3.Connect multiplugs to BCU.
4.Fit closing panel and secure with fixings.
5.Fit glove box and secure with bolts.
6.Connect battery earth lead.
7.Fit battery cover and secure with fixings.
8.Programme and calibrate new BCU using
TestBook.