check engine light LAND ROVER FREELANDER 2001 User Guide
[x] Cancel search | Manufacturer: LAND ROVER, Model Year: 2001, Model line: FREELANDER, Model: LAND ROVER FREELANDER 2001Pages: 1007, PDF Size: 23.47 MB
Page 266 of 1007
ENGINE - K SERIES KV6
OVERHAUL 12-3-89
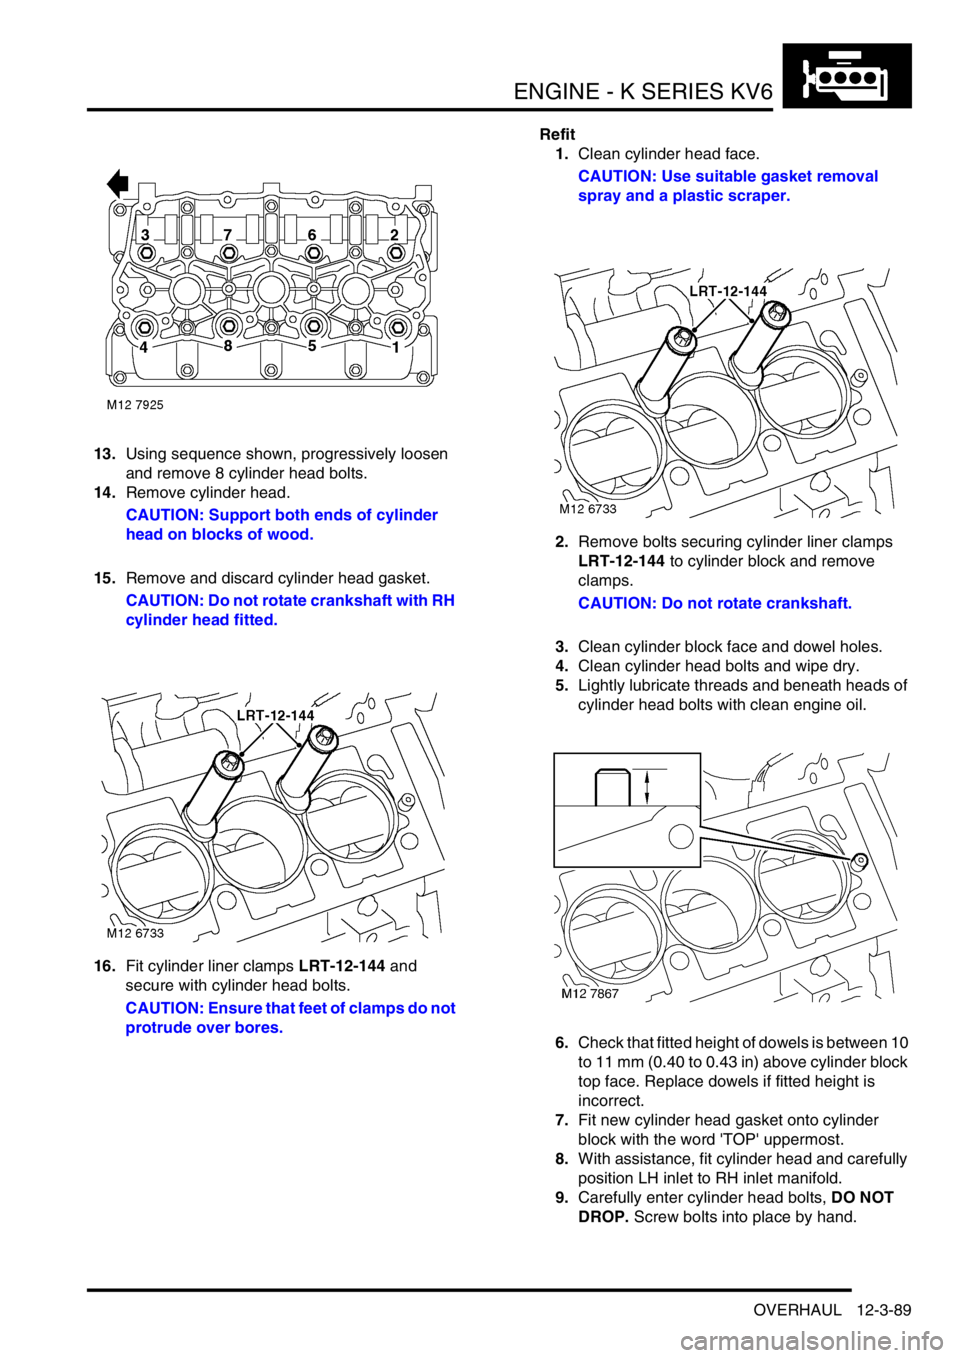
13.Using sequence shown, progressively loosen
and remove 8 cylinder head bolts.
14.Remove cylinder head.
CAUTION: Support both ends of cylinder
head on blocks of wood.
15.Remove and discard cylinder head gasket.
CAUTION: Do not rotate crankshaft with RH
cylinder head fitted.
16.Fit cylinder liner clamps LRT-12-144 and
secure with cylinder head bolts.
CAUTION: Ensure that feet of clamps do not
protrude over bores.Refit
1.Clean cylinder head face.
CAUTION: Use suitable gasket removal
spray and a plastic scraper.
2.Remove bolts securing cylinder liner clamps
LRT-12-144 to cylinder block and remove
clamps.
CAUTION: Do not rotate crankshaft.
3.Clean cylinder block face and dowel holes.
4.Clean cylinder head bolts and wipe dry.
5.Lightly lubricate threads and beneath heads of
cylinder head bolts with clean engine oil.
6.Check that fitted height of dowels is between 10
to 11 mm (0.40 to 0.43 in) above cylinder block
top face. Replace dowels if fitted height is
incorrect.
7.Fit new cylinder head gasket onto cylinder
block with the word 'TOP' uppermost.
8.With assistance, fit cylinder head and carefully
position LH inlet to RH inlet manifold.
9.Carefully enter cylinder head bolts, DO NOT
DROP. Screw bolts into place by hand.
Page 270 of 1007
ENGINE - K SERIES KV6
OVERHAUL 12-3-93
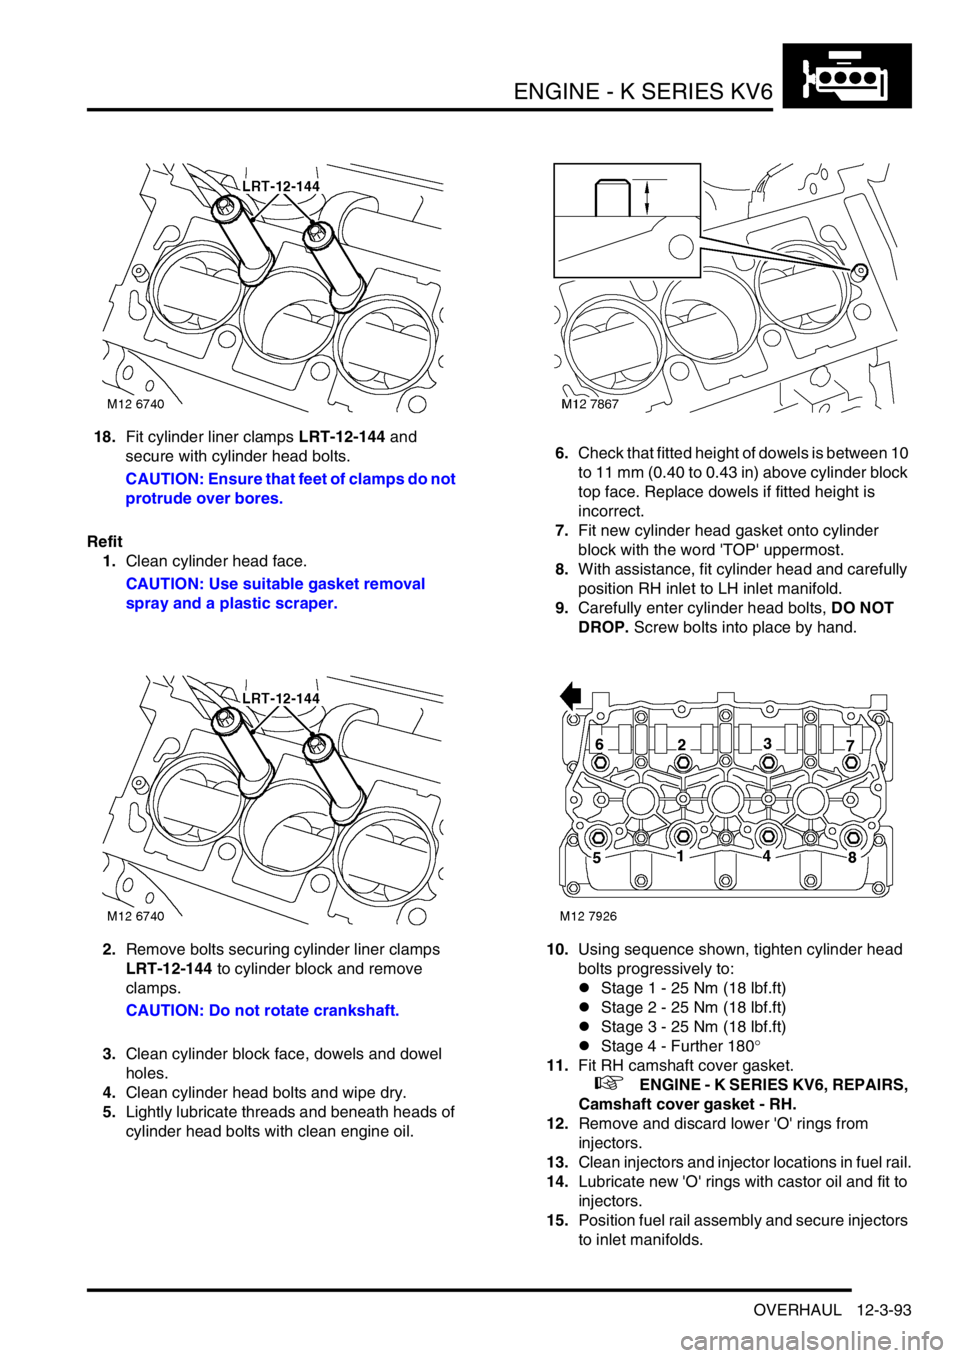
18.Fit cylinder liner clamps LRT-12-144 and
secure with cylinder head bolts.
CAUTION: Ensure that feet of clamps do not
protrude over bores.
Refit
1.Clean cylinder head face.
CAUTION: Use suitable gasket removal
spray and a plastic scraper.
2.Remove bolts securing cylinder liner clamps
LRT-12-144 to cylinder block and remove
clamps.
CAUTION: Do not rotate crankshaft.
3.Clean cylinder block face, dowels and dowel
holes.
4.Clean cylinder head bolts and wipe dry.
5.Lightly lubricate threads and beneath heads of
cylinder head bolts with clean engine oil.6.Check that fitted height of dowels is between 10
to 11 mm (0.40 to 0.43 in) above cylinder block
top face. Replace dowels if fitted height is
incorrect.
7.Fit new cylinder head gasket onto cylinder
block with the word 'TOP' uppermost.
8.With assistance, fit cylinder head and carefully
position RH inlet to LH inlet manifold.
9.Carefully enter cylinder head bolts, DO NOT
DROP. Screw bolts into place by hand.
10.Using sequence shown, tighten cylinder head
bolts progressively to:
lStage 1 - 25 Nm (18 lbf.ft)
lStage 2 - 25 Nm (18 lbf.ft)
lStage 3 - 25 Nm (18 lbf.ft)
lStage 4 - Further 180°
11.Fit RH camshaft cover gasket.
+ ENGINE - K SERIES KV6, REPAIRS,
Camshaft cover gasket - RH.
12.Remove and discard lower 'O' rings from
injectors.
13.Clean injectors and injector locations in fuel rail.
14.Lubricate new 'O' rings with castor oil and fit to
injectors.
15.Position fuel rail assembly and secure injectors
to inlet manifolds.
Page 282 of 1007
ENGINE - K SERIES KV6
OVERHAUL 12-3-105
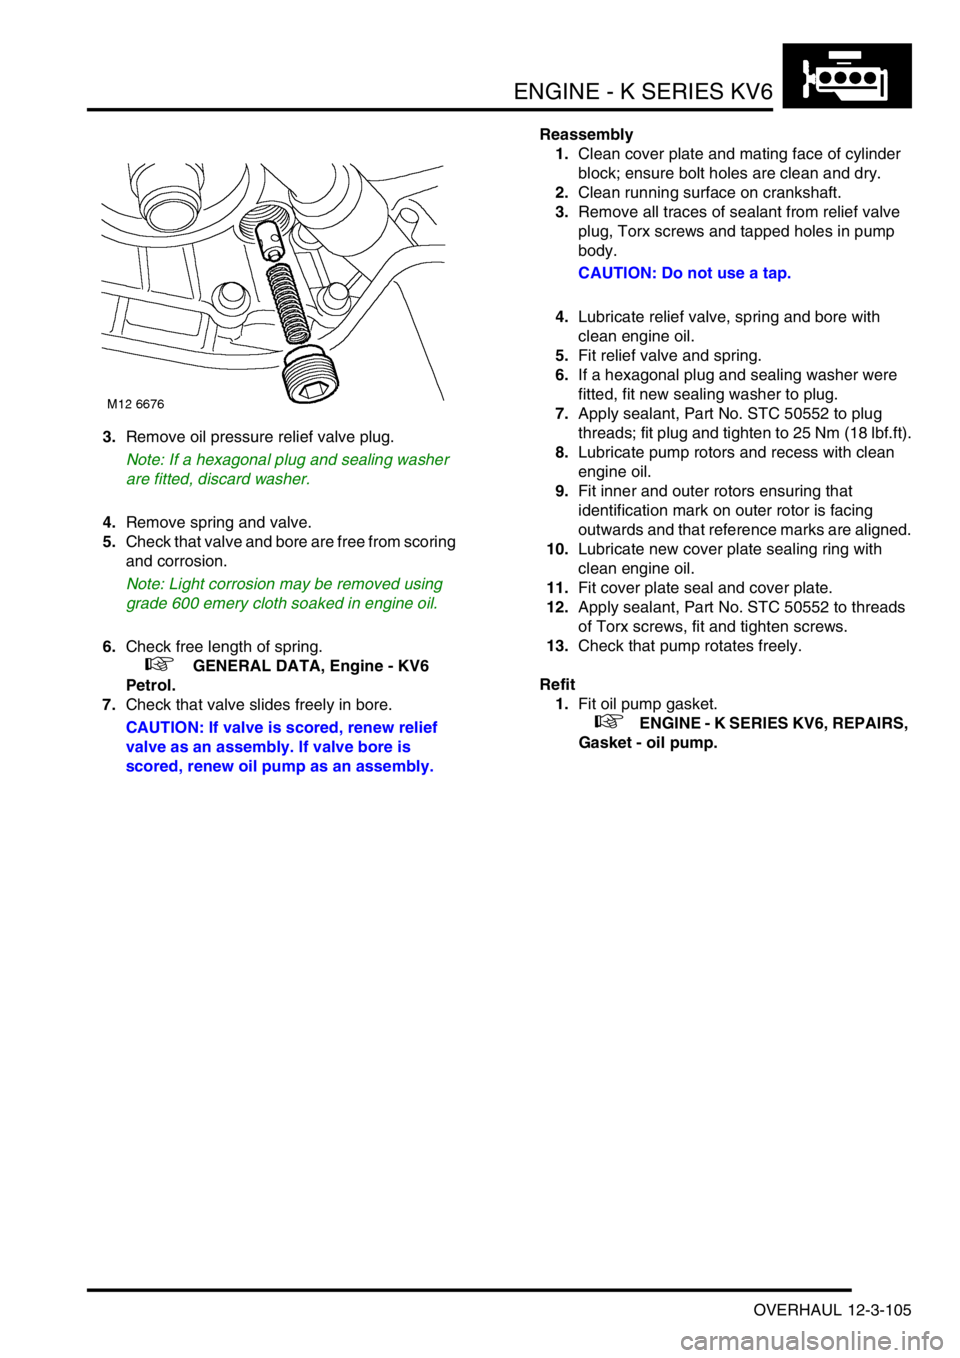
3.Remove oil pressure relief valve plug.
Note: If a hexagonal plug and sealing washer
are fitted, discard washer.
4.Remove spring and valve.
5.Check that valve and bore are free from scoring
and corrosion.
Note: Light corrosion may be removed using
grade 600 emery cloth soaked in engine oil.
6.Check free length of spring.
+ GENERAL DATA, Engine - KV6
Petrol.
7.Check that valve slides freely in bore.
CAUTION: If valve is scored, renew relief
valve as an assembly. If valve bore is
scored, renew oil pump as an assembly.Reassembly
1.Clean cover plate and mating face of cylinder
block; ensure bolt holes are clean and dry.
2.Clean running surface on crankshaft.
3.Remove all traces of sealant from relief valve
plug, Torx screws and tapped holes in pump
body.
CAUTION: Do not use a tap.
4.Lubricate relief valve, spring and bore with
clean engine oil.
5.Fit relief valve and spring.
6.If a hexagonal plug and sealing washer were
fitted, fit new sealing washer to plug.
7.Apply sealant, Part No. STC 50552 to plug
threads; fit plug and tighten to 25 Nm (18 lbf.ft).
8.Lubricate pump rotors and recess with clean
engine oil.
9.Fit inner and outer rotors ensuring that
identification mark on outer rotor is facing
outwards and that reference marks are aligned.
10.Lubricate new cover plate sealing ring with
clean engine oil.
11.Fit cover plate seal and cover plate.
12.Apply sealant, Part No. STC 50552 to threads
of Torx screws, fit and tighten screws.
13.Check that pump rotates freely.
Refit
1.Fit oil pump gasket.
+ ENGINE - K SERIES KV6, REPAIRS,
Gasket - oil pump.
Page 497 of 1007
STEERING
57-4 ADJUSTMENTS
Power steering - pressure test
$% 57.90.10.01
Check
1.Position absorbent cloth to catch spillage.
2.Remove bolt securing PAS high pressure pipe
clip to PAS pump.
3.Loosen union securing high pressure pipe to
PAS pump and release pipe.
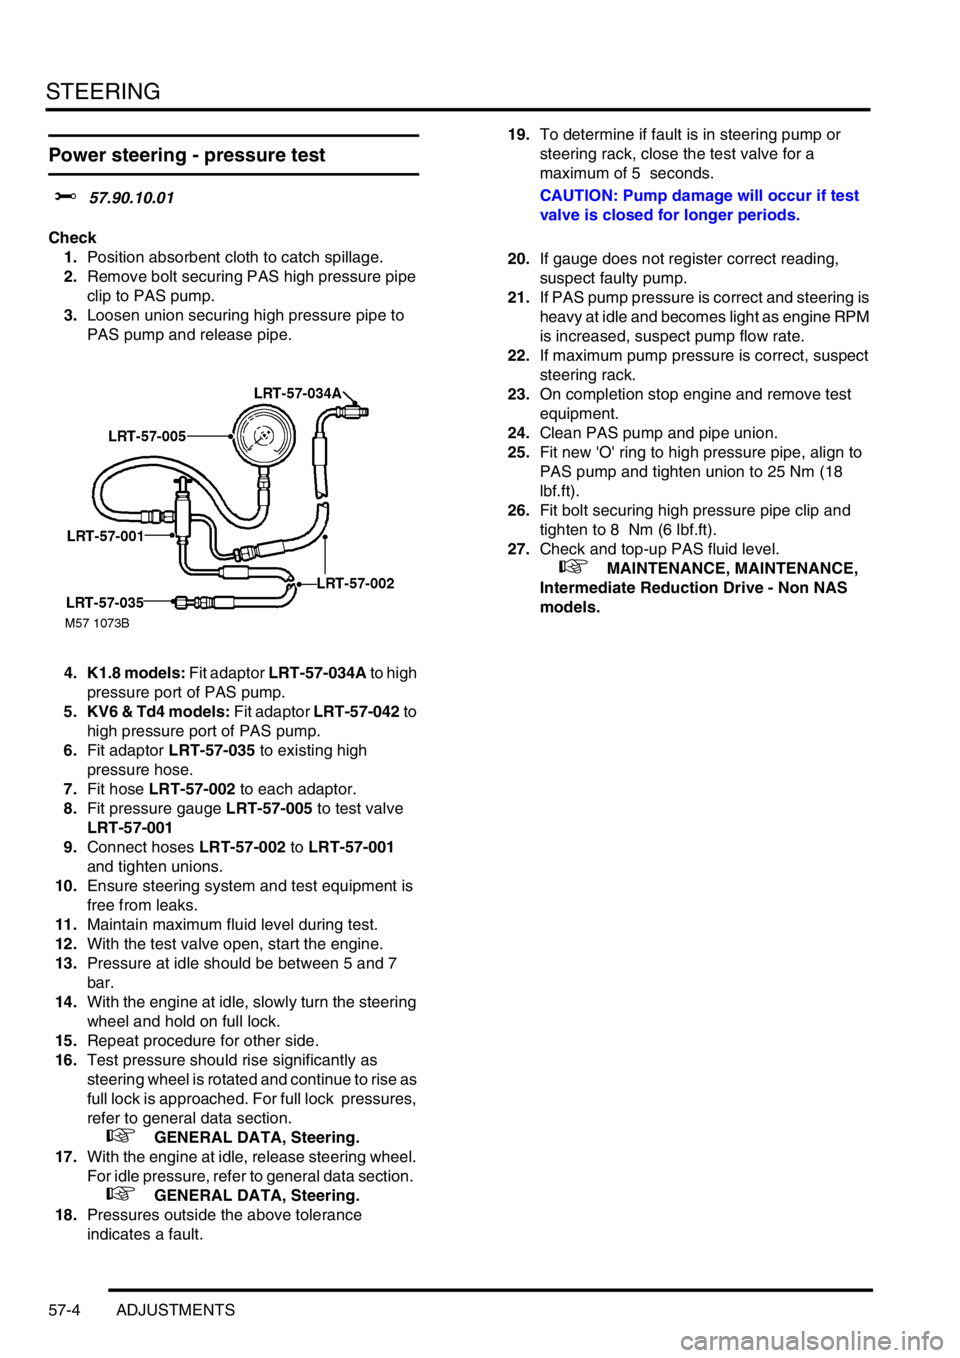
4. K1.8 models: Fit adaptor LRT-57-034A to high
pressure port of PAS pump.
5. KV6 & Td4 models: Fit adaptor LRT-57-042 to
high pressure port of PAS pump.
6.Fit adaptor LRT-57-035 to existing high
pressure hose.
7.Fit hose LRT-57-002 to each adaptor.
8.Fit pressure gauge LRT-57-005 to test valve
LRT-57-001
9.Connect hoses LRT-57-002 to LRT-57-001
and tighten unions.
10.Ensure steering system and test equipment is
free from leaks.
11.Maintain maximum fluid level during test.
12.With the test valve open, start the engine.
13.Pressure at idle should be between 5 and 7
bar.
14.With the engine at idle, slowly turn the steering
wheel and hold on full lock.
15.Repeat procedure for other side.
16.Test pressure should rise significantly as
steering wheel is rotated and continue to rise as
full lock is approached. For full lock pressures,
refer to general data section.
+ GENERAL DATA, Steering.
17.With the engine at idle, release steering wheel.
For idle pressure, refer to general data section.
+ GENERAL DATA, Steering.
18.Pressures outside the above tolerance
indicates a fault.19.To determine if fault is in steering pump or
steering rack, close the test valve for a
maximum of 5 seconds.
CAUTION: Pump damage will occur if test
valve is closed for longer periods.
20.If gauge does not register correct reading,
suspect faulty pump.
21.If PAS pump pressure is correct and steering is
heavy at idle and becomes light as engine RPM
is increased, suspect pump flow rate.
22.If maximum pump pressure is correct, suspect
steering rack.
23.On completion stop engine and remove test
equipment.
24.Clean PAS pump and pipe union.
25.Fit new 'O' ring to high pressure pipe, align to
PAS pump and tighten union to 25 Nm (18
lbf.ft).
26.Fit bolt securing high pressure pipe clip and
tighten to 8 Nm (6 lbf.ft).
27.Check and top-up PAS fluid level.
+ MAINTENANCE, MAINTENANCE,
Intermediate Reduction Drive - Non NAS
models.
Page 551 of 1007
BRAKES
70-2 ADJUSTMENTS
Cable - handbrake - check and adjust
$% 70.35.10
Check
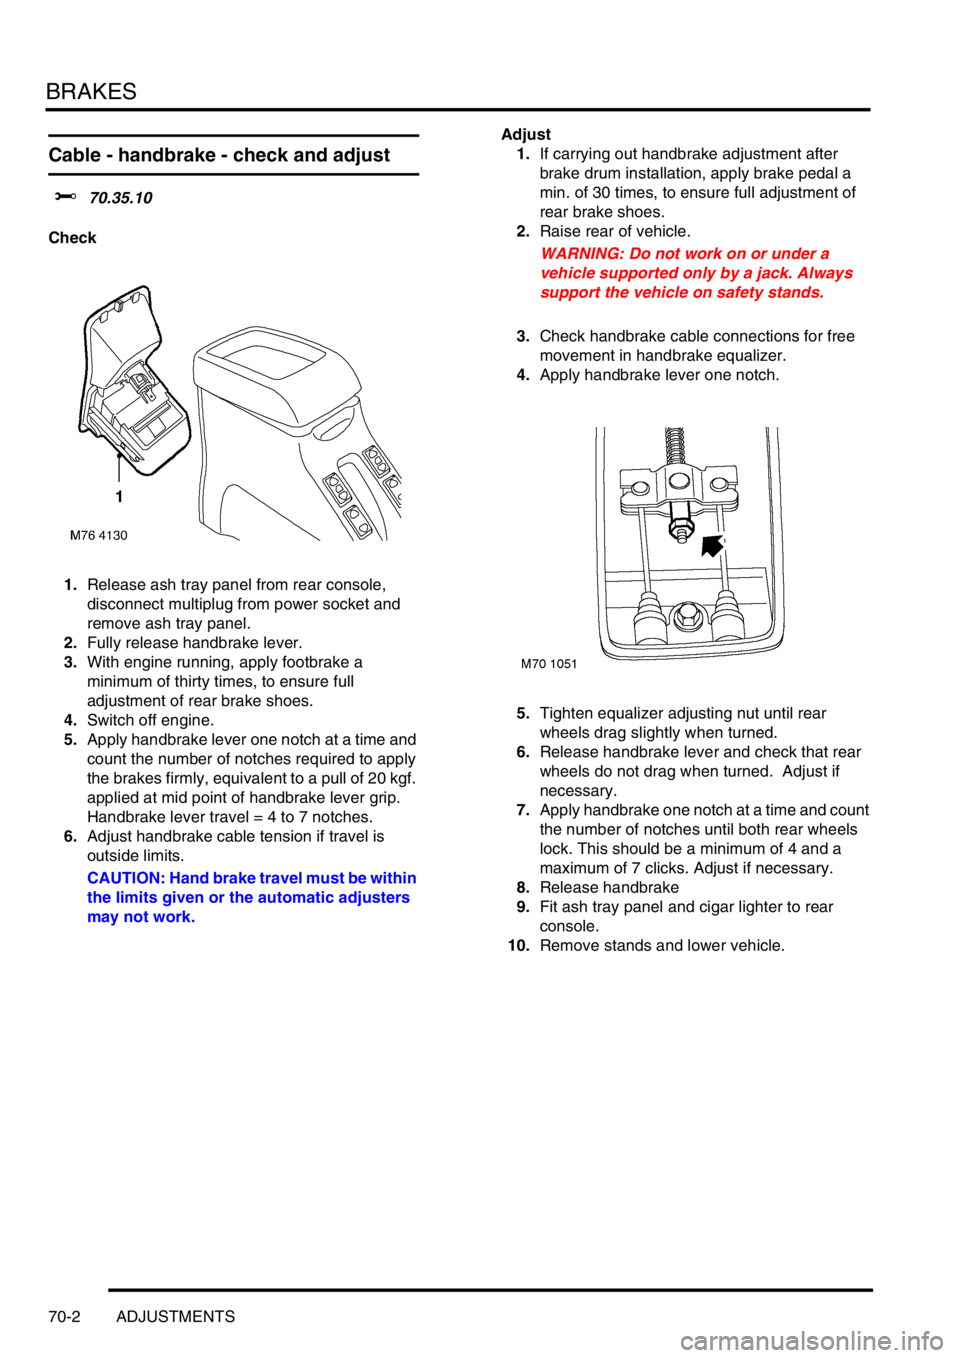
1.Release ash tray panel from rear console,
disconnect multiplug from power socket and
remove ash tray panel.
2.Fully release handbrake lever.
3.With engine running, apply footbrake a
minimum of thirty times, to ensure full
adjustment of rear brake shoes.
4.Switch off engine.
5.Apply handbrake lever one notch at a time and
count the number of notches required to apply
the brakes firmly, equivalent to a pull of 20 kgf.
applied at mid point of handbrake lever grip.
Handbrake lever travel = 4 to 7 notches.
6.Adjust handbrake cable tension if travel is
outside limits.
CAUTION: Hand brake travel must be within
the limits given or the automatic adjusters
may not work.Adjust
1.If carrying out handbrake adjustment after
brake drum installation, apply brake pedal a
min. of 30 times, to ensure full adjustment of
rear brake shoes.
2.Raise rear of vehicle.
WARNING: Do not work on or under a
vehicle supported only by a jack. Always
support the vehicle on safety stands.
3.Check handbrake cable connections for free
movement in handbrake equalizer.
4.Apply handbrake lever one notch.
5.Tighten equalizer adjusting nut until rear
wheels drag slightly when turned.
6.Release handbrake lever and check that rear
wheels do not drag when turned. Adjust if
necessary.
7.Apply handbrake one notch at a time and count
the number of notches until both rear wheels
lock. This should be a minimum of 4 and a
maximum of 7 clicks. Adjust if necessary.
8.Release handbrake
9.Fit ash tray panel and cigar lighter to rear
console.
10.Remove stands and lower vehicle.
Page 756 of 1007
PANEL REPAIRS
BODY REPAIRS 77-2-1
PANEL REPAIRS
General
Body shells are of monocoque construction. Front and rear sections of the shell are designed as 'energy absorbing'
zones. This means they are designed to deform progressively when subjected to impact in order to minimise the
likelihood of injury to vehicle occupants.
It is essential that design dimensions and strength are restored in accident rectification. It is important that neither
structural weakness nor excessive local stiffness are introduced into the vehicle during body repair.
Repairs usually involve a combination of operations ranging from straightening procedures to renewal of individual
panels or panel assemblies. The repairer will determine the repair method and this decision will take into account a
balance of economics between labour and material costs and the availability of repair facilities in both equipment and
skills. It may also involve considerations of the vehicles' downtime, replacement vehicle availability and repair turn-
around time.
It is expected that a repairer will select the best and most economic repair method possible, making use of the facilities
available. The instructions given are intended to assist a skilled body repairer by expanding approved procedures for
panel replacement. The objective is to restore the vehicle to a safe running condition by carrying out a repair which is
as close as is feasible to original standard. The results should not advertise to the experienced eye that the vehicle
has been damaged, although the repair might not be identical in all respects to the original factory build. Commercial
bodyshop repair facilities cannot always duplicate methods of construction used during production.
Operations covered in this Manual do not include reference to testing the vehicle after repair. It is essential that work
is inspected and suspension geometry checked after completion. Where necessary a road test of the vehicle should
be carried out, particularly where safety-related items are concerned.
Where major units have been disconnected or removed it is necessary to ensure that fluid levels are checked and
topped up where necessary. It is also necessary to ensure that the repaired vehicle is in a roadworthy condition in
respect of tyre pressures, lights, washer fluid etc.
Body repairs often involve the removal of mechanical and electrical units and associated wiring. Where necessary,
refer to the relevant section of the Workshop Manual for removal and refitting instructions.
Body components
Taking into consideration the differences in body styles, suspension systems and engine and transmission layouts,
the location of the following components as applicable to a particular vehicle is critical:
lFront suspension upper damper mountings.
lFront suspension or sub frame mountings.
lRear suspension upper damper mountings.
lRear suspension mountings or lower pivots.
Additional points which can be used to check alignment and assembly are:
lInner holes in crossmember - side - main floor.
lHoles in front longitudinals.
lHoles in side members.
lHoles in rear longitudinals.
lHoles in rear lower panels or extension rear floor.
Apertures for windscreen, backlight, bonnet and doors can be measured and checked using the dimensional
information provided and also by offering up an undamaged component as a gauge.
Straightening
Whenever possible, structural members should be cold straightened under tension. Do not attempt to straighten with
a single pull but rework the damaged area using a series of pulls, releasing tension between each stage and using
the opportunity to check alignment.