oil level LAND ROVER FREELANDER 2001 Workshop Manual
[x] Cancel search | Manufacturer: LAND ROVER, Model Year: 2001, Model line: FREELANDER, Model: LAND ROVER FREELANDER 2001Pages: 1007, PDF Size: 23.47 MB
Page 7 of 1007

CONTENTS
4CONTENTS
MAINTENANCE ........................................................................................ 10-1
MAINTENANCE
Td4 - Diesel Engine - Under Bonnet View ...................................................................................... 10-1
K1.8 – Petrol Engine – Under Bonnet View .................................................................................... 10-2
KV6 – Petrol Engine – Under Bonnet View .................................................................................... 10-3
Seats and Seat Belts ...................................................................................................................... 10-4
Lamps, Horns and Warning Indicators ........................................................................................... 10-4
Wipers and Washers ...................................................................................................................... 10-5
Handbrake ...................................................................................................................................... 10-5
Alarm Handset Battery.................................................................................................................... 10-6
Road Wheels .................................................................................................................................. 10-6
Tyres ............................................................................................................................................... 10-7
Brake Pads and Calipers ................................................................................................................ 10-7
Brake Fluid...................................................................................................................................... 10-9
Road Wheel Speed Sensors .......................................................................................................... 10-9
Fuel Filter - Petrol ........................................................................................................................... 10-10
Fuel Filter - Diesel........................................................................................................................... 10-10
Fuel Pump and Filter assembly - Diesel - 03 Model Year onwards ................................................ 10-10
Fuel Sedimenter - Diesel - 03 Model Year onwards ....................................................................... 10-10
Door Locks, Hinges, Check Straps and Bonnet Catch ................................................................... 10-11
Anti-freeze ...................................................................................................................................... 10-12
Cooling System and Intercooler...................................................................................................... 10-12
Vent filter - turbocharger boost control solenoid valve - Td4 .......................................................... 10-13
Spark Plugs – K1.8 ......................................................................................................................... 10-13
Spark Plugs – KV6.......................................................................................................................... 10-13
Air Cleaner – Petrol Models ............................................................................................................ 10-13
Ancillary Drive Belt – Td4 ............................................................................................................... 10-14
Ancillary Drive Belt – K1.8 .............................................................................................................. 10-14
Ancillary Drive Belt – KV6 ............................................................................................................... 10-15
Camshaft Timing Belt – K1.8 .......................................................................................................... 10-15
Camshaft Timing Belt – KV6........................................................................................................... 10-16
Brake/Clutch Reservoir ................................................................................................................... 10-16
PAS Fluid Level .............................................................................................................................. 10-17
Intermediate Reduction Drive - Non NAS models .......................................................................... 10-17
Intermediate Reduction Drive - NAS models .................................................................................. 10-18
Manual Gearbox – PG1 .................................................................................................................. 10-18
Manual Gearbox – GETRAG .......................................................................................................... 10-19
Automatic Gearbox – JATCO ......................................................................................................... 10-19
Rear Axle ........................................................................................................................................ 10-20
Clutch Pipes and Unions ................................................................................................................ 10-21
Windscreen and Rear Washer Reservoir ....................................................................................... 10-21
Battery ............................................................................................................................................ 10-21
Engine Oil and Filter – Td4 ............................................................................................................. 10-22
Engine Oil and Filter – K1.8 ............................................................................................................ 10-23
Engine Oil and Filter – KV6 ............................................................................................................ 10-24
Fuel Hoses and Pipes..................................................................................................................... 10-25
Brake Hoses and Pipes ................................................................................................................. 10-26
Check Exhaust System................................................................................................................... 10-26
Suspension ..................................................................................................................................... 10-27
Steering ......................................................................................................................................... 10-28
Road Test ....................................................................................................................................... 10-28
Endorse Service Record ................................................................................................................. 10-30
Report any Unusual Features ......................................................................................................... 10-30
Page 23 of 1007

CONTENTS
20 CONTENTS
LIGHTING.................................................................................................. 86-2-1
ADJUSTMENTS
Headlamps - pair - align beam - up to 04MY .................................................................................. 86-2-1
Headlamps - pair - align beam - from 04MY ................................................................................... 86-2-1
REPAIRS
Headlamp assembly - up to 04MY.................................................................................................. 86-2-3
Headlamp assembly - from 04MY .................................................................................................. 86-2-4
Lamp assembly - flasher side repeater - front ................................................................................ 86-2-5
Lamp assembly - tail ....................................................................................................................... 86-2-5
Lamp assembly - number plate ...................................................................................................... 86-2-6
Lamp assembly - fog/driving - from 04MY ...................................................................................... 86-2-6
Lamp assembly - rear ..................................................................................................................... 86-2-7
Lamp assembly - centre high mounted stop (CHMSL) ................................................................... 86-2-7
Lamp assembly - glove compartment ............................................................................................. 86-2-8
Lamp assembly - load space .......................................................................................................... 86-2-8
Switch - headlamp levelling ............................................................................................................ 86-2-9
Switch - glove compartment ........................................................................................................... 86-2-9
Switch - hazard warning ................................................................................................................. 86-2-10
Switch - combined direction indicator/headlight/horn ..................................................................... 86-2-10
Switch - rear fog lamp ..................................................................................................................... 86-2-11
CONTROL UNITS ..................................................................................... 86-3-1
REPAIRS
Control unit - window lift ................................................................................................................. 86-3-1
Relay - power folding mirrors - from 02MY ..................................................................................... 86-3-1
Central Control Unit (CCU) ............................................................................................................. 86-3-2
Control Unit - power fold mirrors - up to 02MY ............................................................................... 86-3-3
SECURITY................................................................................................. 86-4-1
REPAIRS
Solenoid/motor - taildoor................................................................................................................. 86-4-1
Switch/push - horn .......................................................................................................................... 86-4-2
Horn ................................................................................................................................................ 86-4-2
Immobilisation - electronic control unit (ECU) - ............................................................................. 86-4-3
Sensor - volumetric - alarm system - 3 door ................................................................................... 86-4-3
Module (ECU) - volumetric - alarm system - 5 door - without sunroof ........................................... 86-4-5
Module (ECU) - volumetric - alarm system - 5 door - with sunroof ................................................ 86-4-7
Receiver - alarm system ................................................................................................................. 86-4-10
Coil - passive immobilisation - alarm system .................................................................................. 86-4-10
Page 33 of 1007
GENERAL INFORMATION
03-2
Environmental Protection Precautions
It is illegal to pour used oil on to the ground, down
sewers or drains, or into water courses.
Burning of used engine oil in small space heaters or
boilers should only be considered for units of
approved design and in compliance with the
equipment manufacturer's recommendations. The
heating system must meet the regulatory standards
of HMIP for small burners of less than 0.4 MW. If in
doubt check with the appropriate local authority and/
or manufacturer of the approved appliance.
Dispose of used oil and filters through authorised
waste disposal contractors and licensed waste
disposal sites, or through the waste oil reclamation
trade. If in doubt, contact the Local Authority for
advice on disposal facilities.
Safety instructions
Whenever possible, use a lift or pit when working
beneath vehicle, in preference to jacking. Chock
wheels as well as applying parking brake.
Jacking
Always use the recommended jacking points. The
recommended jacking points are shown in
theLIFTING AND TOWING sub-section of the
INFORMATION section.
Always ensure that any lifting apparatus has
sufficient load capacity for the weight to be lifted.
Ensure the vehicle is standing on level ground prior
to lifting or jacking.
Apply the handbrake and chock the wheels.
WARNING: Do not work on or under a vehicle
supported only by a jack. Always support the
vehicle on safety stands.
Do not leave tools, lifting equipment, spilt oil, etc.,
around or on the work bench area. Always keep a
clean and tidy work area.
Brake shoes and pads
Always fit the correct grade and specification of
brake linings. When renewing brake pads and brake
shoes always replace as complete axle sets only.
Page 34 of 1007
GENERAL INFORMATION
03-3
Brake hydraulics
Observe the following recommendations when
working on the brake system:
lAlways use two spanners when loosening or
tightening brake pipe or hose connections.
lEnsure that hoses run in a natural curve and are
not kinked or twisted.
lFit brake pipes securely in their retaining clips
and ensure that the pipe run cannot contact a
potential chafing point.
lContainers used for hydraulic brake fluid must
be kept absolutely clean.
lDo not store hydraulic brake fluid in an unsealed
container, it will absorb water and in this
condition would be dangerous to use due to a
lowering of its boiling point.
lDo not allow hydraulic brake fluid to be
contaminated with mineral oil, or put new
hydraulic brake fluid in a container which has
previously contained mineral oil.
lDo not re-use hydraulic brake fluid previously
removed from the system.
lAlways use clean brake fluid or a recommended
alternative to clean hydraulic components.
lFit a blanking cap to a hydraulic union and a
plug to its socket, immediately after
disconnection of pipes and hoses to prevent the
ingress of dirt.
lAbsolute cleanliness must be observed when
working with hydraulic components.
lIt is imperative that the correct brake fittings are
used and that threads of components are
compatible.
Cooling system caps and plugs
Extreme care is necessary when removing engine
cooling system expansion tank caps and coolant
drain or bleed screws when the engine is hot, and
especially if it is overheated.
To avoid the possibility of scalding allow the engine
to cool before attempting coolant cap or plug
removal.
Environmental Precautions
General
This section provides general information which can
help to reduce adverse environmental impacts
incurred through the activities carried out in
workshops.
Emissions to air
Many of the activities that are carried out in
workshops emit gases and fumes which contribute to
global warming, depletion of the ozone layer and/or
the formation of photo-chemical smog at ground
level. By considering and controlling how the
workshop activities are carried out, these gases and
fumes can be minimised, thus reducing the damage
to the environment.
Exhaust fumes
Running car engines is an essential part of workshop
activities and exhaust fumes need to be ventilated to
atmosphere. However, the amount of time engines
are running and the position of the vehicle should be
carefully considered at all times, to reduce the
release of poisonous gases and minimise the
inconvenience to people living nearby.
Solvents
Some of the cleaning agents used are solvent based
and will evaporate to atmosphere if used carelessly,
or if cans are left unsealed. All solvent containers
should be firmly closed when not needed and solvent
should be used sparingly. Suitable alternative
materials may be available to replace some of the
commonly used solvents. Similarly, many paints are
solvent based and the spray should be minimised to
reduce solvent emissions.
Refrigerant
It is illegal to release any refrigerants into the
atmosphere. Discharge and replacement of these
materials from air conditioning units should only be
carried out using the correct equipment.
Checklist
Always adhere to the following:
Engines –
ldon't leave engines running unnecessarily;
lminimise testing times and check where the
exhaust fumes are being blown.
Page 104 of 1007
TORQUE WRENCH SETTINGS
06-1
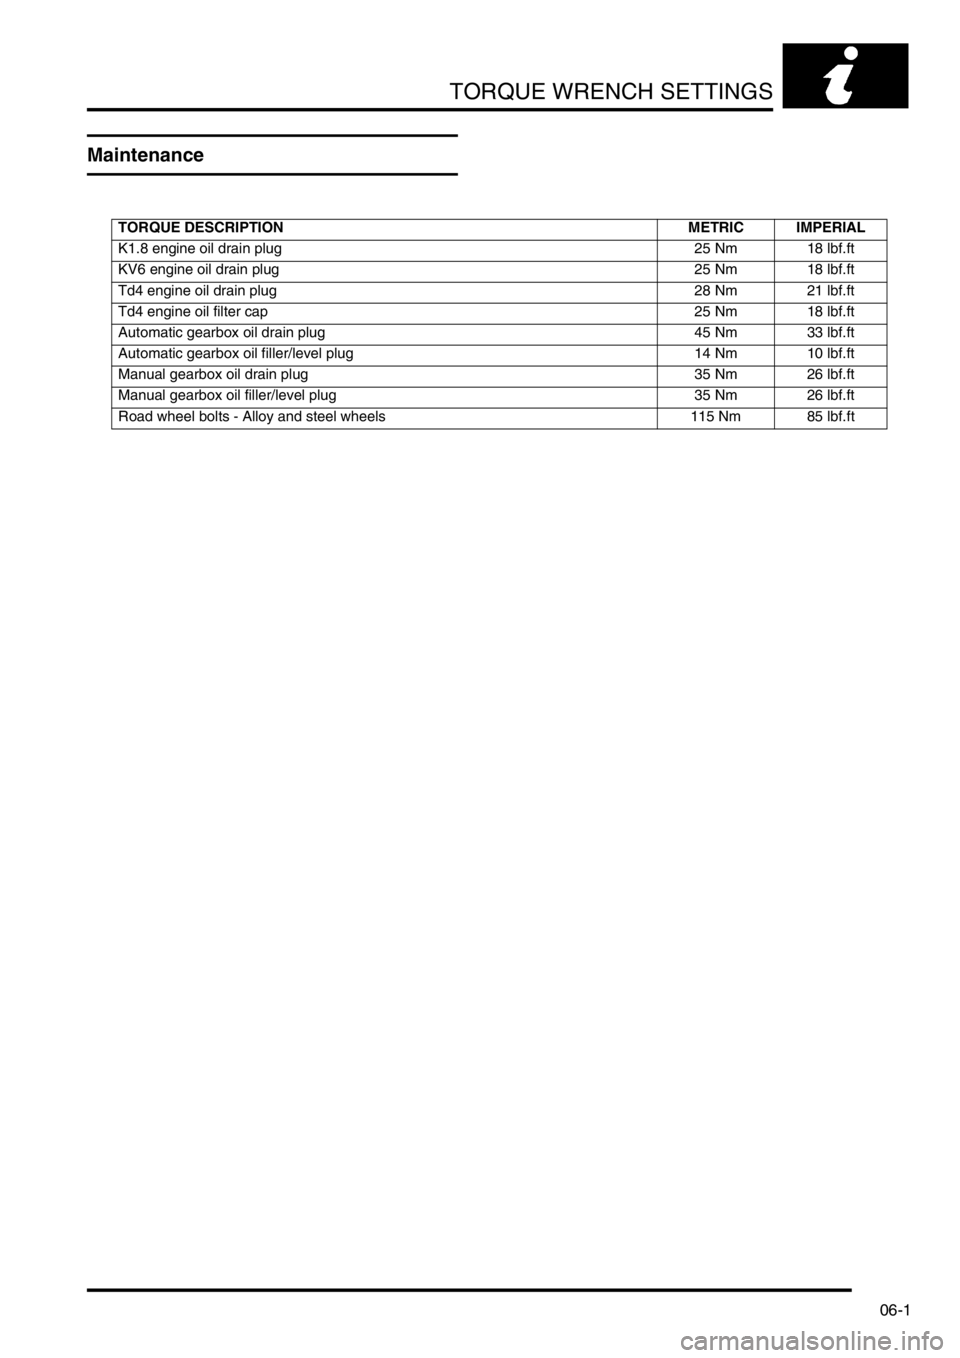
TORQUE WRE NCH SETTINGS
Maintenance
TORQUE DESCRIPTION METRIC IMPERIAL
K1.8 engine oil drain plug 25 Nm 18 lbf.ft
KV6 engine oil drain plug 25 Nm 18 lbf.ft
Td4 engine oil drain plug 28 Nm 21 lbf.ft
Td4 engine oil filter cap 25 Nm 18 lbf.ft
Automatic gearbox oil drain plug 45 Nm 33 lbf.ft
Automatic gearbox oil filler/level plug 14 Nm 10 lbf.ft
Manual gearbox oil drain plug 35 Nm 26 lbf.ft
Manual gearbox oil filler/level plug 35 Nm 26 lbf.ft
Road wheel bolts - Alloy and steel wheels 115 Nm 85 lbf.ft
Page 151 of 1007
MAINTENANCE
10-4 MAINTENANCE
Seats and Seat Belts
Check
1.Check seat frames are secured to floor and
show no signs of movement.
2.Check operation of seat slide and tilt
mechanisms, ensuring there is no excessive
play between seat cushion and seat back.
3.Check tightness of accessible seat fixings.
4.Fully extract seat belt and allow it to return
under its own recoil mechanism.
5.Check entire length of seat belt webbing for
signs of fraying or damage. Repeat for all belts.
6.Check security of seat belt upper mountings.
7.Check for correct operation of seat belt height
adjusters.
8.Check security of seat belt buckle mountings.
9.Connect each belt to the correct buckle, check
seat belt buckle and tongue are secure.
Release seat belt buckle and check for correct
operation.
10.Check tightness of accessible seat belt
mountings.
Lamps, Horns and Warning Indicators
Check
1.Switch on side, head and tail lights and check
operation.
2.Check headlamp dim/dip operation.
3.Check headlamp levelling operation.
4.Check turn signals and hazard warning lights
operation.
5.Press brake pedal and check operation of
brake lights.
6.Check all exterior lamp lenses for clarity and
condition. Pay particular attention to head lamp
lenses for signs of stone chips or damage.
7.Check horn for loud clear sound.
8.Check operation of all instrument pack warning
and indicator lights.
9.Check for correct operation of interior courtesy
lights.
10.Switch on headlamps (with ignition switch at 'O'
position) and check light reminder warning
operates when door is opened.
Page 164 of 1007
MAINTENANCE
MAINTENANCE 10-17
PAS Fluid Level
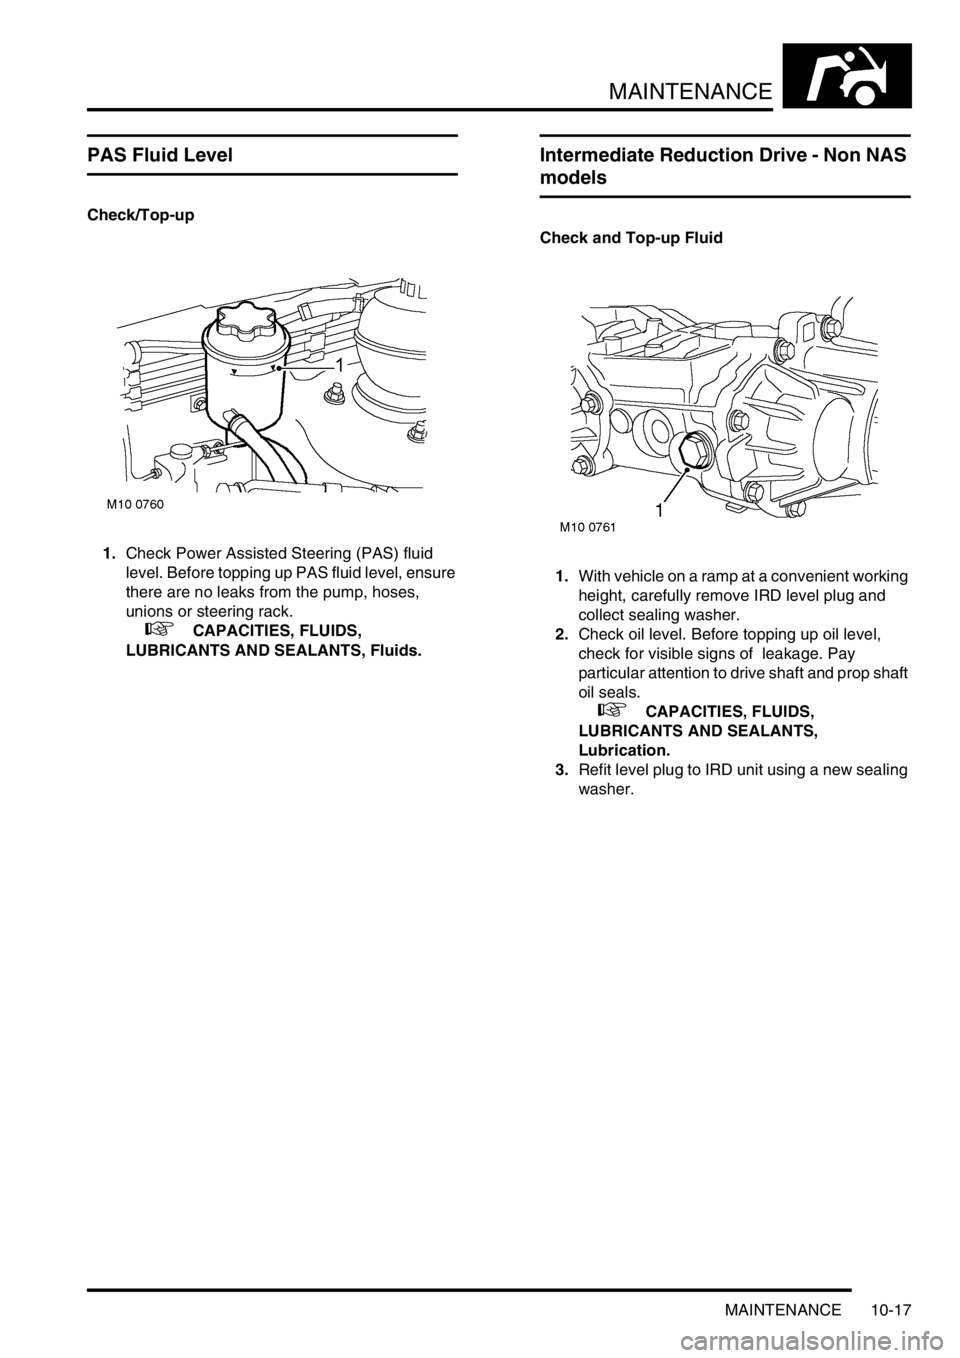
Check/Top-up
1.Check Power Assisted Steering (PAS) fluid
level. Before topping up PAS fluid level, ensure
there are no leaks from the pump, hoses,
unions or steering rack.
+ CAPACITIES, FLUIDS,
LUBRICANTS AND SEALANTS, Fluids.
Intermediate Reduction Drive - Non NAS
models
Check and Top-up Fluid
1.With vehicle on a ramp at a convenient working
height, carefully remove IRD level plug and
collect sealing washer.
2.Check oil level. Before topping up oil level,
check for visible signs of leakage. Pay
particular attention to drive shaft and prop shaft
oil seals.
+ CAPACITIES, FLUIDS,
LUBRICANTS AND SEALANTS,
Lubrication.
3.Refit level plug to IRD unit using a new sealing
washer.
Page 165 of 1007
MAINTENANCE
10-18 MAINTENANCE
Intermediate Reduction Drive - NAS
models
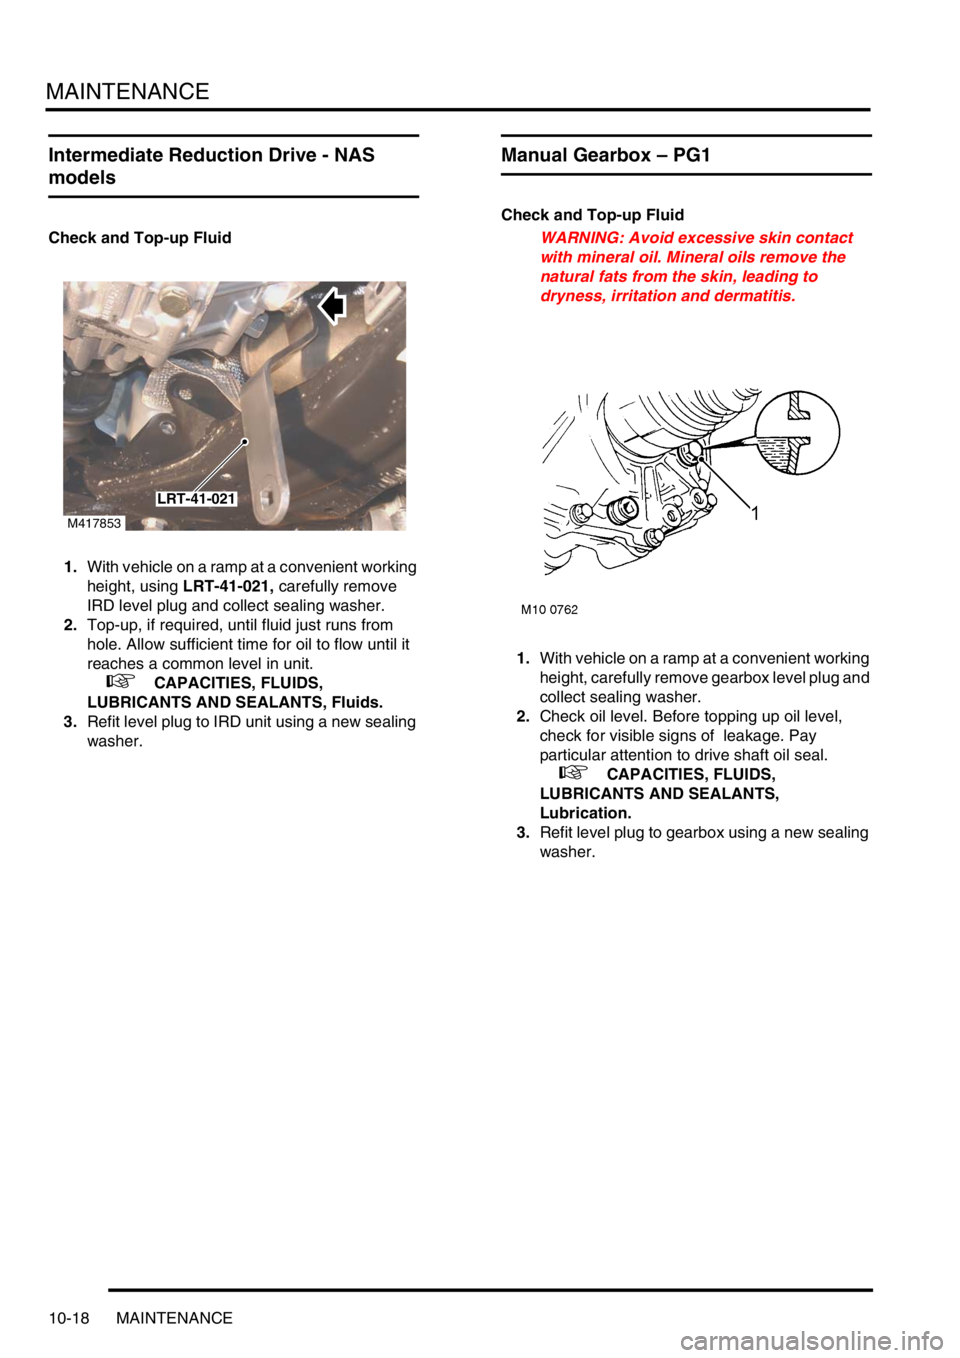
Check and Top-up Fluid
1.With vehicle on a ramp at a convenient working
height, using LRT-41-021, carefully remove
IRD level plug and collect sealing washer.
2.Top-up, if required, until fluid just runs from
hole. Allow sufficient time for oil to flow until it
reaches a common level in unit.
+ CAPACITIES, FLUIDS,
LUBRICANTS AND SEALANTS, Fluids.
3.Refit level plug to IRD unit using a new sealing
washer.
Manual Gearbox – PG1
Check and Top-up Fluid
WARNING: Avoid excessive skin contact
with mineral oil. Mineral oils remove the
natural fats from the skin, leading to
dryness, irritation and dermatitis.
1.With vehicle on a ramp at a convenient working
height, carefully remove gearbox level plug and
collect sealing washer.
2.Check oil level. Before topping up oil level,
check for visible signs of leakage. Pay
particular attention to drive shaft oil seal.
+ CAPACITIES, FLUIDS,
LUBRICANTS AND SEALANTS,
Lubrication.
3.Refit level plug to gearbox using a new sealing
washer.
M417853
LRT-41-021
Page 166 of 1007
MAINTENANCE
MAINTENANCE 10-19
Manual Gearbox – GETRAG
Replace Fluid
WARNING: Avoid excessive skin contact
with mineral oil. Mineral oils remove the
natural fats from the skin, leading to
dryness, irritation and dermatitis.
1.Replace gearbox fluid.
+ MANUAL GEARBOX - GETRAG,
ADJUSTMENTS, Gearbox oil - drain and
refill.
Automatic Gearbox – JATCO
Check and top-up fluid
WARNING: Avoid excessive skin contact
with mineral oil. Mineral oils remove the
natural fats from the skin, leading to
dryness, irritation and dermatitis.
1.Position vehicle on ramp.
2.Apply handbrake and position chocks under
front and rear wheels.
3.Remove underbelly panel.
+ EXTERIOR FITTINGS, REPAIRS,
Panel - underbelly.
4.Connect TestBook/T4 to monitor gearbox fluid
temperature.
CAUTION: The gearbox fluid level must only
be checked when the temperature of the
fluid is between 35° and 45°. The reading
obtained will be incorrect if the fluid is
outside this temperature range.
5.Start engine, move selector lever from 'P'
through all gear positions, pausing in each gear
position for 2-3 seconds and return to 'P'
position.
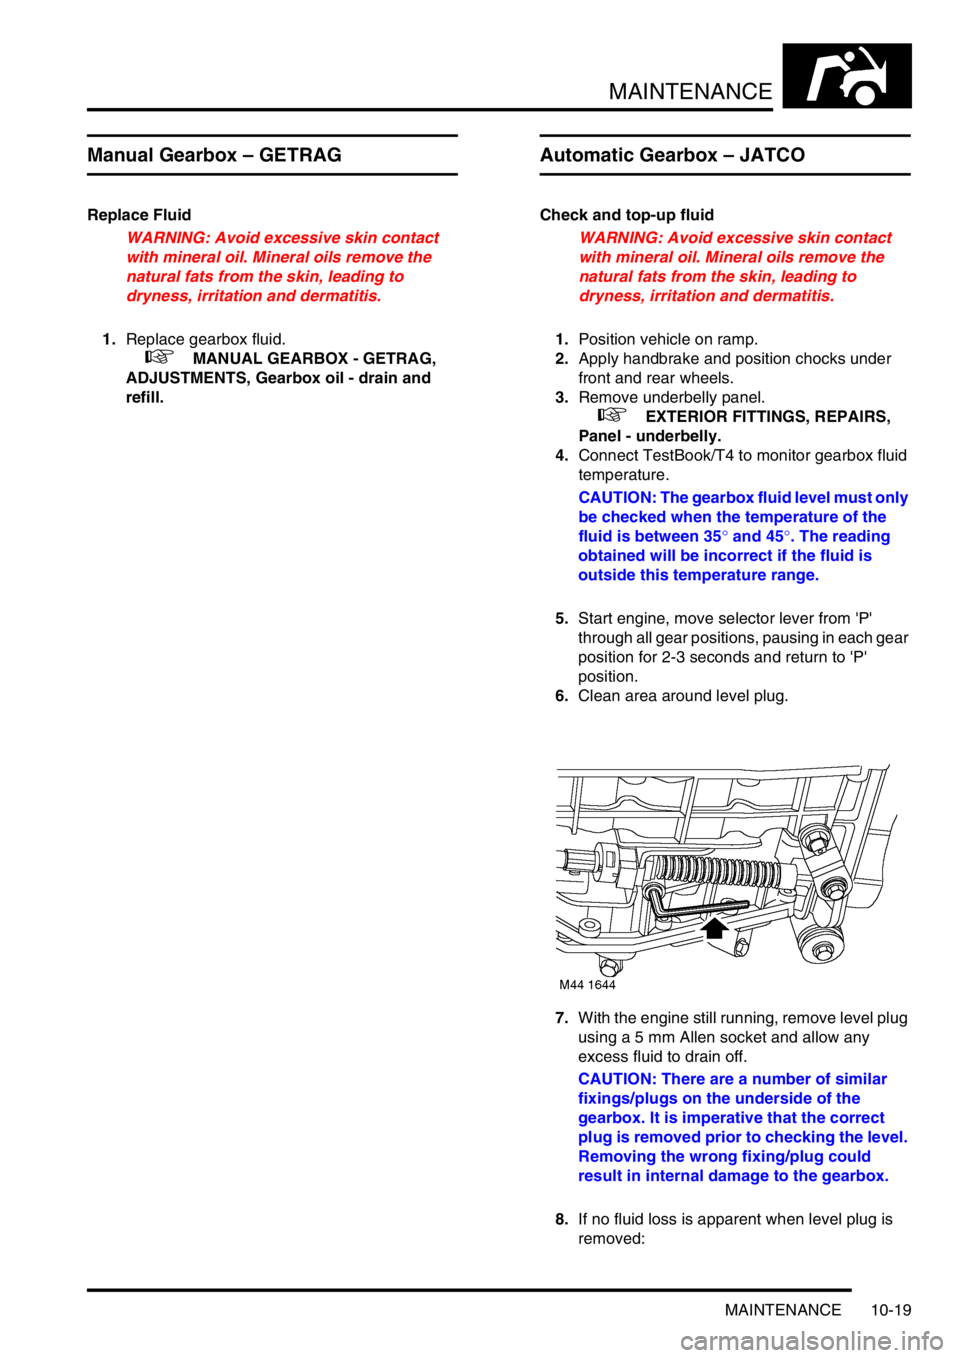
6.Clean area around level plug.
7.With the engine still running, remove level plug
using a 5 mm Allen socket and allow any
excess fluid to drain off.
CAUTION: There are a number of similar
fixings/plugs on the underside of the
gearbox. It is imperative that the correct
plug is removed prior to checking the level.
Removing the wrong fixing/plug could
result in internal damage to the gearbox.
8.If no fluid loss is apparent when level plug is
removed:
Page 167 of 1007
MAINTENANCE
10-20 MAINTENANCE
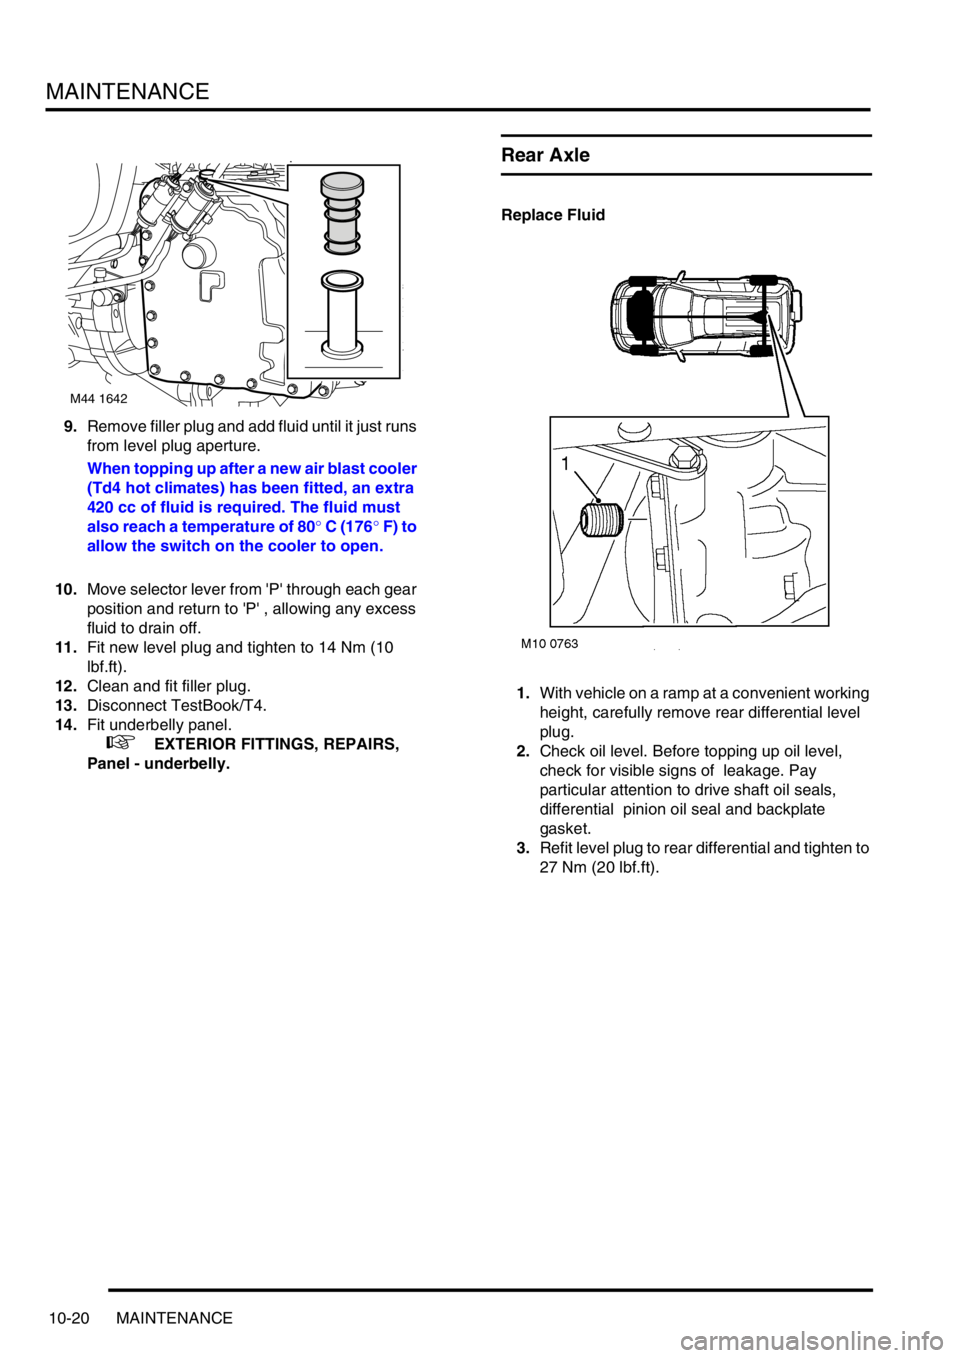
9.Remove filler plug and add fluid until it just runs
from level plug aperture.
When topping up after a new air blast cooler
(Td4 hot climates) has been fitted, an extra
420 cc of fluid is required. The fluid must
also reach a temperature of 80° C (176° F) to
allow the switch on the cooler to open.
10.Move selector lever from 'P' through each gear
position and return to 'P' , allowing any excess
fluid to drain off.
11.Fit new level plug and tighten to 14 Nm (10
lbf.ft).
12.Clean and fit filler plug.
13.Disconnect TestBook/T4.
14.Fit underbelly panel.
+ EXTERIOR FITTINGS, REPAIRS,
Panel - underbelly.
Rear Axle
Replace Fluid
1.With vehicle on a ramp at a convenient working
height, carefully remove rear differential level
plug.
2.Check oil level. Before topping up oil level,
check for visible signs of leakage. Pay
particular attention to drive shaft oil seals,
differential pinion oil seal and backplate
gasket.
3.Refit level plug to rear differential and tighten to
27 Nm (20 lbf.ft).
M44 1642