seat adjustment LAND ROVER FREELANDER 2001 Workshop Manual
[x] Cancel search | Manufacturer: LAND ROVER, Model Year: 2001, Model line: FREELANDER, Model: LAND ROVER FREELANDER 2001Pages: 1007, PDF Size: 23.47 MB
Page 15 of 1007

CONTENTS
12 CONTENTS
RESTRAINT SYSTEMS ............................................................................ 75-1
REPAIRS
Automatic belt assembly - front - 3 door ......................................................................................... 75-1
Automatic belt assembly - front - 5 door ......................................................................................... 75-2
Seat belt - centre - rear ................................................................................................................... 75-3
Seat belt - rear - LH ........................................................................................................................ 75-4
Adjustable mounting - seat belt - 'B' pillar ....................................................................................... 75-5
Stalk - rear seat belt - LH - 3 door .................................................................................................. 75-6
Stalk - rear seat belt - LH - 5 door .................................................................................................. 75-7
Pre-tensioner - seat belt - front ....................................................................................................... 75-8
Pre-tensioner - seat belt - front - deployment - off vehicle ............................................................. 75-9
Stalk - rear seat belt - centre .......................................................................................................... 75-11
Air bag - steering wheel .................................................................................................................. 75-13
Air bag - fascia - passenger - up to 04MY ...................................................................................... 75-14
Air bag - fascia - passenger - from 04MY ....................................................................................... 75-15
Diagnostic control unit (DCU) ........................................................................................................ 75-16
Airbag - passenger - deployment - off vehicle ............................................................................... 75-17
Rotary coupler - (SRS) air bag system ........................................................................................... 75-19
Airbag module - steering wheel - deployment - off vehicle ............................................................ 75-20
Airbag module - steering wheel - deployment - in-vehicle .............................................................. 75-21
Pre-tensioner - front seatbelt - deployment - in-vehicle .................................................................. 75-23
DOORS...................................................................................................... 76-1-1
ADJUSTMENTS
Door - front or rear - adjust on striker ............................................................................................ 76-1-1
Door - front - align on hinges .......................................................................................................... 76-1-2
REPAIRS
Door assembly - front - remove for access & refit .......................................................................... 76-1-3
Door assembly - rear - remove for access & refit ........................................................................... 76-1-4
Door - tail assembly - remove for access & refit ............................................................................. 76-1-5
Glass - front door .......................................................................................................................... 76-1-6
Glass - rear door ............................................................................................................................ 76-1-7
Rubber/felt - glass channel - front door ........................................................................................ 76-1-8
Rubber/felt - glass channel - rear door .......................................................................................... 76-1-9
Glass - tail door .............................................................................................................................. 76-1-10
Quarter light - rear door .................................................................................................................. 76-1-11
Glass regulator - tail door .............................................................................................................. 76-1-12
Seal - waist inner - tail door ............................................................................................................ 76-1-13
Trim casing - front door - 3 door .................................................................................................... 76-1-14
Trim casing - front door - 5 door - up to 04MY................................................................................ 76-1-15
Trim casing - front door - 5 door - from 04MY ................................................................................ 76-1-16
Trim casing - rear door - up to 04MY .............................................................................................. 76-1-18
Trim casing - rear door - from 04MY............................................................................................... 76-1-20
Trim casing - tail door ..................................................................................................................... 76-1-22
Plastic sheet - front door - lower - 3 door........................................................................................ 76-1-23
Pocket - front door - 3 door ............................................................................................................. 76-1-23
Plastic sheet - front door - upper - 3 door ....................................................................................... 76-1-24
Plastic sheet - tail door ................................................................................................................... 76-1-24
Plastic sheet - front door - 5 door .................................................................................................. 76-1-25
Plastic sheet - rear door.................................................................................................................. 76-1-25
Latch - front door - 3 door ............................................................................................................... 76-1-26
Latch - front door - 5 door .............................................................................................................. 76-1-27
Latch - rear door ............................................................................................................................. 76-1-28
Latch - tail door ............................................................................................................................... 76-1-29
Page 59 of 1007

GENERAL INFORMATION
03-28
SRS component replacement policy
The following information details the policy for
replacement of SRS components; either as a result
of a vehicle accident or as a result of vehicle age.
Impacts which do not deploy the airbags or seat
belt pre-tensioners
Check for structural damage in the area of the
impact, paying particular attention to bumper
armatures, longitudinals, crash cans and bracketry.
Impacts which deploy the airbags and/or seat
belt pre-tensioners
The inspection and replacement policy is dependent
on the type and severity of the crash condition. The
following guidelines are the minimum that should be
exercised as a result of the deployment of specific
SRS components.
Front airbag/ seat belt pre-tensioner deployment
(driver and passenger)
If the front airbags and/or seat belt pre-tensioners are
deployed as a result of a front, front angled or side
impact, the following parts must be replaced:
lDriver airbag module
lPassenger airbag module (where fitted)
lSRS flyleads
lSRS DCU
lRotary coupler
lFront seat belt pre-tensioners
In addition, the following should be inspected for
damage and replaced as necessary:
lFront seat belt and buckle tongue (anchorage
points, webbing etc.)
lFascia moulding adjacent to passenger airbag
module (where fitted)
lSteering wheel (if damage is evident)
lFront seat frames and head restraints (if there is
evidence of damage to the seat frame or
cushion pan)
lSteering column (if adjustment is lost or there
are signs of collapse)
lFront seat belt height adjusters on 'BC' posts (5
door models only)
lRear seat belts and seat belt buckles (webbing,
buckle covers, body anchorage and tongue
latching function)Rear Impact
If the seat belt pre-tensioners are deployed during a
rear impact, the following components must be
replaced:
lSeat belt pre-tensioners
lFront and rear automatic seat belt assemblies
used during an impact.
lSRS DCU
In addition, the following components should be
inspected for damage and replaced as necessary:
lFront seat frames
lFront seat belts and buckle (retractors,
webbing, tongue latching, buckle covers, body
anchorages and 'D' loops)
lSeat belt height adjusters (5 door models only)
lRear seat belts and seat belt buckles (webbing,
buckle covers, body anchorage and tongue
latching function)
Periodic replacement of SRS components
The performance of the propellants within airbags
and seat belt pre-tensioners will deteriorate over a
period of time. As a result, it is essential that the
airbags and seat belt pre-tensioners are periodically
replaced to maintain occupant safety. Airbags, seat
belt pre-tensioners and the rotary coupler should be
replaced at the recommended intervals.
Page 210 of 1007

ENGINE - K SERIES KV6
REPAIRS 12-3-33
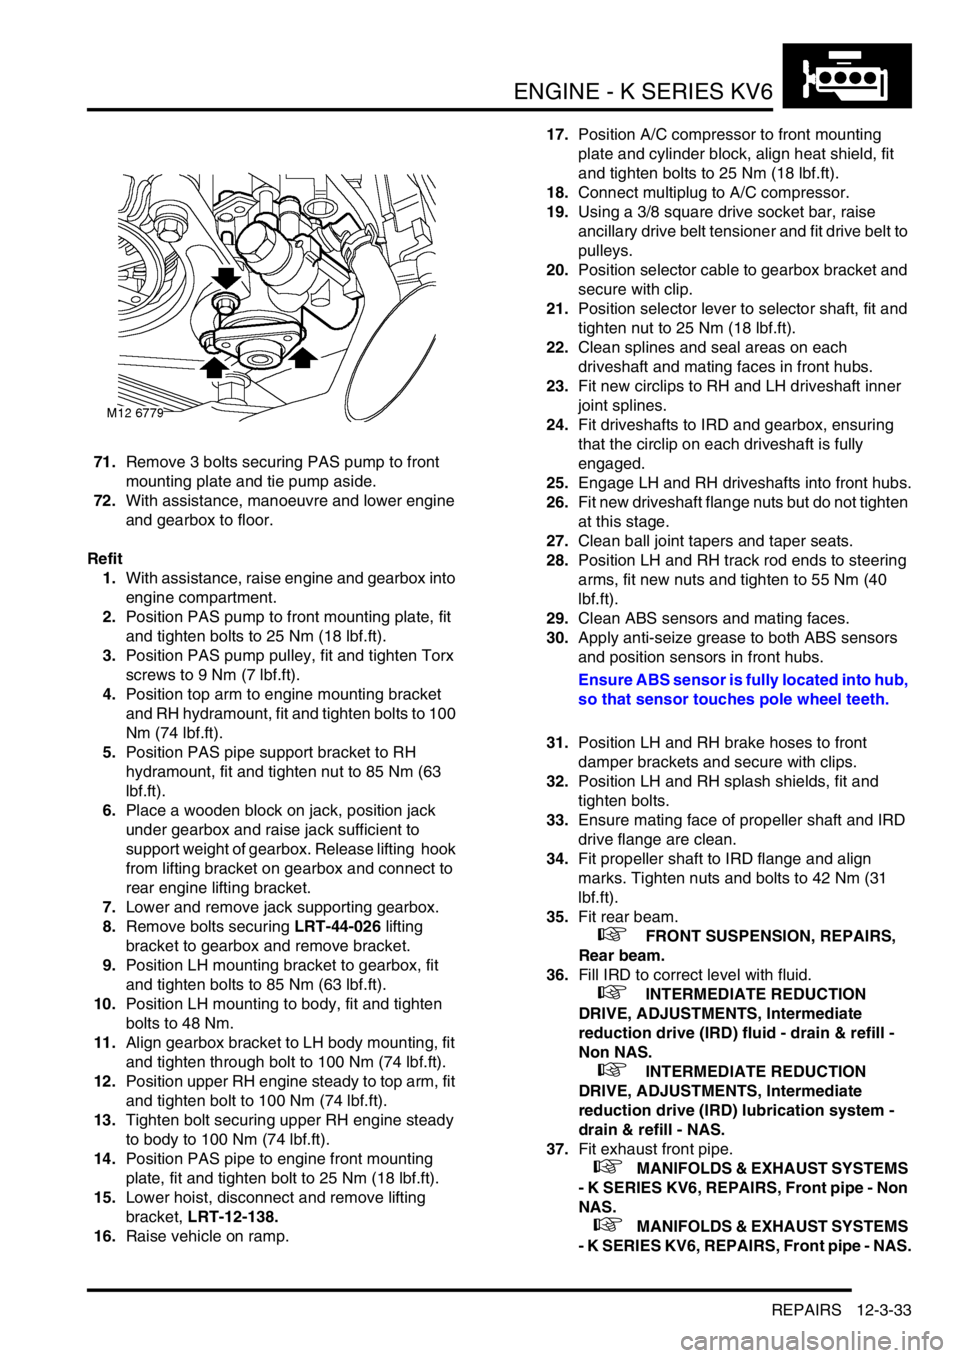
71.Remove 3 bolts securing PAS pump to front
mounting plate and tie pump aside.
72.With assistance, manoeuvre and lower engine
and gearbox to floor.
Refit
1.With assistance, raise engine and gearbox into
engine compartment.
2.Position PAS pump to front mounting plate, fit
and tighten bolts to 25 Nm (18 lbf.ft).
3.Position PAS pump pulley, fit and tighten Torx
screws to 9 Nm (7 lbf.ft).
4.Position top arm to engine mounting bracket
and RH hydramount, fit and tighten bolts to 100
Nm (74 lbf.ft).
5.Position PAS pipe support bracket to RH
hydramount, fit and tighten nut to 85 Nm (63
lbf.ft).
6.Place a wooden block on jack, position jack
under gearbox and raise jack sufficient to
support weight of gearbox. Release lifting hook
from lifting bracket on gearbox and connect to
rear engine lifting bracket.
7.Lower and remove jack supporting gearbox.
8.Remove bolts securing LRT-44-026 lifting
bracket to gearbox and remove bracket.
9.Position LH mounting bracket to gearbox, fit
and tighten bolts to 85 Nm (63 lbf.ft).
10.Position LH mounting to body, fit and tighten
bolts to 48 Nm.
11.Align gearbox bracket to LH body mounting, fit
and tighten through bolt to 100 Nm (74 lbf.ft).
12.Position upper RH engine steady to top arm, fit
and tighten bolt to 100 Nm (74 lbf.ft).
13.Tighten bolt securing upper RH engine steady
to body to 100 Nm (74 lbf.ft).
14.Position PAS pipe to engine front mounting
plate, fit and tighten bolt to 25 Nm (18 lbf.ft).
15.Lower hoist, disconnect and remove lifting
bracket, LRT-12-138.
16.Raise vehicle on ramp.17.Position A/C compressor to front mounting
plate and cylinder block, align heat shield, fit
and tighten bolts to 25 Nm (18 lbf.ft).
18.Connect multiplug to A/C compressor.
19.Using a 3/8 square drive socket bar, raise
ancillary drive belt tensioner and fit drive belt to
pulleys.
20.Position selector cable to gearbox bracket and
secure with clip.
21.Position selector lever to selector shaft, fit and
tighten nut to 25 Nm (18 lbf.ft).
22.Clean splines and seal areas on each
driveshaft and mating faces in front hubs.
23.Fit new circlips to RH and LH driveshaft inner
joint splines.
24.Fit driveshafts to IRD and gearbox, ensuring
that the circlip on each driveshaft is fully
engaged.
25.Engage LH and RH driveshafts into front hubs.
26.Fit new driveshaft flange nuts but do not tighten
at this stage.
27.Clean ball joint tapers and taper seats.
28.Position LH and RH track rod ends to steering
arms, fit new nuts and tighten to 55 Nm (40
lbf.ft).
29.Clean ABS sensors and mating faces.
30.Apply anti-seize grease to both ABS sensors
and position sensors in front hubs.
Ensure ABS sensor is fully located into hub,
so that sensor touches pole wheel teeth.
31.Position LH and RH brake hoses to front
damper brackets and secure with clips.
32.Position LH and RH splash shields, fit and
tighten bolts.
33.Ensure mating face of propeller shaft and IRD
drive flange are clean.
34.Fit propeller shaft to IRD flange and align
marks. Tighten nuts and bolts to 42 Nm (31
lbf.ft).
35.Fit rear beam.
+ FRONT SUSPENSION, REPAIRS,
Rear beam.
36.Fill IRD to correct level with fluid.
+ INTERMEDIATE REDUCTION
DRIVE, ADJUSTMENTS, Intermediate
reduction drive (IRD) fluid - drain & refill -
Non NAS.
+ INTERMEDIATE REDUCTION
DRIVE, ADJUSTMENTS, Intermediate
reduction drive (IRD) lubrication system -
drain & refill - NAS.
37.Fit exhaust front pipe.
+ MANIFOLDS & EXHAUST SYSTEMS
- K SERIES KV6, REPAIRS, Front pipe - Non
NAS.
+ MANIFOLDS & EXHAUST SYSTEMS
- K SERIES KV6, REPAIRS, Front pipe - NAS.
Page 428 of 1007

INTERMEDIATE REDUCTION DRIVE
REPAIRS 41-25
Seal - driveshaft - RH
$% 41.29.09
Remove
1.Remove RH drive shaft.
+ DRIVESHAFTS, REPAIRS, Shaft
with both joints - RH.
2.Carefully remove and discard oil seal, take care
not to damage oil seal recess.
Refit
1.Clean oil seal recess.
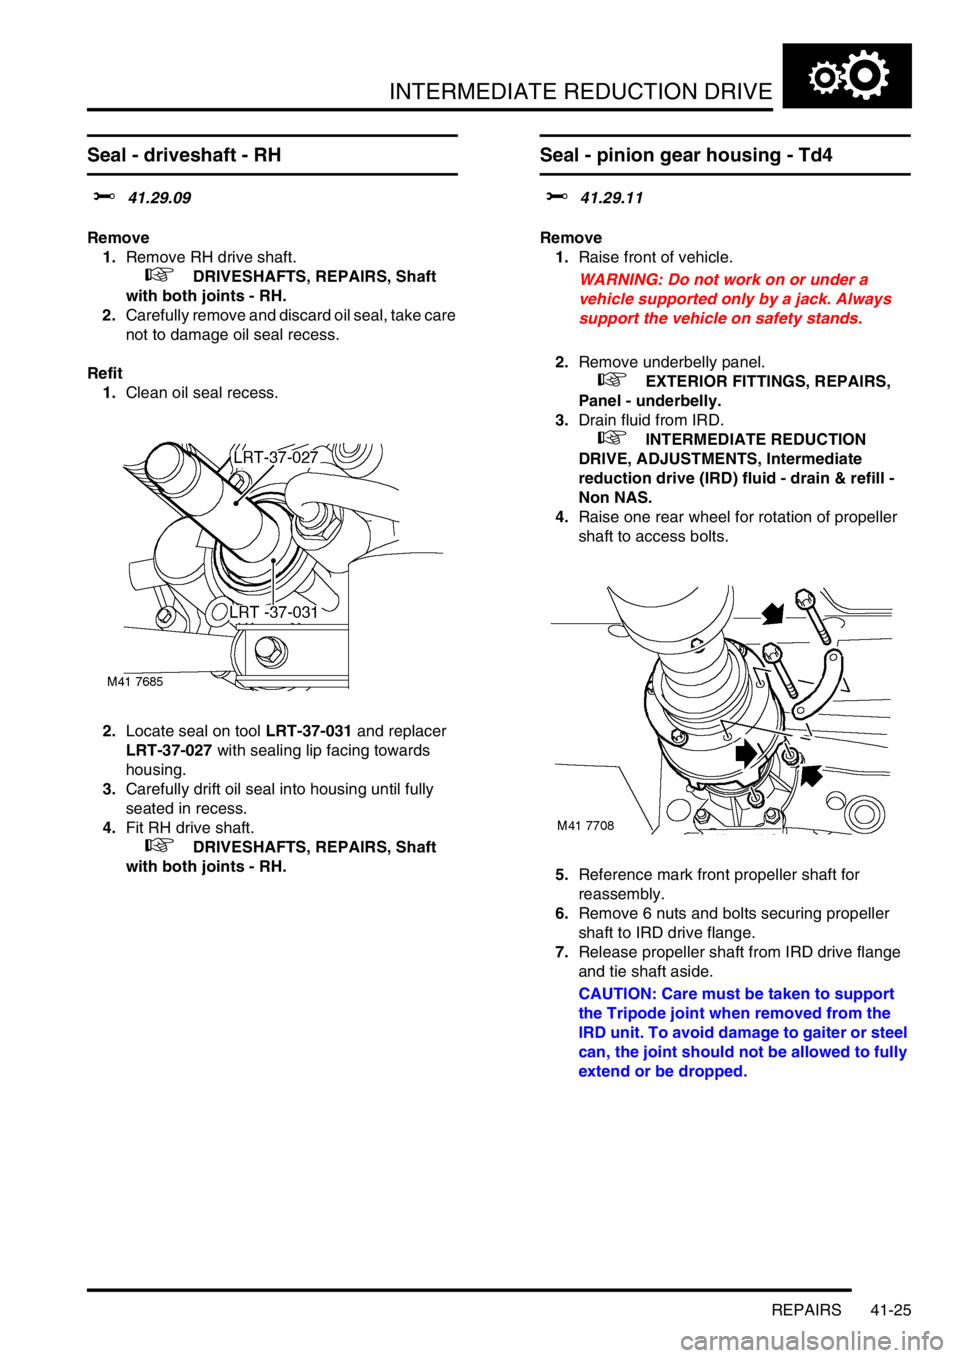
2.Locate seal on tool LRT-37-031 and replacer
LRT-37-027 with sealing lip facing towards
housing.
3.Carefully drift oil seal into housing until fully
seated in recess.
4.Fit RH drive shaft.
+ DRIVESHAFTS, REPAIRS, Shaft
with both joints - RH.
Seal - pinion gear housing - Td4
$% 41.29.11
Remove
1.Raise front of vehicle.
WARNING: Do not work on or under a
vehicle supported only by a jack. Always
support the vehicle on safety stands.
2.Remove underbelly panel.
+ EXTERIOR FITTINGS, REPAIRS,
Panel - underbelly.
3.Drain fluid from IRD.
+ INTERMEDIATE REDUCTION
DRIVE, ADJUSTMENTS, Intermediate
reduction drive (IRD) fluid - drain & refill -
Non NAS.
4.Raise one rear wheel for rotation of propeller
shaft to access bolts.
5.Reference mark front propeller shaft for
reassembly.
6.Remove 6 nuts and bolts securing propeller
shaft to IRD drive flange.
7.Release propeller shaft from IRD drive flange
and tie shaft aside.
CAUTION: Care must be taken to support
the Tripode joint when removed from the
IRD unit. To avoid damage to gaiter or steel
can, the joint should not be allowed to fully
extend or be dropped.
Page 516 of 1007

STEERING
REPAIRS 57-23
Ball joint - track rod
$% 57.55.07
Remove
1.Raise front of vehicle.
WARNING: Do not work on or under a
vehicle supported only by a jack. Always
support the vehicle on safety stands.
2.Remove front road wheel.
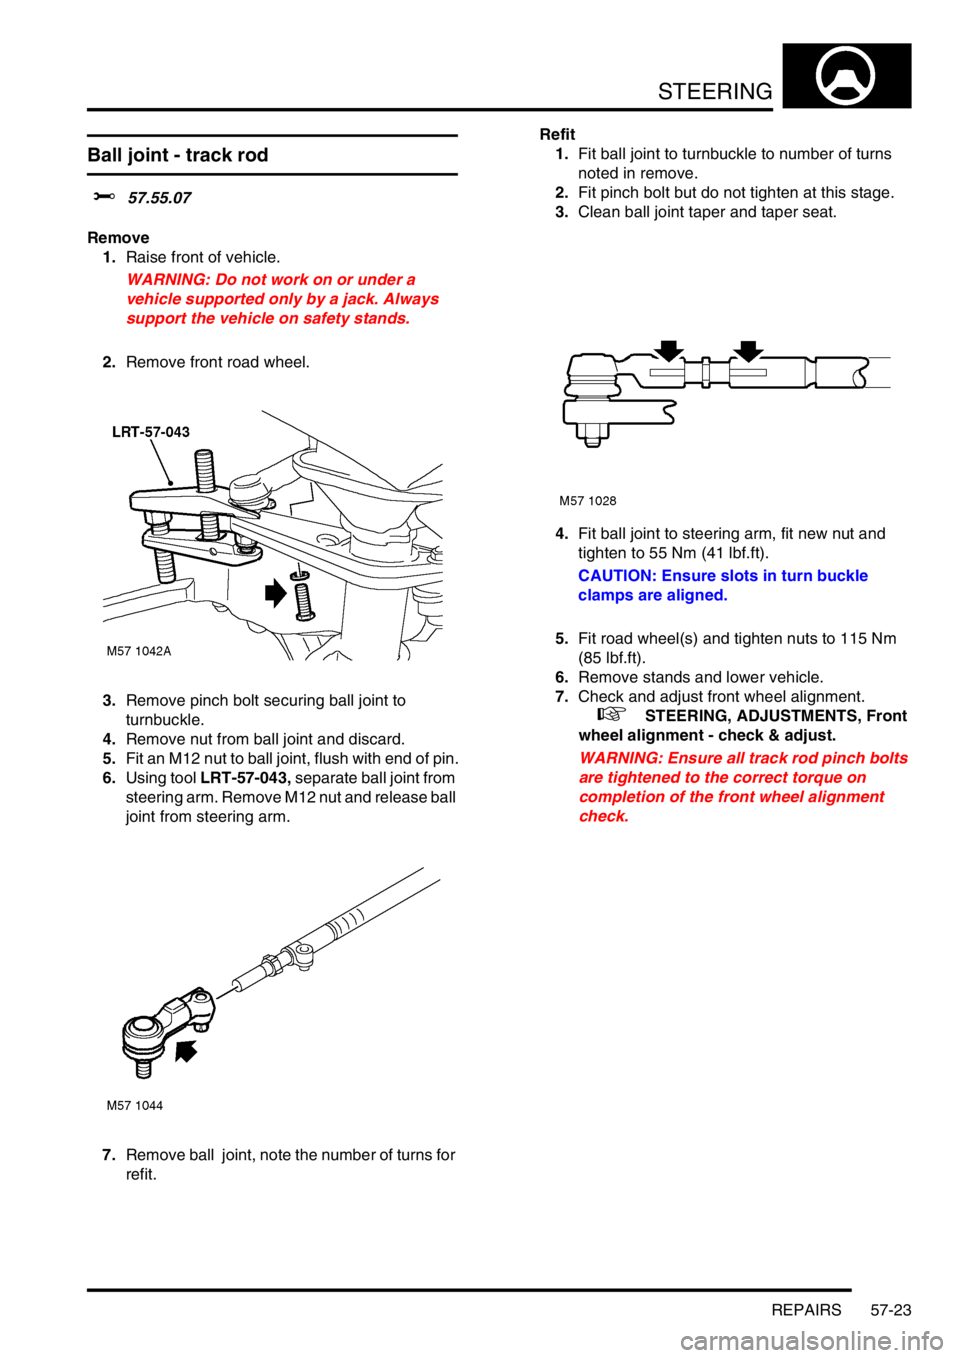
3.Remove pinch bolt securing ball joint to
turnbuckle.
4.Remove nut from ball joint and discard.
5.Fit an M12 nut to ball joint, flush with end of pin.
6.Using tool LRT-57-043, separate ball joint from
steering arm. Remove M12 nut and release ball
joint from steering arm.
7.Remove ball joint, note the number of turns for
refit.Refit
1.Fit ball joint to turnbuckle to number of turns
noted in remove.
2.Fit pinch bolt but do not tighten at this stage.
3.Clean ball joint taper and taper seat.
4.Fit ball joint to steering arm, fit new nut and
tighten to 55 Nm (41 lbf.ft).
CAUTION: Ensure slots in turn buckle
clamps are aligned.
5.Fit road wheel(s) and tighten nuts to 115 Nm
(85 lbf.ft).
6.Remove stands and lower vehicle.
7.Check and adjust front wheel alignment.
+ STEERING, ADJUSTMENTS, Front
wheel alignment - check & adjust.
WARNING: Ensure all track rod pinch bolts
are tightened to the correct torque on
completion of the front wheel alignment
check.
Page 542 of 1007

REAR SUSPENSION
REPAIRS 64-7
17.Remove cover from top mounting.
18.Compress spring by 2 to 3 cm until loose, hold
damper shaft with Allen key, remove and
discard mounting plate nut.
19.Remove top mounting plate.
20.Remove rebound washer and mounting plate.
21.Remove spring aid and bump plate.
22.Remove spring seat, dust cover and bump stop
cup.
23.Remove damper from spring.
24.Release and remove spring from compressor.Refit
1.Inspect damper, spring mounting rubbers and
bearing for deterioration and damage.
2.Clean mating faces of spring, mounting and
mounting plate.
3.Clean damper shaft and bump stop plate.
4.Position spring and damper assembly to spring
compressor. Compress spring.
5.Fit damper to spring, ensure spring locates in
cut recess in damper plate.
6.Fit bump stop, bump stop cup and dust cover to
damper.
7.Fit spring aid and bump plate.
8.Fit mounting plate and rebound washer.
9.Using new nut, hold damper shaft with Allen
key and tighten nut to 57 Nm (42 lbf.ft).
CAUTION: Note alignment of top mounting,
spring and damper dust cover.
10.Fit top mounting cover.
11.Release and remove spring from compressor.
12.Clean mating face of top mounting plate.
13.Fit rubber seal to top mounting.
14.Position damper assembly and align top
mounting to body, fit nuts and tighten to 45 Nm
(33 lbf.ft).
15.Fit rear quarter lower trim casings.
+ INTERIOR TRIM COMPONENTS,
REPAIRS, Trim casing - rear quarter - lower
- 3 door.
+ INTERIOR TRIM COMPONENTS,
REPAIRS, Trim casing - rear quarter - lower
- 5 door.
16.Fit hub to damper and tighten bolts to 205 Nm
(151 lbf.ft).
17.Clean ABS sensor, smear sensor with an anti-
seize grease and fit sensor to hub.
CAUTION: Ensure ABS sensor is fully
located into hub, so that sensor touches
pole wheel teeth.
18.Secure brake hose and ABS sensor harness to
damper.
19.Secure brake hose with 'C' clip.
20.Remove plugs and clean brake pipe male end.
21.Align hose to brake pipe and tighten union to 14
Nm (10 lbf.ft).
22.Remove clamp from brake hose.
23.Bleed brake system.
+ BRAKES, ADJUSTMENTS, Brake
bleed.
24.Fit road wheel(s) and tighten nuts to 115 Nm
(85 lbf.ft).
25.Remove stands and lower vehicle.