POWER switch Lexus CT200h 2011 (in English) User Guide
[x] Cancel search | Manufacturer: LEXUS, Model Year: 2011, Model line: CT200h, Model: Lexus CT200h 2011Pages: 696
Page 76 of 696
76
1-3. Opening, closing and locking the doors
CT200h_EE (OM76041E)
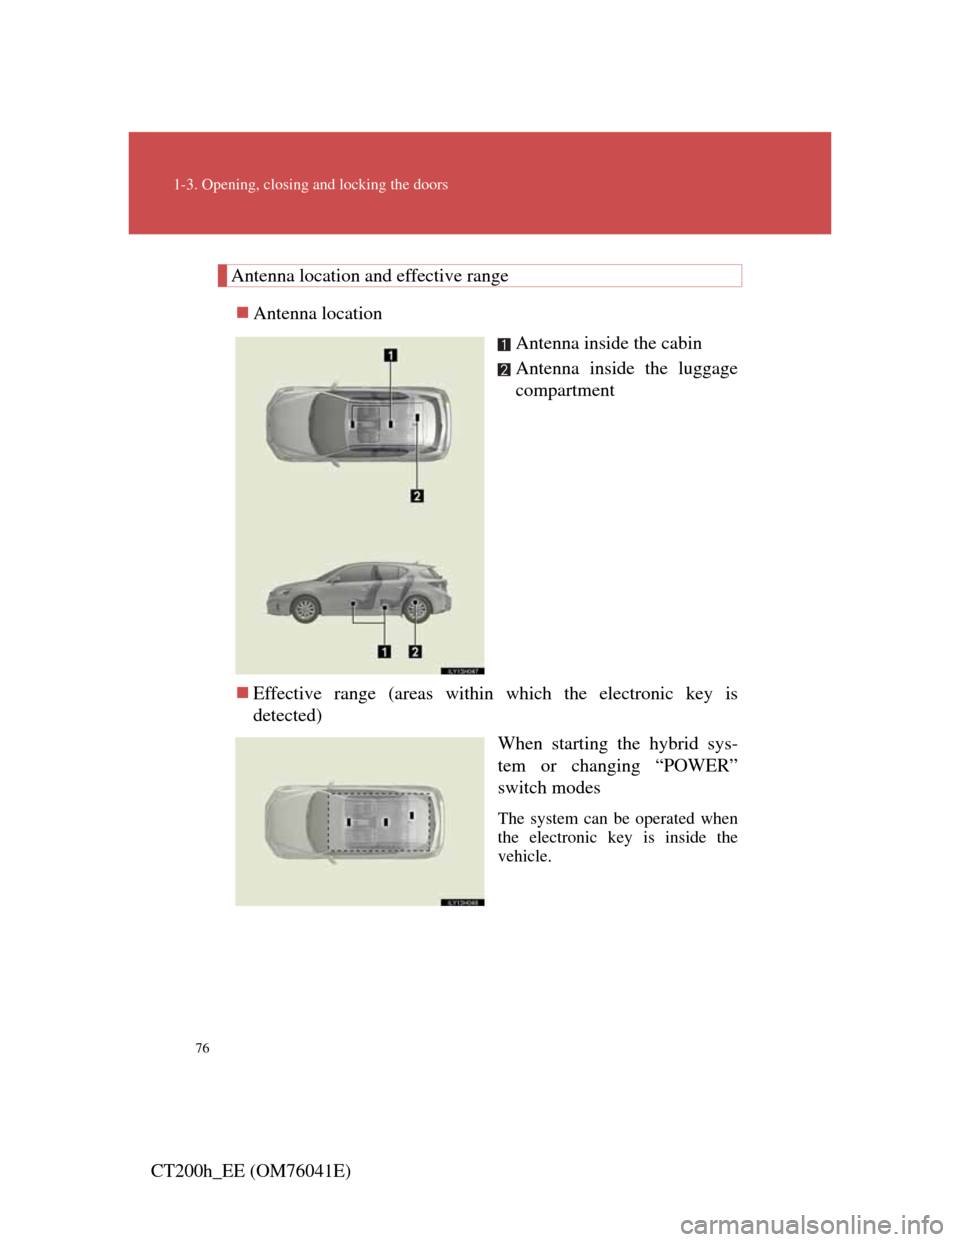
Antenna location and effective range
Antenna location
Antenna inside the cabin
Antenna inside the luggage
compartment
Effective range (areas within which the electronic key is
detected)
When starting the hybrid sys-
tem or changing “POWER”
switch modes
The system can be operated when
the electronic key is inside the
vehicle.
Page 77 of 696

77
1-3. Opening, closing and locking the doors
1
Before driving
CT200h_EE (OM76041E)
Conditions affecting operation
P. 8 2
Electronic key battery depletion
P. 8 3
To operate the system properly
Make sure to carry the electronic key when operating the system.
Depending on the position and holding condition of the electronic key, the
key may not be detected correctly and the system may not operate properly.
(The alarm may go off accidentally, or the door lock prevention may not
function.)
Note for the push-button start system
Even when the electronic key is within the effective range (detection
areas), the system may not operate properly.
For example, the electronic key is on the instrument panel, luggage
cover, floor or in the glove box when the hybrid system is started or
“POWER” switch modes are changed.
Even if the electronic key is not inside the vehicle, it may be possible to
start the hybrid system if the electronic key is near the window.
Page 78 of 696
78
1-3. Opening, closing and locking the doors
CT200h_EE (OM76041E)
Alarms and warning messages
A combination of exterior and interior alarms are used to prevent theft of the
vehicle and unforeseeable accidents resulting from erroneous operation.
Take appropriate measures according to the warning message shown on the
multi-information display. (P. 565)
The following table describes circumstances and correction procedures
when only alarms are sounded.
If the push-button start system does not operate properly
P. 6 1 8
When the electronic key battery is fully depleted
P. 5 1 5
Customization
Settings (e.g. push-button start system) can be changed.
(Customizable features P. 655)
AlarmSituationCorrection procedure
Interior alarm
pings repeatedly
The “POWER” switch was
turned to ACCESSORY
mode while the driver’s
door was open (The
driver’s door was opened
when the “POWER”
switch was in ACCES-
SORY mode)
Turn the “POWER”
switch off and close
the driver’s door.
Page 86 of 696

86
1-3. Opening, closing and locking the doors
CT200h_EE (OM76041E)
Locking the front doors from the outside without a key
Move the inside lock button to the lock position.
Close the door while pulling the door handle.
The door cannot be locked if the “POWER” switch is in ACCES-
SORY or ON mode, or the electronic key is left inside the vehicle.
The key may not be detected correctly and the door may be locked.
Rear door child-protector lock
The door cannot be opened
from inside the vehicle when
the lock is set.
These locks can be set to pre-
vent children from opening the
rear doors. Push down on each
rear door switch to lock both
rear doors.
STEP1
STEP2
Page 94 of 696
94
CT200h_EE (OM76041E)
1-4. Adjustable components (seats, mirrors, steering wheel)
Front seats
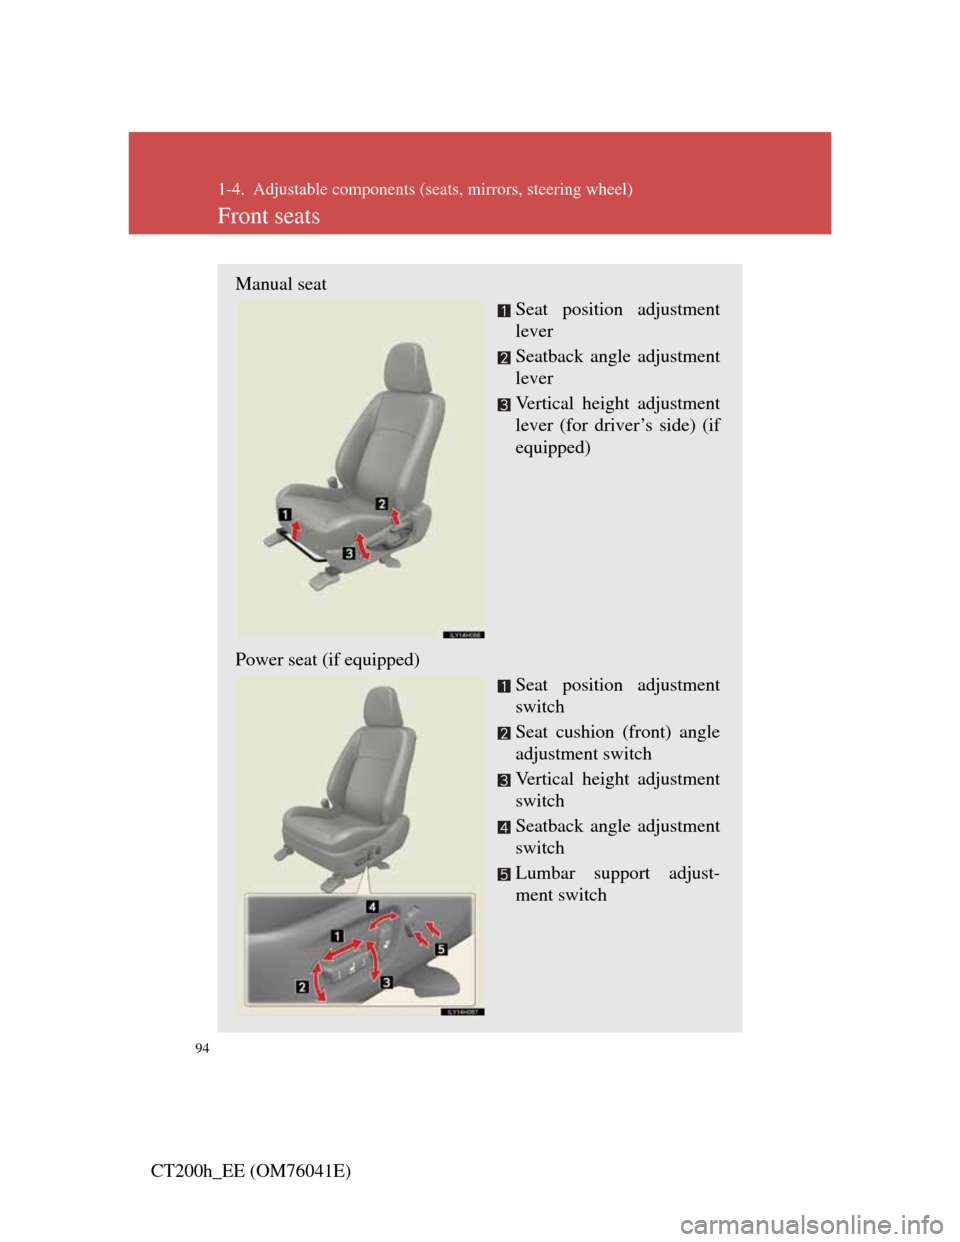
Manual seat
Seat position adjustment
lever
Seatback angle adjustment
lever
Vertical height adjustment
lever (for driver’s side) (if
equipped)
Power seat (if equipped)
Seat position adjustment
switch
Seat cushion (front) angle
adjustment switch
Vertical height adjustment
switch
Seatback angle adjustment
switch
Lumbar support adjust-
ment switch
Page 98 of 696
98
1-4. Adjustable components (seats, mirrors, steering wheel)
CT200h_EE (OM76041E)
Driving position memory
: If equipped
Your preferred driving position (the position of the driver’s seat and
outside rear view mirrors) can be memorized and recalled with the
touch of a button. It is also possible to set this function to activate
automatically when the doors are unlocked.
Three different driving positions can be entered into memory.
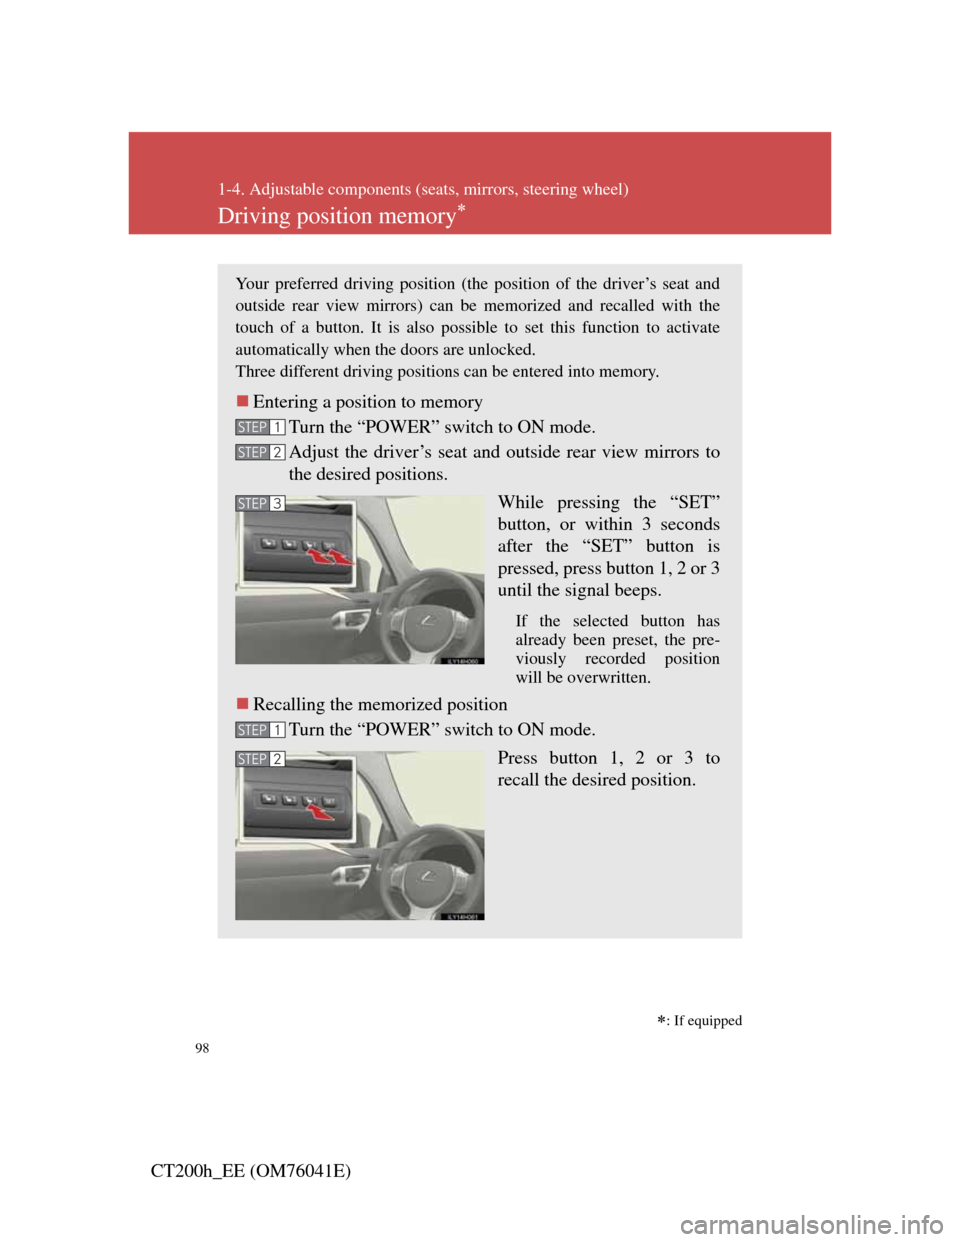
Entering a position to memory
Turn the “POWER” switch to ON mode.
Adjust the driver’s seat and outside rear view mirrors to
the desired positions.
While pressing the “SET”
button, or within 3 seconds
after the “SET” button is
pressed, press button 1, 2 or 3
until the signal beeps.
If the selected button has
already been preset, the pre-
viously recorded position
will be overwritten.
Recalling the memorized position
Turn the “POWER” switch to ON mode.
Press button 1, 2 or 3 to
recall the desired position.
STEP1
STEP2
STEP3
STEP1
STEP2
Page 99 of 696

99
1-4. Adjustable components (seats, mirrors, steering wheel)
1
Before driving
CT200h_EE (OM76041E)
Linking driving position memory with door unlock operation
(driver’s seat only)
Record your driving position to button 1, 2 or 3 before performing
the following:
Carry only the key (including the card key) to which you want to
link the driving position. If 2 or more keys are in the vehicle, the
driving position cannot be linked properly.
Close the driver’s door and turn the “POWER” switch to
OFF mode.
Press the desired button (1, 2 or
3) to recall the position. Then,
while keep pressing the button,
press the driver’s door lock
switches (either lock or unlock)
until the signal beeps.
The driving position is recalled
when the driver’s door is
unlocked using the entry func-
tion or wireless remote control
and the driver’s door is opened.
STEP1
STEP2
Page 100 of 696

100
1-4. Adjustable components (seats, mirrors, steering wheel)
CT200h_EE (OM76041E)
Operating the driving position memory after turning the “POWER” switch
off
Memorized positions can be activated up to 180 seconds after the driver’s
door is opened and another 60 seconds after it is closed again, even after
turning the “POWER” switch off.
Canceling the linked door unlock operation
Turn the “POWER” switch to ON mode and close the driver’s door.
While pressing the “SET” button, press the driver’s door lock
switches (either lock or unlock) until the signal beeps.
Stopping seat position operation part-way through
Perform any of the following operations:
Press the “SET” button.
Press button 1, 2 or 3.
Adjust the seat using the switches (only cancels seat position recall).
Correct seat position
When the seat is in the most forward or most backward position, and the
seat is being moved in those directions, the system may not correctly recog-
nize the current position and the memorized position will not be correctly
recalled.
CAUTION
Seat adjustment caution
Take care during seat adjustment so that the seat does not strike the rear pas-
senger or squeeze your body against the steering wheel.
STEP1
STEP2
Page 112 of 696
112
1-4. Adjustable components (seats, mirrors, steering wheel)
CT200h_EE (OM76041E)
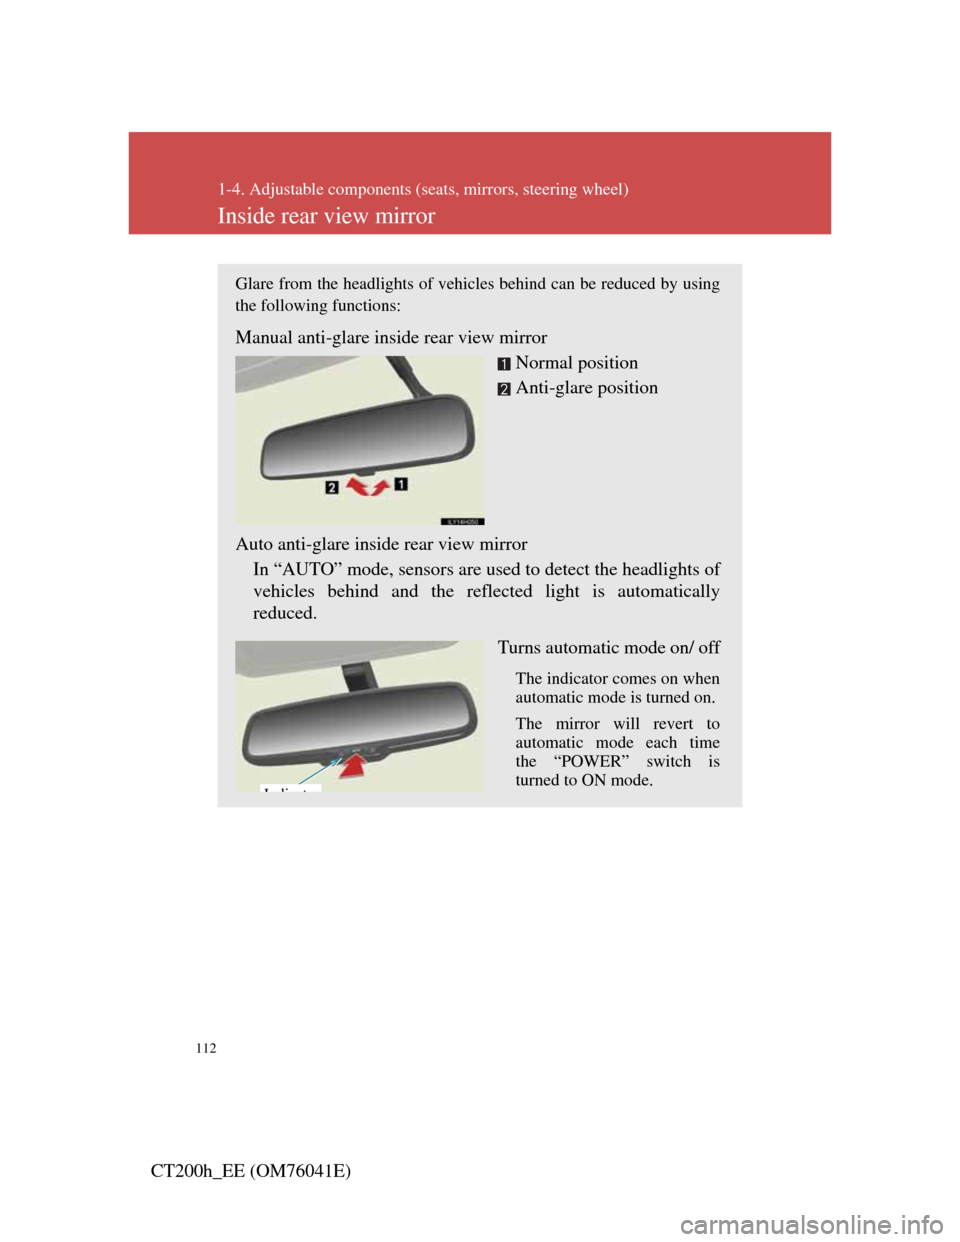
Inside rear view mirror
Glare from the headlights of vehicles behind can be reduced by using
the following functions:
Manual anti-glare inside rear view mirror
Normal position
Anti-glare position
Auto anti-glare inside rear view mirror
In “AUTO” mode, sensors are used to detect the headlights of
vehicles behind and the reflected light is automatically
reduced.
Turns automatic mode on/ off
The indicator comes on when
automatic mode is turned on.
The mirror will revert to
automatic mode each time
the “POWER” switch is
turned to ON mode.
Idi t
Page 117 of 696

117
1-4. Adjustable components (seats, mirrors, steering wheel)
1
Before driving
CT200h_EE (OM76041E)
Mirror angle can be adjusted when
The “POWER” switch is in ACCESSORY or ON mode.
Linked mirror function when reversing (vehicles with driving position
memory)
The outside rear view mirrors will automatically angle downwards when the
vehicle is reversing in order to give a better view of the ground. However,
this function will not operate when the mirror select switch is in the neutral
position (between “L” and “R”).
Rain clearing mirrors (if equipped)
When water droplets collects on the mirror surface, for example when it
rains, the rain clearing (hydrophilic) effect of the mirrors causes the droplets
to be spread out into a film making the rear view clearer. In the following
cases, the rain clearing effect will be reduced temporarily, but will return
after 1 or 2 days’ exposure to direct sunlight.
After wiping dirt off the mirrors
When the mirrors fog up
After waxing your vehicle in an automatic car wash
After your vehicle has been parked for a long period in underground
parking lots etc. where there is no direct sunlight
When the mirrors are fogged up
Turn on the mirror defoggers to defog the mirrors. (P. 323)
Automatic adjustment of the mirror angle (vehicles with driving position
memory)
A desired mirror face angle can be entered to memory and recalled automat-
ically by the driving position memory. (P. 9 8 )
Auto anti-glare function (if equipped)
When the anti-glare inside rear view mirror is set to automatic mode, the
outside rear view mirrors will activate in conjunction with the anti-glare
inside rear view mirror to reduce reflected light. (P. 1 1 2 )