turn signal Lexus CT200h 2011 Owner's Manual (in English)
[x] Cancel search | Manufacturer: LEXUS, Model Year: 2011, Model line: CT200h, Model: Lexus CT200h 2011Pages: 696
Page 3 of 696

1
2
3
4
5
6
3
CT200h_EE (OM76041E)
1-7. Theft deterrent system
Immobilizer system ............ 131
Double locking system ....... 136
Alarm ................................. 138
1-8. Safety information
Correct driving posture ...... 146
SRS airbags ........................ 148
Airbag manual on-off
system .............................. 160
Child restraint systems ....... 163
Installing child restraints .... 1732-1. Driving procedures
Driving the vehicle ............. 184
Power (ignition) switch ...... 196
EV drive mode ................... 201
Hybrid transmission ........... 204
Turn signal lever ................ 213
Parking brake ..................... 214
Horn ................................... 215
2-2. Instrument cluster
Gauges and meters ............. 216
Indicators and warning
lights................................. 222
Multi-information display .. 226
2-3. Operating the lights and
windshield wipers
Headlight switch ................ 232
Fog light switch.................. 237
Windshield wipers and
washer .............................. 239
Rear window wiper and
washer .............................. 245
Headlight cleaner switch .... 247
2When driving
Page 8 of 696
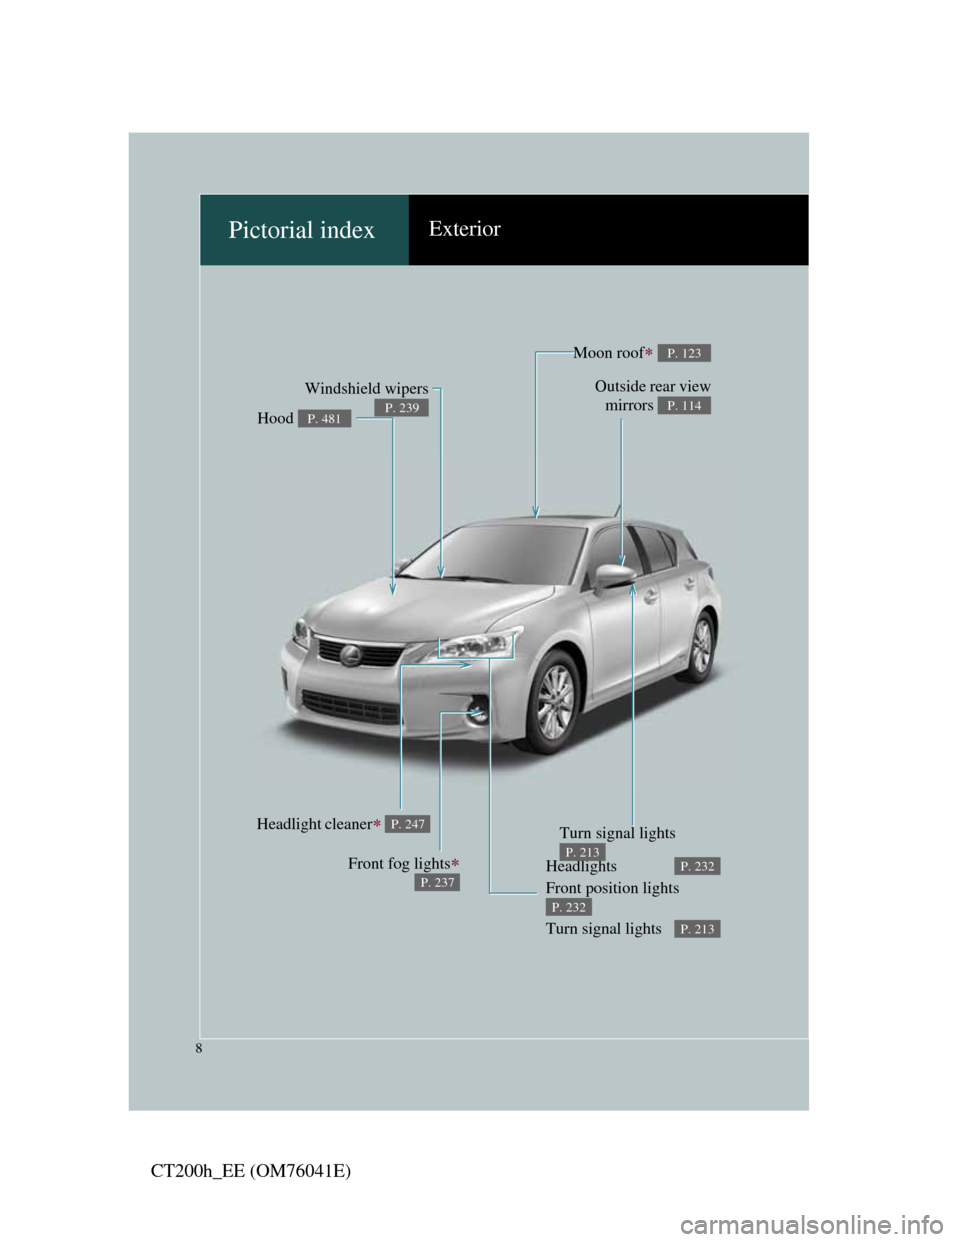
8
CT200h_EE (OM76041E)
Moon roof P. 123
Front fog lights
P. 237
Hood P. 481
Windshield wipers
P. 239
Outside rear view
mirrors
P. 114
Headlight cleaner P. 247
Pictorial indexExterior
Headlights
Front position lights
Turn signal lights P. 232
P. 232
P. 213
Turn signal lights
P. 213
Page 9 of 696
9
CT200h_EE (OM76041E)
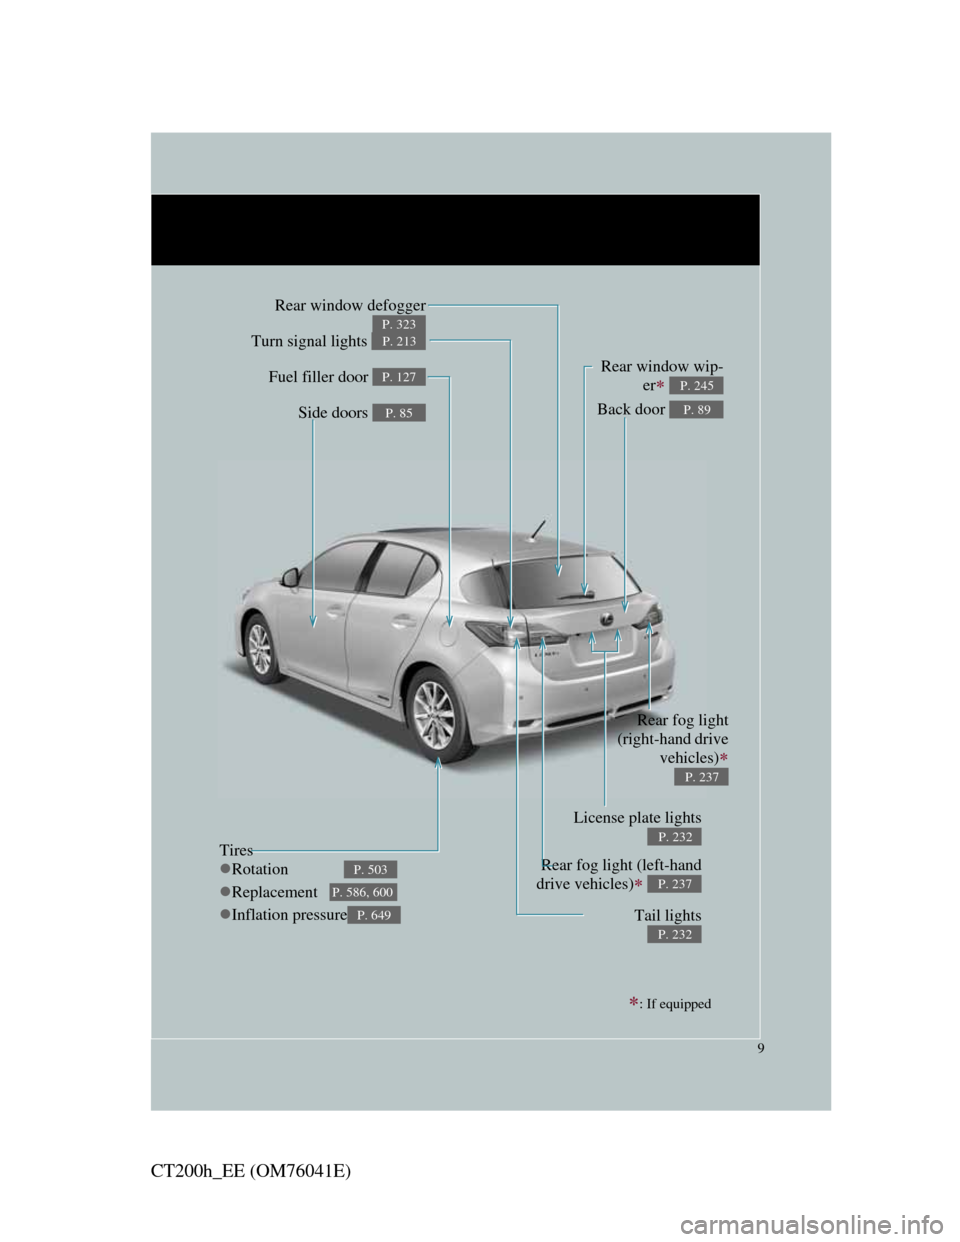
Rear window defogger
P. 323
Tires
Rotation
Replacement
Inflation pressure
P. 503
P. 586, 600
P. 649
Fuel filler door P. 127
Turn signal lights P. 213
Side doors P. 85Back door P. 89
Rear window wip-
er
P. 245
: If equipped
Rear fog light
(right-hand drive
vehicles)
P. 237
Rear fog light (left-hand
drive vehicles)
P. 237
Tail lights
P. 232
License plate lights
P. 232
Page 14 of 696
14
CT200h_EE (OM76041E)
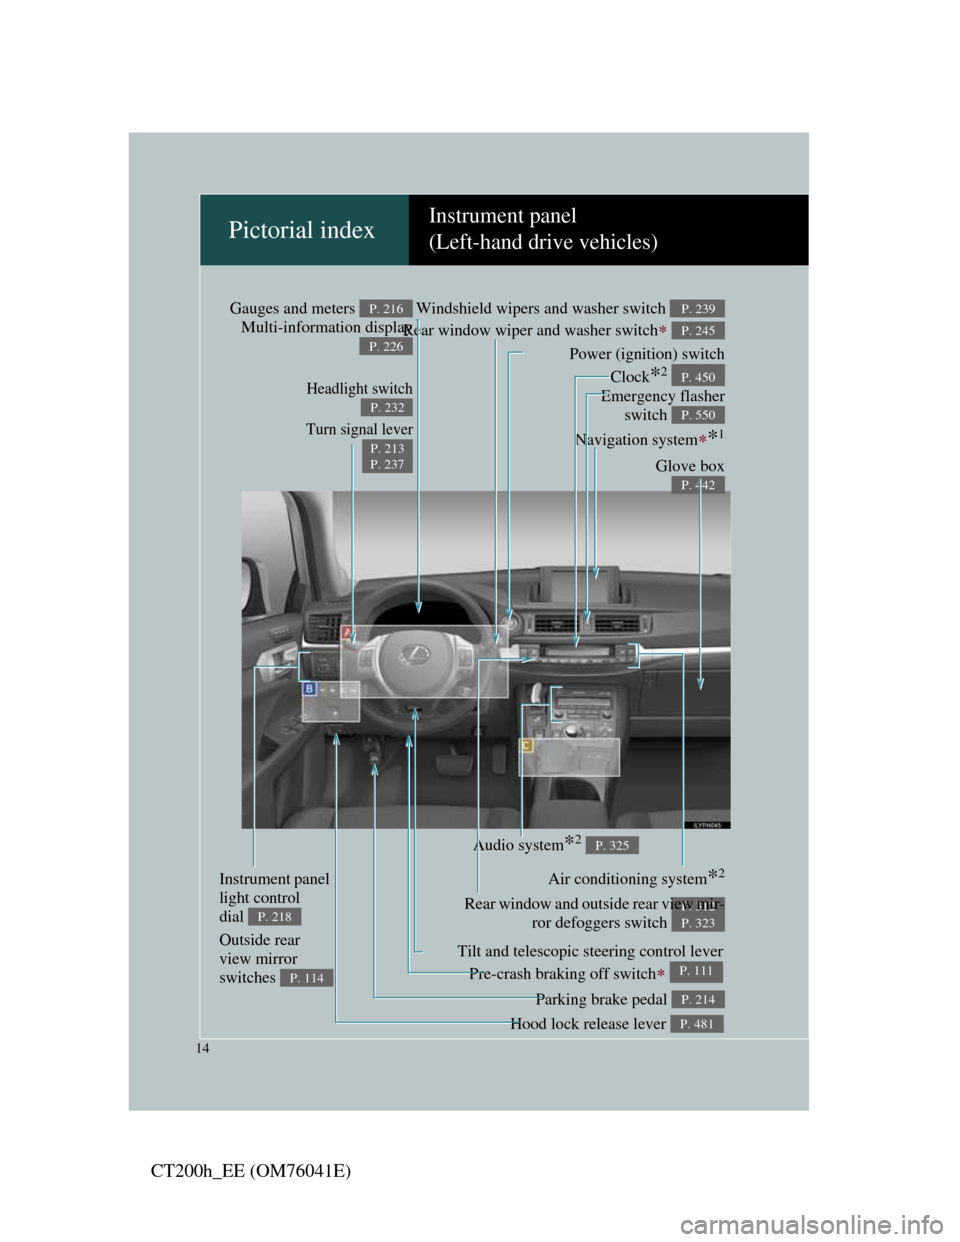
Pictorial indexInstrument panel
(Left-hand drive vehicles)
Headlight switch
Turn signal lever
P. 232
P. 213
P. 237
Pre-crash braking off switch P. 293
Parking brake pedal P. 214
Hood lock release lever P. 481
Tilt and telescopic steering control lever
P. 111
Glove box
P. 442
Power (ignition) switch
P. 196
Windshield wipers and washer switch
Rear window wiper and washer switch
P. 239
P. 245
Gauges and meters
Multi-information displayP. 216
P. 226
Audio system*2 P. 325
Navigation system*1
Emergency flasher
switch
P. 550
Air conditioning system*2
P. 312Rear window and outside rear view mir-
ror defoggers switch
P. 323
Instrument panel
light control
dial
P. 218
Outside rear
view mirror
switches
P. 114
Clock*2 P. 450
Page 22 of 696
22
CT200h_EE (OM76041E)
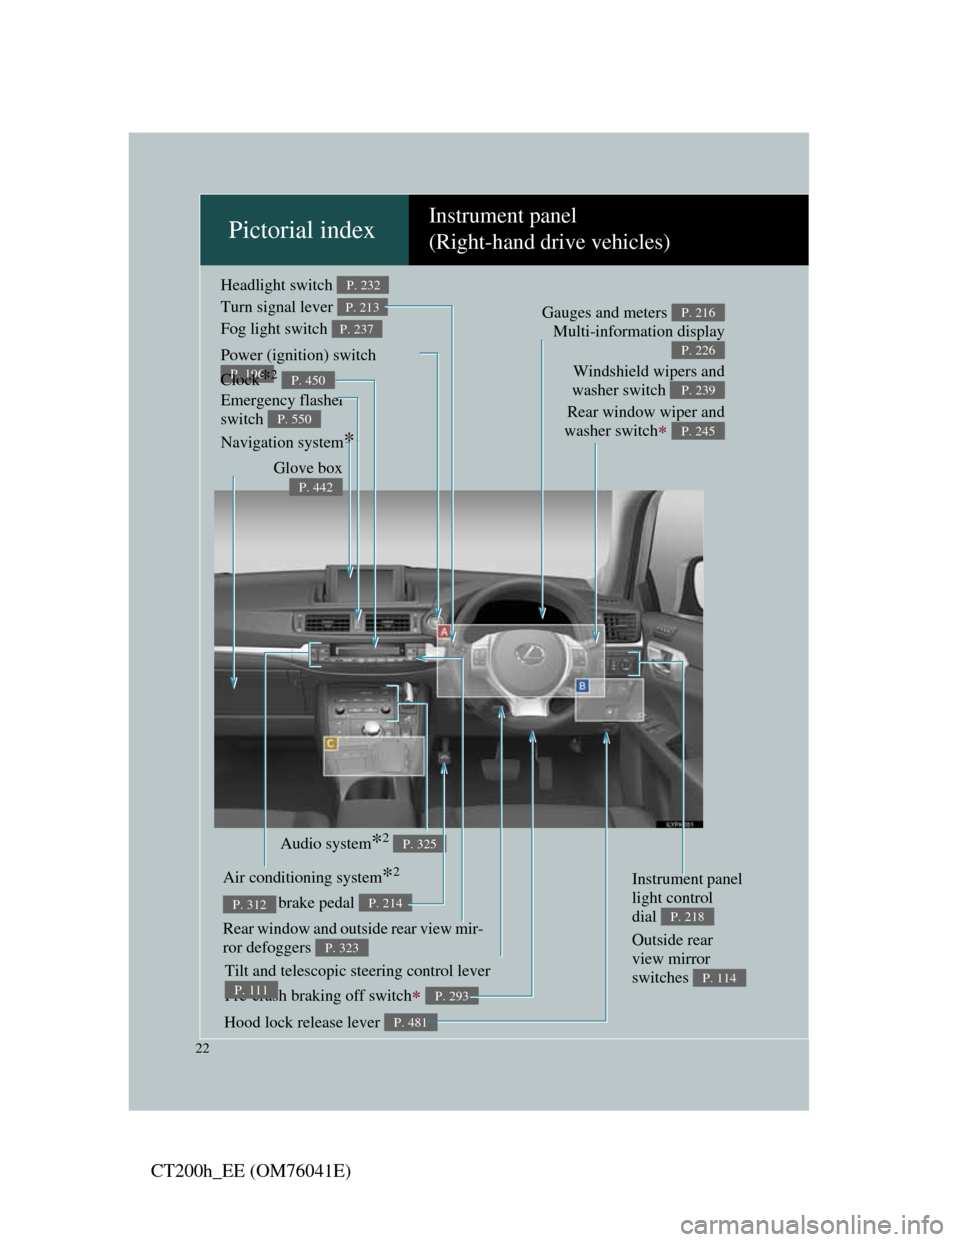
Pictorial indexInstrument panel
(Right-hand drive vehicles)
Headlight switch
Turn signal lever
Fog light switch P. 232
P. 213
P. 237
Pre-crash braking off switch P. 293
Parking brake pedal P. 214
Hood lock release lever P. 481
Tilt and telescopic steering control lever
P. 111
Audio system*2 P. 325
Air conditioning system*2
P. 312
Rear window and outside rear view mir-
ror defoggers
P. 323
Glove box
P. 442
Power (ignition) switch
P. 196Windshield wipers and
washer switch
Rear window wiper and
washer switch
P. 239
P. 245
Gauges and meters
Multi-information displayP. 216
P. 226
Navigation system*1 Emergency flasher
switch
P. 550
Instrument panel
light control
dial
P. 218
Outside rear
view mirror
switches
P. 114
Clock*2 P. 450
Page 98 of 696
98
1-4. Adjustable components (seats, mirrors, steering wheel)
CT200h_EE (OM76041E)
Driving position memory
: If equipped
Your preferred driving position (the position of the driver’s seat and
outside rear view mirrors) can be memorized and recalled with the
touch of a button. It is also possible to set this function to activate
automatically when the doors are unlocked.
Three different driving positions can be entered into memory.
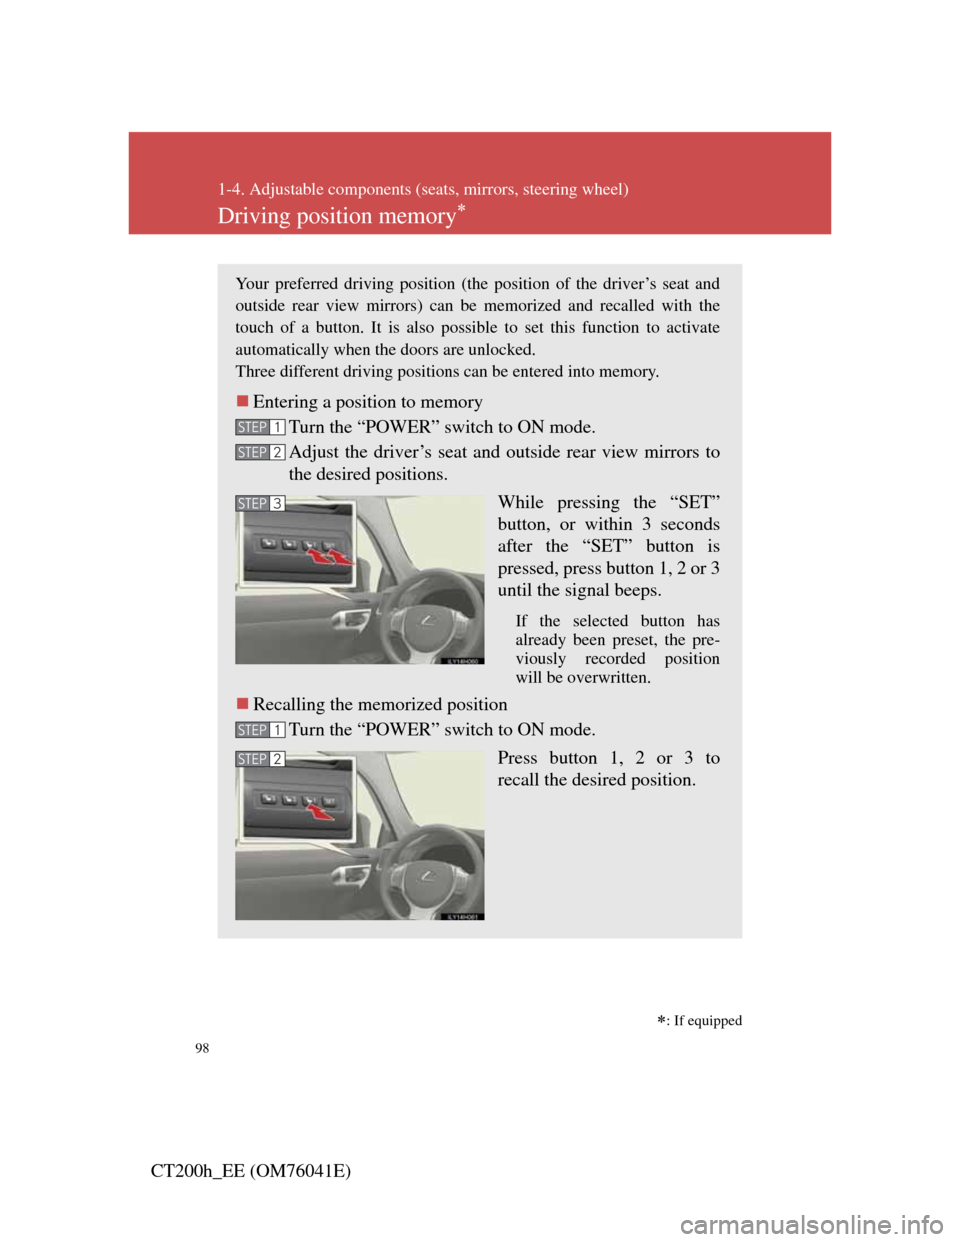
Entering a position to memory
Turn the “POWER” switch to ON mode.
Adjust the driver’s seat and outside rear view mirrors to
the desired positions.
While pressing the “SET”
button, or within 3 seconds
after the “SET” button is
pressed, press button 1, 2 or 3
until the signal beeps.
If the selected button has
already been preset, the pre-
viously recorded position
will be overwritten.
Recalling the memorized position
Turn the “POWER” switch to ON mode.
Press button 1, 2 or 3 to
recall the desired position.
STEP1
STEP2
STEP3
STEP1
STEP2
Page 99 of 696

99
1-4. Adjustable components (seats, mirrors, steering wheel)
1
Before driving
CT200h_EE (OM76041E)
Linking driving position memory with door unlock operation
(driver’s seat only)
Record your driving position to button 1, 2 or 3 before performing
the following:
Carry only the key (including the card key) to which you want to
link the driving position. If 2 or more keys are in the vehicle, the
driving position cannot be linked properly.
Close the driver’s door and turn the “POWER” switch to
OFF mode.
Press the desired button (1, 2 or
3) to recall the position. Then,
while keep pressing the button,
press the driver’s door lock
switches (either lock or unlock)
until the signal beeps.
The driving position is recalled
when the driver’s door is
unlocked using the entry func-
tion or wireless remote control
and the driver’s door is opened.
STEP1
STEP2
Page 100 of 696

100
1-4. Adjustable components (seats, mirrors, steering wheel)
CT200h_EE (OM76041E)
Operating the driving position memory after turning the “POWER” switch
off
Memorized positions can be activated up to 180 seconds after the driver’s
door is opened and another 60 seconds after it is closed again, even after
turning the “POWER” switch off.
Canceling the linked door unlock operation
Turn the “POWER” switch to ON mode and close the driver’s door.
While pressing the “SET” button, press the driver’s door lock
switches (either lock or unlock) until the signal beeps.
Stopping seat position operation part-way through
Perform any of the following operations:
Press the “SET” button.
Press button 1, 2 or 3.
Adjust the seat using the switches (only cancels seat position recall).
Correct seat position
When the seat is in the most forward or most backward position, and the
seat is being moved in those directions, the system may not correctly recog-
nize the current position and the memorized position will not be correctly
recalled.
CAUTION
Seat adjustment caution
Take care during seat adjustment so that the seat does not strike the rear pas-
senger or squeeze your body against the steering wheel.
STEP1
STEP2
Page 183 of 696
2When driving
183
CT200h_EE (OM76041E)
2-1. Driving procedures
Driving the vehicle........... 184
Power (ignition) switch .... 196
EV drive mode ................. 201
Hybrid transmission ......... 204
Turn signal lever .............. 213
Parking brake ................... 214
Horn ................................. 215
2-2. Instrument cluster
Gauges and meters ........... 216
Indicators and warning
lights .............................. 222
Multi-information display 226
2-3. Operating the lights and wind-
shield wipers
Headlight switch.............. 232
Fog light switch ............... 237
Windshield wipers and
washer ............................ 239
Rear window wiper and
washer ............................ 245
Headlight cleaner switch .. 2472-4. Using other driving systems
Cruise control .................. 248
Dynamic radar cruise
control ............................ 252
Lexus parking
assist-sensor ................... 269
Rear view monitor system 275
Driving assist systems ..... 285
Hill-start assist control ..... 290
PCS (Pre-Crash Safety
system)........................... 292
2-5. Driving information
Cargo and luggage ........... 301
Winter driving tips ........... 304
Trailer towing .................. 308
Page 213 of 696
213
2-1. Driving procedures
2
When driving
CT200h_EE (OM76041E)
Turn signal lever
Turn signals can be operated when
The “POWER” switch is in ON mode.
If the indicator flashes faster than usual
Check that a light bulb in the front or rear turn signal lights has not burned
out.
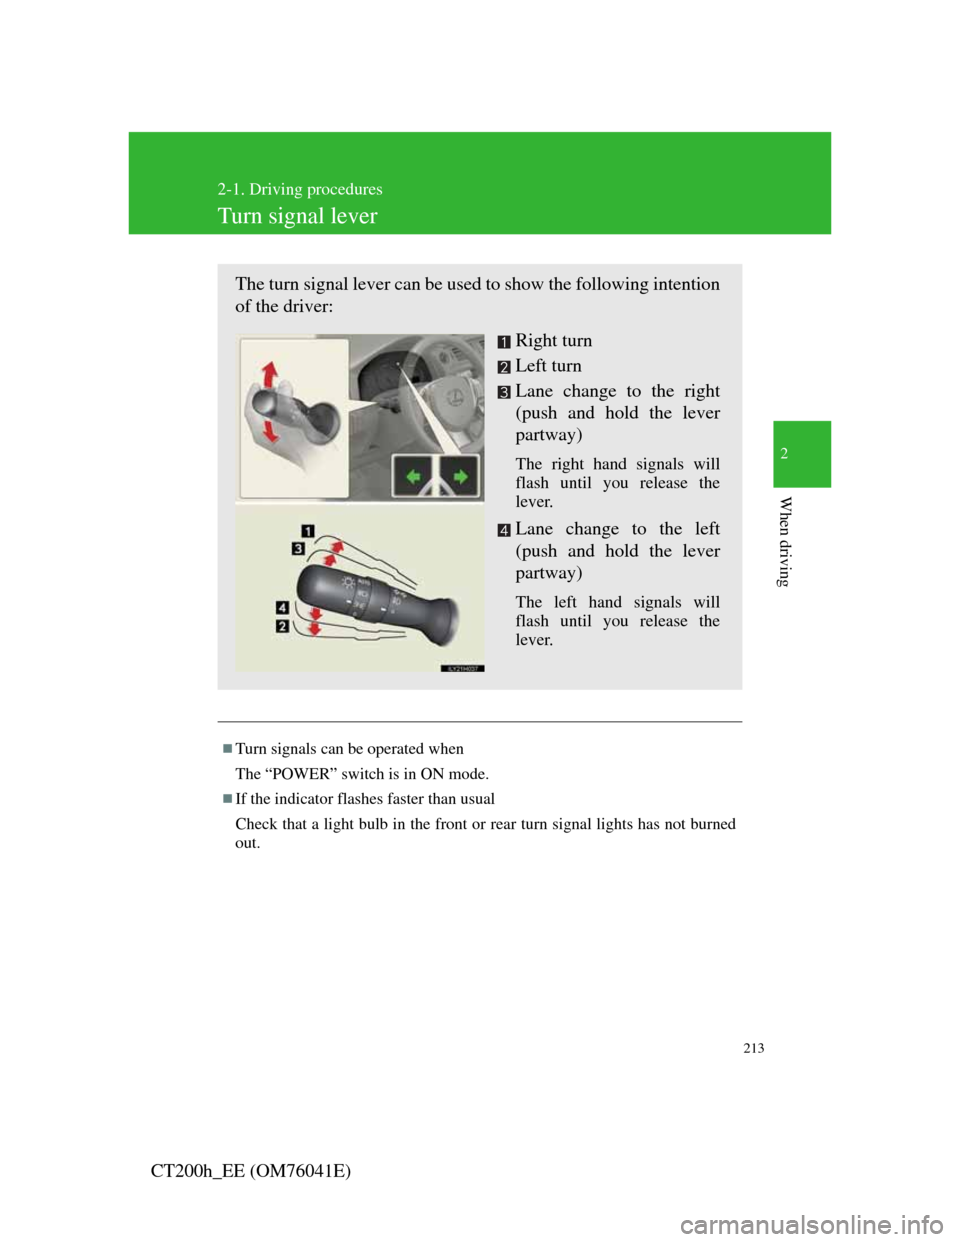
The turn signal lever can be used to show the following intention
of the driver:
Right turn
Left turn
Lane change to the right
(push and hold the lever
partway)
The right hand signals will
flash until you release the
lever.
Lane change to the left
(push and hold the lever
partway)
The left hand signals will
flash until you release the
lever.