change time Lexus CT200h 2012 Navigation Manual (in English)
[x] Cancel search | Manufacturer: LEXUS, Model Year: 2012, Model line: CT200h, Model: Lexus CT200h 2012Pages: 436, PDF Size: 28.25 MB
Page 204 of 436
204
2. SETUP
CT200h_Navi_OM76078E_(EE)
14.02.06 12:30
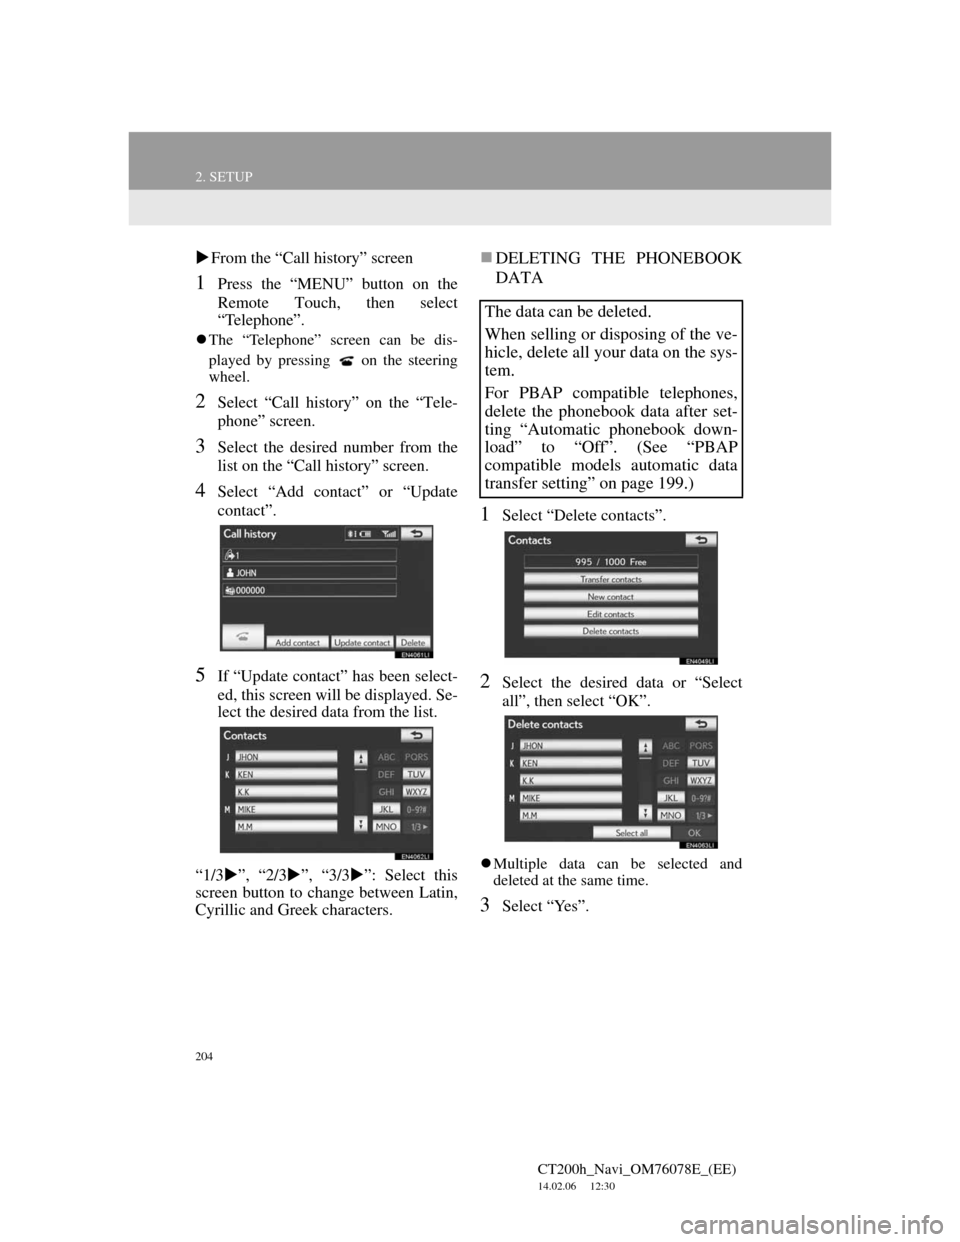
From the “Call history” screen
1Press the “MENU” button on the
Remote Touch, then select
“Telephone”.
The “Telephone” screen can be dis-
played by pressing
on the steering
wheel.
2Select “Call history” on the “Tele-
phone” screen.
3Select the desired number from the
list on the “Call history” screen.
4Select “Add contact” or “Update
contact”.
5If “Update contact” has been select-
ed, this screen will be displayed. Se-
lect the desired data from the list.
“1/3”, “2/3”, “3/3”: Select this
screen button to change between Latin,
Cyrillic and Greek characters.
DELETING THE PHONEBOOK
DATA
1Select “Delete contacts”.
2Select the desired data or “Select
all”, then select “OK”.
Multiple data can be selected and
deleted at the same time.
3Select “Yes”.
The data can be deleted.
When selling or disposing of the ve-
hicle, delete all your data on the sys-
tem.
For PBAP compatible telephones,
delete the phonebook data after set-
ting “Automatic phonebook down-
load” to “Off”. (See “PBAP
compatible models automatic data
transfer setting” on page 199.)
Page 221 of 436
221
2. SETUP
4
TELEPHONE
CT200h_Navi_OM76078E_(EE)
14.02.06 12:30
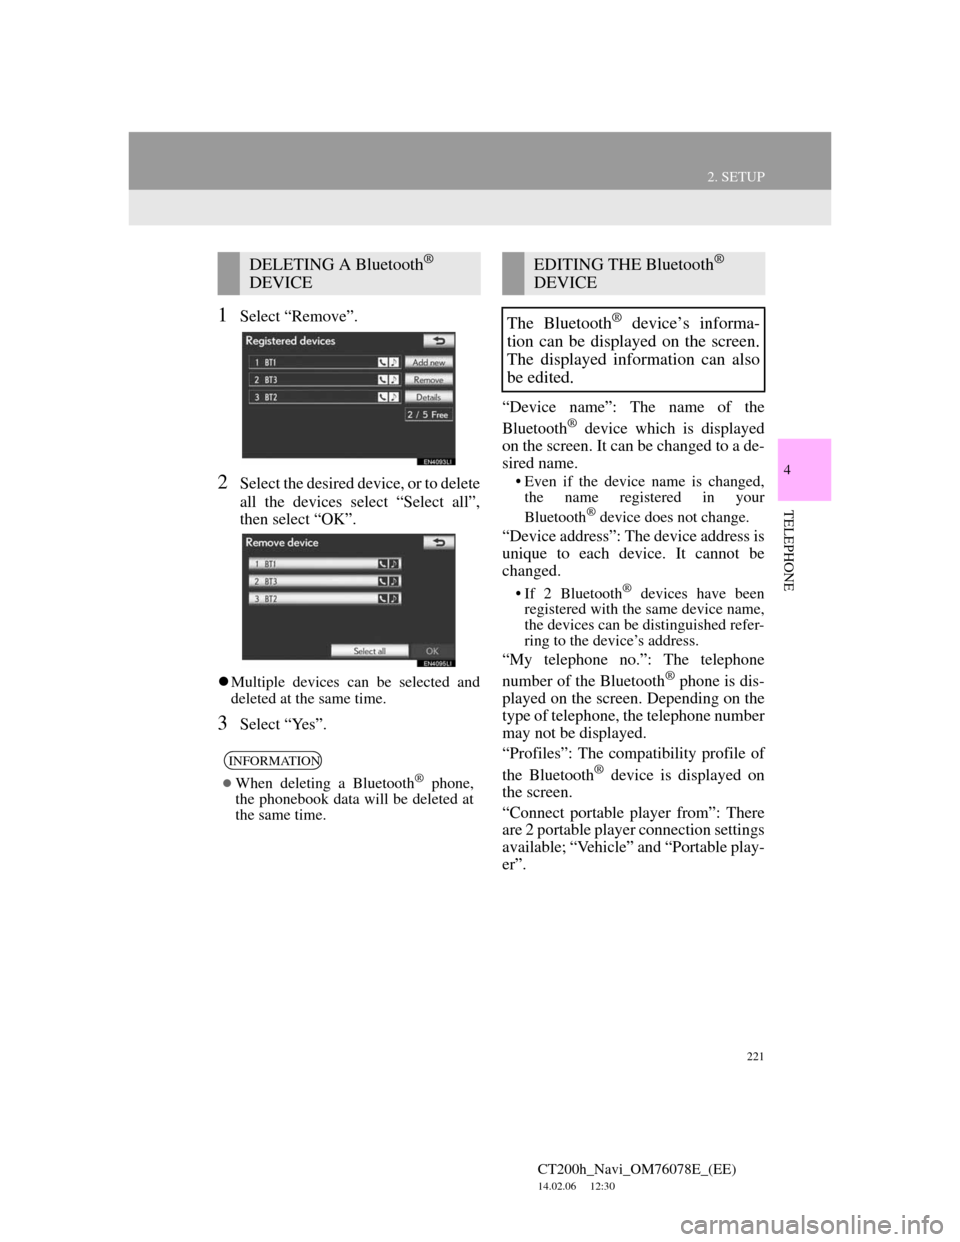
1Select “Remove”.
2Select the desired device, or to delete
all the devices select “Select all”,
then select “OK”.
Multiple devices can be selected and
deleted at the same time.
3Select “Yes”.“Device name”: The name of the
Bluetooth
® device which is displayed
on the screen. It can be changed to a de-
sired name.
• Even if the device name is changed,
the name registered in your
Bluetooth
® device does not change.
“Device address”: The device address is
unique to each device. It cannot be
changed.
• If 2 Bluetooth® devices have been
registered with the same device name,
the devices can be distinguished refer-
ring to the device’s address.
“My telephone no.”: The telephone
number of the Bluetooth® phone is dis-
played on the screen. Depending on the
type of telephone, the telephone number
may not be displayed.
“Profiles”: The compatibility profile of
the Bluetooth
® device is displayed on
the screen.
“Connect portable player from”: There
are 2 portable player connection settings
available; “Vehicle” and “Portable play-
er”.
DELETING A Bluetooth®
DEVICE
INFORMATION
When deleting a Bluetooth® phone,
the phonebook data will be deleted at
the same time.
EDITING THE Bluetooth®
DEVICE
The Bluetooth
® device’s informa-
tion can be displayed on the screen.
The displayed information can also
be edited.
Page 227 of 436
227
2. SETUP
4
TELEPHONE
CT200h_Navi_OM76078E_(EE)
14.02.06 12:30
CHANGING “Bluetooth* power”
When “Bluetooth* power” is “On”:
The Bluetooth® device is automatically
connected when the “POWER” switch
is in ACCESSORY or ON mode.
When “Bluetooth* power” is “Off”:
The Bluetooth
® device is disconnected,
and the system will not connect to it
next time.
The “Bluetooth* power” auto connec-
tion state can be set on or off.
• “On”: The auto connection is turned
on.
• “Off”: The auto connection is turned
off.
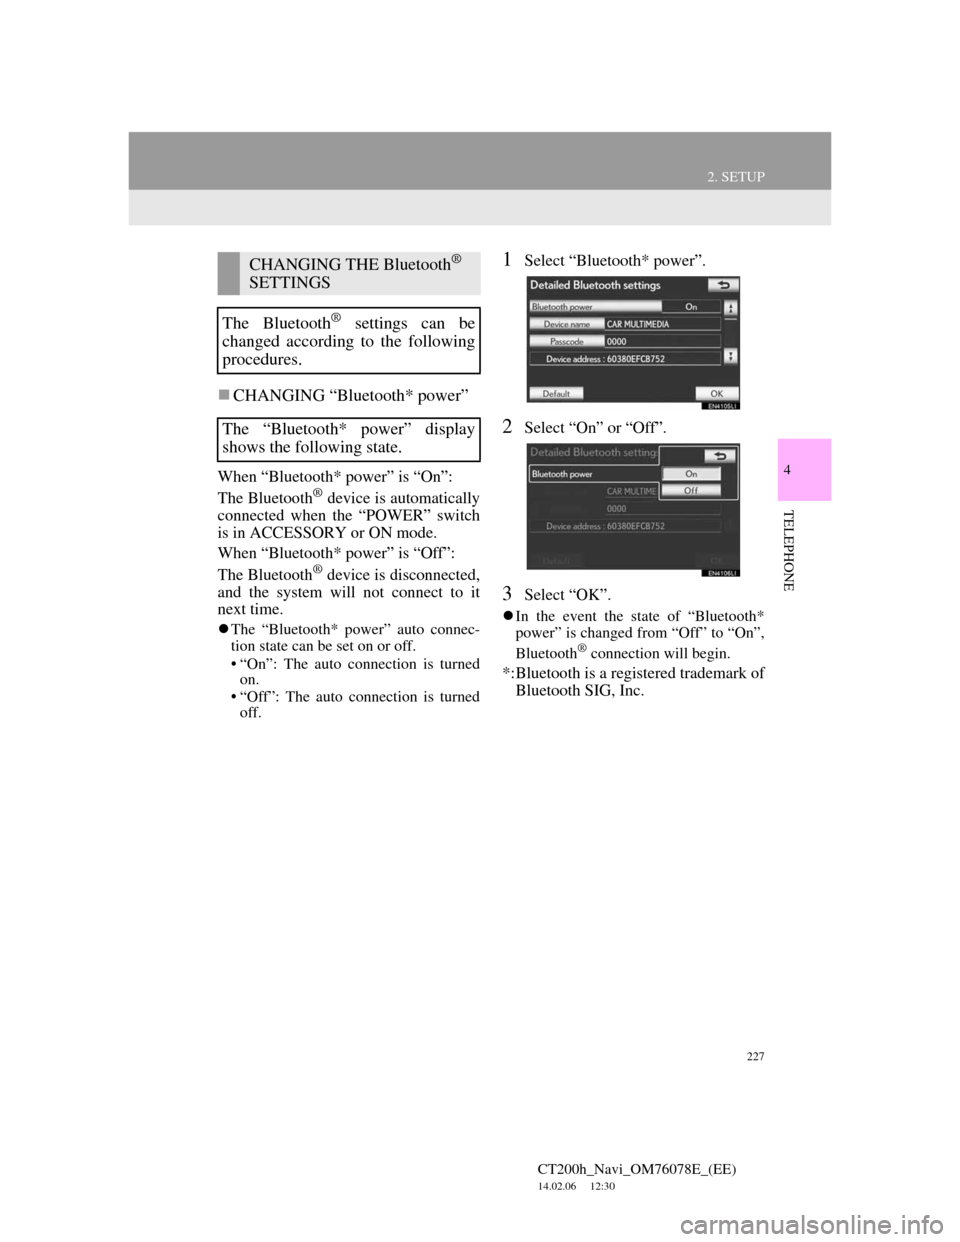
1Select “Bluetooth* power”.
2Select “On” or “Off”.
3Select “OK”.
In the event the state of “Bluetooth*
power” is changed from “Off” to “On”,
Bluetooth
® connection will begin.
*:Bluetooth is a registered trademark of
Bluetooth SIG, Inc.
CHANGING THE Bluetooth®
SETTINGS
The Bluetooth
® settings can be
changed according to the following
procedures.
The “Bluetooth* power” display
shows the following state.
Page 235 of 436
235
1. AUDIO/VIDEO SYSTEM OPERATION
5
AUDIO/VIDEO SYSTEM
CT200h_Navi_OM76078E_(EE)
14.02.06 12:30
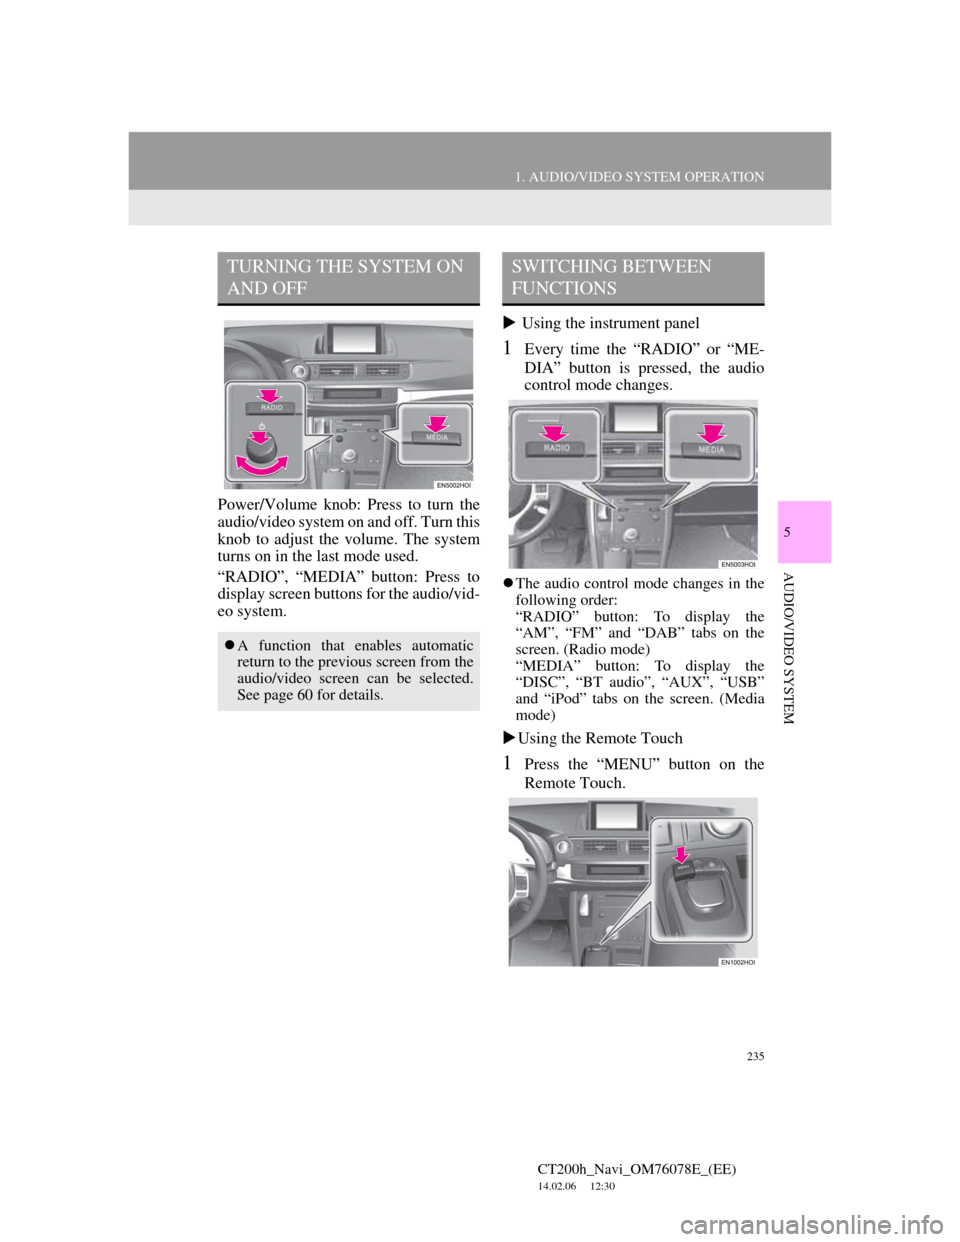
Power/Volume knob: Press to turn the
audio/video system on and off. Turn this
knob to adjust the volume. The system
turns on in the last mode used.
“RADIO”, “MEDIA” button: Press to
display screen buttons for the audio/vid-
eo system. Using the instrument panel
1Every time the “RADIO” or “ME-
DIA” button is pressed, the audio
control mode changes.
The audio control mode changes in the
following order:
“RADIO” button: To display the
“AM”, “FM” and “DAB” tabs on the
screen. (Radio mode)
“MEDIA” button: To display the
“DISC”, “BT audio”, “AUX”, “USB”
and “iPod” tabs on the screen. (Media
mode)
Using the Remote Touch
1Press the “MENU” button on the
Remote Touch.
TURNING THE SYSTEM ON
AND OFF
A function that enables automatic
return to the previous screen from the
audio/video screen can be selected.
See page 60 for details.
SWITCHING BETWEEN
FUNCTIONS
Page 241 of 436
241
1. AUDIO/VIDEO SYSTEM OPERATION
5
AUDIO/VIDEO SYSTEM
CT200h_Navi_OM76078E_(EE)
14.02.06 12:30
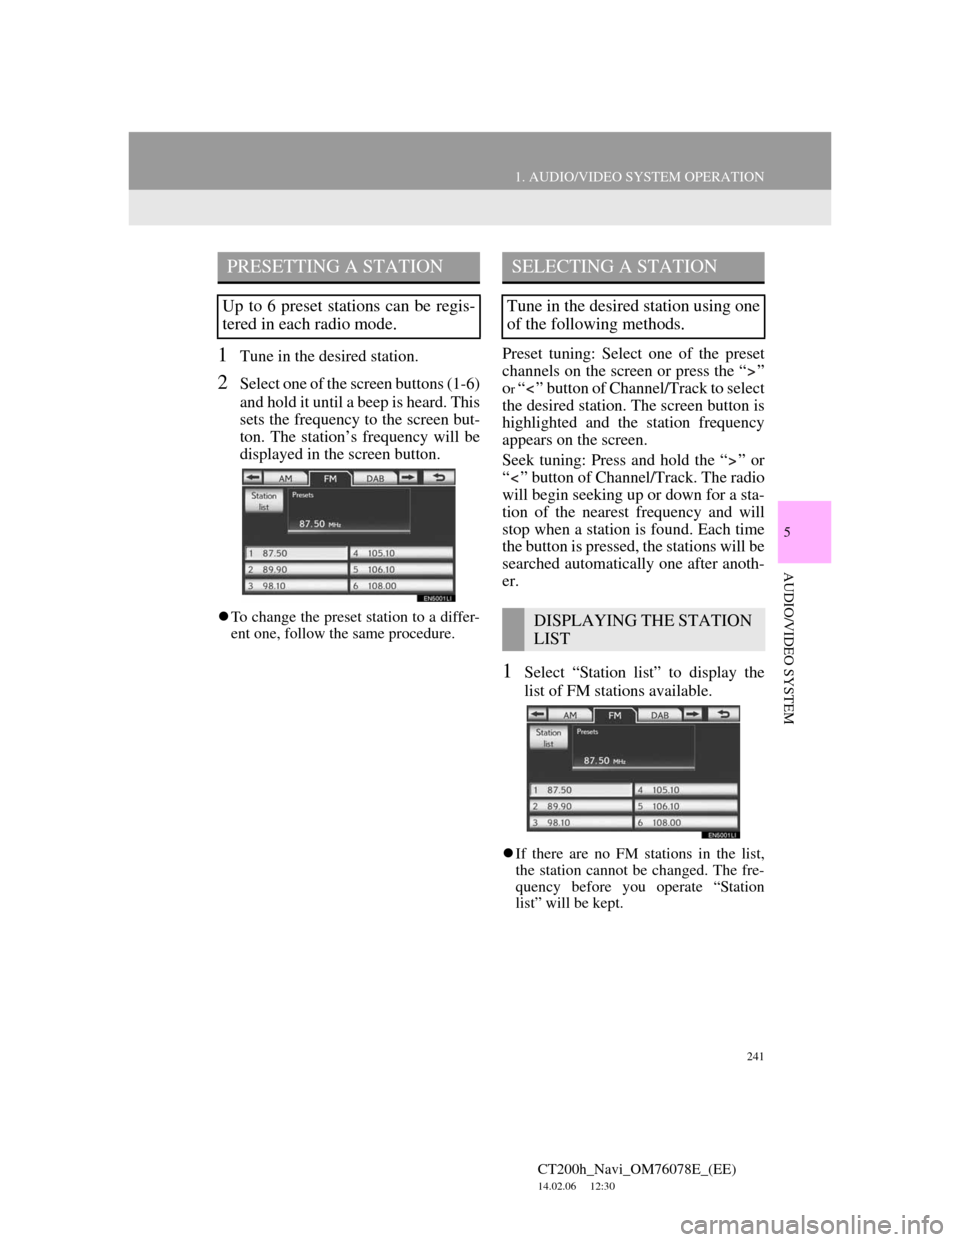
1Tune in the desired station.
2Select one of the screen buttons (1-6)
and hold it until a beep is heard. This
sets the frequency to the screen but-
ton. The station’s frequency will be
displayed in the screen button.
To change the preset station to a differ-
ent one, follow the same procedure.
Preset tuning: Select one of the preset
channels on the screen or press the “ ”
o
r “ ” button of Channel/Track to select
the desired station. The screen button is
highlighted and the station frequency
appears on the screen.
Seek tuning: Press and hold the “ ” or
“ ” button of Channel/Track. The radio
will begin seeking up or down for a sta-
tion of the nearest frequency and will
stop when a station is found. Each time
the button is pressed, the stations will be
searched automatically one after anoth-
er.
1Select “Station list” to display the
list of FM stations available.
If there are no FM stations in the list,
the station cannot be changed. The fre-
quency before you operate “Station
list” will be kept.
PRESETTING A STATION
Up to 6 preset stations can be regis-
tered in each radio mode.
SELECTING A STATION
Tune in the desired station using one
of the following methods.
DISPLAYING THE STATION
LIST
Page 253 of 436
253
1. AUDIO/VIDEO SYSTEM OPERATION
5
AUDIO/VIDEO SYSTEM
CT200h_Navi_OM76078E_(EE)
14.02.06 12:30
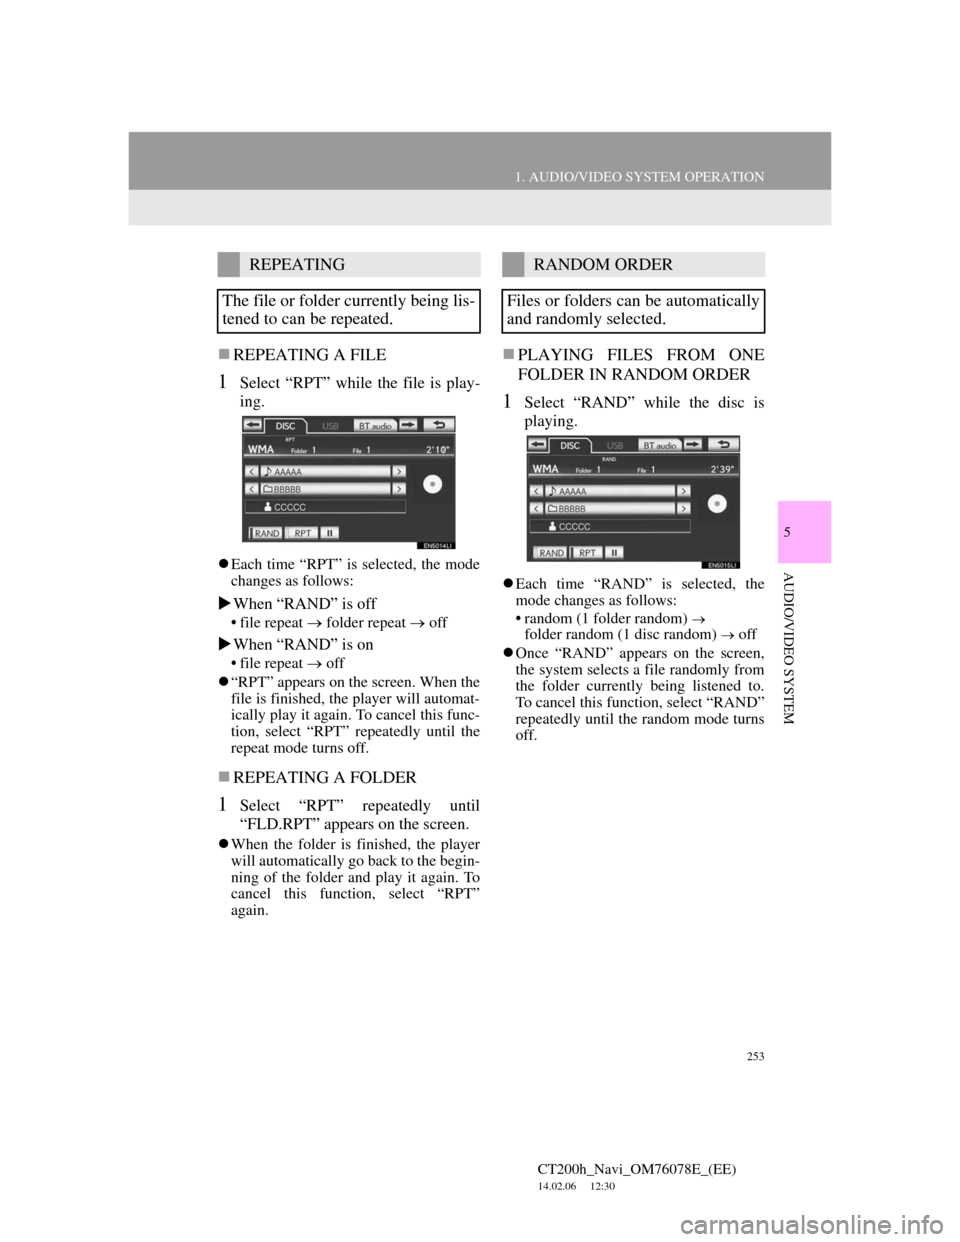
REPEATING A FILE
1Select “RPT” while the file is play-
ing.
Each time “RPT” is selected, the mode
changes as follows:
When “RAND” is off
• file repeat folder repeat off
When “RAND” is on
• file repeat off
“RPT” appears on the screen. When the
file is finished, the player will automat-
ically play it again. To cancel this func-
tion, select “RPT” repeatedly until the
repeat mode turns off.
REPEATING A FOLDER
1Select “RPT” repeatedly until
“FLD.RPT” appears on the screen.
When the folder is finished, the player
will automatically go back to the begin-
ning of the folder and play it again. To
cancel this function, select “RPT”
again.
PLAYING FILES FROM ONE
FOLDER IN RANDOM ORDER
1Select “RAND” while the disc is
playing.
Each time “RAND” is selected, the
mode changes as follows:
• random (1 folder random)
folder random (1 disc random) off
Once “RAND” appears on the screen,
the system selects a file randomly from
the folder currently being listened to.
To cancel this function, select “RAND”
repeatedly until the random mode turns
off.
REPEATING
The file or folder currently being lis-
tened to can be repeated.RANDOM ORDER
Files or folders can be automatically
and randomly selected.
Page 254 of 436
254
1. AUDIO/VIDEO SYSTEM OPERATION
CT200h_Navi_OM76078E_(EE)
14.02.06 12:30
PLAYING THE FILES IN ALL
THE FOLDERS ON THE DISC IN
RANDOM ORDER
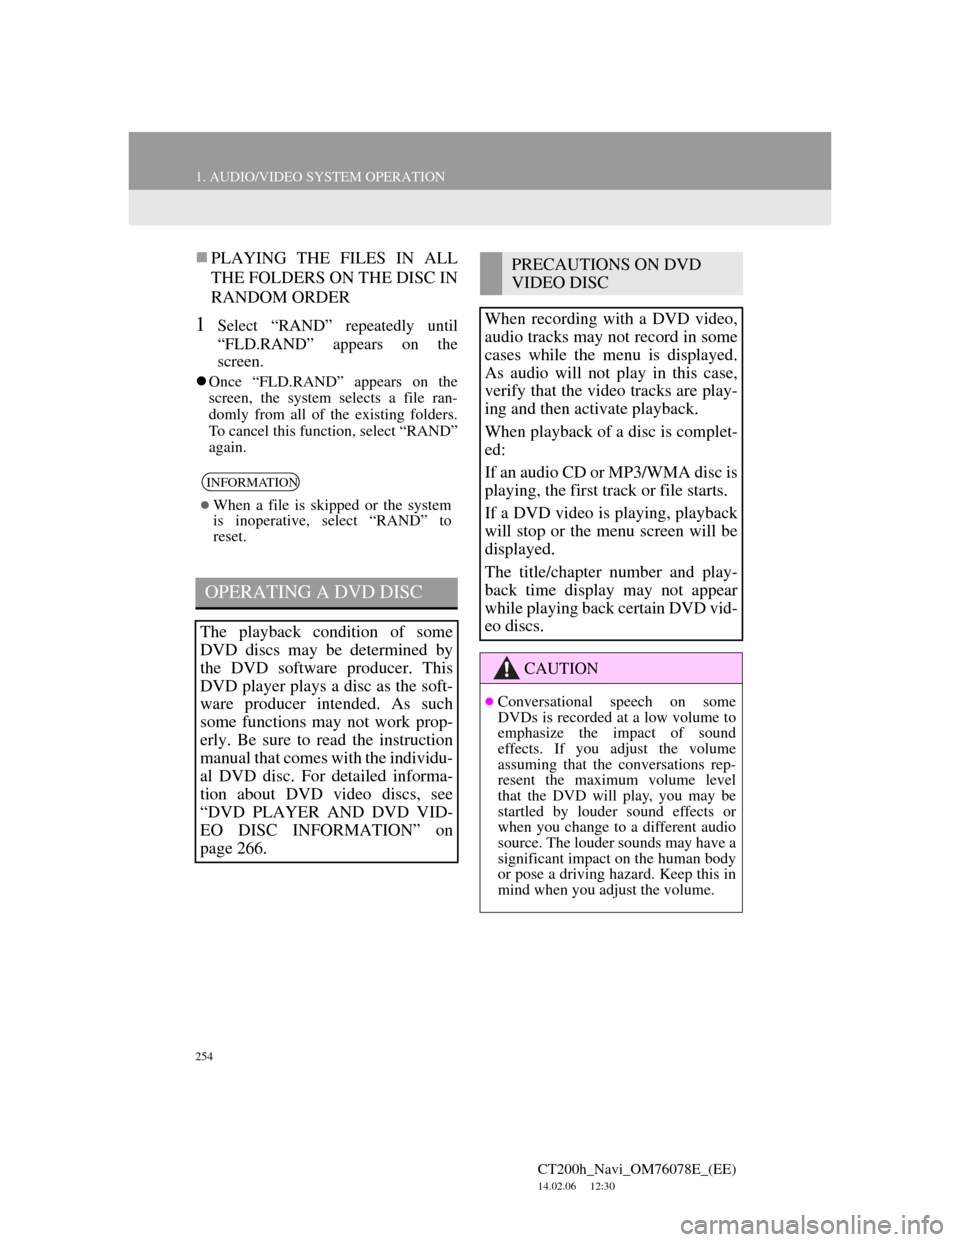
1Select “RAND” repeatedly until
“FLD.RAND” appears on the
screen.
Once “FLD.RAND” appears on the
screen, the system selects a file ran-
domly from all of the existing folders.
To cancel this function, select “RAND”
again.
INFORMATION
When a file is skipped or the system
is inoperative, select “RAND” to
reset.
OPERATING A DVD DISC
The playback condition of some
DVD discs may be determined by
the DVD software producer. This
DVD player plays a disc as the soft-
ware producer intended. As such
some functions may not work prop-
erly. Be sure to read the instruction
manual that comes with the individu-
al DVD disc. For detailed informa-
tion about DVD video discs, see
“DVD PLAYER AND DVD VID-
EO DISC INFORMATION” on
page 266.
PRECAUTIONS ON DVD
VIDEO DISC
When recording with a DVD video,
audio tracks may not record in some
cases while the menu is displayed.
As audio will not play in this case,
verify that the video tracks are play-
ing and then activate playback.
When playback of a disc is complet-
ed:
If an audio CD or MP3/WMA disc is
playing, the first track or file starts.
If a DVD video is playing, playback
will stop or the menu screen will be
displayed.
The title/chapter number and play-
back time display may not appear
while playing back certain DVD vid-
eo discs.
CAUTION
Conversational speech on some
DVDs is recorded at a low volume to
emphasize the impact of sound
effects. If you adjust the volume
assuming that the conversations rep-
resent the maximum volume level
that the DVD will play, you may be
startled by louder sound effects or
when you change to a different audio
source. The louder sounds may have a
significant impact on the human body
or pose a driving hazard. Keep this in
mind when you adjust the volume.
Page 258 of 436
258
1. AUDIO/VIDEO SYSTEM OPERATION
CT200h_Navi_OM76078E_(EE)
14.02.06 12:30
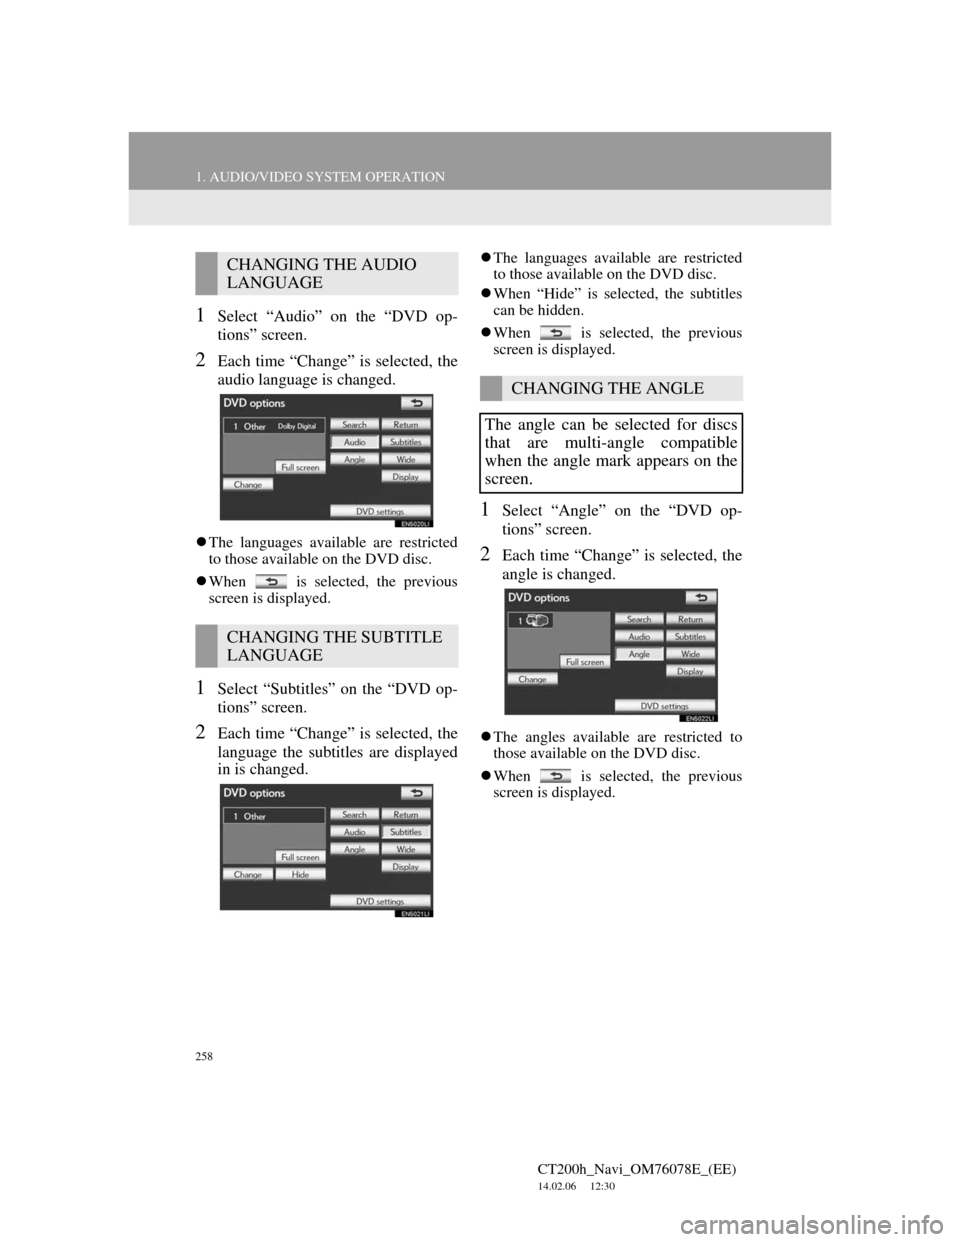
1Select “Audio” on the “DVD op-
tions” screen.
2Each time “Change” is selected, the
audio language is changed.
The languages available are restricted
to those available on the DVD disc.
When is selected, the previous
screen is displayed.
1Select “Subtitles” on the “DVD op-
tions” screen.
2Each time “Change” is selected, the
language the subtitles are displayed
in is changed.
The languages available are restricted
to those available on the DVD disc.
When “Hide” is selected, the subtitles
can be hidden.
When is selected, the previous
screen is displayed.
1Select “Angle” on the “DVD op-
tions” screen.
2Each time “Change” is selected, the
angle is changed.
The angles available are restricted to
those available on the DVD disc.
When is selected, the previous
screen is displayed.
CHANGING THE AUDIO
LANGUAGE
CHANGING THE SUBTITLE
LANGUAGE
CHANGING THE ANGLE
The angle can be selected for discs
that are multi-angle compatible
when the angle mark appears on the
screen.
Page 270 of 436
270
1. AUDIO/VIDEO SYSTEM OPERATION
CT200h_Navi_OM76078E_(EE)
14.02.06 12:30
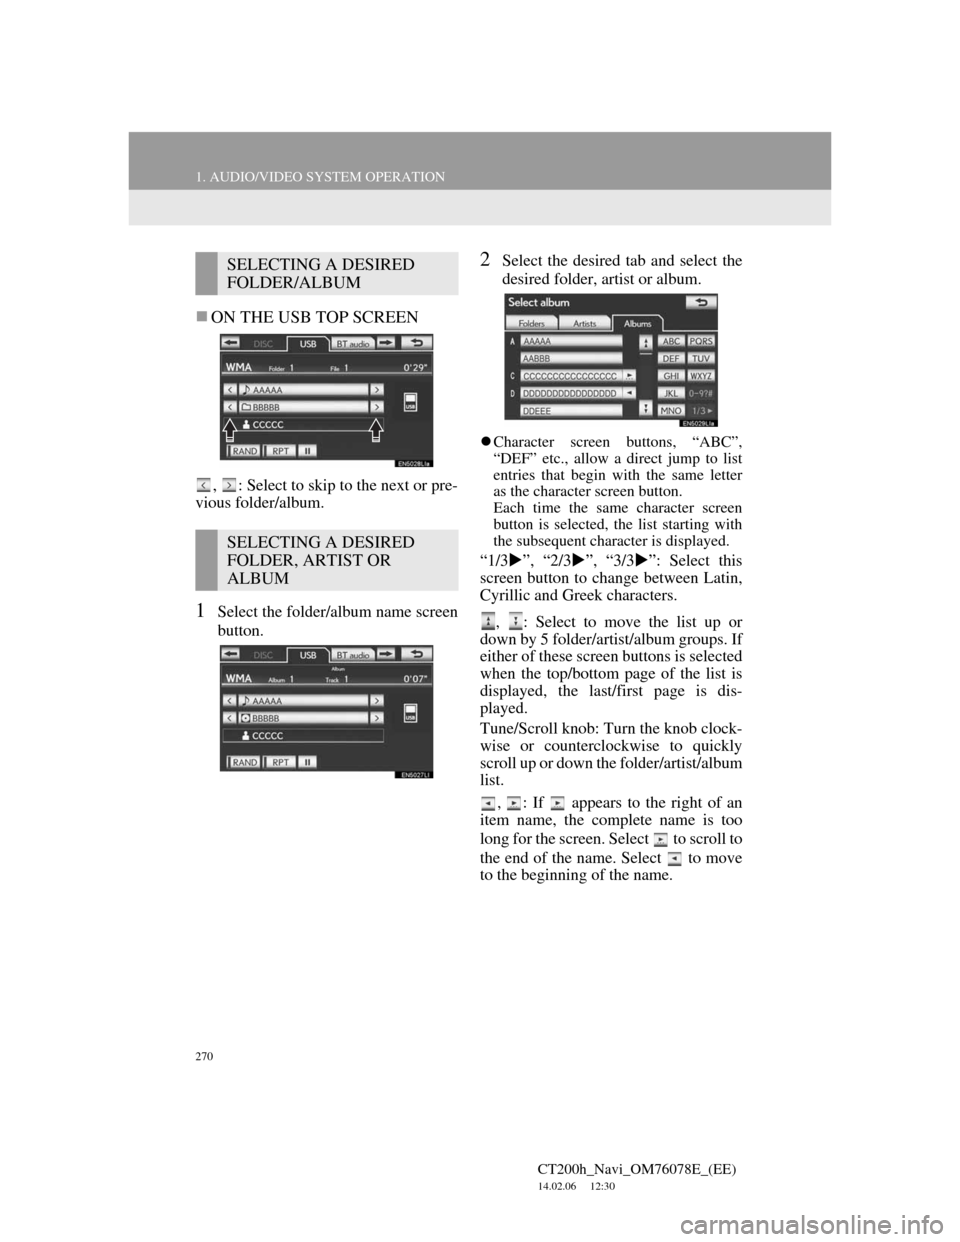
ON THE USB TOP SCREEN
, : Select to skip to the next or pre-
vious folder/album.
1Select the folder/album name screen
button.
2Select the desired tab and select the
desired folder, artist or album.
Character screen buttons, “ABC”,
“DEF” etc., allow a direct jump to list
entries that begin with the same letter
as the character screen button.
Each time the same character screen
button is selected, the list starting with
the subsequent character is displayed.
“1/3”, “2/3”, “3/3”: Select this
screen button to change between Latin,
Cyrillic and Greek characters.
, : Select to move the list up or
down by 5 folder/artist/album groups. If
either of these screen buttons is selected
when the top/bottom page of the list is
displayed, the last/first page is dis-
played.
Tune/Scroll knob: Turn the knob clock-
wise or counterclockwise to quickly
scroll up or down the folder/artist/album
list.
,
: If appears to the right of an
item name, the complete name is too
long for the screen. Select to scroll to
the end of the name. Select to move
to the beginning of the name.
SELECTING A DESIRED
FOLDER/ALBUM
SELECTING A DESIRED
FOLDER, ARTIST OR
ALBUM
Page 272 of 436
272
1. AUDIO/VIDEO SYSTEM OPERATION
CT200h_Navi_OM76078E_(EE)
14.02.06 12:30
FAST FORWARDING OR RE-
WINDING
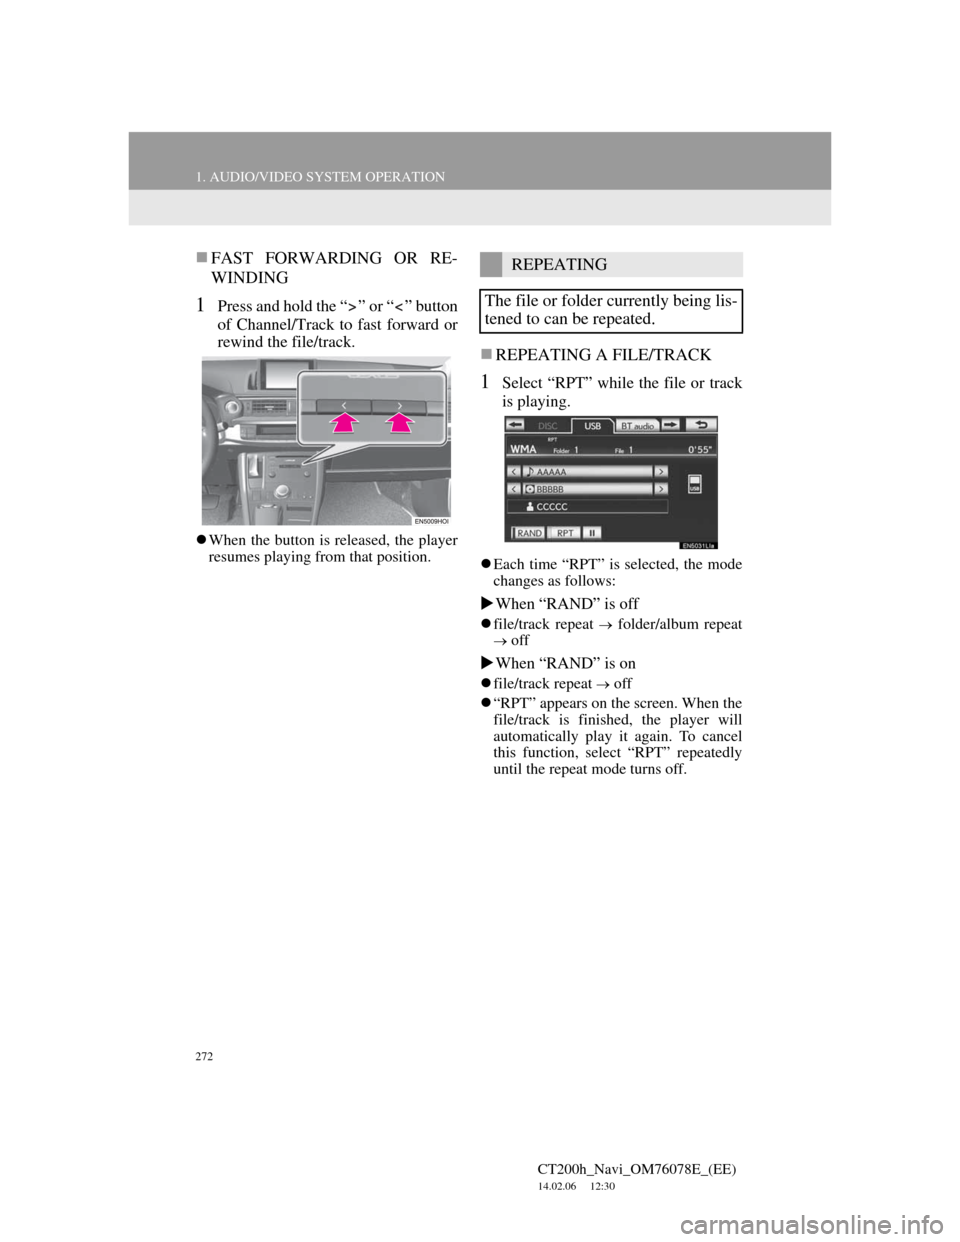
1Press and hold the “ ” or “ ” button
of Channel/Track to fast forward or
rewind the file/track.
When the button is released, the player
resumes playing from that position.
REPEATING A FILE/TRACK
1Select “RPT” while the file or track
is playing.
Each time “RPT” is selected, the mode
changes as follows:
When “RAND” is off
file/track repeat folder/album repeat
off
When “RAND” is on
file/track repeat off
“RPT” appears on the screen. When the
file/track is finished, the player will
automatically play it again. To cancel
this function, select “RPT” repeatedly
until the repeat mode turns off.
REPEATING
The file or folder currently being lis-
tened to can be repeated.