change time Lexus CT200h 2012 Navigation Manual (in English)
[x] Cancel search | Manufacturer: LEXUS, Model Year: 2012, Model line: CT200h, Model: Lexus CT200h 2012Pages: 436, PDF Size: 28.25 MB
Page 2 of 436

2
CT200h_Navi_OM76078E_(EE)
14.02.06 12:29
Introduction
This manual explains the operation of the Navigation System. Please read this
manual carefully to ensure proper use. Keep this manual in your vehicle at all
times.
The screen shots in this document and the actual screens of the navigation sys-
tem differ depending on whether the functions and/or a contract existed and the
map data available at the time of producing this document.
The Navigation System is one of the most technologically advanced vehicle ac-
cessories ever developed. The system receives satellite signals from the Global
Positioning System (GPS) operated by the U.S. Department of Defense. Using
these signals and other vehicle sensors, the system indicates your present posi-
tion and assists in locating a desired destination.
The navigation system is designed to select efficient routes from your present
starting location to your destination. The system is also designed to direct you
to a destination that is unfamiliar to you in an efficient manner. Map database
is made based on AISIN AW maps, whose information source comes from
NAVTEQ maps. The calculated routes may not be the shortest nor the least
traffic congested. Your own personal local knowledge or “short cut” may at
times be faster than the calculated routes.
The navigation system’s database includes Point of Interest categories to allow
you to easily select destinations such as restaurants and hotels. If a destination
is not in the database, you can enter the street address or a major intersection
close to it and the system will guide you there.
The system will provide both a visual map and audio instructions. The audio
instructions will announce the distance remaining and the direction to turn
when approaching an intersection. These voice instructions will help you keep
your eyes on the road and are timed to provide enough time to allow you to ma-
neuver, change lanes or slow down.
NAVIGATION SYSTEM OWNER’S MANUAL
NAVIGATION SYSTEM
Page 36 of 436
36
CT200h_Navi_OM76078E_(EE)
14.02.06 12:29
1. BASIC INFORMATION BEFORE OPERATION
1. INITIAL SCREEN
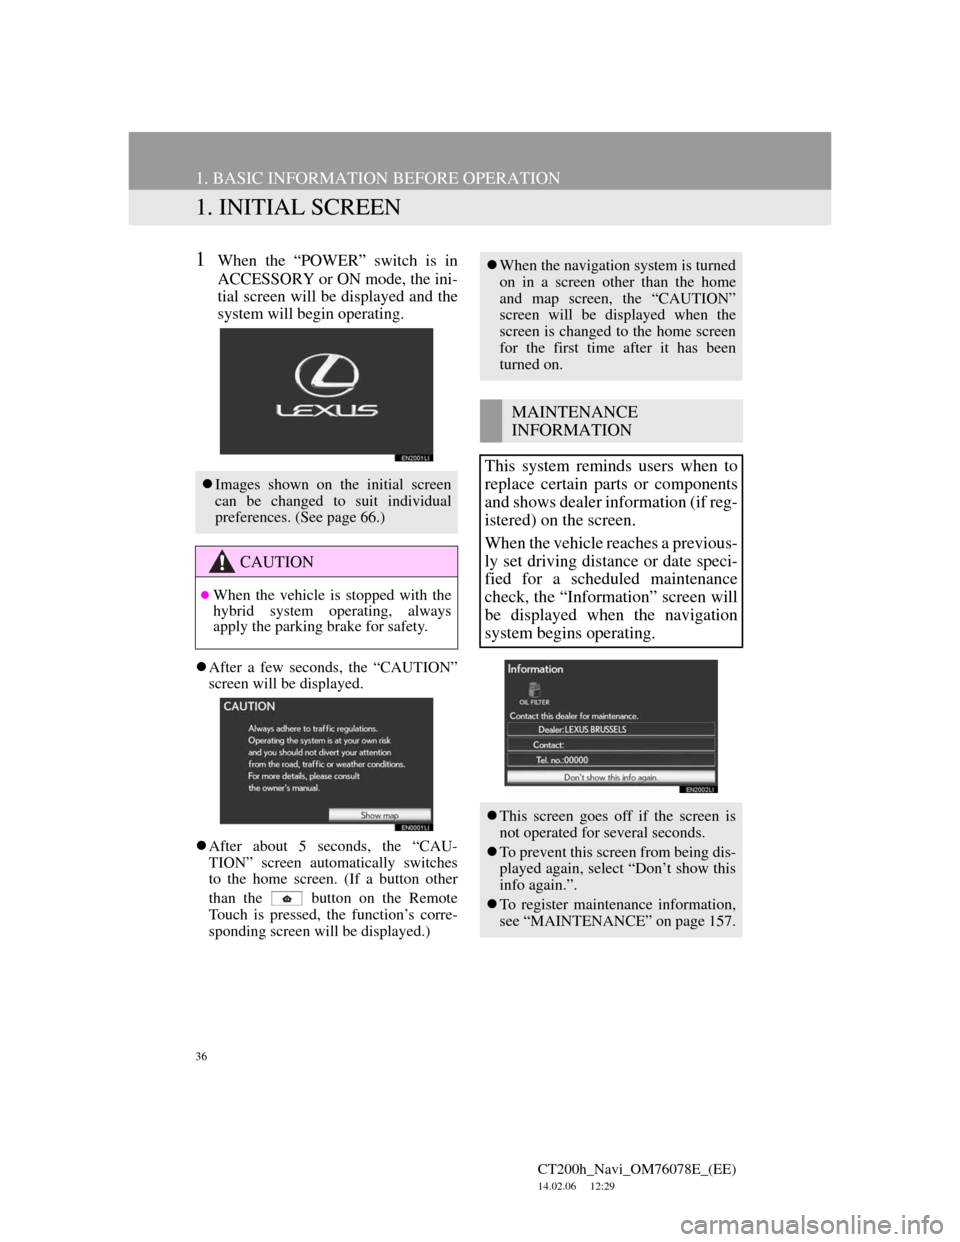
1When the “POWER” switch is in
ACCESSORY or ON mode, the ini-
tial screen will be displayed and the
system will begin operating.
After a few seconds, the “CAUTION”
screen will be displayed.
After about 5 seconds, the “CAU-
TION” screen automatically switches
to the home screen. (If a button other
than the
button on the Remote
Touch is pressed, the function’s corre-
sponding screen will be displayed.)
Images shown on the initial screen
can be changed to suit individual
preferences. (See page 66.)
CAUTION
When the vehicle is stopped with the
hybrid system operating, always
apply the parking brake for safety.
When the navigation system is turned
on in a screen other than the home
and map screen, the “CAUTION”
screen will be displayed when the
screen is changed to the home screen
for the first time after it has been
turned on.
MAINTENANCE
INFORMATION
This system reminds users when to
replace certain parts or components
and shows dealer information (if reg-
istered) on the screen.
When the vehicle reaches a previous-
ly set driving distance or date speci-
fied for a scheduled maintenance
check, the “Information” screen will
be displayed when the navigation
system begins operating.
This screen goes off if the screen is
not operated for several seconds.
To prevent this screen from being dis-
played again, select “Don’t show this
info again.”.
To register maintenance information,
see “MAINTENANCE” on page 157.
Page 61 of 436
61
2. SETUP
CT200h_Navi_OM76078E_(EE)
14.02.06 12:29
2
BASIC FUNCTION
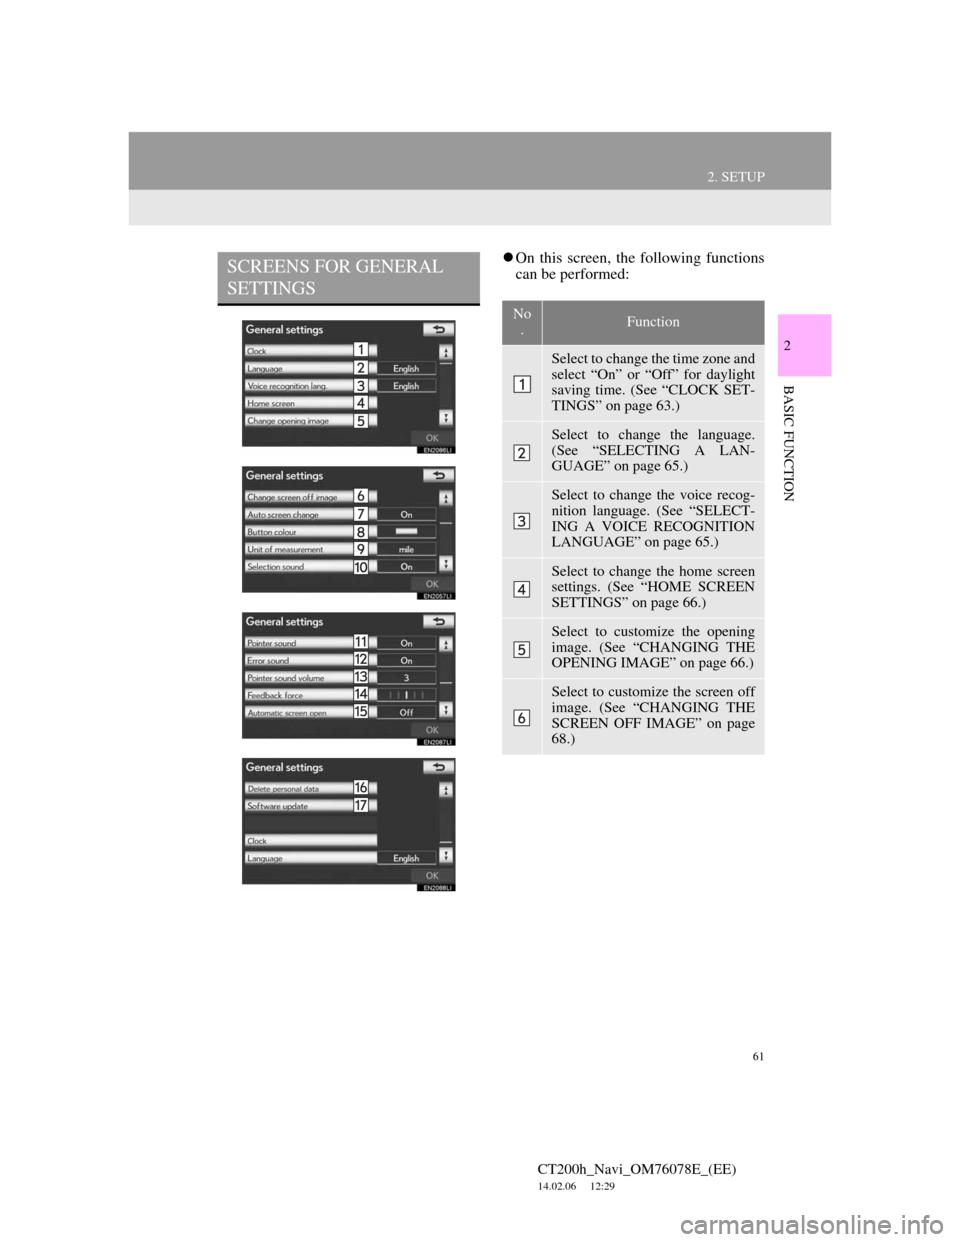
On this screen, the following functions
can be performed:SCREENS FOR GENERAL
SETTINGS
No
.Function
Select to change the time zone and
select “On” or “Off” for daylight
saving time. (See “CLOCK SET-
TINGS” on page 63.)
Select to change the language.
(See “SELECTING A LAN-
GUAGE” on page 65.)
Select to change the voice recog-
nition language. (See “SELECT-
ING A VOICE RECOGNITION
LANGUAGE” on page 65.)
Select to change the home screen
settings. (See “HOME SCREEN
SETTINGS” on page 66.)
Select to customize the opening
image. (See “CHANGING THE
OPENING IMAGE” on page 66.)
Select to customize the screen off
image. (See “CHANGING THE
SCREEN OFF IMAGE” on page
68.)
Page 63 of 436
63
2. SETUP
CT200h_Navi_OM76078E_(EE)
14.02.06 12:29
2
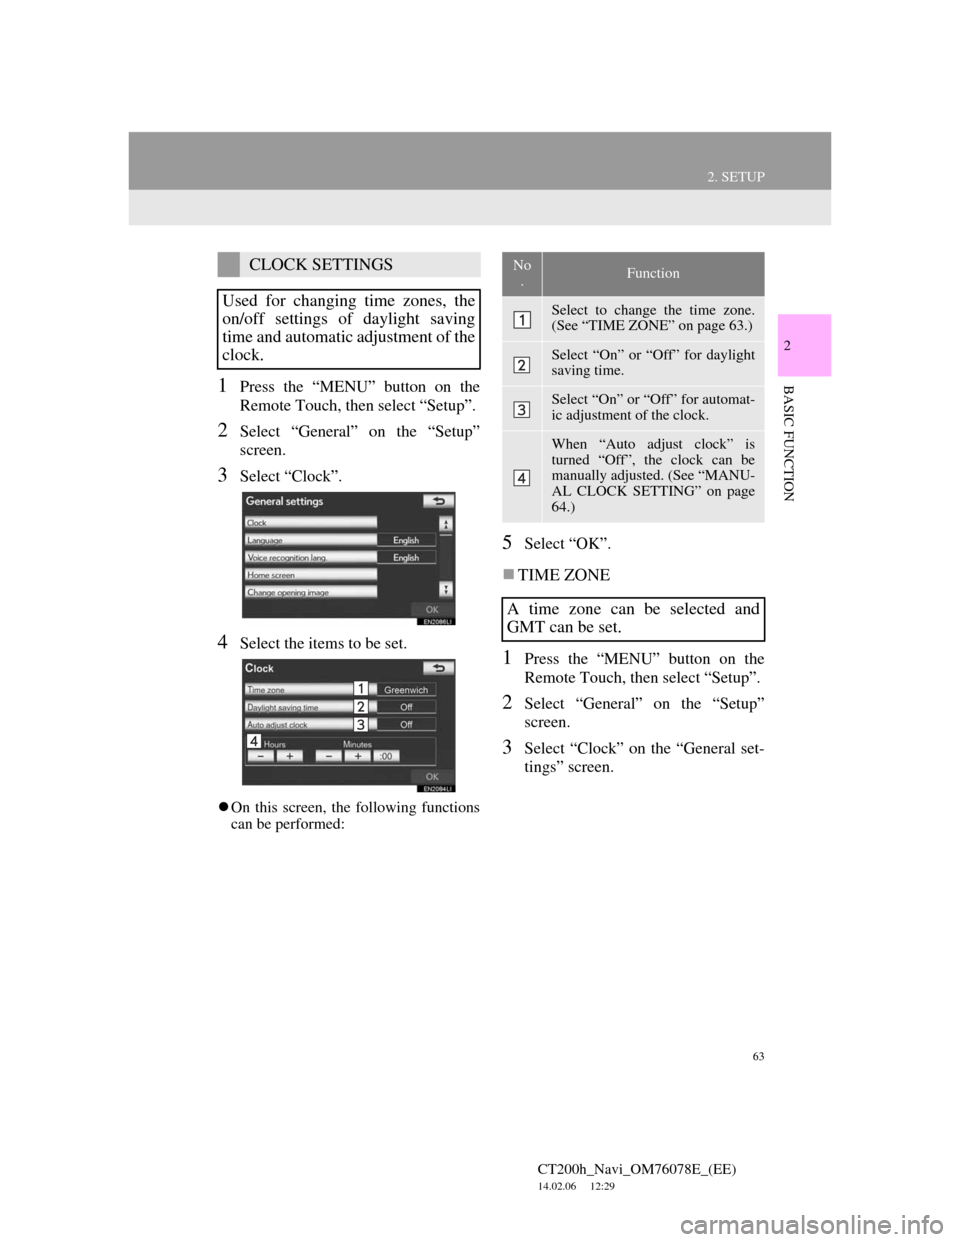
BASIC FUNCTION1Press the “MENU” button on the
Remote Touch, then select “Setup”.
2Select “General” on the “Setup”
screen.
3Select “Clock”.
4Select the items to be set.
On this screen, the following functions
can be performed:
5Select “OK”.
TIME ZONE
1Press the “MENU” button on the
Remote Touch, then select “Setup”.
2Select “General” on the “Setup”
screen.
3Select “Clock” on the “General set-
tings” screen.
CLOCK SETTINGS
Used for changing time zones, the
on/off settings of daylight saving
time and automatic adjustment of the
clock.No
.Function
Select to change the time zone.
(See “TIME ZONE” on page 63.)
Select “On” or “Off” for daylight
saving time.
Select “On” or “Off” for automat-
ic adjustment of the clock.
When “Auto adjust clock” is
turned “Off”, the clock can be
manually adjusted. (See “MANU-
AL CLOCK SETTING” on page
64.)
A time zone can be selected and
GMT can be set.
Page 124 of 436
124
2. ROUTE GUIDANCE
CT200h_Navi_OM76078E_(EE)
14.02.06 12:29
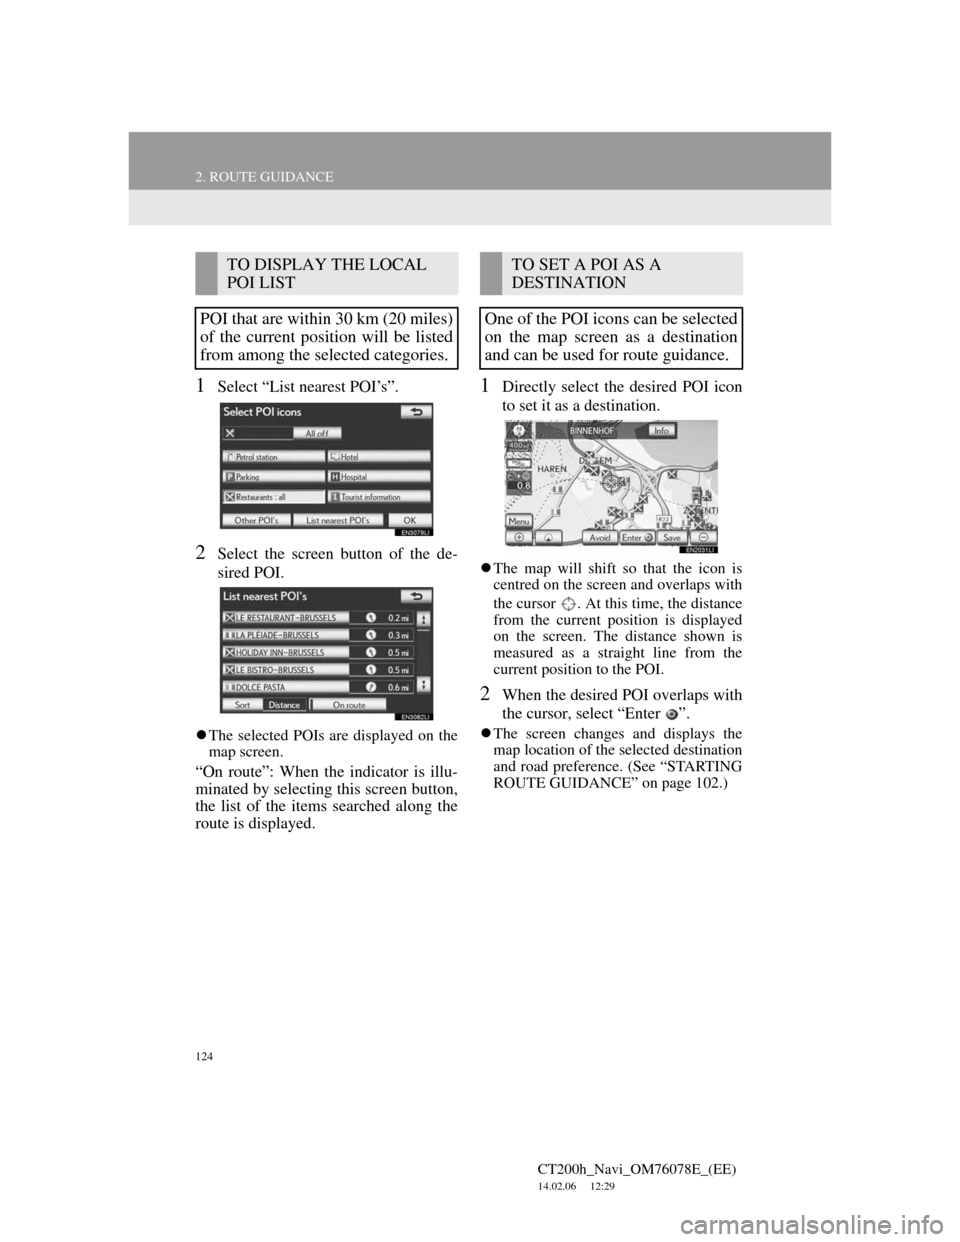
1Select “List nearest POI’s”.
2Select the screen button of the de-
sired POI.
The selected POIs are displayed on the
map screen.
“On route”: When the indicator is illu-
minated by selecting this screen button,
the list of the items searched along the
route is displayed.
1Directly select the desired POI icon
to set it as a destination.
The map will shift so that the icon is
centred on the screen and overlaps with
the cursor . At this time, the distance
from the current position is displayed
on the screen. The distance shown is
measured as a straight line from the
current position to the POI.
2When the desired POI overlaps with
the cursor, select “Enter ”.
The screen changes and displays the
map location of the selected destination
and road preference. (See “STARTING
ROUTE GUIDANCE” on page 102.)
TO DISPLAY THE LOCAL
POI LIST
POI that are within 30 km (20 miles)
of the current position will be listed
from among the selected categories.TO SET A POI AS A
DESTINATION
One of the POI icons can be selected
on the map screen as a destination
and can be used for route guidance.
Page 152 of 436
152
4. SETUP
CT200h_Navi_OM76078E_(EE)
14.02.06 12:30
To reset all setup items, select
“Default”.
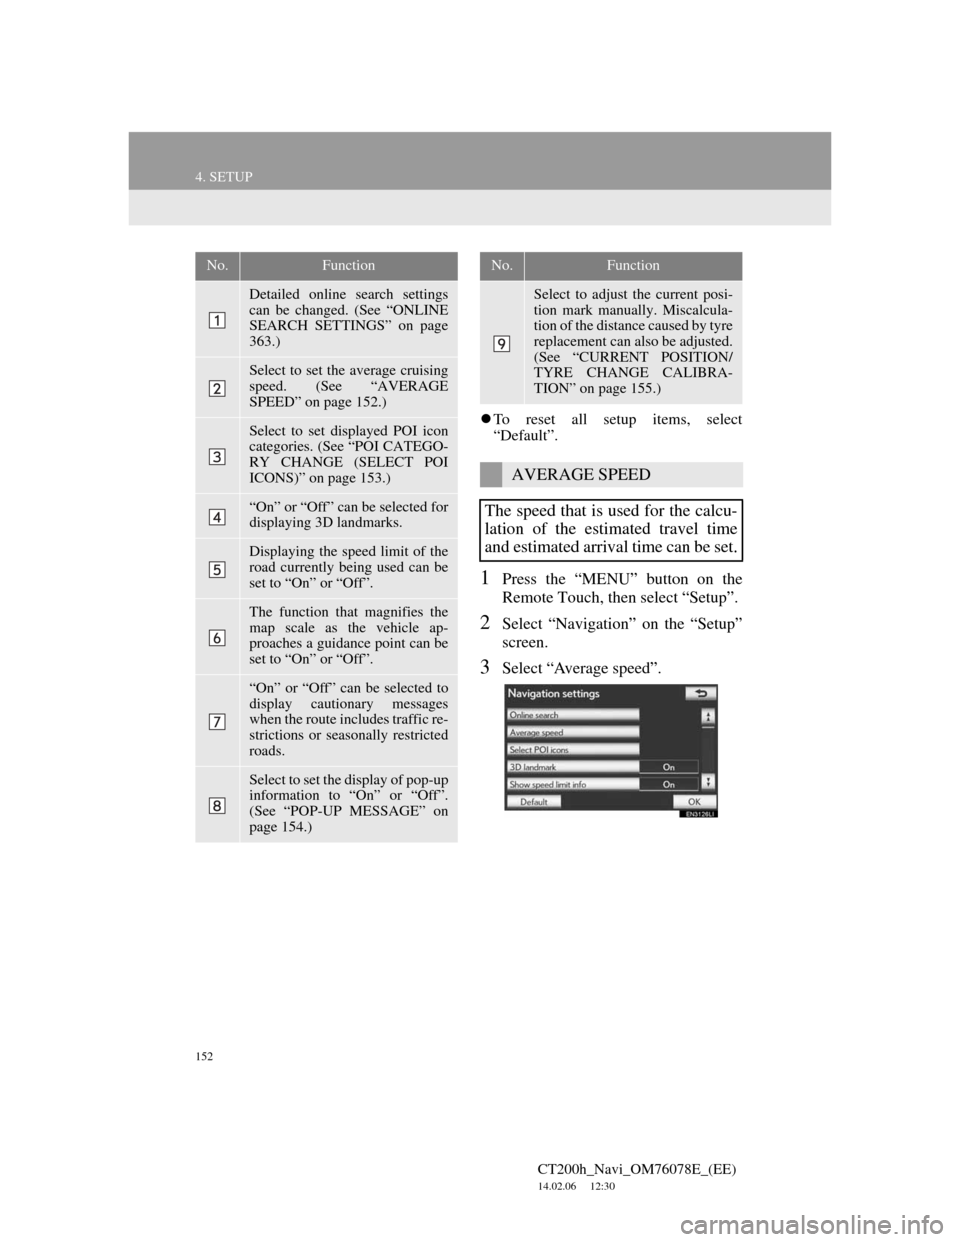
1Press the “MENU” button on the
Remote Touch, then select “Setup”.
2Select “Navigation” on the “Setup”
screen.
3Select “Average speed”.
No.Function
Detailed online search settings
can be changed. (See “ONLINE
SEARCH SETTINGS” on page
363.)
Select to set the average cruising
speed. (See “AVERAGE
SPEED” on page 152.)
Select to set displayed POI icon
categories. (See “POI CATEGO-
RY CHANGE (SELECT POI
ICONS)” on page 153.)
“On” or “Off” can be selected for
displaying 3D landmarks.
Displaying the speed limit of the
road currently being used can be
set to “On” or “Off”.
The function that magnifies the
map scale as the vehicle ap-
proaches a guidance point can be
set to “On” or “Off”.
“On” or “Off” can be selected to
display cautionary messages
when the route includes traffic re-
strictions or seasonally restricted
roads.
Select to set the display of pop-up
information to “On” or “Off”.
(See “POP-UP MESSAGE” on
page 154.)
Select to adjust the current posi-
tion mark manually. Miscalcula-
tion of the distance caused by tyre
replacement can also be adjusted.
(See “CURRENT POSITION/
TYRE CHANGE CALIBRA-
TION” on page 155.)
AVERAGE SPEED
The speed that is used for the calcu-
lation of the estimated travel time
and estimated arrival time can be set.
No.Function
Page 153 of 436
153
4. SETUP
CT200h_Navi_OM76078E_(EE)
14.02.06 12:30
3
NAVIGATION SYSTEM
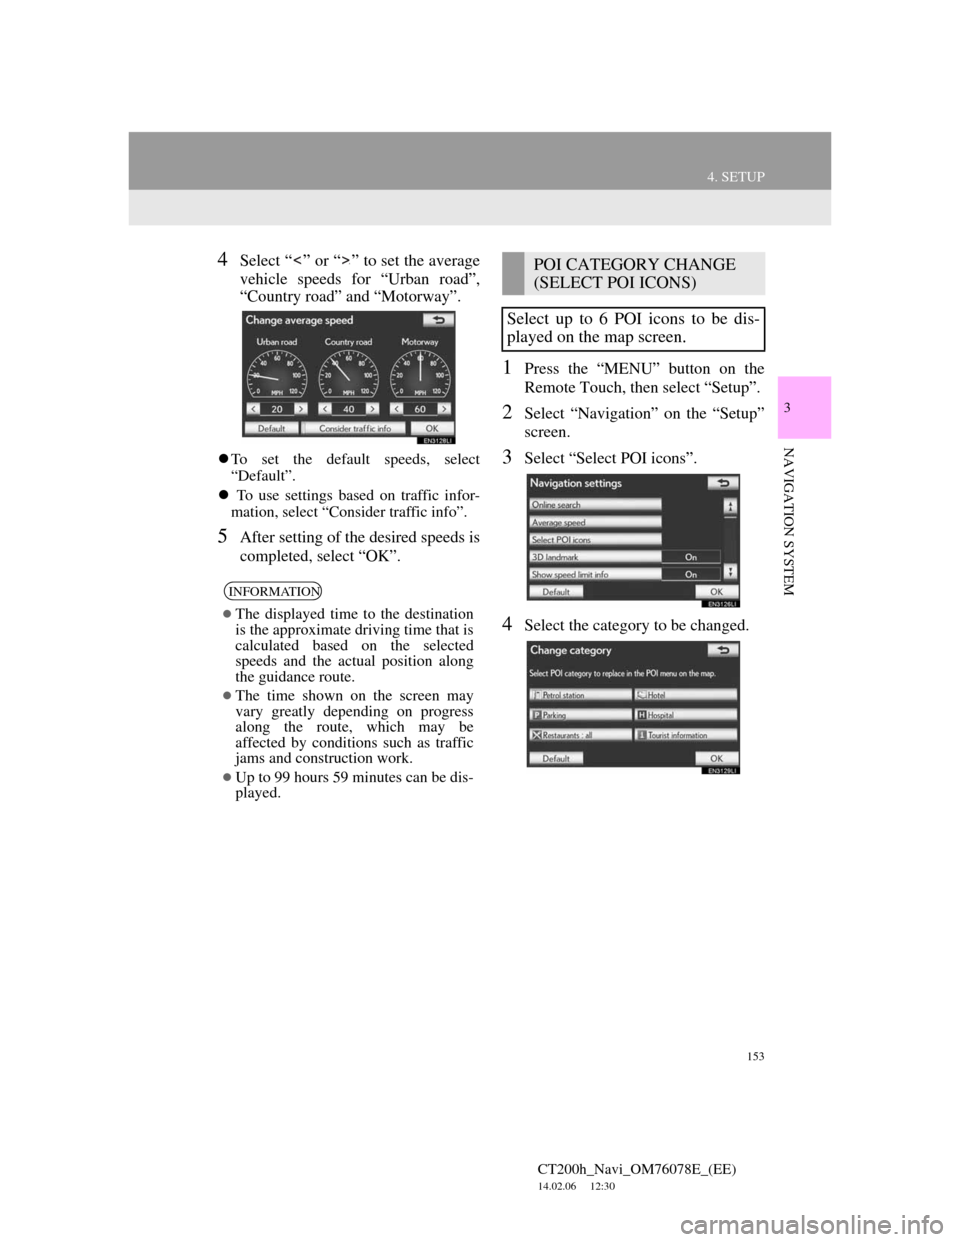
4Select “ ” or “ ” to set the average
vehicle speeds for “Urban road”,
“Country road” and “Motorway”.
To set the default speeds, select
“Default”.
To use settings based on traffic infor-
mation, select “Consider traffic info”.
5After setting of the desired speeds is
completed, select “OK”.
1Press the “MENU” button on the
Remote Touch, then select “Setup”.
2Select “Navigation” on the “Setup”
screen.
3Select “Select POI icons”.
4Select the category to be changed.
INFORMATION
The displayed time to the destination
is the approximate driving time that is
calculated based on the selected
speeds and the actual position along
the guidance route.
The time shown on the screen may
vary greatly depending on progress
along the route, which may be
affected by conditions such as traffic
jams and construction work.
Up to 99 hours 59 minutes can be dis-
played.
POI CATEGORY CHANGE
(SELECT POI ICONS)
Select up to 6 POI icons to be dis-
played on the map screen.
Page 164 of 436
164
5. GPS (GLOBAL POSITIONING SYSTEM)
CT200h_Navi_OM76078E_(EE)
14.02.06 12:30
Accurate current position may not be
shown in the following cases:
• When driving on a small angled Y-
shaped road.
• When driving on a winding road.
• When driving on a slippery road such
as in sand, gravel, snow, etc.
• When driving on a long straight road.
• When motorway and surface streets
run in parallel.
• After moving by ferry or vehicle car-
rier.
• When a long route is searched during
high speed driving.
• When driving without setting the cur-
rent position calibration correctly.
• After repeating a change of direction
by going forward and backward, or
turning on a turntable in a parking lot.
• When leaving a covered parking lot or
parking garage.
• When a roof carrier is installed.
• When driving with tyre chains
installed.
• When the tyres are worn.
• After replacing a tyre or tyres.
• When using tyres that are smaller or
larger than the factory specifications.
• When the tyre pressure in any of the 4
tyres is not correct.Inappropriate route guidance may
occur in the following cases:
• When turning at an intersection off
the designated route guidance.
• If you set more than 1 destination but
skip any of them, auto reroute will
display a route returning to the desti-
nation on the previous route.
• When turning at an intersection for
which there is no route guidance.
• When passing through an intersection
for which there is no route guidance.
• During auto reroute, the route guid-
ance may not be available for the next
turn to the right or left.
• During high speed driving, it may
take a long time for auto reroute to
operate. In auto reroute, a detour route
may be shown.
• After auto reroute, the route may not
be changed.
• If an unnecessary U-turn is shown or
announced.
• If a location has multiple names and
the system announces 1 or more of
them.
• When a route cannot be searched.
• If the route to your destination
includes gravel, unpaved roads or
alleys, the route guidance may not be
shown.
• Your destination point might be
shown on the opposite side of the
street.
• When a portion of the route has regu-
lations prohibiting the entry of the
vehicle that vary by time or season or
other reasons.
If the vehicle cannot receive GPS sig-
nals, the current position can be
adjusted manually. For information
on setting the current position cali-
bration, see page 155.
Page 181 of 436
181
1. TELEPHONE OPERATION
CT200h_Navi_OM76078E_(EE)
14.02.06 12:30
4
TELEPHONE
4. CALL ON THE Bluetooth® PHONE
1Press the “MENU” button on the
Remote Touch. (See “Remote
Touch” on page 12.)
2Select “Telephone” on the “Menu”
screen.
The “Telephone” screen can be dis-
played by pressing
on the steering
wheel.
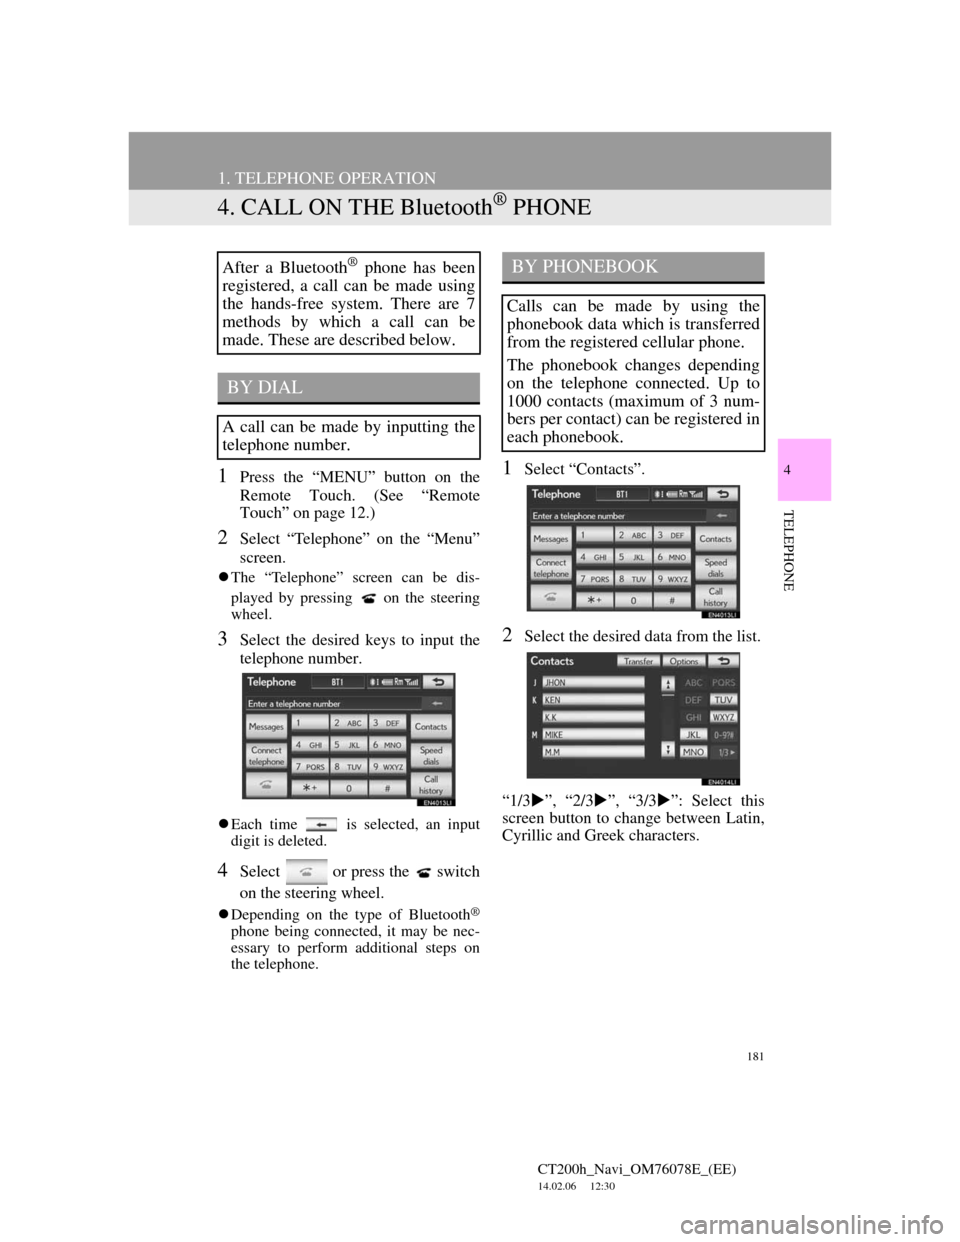
3Select the desired keys to input the
telephone number.
Each time is selected, an input
digit is deleted.
4Select or press the switch
on the steering wheel.
Depending on the type of Bluetooth®
phone being connected, it may be nec-
essary to perform additional steps on
the telephone.
1Select “Contacts”.
2Select the desired data from the list.
“1/3”, “2/3”, “3/3”: Select this
screen button to change between Latin,
Cyrillic and Greek characters.
After a Bluetooth® phone has been
registered, a call can be made using
the hands-free system. There are 7
methods by which a call can be
made. These are described below.
BY DIAL
A call can be made by inputting the
telephone number.
BY PHONEBOOK
Calls can be made by using the
phonebook data which is transferred
from the registered cellular phone.
The phonebook changes depending
on the telephone connected. Up to
1000 contacts (maximum of 3 num-
bers per contact) can be registered in
each phonebook.
Page 185 of 436
185
1. TELEPHONE OPERATION
4
TELEPHONE
CT200h_Navi_OM76078E_(EE)
14.02.06 12:30
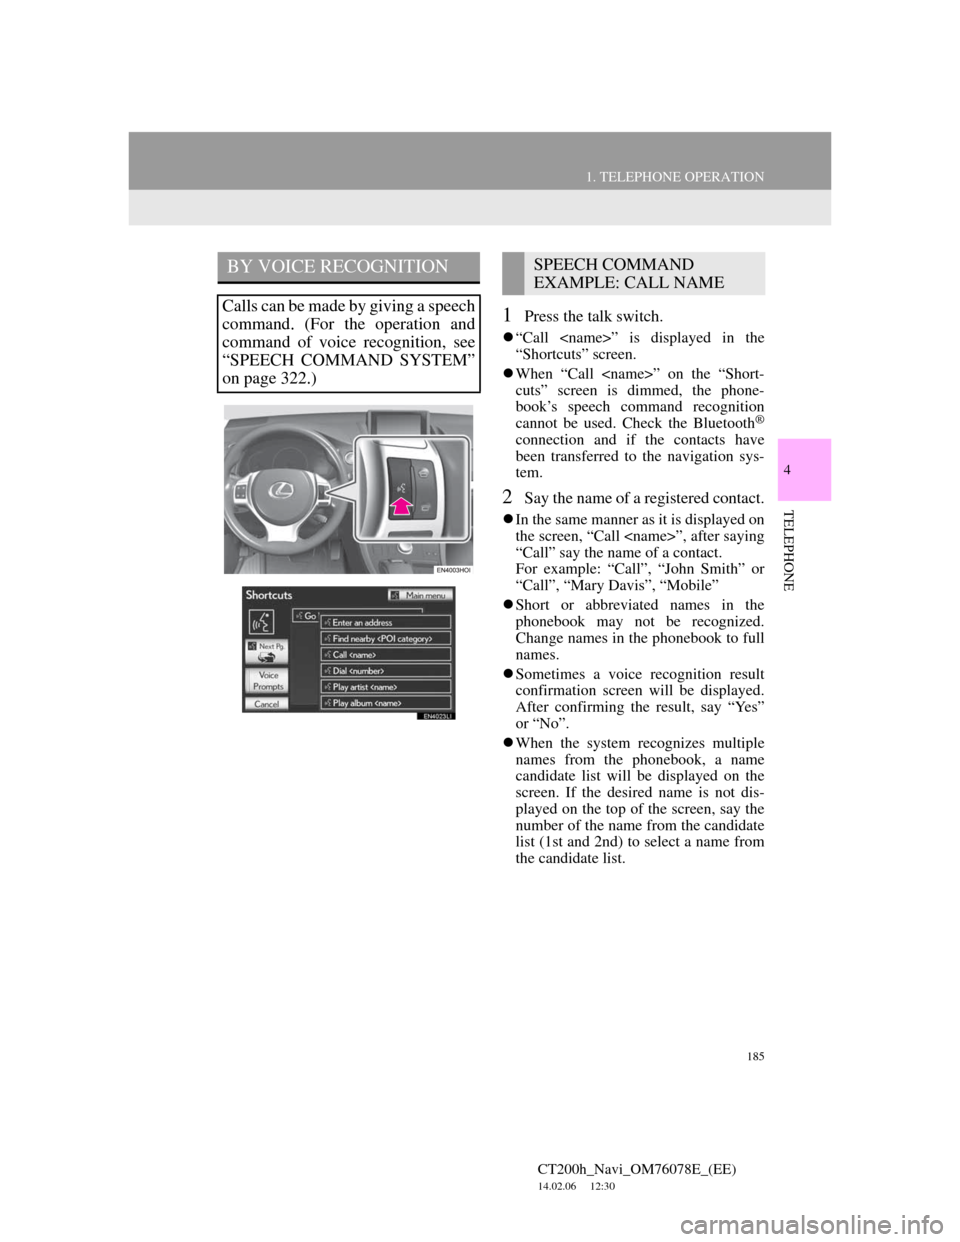
1Press the talk switch.
“Call
“Shortcuts” screen.
When “Call
cuts” screen is dimmed, the phone-
book’s speech command recognition
cannot be used. Check the Bluetooth
®
connection and if the contacts have
been transferred to the navigation sys-
tem.
2Say the name of a registered contact.
In the same manner as it is displayed on
the screen, “Call
“Call” say the name of a contact.
For example: “Call”, “John Smith” or
“Call”, “Mary Davis”, “Mobile”
Short or abbreviated names in the
phonebook may not be recognized.
Change names in the phonebook to full
names.
Sometimes a voice recognition result
confirmation screen will be displayed.
After confirming the result, say “Yes”
or “No”.
When the system recognizes multiple
names from the phonebook, a name
candidate list will be displayed on the
screen. If the desired name is not dis-
played on the top of the screen, say the
number of the name from the candidate
list (1st and 2nd) to select a name from
the candidate list.
BY VOICE RECOGNITION
Calls can be made by giving a speech
command. (For the operation and
command of voice recognition, see
“SPEECH COMMAND SYSTEM”
on page 322.)
SPEECH COMMAND
EXAMPLE: CALL NAME