steering Lexus CT200h 2012 Navigation Manual (in English)
[x] Cancel search | Manufacturer: LEXUS, Model Year: 2012, Model line: CT200h, Model: Lexus CT200h 2012Pages: 436, PDF Size: 28.25 MB
Page 203 of 436
203
2. SETUP
4
TELEPHONE
CT200h_Navi_OM76078E_(EE)
14.02.06 12:30
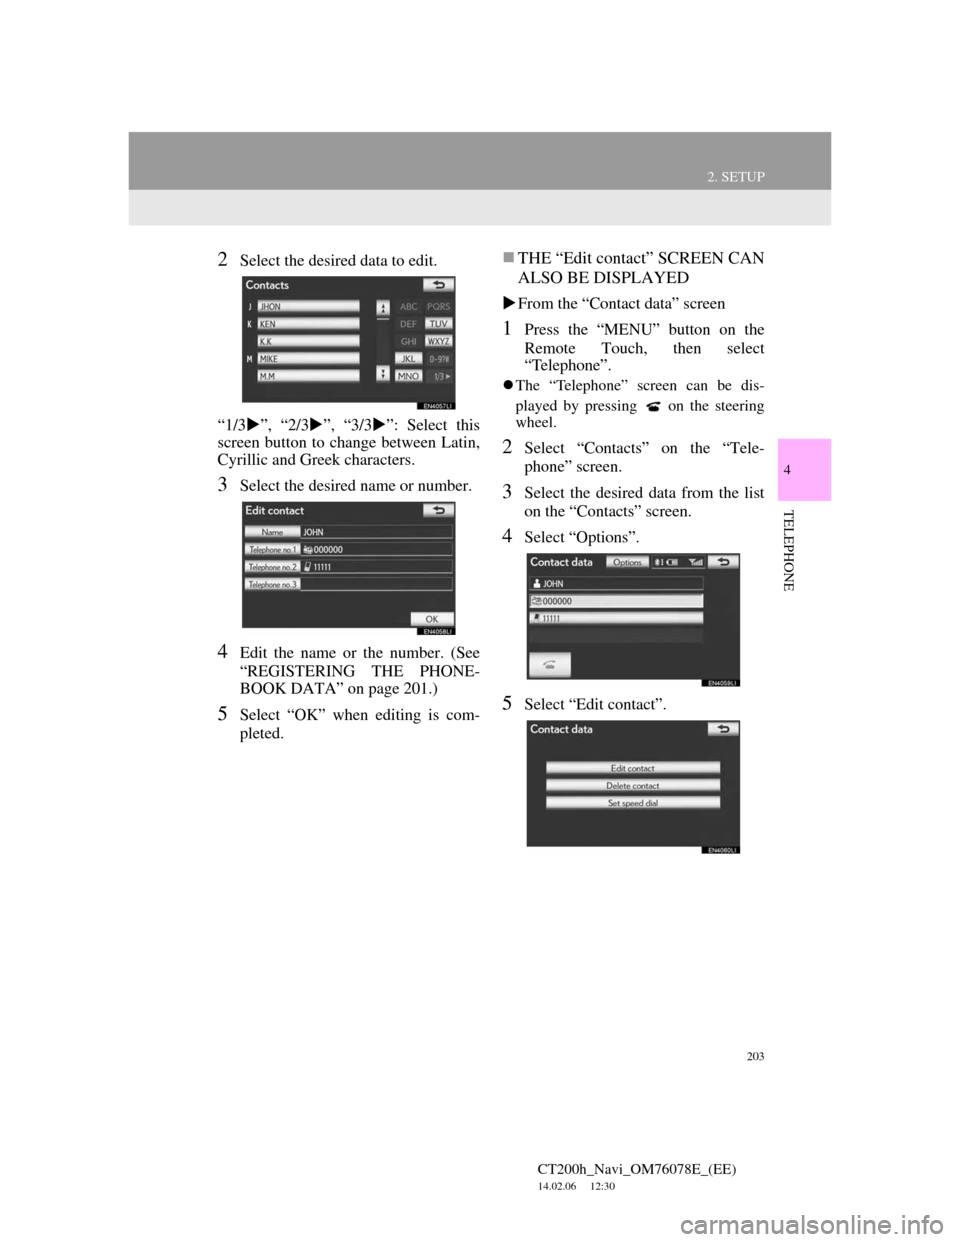
2Select the desired data to edit.
“1/3”, “2/3”, “3/3”: Select this
screen button to change between Latin,
Cyrillic and Greek characters.
3Select the desired name or number.
4Edit the name or the number. (See
“REGISTERING THE PHONE-
BOOK DATA” on page 201.)
5Select “OK” when editing is com-
pleted.
THE “Edit contact” SCREEN CAN
ALSO BE DISPLAYED
From the “Contact data” screen
1Press the “MENU” button on the
Remote Touch, then select
“Telephone”.
The “Telephone” screen can be dis-
played by pressing
on the steering
wheel.
2Select “Contacts” on the “Tele-
phone” screen.
3Select the desired data from the list
on the “Contacts” screen.
4Select “Options”.
5Select “Edit contact”.
Page 204 of 436
204
2. SETUP
CT200h_Navi_OM76078E_(EE)
14.02.06 12:30
From the “Call history” screen
1Press the “MENU” button on the
Remote Touch, then select
“Telephone”.
The “Telephone” screen can be dis-
played by pressing
on the steering
wheel.
2Select “Call history” on the “Tele-
phone” screen.
3Select the desired number from the
list on the “Call history” screen.
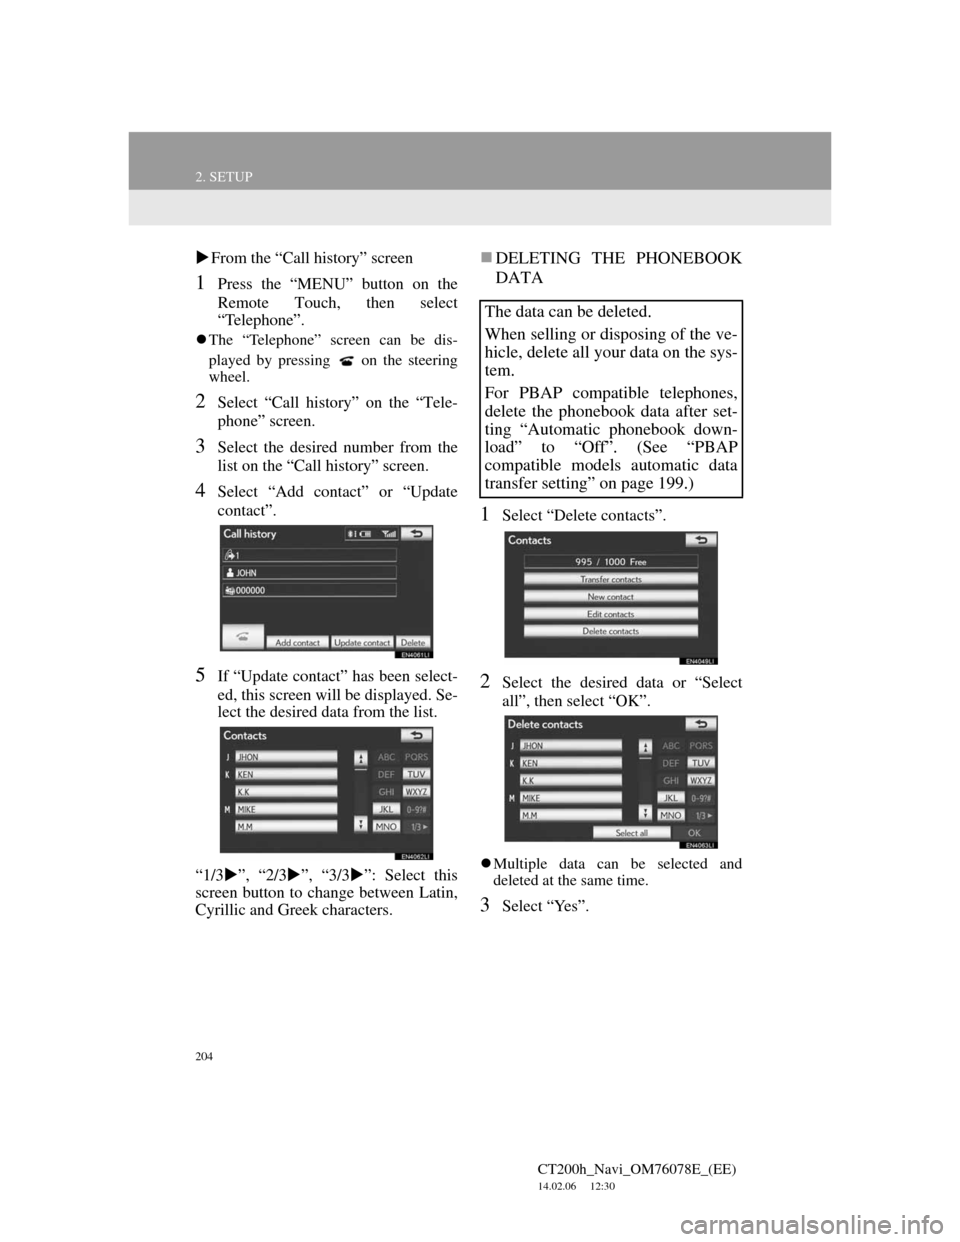
4Select “Add contact” or “Update
contact”.
5If “Update contact” has been select-
ed, this screen will be displayed. Se-
lect the desired data from the list.
“1/3”, “2/3”, “3/3”: Select this
screen button to change between Latin,
Cyrillic and Greek characters.
DELETING THE PHONEBOOK
DATA
1Select “Delete contacts”.
2Select the desired data or “Select
all”, then select “OK”.
Multiple data can be selected and
deleted at the same time.
3Select “Yes”.
The data can be deleted.
When selling or disposing of the ve-
hicle, delete all your data on the sys-
tem.
For PBAP compatible telephones,
delete the phonebook data after set-
ting “Automatic phonebook down-
load” to “Off”. (See “PBAP
compatible models automatic data
transfer setting” on page 199.)
Page 205 of 436
205
2. SETUP
4
TELEPHONE
CT200h_Navi_OM76078E_(EE)
14.02.06 12:30
ALTERNATIVE PHONEBOOK
DATA DELETION METHOD
PBAP incompatible but OPP compat-
ible models
1Press the “MENU” button on the
Remote Touch, then select
“Telephone”.
The “Telephone” screen can be dis-
played by pressing
on the steering
wheel.
2Select “Contacts” on the “Tele-
phone” screen.
3Select the desired data from the list
on the “Contacts” screen.
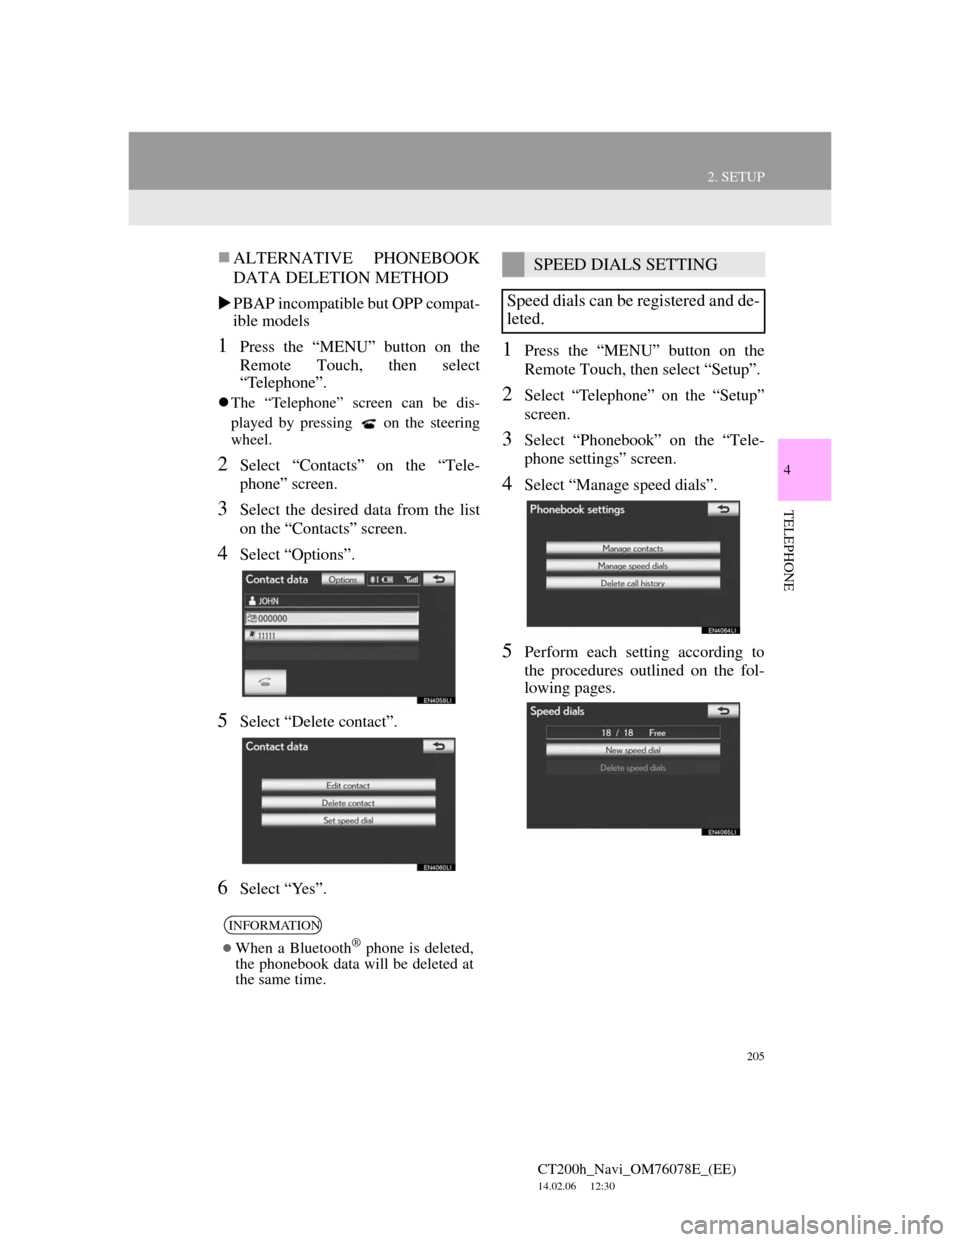
4Select “Options”.
5Select “Delete contact”.
6Select “Yes”.
1Press the “MENU” button on the
Remote Touch, then select “Setup”.
2Select “Telephone” on the “Setup”
screen.
3Select “Phonebook” on the “Tele-
phone settings” screen.
4Select “Manage speed dials”.
5Perform each setting according to
the procedures outlined on the fol-
lowing pages.
INFORMATION
When a Bluetooth® phone is deleted,
the phonebook data will be deleted at
the same time.
SPEED DIALS SETTING
Speed dials can be registered and de-
leted.
Page 206 of 436
206
2. SETUP
CT200h_Navi_OM76078E_(EE)
14.02.06 12:30
THE “Speed dial” SCREEN CAN
ALSO BE DISPLAYED
From the “Speed dial” screen
1Press the “MENU” button on the
Remote Touch, then select
“Telephone”.
The “Telephone” screen can be dis-
played by pressing
on the steering
wheel.
2Select “Speed dials” on the “Tele-
phone” screen.
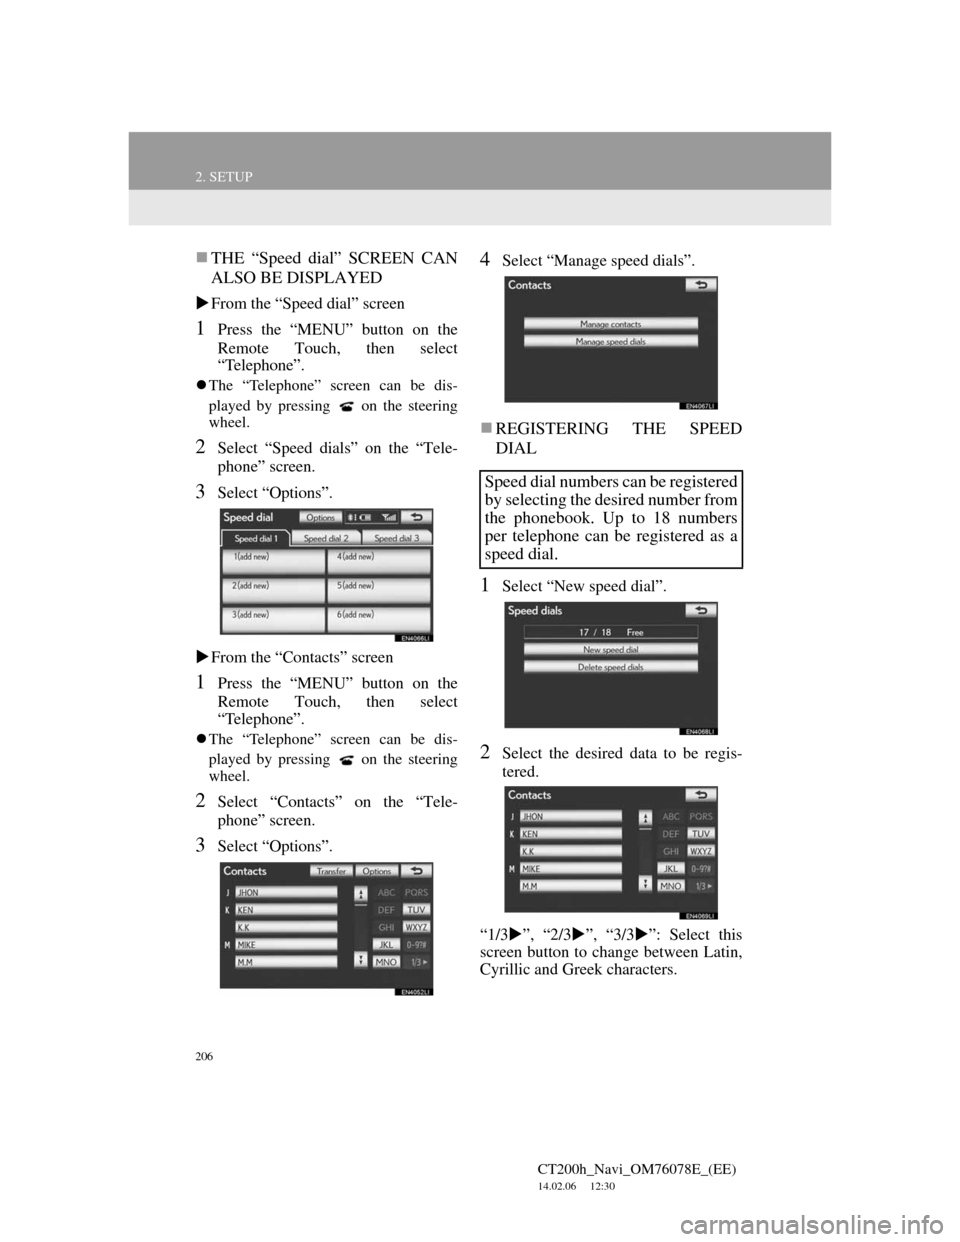
3Select “Options”.
From the “Contacts” screen
1Press the “MENU” button on the
Remote Touch, then select
“Telephone”.
The “Telephone” screen can be dis-
played by pressing
on the steering
wheel.
2Select “Contacts” on the “Tele-
phone” screen.
3Select “Options”.
4Select “Manage speed dials”.
REGISTERING THE SPEED
DIAL
1Select “New speed dial”.
2Select the desired data to be regis-
tered.
“1/3”, “2/3”, “3/3”: Select this
screen button to change between Latin,
Cyrillic and Greek characters.
Speed dial numbers can be registered
by selecting the desired number from
the phonebook. Up to 18 numbers
per telephone can be registered as a
speed dial.
Page 207 of 436
207
2. SETUP
4
TELEPHONE
CT200h_Navi_OM76078E_(EE)
14.02.06 12:30
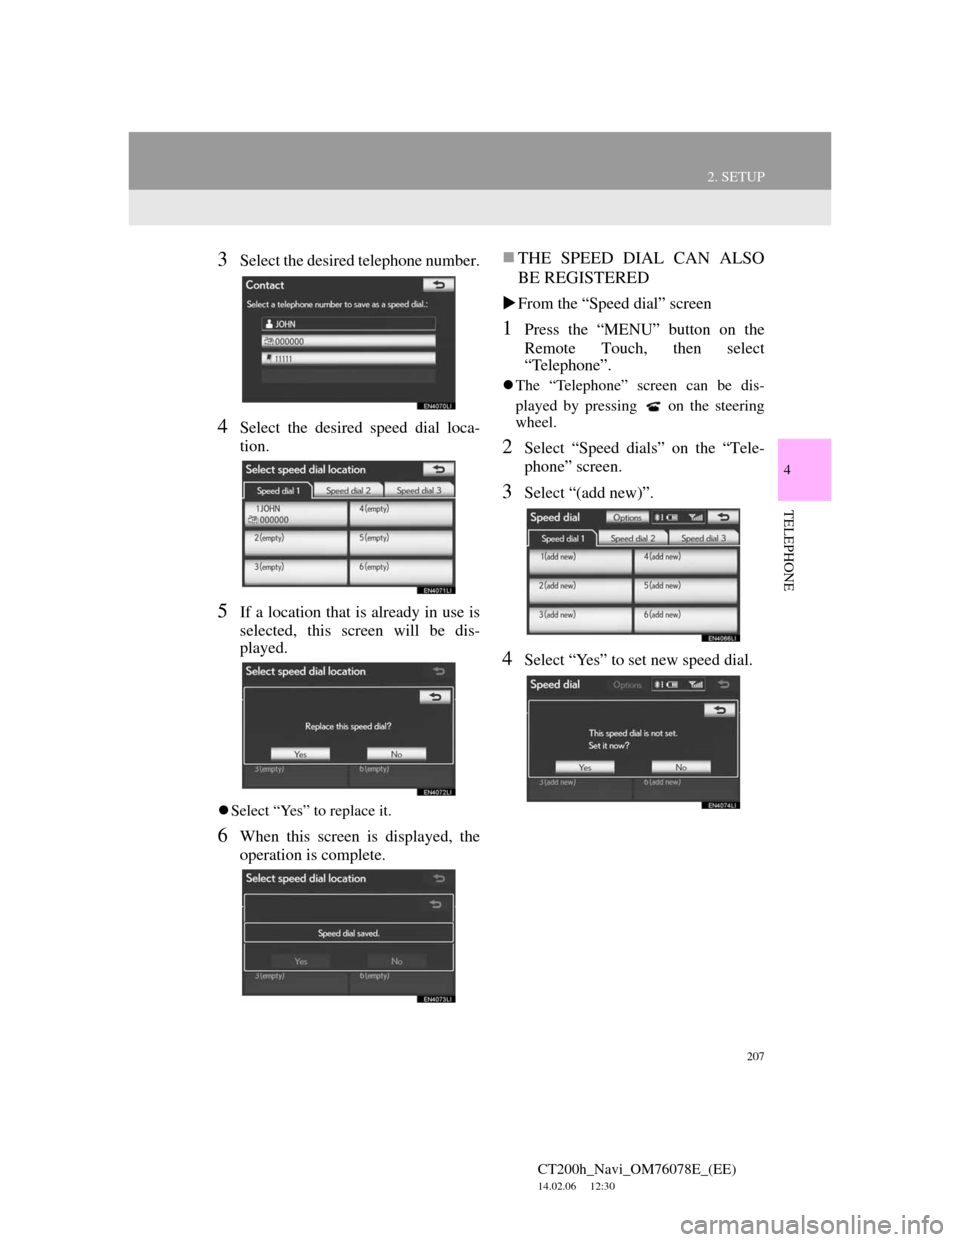
3Select the desired telephone number.
4Select the desired speed dial loca-
tion.
5If a location that is already in use is
selected, this screen will be dis-
played.
Select “Yes” to replace it.
6When this screen is displayed, the
operation is complete.
THE SPEED DIAL CAN ALSO
BE REGISTERED
From the “Speed dial” screen
1Press the “MENU” button on the
Remote Touch, then select
“Telephone”.
The “Telephone” screen can be dis-
played by pressing
on the steering
wheel.
2Select “Speed dials” on the “Tele-
phone” screen.
3Select “(add new)”.
4Select “Yes” to set new speed dial.
Page 208 of 436
208
2. SETUP
CT200h_Navi_OM76078E_(EE)
14.02.06 12:30
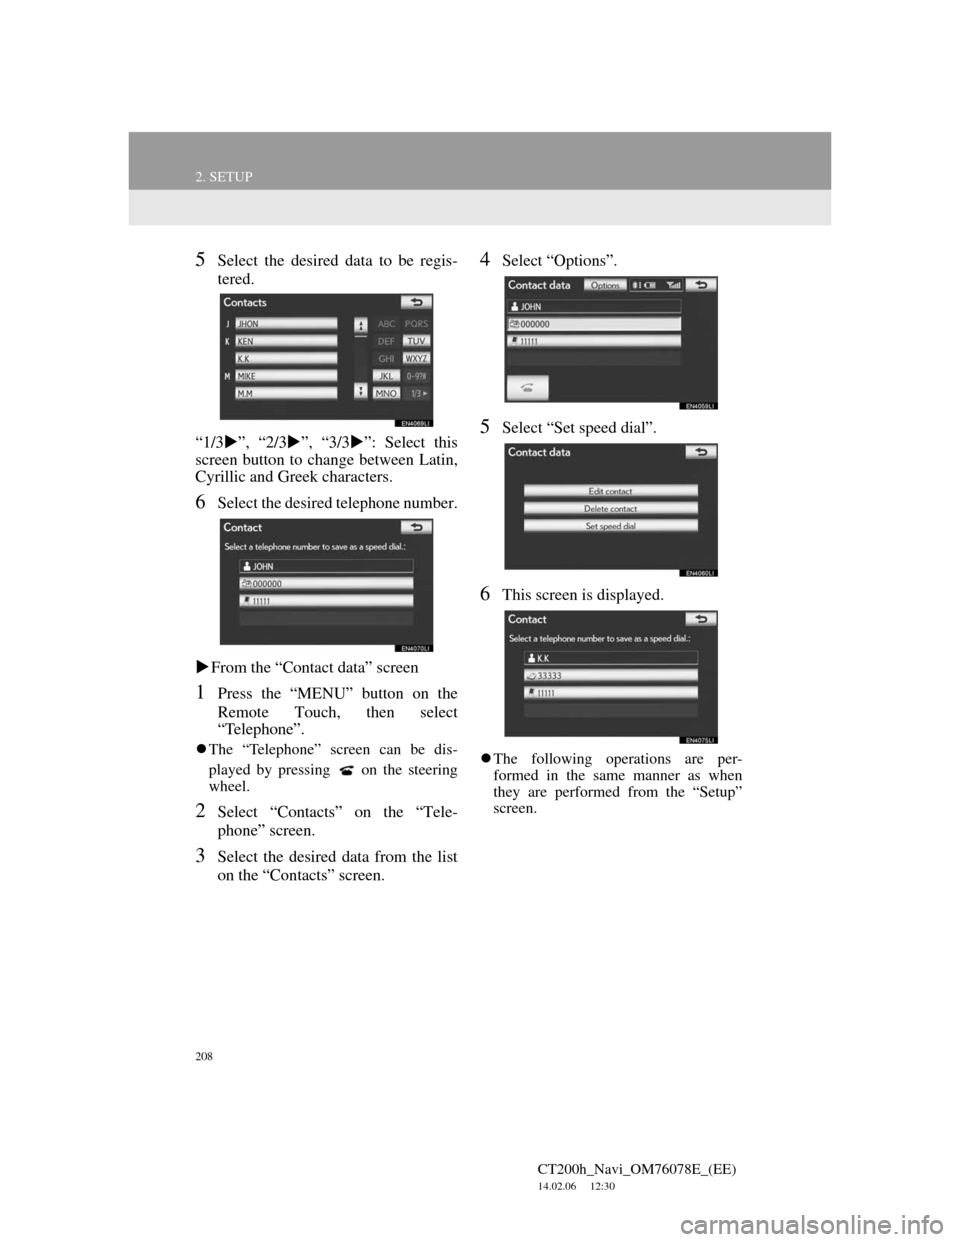
5Select the desired data to be regis-
tered.
“1/3”, “2/3”, “3/3”: Select this
screen button to change between Latin,
Cyrillic and Greek characters.
6Select the desired telephone number.
From the “Contact data” screen
1Press the “MENU” button on the
Remote Touch, then select
“Telephone”.
The “Telephone” screen can be dis-
played by pressing
on the steering
wheel.
2Select “Contacts” on the “Tele-
phone” screen.
3Select the desired data from the list
on the “Contacts” screen.
4Select “Options”.
5Select “Set speed dial”.
6This screen is displayed.
The following operations are per-
formed in the same manner as when
they are performed from the “Setup”
screen.
Page 210 of 436
210
2. SETUP
CT200h_Navi_OM76078E_(EE)
14.02.06 12:30
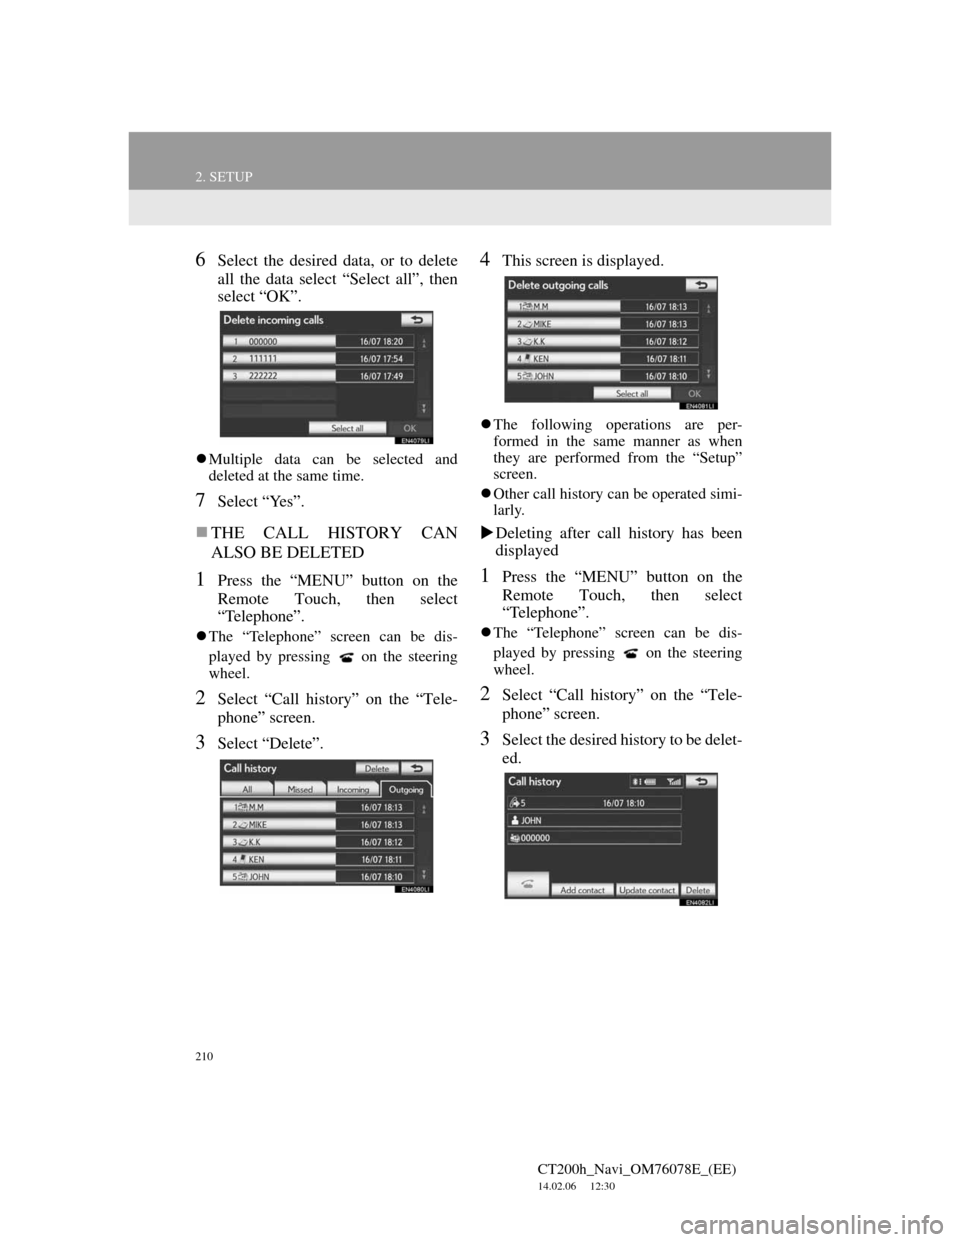
6Select the desired data, or to delete
all the data select “Select all”, then
select “OK”.
Multiple data can be selected and
deleted at the same time.
7Select “Yes”.
THE CALL HISTORY CAN
ALSO BE DELETED
1Press the “MENU” button on the
Remote Touch, then select
“Telephone”.
The “Telephone” screen can be dis-
played by pressing
on the steering
wheel.
2Select “Call history” on the “Tele-
phone” screen.
3Select “Delete”.
4This screen is displayed.
The following operations are per-
formed in the same manner as when
they are performed from the “Setup”
screen.
Other call history can be operated simi-
larly.
Deleting after call history has been
displayed
1Press the “MENU” button on the
Remote Touch, then select
“Telephone”.
The “Telephone” screen can be dis-
played by pressing
on the steering
wheel.
2Select “Call history” on the “Tele-
phone” screen.
3Select the desired history to be delet-
ed.
Page 211 of 436
211
2. SETUP
4
TELEPHONE
CT200h_Navi_OM76078E_(EE)
14.02.06 12:30
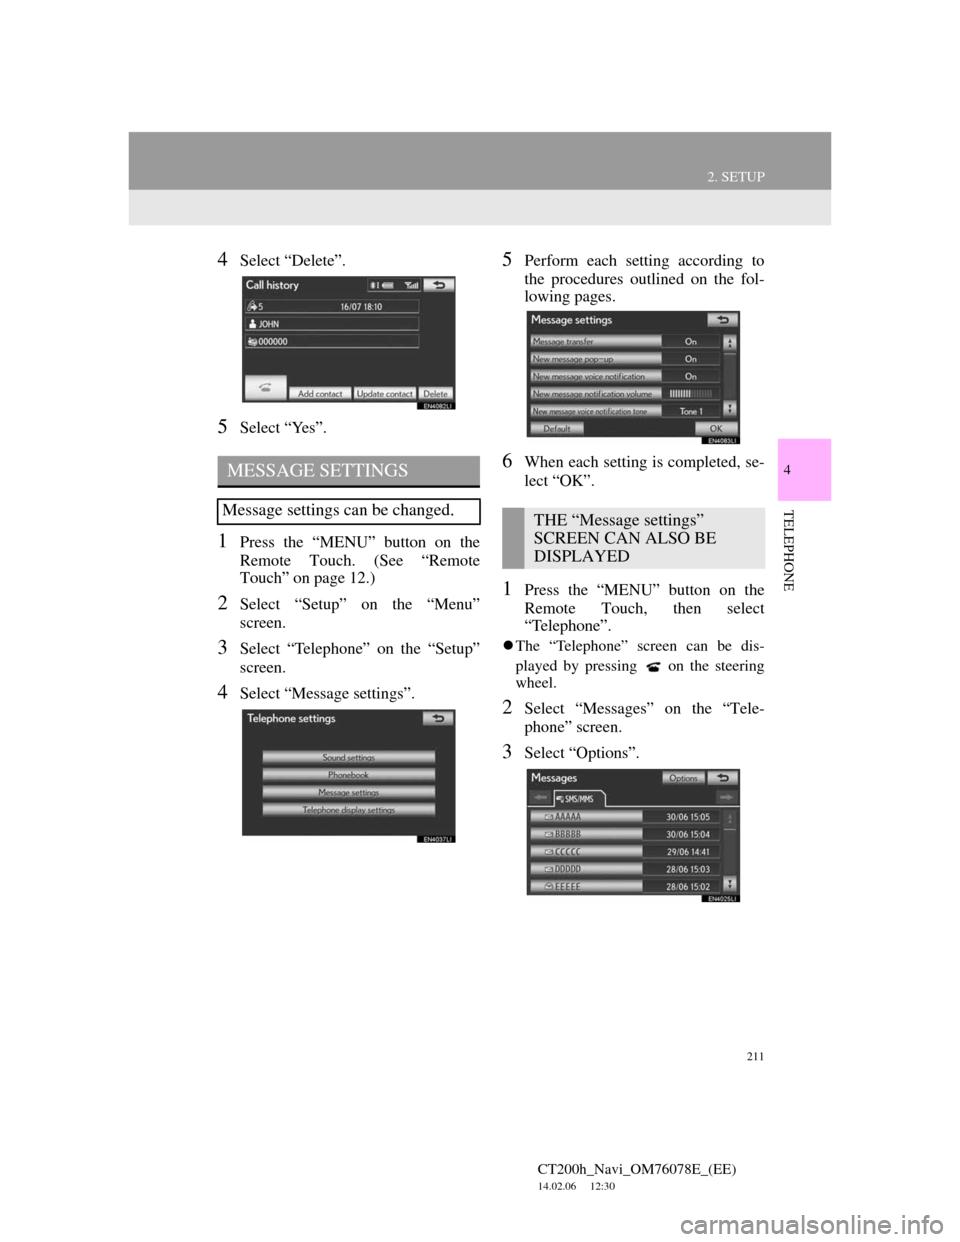
4Select “Delete”.
5Select “Yes”.
1Press the “MENU” button on the
Remote Touch. (See “Remote
Touch” on page 12.)
2Select “Setup” on the “Menu”
screen.
3Select “Telephone” on the “Setup”
screen.
4Select “Message settings”.
5Perform each setting according to
the procedures outlined on the fol-
lowing pages.
6When each setting is completed, se-
lect “OK”.
1Press the “MENU” button on the
Remote Touch, then select
“Telephone”.
The “Telephone” screen can be dis-
played by pressing
on the steering
wheel.
2Select “Messages” on the “Tele-
phone” screen.
3Select “Options”.
MESSAGE SETTINGS
Message settings can be changed.THE “Message settings”
SCREEN CAN ALSO BE
DISPLAYED
Page 217 of 436
217
2. SETUP
4
TELEPHONE
CT200h_Navi_OM76078E_(EE)
14.02.06 12:30
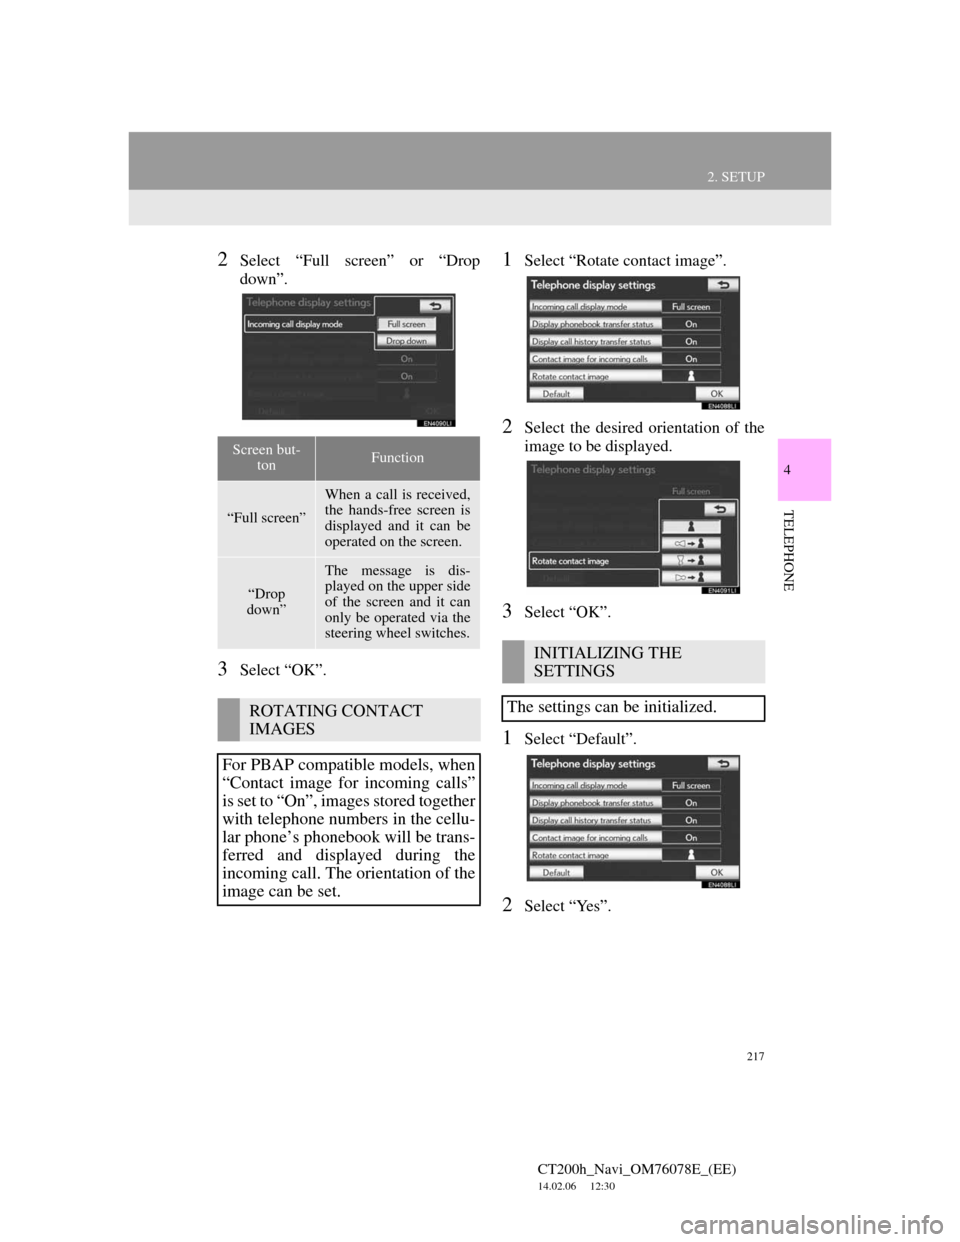
2Select “Full screen” or “Drop
down”.
3Select “OK”.
1Select “Rotate contact image”.
2Select the desired orientation of the
image to be displayed.
3Select “OK”.
1Select “Default”.
2Select “Yes”.
Screen but-
tonFunction
“Full screen”
When a call is received,
the hands-free screen is
displayed and it can be
operated on the screen.
“Drop
down”
The message is dis-
played on the upper side
of the screen and it can
only be operated via the
steering wheel switches.
ROTATING CONTACT
IMAGES
For PBAP compatible models, when
“Contact image for incoming calls”
is set to “On”, images stored together
with telephone numbers in the cellu-
lar phone’s phonebook will be trans-
ferred and displayed during the
incoming call. The orientation of the
image can be set.
INITIALIZING THE
SETTINGS
The settings can be initialized.
Page 231 of 436
5
231
1
2
3
4
5
6
7
CT200h_Navi_OM76078E_(EE)
14.02.06 12:30
8
9
10
4. DVD PLAYER OPERATION ......... 246
INSERTING A DISC ............................. 246
EJECTING A DISC ............................... 246
PLAYING A DISC ................................ 247
PLAYING AN AUDIO DISC............... 247
PLAYING AN MP3/WMA DISC ......... 250
OPERATING A DVD DISC ................. 254
PLAYING A DVD DISC....................... 255
DVD OPTIONS ..................................... 257
IF THE PLAYER MALFUNCTIONS... 265
DVD PLAYER AND DVD VIDEO
DISC INFORMATION ....................... 266
5. USB MEMORY OPERATION ....... 268
CONNECTING A USB MEMORY ...... 268
PLAYING A USB MEMORY............... 269
6. iPod OPERATION........................... 274
CONNECTING iPod ............................. 274
PLAYING iPod ...................................... 275
7. Bluetooth® AUDIO
OPERATION................................. 279
CONNECTING A Bluetooth®
AUDIO PLAYER ................................ 281
PLAYING Bluetooth
® AUDIO ............. 283
8. AUDIO/VIDEO REMOTE
CONTROLS
(STEERING SWITCHES) ............ 288
9. AUDIO/VIDEO SYSTEM
OPERATING HINTS ................... 290
RADIO RECEPTION ............................. 290
iPod ......................................................... 291
USB MEMORY...................................... 292
CARING FOR YOUR DVD PLAYER
AND DISC ........................................... 292
MP3/WMA FILES.................................. 295
CD-R AND CD-RW DISCS................... 297
TERMS ................................................... 297
1. AUDIO SETTINGS ........................ 299
AUDIO SETTINGS................................ 299
SOUND SETTINGS ............................... 300
RADIO SETTINGS ................................ 302
iPod SETTINGS ..................................... 303
2SETUP
For vehicles sold outside Europe, some of the functions cannot be operated while
AUDIO/VIDEO SYSTEM