display Lexus CT200h 2012 Navigation Manual (in English)
[x] Cancel search | Manufacturer: LEXUS, Model Year: 2012, Model line: CT200h, Model: Lexus CT200h 2012Pages: 436, PDF Size: 28.25 MB
Page 96 of 436
96
1. DESTINATION SEARCH
CT200h_Navi_OM76078E_(EE)
14.02.06 12:29
1Press the “MENU” button on the
Remote Touch. (See “Remote
Touch” on page 12.)
2Select “Navi”, and select “Menu” if
the map screen is displayed.
3Select “Destination” on the naviga-
tion menu screen.
4Select “Coordinates” on the second
page of the “Destination” screen.
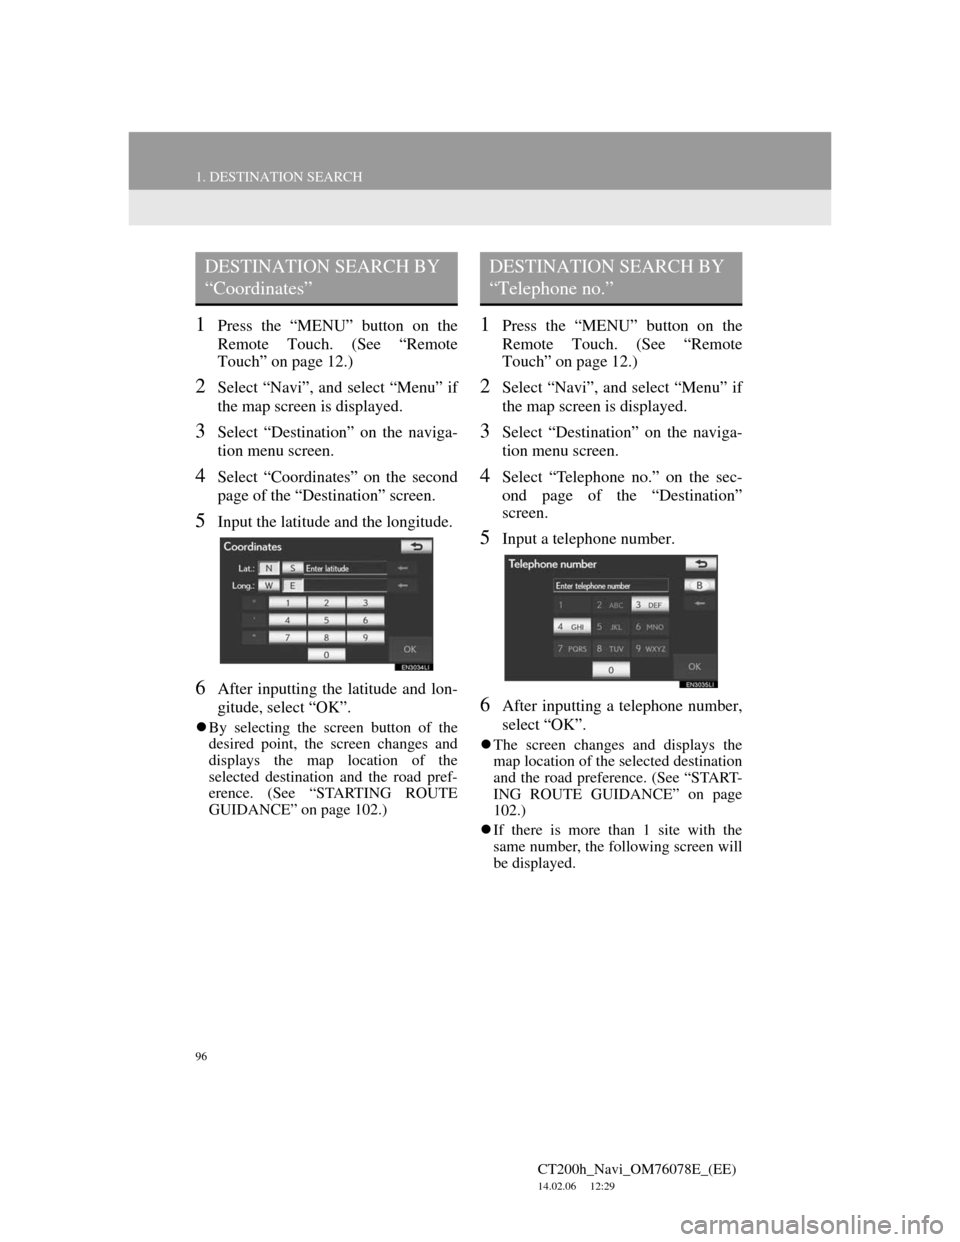
5Input the latitude and the longitude.
6After inputting the latitude and lon-
gitude, select “OK”.
By selecting the screen button of the
desired point, the screen changes and
displays the map location of the
selected destination and the road pref-
erence. (See “STARTING ROUTE
GUIDANCE” on page 102.)
1Press the “MENU” button on the
Remote Touch. (See “Remote
Touch” on page 12.)
2Select “Navi”, and select “Menu” if
the map screen is displayed.
3Select “Destination” on the naviga-
tion menu screen.
4Select “Telephone no.” on the sec-
ond page of the “Destination”
screen.
5Input a telephone number.
6After inputting a telephone number,
select “OK”.
The screen changes and displays the
map location of the selected destination
and the road preference. (See “START-
ING ROUTE GUIDANCE” on page
102.)
If there is more than 1 site with the
same number, the following screen will
be displayed.
DESTINATION SEARCH BY
“Coordinates”DESTINATION SEARCH BY
“Telephone no.”
Page 97 of 436
97
1. DESTINATION SEARCH
3
NAVIGATION SYSTEM
CT200h_Navi_OM76078E_(EE)
14.02.06 12:29
1Press the “MENU” button on the
Remote Touch. (See “Remote
Touch” on page 12.)
2Select “Navi”, and select “Menu” if
the map screen is displayed.
3Select “Destination” on the naviga-
tion menu screen.
4Select “POI near cursor” on the sec-
ond page of the “Destination”
screen.
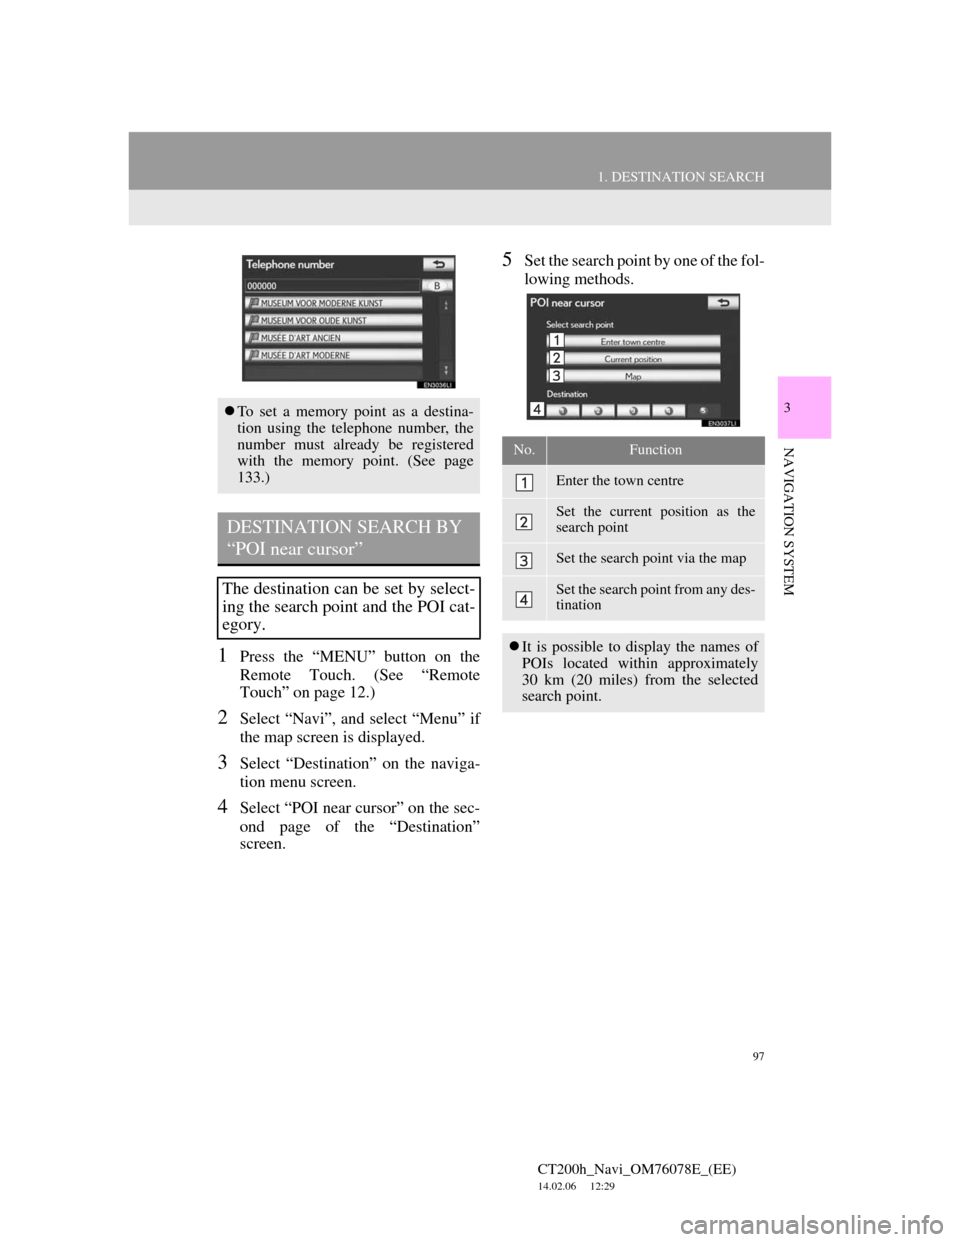
5Set the search point by one of the fol-
lowing methods.
To set a memory point as a destina-
tion using the telephone number, the
number must already be registered
with the memory point. (See page
133.)
DESTINATION SEARCH BY
“POI near cursor”
The destination can be set by select-
ing the search point and the POI cat-
egory.
No.Function
Enter the town centre
Set the current position as the
search point
Set the search point via the map
Set the search point from any des-
tination
It is possible to display the names of
POIs located within approximately
30 km (20 miles) from the selected
search point.
Page 98 of 436
98
1. DESTINATION SEARCH
CT200h_Navi_OM76078E_(EE)
14.02.06 12:29
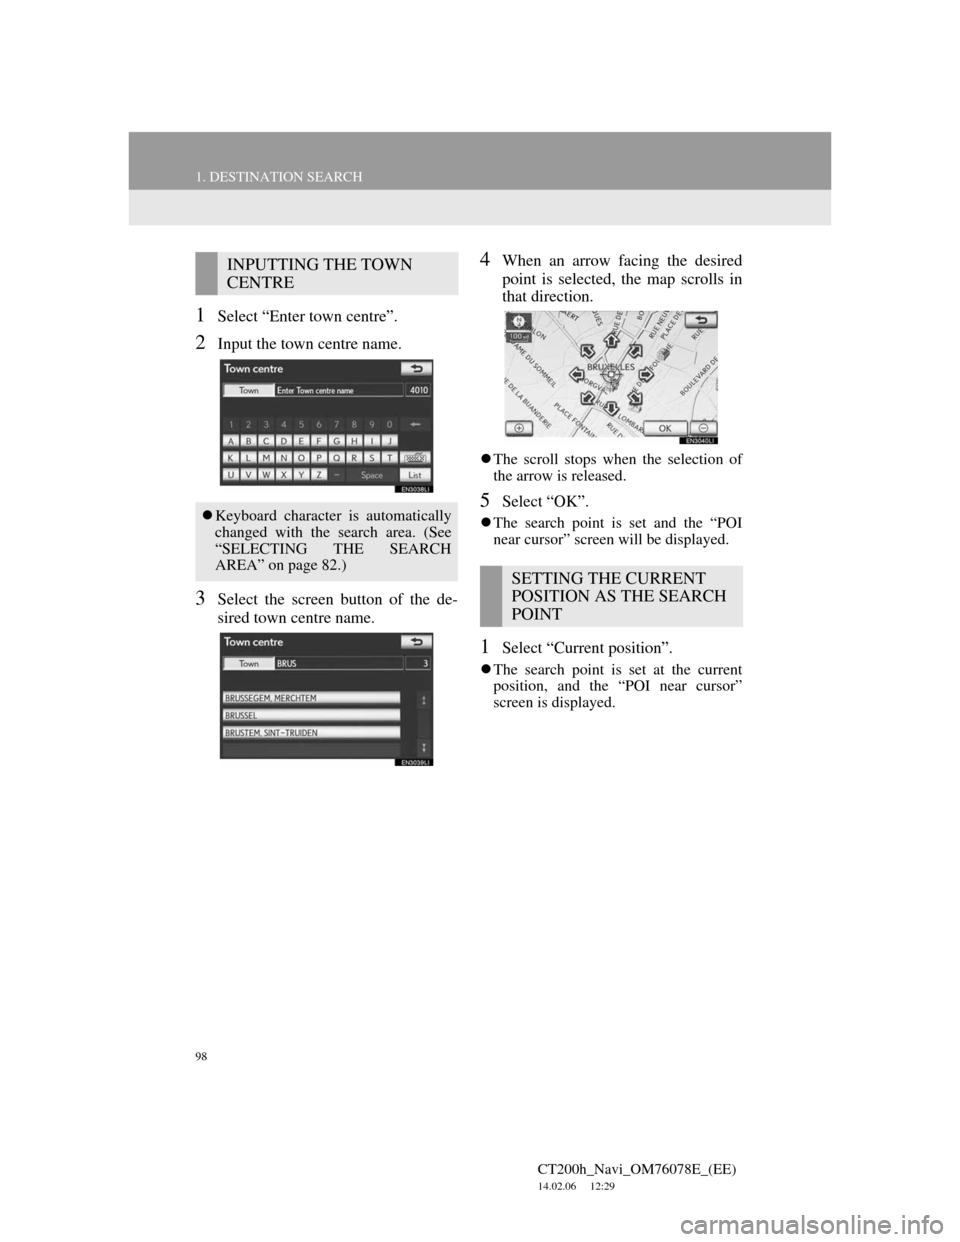
1Select “Enter town centre”.
2Input the town centre name.
3Select the screen button of the de-
sired town centre name.
4When an arrow facing the desired
point is selected, the map scrolls in
that direction.
The scroll stops when the selection of
the arrow is released.
5Select “OK”.
The search point is set and the “POI
near cursor” screen will be displayed.
1Select “Current position”.
The search point is set at the current
position, and the “POI near cursor”
screen is displayed.
INPUTTING THE TOWN
CENTRE
Keyboard character is automatically
changed with the search area. (See
“SELECTING THE SEARCH
AREA” on page 82.)
SETTING THE CURRENT
POSITION AS THE SEARCH
POINT
Page 99 of 436
99
1. DESTINATION SEARCH
3
NAVIGATION SYSTEM
CT200h_Navi_OM76078E_(EE)
14.02.06 12:29
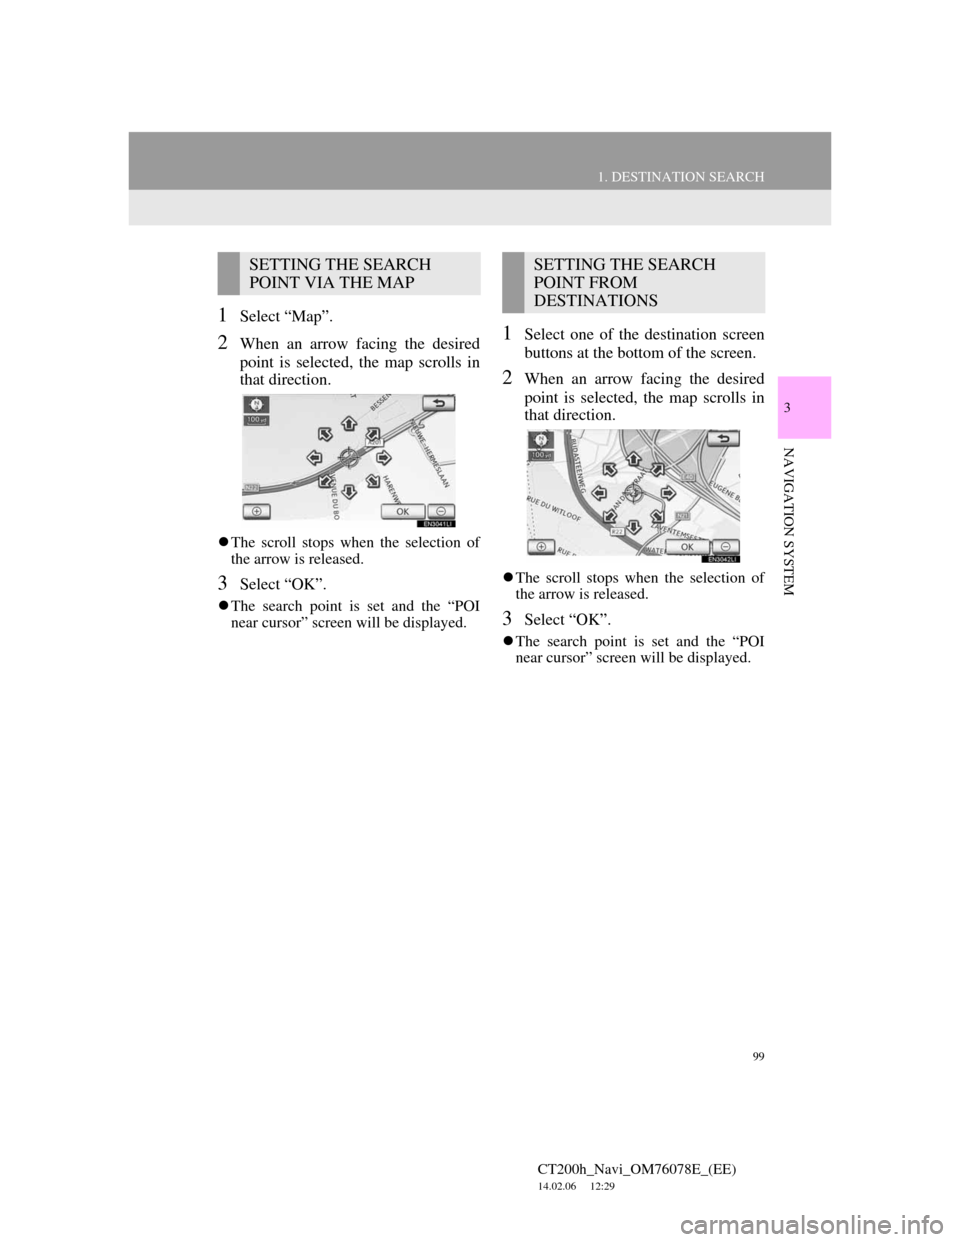
1Select “Map”.
2When an arrow facing the desired
point is selected, the map scrolls in
that direction.
The scroll stops when the selection of
the arrow is released.
3Select “OK”.
The search point is set and the “POI
near cursor” screen will be displayed.
1Select one of the destination screen
buttons at the bottom of the screen.
2When an arrow facing the desired
point is selected, the map scrolls in
that direction.
The scroll stops when the selection of
the arrow is released.
3Select “OK”.
The search point is set and the “POI
near cursor” screen will be displayed.
SETTING THE SEARCH
POINT VIA THE MAPSETTING THE SEARCH
POINT FROM
DESTINATIONS
Page 100 of 436
100
1. DESTINATION SEARCH
CT200h_Navi_OM76078E_(EE)
14.02.06 12:29
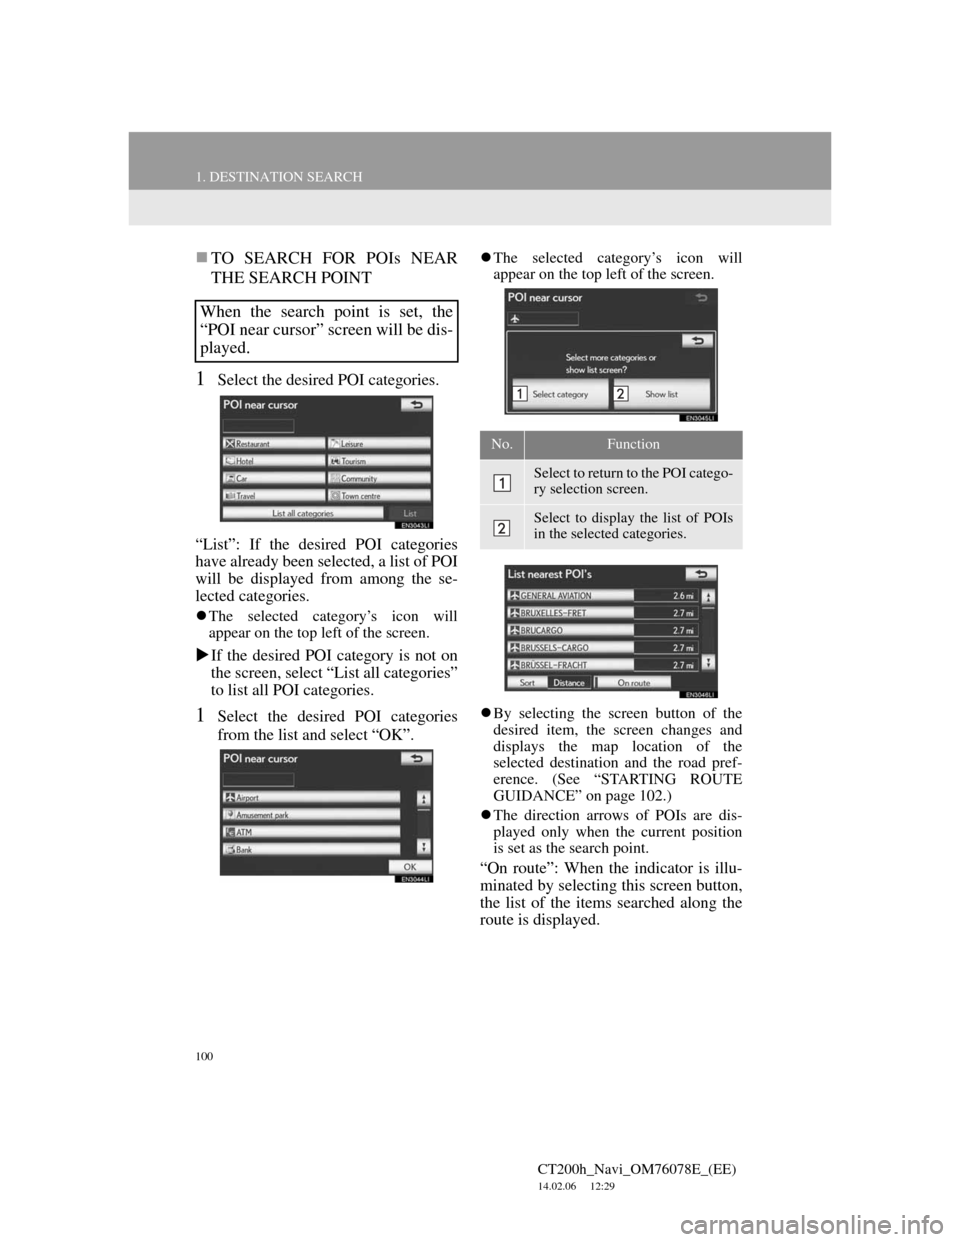
TO SEARCH FOR POIs NEAR
THE SEARCH POINT
1Select the desired POI categories.
“List”: If the desired POI categories
have already been selected, a list of POI
will be displayed from among the se-
lected categories.
The selected category’s icon will
appear on the top left of the screen.
If the desired POI category is not on
the screen, select “List all categories”
to list all POI categories.
1Select the desired POI categories
from the list and select “OK”.
The selected category’s icon will
appear on the top left of the screen.
By selecting the screen button of the
desired item, the screen changes and
displays the map location of the
selected destination and the road pref-
erence. (See “STARTING ROUTE
GUIDANCE” on page 102.)
The direction arrows of POIs are dis-
played only when the current position
is set as the search point.
“On route”: When the indicator is illu-
minated by selecting this screen button,
the list of the items searched along the
route is displayed.
When the search point is set, the
“POI near cursor” screen will be dis-
played.
No.Function
Select to return to the POI catego-
ry selection screen.
Select to display the list of POIs
in the selected categories.
Page 101 of 436
101
1. DESTINATION SEARCH
3
NAVIGATION SYSTEM
CT200h_Navi_OM76078E_(EE)
14.02.06 12:29
1Press the “MENU” button on the
Remote Touch. (See “Remote
Touch” on page 12.)
2Select “Navi”, and select “Menu” if
the map screen is displayed.
3Select “Destination” on the naviga-
tion menu screen.
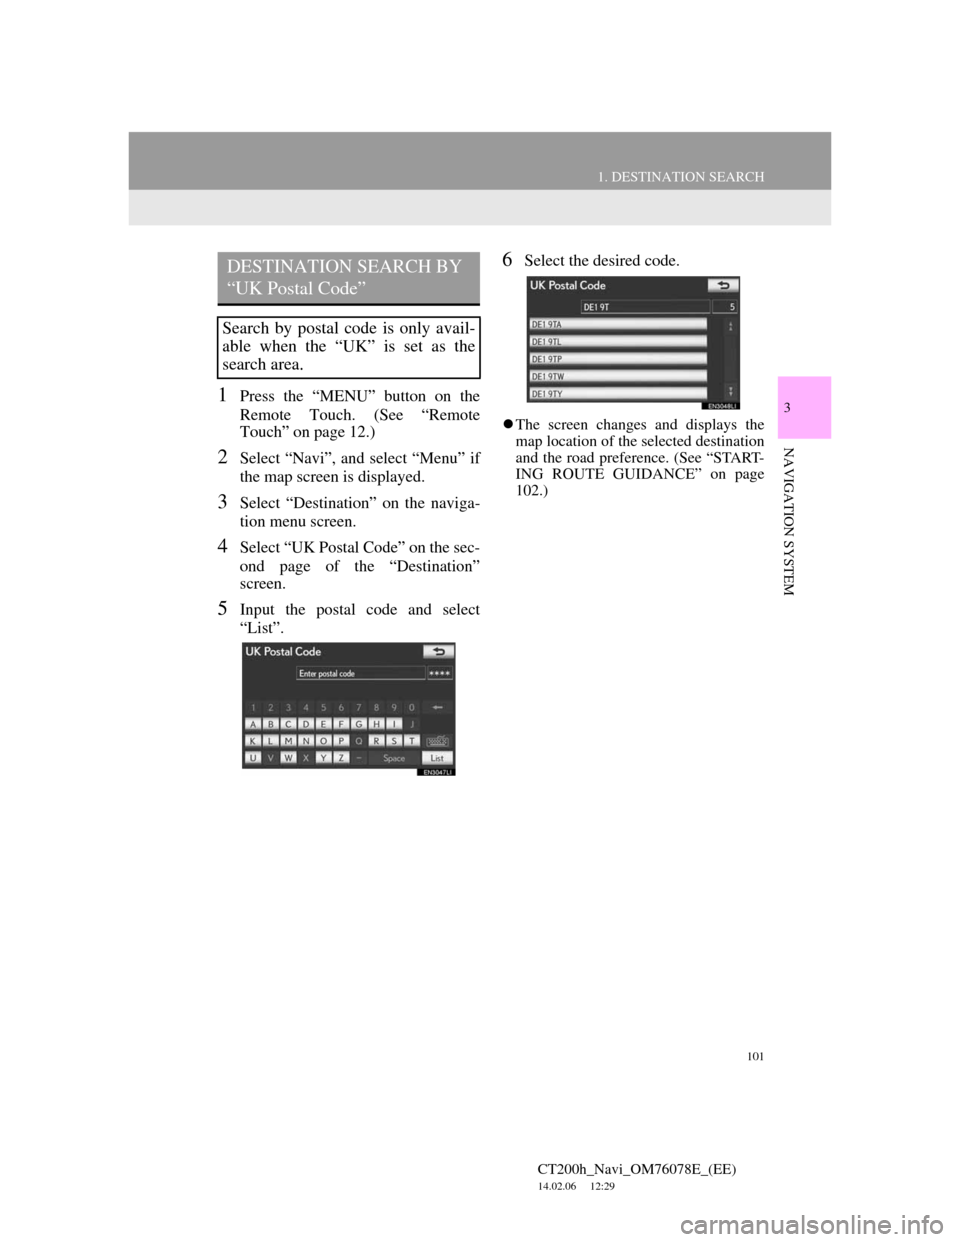
4Select “UK Postal Code” on the sec-
ond page of the “Destination”
screen.
5Input the postal code and select
“List”.
6Select the desired code.
The screen changes and displays the
map location of the selected destination
and the road preference. (See “START-
ING ROUTE GUIDANCE” on page
102.)
DESTINATION SEARCH BY
“UK Postal Code”
Search by postal code is only avail-
able when the “UK” is set as the
search area.
Page 102 of 436
102
1. DESTINATION SEARCH
CT200h_Navi_OM76078E_(EE)
14.02.06 12:29
3. STARTING ROUTE GUIDANCE
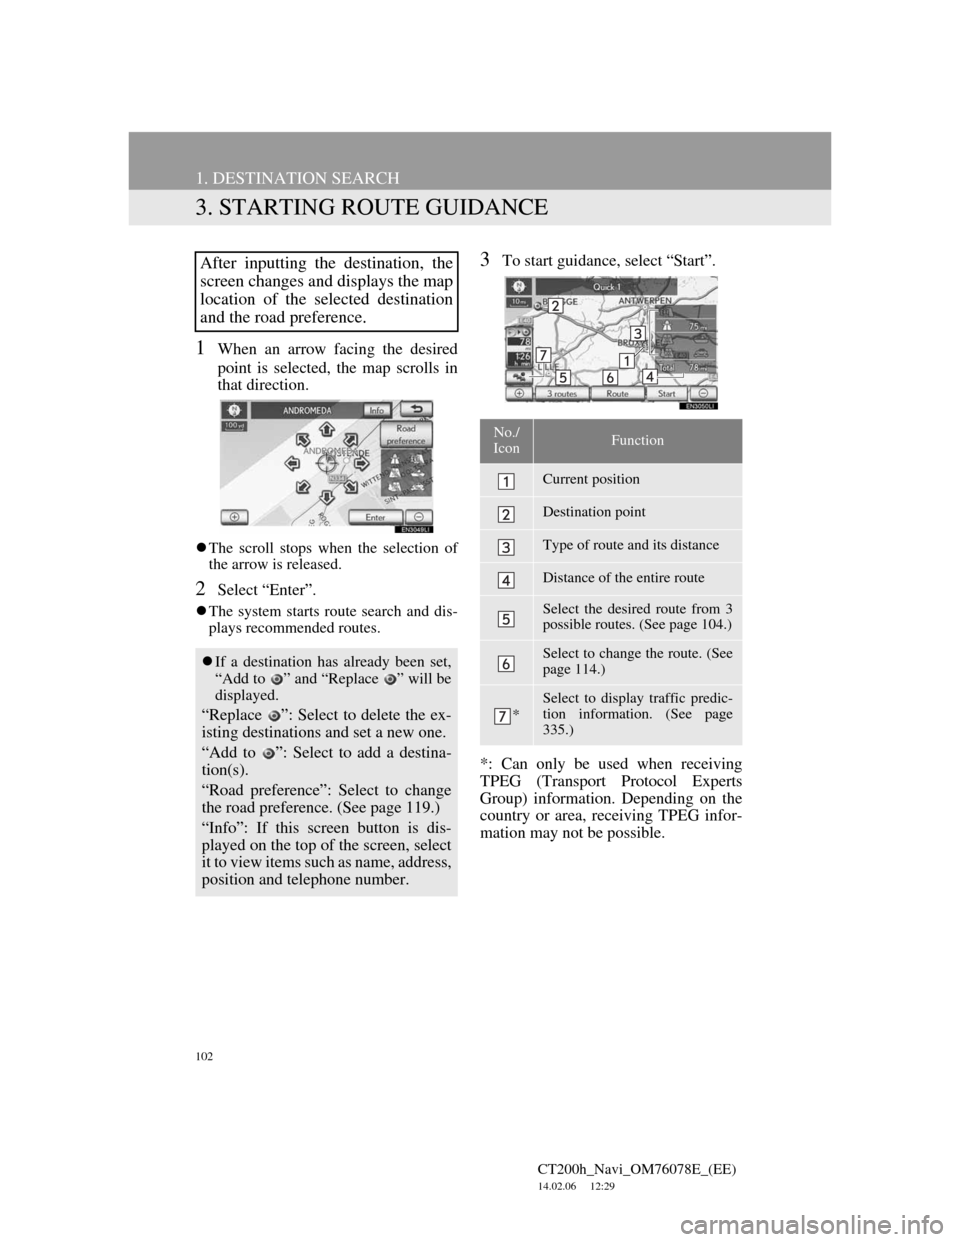
1When an arrow facing the desired
point is selected, the map scrolls in
that direction.
The scroll stops when the selection of
the arrow is released.
2Select “Enter”.
The system starts route search and dis-
plays recommended routes.
3To start guidance, select “Start”.
*: Can only be used when receiving
TPEG (Transport Protocol Experts
Group) information. Depending on the
country or area, receiving TPEG infor-
mation may not be possible.After inputting the destination, the
screen changes and displays the map
location of the selected destination
and the road preference.
If a destination has already been set,
“Add to ” and “Replace ” will be
displayed.
“Replace ”: Select to delete the ex-
isting destinations and set a new one.
“Add to ”: Select to add a destina-
tion(s).
“Road preference”: Select to change
the road preference. (See page 119.)
“Info”: If this screen button is dis-
played on the top of the screen, select
it to view items such as name, address,
position and telephone number.
No./
IconFunction
Current position
Destination point
Type of route and its distance
Distance of the entire route
Select the desired route from 3
possible routes. (See page 104.)
Select to change the route. (See
page 114.)
*
Select to display traffic predic-
tion information. (See page
335.)
Page 104 of 436
104
1. DESTINATION SEARCH
CT200h_Navi_OM76078E_(EE)
14.02.06 12:29
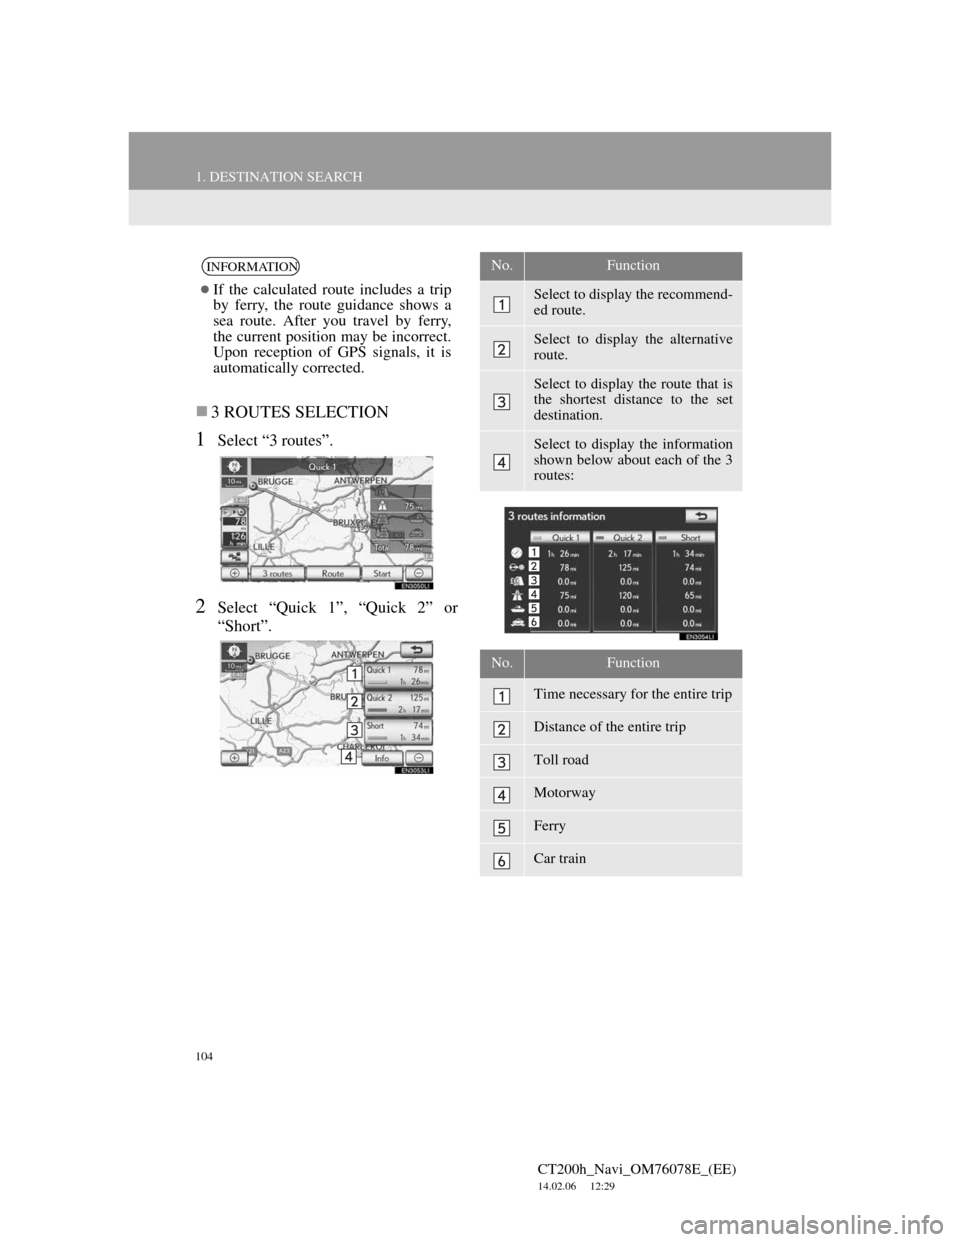
3 ROUTES SELECTION
1Select “3 routes”.
2Select “Quick 1”, “Quick 2” or
“Short”.
INFORMATION
If the calculated route includes a trip
by ferry, the route guidance shows a
sea route. After you travel by ferry,
the current position may be incorrect.
Upon reception of GPS signals, it is
automatically corrected.
No.Function
Select to display the recommend-
ed route.
Select to display the alternative
route.
Select to display the route that is
the shortest distance to the set
destination.
Select to display the information
shown below about each of the 3
routes:
No.Function
Time necessary for the entire trip
Distance of the entire trip
Toll road
Motorway
Ferry
Car train
Page 105 of 436
105
CT200h_Navi_OM76078E_(EE)
14.02.06 12:29
3
NAVIGATION SYSTEM
2. ROUTE GUIDANCE
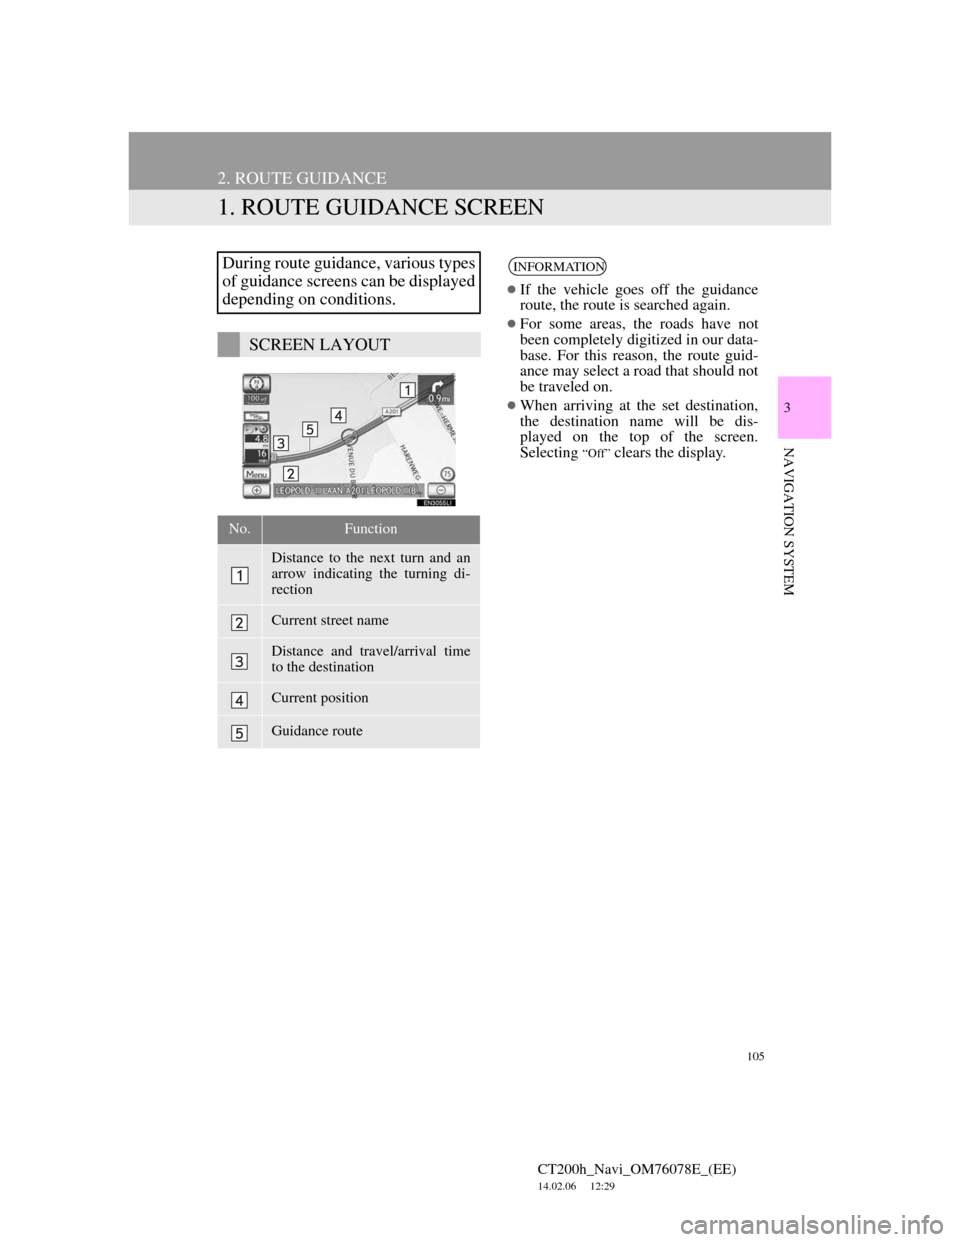
1. ROUTE GUIDANCE SCREEN
During route guidance, various types
of guidance screens can be displayed
depending on conditions.
SCREEN LAYOUT
No.Function
Distance to the next turn and an
arrow indicating the turning di-
rection
Current street name
Distance and travel/arrival time
to the destination
Current position
Guidance route
INFORMATION
If the vehicle goes off the guidance
route, the route is searched again.
For some areas, the roads have not
been completely digitized in our data-
base. For this reason, the route guid-
ance may select a road that should not
be traveled on.
When arriving at the set destination,
the destination name will be dis-
played on the top of the screen.
Selecting
“Off” clears the display.
Page 106 of 436
106
2. ROUTE GUIDANCE
CT200h_Navi_OM76078E_(EE)
14.02.06 12:29
With signpost motorway data
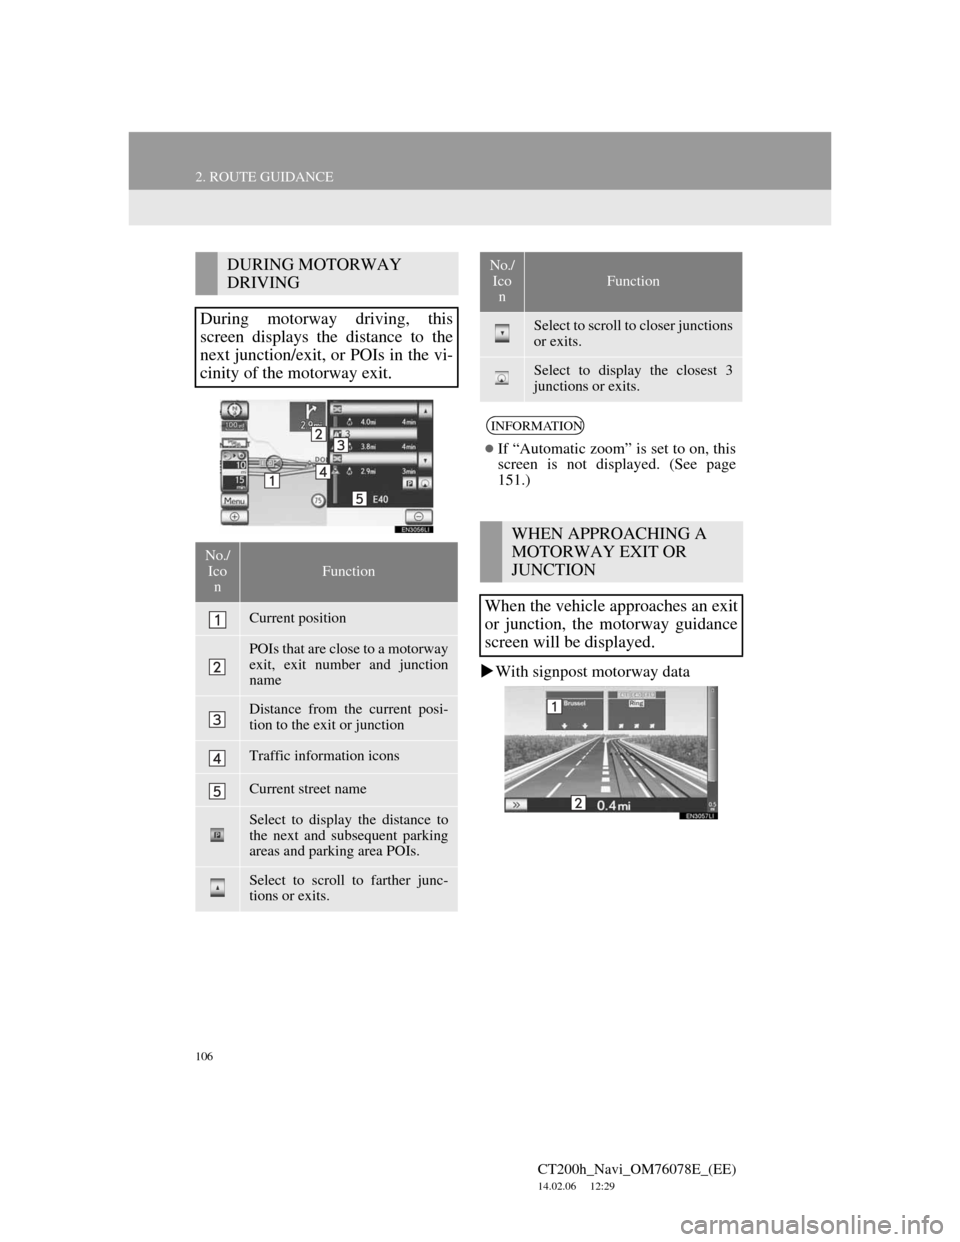
DURING MOTORWAY
DRIVING
During motorway driving, this
screen displays the distance to the
next junction/exit, or POIs in the vi-
cinity of the motorway exit.
No./
Ico
nFunction
Current position
POIs that are close to a motorway
exit, exit number and junction
name
Distance from the current posi-
tion to the exit or junction
Traffic information icons
Current street name
Select to display the distance to
the next and subsequent parking
areas and parking area POIs.
Select to scroll to farther junc-
tions or exits.
Select to scroll to closer junctions
or exits.
Select to display the closest 3
junctions or exits.
INFORMATION
If “Automatic zoom” is set to on, this
screen is not displayed. (See page
151.)
WHEN APPROACHING A
MOTORWAY EXIT OR
JUNCTION
When the vehicle approaches an exit
or junction, the motorway guidance
screen will be displayed.
No./
Ico
n
Function