navigation system Lexus CT200h 2012 Navigation Manual (in English)
[x] Cancel search | Manufacturer: LEXUS, Model Year: 2012, Model line: CT200h, Model: Lexus CT200h 2012Pages: 436, PDF Size: 28.25 MB
Page 344 of 436
344
CT200h_Navi_OM76078E_(EE)
14.02.06 12:30
1. CONNECTED SERVICES
1. CONNECTED SERVICES OVERVIEW
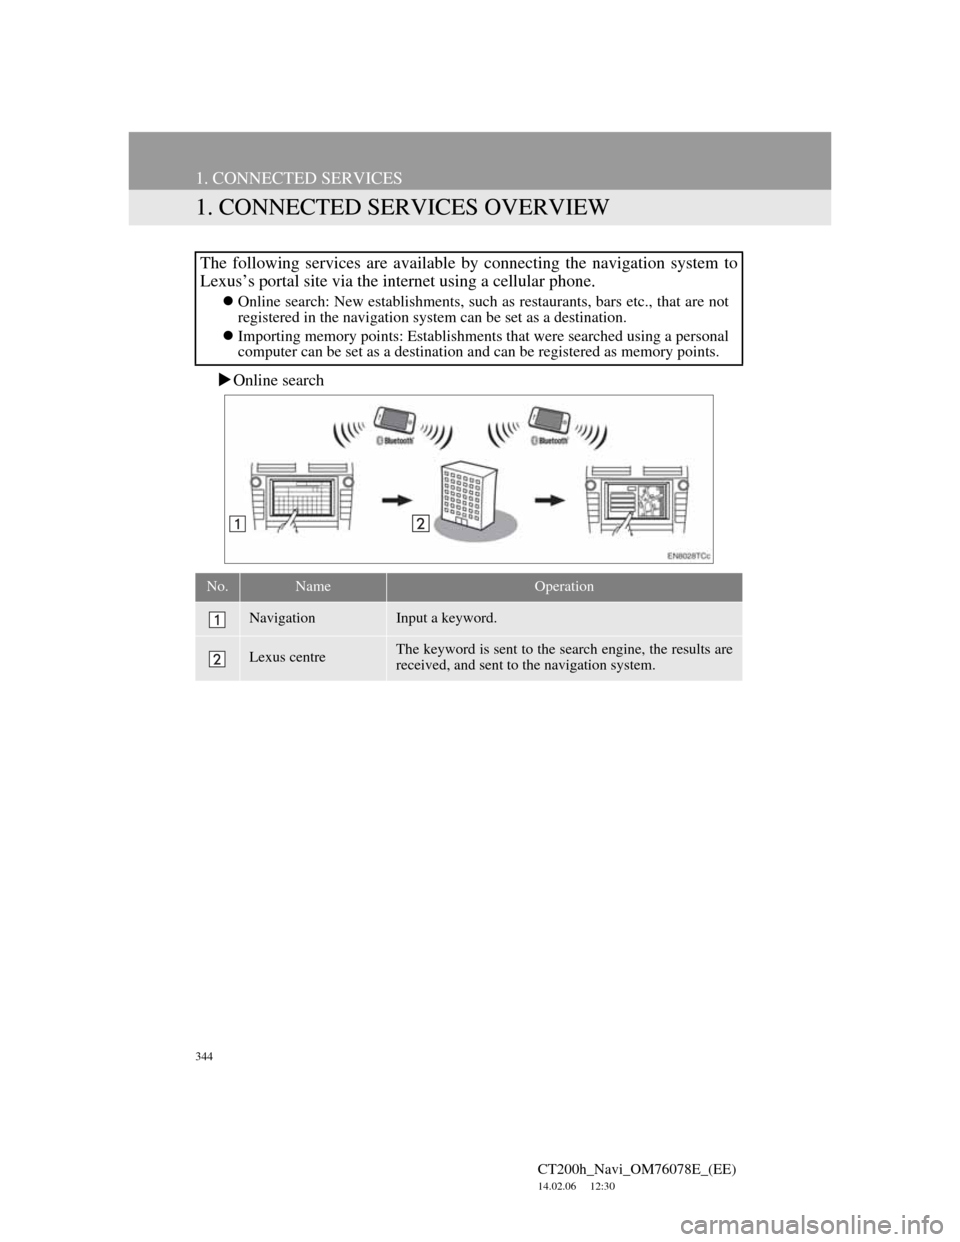
Online search
The following services are available by connecting the navigation system to
Lexus’s portal site via the internet using a cellular phone.
Online search: New establishments, such as restaurants, bars etc., that are not
registered in the navigation system can be set as a destination.
Importing memory points: Establishments that were searched using a personal
computer can be set as a destination and can be registered as memory points.
No.NameOperation
NavigationInput a keyword.
Lexus centreThe keyword is sent to the search engine, the results are
received, and sent to the navigation system.
Page 345 of 436
345
1. CONNECTED SERVICES
CT200h_Navi_OM76078E_(EE)
14.02.06 12:30
9
CONNECTED SERVICES
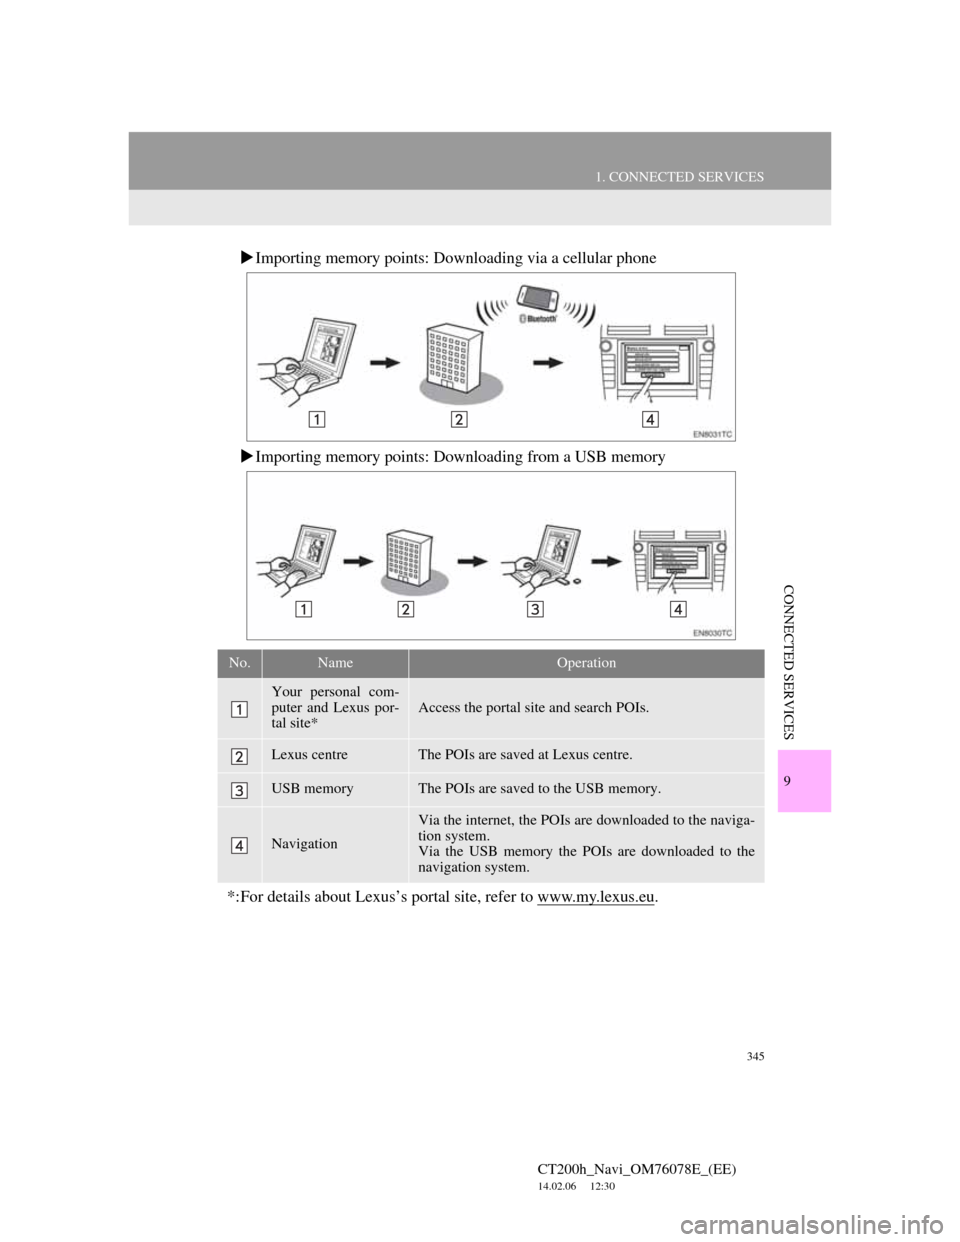
Importing memory points: Downloading via a cellular phone
Importing memory points: Downloading from a USB memory
No.NameOperation
Your personal com-
puter and Lexus por-
tal site*
Access the portal site and search POIs.
Lexus centreThe POIs are saved at Lexus centre.
USB memoryThe POIs are saved to the USB memory.
Navigation
Via the internet, the POIs are downloaded to the naviga-
tion system.
Via the USB memory the POIs are downloaded to the
navigation system.
*:For details about Lexus’s portal site, refer to www.my.lexus.eu.
Page 346 of 436
346
1. CONNECTED SERVICES
CT200h_Navi_OM76078E_(EE)
14.02.06 12:30
In order to use this service, a
Bluetooth® DUN compatible cellular
phone with sufficient network coverage
and a SIM card with a contract that
allows access to the internet are
required.
Before using this service, it is necessary
to access Lexus’s portal site via a per-
sonal computer and create an account.
When creating an account, “Navigation
Identification” will be required. (For
details about “CHECKING NAVIGA-
TION IDENTIFICATION”, see page
347.)
When using the connected services,
depending on your telephone subscrip-
tion, some related fees might apply.
When a cellular phone is used in a
roaming situation (when outside the
geographical coverage area of mobile
network provider) connection fees will
be more expensive.
Bluetooth is a registered trademark of
Bluetooth SIG, Inc.
BEFORE USING
CONNECTED SERVICESINFORMATION
This system supports the following
service:
• Bluetooth
® Specification
Ver.1.1 or higher
(Recommended: Ver.2.1 + EDR or
higher)
•Profiles
HFP (Hands Free Profile)
Ver.1.0 or higher
(Recommended: Ver.1.5 or higher)
OPP (Object Push Profile)
Ver.1.1 or higher
PBAP (Phone Book Access Profile)
Ver.1.0 or higher
DUN (Dial-Up Networking Profile)
Ver.1.1 or higher
If your cellular phone does not sup-
port HFP, you cannot register the
Bluetooth
® DUN compatible cellular
phone, or use DUN, OPP or PBAP
profiles individually.
If the connected Bluetooth® DUN
compatible cellular phone version is
older than recommended or incom-
patible, this function may not be used.
Page 348 of 436
348
1. CONNECTED SERVICES
CT200h_Navi_OM76078E_(EE)
14.02.06 12:30
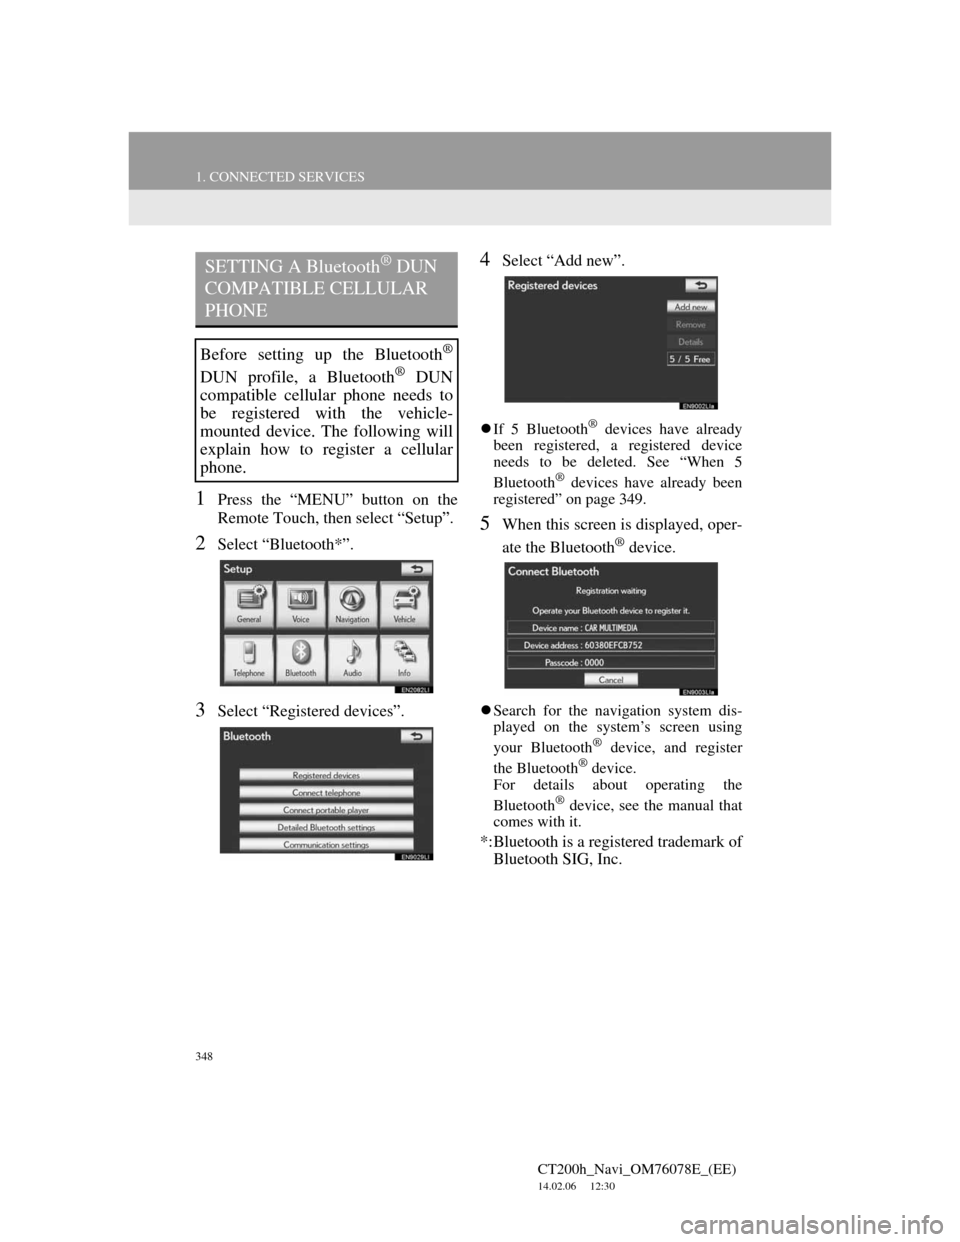
1Press the “MENU” button on the
Remote Touch, then select “Setup”.
2Select “Bluetooth*”.
3Select “Registered devices”.
4Select “Add new”.
If 5 Bluetooth® devices have already
been registered, a registered device
needs to be deleted. See “When 5
Bluetooth
® devices have already been
registered” on page 349.
5When this screen is displayed, oper-
ate the Bluetooth
® device.
Search for the navigation system dis-
played on the system’s screen using
your Bluetooth
® device, and register
the Bluetooth® device.
For details about operating the
Bluetooth
® device, see the manual that
comes with it.
*:Bluetooth is a registered trademark of
Bluetooth SIG, Inc.
SETTING A Bluetooth® DUN
COMPATIBLE CELLULAR
PHONE
Before setting up the Bluetooth®
DUN profile, a Bluetooth® DUN
compatible cellular phone needs to
be registered with the vehicle-
mounted device. The following will
explain how to register a cellular
phone.
Page 352 of 436
352
1. CONNECTED SERVICES
CT200h_Navi_OM76078E_(EE)
14.02.06 12:30
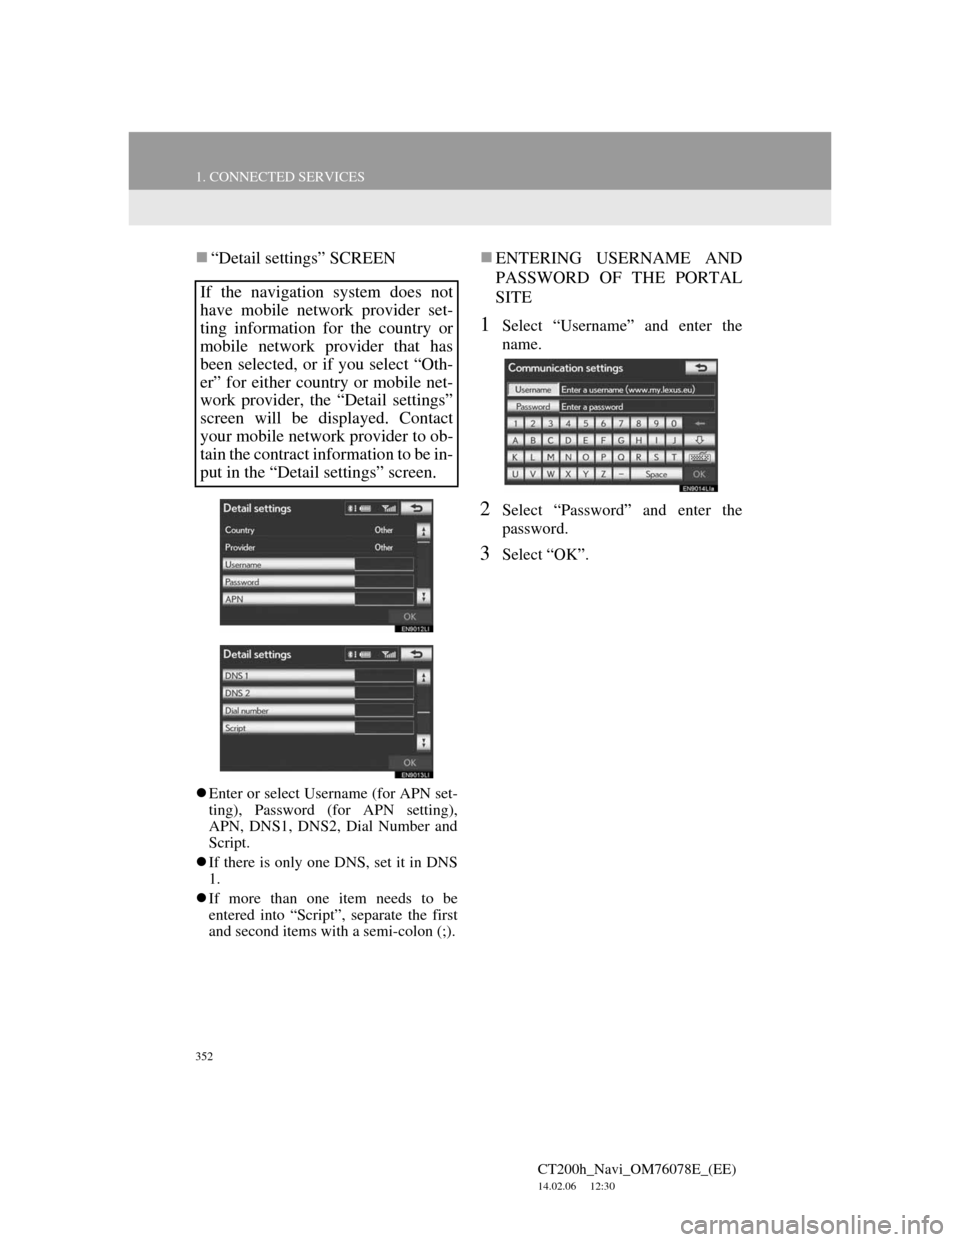
“Detail settings” SCREEN
Enter or select Username (for APN set-
ting), Password (for APN setting),
APN, DNS1, DNS2, Dial Number and
Script.
If there is only one DNS, set it in DNS
1.
If more than one item needs to be
entered into “Script”, separate the first
and second items with a semi-colon (;).
ENTERING USERNAME AND
PASSWORD OF THE PORTAL
SITE
1Select “Username” and enter the
name.
2Select “Password” and enter the
password.
3Select “OK”.
If the navigation system does not
have mobile network provider set-
ting information for the country or
mobile network provider that has
been selected, or if you select “Oth-
er” for either country or mobile net-
work provider, the “Detail settings”
screen will be displayed. Contact
your mobile network provider to ob-
tain the contract information to be in-
put in the “Detail settings” screen.
Page 353 of 436
353
1. CONNECTED SERVICES
CT200h_Navi_OM76078E_(EE)
14.02.06 12:30
9
CONNECTED SERVICES
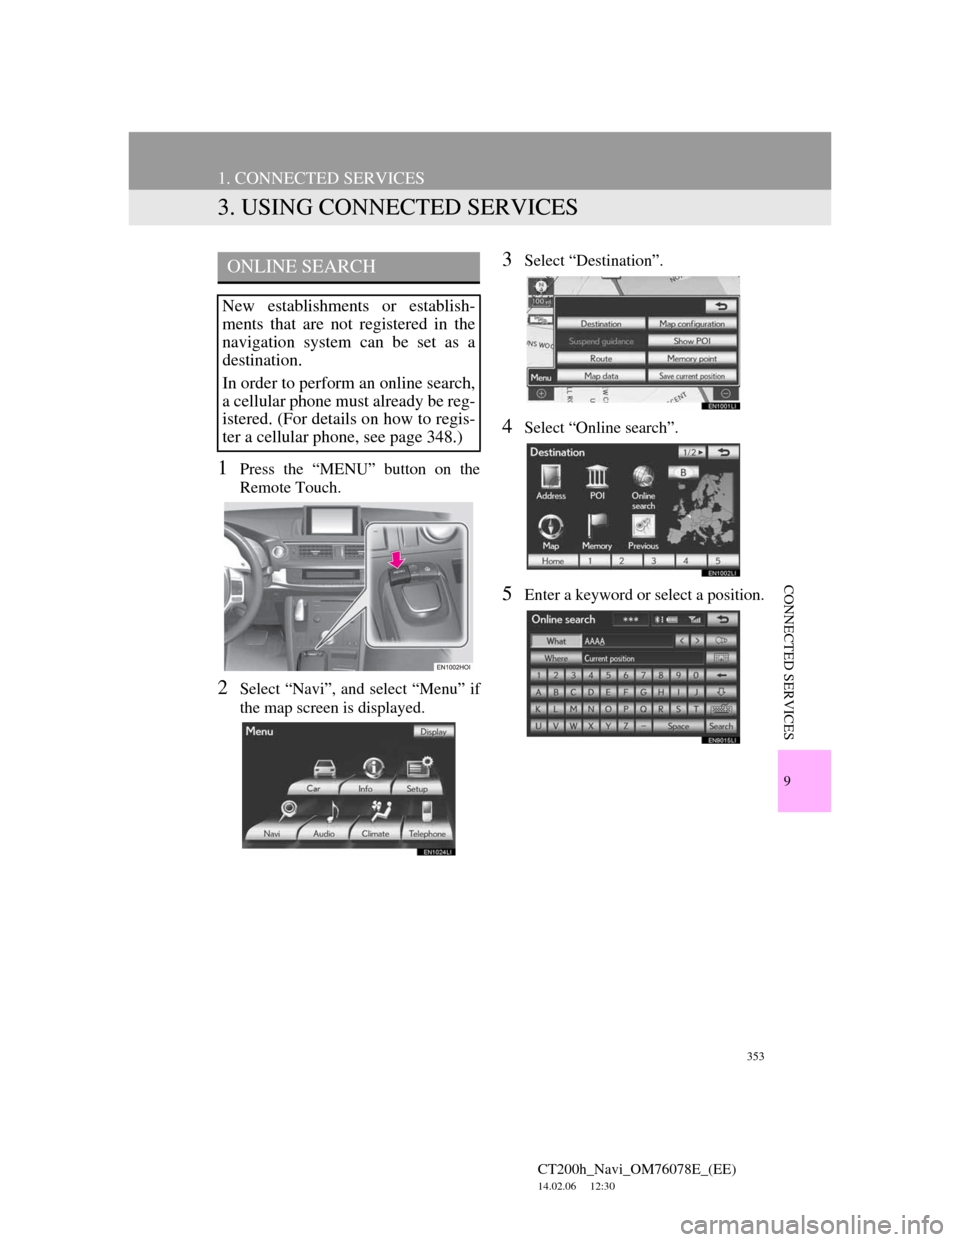
3. USING CONNECTED SERVICES
1Press the “MENU” button on the
Remote Touch.
2Select “Navi”, and select “Menu” if
the map screen is displayed.
3Select “Destination”.
4Select “Online search”.
5Enter a keyword or select a position.
ONLINE SEARCH
New establishments or establish-
ments that are not registered in the
navigation system can be set as a
destination.
In order to perform an online search,
a cellular phone must already be reg-
istered. (For details on how to regis-
ter a cellular phone, see page 348.)
Page 355 of 436
355
1. CONNECTED SERVICES
CT200h_Navi_OM76078E_(EE)
14.02.06 12:30
9
CONNECTED SERVICES
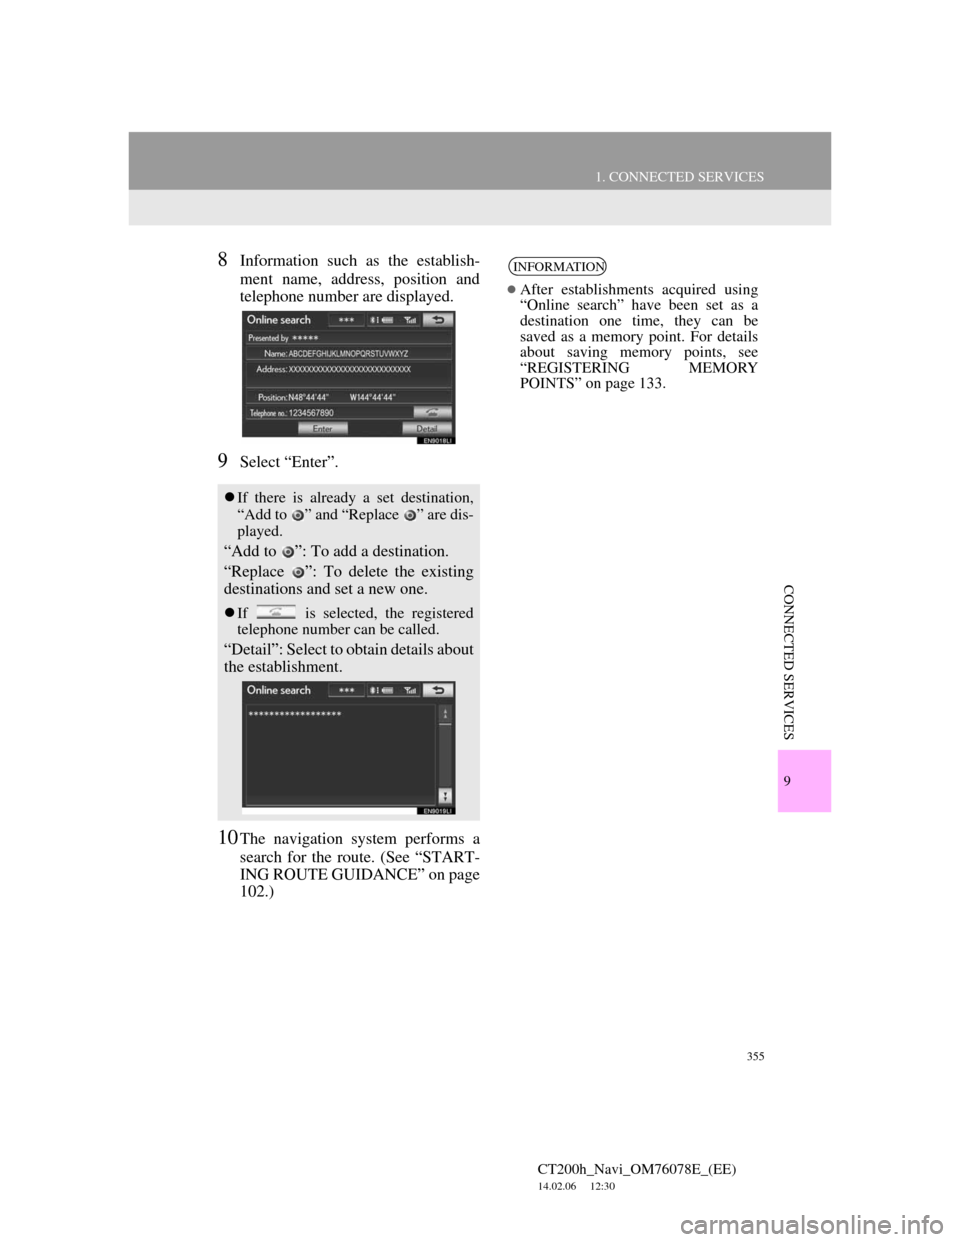
8Information such as the establish-
ment name, address, position and
telephone number are displayed.
9Select “Enter”.
10The navigation system performs a
search for the route. (See “START-
ING ROUTE GUIDANCE” on page
102.)
If there is already a set destination,
“Add to ” and “Replace ” are dis-
played.
“Add to ”: To add a destination.
“Replace ”: To delete the existing
destinations and set a new one.
If is selected, the registered
telephone number can be called.
“Detail”: Select to obtain details about
the establishment.
INFORMATION
After establishments acquired using
“Online search” have been set as a
destination one time, they can be
saved as a memory point. For details
about saving memory points, see
“REGISTERING MEMORY
POINTS” on page 133.
Page 358 of 436
358
1. CONNECTED SERVICES
CT200h_Navi_OM76078E_(EE)
14.02.06 12:30
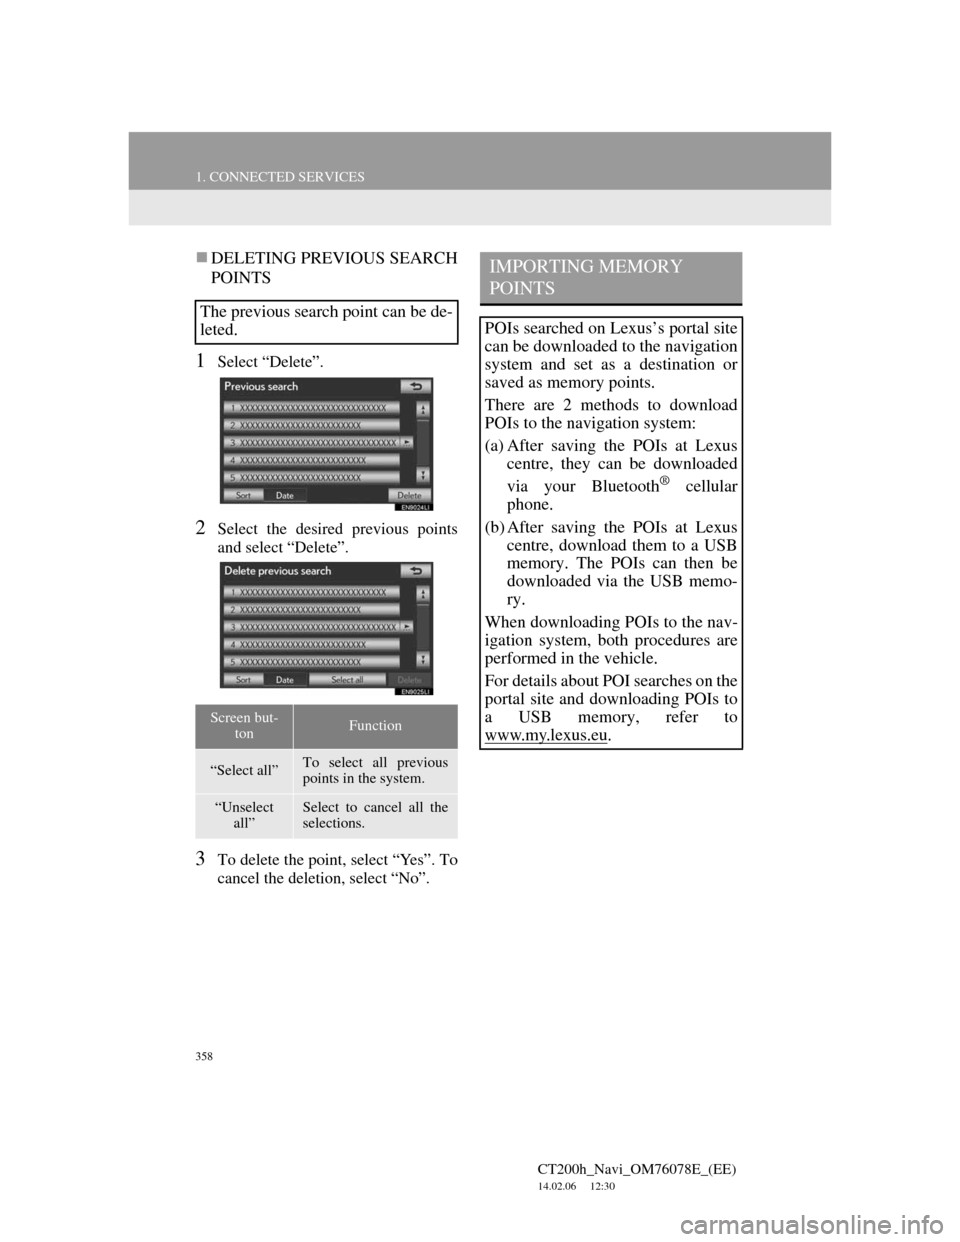
DELETING PREVIOUS SEARCH
POINTS
1Select “Delete”.
2Select the desired previous points
and select “Delete”.
3To delete the point, select “Yes”. To
cancel the deletion, select “No”.
The previous search point can be de-
leted.
Screen but-
tonFunction
“Select all”To select all previous
points in the system.
“Unselect
all”Select to cancel all the
selections.
IMPORTING MEMORY
POINTS
POIs searched on Lexus’s portal site
can be downloaded to the navigation
system and set as a destination or
saved as memory points.
There are 2 methods to download
POIs to the navigation system:
(a) After saving the POIs at Lexus
centre, they can be downloaded
via your Bluetooth
® cellular
phone.
(b) After saving the POIs at Lexus
centre, download them to a USB
memory. The POIs can then be
downloaded via the USB memo-
ry.
When downloading POIs to the nav-
igation system, both procedures are
performed in the vehicle.
For details about POI searches on the
portal site and downloading POIs to
a USB memory, refer to
www.my.lex
us.eu.
Page 359 of 436
359
1. CONNECTED SERVICES
CT200h_Navi_OM76078E_(EE)
14.02.06 12:30
9
CONNECTED SERVICES
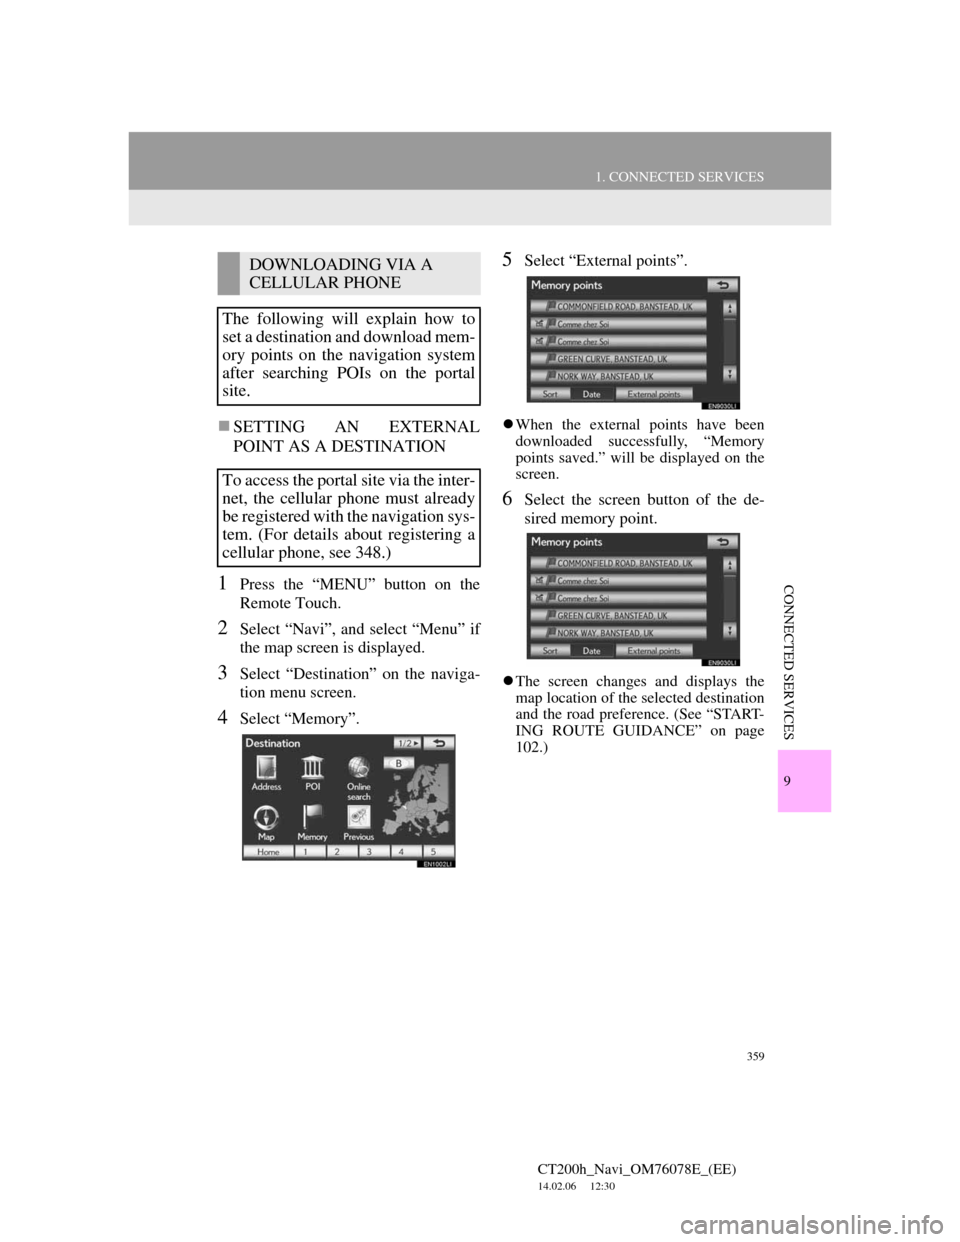
SETTING AN EXTERNAL
POINT AS A DESTINATION
1Press the “MENU” button on the
Remote Touch.
2Select “Navi”, and select “Menu” if
the map screen is displayed.
3Select “Destination” on the naviga-
tion menu screen.
4Select “Memory”.
5Select “External points”.
When the external points have been
downloaded successfully, “Memory
points saved.” will be displayed on the
screen.
6Select the screen button of the de-
sired memory point.
The screen changes and displays the
map location of the selected destination
and the road preference. (See “START-
ING ROUTE GUIDANCE” on page
102.)
DOWNLOADING VIA A
CELLULAR PHONE
The following will explain how to
set a destination and download mem-
ory points on the navigation system
after searching POIs on the portal
site.
To access the portal site via the inter-
net, the cellular phone must already
be registered with the navigation sys-
tem. (For details about registering a
cellular phone, see 348.)
Page 360 of 436
360
1. CONNECTED SERVICES
CT200h_Navi_OM76078E_(EE)
14.02.06 12:30
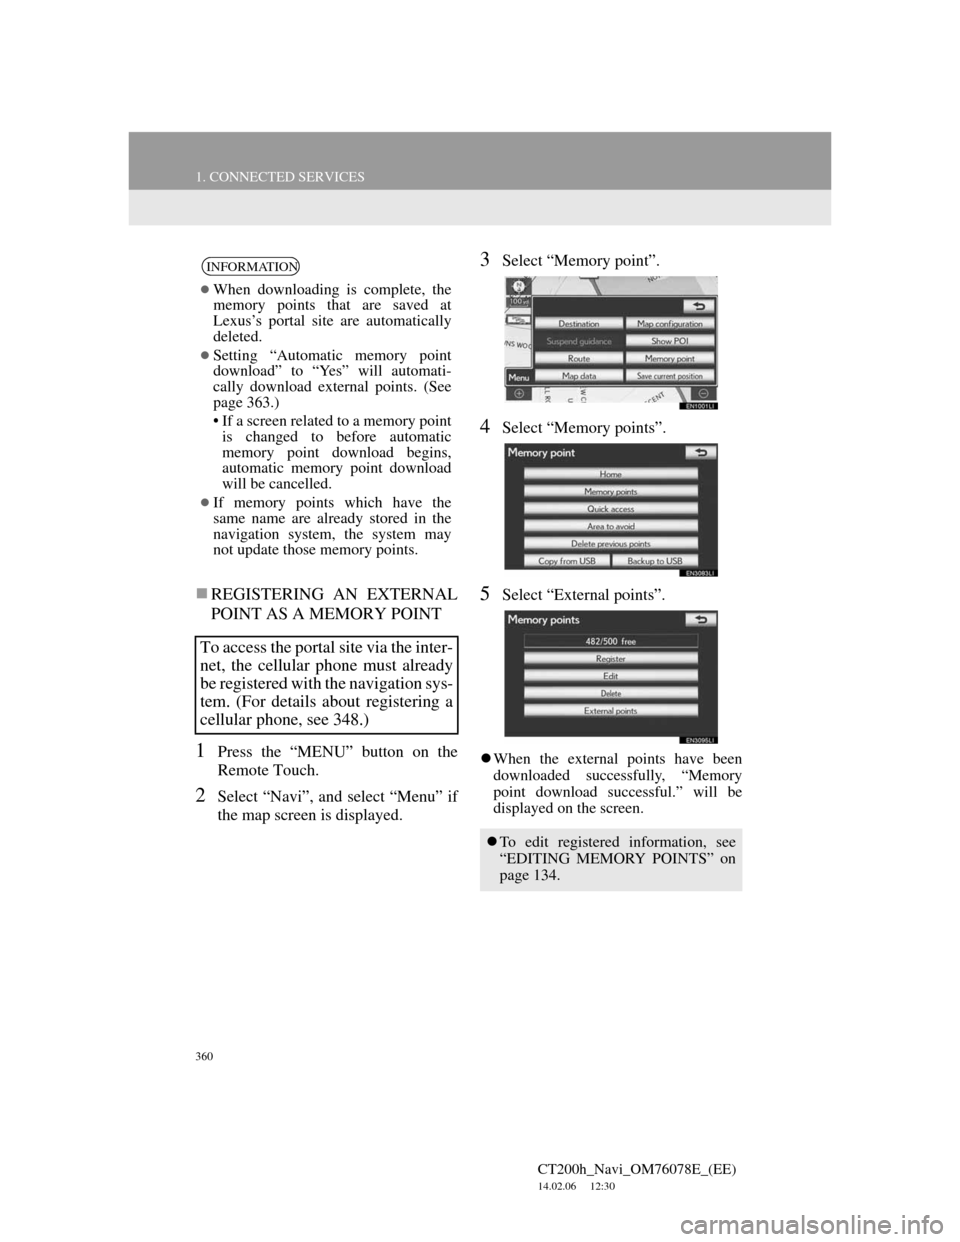
REGISTERING AN EXTERNAL
POINT AS A MEMORY POINT
1Press the “MENU” button on the
Remote Touch.
2Select “Navi”, and select “Menu” if
the map screen is displayed.
3Select “Memory point”.
4Select “Memory points”.
5Select “External points”.
When the external points have been
downloaded successfully, “Memory
point download successful.” will be
displayed on the screen.
INFORMATION
When downloading is complete, the
memory points that are saved at
Lexus’s portal site are automatically
deleted.
Setting “Automatic memory point
download” to “Yes” will automati-
cally download external points. (See
page 363.)
• If a screen related to a memory point
is changed to before automatic
memory point download begins,
automatic memory point download
will be cancelled.
If memory points which have the
same name are already stored in the
navigation system, the system may
not update those memory points.
To access the portal site via the inter-
net, the cellular phone must already
be registered with the navigation sys-
tem. (For details about registering a
cellular phone, see 348.)
To edit registered information, see
“EDITING MEMORY POINTS” on
page 134.