USB port Lexus CT200h 2012 Navigation Manual (in English)
[x] Cancel search | Manufacturer: LEXUS, Model Year: 2012, Model line: CT200h, Model: Lexus CT200h 2012Pages: 436, PDF Size: 28.25 MB
Page 147 of 436
147
3. MEMORY POINTS
CT200h_Navi_OM76078E_(EE)
14.02.06 12:29
3
NAVIGATION SYSTEM
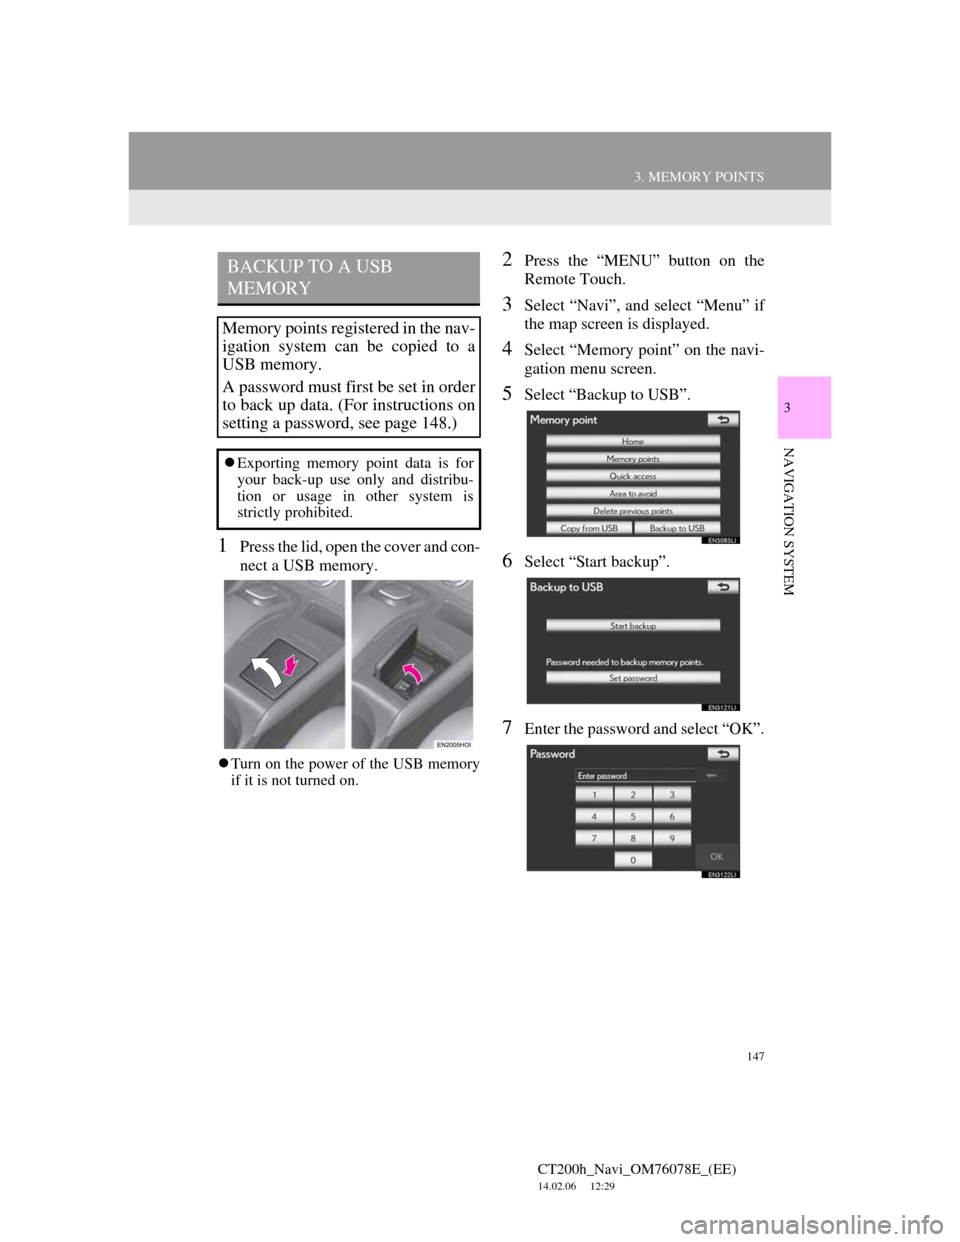
1Press the lid, open the cover and con-
nect a USB memory.
Turn on the power of the USB memory
if it is not turned on.
2Press the “MENU” button on the
Remote Touch.
3Select “Navi”, and select “Menu” if
the map screen is displayed.
4Select “Memory point” on the navi-
gation menu screen.
5Select “Backup to USB”.
6Select “Start backup”.
7Enter the password and select “OK”.
BACKUP TO A USB
MEMORY
Memory points registered in the nav-
igation system can be copied to a
USB memory.
A password must first be set in order
to back up data. (For instructions on
setting a password, see page 148.)
Exporting memory point data is for
your back-up use only and distribu-
tion or usage in other system is
strictly prohibited.
Page 230 of 436
230
CT200h_Navi_OM76078E_(EE)
14.02.06 12:30
1. QUICK REFERENCE..................... 232
2. SOME BASICS ............................... 234
SPEECH COMMAND SYSTEM .......... 234
TURNING THE SYSTEM
ON AND OFF...................................... 235
SWITCHING BETWEEN
FUNCTIONS ....................................... 235
SELECTING SCREEN SIZE................. 236
DVD PLAYER ....................................... 237
AUX PORT ............................................ 238
USB PORT ............................................. 239
PORTABLE AUDIO DEVICE
HOLDER ............................................. 239
3. RADIO OPERATION ..................... 240
LISTENING TO THE RADIO .............. 240
PRESETTING A STATION .................. 241
SELECTING A STATION .................... 241
RDS (RADIO DATA SYSTEM) ........... 242
LISTENING TO THE DAB................... 243
1AUDIO/VIDEO SYSTEM
OPERATION
Page 239 of 436
239
1. AUDIO/VIDEO SYSTEM OPERATION
5
AUDIO/VIDEO SYSTEM
CT200h_Navi_OM76078E_(EE)
14.02.06 12:30
1Press the “MEDIA” button to
display the media control screen and
select the “USB” or “iPod” tab or
press the “MEDIA” button
repeatedly to change to USB
memory or iPod mode.
For the Remote Touch operation
method, see “SWITCHING
BETWEEN FUNCTIONS” on page
235.
USB PORT
A USB memory/iPod can be con-
nected to the USB port. For details,
see “CONNECTING A USB MEM-
ORY” on page 268 and “CON-
NECTING iPod” on page 274.
INFORMATION
When a USB memory/iPod is not
connected with the USB port, the tab
will be dimmed.
PORTABLE AUDIO DEVICE
HOLDER*
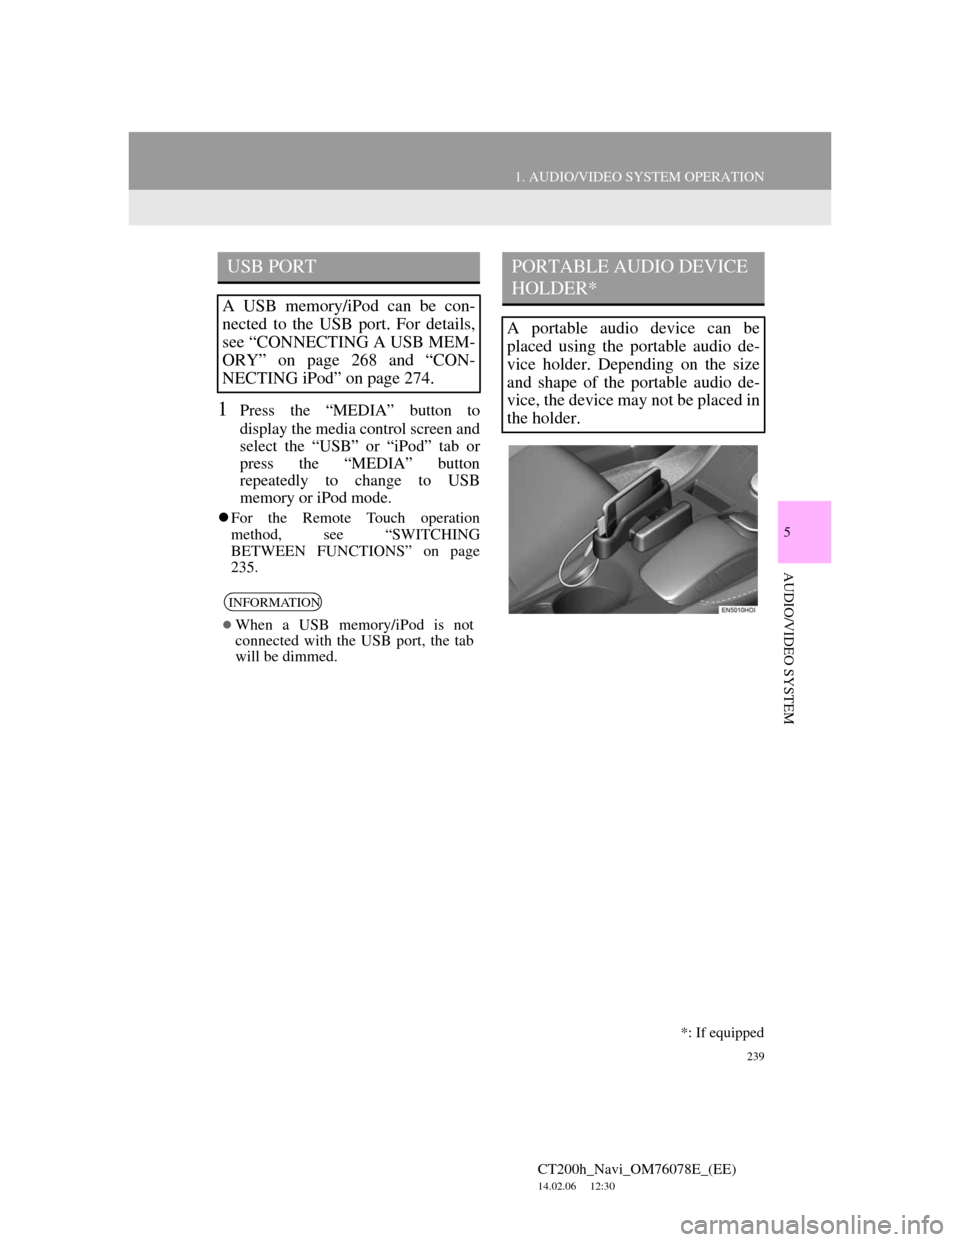
A portable audio device can be
placed using the portable audio de-
vice holder. Depending on the size
and shape of the portable audio de-
vice, the device may not be placed in
the holder.
*: If equipped
Page 268 of 436
268
1. AUDIO/VIDEO SYSTEM OPERATION
CT200h_Navi_OM76078E_(EE)
14.02.06 12:30
5. USB MEMORY OPERATION
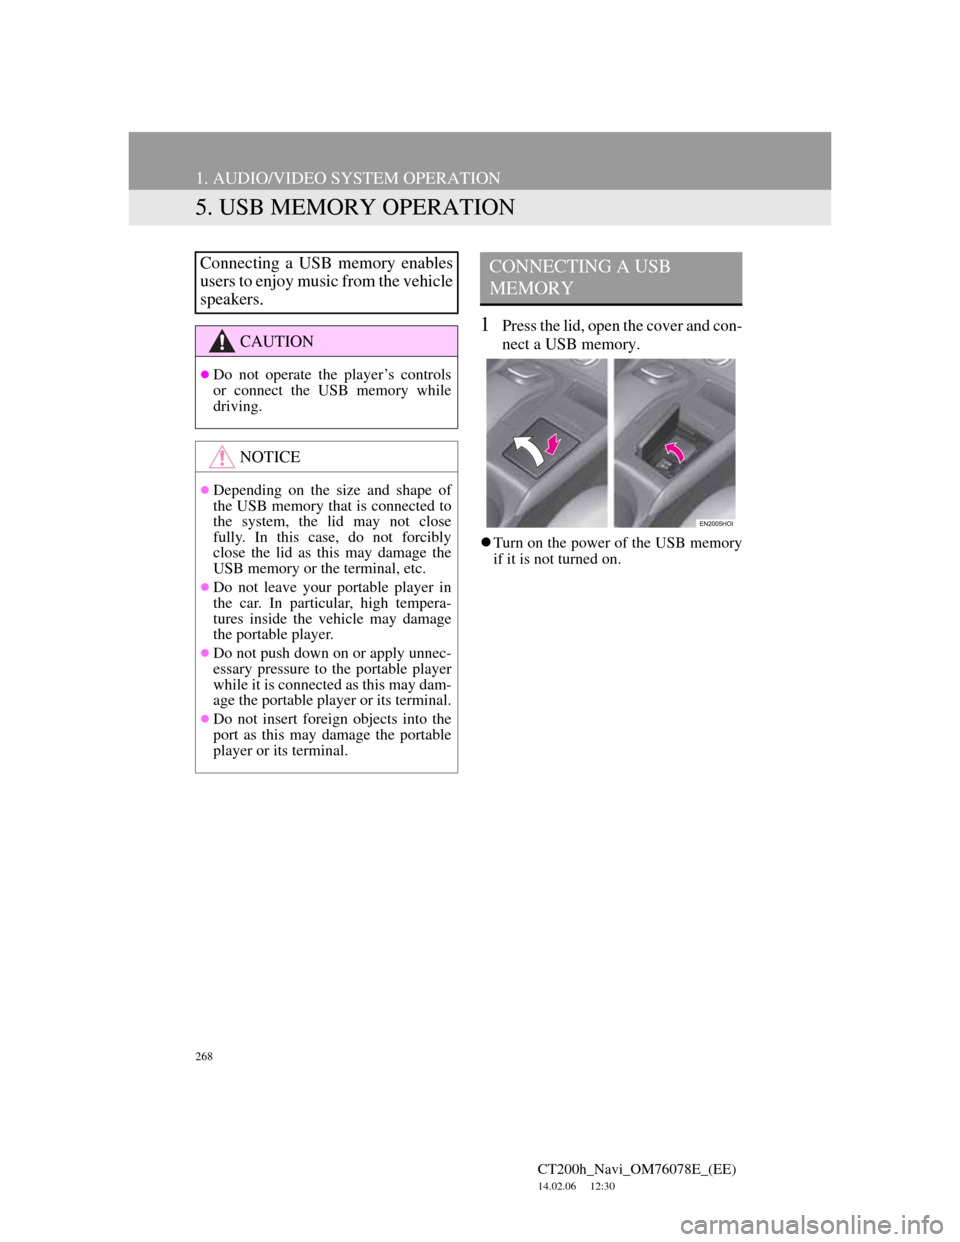
1Press the lid, open the cover and con-
nect a USB memory.
Turn on the power of the USB memory
if it is not turned on.
Connecting a USB memory enables
users to enjoy music from the vehicle
speakers.
CAUTION
Do not operate the player’s controls
or connect the USB memory while
driving.
NOTICE
Depending on the size and shape of
the USB memory that is connected to
the system, the lid may not close
fully. In this case, do not forcibly
close the lid as this may damage the
USB memory or the terminal, etc.
Do not leave your portable player in
the car. In particular, high tempera-
tures inside the vehicle may damage
the portable player.
Do not push down on or apply unnec-
essary pressure to the portable player
while it is connected as this may dam-
age the portable player or its terminal.
Do not insert foreign objects into the
port as this may damage the portable
player or its terminal.
CONNECTING A USB
MEMORY
Page 345 of 436
345
1. CONNECTED SERVICES
CT200h_Navi_OM76078E_(EE)
14.02.06 12:30
9
CONNECTED SERVICES
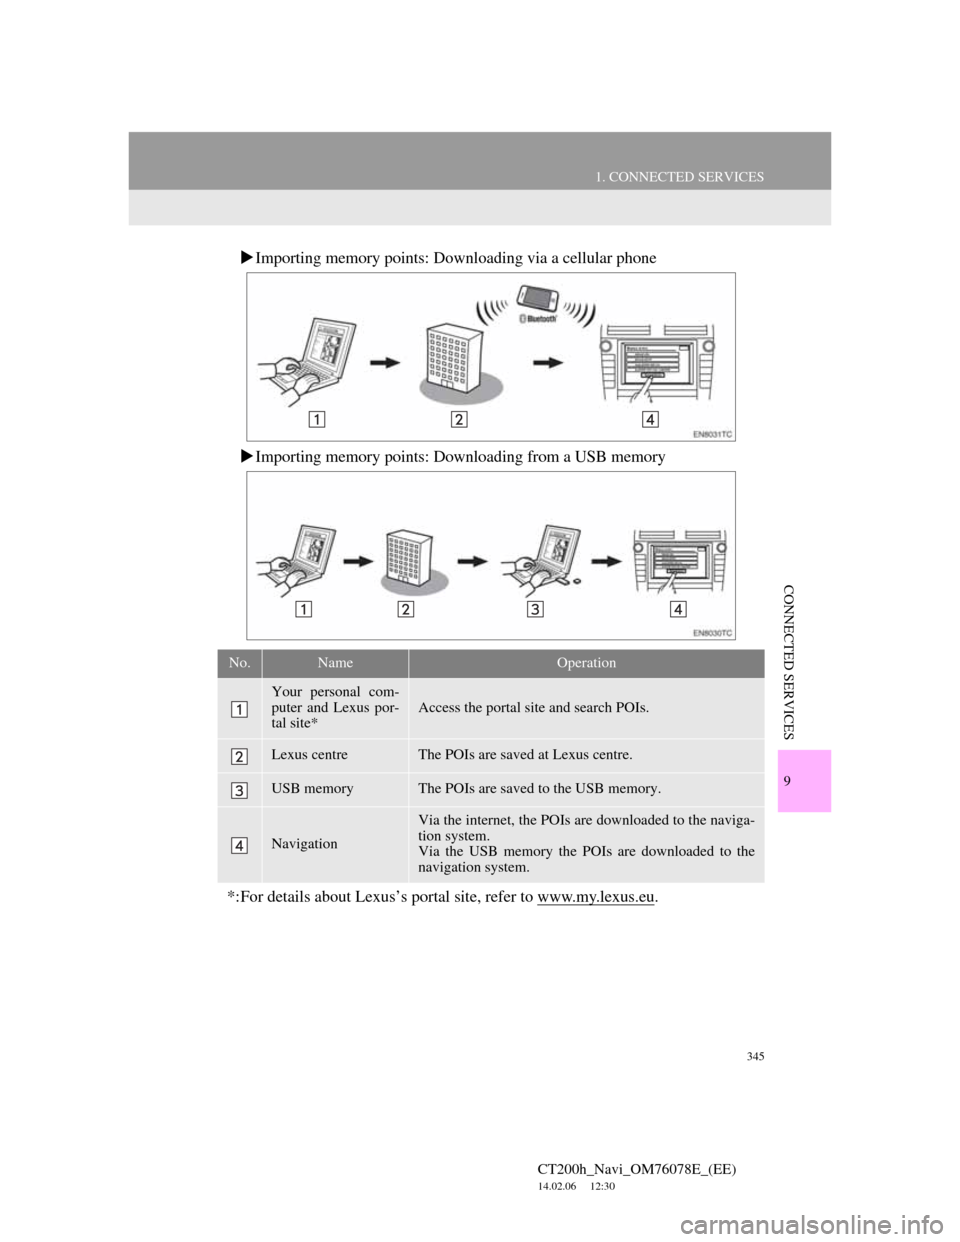
Importing memory points: Downloading via a cellular phone
Importing memory points: Downloading from a USB memory
No.NameOperation
Your personal com-
puter and Lexus por-
tal site*
Access the portal site and search POIs.
Lexus centreThe POIs are saved at Lexus centre.
USB memoryThe POIs are saved to the USB memory.
Navigation
Via the internet, the POIs are downloaded to the naviga-
tion system.
Via the USB memory the POIs are downloaded to the
navigation system.
*:For details about Lexus’s portal site, refer to www.my.lexus.eu.
Page 358 of 436
358
1. CONNECTED SERVICES
CT200h_Navi_OM76078E_(EE)
14.02.06 12:30
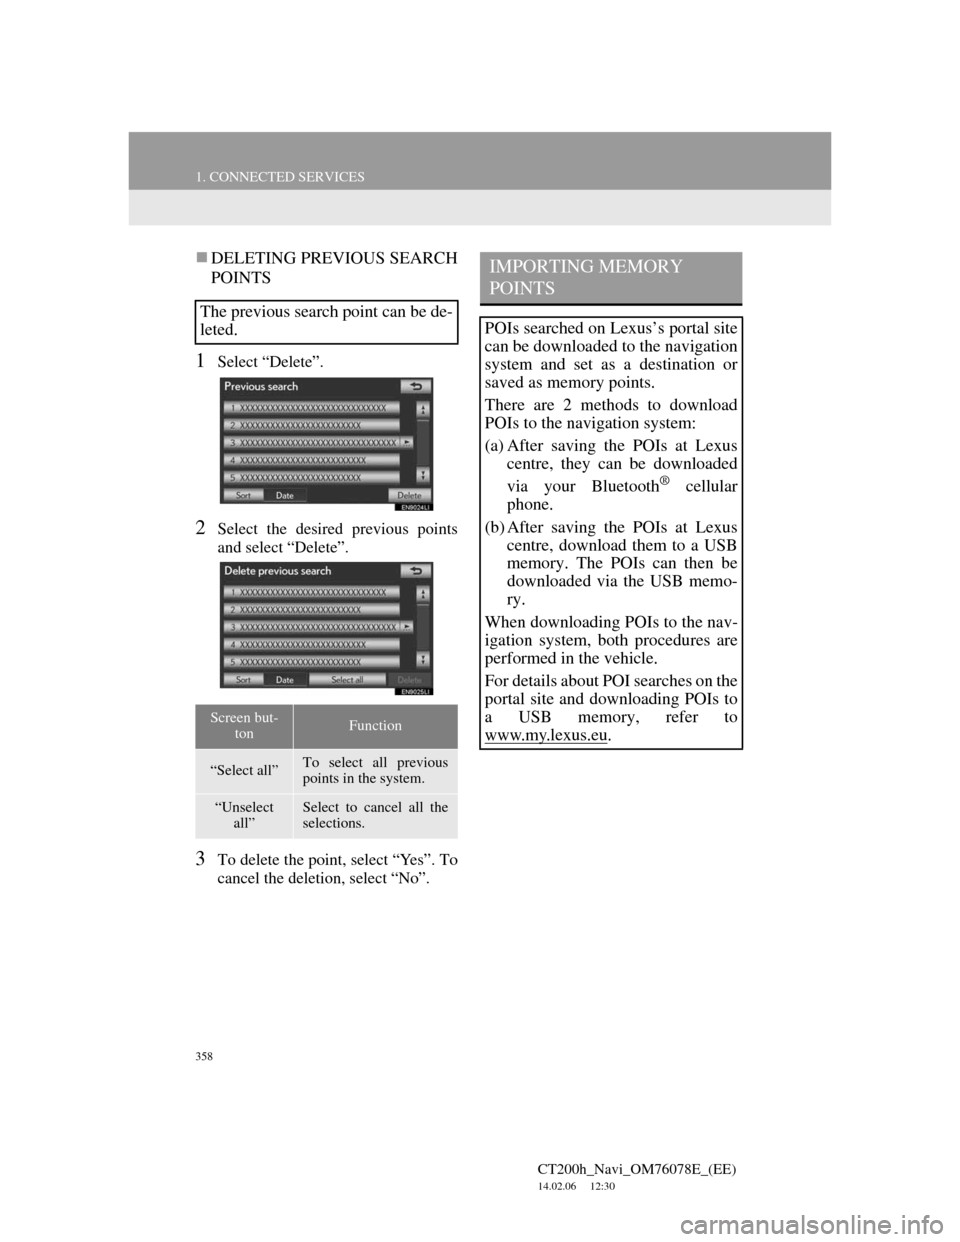
DELETING PREVIOUS SEARCH
POINTS
1Select “Delete”.
2Select the desired previous points
and select “Delete”.
3To delete the point, select “Yes”. To
cancel the deletion, select “No”.
The previous search point can be de-
leted.
Screen but-
tonFunction
“Select all”To select all previous
points in the system.
“Unselect
all”Select to cancel all the
selections.
IMPORTING MEMORY
POINTS
POIs searched on Lexus’s portal site
can be downloaded to the navigation
system and set as a destination or
saved as memory points.
There are 2 methods to download
POIs to the navigation system:
(a) After saving the POIs at Lexus
centre, they can be downloaded
via your Bluetooth
® cellular
phone.
(b) After saving the POIs at Lexus
centre, download them to a USB
memory. The POIs can then be
downloaded via the USB memo-
ry.
When downloading POIs to the nav-
igation system, both procedures are
performed in the vehicle.
For details about POI searches on the
portal site and downloading POIs to
a USB memory, refer to
www.my.lex
us.eu.
Page 361 of 436
361
1. CONNECTED SERVICES
CT200h_Navi_OM76078E_(EE)
14.02.06 12:30
9
CONNECTED SERVICES
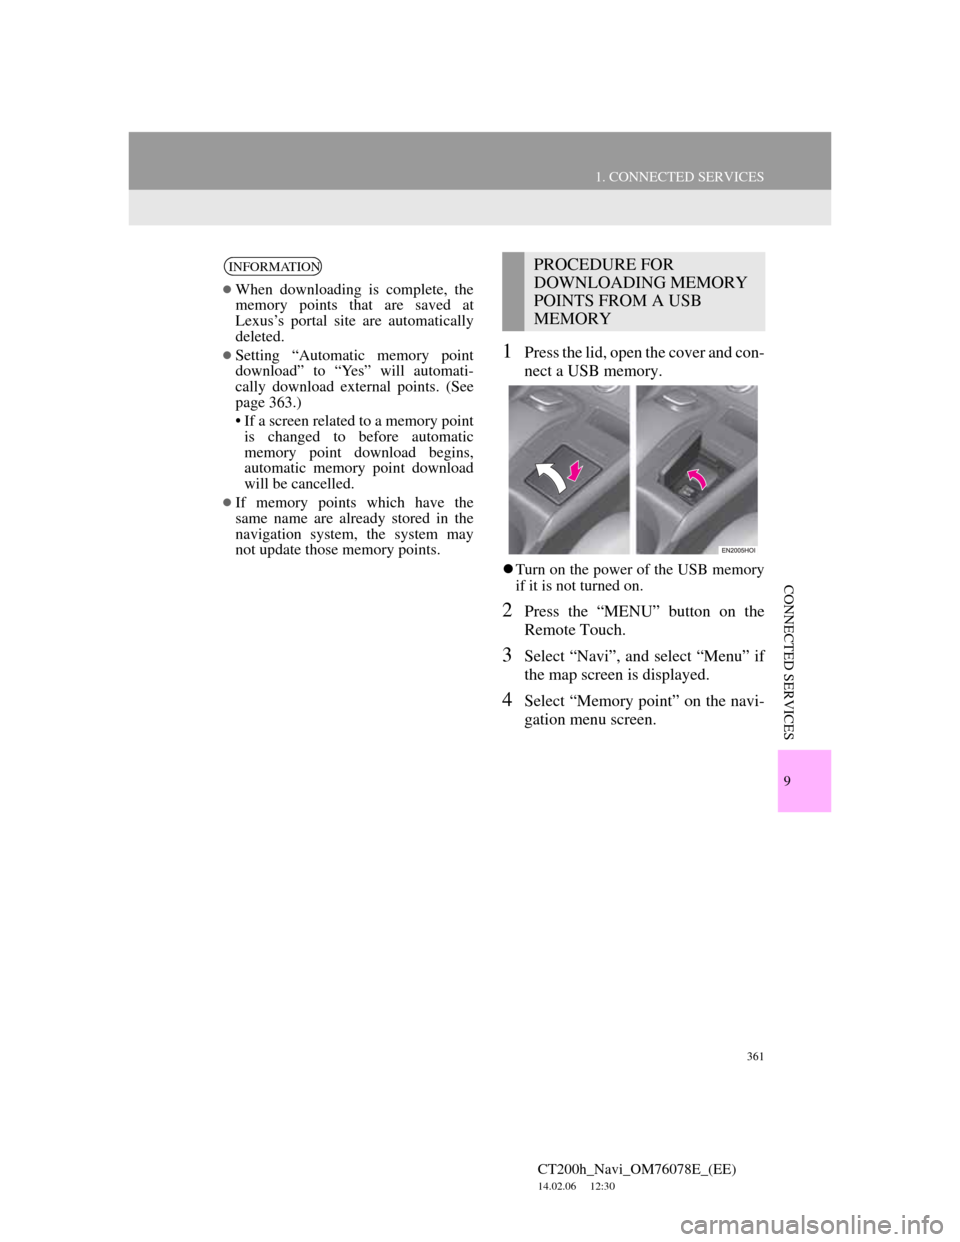
1Press the lid, open the cover and con-
nect a USB memory.
Turn on the power of the USB memory
if it is not turned on.
2Press the “MENU” button on the
Remote Touch.
3Select “Navi”, and select “Menu” if
the map screen is displayed.
4Select “Memory point” on the navi-
gation menu screen.
INFORMATION
When downloading is complete, the
memory points that are saved at
Lexus’s portal site are automatically
deleted.
Setting “Automatic memory point
download” to “Yes” will automati-
cally download external points. (See
page 363.)
• If a screen related to a memory point
is changed to before automatic
memory point download begins,
automatic memory point download
will be cancelled.
If memory points which have the
same name are already stored in the
navigation system, the system may
not update those memory points.
PROCEDURE FOR
DOWNLOADING MEMORY
POINTS FROM A USB
MEMORY
Page 362 of 436
362
1. CONNECTED SERVICES
CT200h_Navi_OM76078E_(EE)
14.02.06 12:30
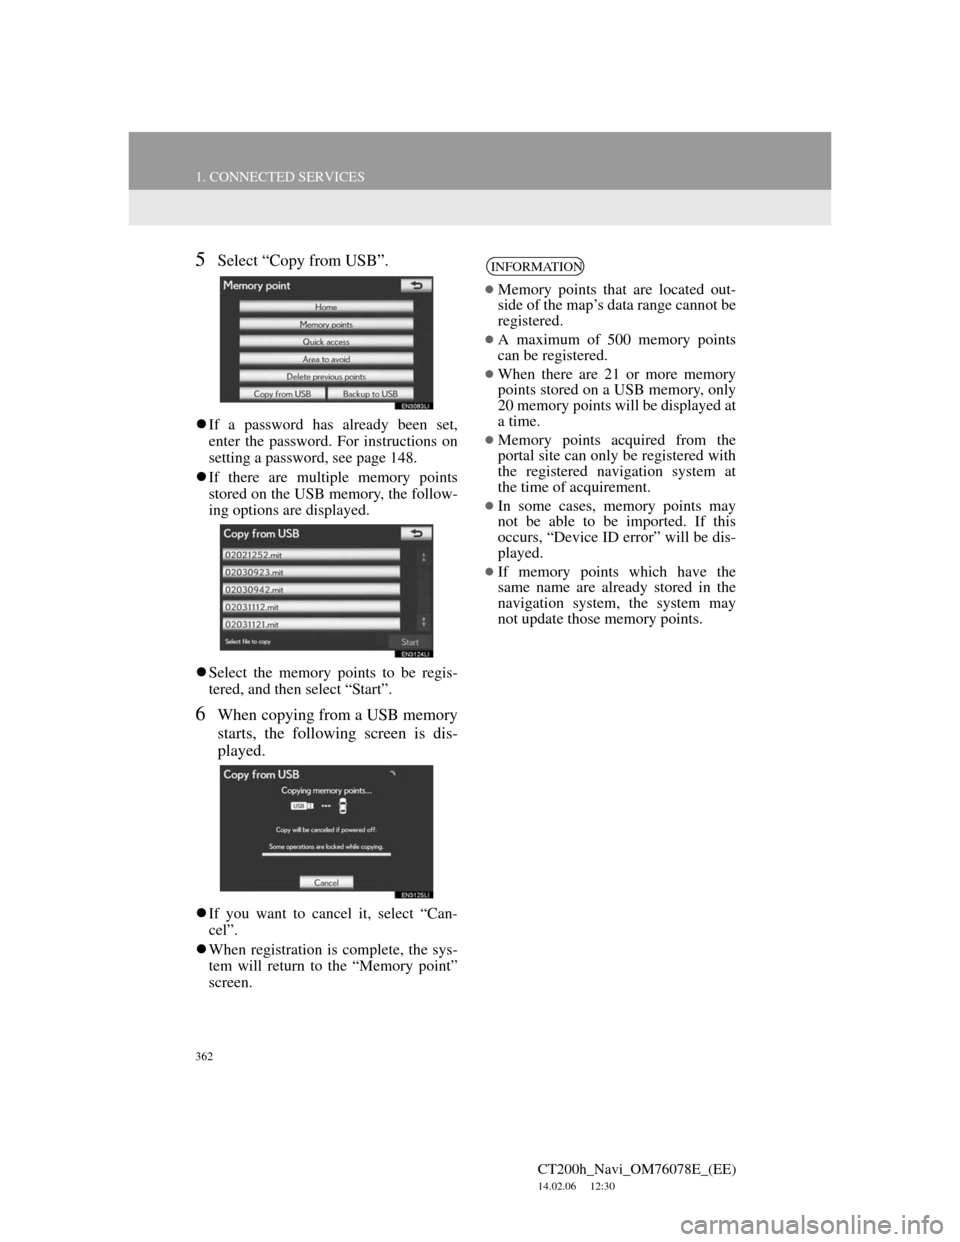
5Select “Copy from USB”.
If a password has already been set,
enter the password. For instructions on
setting a password, see page 148.
If there are multiple memory points
stored on the USB memory, the follow-
ing options are displayed.
Select the memory points to be regis-
tered, and then select “Start”.
6When copying from a USB memory
starts, the following screen is dis-
played.
If you want to cancel it, select “Can-
cel”.
When registration is complete, the sys-
tem will return to the “Memory point”
screen.
INFORMATION
Memory points that are located out-
side of the map’s data range cannot be
registered.
A maximum of 500 memory points
can be registered.
When there are 21 or more memory
points stored on a USB memory, only
20 memory points will be displayed at
a time.
Memory points acquired from the
portal site can only be registered with
the registered navigation system at
the time of acquirement.
In some cases, memory points may
not be able to be imported. If this
occurs, “Device ID error” will be dis-
played.
If memory points which have the
same name are already stored in the
navigation system, the system may
not update those memory points.
Page 398 of 436

398
ALPHABETICAL INDEX
CT200h_Navi_OM76078E_(EE)
14.02.06 12:30
Symbols
“ ” button.......................................... 12
“
·” button ........................................... 12
A
Air conditioning ..................................... 306
Air conditioning system operating
hints................................................. 316
Automatic air conditioning system..... 309
Climate control ................................... 308
Using the automatic air conditioning
system ............................................. 309
AM ......................................................... 240
Audio settings ........................................ 299
iPod settings ....................................... 303
Radio settings ..................................... 302
Sound settings..................................... 300
Audio system operating hints
Caring for your DVD player
and disc ........................................... 292
CD-R and CD-RW discs .................... 297
iPod..................................................... 291
MP3/WMA files ................................. 295
Radio reception................................... 290
Terms .................................................. 297
USB memory ...................................... 292
Audio/video remote controls
(Steering switches) ............................. 288
Audio/video system ............................... 231
Audio/video system operating hints....... 290
Automatic sound leveliser (ASL) .......... 300
AUX port ............................................... 238
B
Basic function .......................................... 35
Basic information before operation ......... 36
Bluetooth
®..................................... 170, 279
Bluetooth® audio operation ................... 279
Connecting a Bluetooth® audio
player .............................................. 281
Playing Bluetooth
® audio .................. 283
Bluetooth® phone message function ..... 192
Checking messages ............................ 192
New message notification .................. 194
Replying (Quick reply) ...................... 193
Bluetooth
® settings................................ 218
Detailed Bluetooth® settings.............. 226
Registered devices ............................. 219
Selecting a Bluetooth
® phone ............ 223
Selecting portable player.................... 224
Brightness ........................................ 46, 259
ALPHABETICAL INDEX
Page 401 of 436
401
CT200h_Navi_OM76078E_(EE)
14.02.06 12:30
M
Manual clock setting ................................ 64
Map database version and
covered area........................................ 166
Map information ................................. 166
Map screen ............................................... 25
Map screen operation ............................... 47
Current position display ....................... 47
Map orientation and 3D map mode ...... 58
Map scale.............................................. 57
Screen scroll operation ......................... 48
Standard map icons .............................. 59
Switching map configurations .............. 55
“MEDIA” button.................................... 232
Memory point settings ........................... 125
Backup to a USB memory.................. 147
Copying from a USB memory............ 149
Deleting previous destinations ........... 146
Setting up the “Area to avoid” ........... 141
Setting up the “Home” ....................... 126
Setting up the “Memory points”......... 133
Setting up the “Quick access” ............ 129
Memory points ....................................... 125
“MENU” button ....................................... 12
“Menu” screen ......................................... 29
MP3 ................................ 250, 295, 297, 298
N
Navigation menu screen........................... 27
Navigation operation................................ 12
Navigation settings................................. 151
Screens for navigation settings ........... 151
Navigation system.................................... 77
Navigation system function index ........... 23
North-up screen........................................ 58
O
Online search settings ............................ 363
Screens for online search settings ...... 363
Operation flow: Guiding the route .......... 19
P
Peripheral monitoring system ................ 370
Portable audio device holder ................. 239
Power/Volume knob .............................. 232
Q
Quick guide ............................................. 11
Quick reference ......... 25, 78, 170, 232, 306
R
“RADIO” button.................................... 232
Radio operation ..................................... 240
Listening to the DAB ......................... 243
Listening to the radio ......................... 240
Presetting a station ............................. 241
RDS (Radio data system) ................... 242
Selecting a station .............................. 241
Receive on the Bluetooth
® phone ......... 188
Register a Bluetooth® phone ................. 176
Connecting a Bluetooth® phone ........ 178
Reconnecting the Bluetooth® phone.. 180
Registering home ..................................... 15
Registering quick access.......................... 17
Remote Touch ......................................... 12
Remote Touch knob ................................ 12
Route guidance ...................................... 105
Route guidance screen ........................... 105