flat tire Lexus CT200h 2012 (in English) User Guide
[x] Cancel search | Manufacturer: LEXUS, Model Year: 2012, Model line: CT200h, Model: Lexus CT200h 2012Pages: 710
Page 518 of 710

516
4-3. Do-it-yourself maintenance
CT200h_OM_OM76067E_(EE)
When to replace your vehicle’s tires
Tires should be replaced if:
You have tire damage such as cuts, splits, cracks deep enough to expose
the fabric, and bulges indicating internal damage.
A tire goes flat repeatedly or cannot be properly repaired due to the size
or location of a cut or other damage.
If you are not sure, consult with any authorized Lexus dealer or repairer, or
another duly qualified and equipped professional.
Tire life
Any tire over 6 years old must be checked by a qualified technician even if
it has seldom or never been used or damage is not obvious.
Low profile tires (vehicles with 17 inch tires)
Generally, low profile tires will wear more rapidly and tire grip performance
will be reduced on snowy and/or icy roads when compared to standard tires.
Be sure to use snow tires or tire chains on snowy and/or icy roads and drive
carefully at a speed appropriate for road and weather conditions.
If the tread on snow tires wears down below 4 mm (0.16 in.)
The effectiveness of the tires as snow tires is lost.
Page 520 of 710
518
4-3. Do-it-yourself maintenance
CT200h_OM_OM76067E_(EE)
NOTICE
Driving on rough roads
Take particular care when driving on roads with loose surfaces or potholes.
These conditions may cause losses in tire inflation pressure, reducing the
cushioning ability of the tires. In addition, driving on rough roads may cause
damage to the tires themselves, as well as the vehicle’s wheels and body.
Low profile tires (vehicles with 17 inch tires)
Low profile tires may cause greater damage than usual to the tire wheel
when sustaining impact from the road surface. Therefore, pay attention to
the following:
Be sure to use proper tire inflation pressure. If tires are under-inflated,
they may be damaged more severely.
Avoid potholes, uneven pavement, curbs and other road hazards. Failure
to do so may lead to severe tire and wheel damage.
If tire inflation pressure of each tire becomes low while driving
Do not continue driving, or your tires and/or wheels may be ruined.
Page 521 of 710
519
4-3. Do-it-yourself maintenance
4
Maintenance and care
CT200h_OM_OM76067E_(EE)
Tire inflation pressure
Effects of incorrect tire inflation pressure
Driving with incorrect tire inflation pressure may result in the following:
Reduced fuel efficiency
Reduced driving comfort and tire life
Reduced safety
Damage to the drive train
If a tire needs frequent inflating, have it checked by any authorized Lexus
dealer or repairer, or another duly qualified and equipped professional.
Instructions for checking tire inflation pressure
When checking tire inflation pressure, observe the following:
Check only when the tires are cold.
If your vehicle has been parked for at least 3 hours or has not been driven
for more than 1.5 km or 1 mile, you will get an accurate cold tire infla-
tion pressure reading.
Always use a tire pressure gauge.
The appearance of the tire can be misleading. In addition, tire inflation
pressure that is even just a few pounds off can affect ride quality and
handling.
Do not reduce tire inflation pressure after driving. It is normal for tire
inflation pressure to be higher after driving.
Never exceed the vehicle capacity weight.
Passengers and luggage weight should be placed so that the vehicle is
balanced.
Make sure to maintain proper tire inflation pressure. Tire inflation
pressure should be checked at least once per month. However, Lexus
recommends that tire inflation pressure be checked once every two
Page 522 of 710
520
4-3. Do-it-yourself maintenance
CT200h_OM_OM76067E_(EE)
CAUTION
Proper inflation is critical to save tire performance
Keep your tires properly inflated. Otherwise, the following conditions may
occur and result in an accident causing death or serious injury:
Excessive wear
Uneven wear
Poor handling
Possibility of blowouts resulting from overheated tires
Poor sealing of the tire bead
Wheel deformation and/or tire separation
A greater possibility of tire damage from road hazards
NOTICE
When inspecting and adjusting tire inflation pressure
Be sure to put the tire valve caps back on.
Without the valve caps, dirt or moisture could get into the valve and cause
air leakage, which could result in an accident. If the caps are lost, replace
them as soon as possible.
Page 563 of 710
5When trouble arises
561
CT200h_OM_OM76067E_(EE)
5-1. Essential information
Emergency flashers .......... 562
If your vehicle needs to
be towed ......................... 563
If you think something
is wrong ......................... 5705-2. Steps to take in an
emergency
If a warning light turns
on or a warning buzzer
sounds ............................ 571
If a warning message is
displayed ........................ 578
If you have a flat tire
(vehicles with a
spare tire) ....................... 599
If you have a flat tire
(vehicles without a
spare tire) ....................... 613
If the hybrid system will
not start .......................... 627
If you lose your keys ....... 629
If the electronic key does
not operate properly....... 630
If the 12-volt battery
is discharged .................. 633
If your vehicle overheats . 639
If the vehicle becomes
stuck............................... 644
If your vehicle has to be
stopped in an
emergency...................... 646
Page 572 of 710
570
5-1. Essential information
CT200h_OM_OM76067E_(EE)
If you think something is wrong
If you notice any of the following symptoms, your vehicle probably
needs adjustment or repair. Contact any authorized Lexus dealer or
repairer, or another duly qualified and equipped professional as soon
as possible.
Visible symptoms
Fluid leaks under the vehicle.
(Water dripping from the air conditioning after use is nor-
mal.)
Flat-looking tires or uneven tire wear
High coolant temperature warning light flashes or comes
on.
Audible symptoms
Changes in exhaust sound
Excessive tire squeal when cornering
Strange noises related to the suspension system
Pinging or other noises related to the hybrid system
Operational symptoms
Engine missing, stumbling or running roughly
Appreciable loss of power
Vehicle pulls heavily to one side when braking
Vehicle p lls hea il to one side hen dri ing on a le el
Page 601 of 710
5
599
5-2. Steps to take in an emergency
When trouble arises
CT200h_OM_OM76067E_(EE)
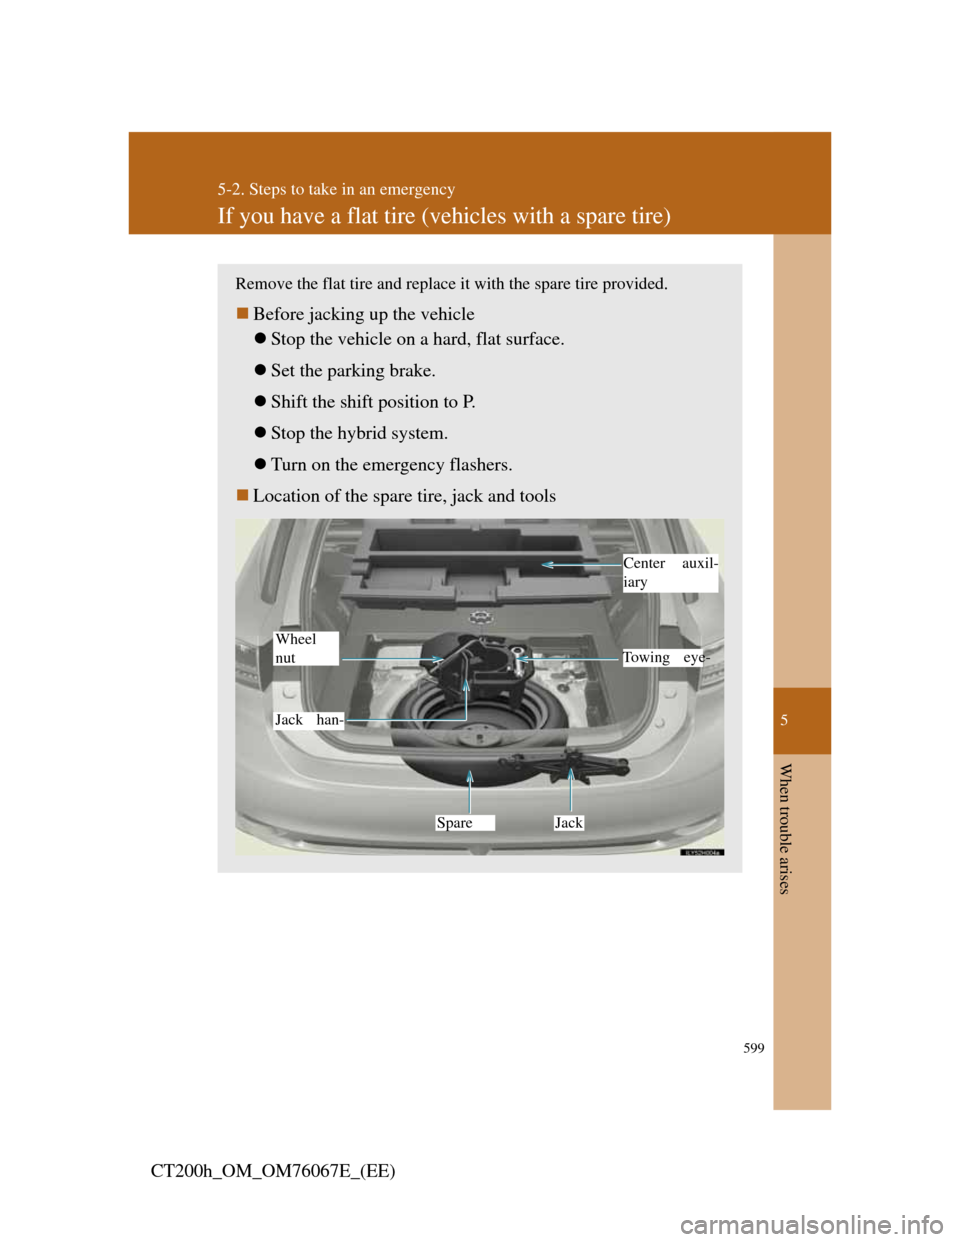
If you have a flat tire (vehicles with a spare tire)
Remove the flat tire and replace it with the spare tire provided.
Before jacking up the vehicle
Stop the vehicle on a hard, flat surface.
Set the parking brake.
Shift the shift position to P.
Stop the hybrid system.
Turn on the emergency flashers.
Location of the spare tire, jack and tools
Center auxil-
iary
Jack Spare Jack han- Wheel
nut
Towing eye-
Page 604 of 710

602
5-2. Steps to take in an emergency
CT200h_OM_OM76067E_(EE)
Replacing a flat tire
Chock the tires.
For vehicles with 15 inch
wheels, remove the wheel orna-
ment using the wrench.
To protect the wheel ornament,
place a rag between the wrench
and the wheel ornament.
STEP1
Flat tireWheel chock positions
FrontLeft-hand sideBehind the rear right-hand side tire
Right-hand sideBehind the rear left-hand side tire
RearLeft-hand sideIn front of the front right-hand side tire
Right-hand sideIn front of the front left-hand side tire
STEP2
Page 607 of 710

5
605
5-2. Steps to take in an emergency
When trouble arises
CT200h_OM_OM76067E_(EE)Lower the vehicle.
Firmly tighten each wheel nut
two or three times in the order
shown in the illustration.
Tightening torque:
103 N•m (10.5 kgf•m, 76 ft•lbf)
Stow the flat tire, tire jack and all tools.
Stowing the flat tire
Vehicles with a 16 or 17 inch
wheel: Before stowing the flat
tire, remove the center wheel
ornament by pushing from the
reverse side.
STEP3
STEP4
STEP5
STEP1
Page 608 of 710

606
5-2. Steps to take in an emergency
CT200h_OM_OM76067E_(EE)Place the flat tire on the deck
board, and pass the belt through
the lower-right cargo hook and
then through the hole in the
center of the tire.
Pass the belt through the lower-
left cargo hook.
Pass the belt through the buckle
and secure the tire firmly.
Check that the belt is securely
held by the buckle.
The belt cannot be fastened
securely if the buckle is facing
the wrong direction.
STEP2
STEP3
STEP4