flat tire Lexus CT200h 2012 (in English) Owner's Guide
[x] Cancel search | Manufacturer: LEXUS, Model Year: 2012, Model line: CT200h, Model: Lexus CT200h 2012Pages: 710
Page 609 of 710

5
607
5-2. Steps to take in an emergency
When trouble arises
CT200h_OM_OM76067E_(EE)
The compact spare tire
The compact spare tire is identified by the label “TEMPORARY USE
ONLY” on the tire sidewall.
Use the compact spare tire temporarily, and only in an emergency.
Make sure to check the tire inflation pressure of the compact spare tire.
(P. 661)
If you have a flat front tire on a road covered with snow or ice
Install the compact spare tire on one of the rear wheels of the vehicle. Per-
form the following steps and fit tire chains to the front tires:
Replace a rear tire with the compact spare tire.
Replace the flat front tire with the tire removed from the rear of the
vehicle.
Fit tire chains to the front tires.
STEP1
STEP2
STEP3
Page 612 of 710
610
5-2. Steps to take in an emergency
CT200h_OM_OM76067E_(EE)
CAUTION
Speed limit when using the compact spare tire
Do not drive at speeds in excess of 80 km/h (50 mph) when a compact spare
tire is installed on the vehicle.
The compact spare tire is not designed for driving at high speeds. Failure to
observe this precaution may lead to an accident causing death or serious
injury.
Using the tire jack
Improper use of the tire jack may cause the vehicle to suddenly fall off the
jack, leading to death or serious injury.
Do not use the tire jack for any purpose other than replacing tires or
installing and removing tire chains.
Only use the tire jack that comes with this vehicle for replacing a flat tire.
Do not use it on other vehicles, and do not use other tire jacks for replac-
ing tires on this vehicle.
Always check that the tire jack is securely set to the jack point.
Do not put any part of your body under the vehicle while it is supported
by the jack.
Do not start or run the hybrid system while your vehicle is supported by
the jack.
Do not raise the vehicle while someone is inside.
When raising the vehicle, do not put an object on or under the jack.
Do not raise the vehicle to a height greater than that required to replace the
tire.
Use a jack stand if it is necessary to get under the vehicle.
Take particular care when lowering the vehicle to ensure that no one work-
ing on or near the vehicle may be injured.
Page 613 of 710
5
611
5-2. Steps to take in an emergency
When trouble arises
CT200h_OM_OM76067E_(EE)
CAUTION
Replacing a flat tire
Do not touch the disc wheels or the area around the brakes immediately
after the vehicle has been driven.
After the vehicle has been driven the disc wheels and the area around the
brakes will be extremely hot. Touching these areas with hands, feet or
other body parts while changing a tire, etc. may result in burns.
Failure to follow these precautions could cause the wheel nuts to loosen
and the tire to fall off, resulting in death or serious injury.
• Have the wheel nuts tightened with a torque wrench to 103 N•m
(10.5 kgf•m, 76 ft•lbf) as soon as possible after changing wheels.
• When installing a tire, only use wheel nuts that have been specifically
designed for that wheel.
• If there are any cracks or deformations in the bolt screws, nut threads
or bolt holes of the wheel, have the vehicle inspected by any autho-
rized Lexus dealer or repairer, or another duly qualified and equipped
professional.
• When installing the wheel nuts, be sure to install then with the tapered
ends facing inward. (P. 522)
Page 614 of 710
612
5-2. Steps to take in an emergency
CT200h_OM_OM76067E_(EE)
CAUTION
After using the tools and jack
Before driving, make sure all the tools and jack are securely in place in their
storage location to reduce the possibility of personal injury during a colli-
sion or sudden braking.
When stowing the flat tire
Make sure the rear seatbacks are in their original position.
Secure it using a tire tie-down belt. Otherwise, the flat tire may fly out in
case of sudden braking or an accident, resulting in death or serious injury.
NOTICE
Do not drive the vehicle with a flat tire.
Do not continue driving with a flat tire.
Driving even a short distance with a flat tire can damage the tire and the
wheel beyond repair.
Be careful when driving over bumps with the compact spare tire installed on
the vehicle.
The vehicle becomes lower when driving with the compact spare tire com-
pared to when driving with standard tires. Be careful when driving over
uneven road surfaces.
Driving with tire chains and the compact spare tire
Do not fit tire chains to the compact spare tire.
Tire chains may damage the vehicle body and adversely affect driving per-
formance.
Page 615 of 710
5
613
5-2. Steps to take in an emergency
When trouble arises
CT200h_OM_OM76067E_(EE)
If you have a flat tire (vehicles without a spare tire)
Your vehicle is equipped with an emergency tire puncture repair kit.
A puncture caused by a nail or screw passing through the tire tread can
be repaired temporarily with the emergency tire puncture repair kit.
Before repairing the vehicle
Stop the vehicle in a safe place on a hard, flat surface.
Set the parking brake.
Shift the shift position to P.
Stop the hybrid system.
Turn on the emergency flashers.
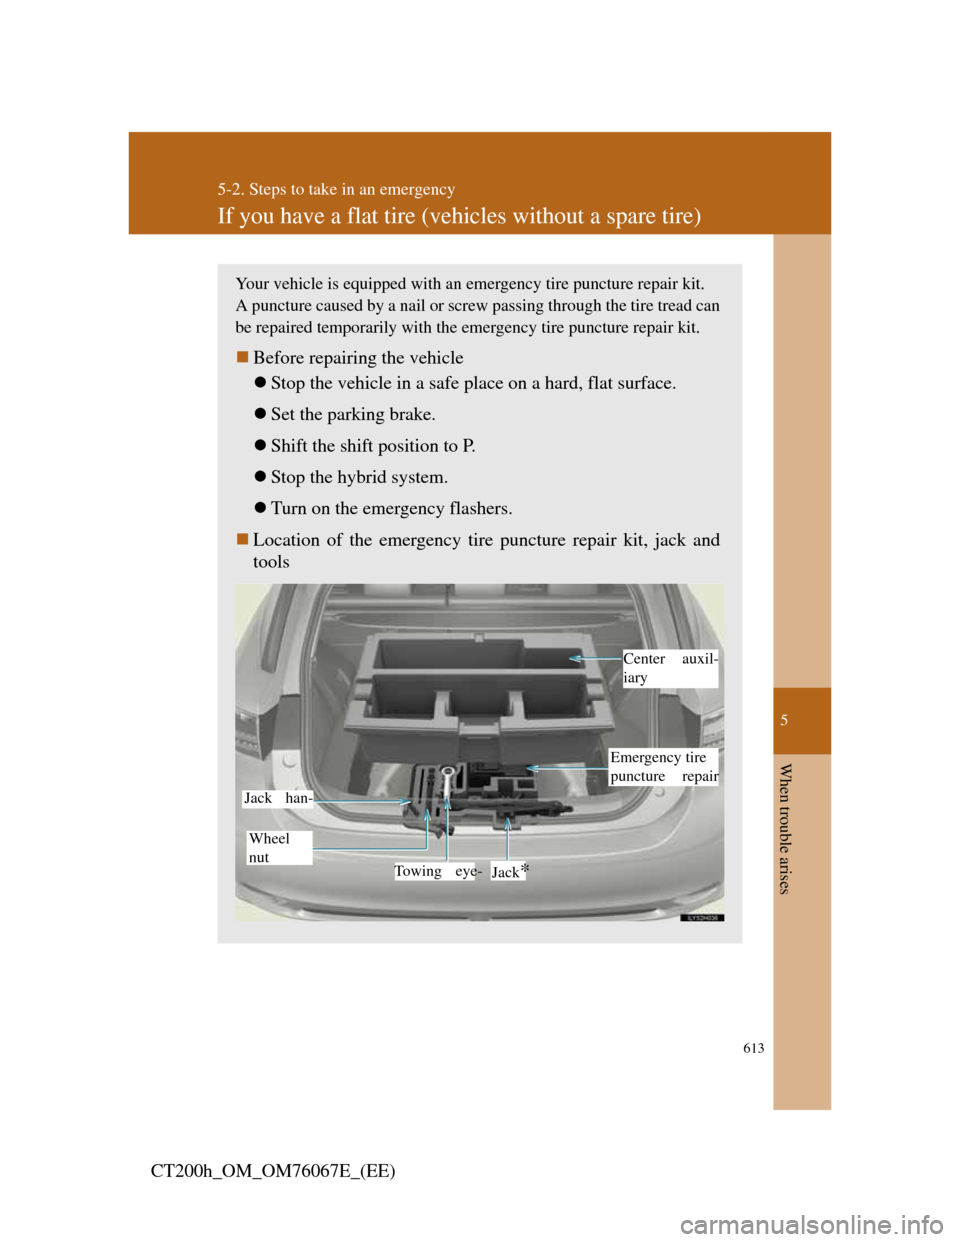
Location of the emergency tire puncture repair kit, jack and
tools
Center auxil-
iary
Jack*Towing eye-
Wheel
nut
Jack han-
Emergency tire
puncture repair
Page 620 of 710
618
5-2. Steps to take in an emergency
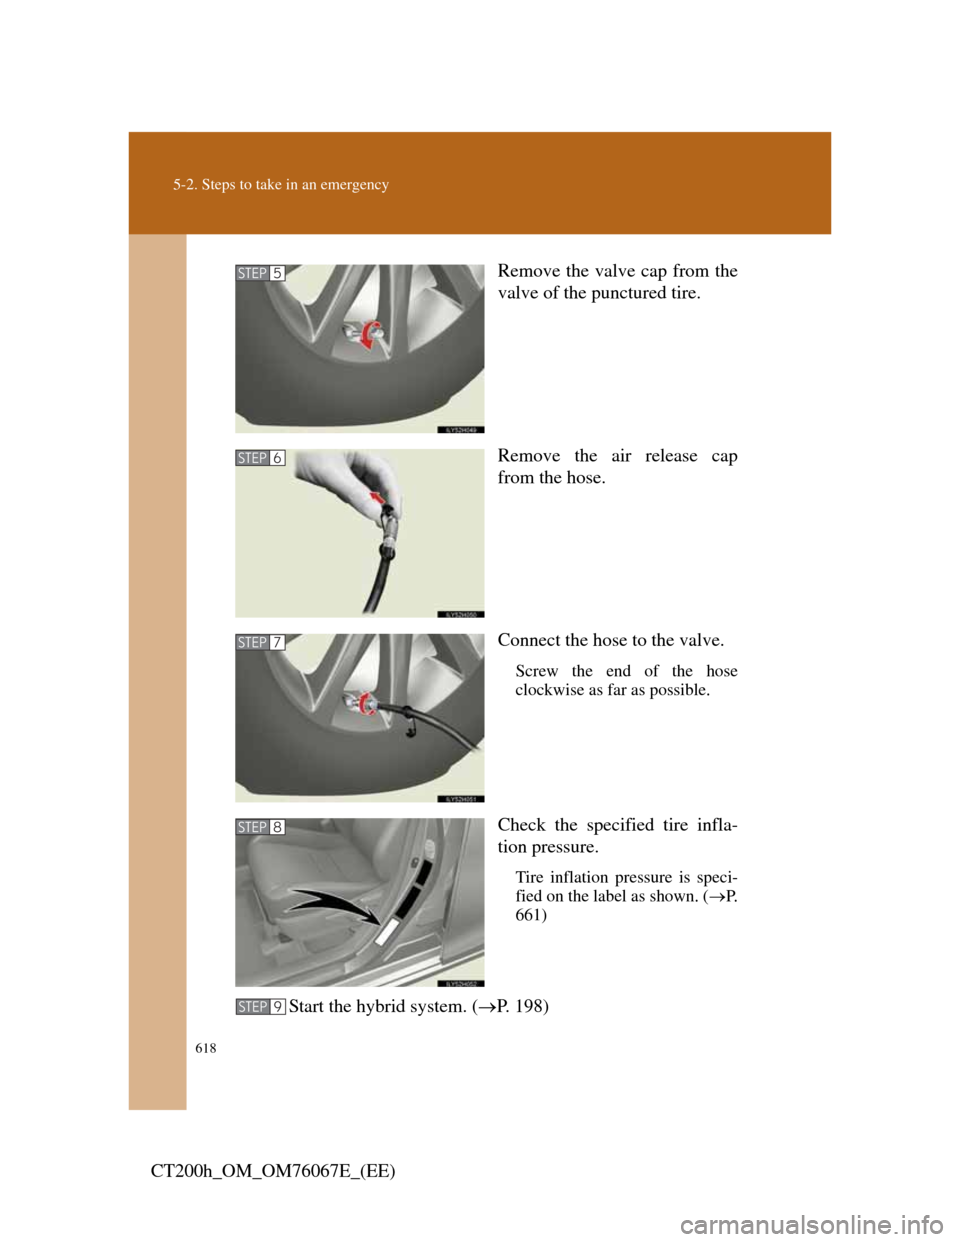
CT200h_OM_OM76067E_(EE)Remove the valve cap from the
valve of the punctured tire.
Remove the air release cap
from the hose.
Connect the hose to the valve.
Screw the end of the hose
clockwise as far as possible.
Check the specified tire infla-
tion pressure.
Tire inflation pressure is speci-
fied on the label as shown. (P.
661)
Start the hybrid system. (P. 198)
STEP5
STEP6
STEP7
STEP8
STEP9
Page 621 of 710

5
619
5-2. Steps to take in an emergency
When trouble arises
CT200h_OM_OM76067E_(EE)To inject the sealant and inflate
the tire, turn the compressor
switch on.
Use the kit with the top facing
upward.
Inflate the tire until the recom-
mended pressure is reached.
The sealant will be injected
and the pressure will spike
to 300 kPa (3.0 kgf/cm
2
or bar, 44 psi) or 400 kPa
(4.0 kgf/cm2 or bar, 58 psi),
then gradually decrease.
The air pressure gauge will
display the actual tire infla-
tion pressure about 1 minute
after the switch is turned on.
• Turn the compressor switch
off and then check the tire
inflation pressure. Being
careful not to over inflate,
check and repeat the infla-
tion procedure until the rec-
ommended tire inflation
pressure is reached.
STEP10
STEP 11
Page 622 of 710
![Lexus CT200h 2012 (in English) Owners Guide 620
5-2. Steps to take in an emergency
CT200h_OM_OM76067E_(EE)
• If the needle of the air pres-
sure gauge reaches the red
zone (450 kPa [4.5 kgf/cm
2
or bar, 65 psi] or more),
there may be a malfun Lexus CT200h 2012 (in English) Owners Guide 620
5-2. Steps to take in an emergency
CT200h_OM_OM76067E_(EE)
• If the needle of the air pres-
sure gauge reaches the red
zone (450 kPa [4.5 kgf/cm
2
or bar, 65 psi] or more),
there may be a malfun](/img/36/12742/w960_12742-621.png)
620
5-2. Steps to take in an emergency
CT200h_OM_OM76067E_(EE)
• If the needle of the air pres-
sure gauge reaches the red
zone (450 kPa [4.5 kgf/cm
2
or bar, 65 psi] or more),
there may be a malfunction
in the tire or in the kit itself.
Stop operation immediately.
• If the tire inflation pressure
is still lower than the recom-
mended level after inflation
for 10 minutes with the
switch on, the tire is too
damaged to be repaired.
Turn the compressor switch
off and contact any autho-
rized Lexus dealer or
repairer, or another duly
qualified and equipped pro-
fessional.
• If the tire inflation pressure
exceeds the recommended
level, let out some air to
adjust the tire inflation pres-
sure.
(P. 624)
Disconnect the hose from the valve on the tire and then pull
out the power plug from the power outlet socket.
To spread the liquid sealant evenly within the tire, immedi-
ately drive for about 5 km (3 miles).STEP 12
STEP 13
Page 623 of 710

5
621
5-2. Steps to take in an emergency
When trouble arises
CT200h_OM_OM76067E_(EE)After driving for about 5 km
(3 miles), stop your vehicle in a
safe place on a hard, flat surface
and reconnect the compressor.
Turn the compressor switch on
and wait for several seconds,
then turn it off. Check the tire
inflation pressure.
If the tire inflation pressure is
below 130 kPa (1.3 kgf/cm
2
or bar, 19 psi): The puncture
cannot be repaired. Contact
any authorized Lexus dealer
or repairer, or another duly
qualified and equipped pro-
fessional.
If the tire inflation pressure is
between 130 kPa (1.3 kgf/
cm
2 or bar, 19 psi) and a
point below the recom-
mended level: The tire can be
repaired. Proceed to .
If the tire inflation pressure is
at the recommended level:
Proceed to .
STEP 14
STEP 15
STEP 16
STEP 17
Page 624 of 710

622
5-2. Steps to take in an emergency
CT200h_OM_OM76067E_(EE)Turn the compressor switch on to inflate the tire until the
recommended tire inflation pressure is reached. Drive for
about 5 km (3 miles) and then perform .
Store the kit and then attach the
2 stickers as shown.
Taking precautions to avoid
sudden braking and sharp turns,
drive carefully at under 80 km/h
(50 mph) to the nearest
authorized Lexus dealer, tire
dealer or repairer, or another
duly qualified and equipped
professional for tire repair or
replacement.
STEP 16
STEP 14
STEP 17
In the following cases, the tire cannot be repaired with the emergency tire
puncture repair kit. Contact any authorized Lexus dealer or repairer, or
another duly qualified and equipped professional.
When the tire is damaged due to driving without sufficient air pressure
When the tire lost air pressure due to a crack or damage in the tire side-
wall
When the tire is visibly separated from the wheel
When the cut or damage to the tread is 4 mm (0.16 in.) long or more
When the wheel is damaged
When two or more tires have been punctured
When there is more than one hole or cut in the damaged tire