Car seat Lexus CT200h 2012 Owner's Manual (in English)
[x] Cancel search | Manufacturer: LEXUS, Model Year: 2012, Model line: CT200h, Model: Lexus CT200h 2012Pages: 710
Page 5 of 710
1
2
3
4
5
6
5
CT200h_OM_OM76067E_(EE)
3-5. Using the interior lights
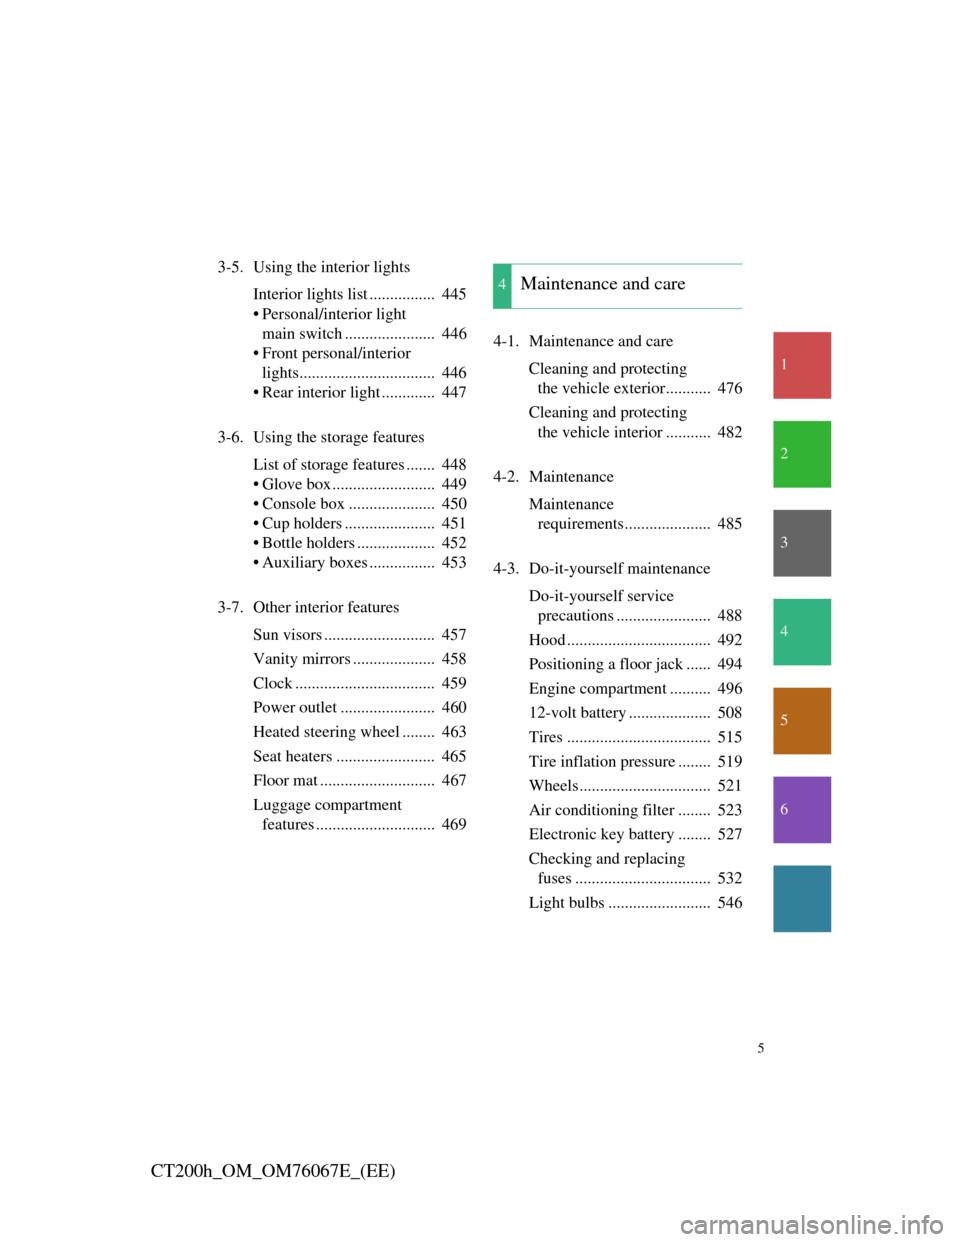
Interior lights list ................ 445
• Personal/interior light
main switch ...................... 446
• Front personal/interior
lights................................. 446
• Rear interior light ............. 447
3-6. Using the storage features
List of storage features ....... 448
• Glove box ......................... 449
• Console box ..................... 450
• Cup holders ...................... 451
• Bottle holders ................... 452
• Auxiliary boxes ................ 453
3-7. Other interior features
Sun visors ........................... 457
Vanity mirrors .................... 458
Clock .................................. 459
Power outlet ....................... 460
Heated steering wheel ........ 463
Seat heaters ........................ 465
Floor mat ............................ 467
Luggage compartment
features ............................. 4694-1. Maintenance and care
Cleaning and protecting
the vehicle exterior........... 476
Cleaning and protecting
the vehicle interior ........... 482
4-2. Maintenance
Maintenance
requirements..................... 485
4-3. Do-it-yourself maintenance
Do-it-yourself service
precautions ....................... 488
Hood ................................... 492
Positioning a floor jack ...... 494
Engine compartment .......... 496
12-volt battery .................... 508
Tires ................................... 515
Tire inflation pressure ........ 519
Wheels................................ 521
Air conditioning filter ........ 523
Electronic key battery ........ 527
Checking and replacing
fuses ................................. 532
Light bulbs ......................... 546
4Maintenance and care
Page 92 of 710
92
1-3. Opening, closing and locking the doors
CT200h_OM_OM76067E_(EE)
CAUTION
To prevent an accident
Observe the following precautions while driving the vehicle.
Failure to do so may result in a door opening and an occupant falling out,
resulting in death or serious injury.
Always use a seat belt.
Ensure that all doors are properly closed.
Do not pull the inside handle of the doors while driving.
The doors may be opened and the passengers are thrown out of the vehicle
and it may result in serious injury or death.
Be especially careful for the front doors, as the door may be opened even
if the inside lock buttons are in locked position.
Set the rear door child-protector locks when children are seated in the rear
seats.
When opening or closing a door
Check the surroundings of the vehicle such as whether the vehicle is on an
incline, whether there is enough space for a door to open and whether a
strong wind is blowing. When opening or closing the door, hold the door
handle tightly to prepare for any unpredictable movement.
Page 103 of 710
103
1-4. Adjustable components (seats, mirrors, steering wheel)
1
Before driving
CT200h_OM_OM76067E_(EE)
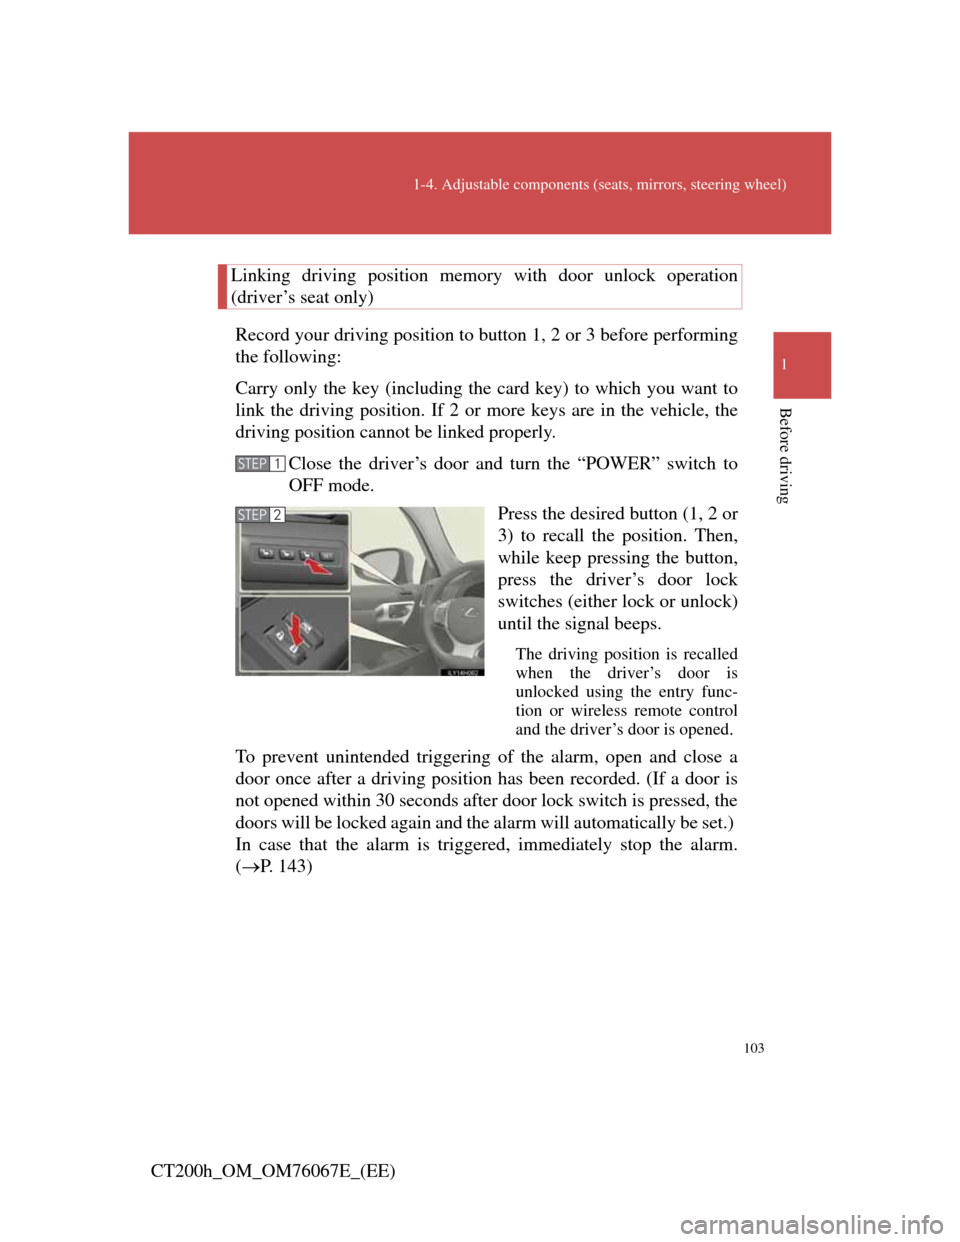
Linking driving position memory with door unlock operation
(driver’s seat only)
Record your driving position to button 1, 2 or 3 before performing
the following:
Carry only the key (including the card key) to which you want to
link the driving position. If 2 or more keys are in the vehicle, the
driving position cannot be linked properly.
Close the driver’s door and turn the “POWER” switch to
OFF mode.
Press the desired button (1, 2 or
3) to recall the position. Then,
while keep pressing the button,
press the driver’s door lock
switches (either lock or unlock)
until the signal beeps.
The driving position is recalled
when the driver’s door is
unlocked using the entry func-
tion or wireless remote control
and the driver’s door is opened.
To prevent unintended triggering of the alarm, open and close a
door once after a driving position has been recorded. (If a door is
not opened within 30 seconds after door lock switch is pressed, the
doors will be locked again and the alarm will automatically be set.)
In case that the alarm is triggered, immediately stop the alarm.
(P. 143)
STEP1
STEP2
Page 104 of 710
104
1-4. Adjustable components (seats, mirrors, steering wheel)
CT200h_OM_OM76067E_(EE)
Operating the driving position memory after turning the “POWER” switch
off
Memorized positions can be activated up to 180 seconds after the driver’s
door is opened and another 60 seconds after it is closed again, even after
turning the “POWER” switch off.
Canceling the linked door unlock operation
Turn the “POWER” switch to ON mode and close the driver’s door.
While pressing the “SET” button, press the driver’s door lock
switches (either lock or unlock) until the signal beeps.
Stopping seat position operation part-way through
Perform any of the following operations:
Press the “SET” button.
Press button 1, 2 or 3.
Adjust the seat using the switches (only cancels seat position recall).
Correct seat position
When the seat is in the most forward or most backward position, and the
seat is being moved in those directions, the system may not correctly recog-
nize the current position and the memorized position will not be correctly
recalled.
CAUTION
Seat adjustment caution
Take care during seat adjustment so that the seat does not strike the rear pas-
senger or squeeze your body against the steering wheel.
STEP1
STEP2
Page 114 of 710
114
1-4. Adjustable components (seats, mirrors, steering wheel)
CT200h_OM_OM76067E_(EE)
CAUTION
Seat belt pretensioners
If the pretensioner has activated, the SRS warning light will come on. In that
case, the seat belt cannot be used again and must be replaced at any autho-
rized Lexus dealer or repairer, or another duly qualified and equipped pro-
fessional.
Seat belt damage and wear
Do not damage the seat belts by allowing the belt, plate, or buckle to be
jammed in the door.
Inspect the seat belt system periodically. Check for cuts, fraying, and
loose parts. Do not use a damaged seat belt until it is replaced. Damaged
seat belts cannot protect an occupant from death or serious injury.
Ensure that the belt and plate are locked and the belt is not twisted.
If the seat belt does not function correctly, immediately contact any autho-
rized Lexus dealer or repairer, or another duly qualified and equipped pro-
fessional.
Replace the seat assembly, including the belts, if your vehicle has been
involved in a serious accident, even if there’s no obvious damage.
Do not attempt to install, remove, modify, disassemble or dispose of the
seat belts. Have any necessary repairs carried out by any authorized Lexus
dealer or repairer, or another duly qualified and equipped professional.
Inappropriate handling of the pretensioner may prevent it from operating
properly, resulting in death or serious injury.
Page 121 of 710
121
1-4. Adjustable components (seats, mirrors, steering wheel)
1
Before driving
CT200h_OM_OM76067E_(EE)
Mirror angle can be adjusted when
The “POWER” switch is in ACCESSORY or ON mode.
Linked mirror function when reversing (vehicles with driving position
memory)
When the mirror select switch is in the “L” or “R” position, the outside rear
view mirrors will automatically angle downwards when the vehicle is
reversing in order to give a better view of the ground. To disable this func-
tion, move the mirror select switch to the neutral position (between “L” and
“R”).
Rain clearing mirrors (if equipped)
When water droplets collects on the mirror surface, for example when it
rains, the rain clearing (hydrophilic) effect of the mirrors causes the droplets
to be spread out into a film making the rear view clearer. In the following
cases, the rain clearing effect will be reduced temporarily, but will return
after 1 or 2 days’ exposure to direct sunlight.
After wiping dirt off the mirrors
When the mirrors fog up
After waxing your vehicle in an automatic car wash
After your vehicle has been parked for a long period in underground
parking lots etc. where there is no direct sunlight
When the mirrors are fogged up
The outside rear view mirrors can be cleared using the mirror defoggers.
Turn on the rear window defogger to turn on the outside rear view mirror
defoggers.
(P. 329)
Automatic adjustment of the mirror angle (vehicles with driving position
memory)
A desired mirror face angle can be entered to memory and recalled automat-
ically by the driving position memory. (P. 102)
Page 122 of 710
122
1-4. Adjustable components (seats, mirrors, steering wheel)
CT200h_OM_OM76067E_(EE)
Auto anti-glare function (if equipped)
When the anti-glare inside rear view mirror is set to automatic mode, the
outside rear view mirrors will activate in conjunction with the anti-glare
inside rear view mirror to reduce reflected light. (P. 1 1 6 )
CAUTION
When driving the vehicle
Observe the following precautions while driving.
Failing to do so may result in loss of control of the vehicle and cause an
accident, resulting in death or serious injury.
Do not adjust the mirrors while driving.
Do not drive with the mirrors folded.
Both the driver and passenger side mirrors must be extended and properly
adjusted before driving.
When a mirror is moving
To avoid personal injury and mirror malfunction, be careful not to get your
hand caught by the moving mirror.
When the mirror defoggers are operating
Do not touch the rear view mirror surfaces, as they can become very hot and
burn you.
NOTICE
If the mirrors become iced up (vehicles with rain-clearing mirror)
In order to retain the rain-clearing properties of the mirror, do not attempt to
scrape the ice off. Instead, remove it by turning on the mirror defoggers or
by applying warm water.
Page 150 of 710
150
1-8. Safety information
CT200h_OM_OM76067E_(EE)
CAUTION
While driving
Do not adjust the position of the driver’s seat.
Doing so could cause the driver to lose control of the vehicle.
Do not place a cushion between the driver or passenger and the seatback.
A cushion may prevent correct posture from being achieved, and reduce
the effectiveness of the seat belt and head restraint, increasing the risk of
death or serious injury to the driver or passenger.
Do not place anything under the front seats.
Objects placed under the front seats may become jammed in the seat
tracks and stop the seat from locking in place. This may lead to an acci-
dent, resulting in death or serious injury. The adjustment mechanism may
also be damaged.
Adjusting the seat position
Take care when adjusting the seat position to ensure that other passengers
are not injured by the moving seat.
Do not put your hands under the seat or near the moving parts to avoid
injury.
Fingers or hands may become jammed in the seat mechanism.
Page 170 of 710

170
1-8. Safety information
CT200h_OM_OM76067E_(EE)Key of letters inserted in the above table:
U: Suitable for “universal” category child restraint system
approved for the use in this mass group.
UF: Suitable for forward facing “universal” category child
restraint system approved for the use in this mass group.
L1: Suitable for “LEXUS G 0+, BABY SAFE PLUS” (0 to 13 kg
[0 to 28 lb.]) approved for the use in this mass group.
L2: Suitable for “LEXUS G 0+, BABY SAFE PLUS with SEAT
BELT FIXATION, BASE PLATFORM” (0 to 13 kg [0 to
28 lb.]) approved for the use in this mass group.
L3: Suitable for “LEXUS DUO+” (without ISOFIX, 9 to 18 kg
[20 to 39 lb.]) approved for the use in this mass group.
L4: Suitable for “LEXUS KID” (15 to 36 kg [34 to 79 lb.])
approved for the use in this mass group.
L5: Suitable for “LEXUS KIDFIX” (15 to 36 kg [34 to 79 lb.])
approved for the use in this mass group.
X: Not suitable seat position for children in this mass group.
*1: When you use a child restraint system in this position, adjust
the seat back and fix it at the most upright lock position.
*2: When you use a child restraint system in this position, remove
the head restraint.
Other child restraint system which is different from the system
mentioned in the table can be used.
But the suitability of the systems must be carefully checked with
the child restraint system manufacturer concerned and the seller of
those seats.
Page 171 of 710
171
1-8. Safety information
1
Before driving
CT200h_OM_OM76067E_(EE)
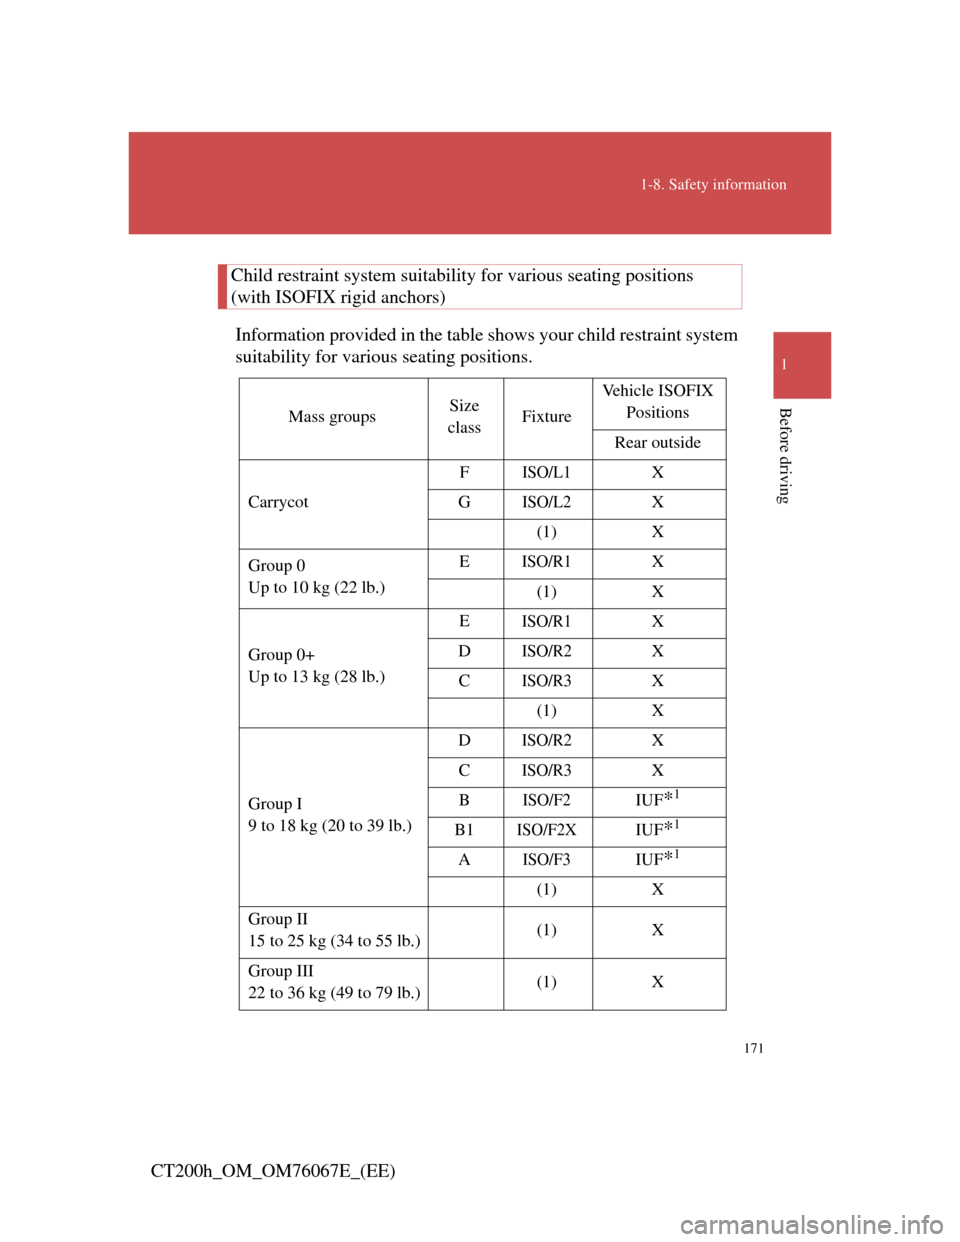
Child restraint system suitability for various seating positions
(with ISOFIX rigid anchors)
Information provided in the table shows your child restraint system
suitability for various seating positions.
Mass groupsSize
classFixtureVehicle ISOFIX
Positions
Rear outside
CarrycotF
ISO/L1X
G
ISO/L2X
(1) X
Group 0
Up to 10 kg (22 lb.)E
ISO/R1X
(1) X
Group 0+
Up to 13 kg (28 lb.)E
ISO/R1X
D
ISO/R2X
C
ISO/R3X
(1) X
Group I
9 to 18 kg (20 to 39 lb.)D
ISO/R2X
C
ISO/R3X
B
ISO/F2IUF*1
B1ISO/F2XIUF*1
AISO/F3IUF*1
(1) X
Group II
15 to 25 kg (34 to 55 lb.)(1) X
Group III
22 to 36 kg (49 to 79 lb.)(1) X