Wheel lock Lexus CT200h 2013 Owner's Manual (in English)
[x] Cancel search | Manufacturer: LEXUS, Model Year: 2013, Model line: CT200h, Model: Lexus CT200h 2013Pages: 688
Page 7 of 688

7
1
8 7
6
5
4
3
2
CT200h_OM_OM76102E_(EE)
9
6-4. Other interior features
Other interior features ....... 473
• Sun visors...................... 473
• Vanity mirrors ............... 473
• Clock ............................. 474
• Power outlet .................. 475
• Assist grips.................... 477
7-1. Maintenance and care
Cleaning and protecting the
vehicle exterior.................480
Cleaning and protecting the
vehicle interior.................484
7-2. Maintenance
Maintenance require-
ments...............................4877-3. Do-it-yourself maintenance
Do-it-yourself service precau-
tions..................................490
Hood .................................. 492
Positioning a floor jack ..... 494
Engine compartment ......... 495
12-volt battery ................... 504
Tires................................... 510
Tire inflation pressure ....... 523
Wheels............................... 525
Air conditioning filter ....... 527
Electronic key battery ....... 530
Checking and replacing
fuses.................................534
Light bulbs ........................ 538
8-1. Essential information
Emergency flashers ........... 560
If your vehicle has to be stopped
in an emergency...............561
7Maintenance and care
8When trouble arises
Page 38 of 688

381-1. For safe use
CT200h_OM_OM76102E_(EE)
For safety drive
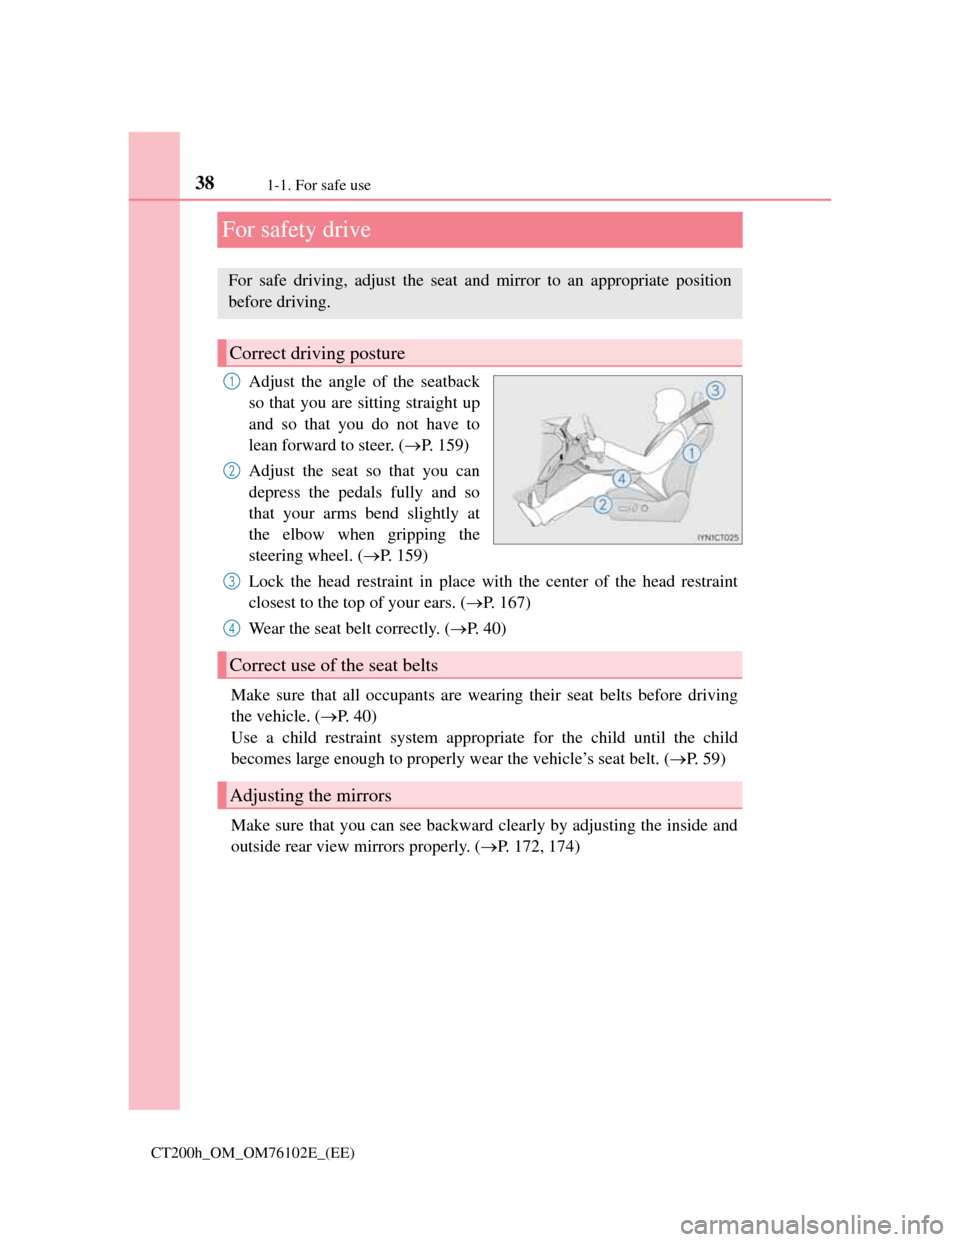
Adjust the angle of the seatback
so that you are sitting straight up
and so that you do not have to
lean forward to steer. (P. 1 5 9 )
Adjust the seat so that you can
depress the pedals fully and so
that your arms bend slightly at
the elbow when gripping the
steering wheel. (P. 159)
Lock the head restraint in place with the center of the head restraint
closest to the top of your ears. (P. 167)
Wear the seat belt correctly. (P. 40)
Make sure that all occupants are wearing their seat belts before driving
the vehicle. (P. 4 0 )
Use a child restraint system appropriate for the child until the child
becomes large enough to properly wear the vehicle’s seat belt. (P. 5 9 )
Make sure that you can see backward clearly by adjusting the inside and
outside rear view mirrors properly. (P. 172, 174)
For safe driving, adjust the seat and mirror to an appropriate position
before driving.
Correct driving posture
1
2
Correct use of the seat belts
Adjusting the mirrors
3
4
Page 125 of 688

125
3
Operation of
each component
CT200h_OM_OM76102E_(EE)
3-1. Key information
Keys .................................. 126
3-2. Opening, closing and
locking the doors
Side doors ......................... 132
Back door.......................... 138
Smart entry & start system 143
3-3. Adjusting the seats
Front seats ......................... 159
Rear seats .......................... 161
Driving position memory.. 163
Head restraints .................. 167
3-4. Adjusting the steering
wheel and mirrors
Steering wheel .................. 170
Inside rear view mirror ..... 172
Outside rear view mirrors . 174
3-5. Opening, closing the windows
and moon roof
Power windows................. 178
Moon roof ......................... 181
Page 166 of 688

1663-3. Adjusting the seats
CT200h_OM_OM76102E_(EE)
Cancelation procedure
Carry only the key you want to cancel and then close the driver’s door.
If 2 or more keys are in the vehicle, the driving position cannot be can-
celed properly.
Turn the power switch to ON mode.
While pressing the “SET” button, press and hold the door lock
switch (either lock or unlock) until the buzzer sounds twice.
If the button could not be canceled, the buzzer sounds continuously for
approximately 3 seconds.
Recalling the driving position using the memory recall function
Different driving positions can be registered for each electronic key. Therefore,
the driving position that is recalled may be different depending on the key being
carried.
If a door other than the driver’s door is unlocked with the smart entry & start
system, the driving position cannot be recalled. In this case, press the driving
position button which has been set.
WA R N I N G
Seat adjustment caution
Take care during seat adjustment so that the seat does not strike the rear passen-
ger or squeeze your body against the steering wheel.
1
2
Page 170 of 688

1703-4. Adjusting the steering wheels and mirrors
CT200h_OM_OM76102E_(EE)
Steering wheel
Hold the steering wheel and push
the lever down.
Adjust to the ideal position by
moving the steering wheel hori-
zontally and vertically.
After adjustment, pull the lever up to
secure the steering wheel.
To sound the horn, press on or close
to the mark.
After adjusting the steering wheel
Make sure that the steering wheel is securely locked.
The horn may not sound if the steering wheel is not securely locked.
Adjustment procedure
1
2
Horn
Page 171 of 688

1713-4. Adjusting the steering wheels and mirrors
3
Operation of each component
CT200h_OM_OM76102E_(EE)
WA R N I N G
Caution while driving
Do not adjust the steering wheel while driving.
Doing so may cause the driver to mishandle the vehicle and cause an accident,
resulting in death or serious injury.
After adjusting the steering wheel
Make sure that the steering wheel is securely locked.
Otherwise, the steering wheel may move suddenly, possibly causing an acci-
dent, and resulting in death or serious injury.
Page 175 of 688

1753-4. Adjusting the steering wheels and mirrors
3
Operation of each component
CT200h_OM_OM76102E_(EE)
To adjust the mirror, press the
switch.
Up
Right
Down
Left
Ty p e A
Press the switch to fold the mirrors.
Press it again to extend them to the
original position.
Ty p e B
Extends the mirrors
Folds the mirrors
Putting the outside rear view mirror
folding switch in the neutral position
sets the mirrors to automatic mode.
Automatic mode allows the folding
or extending of the mirrors to be
linked to locking/unlocking of the
doors.
2
1
2
3
4
Folding and extending the mirrors
1
2
Page 186 of 688

1864-1. Before driving
CT200h_OM_OM76102E_(EE)
Driving the vehicle
P. 1 9 6
With the brake pedal depressed, shift the shift position to D. (P. 203)
Check that the shift position indicator shows D.
Release the parking brake. (P. 210)
Gradually release the brake pedal and gently depress the accelerator
pedal to accelerate the vehicle.
With the shift position in D, depress the brake pedal.
If necessary, set the parking brake.
If the vehicle is to be stopped for an extended period of time, shift the shift
position to P. (P. 205)
Stop the vehicle completely.
Set the parking brake. (P. 210)
Shift the shift position to P. (P. 205)
Check that the shift position indicator shows P.
Press the power switch to stop the hybrid system.
Slowly release the brake pedal.
Lock the door, making sure that you have the electronic key on your
person.
If parking on a hill, block the wheels as needed.
The following procedures should be observed to ensure safe driving:
Starting the hybrid system
Driving
Stopping
Parking the vehicle
1
2
3
1
2
1
2
3
4
5
6
Page 193 of 688

1934-1. Before driving
4
Driving
CT200h_OM_OM76102E_(EE)
NOTICE
When driving the vehicle
Do not depress the accelerator and brake pedals at the same time during driv-
ing, as this may restrain driving torque.
Do not use the accelerator pedal or depress the accelerator and brake pedals at
the same time to hold the vehicle on a hill.
When parking the vehicle
Always shift the shift position to P. Failure to do so may cause the vehicle to
move or the vehicle may accelerate suddenly if the accelerator pedal is acciden-
tally depressed.
Avoiding damage to vehicle parts
Do not turn the steering wheel fully in either direction and hold it there for an
extended period of time.
Doing so may damage the power steering motor.
When driving over bumps in the road, drive as slowly as possible to avoid
damaging the wheels, underside of the vehicle, etc.
If you get a flat tire while driving
A flat or damaged tire may cause the following situations. Hold the steering
wheel firmly and gradually depress the brake pedal to slow down the vehicle.
It may be difficult to control your vehicle.
The vehicle will make abnormal sounds or vibrations.
The vehicle will lean abnormally.
Information on what to do in case of a flat tire (P. 590, 604)
When encountering flooded roads
Do not drive on a road that has flooded after heavy rain etc. Doing so may
cause the following serious damage to the vehicle:
Engine stalling
Short in electrical components
Engine damage caused by water immersion
In the event that you drive on a flooded road and the vehicle is flooded, be sure
to have any authorized Lexus dealer or repairer, or another duly qualified and
equipped professional check the following:
Brake function
Changes in quantity and quality of oil and fluid used for the engine, transmis-
sion, etc.
Lubricant condition for the bearings and suspension joints (where possible),
and the function of all joints, bearings, etc.
If the P position control system is damaged by flooding, it may not be possible
to shift the shift position to P, or from P to other positions. When the shift posi-
tion cannot be changed from P to any other position, the front wheels will lock,
and you will be unable to tow the vehicle with the front wheels on the ground,
as the front wheels may be locked. In this case, transport the vehicle with both
front wheels or all four wheels lifted.
Page 268 of 688

2684-5. Using the driving support systems
CT200h_OM_OM76102E_(EE)
Driving assist systems
ABS (Anti-lock Brake System)
Helps to prevent wheel lock when the brakes are applied suddenly, or if
the brakes are applied while driving on a slippery road surface
Brake assist
Generates an increased level of braking force after the brake pedal is
depressed when the system detects a panic stop situation
VSC (Vehicle Stability Control)
Helps the driver to control skidding when swerving suddenly or turn-
ing on slippery road surfaces
TRC (Traction Control)
Helps to maintain drive power and prevent the drive wheels from spin-
ning when starting the vehicle or accelerating on slippery roads
EPS (Electric Power Steering)
Employs an electric motor to reduce the amount of effort needed to
turn the steering wheel
To help enhance driving safety and performance, the following systems
operate automatically in response to various driving situations. Be aware,
however, that these systems are supplementary and should not be relied
upon too heavily when operating the vehicle.