parking brake Lexus CT200h 2016 (in English) User Guide
[x] Cancel search | Manufacturer: LEXUS, Model Year: 2016, Model line: CT200h, Model: Lexus CT200h 2016Pages: 632, PDF Size: 8.5 MB
Page 156 of 632
156
CT200h_OM_OM76197U_(U)4-2. Driving procedures
Power (ignition) switch
Check that the parking brake is set.
Firmly depress the brake pedal.
Check that the power switch indicator turns green. If the indicator does not turn
green, the hybrid system cannot be started.
When the shift position is N, the hybrid syst
em cannot start. Shift the shift position to P
when starting the hybrid system. ( P. 1 6 3 )
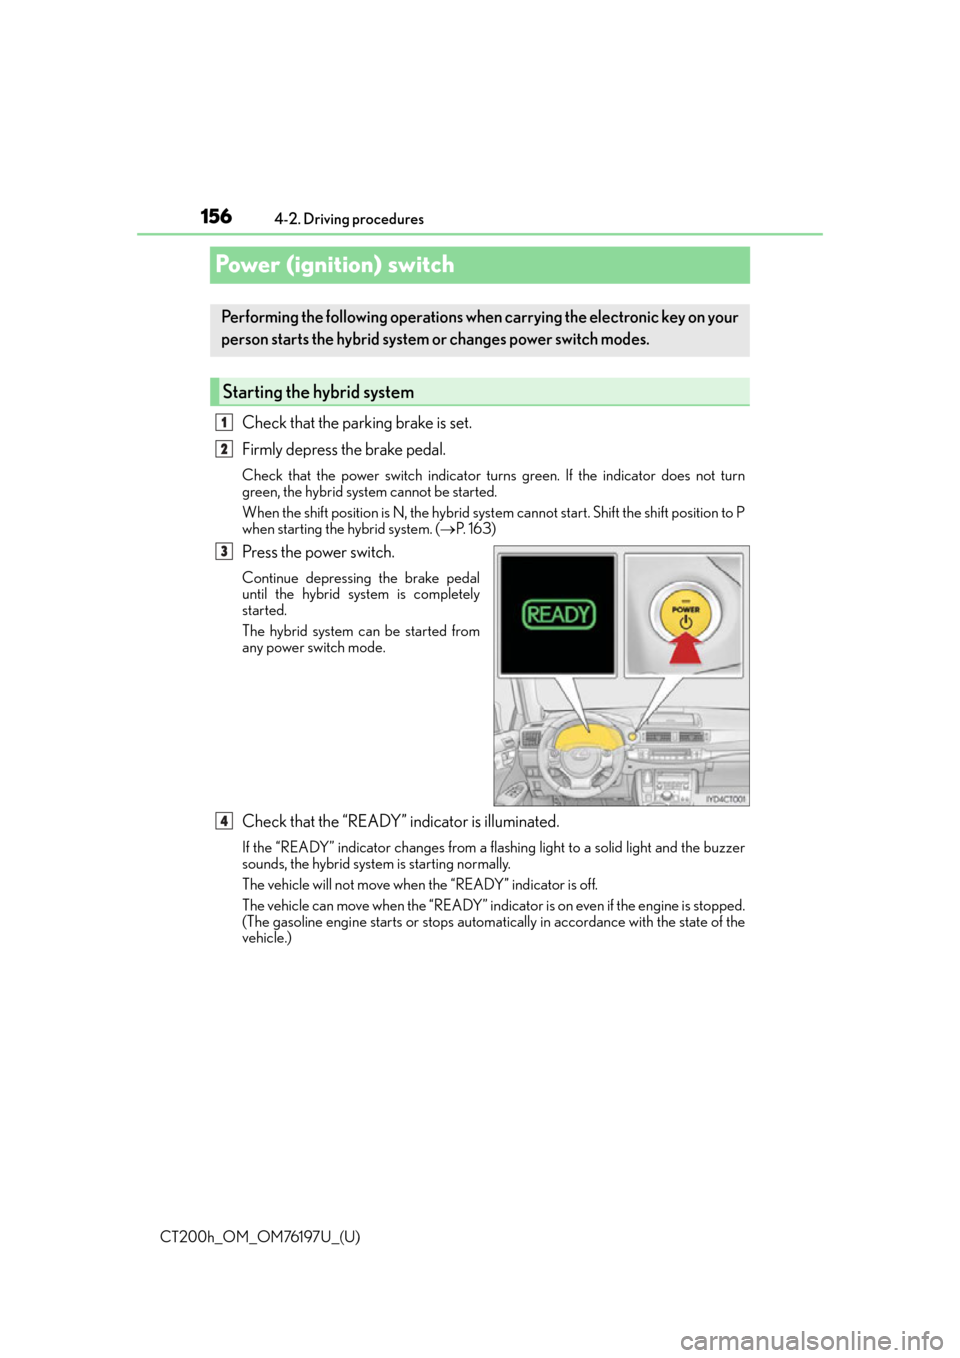
Press the power switch.
Continue depressing the brake pedal
until the hybrid sy stem is completely
started.
The hybrid system can be started from
any power switch mode.
Check that the “READY” indicator is illuminated.
If the “READY” indicator changes from a flas hing light to a solid light and the buzzer
sounds, the hybrid system is starting normally.
The vehicle will not move when the “READY” indicator is off.
The vehicle can move when the “READY” indicator is on even if the engine is stopped.
(The gasoline engine starts or stops automatically in accordance with the state of the
vehicle.)
Performing the following op erations when carrying the electronic key on your
person starts the hybrid system or changes power switch modes.
Starting the hybrid system
1
2
3
4
Page 157 of 632
CT200h_OM_OM76197U_(U)
1574-2. Driving procedures
4
Driving
Stop the vehicle completely.
Set the parking brake. (P. 1 6 8 )
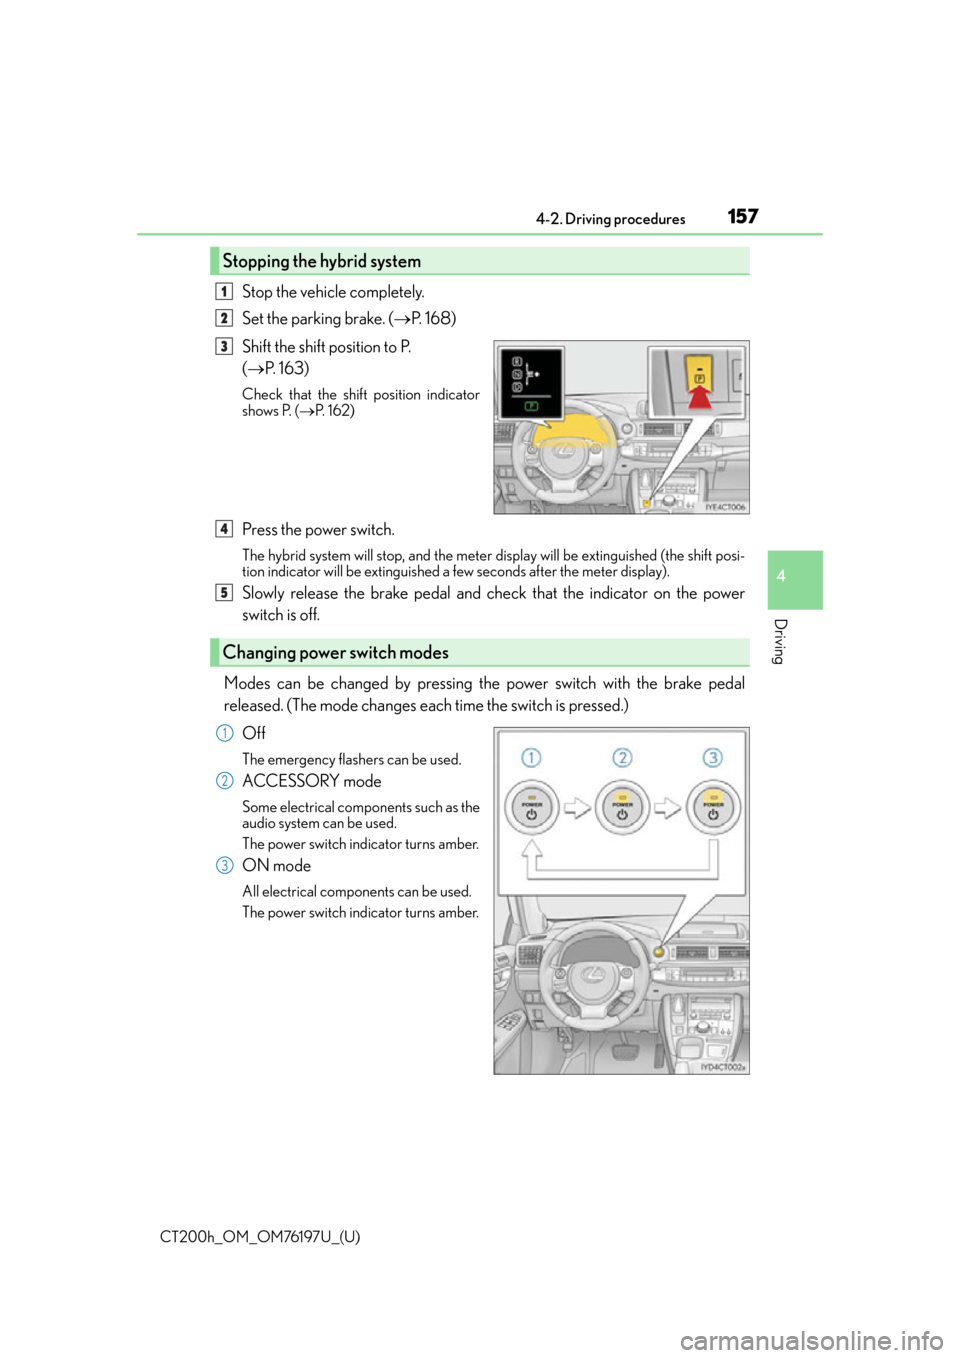
Shift the shift position to P.
( P. 1 6 3 )
Check that the shift position indicator
shows P. ( P. 1 6 2 )
Press the power switch.
The hybrid system will stop, and the meter display will be extinguished (the shift posi-
tion indicator will be extinguished a few seconds after th e meter display).
Slowly release the brake pedal and check that the indicator on the power
switch is off.
Modes can be changed by pressing the power switch with the brake pedal
released. (The mode changes each time the switch is pressed.) Off
The emergency flashers can be used.
ACCESSORY mode
Some electrical components such as the
audio system can be used.
The power switch indicator turns amber.
ON mode
All electrical components can be used.
The power switch indicator turns amber.
Stopping the hybrid system
1
2
3
Changing power switch modes
4
5
1
2
3
Page 158 of 632

158
CT200h_OM_OM76197U_(U)4-2. Driving procedures
■Auto power off function
If the vehicle is left in ACCESSORY mode for more than 20 minutes or ON mode (the
hybrid system is not operating) for more than an hour with the shift position in P, the
power switch will automatically turn off. Howe
ver, this function cannot entirely prevent
the 12-volt battery discharge. Do not leave the vehicle with the power switch in ACCES-
SORY or ON mode for long periods of time when the hybrid system is not operating.
■Sounds and vibrations specific to a hybrid vehicle
P. 6 8
■Electronic key battery depletion
P. 1 0 3
■When the ambient temperature is low, such as during winter driving conditions
When starting the hybrid system, the flas hing time of the “READY” indicator may be
long. Leave the vehicle as it is until the “REA DY” indicator is steady on, as steady means
the vehicle is able to move.
■Conditions affe cting operation
P. 115
■Note for the entry function
P. 116
■If the hybrid system does not start
The immobilizer system may not have been deactivated. ( P. 74 )
Contact your Lexus dealer.
■When the power switch indicator flashes in amber
The system may be malfunctioning. Have the vehicle inspected by your Lexus dealer
immediately.
■If the “READY” indicator does not come on
In the event that the “READY” indicator does not come on even after performing the
proper procedures for starting the vehicle, contact your Lexus dealer immediately.
■If the hybrid system is malfunctioning
P. 5 3 9
■If the electronic key battery is depleted
P. 5 0 4
■Operation of the power switch
●When operating the power switch, one short, firm press is enough. If the switch is
pressed improperly, the hybrid system may no t start or the power switch mode may not
change. It is not necessary to press and hold the switch.
●If attempting to restart the hybrid system immediately after turning the power switch off,
the hybrid system may not start in some cases. After turning the power switch off,
please wait a few seconds before restarting the hybrid system.
■Automatically P position selection function
P. 1 6 5
■When the shift control system malfunctions
The power switch will not be able to be turn ed off. In such a case, the switch can be
turned off after applying the parking brake.
Have the vehicle inspected by your Lexus dealer immediately.
Page 163 of 632
CT200h_OM_OM76197U_(U)
1634-2. Driving procedures
4
Driving
*: For good fuel economy and noise reduction, the D position should usually be used.
P. 2 3 4
■When shifting the shift position to P
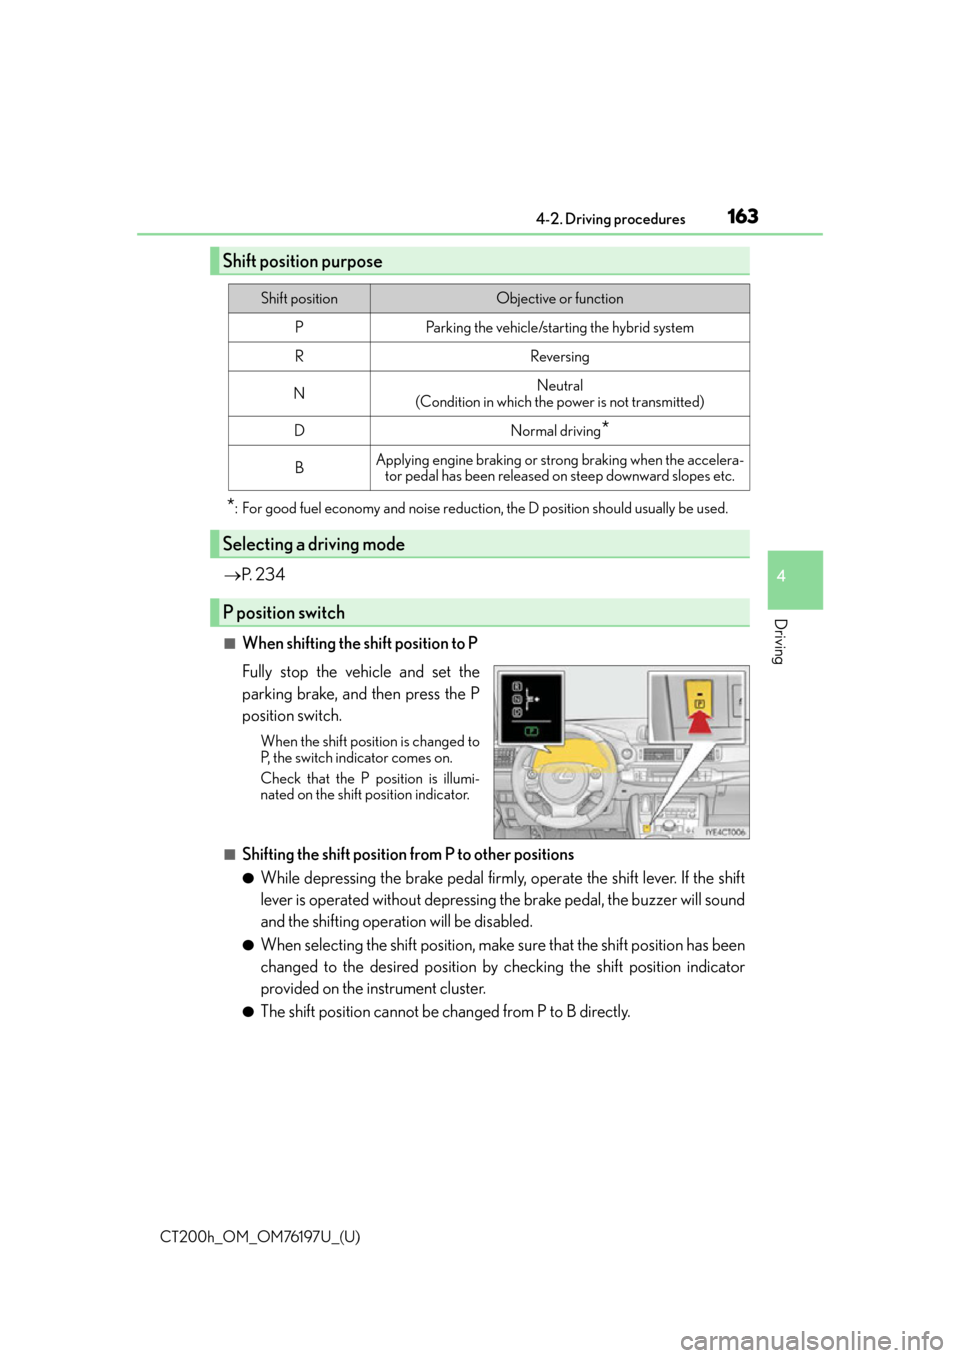
Fully stop the vehicle and set the
parking brake, and then press the P
position switch.
When the shift position is changed to
P, the switch indicator comes on.
Check that the P position is illumi-
nated on the shift position indicator.
■Shifting the shift position from P to other positions
●While depressing the brake pedal firmly, operate the shift lever. If the shift
lever is operated without depressing the brake pedal, the buzzer will sound
and the shifting operation will be disabled.
●When selecting the shift position, make sure that the shift position has been
changed to the desired position by checking the shift position indicator
provided on the instrument cluster.
●The shift position cannot be changed from P to B directly.
Shift position purpose
Shift positionObjective or function
PParking the vehicle/starting the hybrid system
RReversing
NNeutral
(Condition in which the power is not transmitted)
DNormal driving*
BApplying engine braking or strong braking when the accelera- tor pedal has been released on steep downward slopes etc.
Selecting a driving mode
P position switch
Page 166 of 632

166
CT200h_OM_OM76197U_(U)4-2. Driving procedures
NOTICE
■Hybrid battery (traction battery) charge
If the shift position is in N, the hybrid ba
ttery (traction battery) will not be charged. To
help prevent the battery from discharging, avoid leaving the N position selected for an
extended period of time.
■Situations where shift control system malfunctions are possible
If any of the following situations occurs, sh ift control system malfunctions are possible.
Immediately stop the vehicle in a safe place on level ground, apply the parking brake,
and then contact your Lexus dealer.
●When the warning message indicating the shift control system appears on the multi-
information display. ( P. 5 3 9 )
●When the shift position indicator remains off.
■Notes regarding shift lever and P position switch operation
Avoid repeatedly operating the shift lever an d P position switch in quick succession.
The system protection function may activate and it will not be temporarily possible to
shift the shift position other than P. If th is happens, please wait for a while before
attempting to change the shift position again.
Page 168 of 632
168
CT200h_OM_OM76197U_(U)4-2. Driving procedures
Parking brake
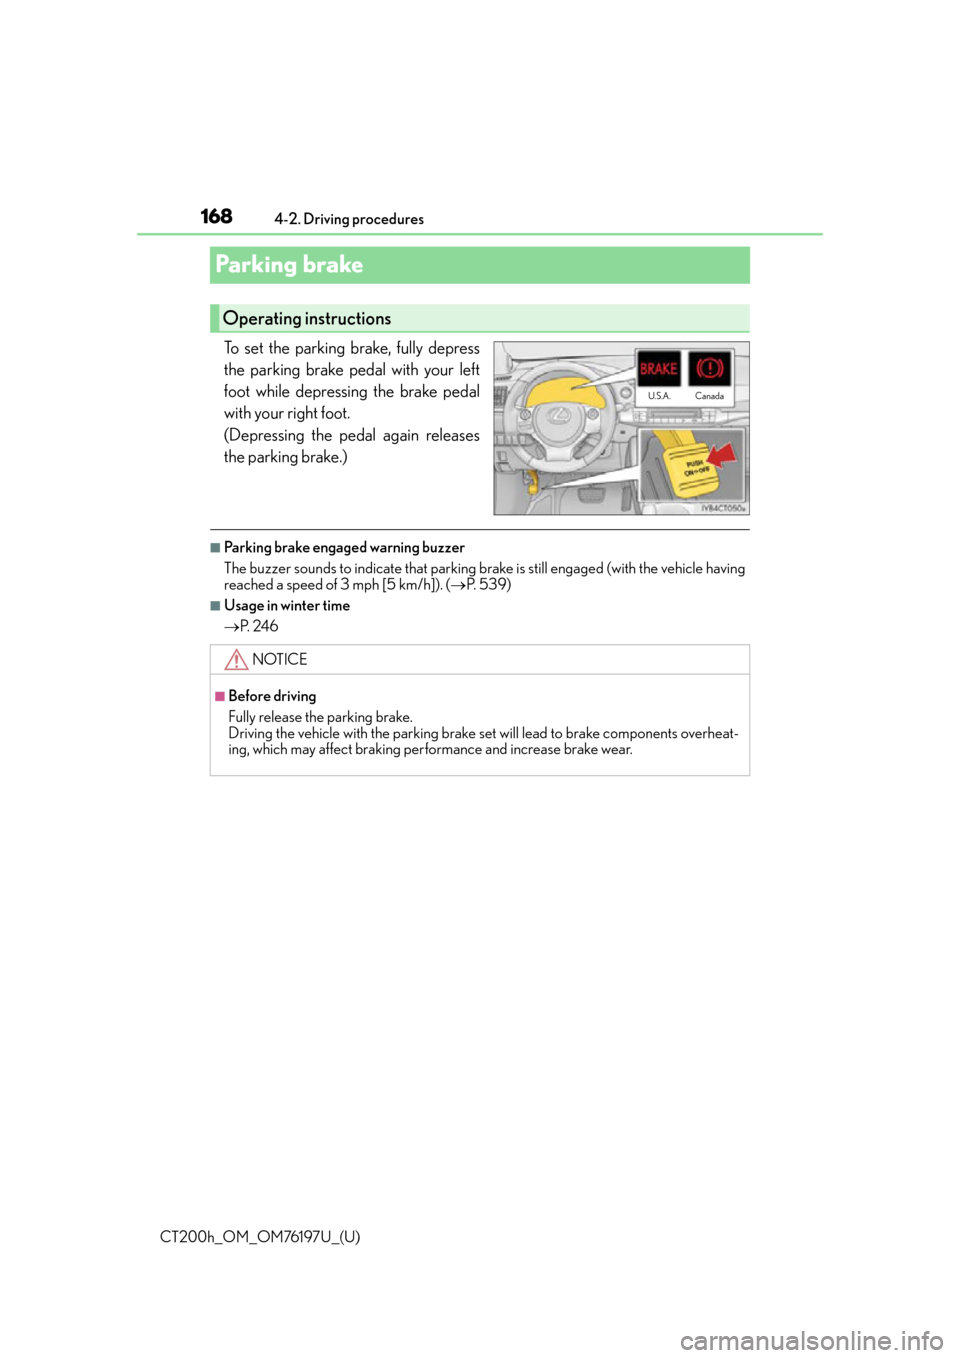
To set the parking brake, fully depress
the parking brake pedal with your left
foot while depressing the brake pedal
with your right foot.
(Depressing the pedal again releases
the parking brake.)
■Parking brake engaged warning buzzer
The buzzer sounds to indicate that parking brake is still engaged (with the vehicle having
reached a speed of 3 mph [5 km/h]). (
P. 5 3 9 )
■Usage in winter time
P. 2 4 6
Operating instructions
U.S.A. Canada
NOTICE
■Before driving
Fully release the parking brake.
Driving the vehicle with the parking brake set will lead to brake components overheat-
ing, which may affect braking perf
ormance and increase brake wear.
Page 170 of 632
170
CT200h_OM_OM76197U_(U)4-3. Operating the lights and wipers
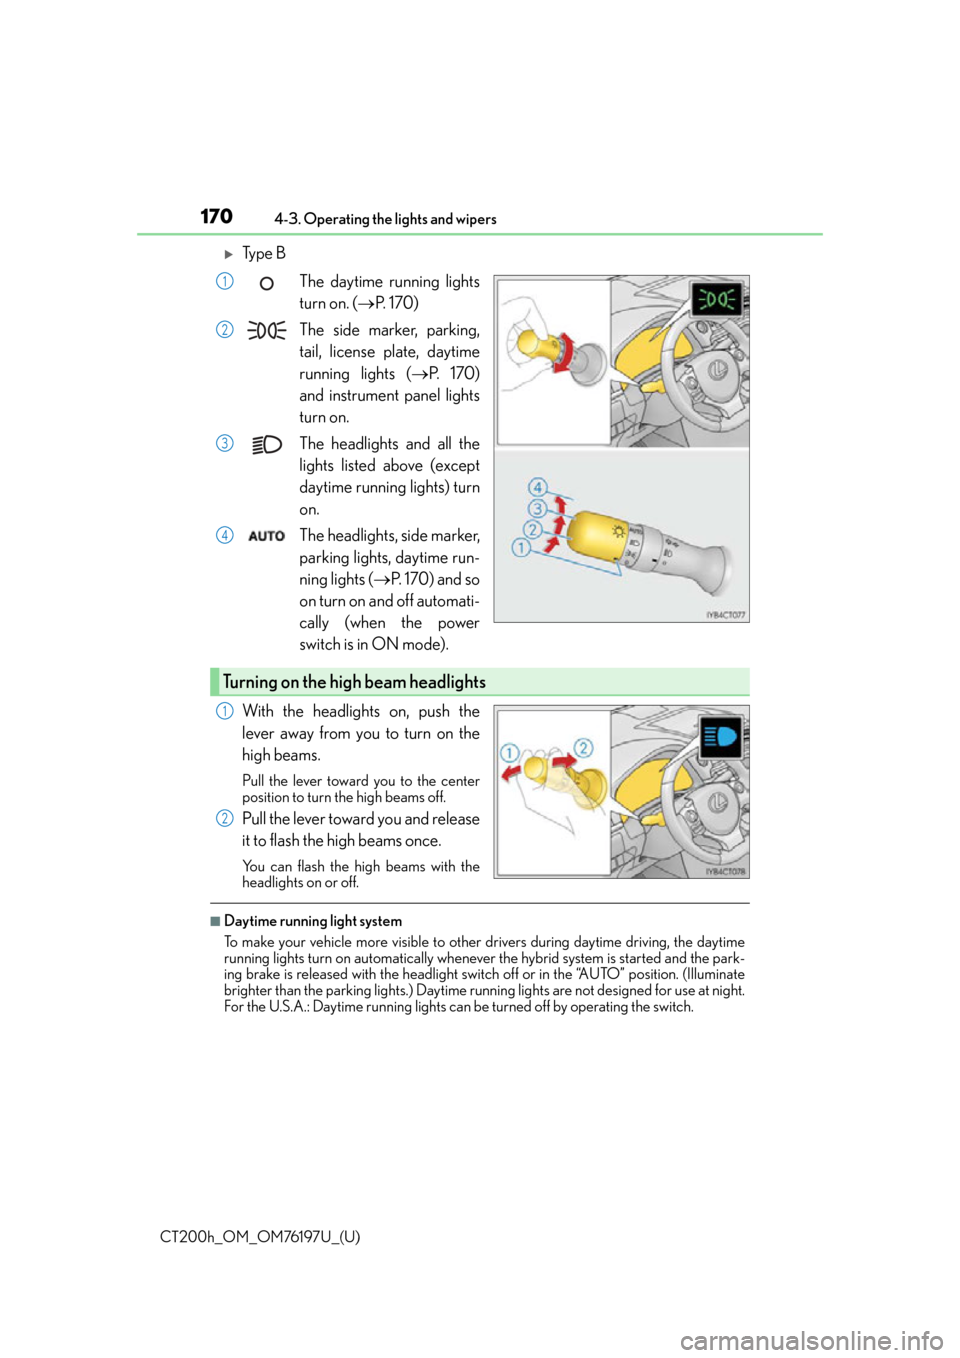
Ty p e B
The daytime running lights
turn on. ( P. 1 7 0 )
The side marker, parking,
tail, license plate, daytime
running lights ( P. 1 7 0 )
and instrument panel lights
turn on.
The headlights and all the
lights listed above (except
daytime running lights) turn
on.
The headlights, side marker,
parking lights, daytime run-
ning lights ( P. 1 7 0 ) a n d s o
on turn on and off automati-
cally (when the power
switch is in ON mode).
With the headlights on, push the
lever away from you to turn on the
high beams.
Pull the lever toward you to the center
position to turn the high beams off.
Pull the lever toward you and release
it to flash the high beams once.
You can flash the high beams with the
headlights on or off.
■Daytime running light system
To make your vehicle more visible to other drivers during daytime driving, the daytime
running lights turn on automatically whenever the hybrid system is started and the park-
ing brake is released with the headlight swit ch off or in the “AUTO” position. (Illuminate
brighter than the parking lights.) Daytime ru nning lights are not designed for use at night.
For the U.S.A.: Daytime running lights can be turned off by operating the switch.
1
2
3
4
Turning on the high beam headlights
1
2
Page 207 of 632

CT200h_OM_OM76197U_(U)
2074-5. Using the driving support systems
4
Driving
■Intuitive parking assist display
When an obstacle is detected while the Lexus parking assist monitor is in use, the warn-
ing indicator will appear in the upper corner of the screen even if the display setting has
been set to off.
■Sensor detectio n information
●The sensor’s detection areas are limited to the areas around the vehicle’s bumper.
●Certain vehicle conditions and the surround ing environment may affect the ability of a
sensor to correctly detect an obstacle. Particular instances where this may occur are
listed below.
• There is dirt, snow or ice on the sensor . (Wiping the sensors will resolve this prob-
lem.)
• The sensor is frozen. (Thawing th e area will resolve this problem.)
In especially cold weather, if a sensor is frozen the screen may show an abnormal
display, or obstacles may not be detected.
• The sensor is covered in any way.
• The vehicle is leaning co nsiderably to one side.
• On an extremely bumpy road, on an incline, on gravel, or on grass.
• The vicinity of the vehicle is noisy due to vehicle horns, motorcycle engines, air brakes of large vehicles, or other loud noises producing ultrasonic waves.
• There is another vehicle equipped with parking assist sensors in the vicinity.
• The sensor is coated with a sheet of spray or heavy rain.
• The vehicle is equipped with a fender pole or wireless antenna.
• Towing eyelets are installed.
• The bumper or sensor receives a strong impact.
• The vehicle is approaching a tall or curved curb.
• In harsh sunlight or intense cold weather.
• The area directly under the bumpers is not detected.
• If obstacles draw too close to the sensor.
• A non-genuine Lexus suspension (low ered suspension etc.) is installed.
• People may not be detected if they are wearing certain types of clothing.
In addition to the examples above, there are instances in which, because of their shape,
signs and other objects may be judged by a sensor to be closer than they are.
●The shape of the obstacle may prevent a sensor from detecting it. Pay particular atten-
tion to the following obstacles:
• Wires, fences, ropes, etc.
• Cotton, snow and other materials that absorb sound waves
• Sharply-angled objects
•Low obstacles
• Tall obstacles with upper sections projecting outwards in the direction of your vehi-
cle
●The following situations may occur during use.
• Depending on the shape of the obstacle and other factors, the detection distance may shorten, or detect ion may be impossible.
• Obstacles may not be detected if they are too close to the sensor.
• There will be a short delay between obst acle detection and display. Even at slow
speeds, there is a possibility that the obstacle will come within the sensor’s detection
areas before the display is shown and the buzzer sounds.
• Thin posts or objects lower than the sensor may not be detected when approached,
even if they have been detected once.
• It might be difficult to hear beeps due to th e volume of audio system or air flow noise
of the air conditioning system.
Page 208 of 632

208
CT200h_OM_OM76197U_(U)4-5. Using the driving support systems
■If a message is displayed on
the multi-information display
P. 5 3 6
■Certification
For vehicles sold in the U.S.A.
This device complies with Part 15 of the FC C Rules. Operation is subject to the following
two conditions; (1) This device may not caus e harmful interference, and (2) this device
must accept any interference received, incl uding interference that may cause undesired
operation.
For vehicles sold in Canada
This ISM device complies with Canadian ICES-001.
Cet appareil ISM est conforme à la norme NMB-001 du Canada.
■Customization
Settings (e.g. buzzer sounds volume) can be changed.
(Customizable features: P. 5 9 1 )
WA R N I N G
■When using the intuitive parking assist
Observe the following precautions.
Failing to do so may result in the vehicle being unable to be driven safely and possibly
cause an accident.
●Do not use the sensor at speeds in excess of 6 mph (10 km/h).
●The sensors’ detection areas and reaction times are limited. When moving forward or
reversing, check the areas surrounding the vehicle (especially the sides of the vehi-
cle) for safety, and drive slowly, using the brake to control the vehicle’s speed.
●Do not install accessories within the sensors’ detection areas.
NOTICE
■When using intuitive parking assist
In the following situations, the system may not function correctly due to a sensor mal-
function etc. Have the vehicle checked by your Lexus dealer.
●The intuitive parking assist operation display flashes, and a buzzer sounds when no
obstacles are detected.
●If the area around a sensor collides with so mething, or is subjected to strong impact.
●If the bumper collides with something.
●If the display shows continuously withou t beeping, except when the buzzer mute
switch has been turned on.
●If a display error occurs, first check the sensor.
If the error occurs even if there is no ice, snow or mud on the sensor, it is likely that the
sensor is malfunctioning.
■Notes when washing the vehicle
Do not apply intensive bursts of water or steam to the sensor area.
Doing so may result in th e sensor malfunctioning.
Page 217 of 632

CT200h_OM_OM76197U_(U)
2174-5. Using the driving support systems
4
Driving
WA R N I N G
■When using the rear view monitor system
The rear view monitor system is a supplemental device intended to assist the driver
when backing up. When backing up, be sure to check visually behind and all around
the vehicle before proceeding.
Observe the following precautions to avoid an accident that could result in death or
serious injuries.
●Never depend on the rear view monitor system entirely when backing up. The image
and the position of the guide lines displaye d on the screen may differ from the actual
state.
Use caution, just as you would when backing up any vehicle.
●Be sure to back up slowly, depressing the brake pedal to control vehicle speed.
●The instructions given are only guide lines.
When and how much to turn the steering wheel will vary according to traffic condi-
tions, road surface conditions, vehicle condit ion, etc. when parking. It is necessary to
be fully aware of this before using the rear view monitor system.
●When parking, be sure to check that the par king space will accommodate your vehi-
cle before maneuvering into it.
●Do not use the rear view monitor system in the following cases:
• On icy or slick road surfaces, or in snow
• When using tire chains or emergency tires
• When the back door is not closed completely
• On roads that are not flat or straight, such as curves or slopes.
●In low temperatures, the screen may darken or the image may become faint. The
image could distort when the vehicle is moving, or you may become unable to see the
image on the screen. Be sure to check dire ct visually and with the mirrors all around
the vehicle before proceeding.
●If the tire sizes are changed, the position of the fixed guide lines displayed on the
screen may change.
●The camera uses a special lens. The dist ances between objects and pedestrians that
appear in the image displayed on the screen will differ from the actual distances.
( P. 2 1 3 )