turn signal Lexus CT200h 2016 (in English) User Guide
[x] Cancel search | Manufacturer: LEXUS, Model Year: 2016, Model line: CT200h, Model: Lexus CT200h 2016Pages: 632, PDF Size: 8.5 MB
Page 346 of 632
3465-14. Using the radio (Lexus Display Audio System)
CT200h_OM_OM76197U_(U)
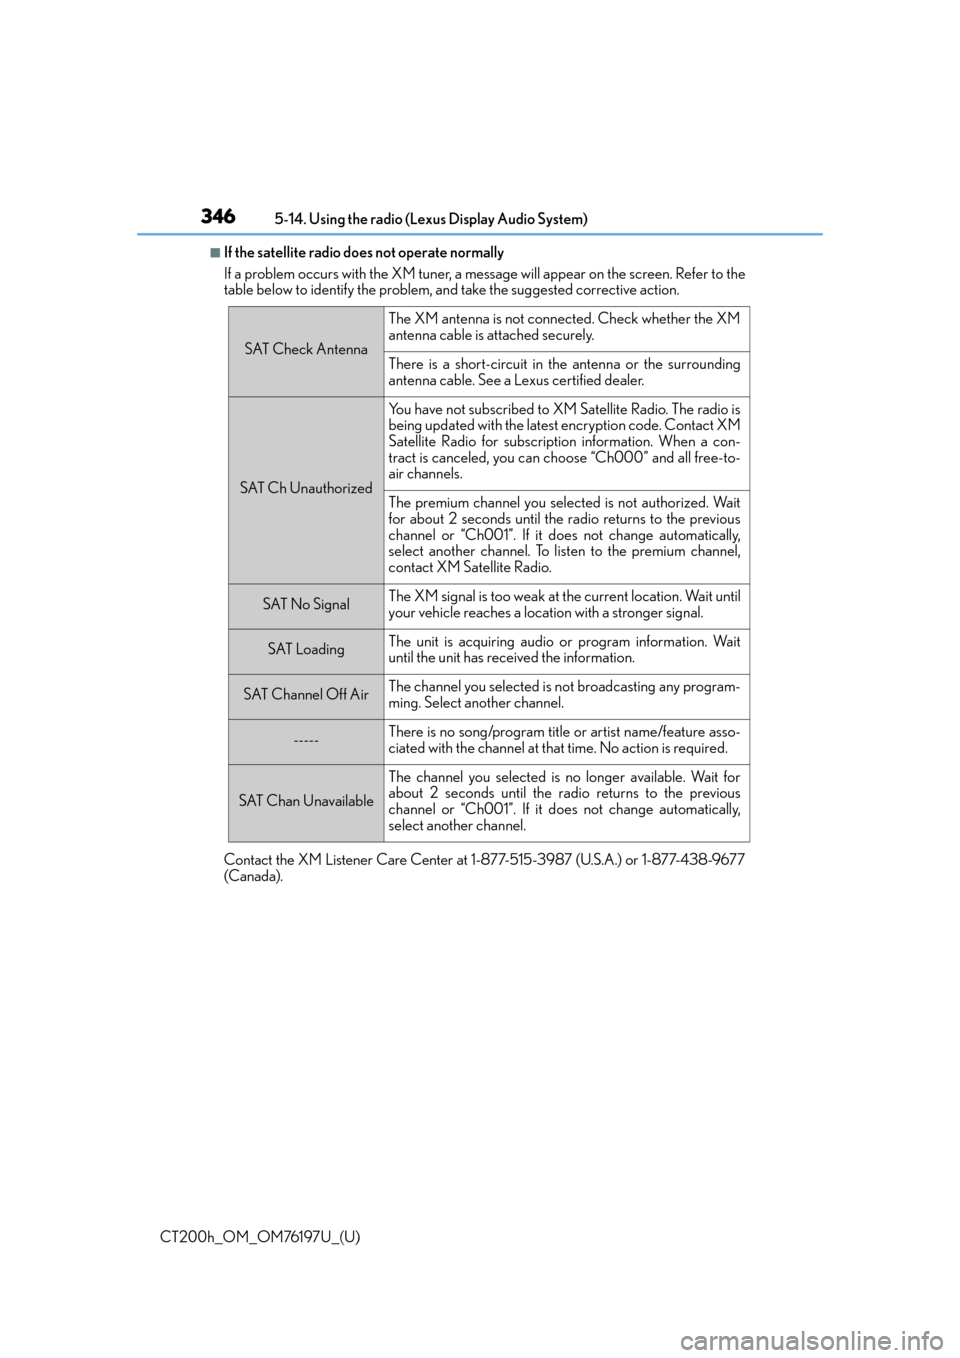
■If the satellite radio does not operate normally
If a problem occurs with the XM tuner, a me ssage will appear on the screen. Refer to the
table below to identify the problem, and take the suggested corrective action.
Contact the XM Listener Care Center at 1-877-515-3987 (U.S.A.) or 1-877-438-9677
(Canada).
SAT Check Antenna
The XM antenna is not connected. Check whether the XM
antenna cable is attached securely.
There is a short-circuit in the antenna or the surrounding
antenna cable. See a Lexus certified dealer.
SAT Ch Unauthorized
Yo u h a v e n o t s u b s c r i b e d t o X M Satellite Radio. The radio is
being updated with the latest encryption code. Contact XM
Satellite Radio for subscription information. When a con-
tract is canceled, you can choose “Ch000” and all free-to-
air channels.
The premium channel you select ed is not authorized. Wait
for about 2 seconds until the radio returns to the previous
channel or “Ch001”. If it does not change automatically,
select another channel. To listen to the premium channel,
contact XM Satellite Radio.
SAT No SignalThe XM signal is too weak at the current location. Wait until
your vehicle reaches a location with a stronger signal.
SAT LoadingThe unit is acquiring audio or program information. Wait
until the unit has received the information.
SAT Channel Off AirThe channel you selected is not broadcasting any program-
ming. Select another channel.
-----There is no song/program title or artist name/feature asso-
ciated with the channel at that time. No action is required.
SAT Chan Unavailable
The channel you selected is no longer available. Wait for
about 2 seconds until the radio returns to the previous
channel or “Ch001”. If it does not change automatically,
select another channel.
Page 366 of 632
366
CT200h_OM_OM76197U_(U)5-17. Connecting Bluetooth
® (Lexus Display Audio System)
Connecting a Bluetooth® phone
When you register a phone, auto connection will be activated. Always set it to
this mode and leave the Bluetooth® phone in a place where a connection can be
established.
When the power switch is turned to ACCESSORY or ON mode, the system will
search for a nearby cellular phone you have registered.
Next, the system automatically connects with the most recent phone that was
connected. The connected result is displayed.
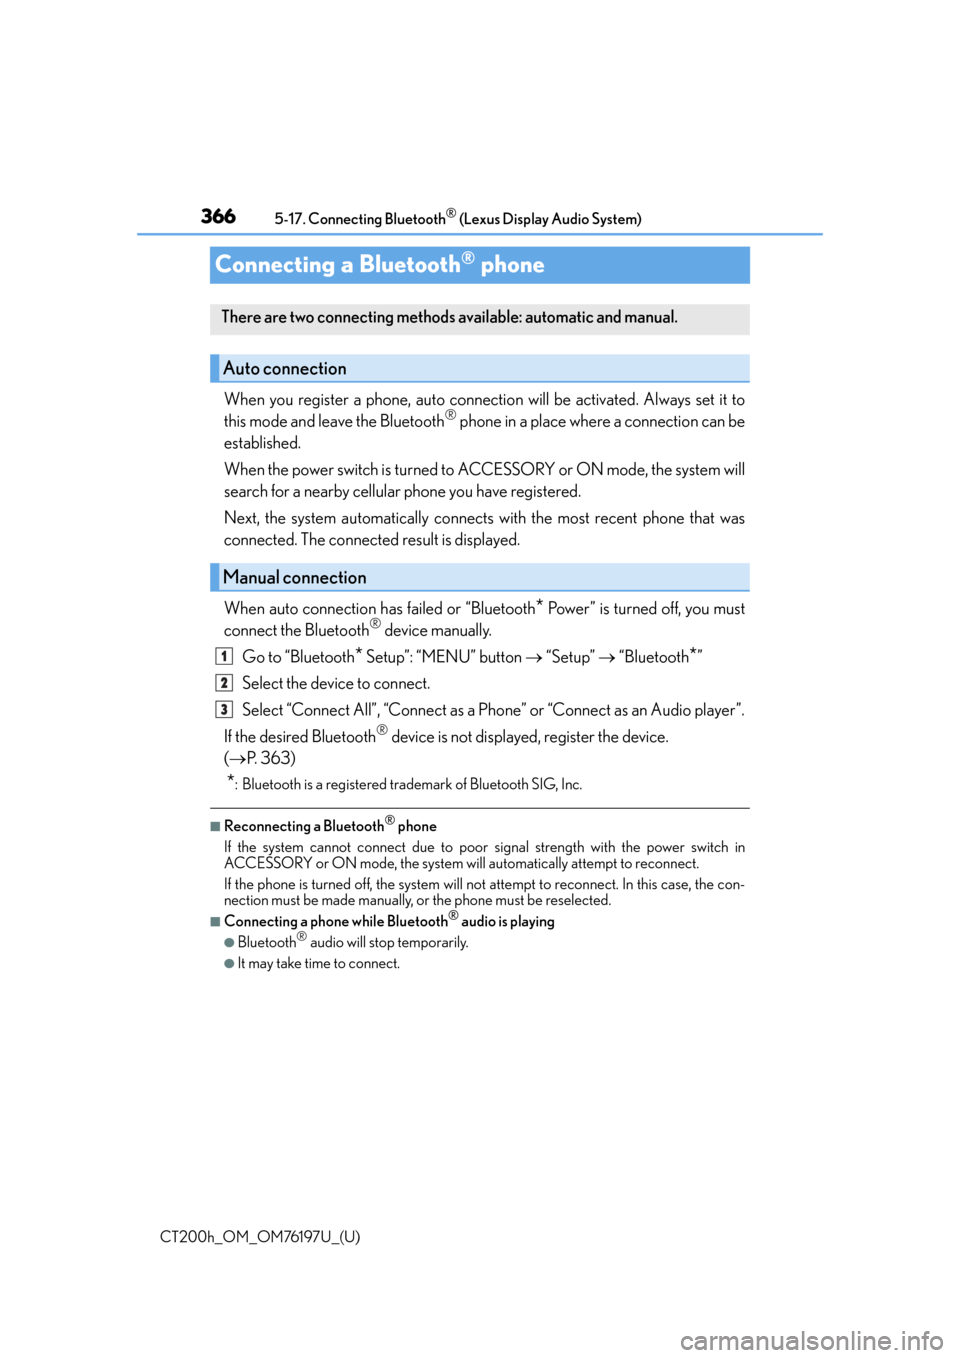
When auto connection has failed or “Bluetooth
* Power” is turned off, you must
connect the Bluetooth® device manually.
Go to “Bluetooth
* Setup”: “MENU” button “Setup” “Bluetooth*”
Select the device to connect.
Select “Connect All”, “Connect as a Ph one” or “Connect as an Audio player”.
If the desired Bluetooth
® device is not displayed, register the device.
( P. 3 6 3 )
*: Bluetooth is a registered trademark of Bluetooth SIG, Inc.
■Reconnecting a Bluetooth® phone
If the system cannot connect due to poor signal strength with the power switch in
ACCESSORY or ON mode, the system will automatically attempt to reconnect.
If the phone is turned off, the system will not attempt to reconnect. In this case, the con-
nection must be made manually, or the phone must be reselected.
■Connecting a phone while Bluetooth® audio is playing
●Bluetooth® audio will stop temporarily.
●It may take time to connect.
There are two connecting methods av ailable: automatic and manual.
Auto connection
Manual connection
1
2
3
Page 447 of 632
CT200h_OM_OM76197U_(U)
4476-4. Using the other interior features
6
Interior features
Press the appropriate HomeLink® button. The HomeLink® indicator light
should turn on.
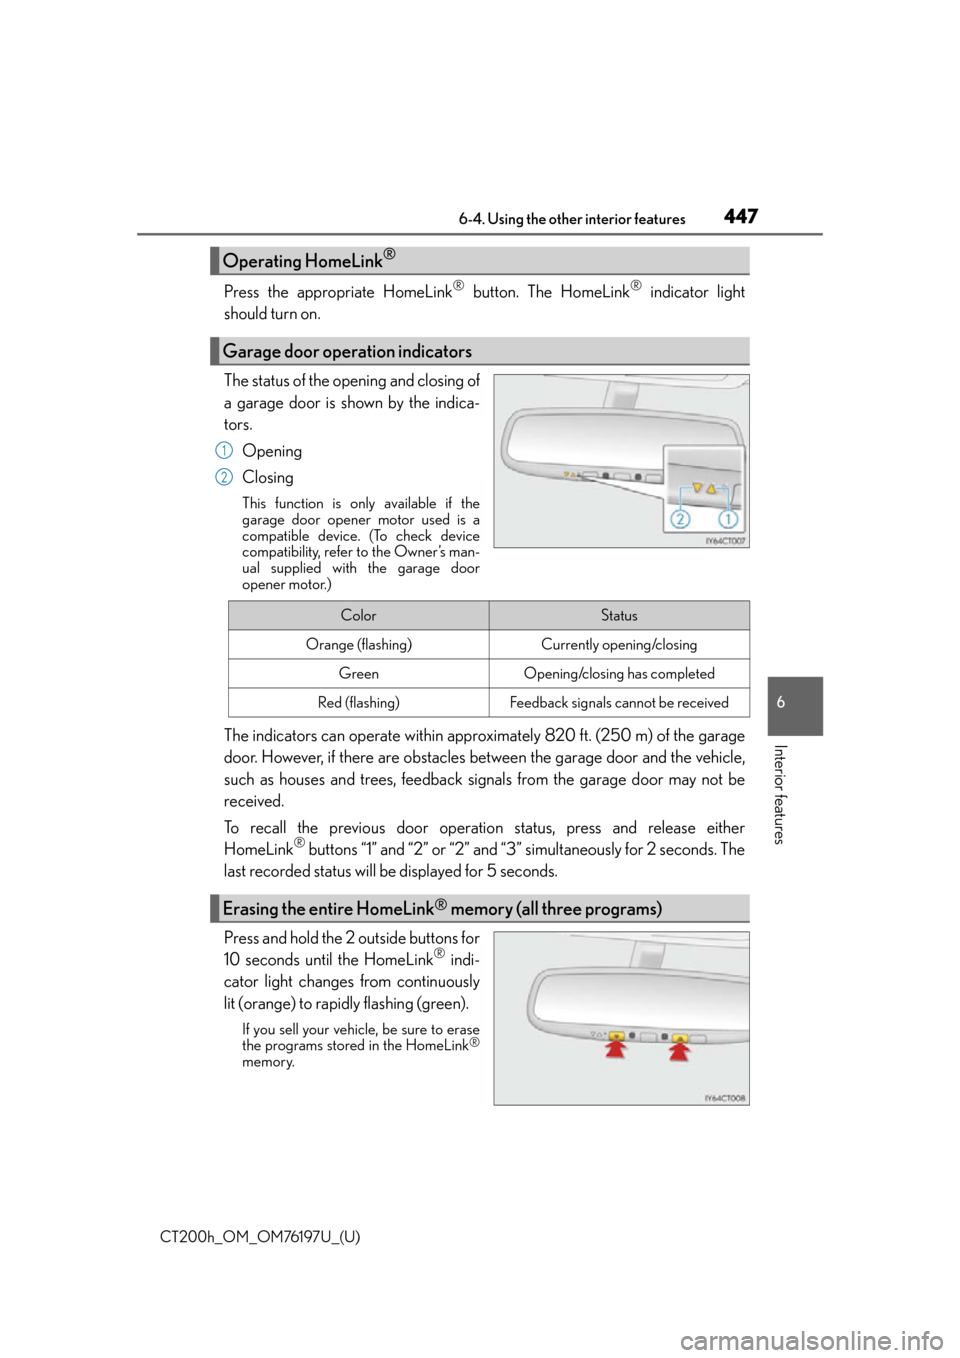
The status of the opening and closing of
a garage door is shown by the indica-
tors.
Opening
Closing
This function is only available if the
garage door opener motor used is a
compatible device. (To check device
compatibility, refer to the Owner’s man-
ual supplied with the garage door
opener motor.)
The indicators can operate within approximately 820 ft. (250 m) of the garage
door. However, if there are obstacles between the garage door and the vehicle,
such as houses and trees, feedback signals from the garage door may not be
received.
To recall the previous door operation status, press and release either
HomeLink
® buttons “1” and “2” or “2” and “3” simultaneously for 2 seconds. The
last recorded status will be displayed for 5 seconds.
Press and hold the 2 outside buttons for
10 seconds until the HomeLink
® indi-
cator light changes from continuously
lit (orange) to rapidly flashing (green).
If you sell your vehicle, be sure to erase
the programs stored in the HomeLink®
memory.
Operating HomeLink®
Garage door operation indicators
1
2
ColorStatus
Orange (flashing)Currently opening/closing
GreenOpening/closing has completed
Red (flashing)Feedback signals cannot be received
Erasing the entire HomeLink® memory (all three programs)
Page 494 of 632

494
CT200h_OM_OM76197U_(U)7-3. Do-it-yourself maintenance
■Situations in which the tire pressure warning system may not operate properly
●In the following cases, the tire pressure warning system may not operate properly.
• If non-genuine Lexus wheels are used.
• A tire has been replaced with a tire that is not an OE (Original Equipment) tire.
• A tire has been replaced with a tire that is not of the specified size.
• Tire chains etc. are equipped.
• Lock nuts are equipped.
• An auxiliary-supported run-flat tire is equipped.
• If a window tint that affects the radio wave signals is installed.
• If there is a lot of snow or ice on the vehicle, particularly around the wheels or wheel
housings.
• If the tire inflation pressure is extremely higher than the specified level.
• If wheel without the tire pressure warning valve and transmitter is used.
• If the ID code on the tire pressure warning valves and transmitters is not registered in the tire pressure warning computer.
●Performance may be affected in the following situations.
• Near a TV tower, electric power plant, gas station, radio station, large display, air-
port or other facility th at generates strong radio waves or electrical noise
• When carrying a portable radio, cellular phone, cordless phone or other wireless
communication device
●When the vehicle is parked, the time taken for the warning to start or go off could be
extended.
●When tire inflation pressure declines rapidly for example when a tire has burst, the
warning may not function.
■The initialization operation
●Make sure to carry out initialization af ter adjusting the tire inflation pressure.
Also, make sure the tires are cold before carry ing out initialization or tire inflation pres-
sure adjustment.
●If you have accidentally turned the power swit ch off during initialization, it is not neces-
sary to press the reset switch again as init ialization will restart automatically when the
power switch has been turned to ON mode for the next time.
●If you accidentally press the reset switch when initialization is not necessary, adjust the
tire inflation pressure to the specified level when the tires are co ld, and conduct initial-
ization again.
■When initialization of the tire pressure warning system has failed
Initialization can be completed in a few minutes. However, in the following cases, the set-
tings have not been recorded and the system will not operate properly. If repeated
attempts to record tire inflation pressure settings are unsuccessful, have the vehicle
inspected by your Lexus dealer.
●When operating the tire pressure warning reset switch, the tire pressure warning light
does not blink 3 times.
●After carrying out the initialization procedure, the tire pressure warning light blinks for 1
minute then stays on after driving for 20 minutes.
Page 509 of 632
509
CT200h_OM_OM76197U_(U)7-3. Do-it-yourself maintenance
7
Maintenance and care
Light bulbs
Check the wattage of the light bulb to be replaced. (
P. 5 7 9 )
P. 4 7 9
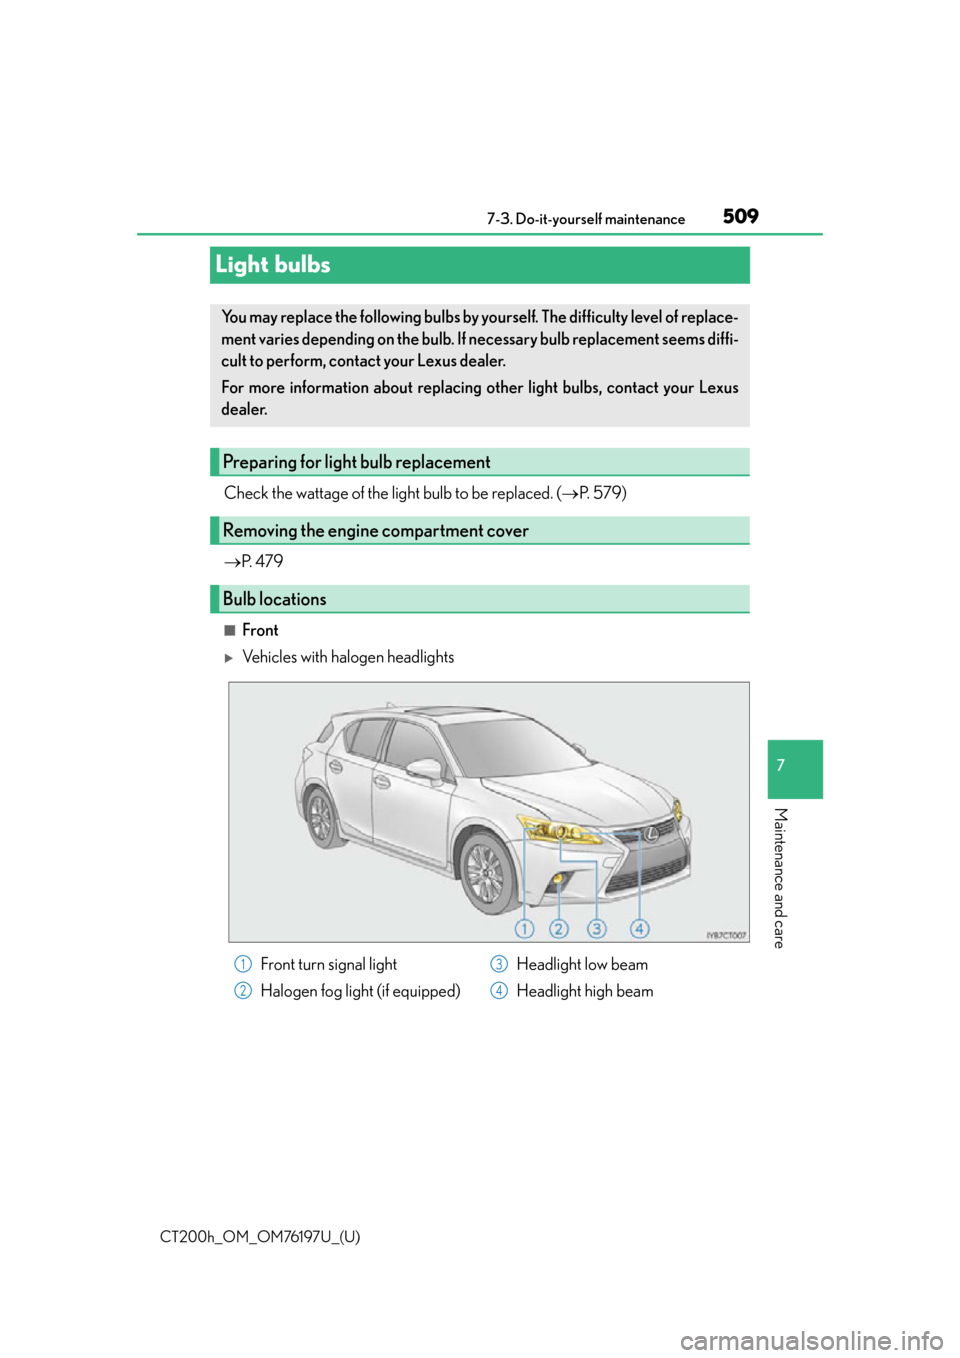
■Front
Vehicles with halogen headlights
You may replace the following bulbs by yourself. The difficulty level of replace-
ment varies depending on the bulb. If necessary bulb replacement seems diffi-
cult to perform, contact your Lexus dealer.
For more information about replacing other light bulbs, contact your Lexus
dealer.
Preparing for light bulb replacement
Removing the engine compartment cover
Bulb locations
Front turn signal light
Halogen fog light (if equipped) Headlight low beam
Headlight high beam1
2
3
4
Page 510 of 632
510
CT200h_OM_OM76197U_(U)7-3. Do-it-yourself maintenance
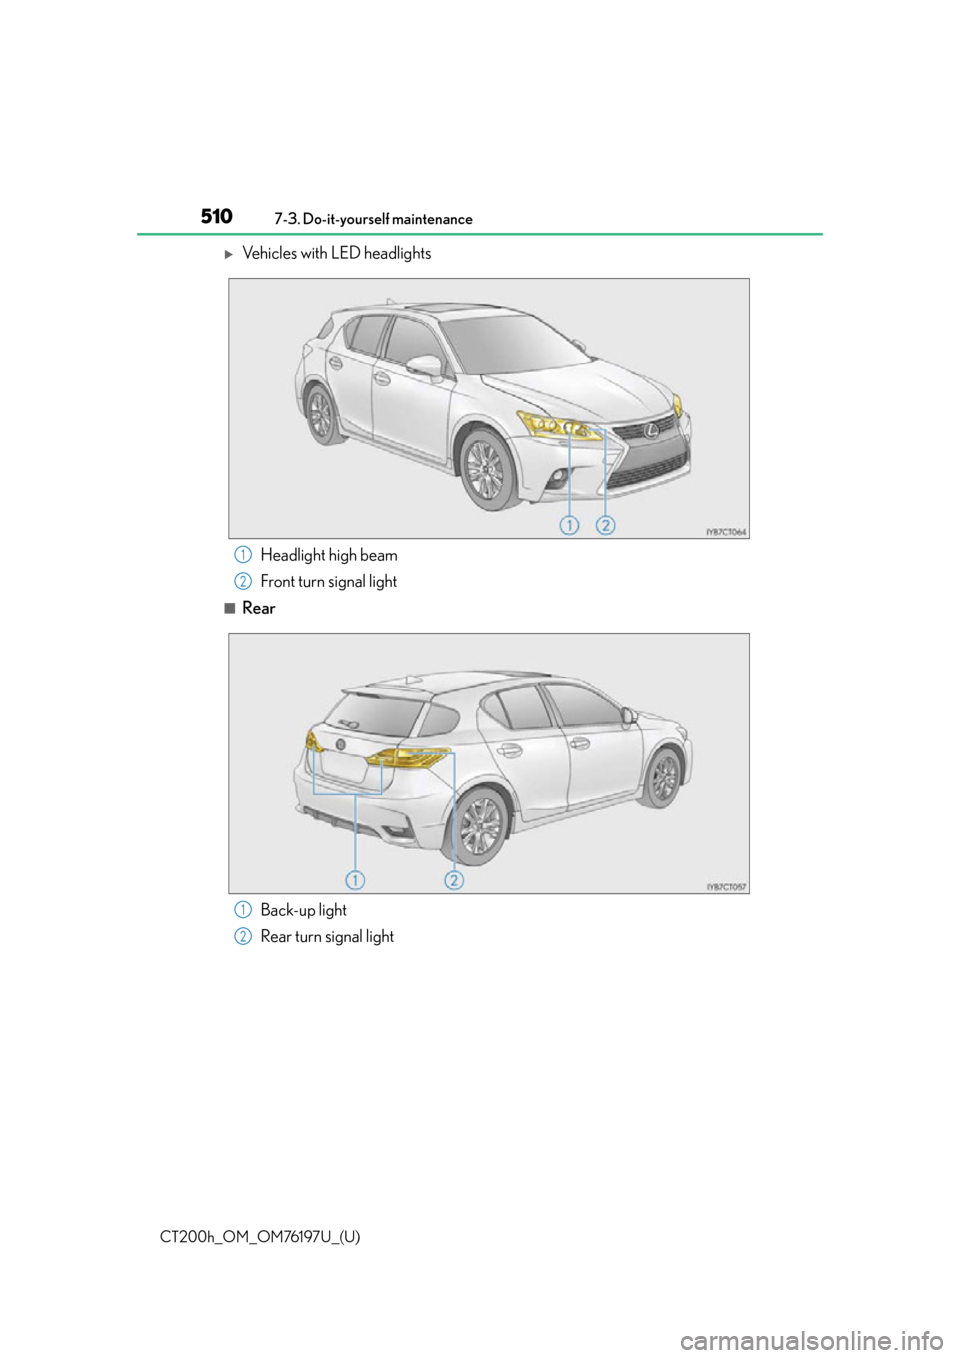
Vehicles with LED headlights
Headlight high beam
Front turn signal light
■RearBack-up light
Rear turn signal light
1
2
1
2
Page 516 of 632
516
CT200h_OM_OM76197U_(U)7-3. Do-it-yourself maintenance
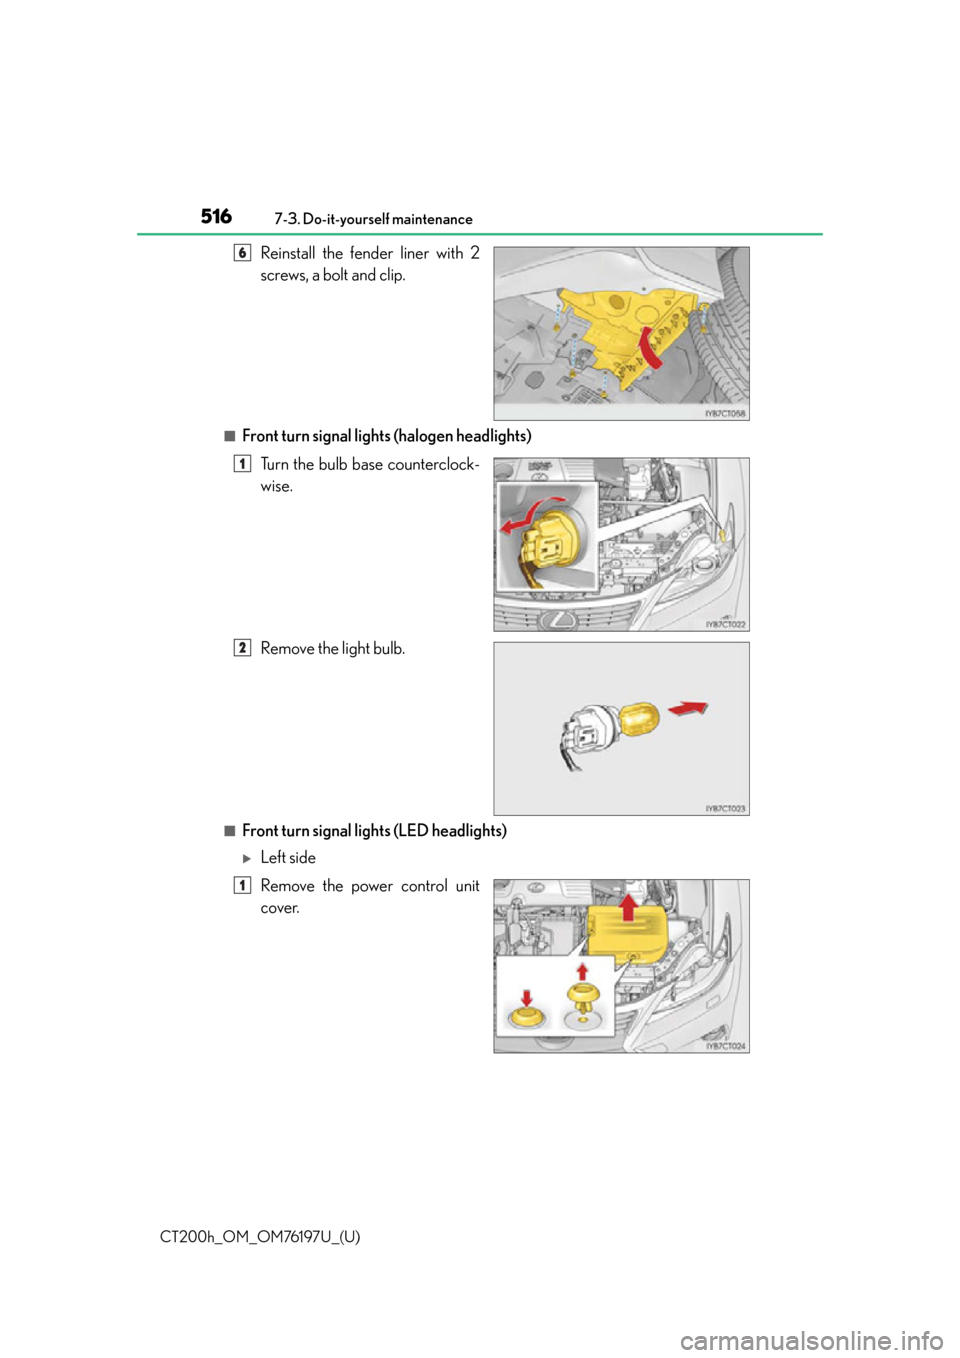
Reinstall the fender liner with 2
screws, a bolt and clip.
■Front turn signal lights (halogen headlights)
Turn the bulb base counterclock-
wise.
Remove the light bulb.
■Front turn signal lights (LED headlights)
Left side
Remove the power control unit
cover.
6
1
2
1
Page 518 of 632
518
CT200h_OM_OM76197U_(U)7-3. Do-it-yourself maintenance
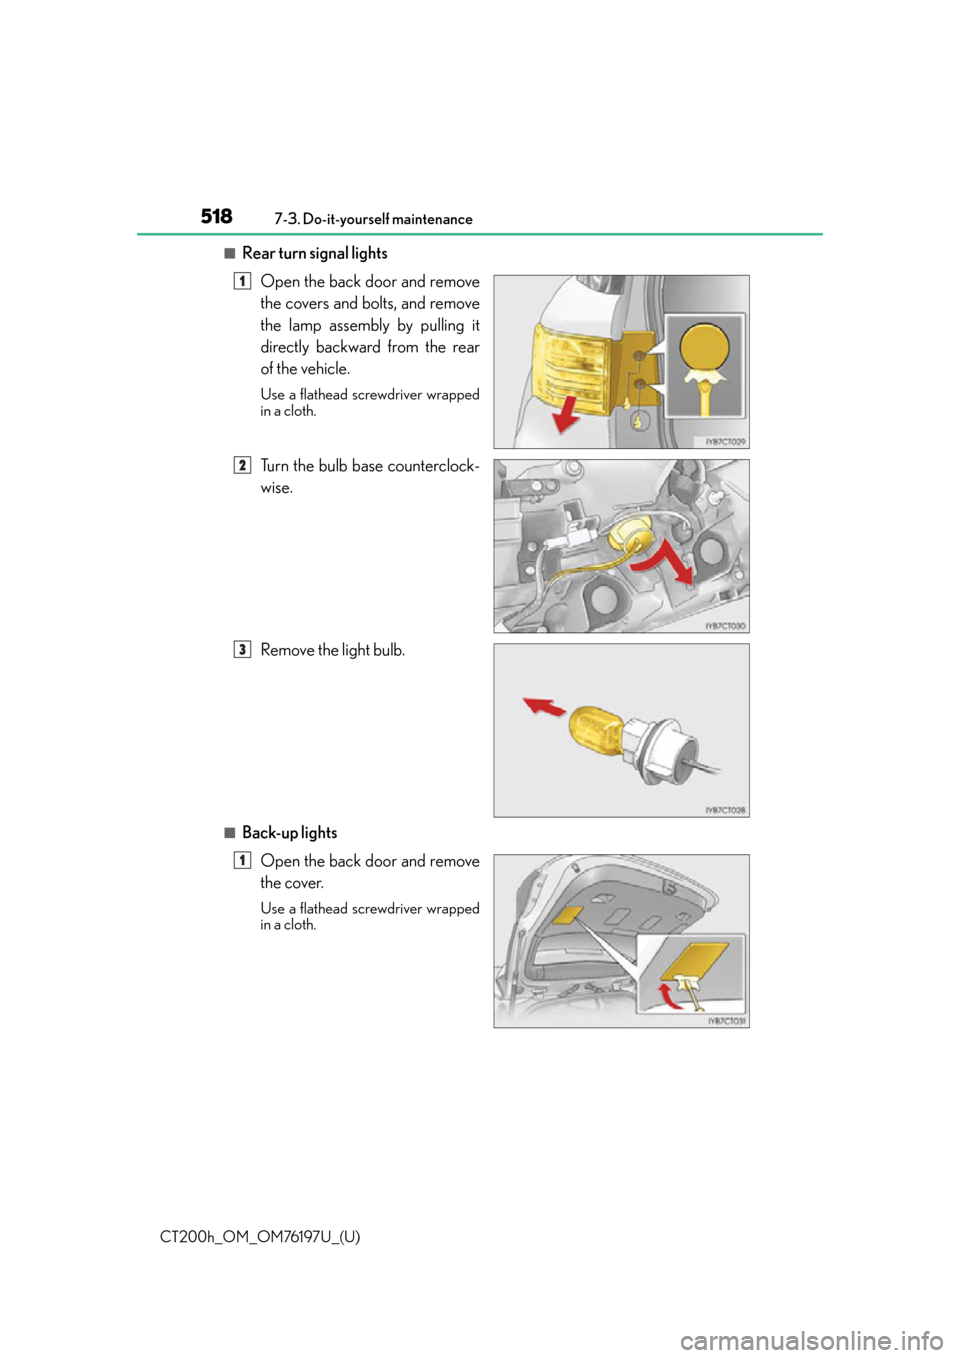
■Rear turn signal lights
Open the back door and remove
the covers and bolts, and remove
the lamp assembly by pulling it
directly backward from the rear
of the vehicle.
Use a flathead screwdriver wrapped
in a cloth.
Turn the bulb base counterclock-
wise.
Remove the light bulb.
■Back-up lightsOpen the back door and remove
the cover.
Use a flathead screwdriver wrapped
in a cloth.
1
2
3
1
Page 519 of 632
CT200h_OM_OM76197U_(U)
5197-3. Do-it-yourself maintenance
7
Maintenance and care
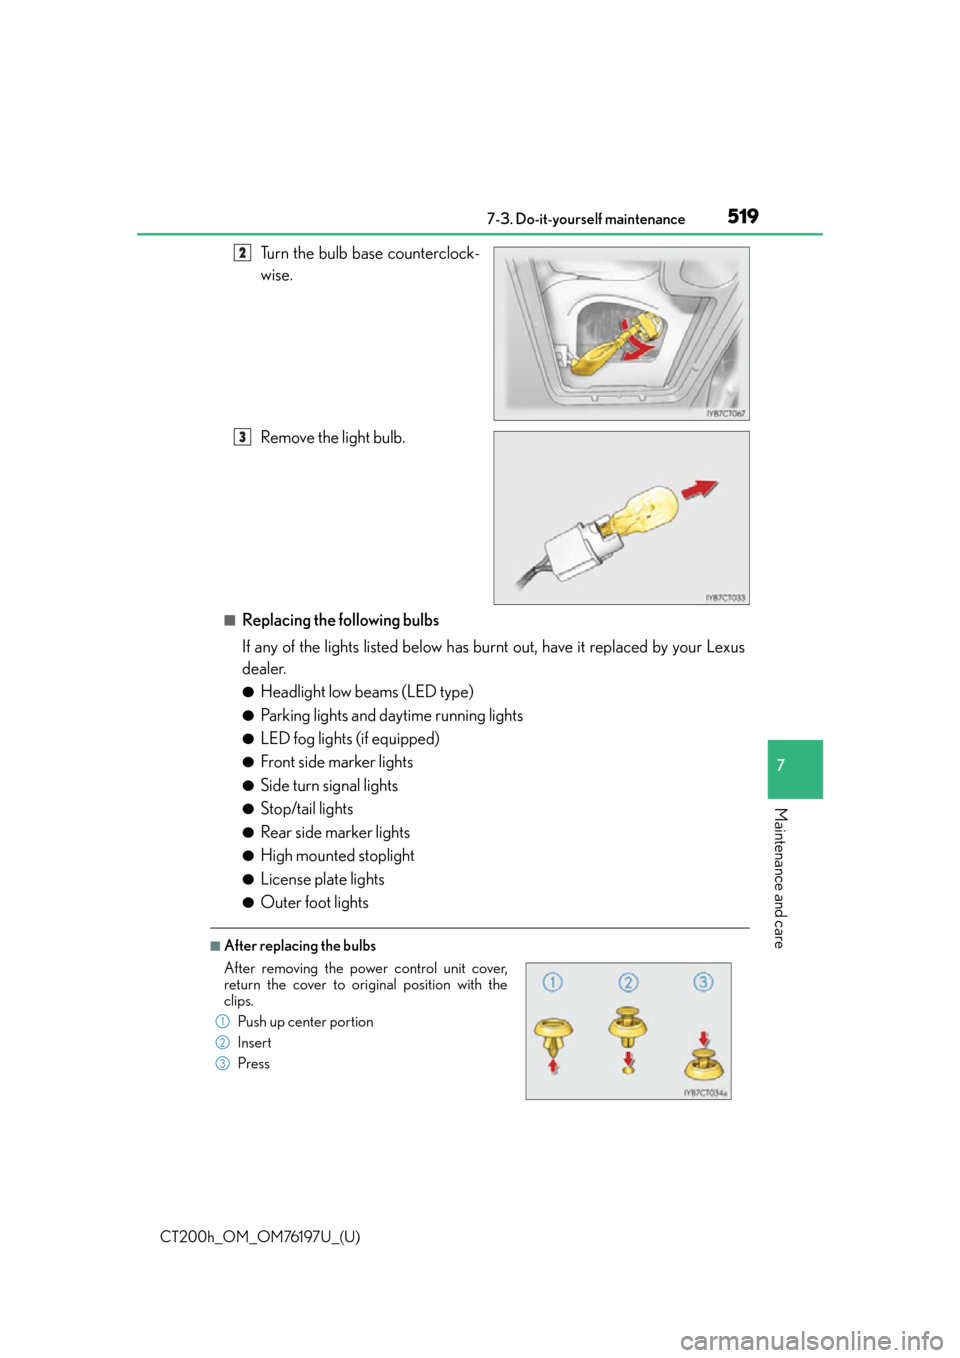
Turn the bulb base counterclock-
wise.
Remove the light bulb.
■Replacing the following bulbs
If any of the lights listed below has burnt out, have it replaced by your Lexus
dealer.
●Headlight low beams (LED type)
●Parking lights and daytime running lights
●LED fog lights (if equipped)
●Front side marker lights
●Side turn signal lights
●Stop/tail lights
●Rear side marker lights
●High mounted stoplight
●License plate lights
●Outer foot lights
■After replacing the bulbs
2
3
After removing the power control unit cover,
return the cover to original position with the
clips.Push up center portion
Insert
Press
1
2
3
Page 520 of 632
520
CT200h_OM_OM76197U_(U)7-3. Do-it-yourself maintenance
■LED lights
The headlight low beams (LED type), parking
lights, front side marker lights, daytime
running lights, LED fog lights (if equipped), side turn signal lights, rear side marker lights,
stop/tail lights, high mounted stoplight and license plate lights consist of a number of
LEDs. If any of the LEDs burn out, take your vehicle to your Lexus dealer to have the light
replaced.
■Condensation build-up on the inside of the lens
Temporary condensation build-up on the inside of the headlight lens does not indicate a
malfunction. Contact your Lexus dealer for mo re information in the following situations:
●Large drops of water have built up on the inside of the lens.
●Wa t e r h a s b u i l t u p i nside the headlight.
■When replacing light bulbs
P. 5 0 8
WA R N I N G
■Replacing light bulbs
●Be sure to stop the hybrid system and turn off the lights. Do not attempt to replace the
bulb immediately after turning off the lights.
The bulbs become very hot and may cause burns.
●Do not touch the glass portion of the light bulb with bare hands. When it is unavoid-
able to hold the glass portion, use and ho ld with a clean dry cloth to avoid getting
moisture and oils on the bulb.
Also, if the bulb is scratched or dropped, it may blow out or crack.
●Fully install light bulbs and any parts used to secure them. Failure to do so may result
in heat damage, fire, or water entering the headlight unit. This may damage the head-
lights or cause condensation to build up on the lens.
●Do not attempt to repair or disassemble light bulbs, connectors, electric circuits or
component parts.
Doing so may result in death or se rious injury due to electric shock.
■To prevent damage or fire
●Make sure bulbs are fully seated and locked.
●Check the wattage of the bulb before installin g to prevent heat damage.