ECO mode Lexus CT200h 2016 (in English) Workshop Manual
[x] Cancel search | Manufacturer: LEXUS, Model Year: 2016, Model line: CT200h, Model: Lexus CT200h 2016Pages: 632, PDF Size: 8.5 MB
Page 417 of 632
CT200h_OM_OM76197U_(U)
4176-1. Using the air conditioning system and defogger
6
Interior features
■Ventilation and air conditioning odors
●To let fresh air in, set the air conditio ning system to the outside air mode.
●During use, various odors from inside and outside the vehicle may enter into and accu-
mulate in the air conditioning system. This may then cause odor to be emitted from the
vents.
●To reduce potential odors from occurring:
• It is recommended that the air conditioning system be set to outside air mode prior to turning the vehicle off.
• The start timing of the blower may be dela yed for a short period of time immediately
after the air conditioning system is started in automatic mode.
■Air conditioning filter
P. 5 0 2
■Customization
Settings (e.g. A/C automatic mode switch operation) can be changed.
(Customizable features: P. 5 9 1 )
WA R N I N G
■To prevent the windshield from fogging up
●Do not use during cool air operation in extremely humid weather. The differ-
ence between the temperature of the outside air and that of the windshield can cause
the outer surface of the windshield to fog up, blocking your vision.
■To prevent burns
●Do not touch the rear view mirror surfaces when the outside rear view mirror defog-
gers are on.
●Do not touch the glass at lower part of the wi ndshield or to the side of the front pillars
when the windshield wiper de-icer is on. (vehicles with windshield wiper de-icer)
NOTICE
■To prevent 12-volt battery discharge
Do not leave the air conditioning system on longer than necessary when the hybrid sys-
tem is off.
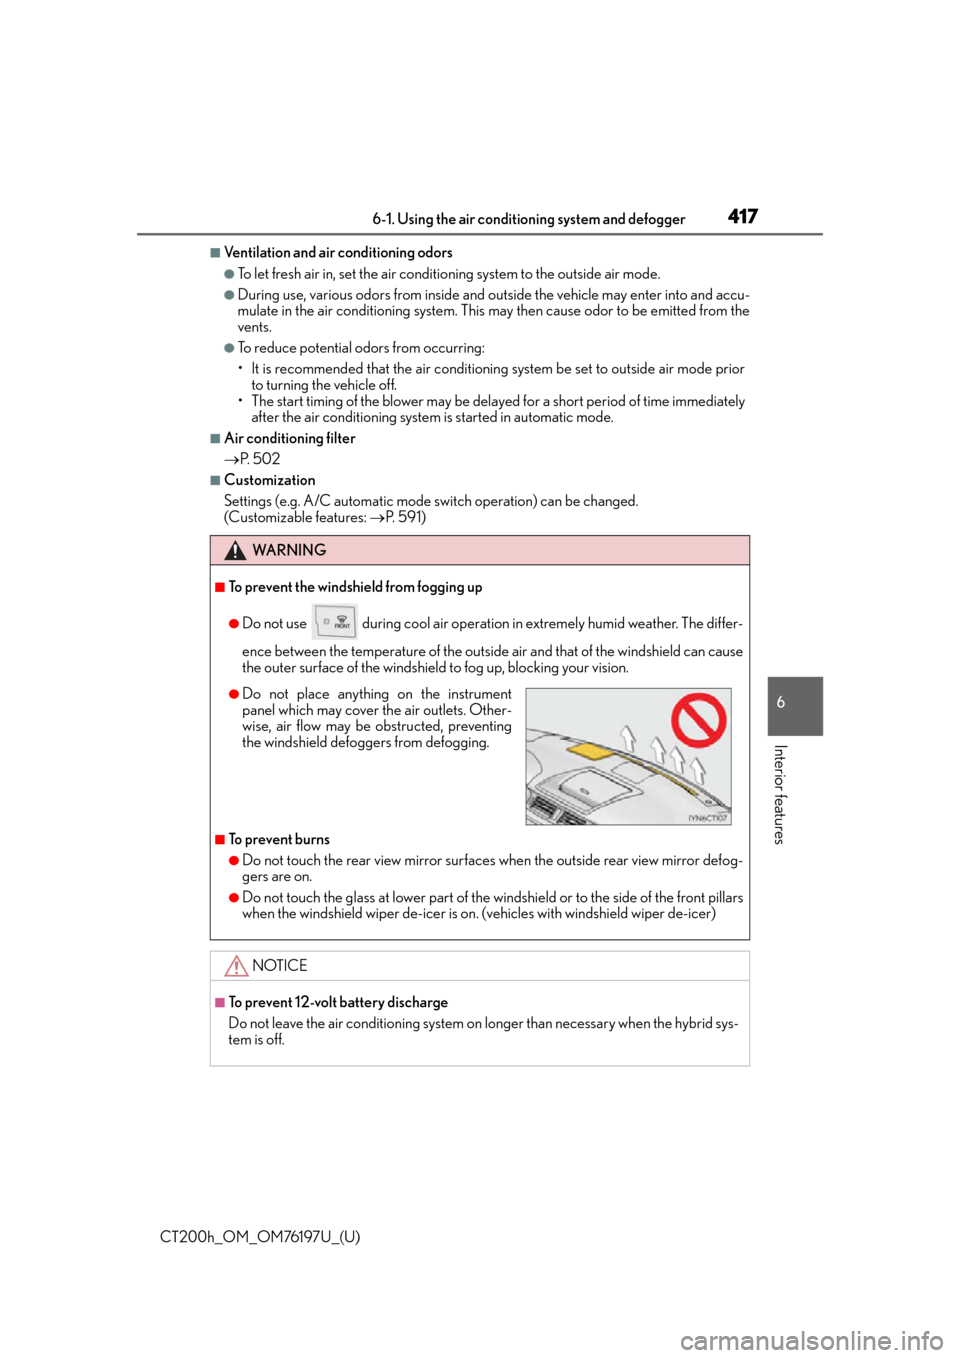
●Do not place anything on the instrument
panel which may cover th e air outlets. Other-
wise, air flow may be obstructed, preventing
the windshield defoggers from defogging.
Page 423 of 632

CT200h_OM_OM76197U_(U)
4236-1. Using the air conditioning system and defogger
6
Interior features
■When the outside temperature is low
The dehumidification function may not operate even when “A/C” is pressed.
■Operation of the air conditioning system in Eco drive mode
●In the Eco drive mode, the air conditioning sy stem is controlled as follows to prioritize
fuel efficiency
• Engine speed and compressor operation controlled to restrict heating/cooling capacity
• Fan speed restricted when automatic mode is selected
●To improve air conditioning performa nce, perform the following operations
• Adjust the fan speed
• Turn off Eco drive mode
• Customize the air conditioning control of Eco drive mode. (P. 5 9 6 )
■Ventilation and air conditioning odors
●To let fresh air in, set the air conditio ning system to the outside air mode.
●During use, various odors from inside and outside the vehicle may enter into and accu-
mulate in the air conditioning system. This may then cause odor to be emitted from the
vents.
●To reduce potential odors from occurring:
• It is recommended that the air conditioning system be set to outside air mode prior to turning the vehicle off.
• The start timing of the blower may be dela yed for a short period of time immediately
after the air conditioning system is started in automatic mode.
■Air conditioning filter
P. 5 0 2
■Customization
Settings (e.g. A/C automatic mode switch operation) can be changed.
(Customizable features: P. 5 9 1 )
Page 426 of 632
4266-1. Using the air conditioning system and defogger
CT200h_OM_OM76197U_(U)
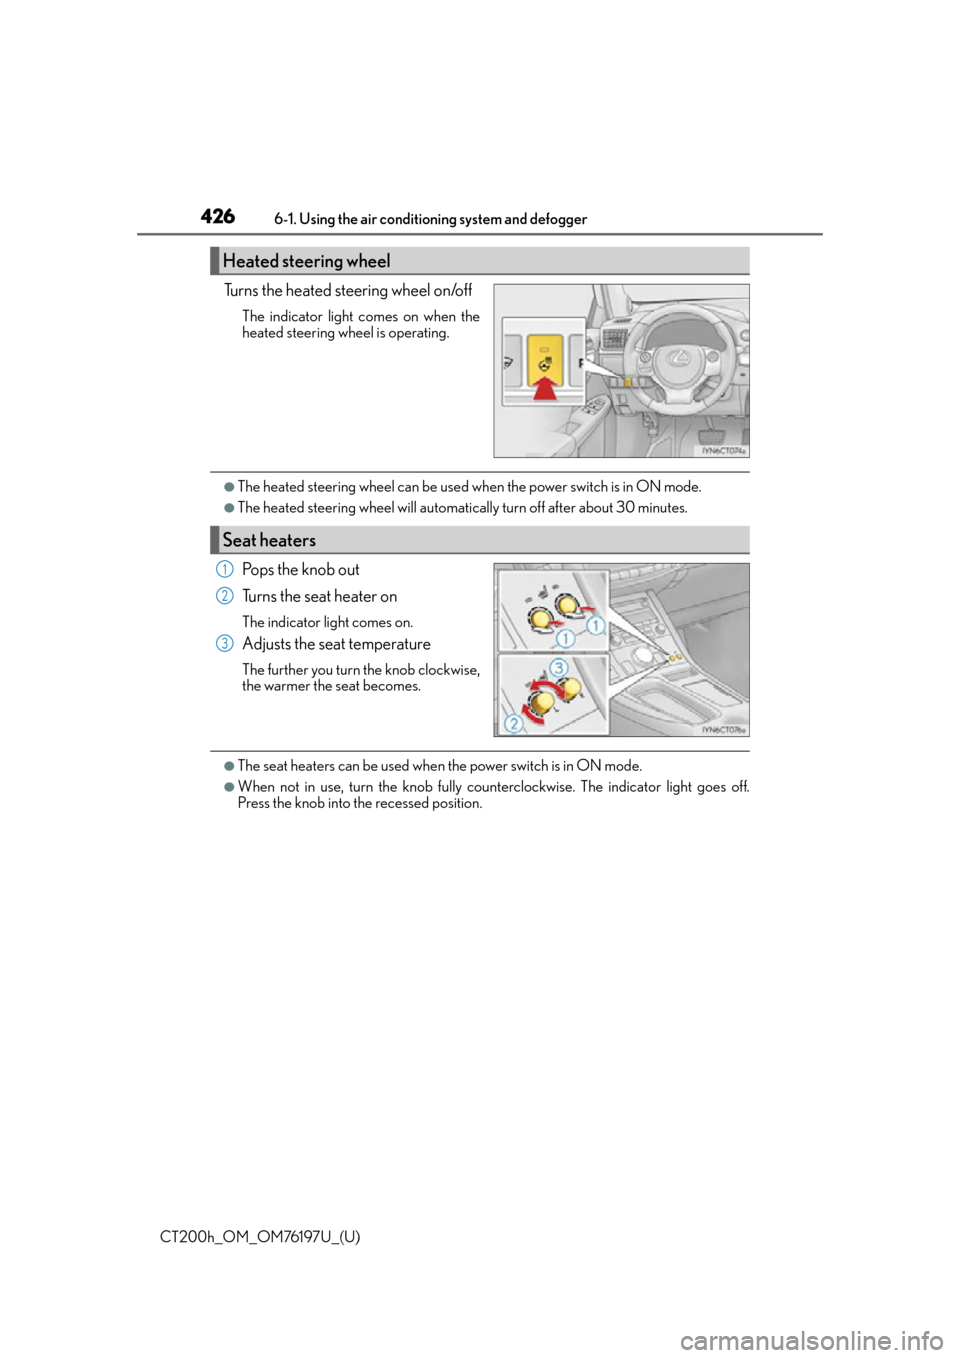
Turns the heated steering wheel on/off
The indicator light comes on when the
heated steering wheel is operating.
●The heated steering wheel can be used when the power switch is in ON mode.
●The heated steering wheel will automati cally turn off after about 30 minutes.
Po p s t h e k n o b o u t
Turns the seat heater on
The indicator light comes on.
Adjusts the seat temperature
The further you turn the knob clockwise,
the warmer the seat becomes.
●The seat heaters can be used when the power switch is in ON mode.
●When not in use, turn the knob fully coun terclockwise. The indicator light goes off.
Press the knob into the recessed position.
Heated steering wheel
Seat heaters
1
2
3
Page 444 of 632
444
CT200h_OM_OM76197U_(U)6-4. Using the other interior features
■Before programming HomeLink®
●During programming, it is possible that garage doors, gates, or other
devices may operate. For this reason, make sure that people and objects
are clear of the garage door or other devices to prevent injury or other
potential harm.
●It is recommended that a new battery be placed in the remote control
transmitter for more accurate programming.
●Garage door openers manufactured
after 1995 may be equipped with
rolling code protection. If this is the case, you will need a stepladder or
other sturdy, safe device to reach the “learn” or “smart” button on the
garage door opener motor.
●In order to conserve electricity after the power switch is turned off and 20
minutes after the doors have been opened or closed, registration proce-
dures may not be possible and the garage door opener may not operate.
Perform the registration procedures with the power switch in ON mode.
■Programming HomeLink®
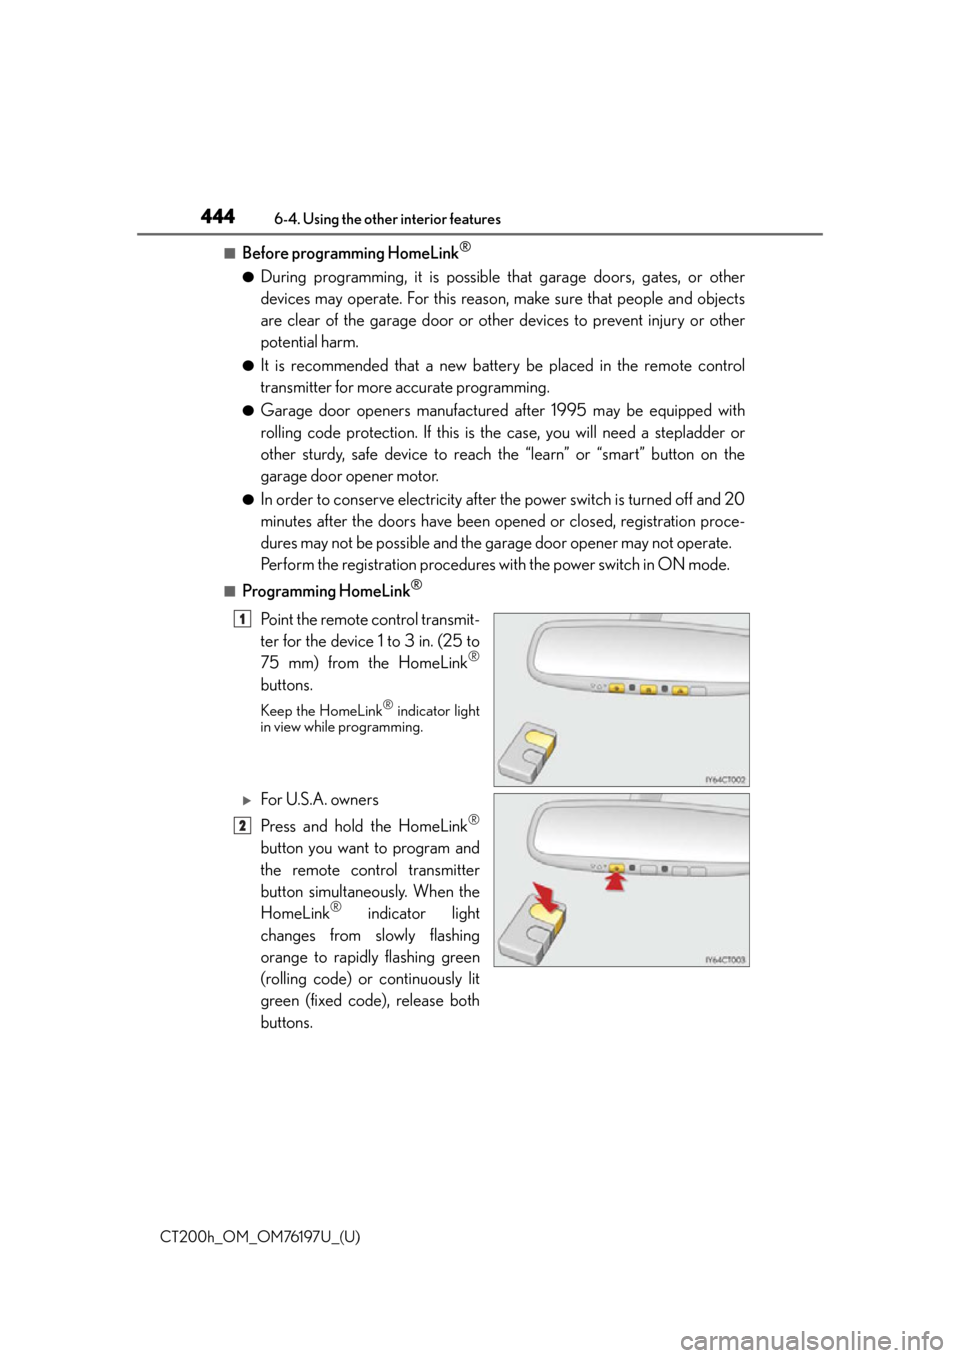
Point the remote control transmit-
ter for the device 1 to 3 in. (25 to
75 mm) from the HomeLink
®
buttons.
Keep the HomeLink® indicator light
in view while programming.
For U.S.A. owners
Press and hold the HomeLink
®
button you want to program and
the remote control transmitter
button simultaneously. When the
HomeLink
® indicator light
changes from slowly flashing
orange to rapidly flashing green
(rolling code) or continuously lit
green (fixed code), release both
buttons.
1
2
Page 457 of 632
CT200h_OM_OM76197U_(U)
4576-4. Using the other interior features
6
Interior features
When the power switch is turned to ON mode, the red indicator light comes on
for 2 seconds then turns off. Afterward, the green indicator light comes on, indi-
cating that the service is active.
The following indicator light patterns indicate specific system usage conditions:
●Green indicator light on = Active service
●Green indicator light flashing = Safety Connect call in process
●Red indicator light (except at vehicle start-up) = System malfunction (contact
your Lexus dealer)
●No indicator light (off) = Safety Connect service not active
■Automatic Collis ion Notification
In case of either airbag deployment or severe rear-end collision, the system is
designed to automatically call the response center. The responding agent
receives the vehicle’s location and attempts to speak with the vehicle occu-
pants to assess the level of emergency. If the occupants are unable to commu-
nicate, the agent automatically treats the call as an emergency, contacts the
nearest emergency services provider to describe the situation, and requests
that assistance be se nt to the location.
■Stolen Vehicle Location
If your vehicle is stolen, Safety Connect can work with local authorities to
assist them in locating and recovering the vehicle. After filing a police report,
call the Safety Connect response center at 1-800-25-LEXUS
(1-800-255-3987) and follow the prompts for Safety Connect to initiate this
service.
In addition to assisting law enforcement with recovery of a stolen vehicle,
Safety-Connect-equipped vehicle location data may, under certain circum-
stances, be shared with third parties to locate your vehicle. Further informa-
tion is available at Lexus.com.
■Emergency Assistance Button (“SOS”)
In the event of an emergency on the ro ad, push the “SOS” button to reach the
Safety Connect response center. Th e answering agent will determine your
vehicle’s location, assess the emergency, and dispatch the necessary assis-
tance required.
If you accidentally press the “SOS” button, tell the response-center agent that you
are not experiencing an emergency.
Safety Connect LED light Indicators
Safety Connect services
Page 468 of 632

468
CT200h_OM_OM76197U_(U)7-2. Maintenance
■Repair and replacement
It is recommended that genuine Lexus parts be used for repairs to ensure performance
of each system. If non-Lexus parts are used in replacement or if a repair shop other than
a Lexus dealer performs repairs, confirm the warranty coverage.
■Resetting the message indicating maintenance is required (U.S.A. only)
After the required maintenance is preforme
d according to the maintenance schedule,
please reset the message.
To reset the message, follow the procedures described below:
Switch the display to the trip meter “A” ( P. 84) when the hybrid system is operating.
Turn the power switch off.
While pressing the odometer/trip meter display change button ( P. 8 4 ) , t u r n t h e
power switch to ON mode (do not start the hybrid system because otherwise the reset
mode will be canceled). Continue to press an d hold the button until the trip meter dis-
plays “000000” and the multi-information displa y indicates that the reset is complete.
■Allow inspection and repairs to be performed by a Lexus dealer
●Lexus technicians are well-trained specialists and are kept up to date with the latest ser-
vice information. They are well informed about the operation of all systems on your
vehicle.
●Keep a copy of the repair order. It proves that the maintenance that has been per-
formed is under warranty coverage. If any problem should arise while your vehicle is
under warranty, your Lexus dealer will promptly take care of it.
WA R N I N G
■If your vehicle is not properly maintained
Improper maintenance could result in seriou s damage to the vehicle and possible seri-
ous injury or death.
■Handling of the 12-volt battery
●Engine exhaust, some of its constituents , and a wide variety of automobile compo-
nents contain or emit chemicals known to the State of California to cause cancer and
birth defects and other reproductive harm. Work in a well ventilated area.
●Oils, fuels and fluids contained in vehicles as well as waste produced by component
wear contain or emit chemicals known to the State of California to cause cancer and
birth defects or other reproductive harm. Avoid exposure and wash any affected area
immediately.
●12-volt battery posts, terminals and related accessories contain lead and lead com-
pounds which are known to cause brain damage. Wash your hands after handling.
( P. 4 8 6 )
1
2
3
Page 474 of 632
474
CT200h_OM_OM76197U_(U)7-3. Do-it-yourself maintenance
WA R N I N G
The engine compartment contains many mechanisms and fluids that may move suddenly,
become hot, or become electrically energized. To avoid death or serious injury, observe
the following precautions.
■When working on the engine compartment
●Make sure that the indicator on the power switch and the “READY” indicator are
both off.
●Keep hands, clothing and tools away from the moving fan.
●Be careful not to touch the engine, power control unit, radiator, exhaust manifold, etc.
right after driving as they may be hot. Oil and other fluids may also be hot.
●Do not leave anything that may burn easily, such as paper and rags, in the engine
compartment.
●Do not smoke, cause sparks or expose an open flame to fuel. Fuel fumes are flamma-
ble.
■When working near the electric cooling fans or radiator grille
Be sure the power switch is off.
With the power switch in ON mode, the electric cooling fans may automatically start to
run if the air conditioning is on and/or the coolant temperature is high. (
P. 484)
■Safety glasses
Wear safety glasses to prevent flying or fallin g material, fluid spray, etc. from getting in
your eyes.
NOTICE
■If you remove the air cleaner filter
Driving with the air cleaner filter removed may cause excessive engine wear due to dirt
in the air.
Page 488 of 632

488
CT200h_OM_OM76197U_(U)7-3. Do-it-yourself maintenance
■Before recharging
When recharging, the 12-volt battery produces hydrogen gas which is flammable and
explosive. Therefore, observe the following precautions before recharging:
●If recharging with the 12-volt battery installed on the vehicle, be sure to disconnect the
ground cable.
●Make sure the power switch on the charger is off when connecting and disconnecting
the charger cables to the 12-volt battery.
■After recharging/reconnecting the 12-volt battery
●Unlocking the doors using the smart access
system with push-button start may not be
possible immediately after reconnecting the 12-volt battery. If this happens, use the
wireless remote control or the mech anical key to lock/unlock the doors.
●Start the hybrid system with the power switch in ACCESSORY mode. The hybrid sys-
tem may not start with the power switch turned off. However, the hybrid system will
operate normally from the second attempt.
●The power switch mode is recorded by the vehicle. If the 12-volt battery is reconnected,
the vehicle will return the power switch mode to the status it was in before the 12-volt
battery was disconnected. Make sure to turn off the power before disconnect the 12-
volt battery. Take extra care when connecting the 12-volt battery if the power switch
mode prior to discharge is unknown.
●Restart the hybrid system, depress the brake pedal, and confirm that it is possible to
shift into each shift position.
If the system will not start even after multiple attempts at all methods above, contact your
Lexus dealer.
WA R N I N G
■Chemicals in the 12-volt battery
The 12-volt battery contains poisonous and corrosive sulfuric acid and may produce
hydrogen gas which is flammable and explosive. To reduce the risk of death or serious
injury, take the following precautions while working on or near the 12-volt battery:
●Do not cause sparks by touching the 12-volt battery terminals with tools.
●Do not smoke or light a match near the 12-volt battery.
●Avoid contact with eyes, skin and clothes.
●Never inhale or swallow electrolyte.
●Wear protective safety glasses when working near the 12-volt battery.
●Keep children away from the 12-volt battery.
■Where to safely charge the 12-volt battery
Always charge the 12-volt battery in an open area. Do not charge the 12-volt battery in
a garage or closed room where there is insufficient ventilation.
■How to recharge the 12-volt battery
Only perform a slow charge (4.2 A or less). The 12-volt battery may explode if charged
at a quicker rate.
Page 494 of 632

494
CT200h_OM_OM76197U_(U)7-3. Do-it-yourself maintenance
■Situations in which the tire pressure warning system may not operate properly
●In the following cases, the tire pressure warning system may not operate properly.
• If non-genuine Lexus wheels are used.
• A tire has been replaced with a tire that is not an OE (Original Equipment) tire.
• A tire has been replaced with a tire that is not of the specified size.
• Tire chains etc. are equipped.
• Lock nuts are equipped.
• An auxiliary-supported run-flat tire is equipped.
• If a window tint that affects the radio wave signals is installed.
• If there is a lot of snow or ice on the vehicle, particularly around the wheels or wheel
housings.
• If the tire inflation pressure is extremely higher than the specified level.
• If wheel without the tire pressure warning valve and transmitter is used.
• If the ID code on the tire pressure warning valves and transmitters is not registered in the tire pressure warning computer.
●Performance may be affected in the following situations.
• Near a TV tower, electric power plant, gas station, radio station, large display, air-
port or other facility th at generates strong radio waves or electrical noise
• When carrying a portable radio, cellular phone, cordless phone or other wireless
communication device
●When the vehicle is parked, the time taken for the warning to start or go off could be
extended.
●When tire inflation pressure declines rapidly for example when a tire has burst, the
warning may not function.
■The initialization operation
●Make sure to carry out initialization af ter adjusting the tire inflation pressure.
Also, make sure the tires are cold before carry ing out initialization or tire inflation pres-
sure adjustment.
●If you have accidentally turned the power swit ch off during initialization, it is not neces-
sary to press the reset switch again as init ialization will restart automatically when the
power switch has been turned to ON mode for the next time.
●If you accidentally press the reset switch when initialization is not necessary, adjust the
tire inflation pressure to the specified level when the tires are co ld, and conduct initial-
ization again.
■When initialization of the tire pressure warning system has failed
Initialization can be completed in a few minutes. However, in the following cases, the set-
tings have not been recorded and the system will not operate properly. If repeated
attempts to record tire inflation pressure settings are unsuccessful, have the vehicle
inspected by your Lexus dealer.
●When operating the tire pressure warning reset switch, the tire pressure warning light
does not blink 3 times.
●After carrying out the initialization procedure, the tire pressure warning light blinks for 1
minute then stays on after driving for 20 minutes.
Page 532 of 632

5328-2. Steps to take in an emergency
CT200h_OM_OM76197U_(U)
*1: Brake system warning buzzer:When there is a possible problem that coul d affect braking performance, the warning
light will come on and a warning buzzer will sound.
Parking brake engaged warning buzzer:
P. 5 3 9
*2: Open door warning buzzer:
P. 5 3 7
*3: Driver’s seat belt buzzer:
The driver’s seat belt buzzer sounds to alert the driver that his or her seat belt is not
fastened. Once the power switch is turned to ON mode, the buzzer sounds for 6 sec-
onds. If the vehicle reaches a speed of 12 mph (20 km/h), the buzzer sounds once. If
the seat belt is still unfastened after 30 seconds, the buzzer will sound intermittently
for 10 seconds. Then, if the seat belt is still unfastened, the buzzer will sound in a differ-
ent tone for 20 more seconds.
Front passenger’s seat belt buzzer:
The front passenger’s seat belt buzzer sounds to alert the front passenger that his or
her seat belt is not fastened. The buzzer sounds once if the vehicle reaches a speed of
12 mph (20 km/h). If the seat belt is still unfastened after 30 seconds, the buzzer will
sound intermittently for 10 seconds. Then, if the seat belt is still unfastened, the buzzer
will sound in a different tone for 20 more seconds.
■SRS warning light
This warning light system monitors the airbag sensor assembly, front impact sensors, side
impact sensors (front door), side impact sensors (front), side impact sensors (rear),
driver’s seat position sensor, driver’s seat belt buckle switch, front passenger occupant
classification system (ECU and sensors), “A IR BAG ON” indicator light, “AIR BAG OFF”
indicator light, front passenger’s seat belt buc kle switch, seat belt pretensioners, airbags,
interconnecting wiring and power sources. ( P. 3 8 )
■Front passenger detection sensor, seat belt reminder and warning buzzer
●If luggage is placed on the front passenger seat, the front passenger detection sensor
may cause the warning light to flash and the warning buzzer to sound even if a passen-
ger is not sittin g in the seat.
●If a cushion is placed on th e seat, the sensor may not detect a passenger, and the warn-
ing light may not operate properly.
■Electric power steering system warning light (warning buzzer)
When the 12-volt battery charge becomes insu fficient or the voltage temporarily drops,
the electric power steering system warning light may come on and the warning buzzer
may sound.