Lexus ES300h 2013 Maintenance and care / Owner's Manual (OM33A01U)
Manufacturer: LEXUS, Model Year: 2013,
Model line: ES300h,
Model: Lexus ES300h 2013
Pages: 908, PDF Size: 11.09 MB
Lexus ES300h 2013 Maintenance and care / Owner's Manual (OM33A01U)
ES300h 2013
Lexus
Lexus
https://www.carmanualsonline.info/img/36/12901/w960_12901-0.png
Lexus ES300h 2013 Maintenance and care / Owner's Manual (OM33A01U)
Trending: satellite radio antenna, radio, oil temperature, instrument cluster, start stop button, fog light bulb, belt
Page 781 of 908
7817-2. Steps to take in an emergency
ES350 300h_OM_OM33A01U_(U)
7
When trouble arises
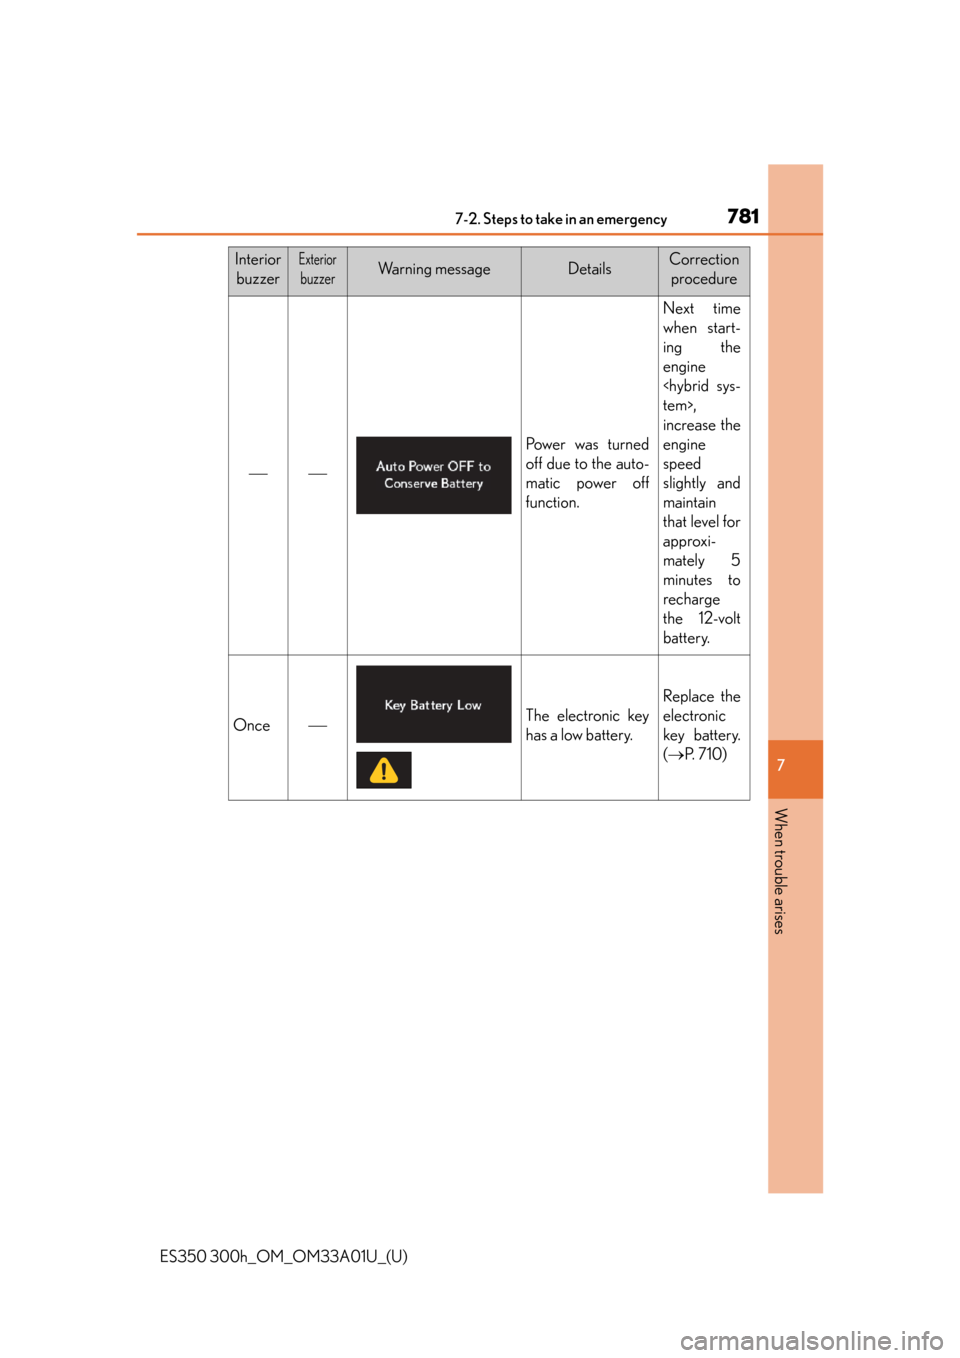
InteriorbuzzerExterior
buzzerWa r n i n g m e s s a g eDetailsCorrection procedure
Power was turned
off due to the auto-
matic power off
function.
Next time
when start-
ing the
engine
tem>,
increase the
engine
speed
slightly and
maintain
that level for
approxi-
mately 5
minutes to
recharge
the 12-volt
battery.
OnceThe electronic key
has a low battery.
Replace the
electronic
key batter y.
( P. 7 1 0 )
Page 782 of 908
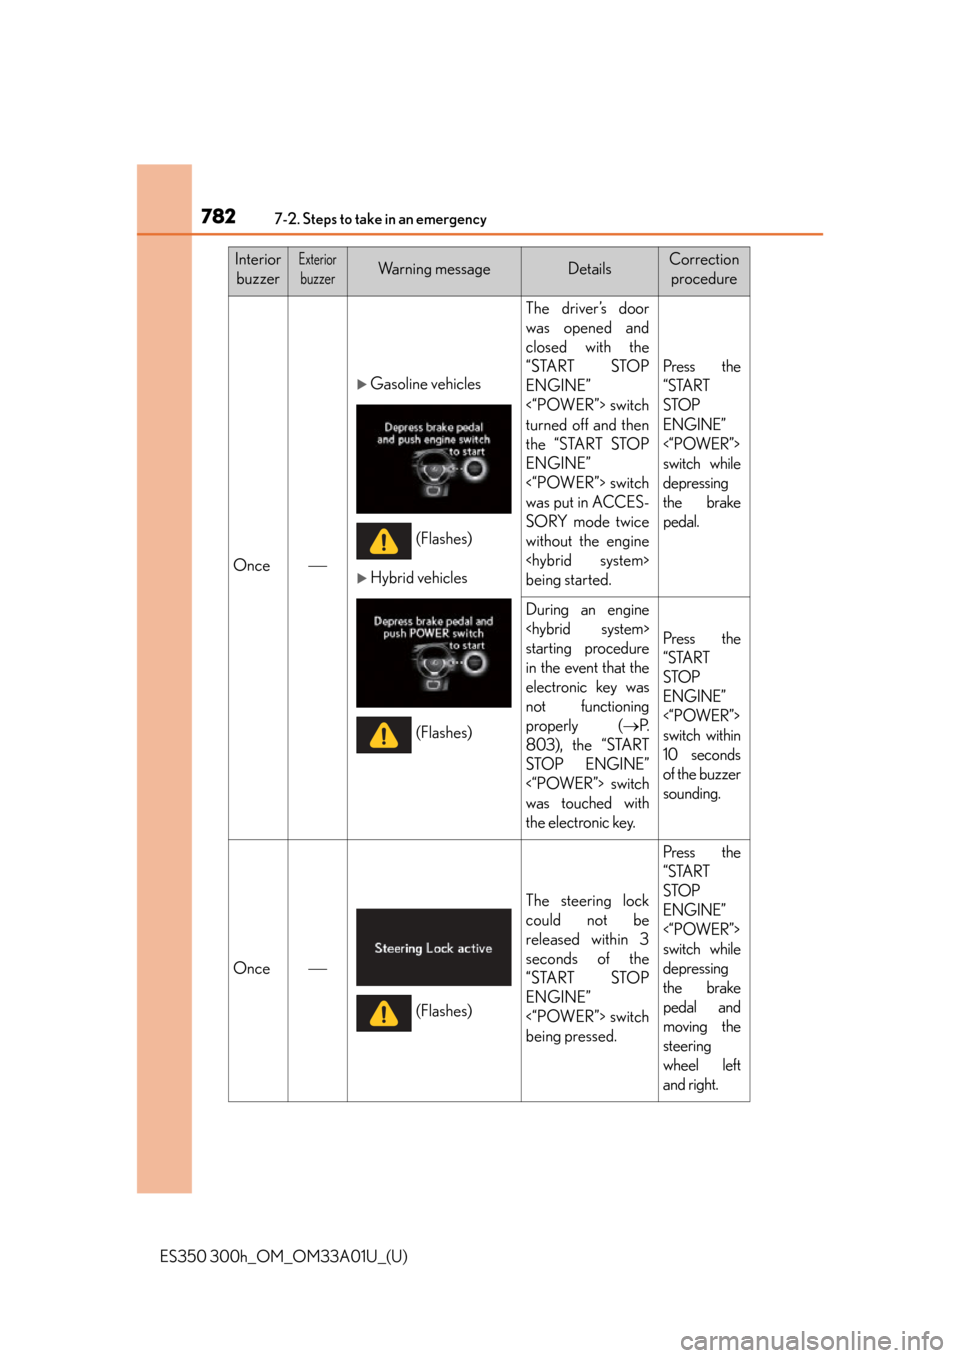
7827-2. Steps to take in an emergency
ES350 300h_OM_OM33A01U_(U)
InteriorbuzzerExterior
buzzerWa r n i n g m e s s a g eDetailsCorrection procedure
Once
Gasoline vehicles
Hybrid vehicles
The driver’s door
was opened and
closed with the
“START STOP
ENGINE”
<“POWER”> switch
turned off and then
the “START STOP
ENGINE”
<“POWER”> switch
was put in ACCES-
SORY mode twice
without the engine
being started.
Press the
“START
STOP
ENGINE”
<“POWER”>
switch while
depressing
the brake
pedal.
During an engine
starting procedure
in the event that the
electronic key was
not functioning
properly ( P.
803), the “START
STOP ENGINE”
<“POWER”> switch
was touched with
the electronic key.
Press the
“START
STOP
ENGINE”
<“POWER”>
switch within
10 seconds
of the buzzer
sounding.
Once
The steering lock
could not be
released within 3
seconds of the
“START STOP
ENGINE”
<“POWER”> switch
being pressed.
Press the
“START
STOP
ENGINE”
<“POWER”>
switch while
depressing
the brake
pedal and
moving the
steering
wheel left
and right.
(Flashes)
(Flashes)
(Flashes)
Page 783 of 908
7837-2. Steps to take in an emergency
ES350 300h_OM_OM33A01U_(U)
7
When trouble arises
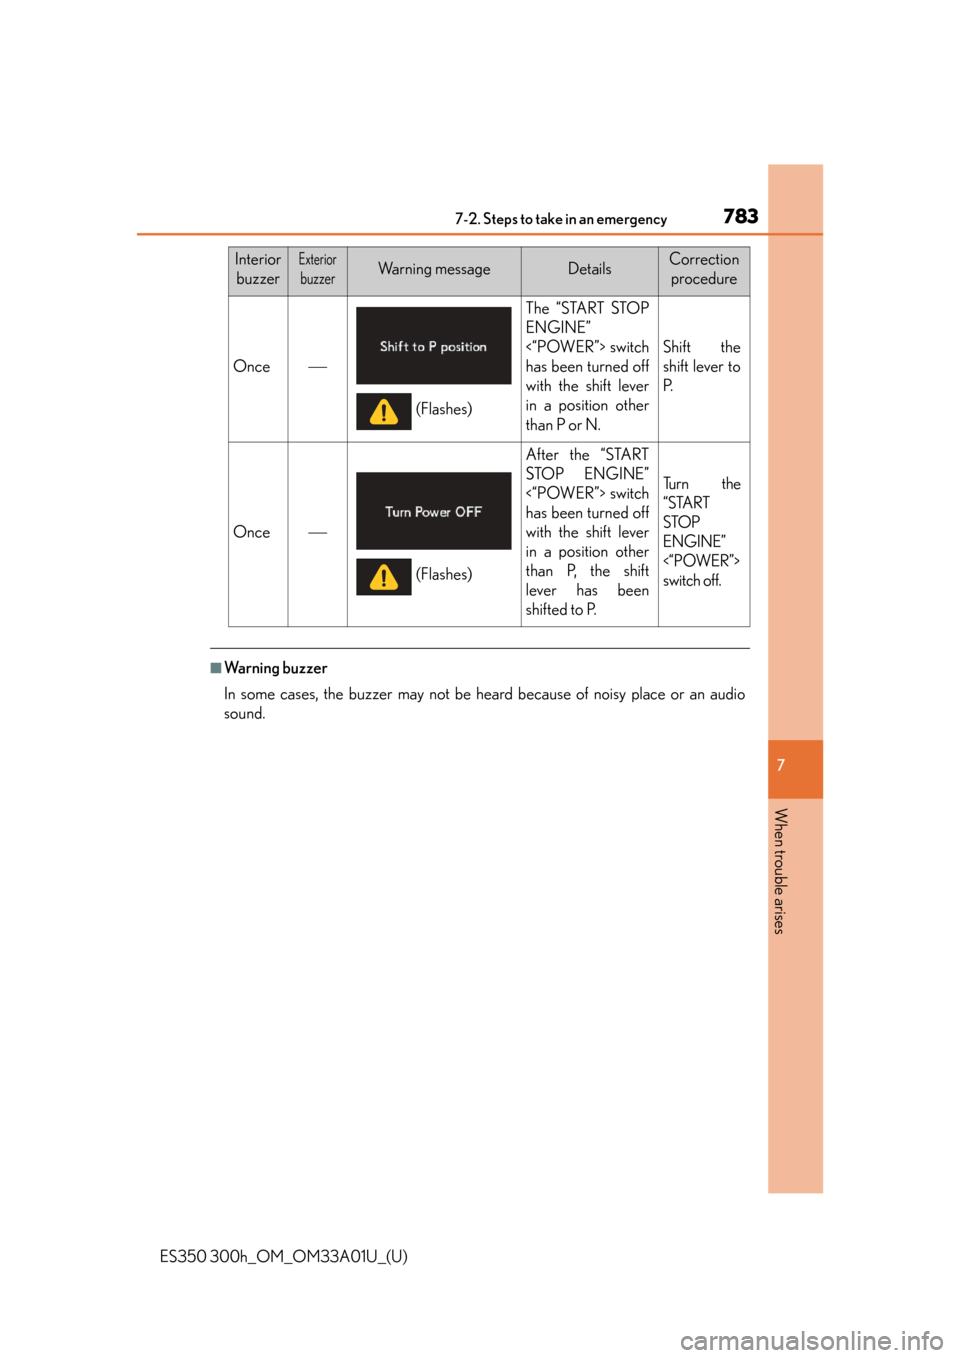
■Warning buzzer
In some cases, the buzzer may not be heard because of noisy place or an audio
sound.
Once
The “START STOP
ENGINE”
<“POWER”> switch
has been turned off
with the shift lever
in a position other
than P or N.
Shift the
shift lever to
P.
Once
After the “START
STOP ENGINE”
<“POWER”> switch
has been turned off
with the shift lever
in a position other
than P, the shift
lever has been
shifted to P.
Tu r n t h e
“START
STOP
ENGINE”
<“POWER”>
switch off.
Interior buzzerExterior
buzzerWa r n i n g m e s s a g eDetailsCorrection procedure
(Flashes)
(Flashes)
Page 784 of 908
784
ES350 300h_OM_OM33A01U_(U)
7-2. Steps to take in an emergency
If you have a flat tire
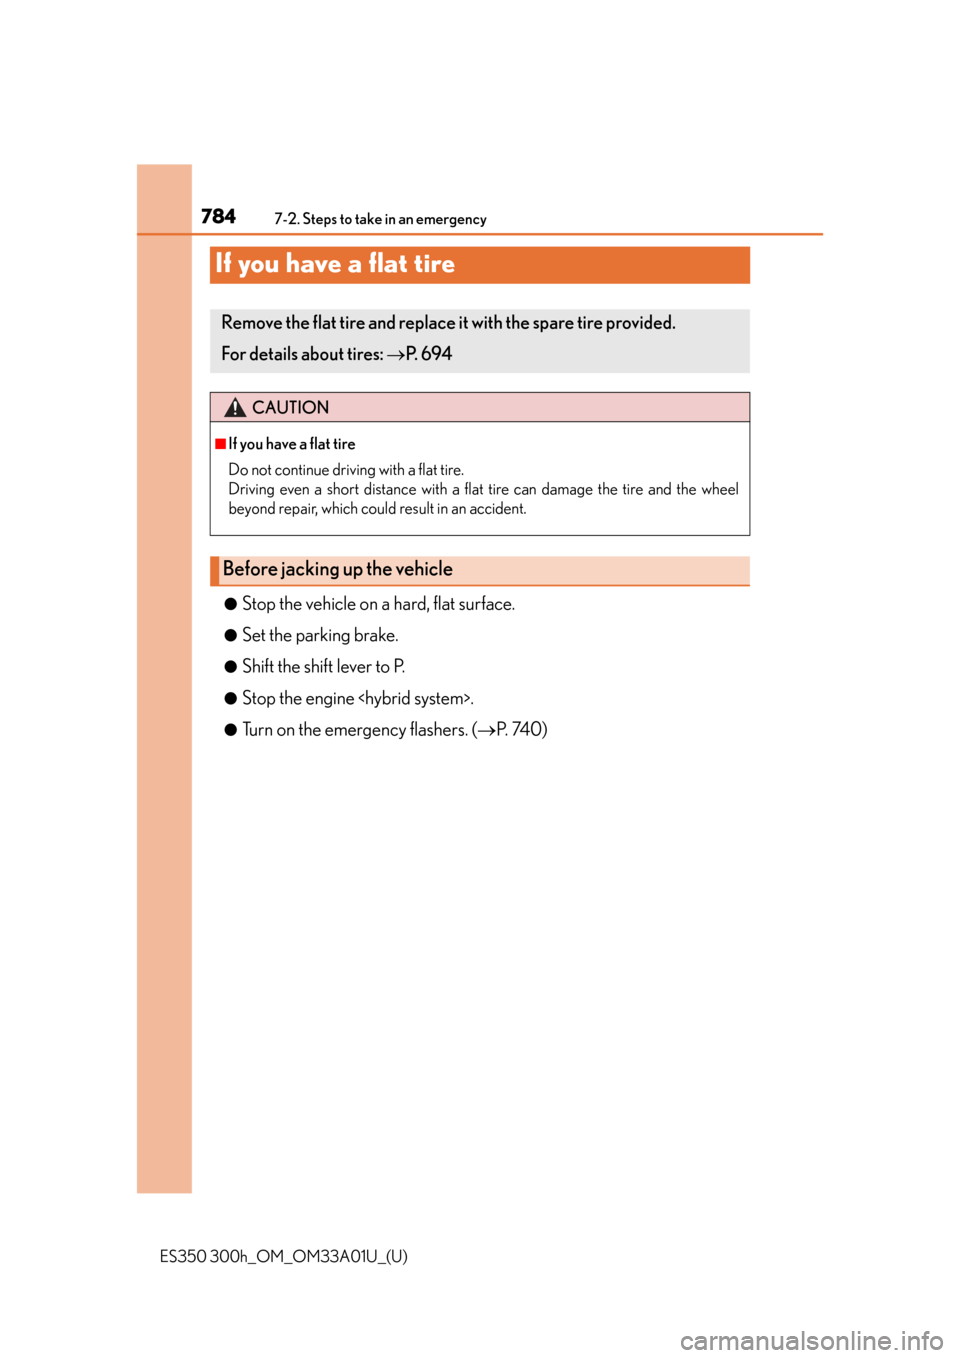
●Stop the vehicle on a hard, flat surface.
●Set the parking brake.
●Shift the shift lever to P.
●Stop the engine .
●Turn on the emergency flashers. (P. 740)
Remove the flat tire and replace it with the spare tire provided.
For details about tires: P. 6 9 4
CAUTION
■If you have a flat tire
Do not continue driving with a flat tire.
Driving even a short distance with a flat tire can damage the tire and the wheel
beyond repair, which could result in an accident.
Before jacking up the vehicle
Page 785 of 908
7857-2. Steps to take in an emergency
ES350 300h_OM_OM33A01U_(U)
7
When trouble arises
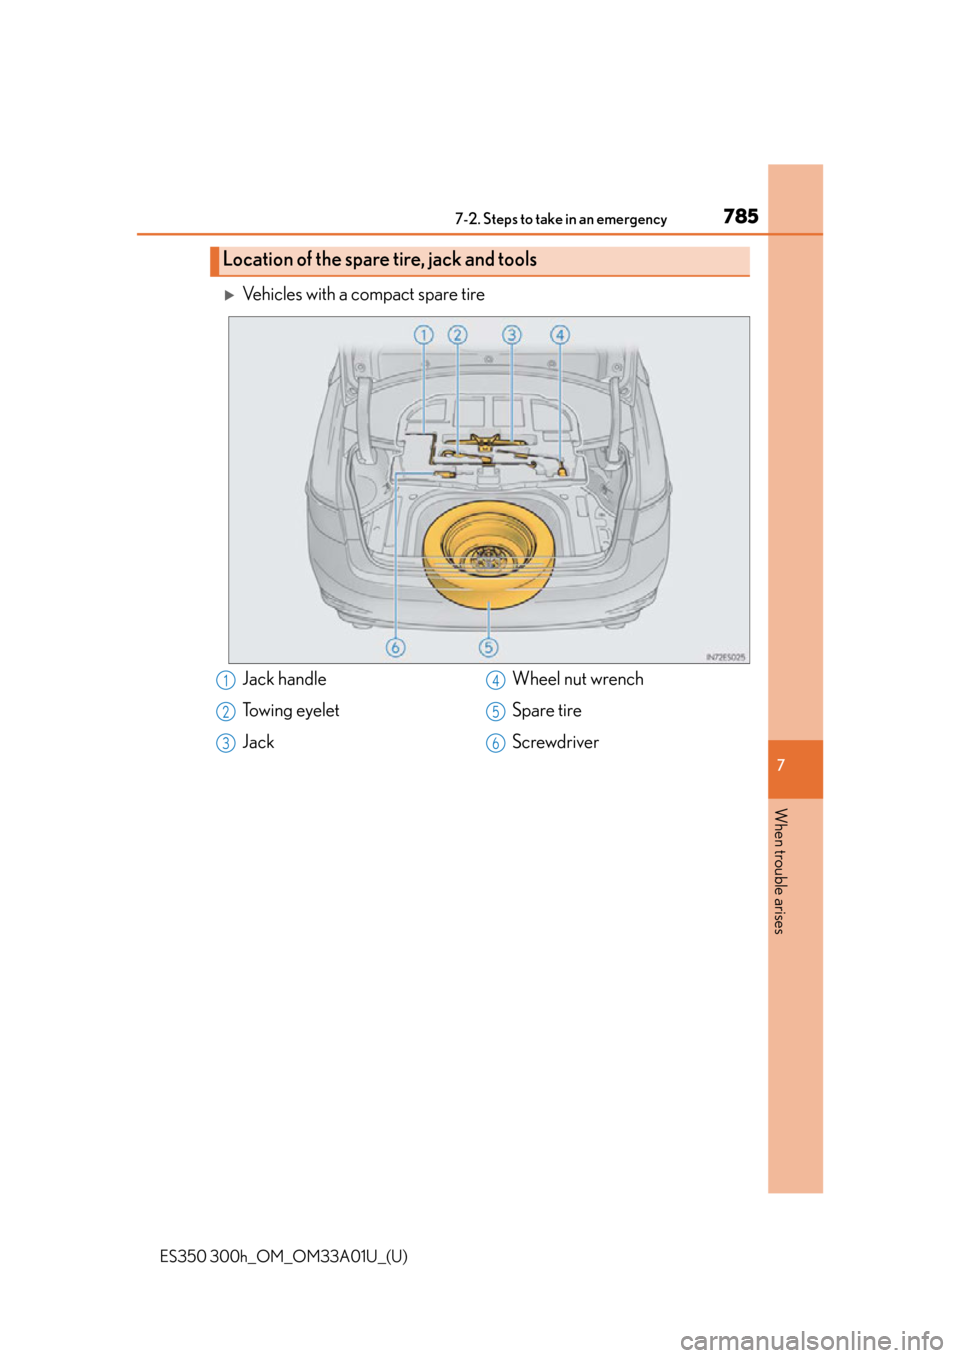
Vehicles with a compact spare tire
Location of the spare tire, jack and tools
Jack handle
Towing eyelet
JackWheel nut wrench
Spare tire
Screwdriver1
2
3
4
5
6
Page 786 of 908
7867-2. Steps to take in an emergency
ES350 300h_OM_OM33A01U_(U)
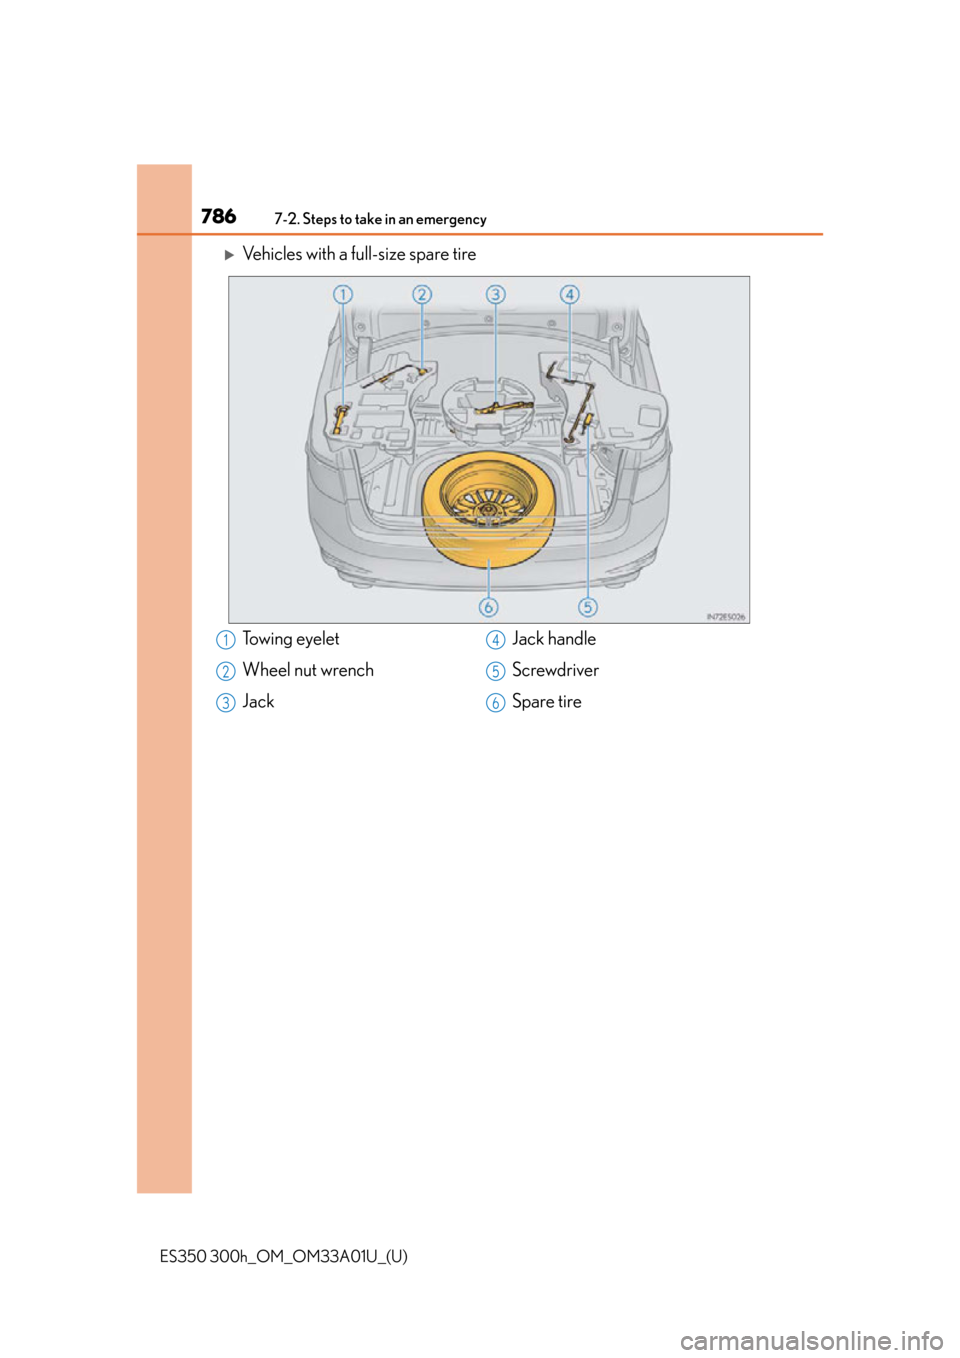
Vehicles with a full-size spare tire
Towing eyelet
Wheel nut wrench
JackJack handle
Screwdriver
Spare tire1
2
3
4
5
6
Page 787 of 908

7877-2. Steps to take in an emergency
ES350 300h_OM_OM33A01U_(U)
7
When trouble arises
CAUTION
■Using the tire jack
Observe the following precautions.
Improper use of the tire jack may cause the vehicle to suddenly fall off the jack,
leading to death or serious injury.
●Do not use the tire jack for any purpose other than replacing tires or installing and
removing tire chains.
●Only use the tire jack that comes with this vehicle for replacing a flat tire.
Do not use it on other vehicles, and do not use other tire jacks for replacing tires
on this vehicle.
●Put the jack properly in its jack point.
●Do not put any part of your body under the vehicle while it is supported by the
jack.
●Do not start the engine or drive the vehicle while the vehicle is
supported by the jack.
●Do not raise the vehicle while someone is inside.
●When raising the vehicle, do not put an object on or under the jack.
●Do not raise the vehicle to a height greater than that required to replace the tire.
●Use a jack stand if it is necessary to get under the vehicle.
●When lowering the vehicle, make sure that there is no-one near the vehicle. If
there are people nearby, warn them vocally before lowering.
Page 788 of 908
7887-2. Steps to take in an emergency
ES350 300h_OM_OM33A01U_(U)
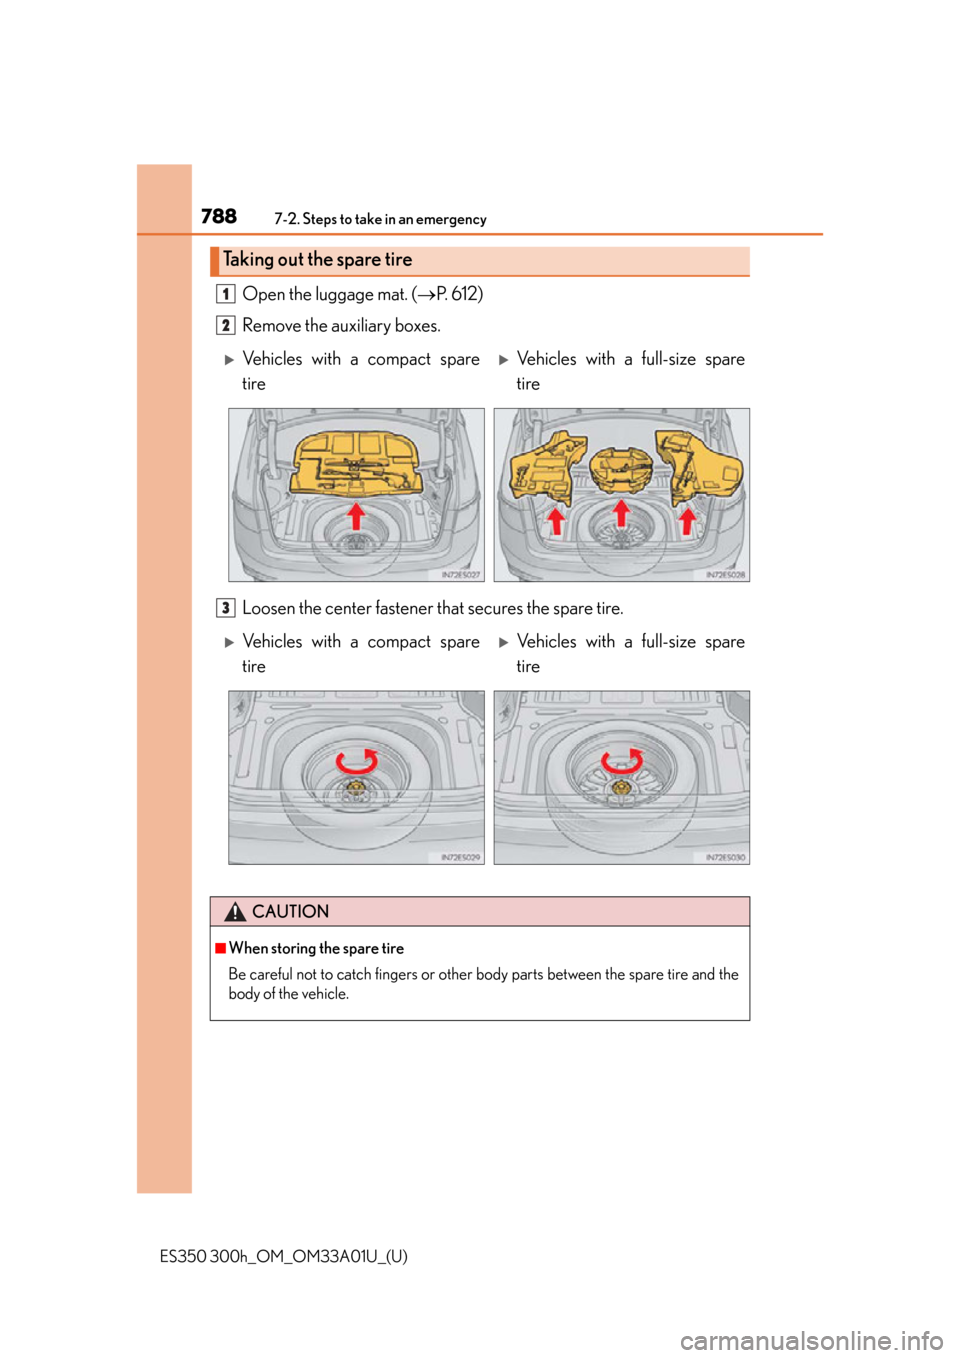
Open the luggage mat. (P. 612)
Remove the auxiliary boxes.
Loosen the center fastener that secures the spare tire.
Taking out the spare tire
1
2
Vehicles with a compact spare
tireVehicles with a full-size spare
tire
3
Vehicles with a compact spare
tireVehicles with a full-size spare
tire
CAUTION
■When storing the spare tire
Be careful not to catch fingers or other body parts between the spare tire and the
body of the vehicle.
Page 789 of 908
7897-2. Steps to take in an emergency
ES350 300h_OM_OM33A01U_(U)
7
When trouble arises
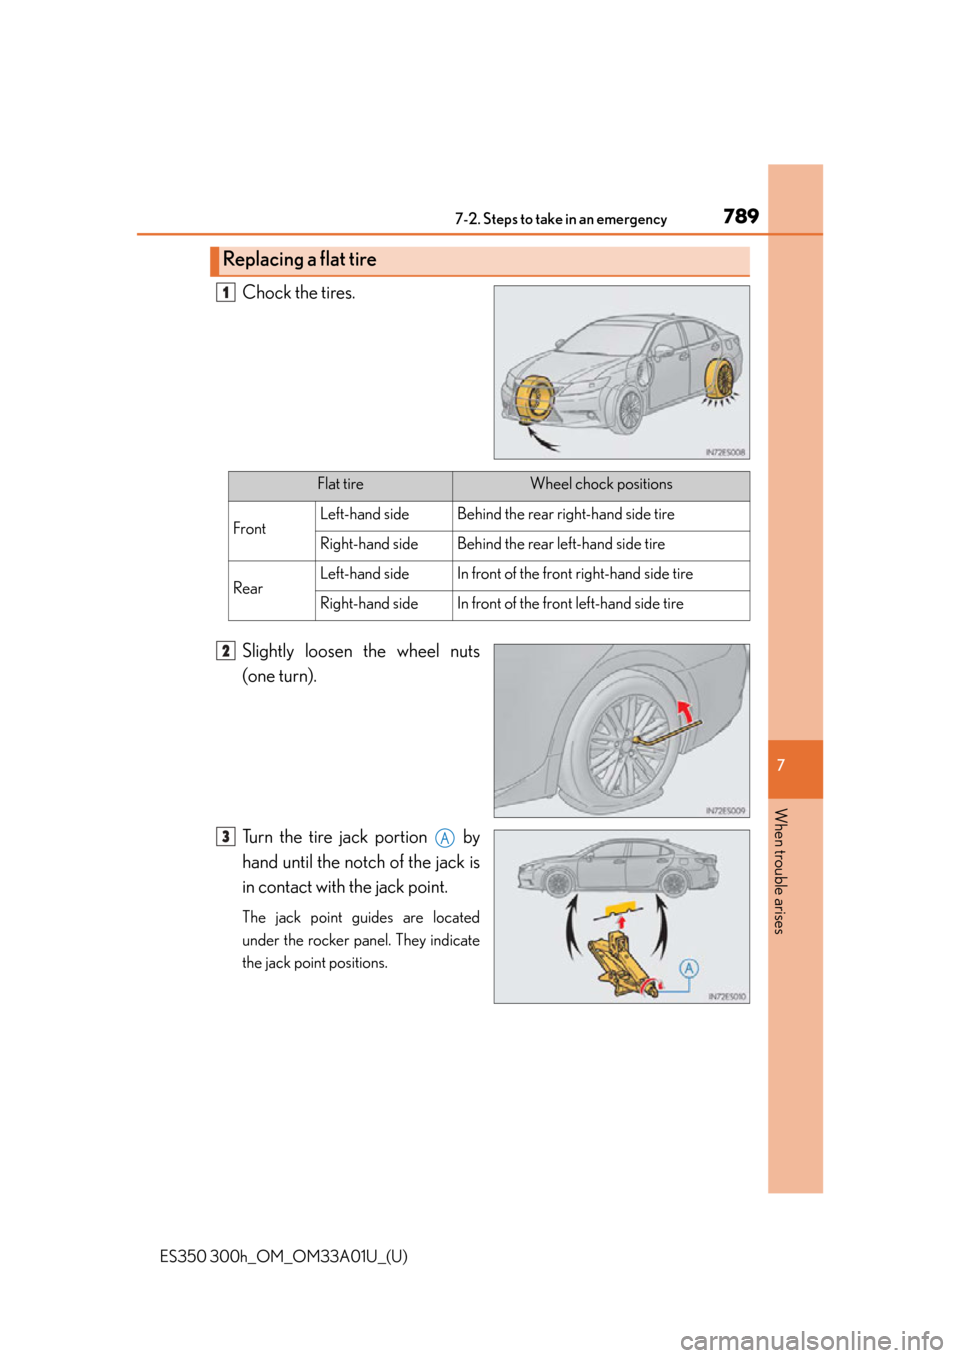
Chock the tires.
Slightly loosen the wheel nuts
(one turn).
Turn the tire jack portion by
hand until the notch of the jack is
in contact with the jack point.
The jack point guides are located
under the rocker panel. They indicate
the jack point positions.
Replacing a flat tire
1
Flat tireWheel chock positions
FrontLeft-hand sideBehind the rear right-hand side tire
Right-hand sideBehind the rear left-hand side tire
RearLeft-hand sideIn front of the front right-hand side tire
Right-hand sideIn front of the fron t left-hand side tire
2
3A
Page 790 of 908
7907-2. Steps to take in an emergency
ES350 300h_OM_OM33A01U_(U)
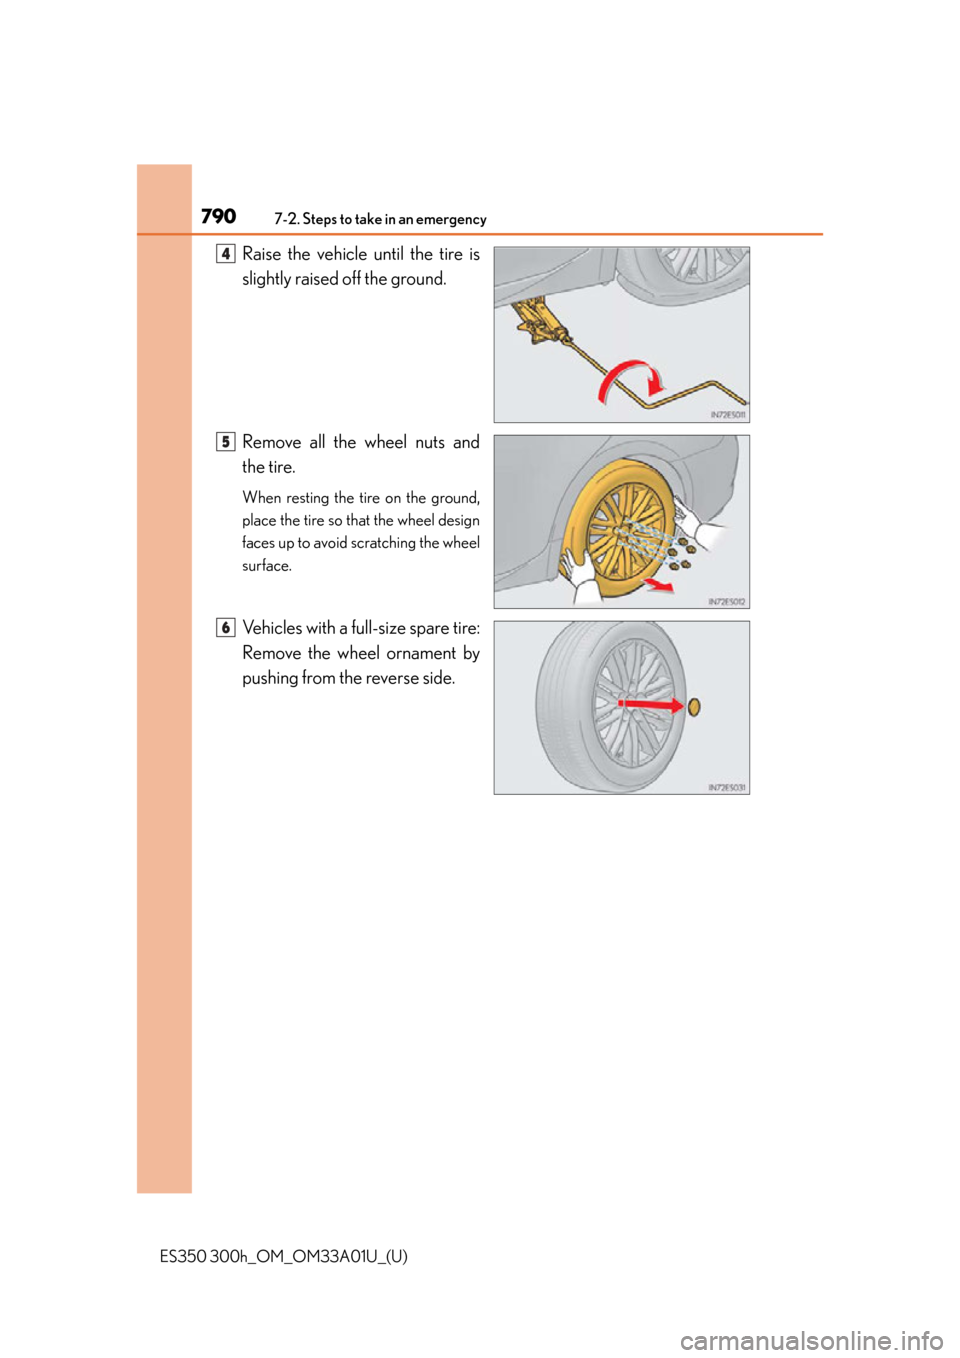
Raise the vehicle until the tire is
slightly raised off the ground.
Remove all the wheel nuts and
the tire.
When resting the tire on the ground,
place the tire so that the wheel design
faces up to avoid scratching the wheel
surface.
Vehicles with a full-size spare tire:
Remove the wheel ornament by
pushing from the reverse side.
4
5
6
Trending: sat nav, mirror, change wheel, brake torque, USB, battery capacity, door lock
