Lexus ES300h 2018 Owner's Manual (OM33D45U)
Manufacturer: LEXUS, Model Year: 2018, Model line: ES300h, Model: Lexus ES300h 2018Pages: 608, PDF Size: 10.67 MB
Page 511 of 608

5118-2. Steps to take in an emergency
ES300h_OM_OM33D45U_(U)
8
When trouble arises
■If “Maintenance Required Visit Your Dealer” is shown (U.S.A. only)
Indicates that all maintenance is required to correspond to the driven distance on the
maintenance schedule
*.
Comes on approximately 5000 miles (8000 km) after the message has been reset.
(The indicator will not work properly unless the message has been reset.)
Perform the necessary maintenance. Please reset the message after the maintenance is
performed (→ P. 437)
*: Refer to the separate “Scheduled Maintena nce” or “Owner’s Manual Supplement” for
the maintenance interval applicable to your vehicle.
■If “Oil Maintenance Required Soon” is shown
Indicates that the engine oil is scheduled to be changed. (The indicator will not work
properly unless the oil mainte nance data has been reset.)
Check the engine oil, and change if necessary. After changing the engine oil, the oil
change system should be reset. ( →P. 451)
■If “Oil Maintenance Required” is shown
Indicates that the engine oil should be changed. (After the engine oil is changed and the
oil maintenance data has been reset.)
Check and change the engine o il, and oil filter by your Lexus dealer. After changing the
engine oil, the oil change system should be reset. (→ P. 451)
■If “Power Turned Off to Save Battery” is shown
Power was turned off due to the automatic power off function.
Next time when starting the hybrid system, operate the hybrid system for approximately
5 minutes to recharge the 12-volt battery.
■If “Forward Camera System Unavailable” or “Forward Camera System Unavailable
Clean Windshield” is displayed.
The following systems may be suspended until the problem shown in the message is
resolved. ( →P. 215, 503)
●PCS (Pre-Collision System)
●LDA (Lane Departure Alert with steering control)
●Dynamic radar cruise control
●Automatic High Beam
■When a message that indicates the need for the shift lever operation is shown
To prevent the shift lever from being operat ed incorrectly or the vehicle from moving
unexpectedly, a message that re quires shifting the shift lever may be shown on the multi-
information display. In that case, follow the instruction of the message and shift the shift
lever.
■If “Visit Your Dealer” is shown
The system or part shown on the multi-info rmation display is malfunctioning. Have the
vehicle inspected by your Lexus dealer immediately.
Page 512 of 608

5128-2. Steps to take in an emergency
ES300h_OM_OM33D45U_(U)
■If “See Owner’s Manual” is shown
●If the following message is shown, following the instructions, accordingly.
• “Engine Coolant Temp High” ( →P. 531)
●If the following messages are sh own, there may be a malfunction.
Immediately have the vehicle inspected by your Lexus dealer.
• “Check Access System with Elec. Key”
• “Hybrid System Malfunction”
●If the following messages are sh own, there may be a malfunction.
Immediately stop the vehicle in a safe place and contact your Lexus dealer. Continuing
to drive the vehicle may be dangerous.
• “Braking Power Low Stop in a Safe Place”
• “Charging System Malfunction”
• “Oil Pressure Low Stop in a Safe Place”
■Warning buzzer
In some cases, the buzzer may not be heard because of noisy place or an audio sound.
Page 513 of 608

513
ES300h_OM_OM33D45U_(U)8-2. Steps to take in an emergency
8
When trouble arises
If you have a flat tire
●Stop the vehicle in a safe pl
ace on a hard, flat surface.
●Set the parking brake.
●Shift the shift lever to P.
●Stop the hybrid system.
●Turn on the emergency flashers. ( →P. 496)
Your vehicle is equipped with a spare tire. The flat tire can be replaced with
the spare tire.
For details about tires: → P. 461
WARNING
■If you have a flat tire
Do not continue driving with a flat tire.
Driving even a short distance with a flat ti re can damage the tire and the wheel beyond
repair, which could re sult in an accident.
Before jacking up the vehicle
Page 514 of 608
5148-2. Steps to take in an emergency
ES300h_OM_OM33D45U_(U)
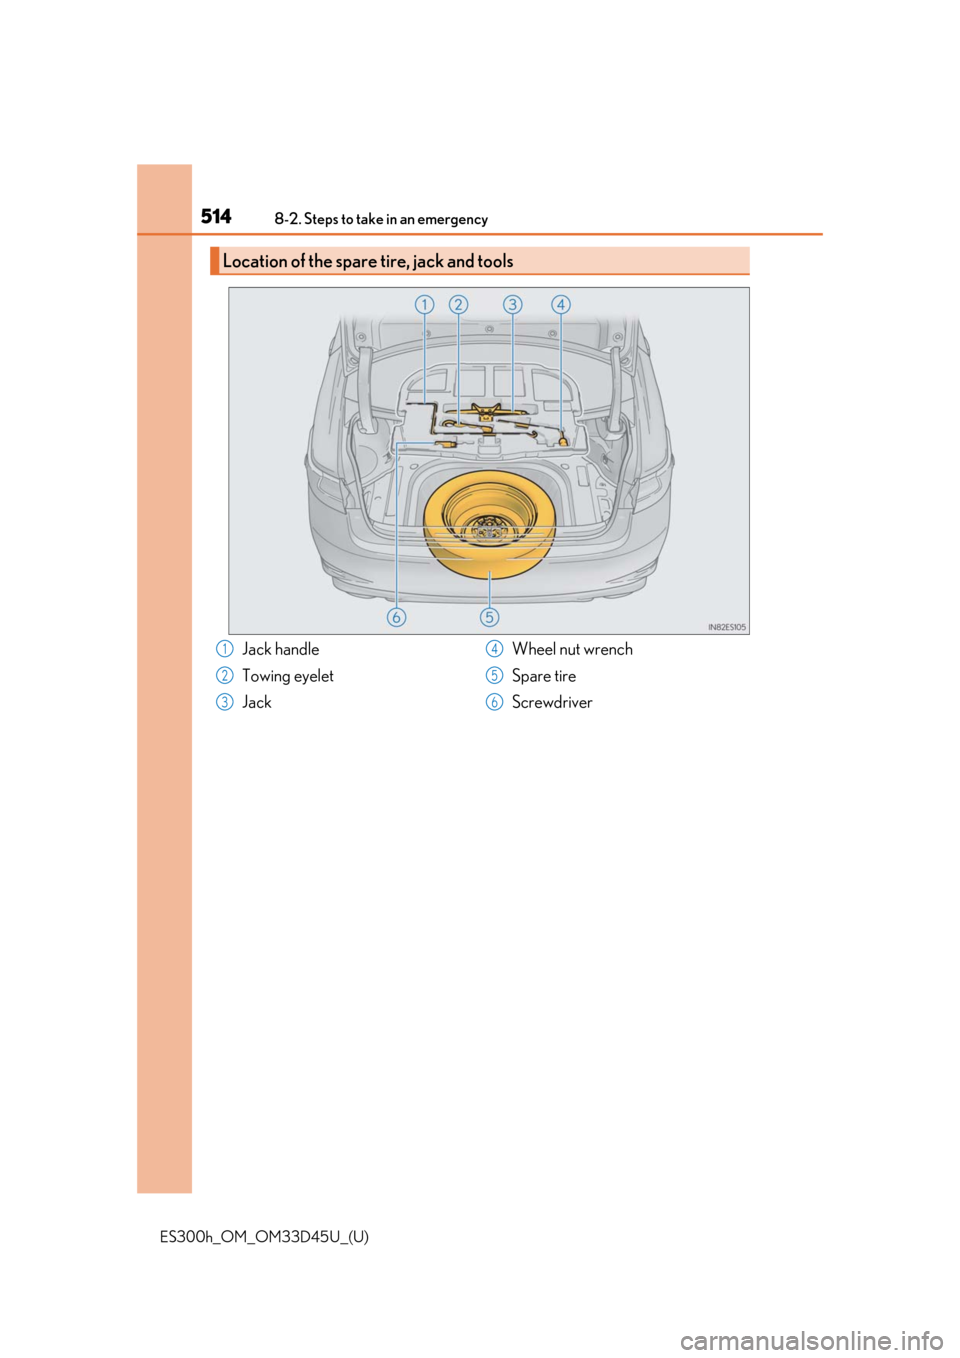
Location of the spare tire, jack and tools
Jack handle
Towing eyelet
JackWheel nut wrench
Spare tire
Screwdriver1
2
3
4
5
6
Page 515 of 608
5158-2. Steps to take in an emergency
ES300h_OM_OM33D45U_(U)
8
When trouble arises
WARNING
■Using the tire jack
Observe the following precautions.
Improper use of the tire jack may cause the ve hicle to suddenly fall off the jack, leading
to death or serious injury.
●Do not use the tire jack for any purpose ot her than replacing tires or installing and
removing tire chains.
●Only use the tire jack that comes with this vehicle for replacing a flat tire.
Do not use it on other vehicles, and do no t use other tire jacks for replacing tires on
this vehicle.
●Put the jack properly in its jack point.
●Do not put any part of your body under the vehicle while it is supported by the jack.
●Do not start the hybrid system or drive the vehicle while the vehicle is supported by
the jack.
●Do not raise the vehicle while someone is inside.
●When raising the vehicle, do not pu t an object on or under the jack.
●Do not raise the vehicle to a height greater than that required to replace the tire.
●Use a jack stand if it is necessary to get under the vehicle.
●When lowering the vehicle, make sure that there is no-one near the vehicle. If there
are people nearby, warn them vocally before lowering.
Page 516 of 608
5168-2. Steps to take in an emergency
ES300h_OM_OM33D45U_(U)
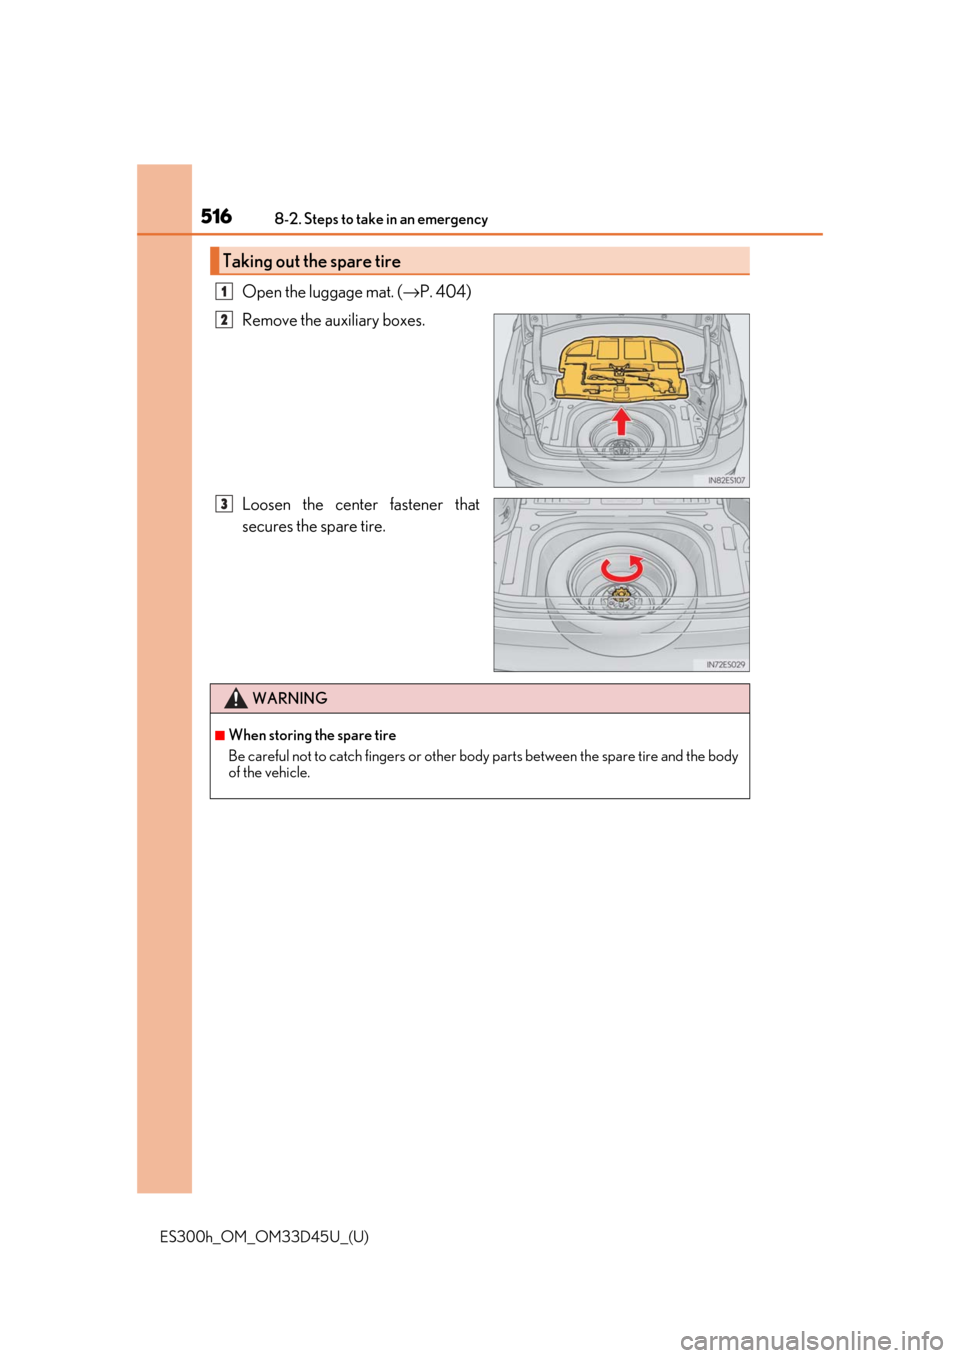
Open the luggage mat. (→P. 404)
Remove the auxiliary boxes.
Loosen the center fastener that
secures the spare tire.
Taking out the spare tire
1
2
3
WARNING
■When storing the spare tire
Be careful not to catch fingers or other body parts between the spare tire and the body
of the vehicle.
Page 517 of 608
5178-2. Steps to take in an emergency
ES300h_OM_OM33D45U_(U)
8
When trouble arises
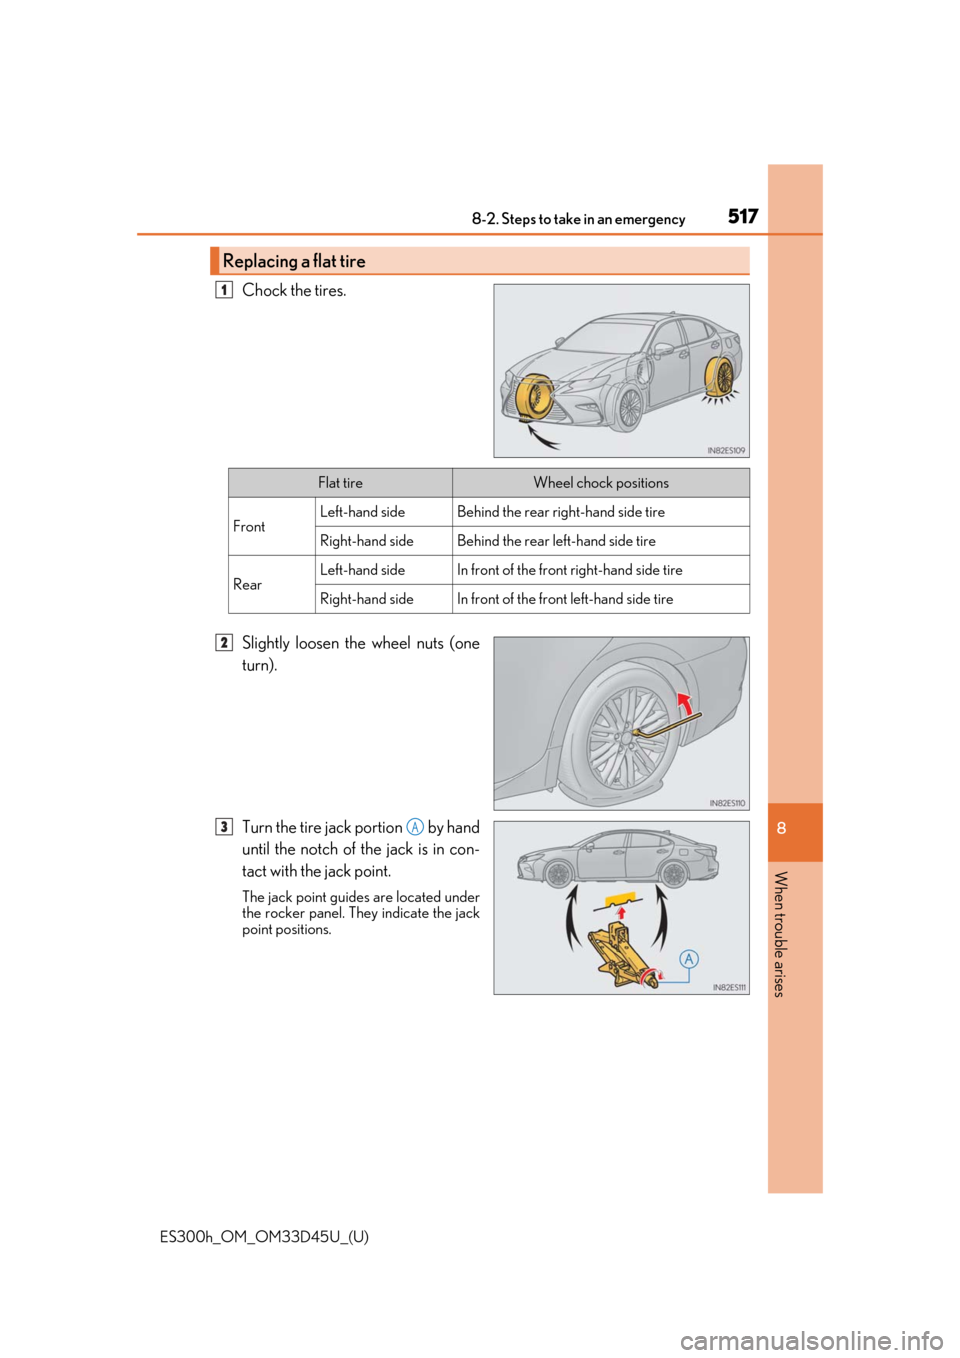
Chock the tires.
Slightly loosen the wheel nuts (one
turn).
Turn the tire jack portion by hand
until the notch of the jack is in con-
tact with the jack point.
The jack point guides are located under
the rocker panel. They indicate the jack
point positions.
Replacing a flat tire
1
Flat tireWheel chock positions
FrontLeft-hand sideBehind the rear right-hand side tire
Right-hand sideBehind the rear left-hand side tire
RearLeft-hand sideIn front of the front right-hand side tire
Right-hand sideIn front of the front left-hand side tire
2
3A
Page 518 of 608
5188-2. Steps to take in an emergency
ES300h_OM_OM33D45U_(U)
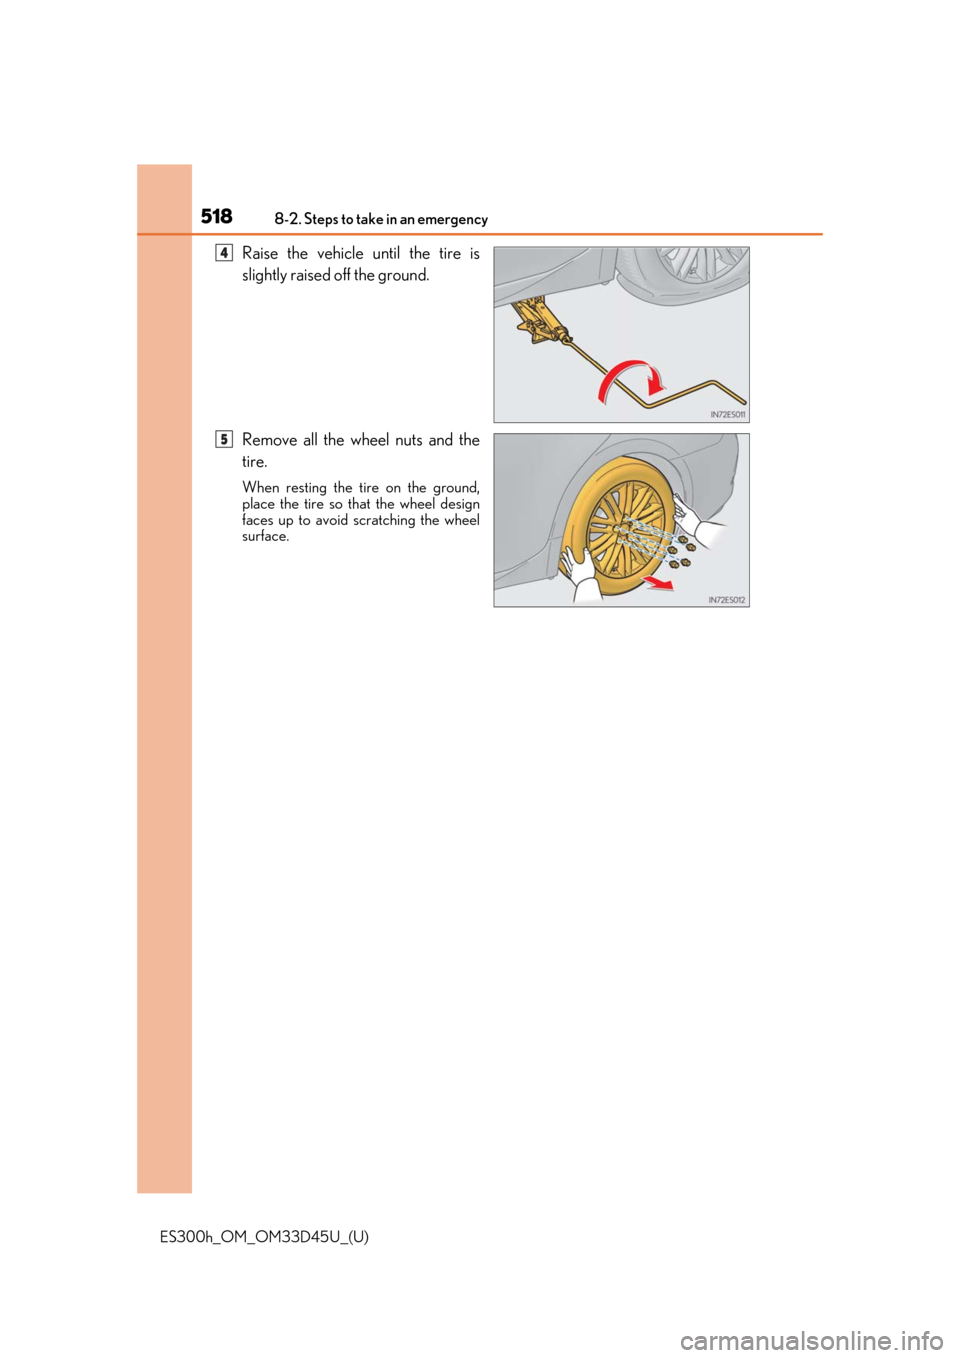
Raise the vehicle until the tire is
slightly raised off the ground.
Remove all the wheel nuts and the
tire.
When resting the tire on the ground,
place the tire so that the wheel design
faces up to avoid scratching the wheel
surface.
4
5
Page 519 of 608

5198-2. Steps to take in an emergency
ES300h_OM_OM33D45U_(U)
8
When trouble arises
WARNING
■Replacing a flat tire
●Observe the following precautions.
Failure to do so may result in serious injury:
• Do not try to remove the wheel ornament by hand. Take due care in handling the ornament to avoid unexpected personal injury.
• Do not touch the disc wheels or the area around the brakes immediately after the vehicle has been driven.
After the vehicle has been driven the disc wheels and the area around the brakes
will be extremely hot. Touching these areas with hands, feet or other body parts
while changing a tire, etc. may result in burns.
●Failure to follow these precautions could cau se the wheel nuts to loosen and the tire
to fall off, resulting in death or serious injury.
• Never use oil or grease on the wheel bolts or wheel nuts. Oil and grease may cause the wheel nuts to be excessively tightened, leading to
bolt or disc wheel damage. In addition, the oil or grease can cause the wheel nuts
to loosen and the wheel may fall off, causing a serious accident. Remove any oil or
grease from the wheel bolts or wheel nuts.
• Have the wheel nuts tightened with a torque wrench to 76 ft•lbf (103 N•m, 10.5 kgf•m) as soon as possible after changing wheels.
• Do not attach a heavily damaged wheel or nament, as it may fly off the wheel while
the vehicle is moving.
• When installing a tire, only use wheel nuts that have been specifically designed for
that wheel.
• If there are any cracks or deformations in the bolt screws, nut threads or bolt holes
of the wheel, have the vehicle inspected by your Lexus dealer.
Page 520 of 608
5208-2. Steps to take in an emergency
ES300h_OM_OM33D45U_(U)
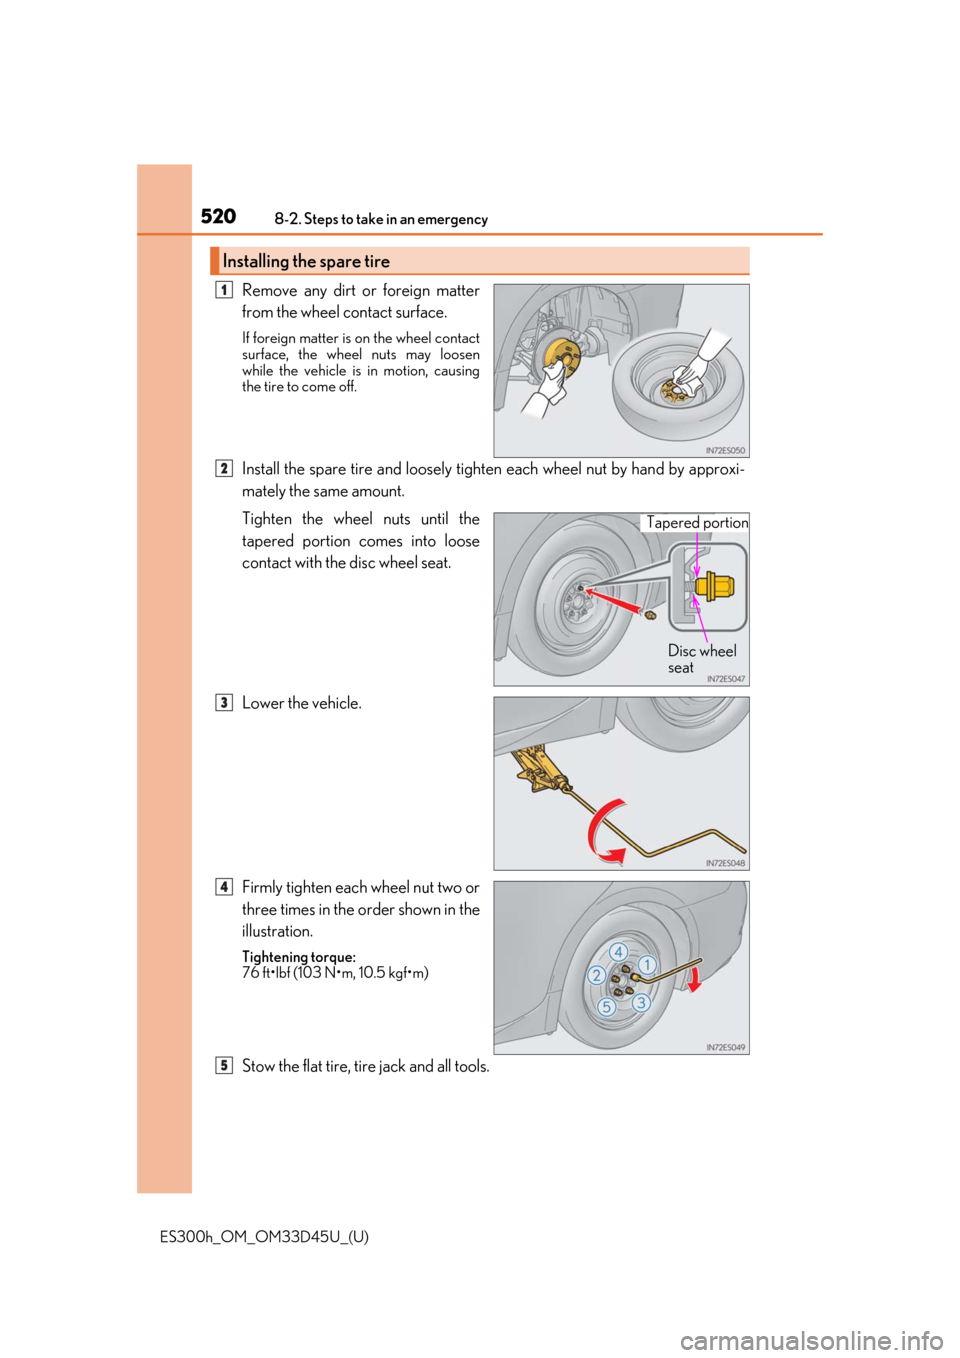
Remove any dirt or foreign matter
from the wheel contact surface.
If foreign matter is on the wheel contact
surface, the wheel nuts may loosen
while the vehicle is in motion, causing
the tire to come off.
Install the spare tire and loosely tighte n each wheel nut by hand by approxi-
mately the same amount.
Tighten the wheel nuts until the
tapered portion comes into loose
contact with the disc wheel seat.
Lower the vehicle.
Firmly tighten each wheel nut two or
three times in the order shown in the
illustration.
Tightening torque:
76 ft•lbf (103 N•m, 10.5 kgf•m)
Stow the flat tire, tire jack and all tools.
Installing the spare tire
1
2
Tapered portion
Disc wheel
seat
3
4
5