Lexus ES300h 2018 Owner's Manual (OM33D45U)
Manufacturer: LEXUS, Model Year: 2018, Model line: ES300h, Model: Lexus ES300h 2018Pages: 608, PDF Size: 10.67 MB
Page 491 of 608
ES300h_OM_OM33D45U_(U)
4917-3. Do-it-yourself maintenance
7
Maintenance and care
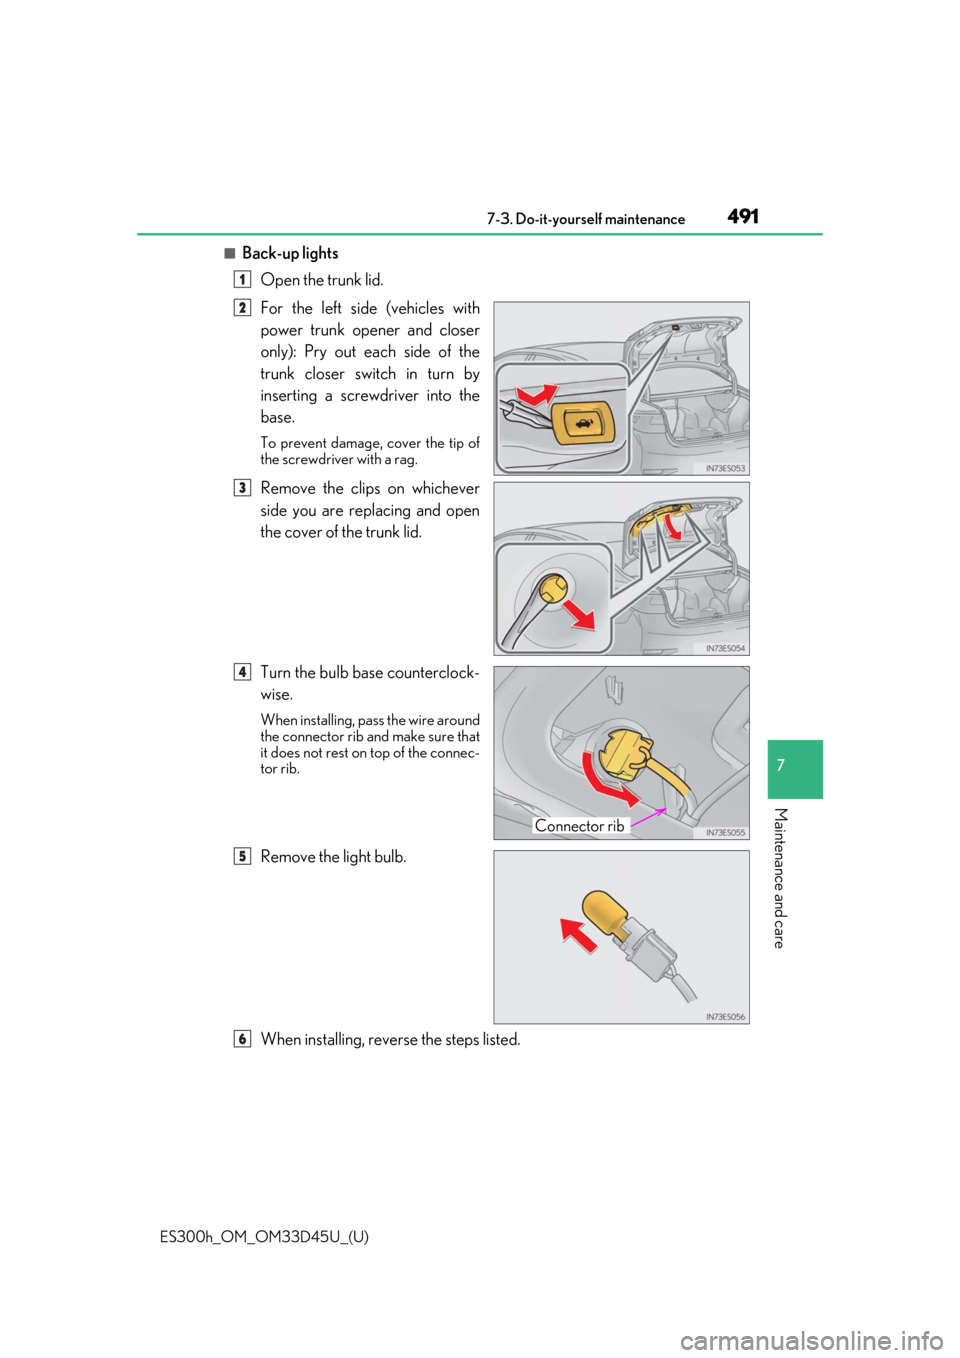
■Back-up lightsOpen the trunk lid.
For the left side (vehicles with
power trunk opener and closer
only): Pry out each side of the
trunk closer switch in turn by
inserting a screwdriver into the
base.
To prevent damage, cover the tip of
the screwdriver with a rag.
Remove the clips on whichever
side you are replacing and open
the cover of the trunk lid.
Turn the bulb base counterclock-
wise.
When installing, pass the wire around
the connector rib and make sure that
it does not rest on top of the connec-
tor rib.
Remove the light bulb.
When installing, reverse the steps listed.
1
2
3
Connector rib
4
5
6
Page 492 of 608

492
ES300h_OM_OM33D45U_(U)7-3. Do-it-yourself maintenance
■Replacing the following bulbs
If any of the lights listed
below has burnt out, have it replaced by your Lexus
dealer.
●Headlight low beams
●Headlight high beams (LED type)
●Parking lights/daytime running lights
●Side turn signal lights
●Fog lights
●Stop/tail lights
●High mounted stoplight
●License plate lights
●Outer foot lights
●Rear side marker lights
■LED lights
The headlight low beams, headlight high beam s (LED type), parking lights/daytime run-
ning lights, fog lights, side turn signal lights, stop/tail lights, rear side marker lights, high
mounted stoplight and license plate lights cons ist of a number of LEDs. If any of the LEDs
burn out, take your vehicle to your Le xus dealer to have the light replaced.
■Condensation build-up on the inside of the lens
Temporary condensation build-up on the inside of the headlight lens does not indicate a
malfunction. Contact your Lexus dealer for mo re information in the following situations:
●Large drops of water have built up on the inside of the lens.
●Water has built up inside the headlight.
■When replacing light bulbs
→P. 482
Page 493 of 608
ES300h_OM_OM33D45U_(U)
4937-3. Do-it-yourself maintenance
7
Maintenance and care
WARNING
■Replacing light bulbs
●Turn off the lights. Do not attempt to replace the bulb immediately after turning off the
lights.
The bulbs become very hot and may cause burns.
●Do not touch the glass portion of the light bu lb with bare hands. When it is unavoid-
able to hold the glass portion, use and hold with a clean dry cloth to avoid getting
moisture and oils on the bulb.
Also, if the bulb is sc ratched or dropped, it may blow out or crack.
●Fully install light bulbs and any parts used to secure them. Failure to do so may result
in heat damage, fire, or water entering th e headlight unit. This may damage the head-
lights or cause condensation to build up on the lens.
■To prevent damage or fire
●Make sure bulbs are fully seated and locked.
●Check the wattage of the bulb before installing to prevent heat damage.
Page 494 of 608

494
ES300h_OM_OM33D45U_(U)7-3. Do-it-yourself maintenance
Page 495 of 608

495
ES300h_OM_OM33D45U_(U)
8When trouble arises
8-1. Essential informationEmergency flashers .................. 496
If your vehicle has to be stopped in an emergency.... 497
8-2. Steps to take in an emergency If your vehicle needs to be towed................................498
If you think something is wrong ................502
If a warning light turns on or a warning buzzer sounds.....503
If a warning message is displayed ................................509
If you have a flat tire ................... 513
If the hybrid sy stem will not
start ............................................... 523
If the electronic key does not operate properly ..................... 525
If the 12-volt battery is discharged ................................. 527
If your vehicle overheats .......... 531
If the vehicle becomes stuck .............................................535
Page 496 of 608
496
ES300h_OM_OM33D45U_(U)8-1. Essential information
Emergency flashers
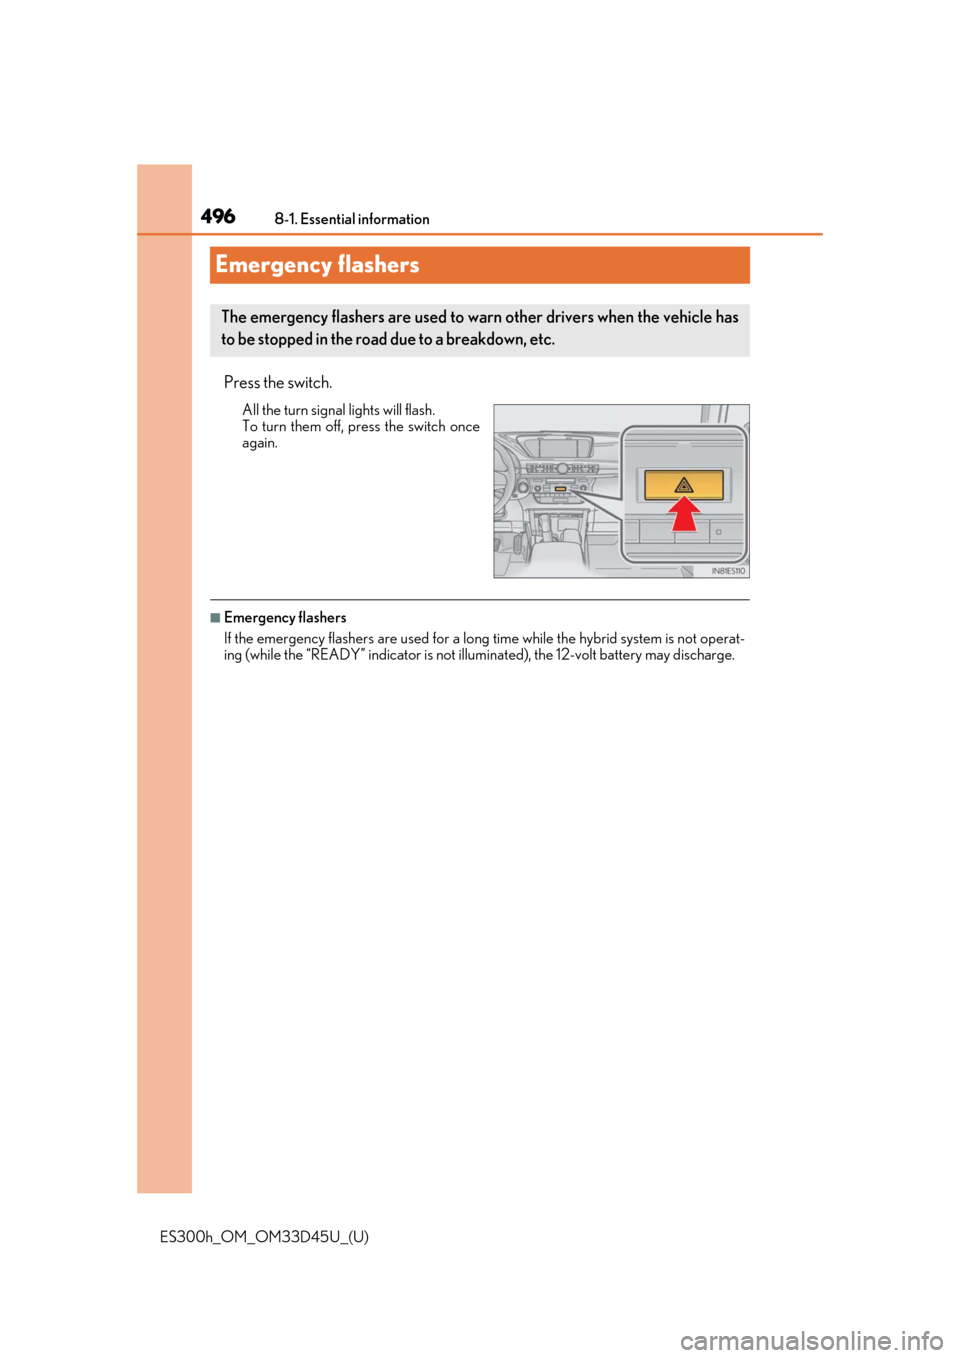
Press the switch.
All the turn signal lights will flash.
To turn them off, press the switch once
again.
■Emergency flashers
If the emergency flashers are used for a long
time while the hybrid system is not operat-
ing (while the “READY” indicator is not illu minated), the 12-volt battery may discharge.
The emergency flashers are used to warn other drivers when the vehicle has
to be stopped in the road due to a breakdown, etc.
Page 497 of 608
497
ES300h_OM_OM33D45U_(U)8-1. Essential information
8
When trouble arises
If your vehicle has to be stopped in an emergency
Steadily step on the brake pedal with
both feet and firmly depress it.
Do not pump the brake pedal repeatedly as this will increase the effort required to
slow the vehicle.
Shift the shift lever to N.
If the shift lever is shifted to N
After slowing down, stop the vehicle in a safe place by the road.
Stop the hybrid system.
If the shift lever cannot be shifted to N
Keep depressing the brake pedal with both feet to reduce vehicle speed as
much as possible.
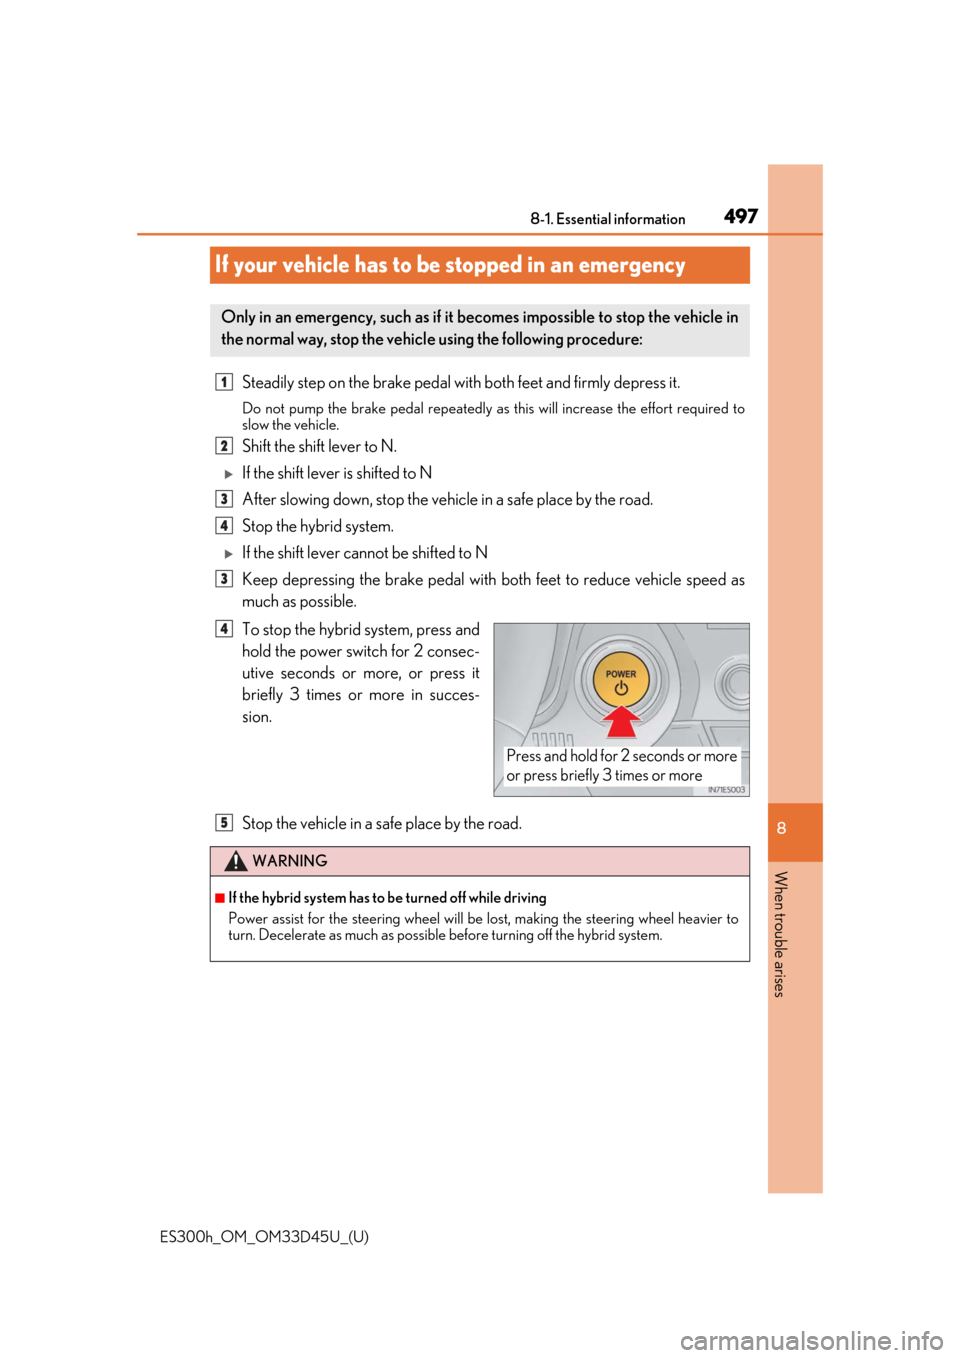
To stop the hybrid system, press and
hold the power switch for 2 consec-
utive seconds or more, or press it
briefly 3 times or more in succes-
sion.
Stop the vehicle in a safe place by the road.
Only in an emergency, such as if it becomes impossible to stop the vehicle in
the normal way, stop the vehicl e using the following procedure:
1
2
3
4
3
Press and hold for 2 seconds or more
or press briefly 3 times or more
4
WARNING
■If the hybrid system has to be turned off while driving
Power assist for the steering wheel will be lost, making the steering wheel heavier to
turn. Decelerate as much as possible before turning off the hybrid system.
5
Page 498 of 608
498
ES300h_OM_OM33D45U_(U)8-2. Steps to take in an emergency
If your vehicle needs to be towed
The following may indicate a problem wi
th your hybrid transmission. Contact
your Lexus dealer or commercial towing service before towing.
●A warning message for the hybrid system is shown on the multi-information
display and the vehicle does not move.
●The vehicle makes an abnormal sound.
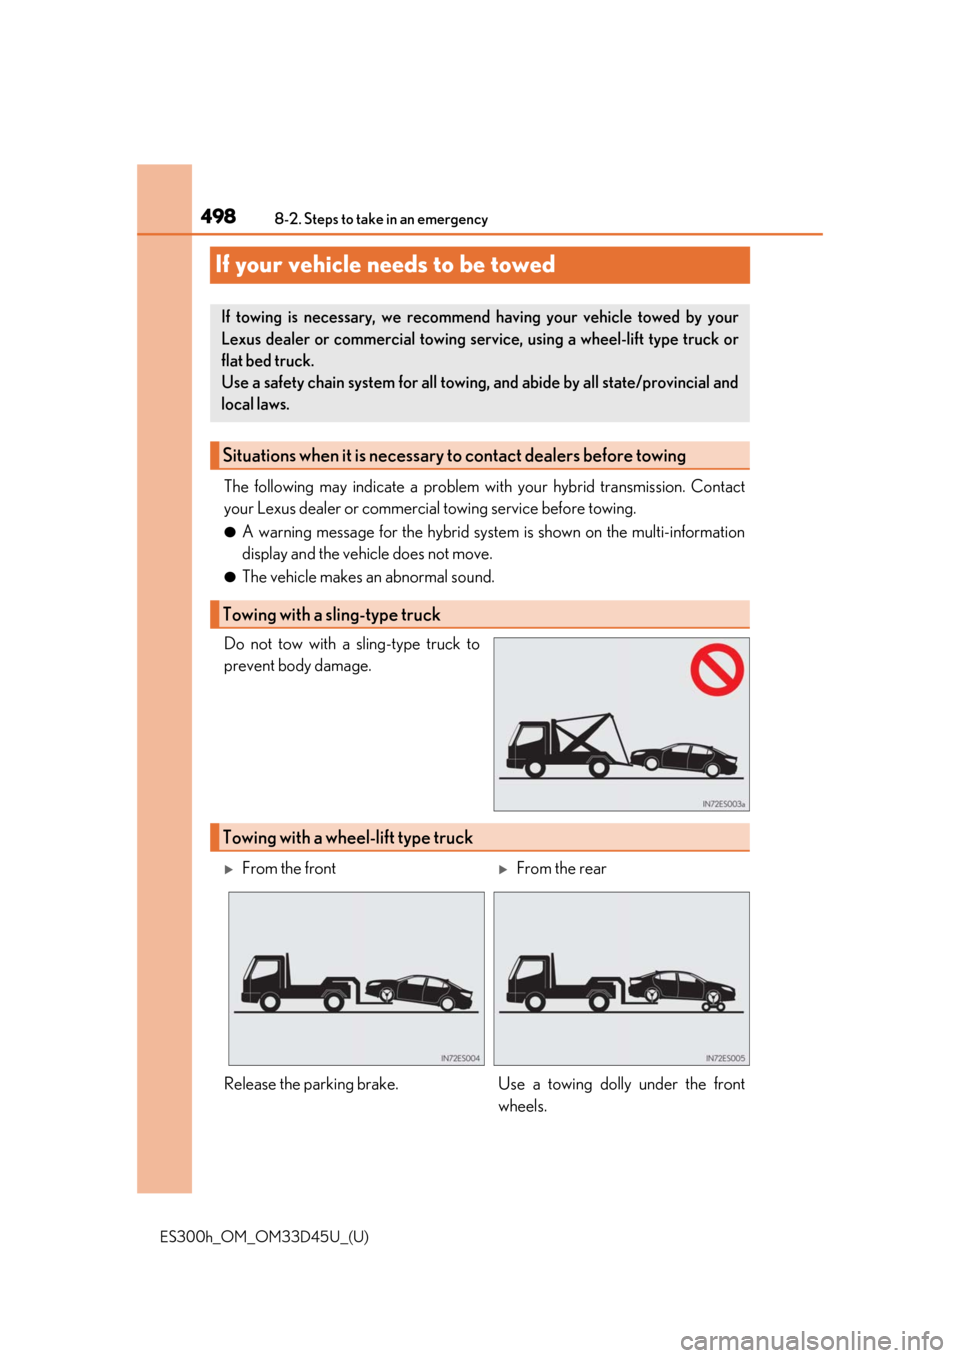
Do not tow with a sling-type truck to
prevent body damage.
If towing is necessary, we recommend having your vehicle towed by your
Lexus dealer or commercial towing se rvice, using a wheel-lift type truck or
flat bed truck.
Use a safety chain system for all towing, and abide by all state/provincial and
local laws.
Situations when it is necessary to contact dealers before towing
Towing with a sling-type truck
Towing with a wheel-lift type truck
From the frontFrom the rear
Release the parking brake. Use a towing dolly under the front wheels.
Page 499 of 608
4998-2. Steps to take in an emergency
ES300h_OM_OM33D45U_(U)
8
When trouble arises
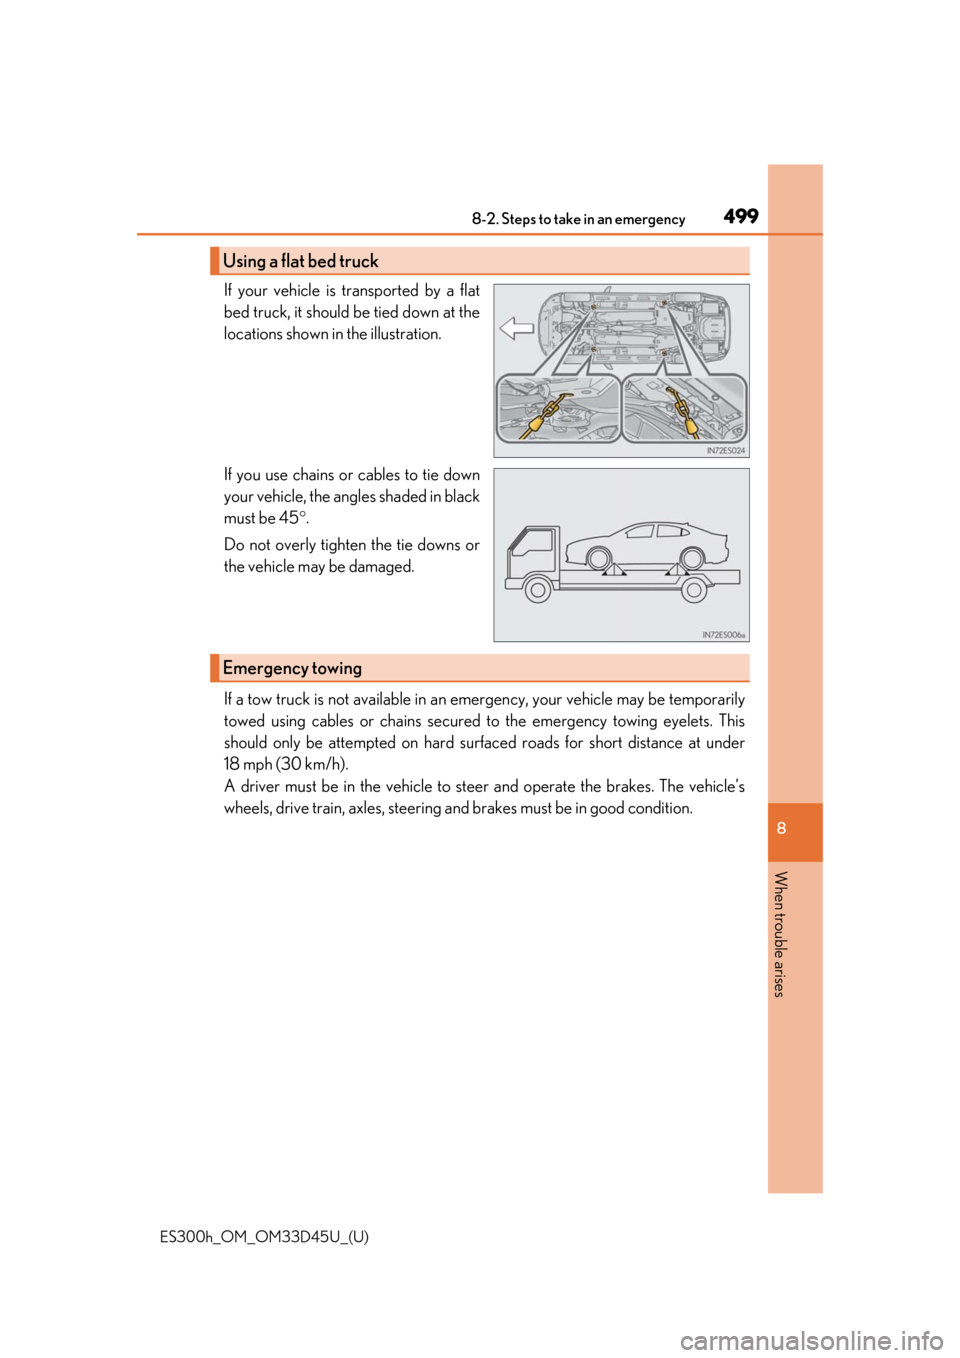
If your vehicle is transported by a flat
bed truck, it should be tied down at the
locations shown in the illustration.
If you use chains or cables to tie down
your vehicle, the angles shaded in black
must be 45 °.
Do not overly tighten the tie downs or
the vehicle may be damaged.
If a tow truck is not available in an em ergency, your vehicle may be temporarily
towed using cables or chains secured to the emergency towing eyelets. This
should only be attempted on hard surf aced roads for short distance at under
18 mph (30 km/h).
A driver must be in the vehicle to st eer and operate the brakes. The vehicle’s
wheels, drive train, axles, steering an d brakes must be in good condition.
Using a flat bed truck
Emergency towing
Page 500 of 608
5008-2. Steps to take in an emergency
ES300h_OM_OM33D45U_(U)
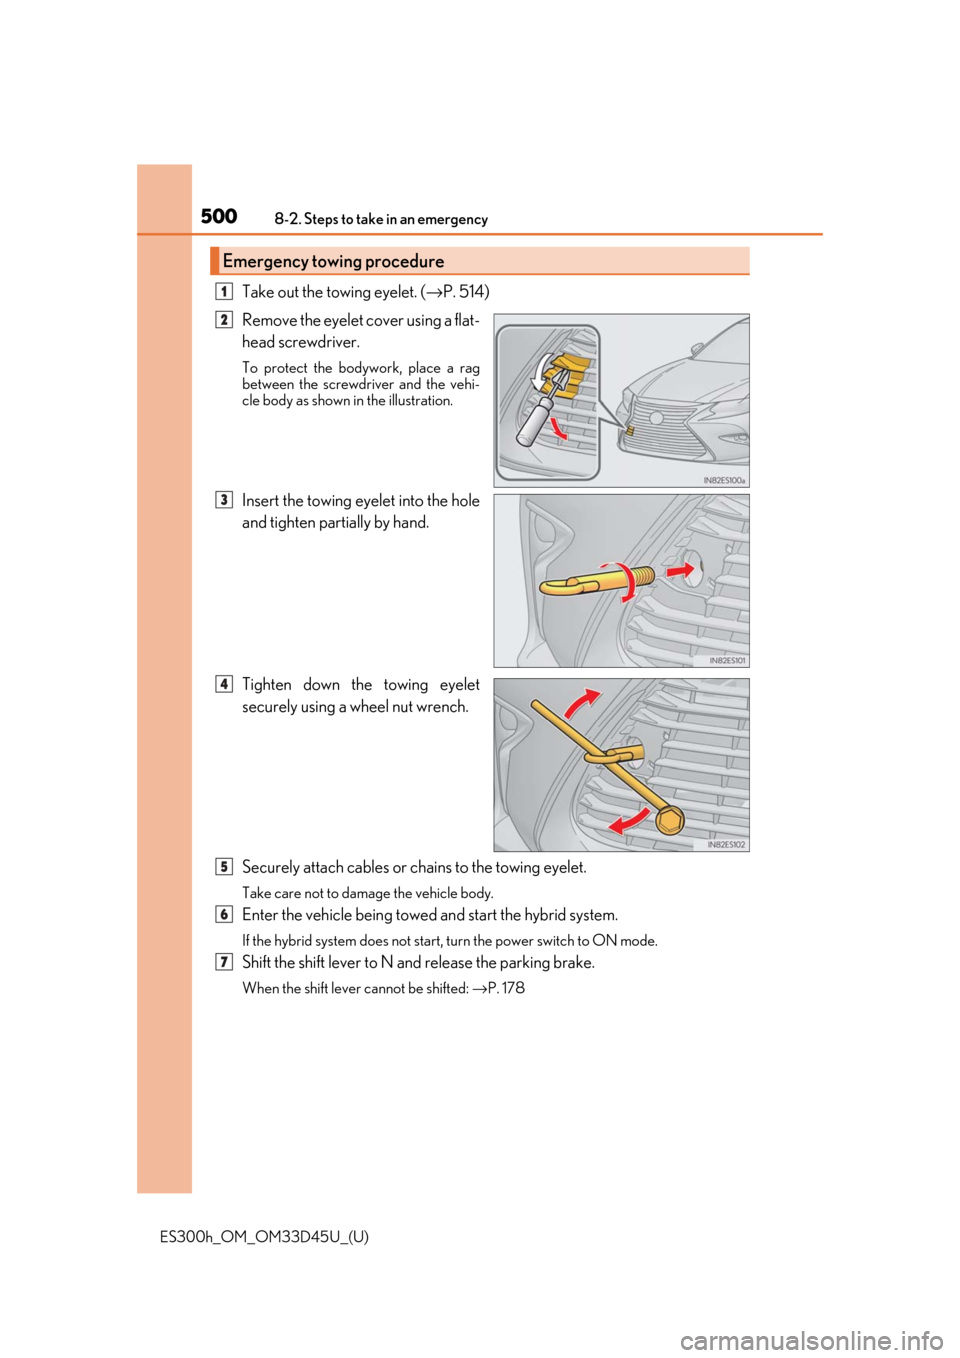
Take out the towing eyelet. (→P. 514)
Remove the eyelet cover using a flat-
head screwdriver.
To protect the bodywork, place a rag
between the screwdriver and the vehi-
cle body as shown in the illustration.
Insert the towing eyelet into the hole
and tighten partially by hand.
Tighten down the towing eyelet
securely using a wheel nut wrench.
Securely attach cables or chains to the towing eyelet.
Take care not to damage the vehicle body.
Enter the vehicle being towed and start the hybrid system.
If the hybrid system does not start, turn the power switch to ON mode.
Shift the shift lever to N and release the parking brake.
When the shift lever cannot be shifted: →P. 178
Emergency towing procedure
1
2
3
4
5
6
7