tow Lexus ES300h 2020 User Guide
[x] Cancel search | Manufacturer: LEXUS, Model Year: 2020, Model line: ES300h, Model: Lexus ES300h 2020Pages: 462, PDF Size: 9.98 MB
Page 114 of 462

1123-2. Opening, closing and locking the doors and trunk
■Conditions affecting operation
The smart access system with push-button
start uses weak radio waves. In the following
situations, the communication between the
electronic key and the vehicle may be
affected, preventing the smart access sys-
tem with push-button start, wireless remote
control and immobilizer system from oper-
ating properly.
(Ways of coping: P.388)
●When the electronic key battery is
depleted
●Near a TV tower, electric power plant,
gas station, radio stat ion, large display,
airport or other faci lity that generates
strong radio waves or electrical noise
●When the electronic key is in contact
with, or is covered by the following metal-
lic objects
• Cards to which aluminum foil is attached
• Cigarette boxes that have aluminum foil
inside
• Metallic wallets or bags
•Coins
• Hand warmers made of metal
• Media such as CDs and DVDs
●When other wireless ke ys (that emit radio
waves) are being used nearby
●When carrying the electronic key
together with the following devices that
emit radio waves
• Portable radio, cellular phone, cordless
phone or other wireless communication
device
• Another electronic ke y or a wireless key
that emits radio waves
• Personal computers or personal digital assistants (PDAs)
• Digital audio players
• Portable game systems
●If window tint with a metallic content or
metallic objects are attached to the rear
window
●When the electronic key is placed near a
battery charger or electronic devices
●When the vehicle is parked in a pay park-
ing spot where radio waves are emitted.
■Notes for the entry function
●Even when the electronic key is within the effective range (detection areas), the sys-
tem may not operate properly in the fol-
lowing cases:
• The electronic key is too close to the win-
dow or outside door handle, near the
ground, or in a high place when the doors
are locked or unlocked.
• The electronic key is near the ground or in a high place, or too close to the center
of the rear bumper when the trunk is
opened.
• The electronic key is on the instrument panel, rear package tray or floor, or in the
door pockets or glove box when the
hybrid system is started or power switch
modes are changed.
●Do not leave the electronic key on top of
the instrument panel or near the door
pockets when exiting the vehicle.
Depending on the radio wave reception
conditions, it may be detected by the
antenna outside the cabin and the doors
will become lockable from the outside,
possibly trapping the electronic key
inside the vehicle.
●As long as the electronic key is within the
effective range, the doors may be locked
or unlocked by anyone. However, only
the doors detecting the electronic key
can be used to unlock the vehicle.
●Even if the electronic key is not inside the
vehicle, it may be po ssible to start the
hybrid system if the el ectronic key is near
the window.
●The doors may unlock or lock if a large
amount of water splashes on the door
handle, such as in the rain or in a car
wash, when the electronic key is within
the effective range. (The doors will auto-
matically be locked after approximately
60 seconds if the doors are not opened
and closed.)
●If the wireless remote control is used to
lock the doors when the electronic key is
near the vehicle, there is a possibility that
the door may not be unlocked by the
entry function. (Use the wireless remote
control to unlock the doors.)
●Touching the door lock sensor while
wearing gloves may delay or prevent lock
operation. Remove the gloves and touch
the lock sensor again.
Page 125 of 462
1233-4. Adjusting the steering wheel and mirrors
3
Before driving
3-4.Adjusting the steering wheel and mirrors
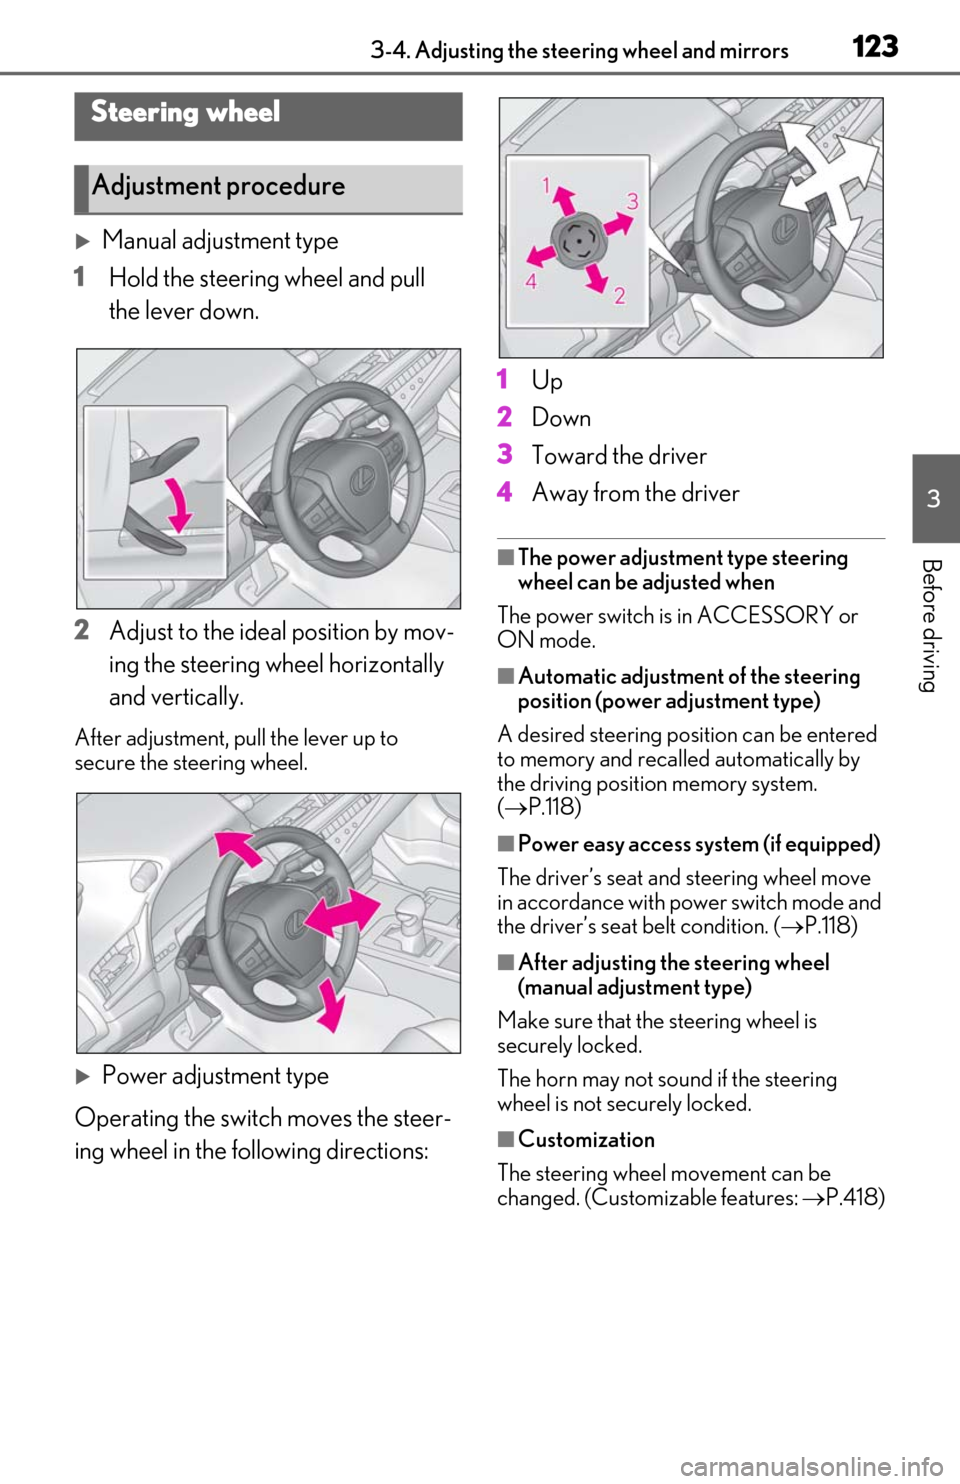
Manual adjustment type
1 Hold the steering wheel and pull
the lever down.
2 Adjust to the ideal position by mov-
ing the steering wheel horizontally
and vertically.
After adjustment, pull the lever up to
secure the steering wheel.
Power adjustment type
Operating the switch moves the steer-
ing wheel in the following directions: 1
Up
2 Down
3 Toward the driver
4 Away from the driver
■The power adjustment type steering
wheel can be adjusted when
The power switch is in ACCESSORY or
ON mode.
■Automatic adjustment of the steering
position (power adjustment type)
A desired steering posi tion can be entered
to memory and recalled automatically by
the driving position memory system.
( P.118)
■Power easy access system (if equipped)
The driver’s seat and steering wheel move
in accordance with power switch mode and
the driver’s seat belt condition. ( P.118)
■After adjusting the steering wheel
(manual adjustment type)
Make sure that the steering wheel is
securely locked.
The horn may not sound if the steering
wheel is not securely locked.
■Customization
The steering wheel movement can be
changed. (Customizable features: P.418)
Steering wheel
Adjustment procedure
Page 129 of 462

1273-4. Adjusting the steering wheel and mirrors
3
Before driving
■Using automatic mode in cold weather
(power type)
When automatic mode is used in cold
weather, the door mirror could freeze up
and automatic stowing and return may not
be possible. In this case, remove any ice and
snow from the door mirror, then either
operate the mirror using manual mode or
move the mirror by hand.
■Customization
The automatic mirror fo lding and extending
operation can be changed.
(Customizable features: P.418)
When the mirror select switch is in the
“L” or “R” position, the outside rear
view mirrors will automatically angle
downwards when the vehicle is revers-
ing in order to give a better view of the
ground.
To disable this function, move the mir-
ror select switch to the neutral position
(between “L” or “R”).
■Adjusting the mirror angle when
the vehicle is reversing
With the shift lever in R, adjust the mir-
ror angle at a desired position. The
adjusted angle will be memorized and
the mirror will automatically tilt to the
memorized angle whenever the shift
lever is shifted to R from next time.
The memorized downward tilt position of
the mirror is linked to the normal position
(angle adjusted with th e shift lever in other
than R). Therefore, if the normal position is
changed after adjustment, the tilt position
will also change.
When the normal position is changed,
readjust the angle in reversing.
WARNING
■When a mirror is moving
To avoid personal injury and mirror mal-
function, be careful not to get your hand
caught by the moving mirror.
Linked mirror function when
reversing (vehicles with driving
position memory)
Page 135 of 462

133
4
4
Driving
Driving
4-1. Before drivingDriving the vehicle ..................... 134
Cargo and luggage ................... 139
Vehicle load limits ....................... 141
Trailer towing ............................... 142
Dinghy towing ............................. 142
4-2. Driving procedures Power (ignition) switch ............ 143
EV drive mode ............................ 148
Hybrid transmission .................. 150
Turn signal lever.......................... 154
Parking brake .............................. 155
Brake Hold.................................... 157
4-3. Operating the lights and wipers Headlight switch ......................... 159
Automatic High Beam ............. 162
Windshield wipers and washer ......................................................... 164
4-4. Refueling Opening the fuel tank cap...... 170
4-5. Using the driving support sys- tems
Lexus Safety System + 2.0 ..... 172
PCS (Pre-Collision System).. 178
LTA (Lane Tracing Assist)...... 185
RSA (Road Sign Assist) ........... 194
Dynamic radar cruise control with full-speed range....................... 196
BSM (Blind Spot Monitor) .... 206
Driving Mode Select switch .. 212PKSA (Parking Support Alert)
......................................................... 214
Intuitive parking assist .............. 215
RCTA (Rear Cross Traffic Alert) function......................................... 221
RCD (Rear Camera Detection) function....................................... 225
PKSB (Parking Support Brake) ....................................................... 228
Parking Support Brake function (static objects) ......................... 234
Parking Support Brake function (rear-crossing vehicles) ...... 240
Parking Support Brake function (rear pedestrians) .................. 244
Driving assist systems.............. 247
4-6. Driving tips Hybrid vehicle driving tips ..... 251
Winter driving tips .................... 253
Page 141 of 462
1394-1. Before driving
4
Driving
Cargo capacity depends on the total
weight of the occupants.
(Cargo capacity) = (Total load capac-
ity) (Total weight of occupants)
NOTICE
●Changes in quantity and quality of oil
and fluid used for the engine, hybrid
transmission, etc.
●Lubricant condition for the bearings
and suspension joints (where possi-
ble), and the function of all joints, bear-
ings, etc.
■When parking the vehicle
Always set the parking brake, and shift
the shift lever to P. Failure to do so may
cause the vehicle to move or the vehicle
may accelerate sudden ly if the accelera-
tor pedal is accidentally depressed.
Cargo and luggage
Take notice of the following infor-
mation about storage precautions,
cargo capacity and load:
WARNING
■Things that must not be carried in the
trunk
The following things may cause a fire if
loaded in the trunk:
●Receptacles containing gasoline
●Aerosol cans
■Storage precautions
Observe the following precautions.
Failure to do so may prevent the pedals
from being depressed properly, may
block the driver’s vision, or may result in
items hitting the driver or passengers,
possibly causing an accident.
●Stow cargo and luggage in the trunk
whenever possible.
●Do not place cargo or luggage in or on
the following locations.
• At the feet of the driver
• On the front passenger or rear seats (when stacking items)
• On the package tray
• On the instrument panel
• On the dashboard
• In front of the Center Display
●Secure all items in the occupant com-
partment.
Capacity and distribution
Page 142 of 462
1404-1. Before driving
Steps for Determining Correct Load
Limit
(1) Locate the statement “The com-
bined weight of occupants and cargo
should never exceed XXX kg or XXX
lbs.” on your vehicle’s placard.
(2) Determine the combined weight of
the driver and passengers that will be
riding in your vehicle.
(3) Subtract the combined weight of
the driver and passengers from XXX
kg or XXX lbs.
(4) The resulting figure equals the
available amount of cargo and luggage
load capacity.
For example, if the “XXX” amount
equals 1400 lbs. and there will be five
150 lb passengers in your vehicle, the
amount of available cargo and luggage
load capacity is 650 lbs. (1400 − 750
(5 150) = 650 lbs.)
(5) Determine the combined weight of
luggage and cargo being loaded on
the vehicle. That weight may not safely
exceed the available cargo and lug-
gage load capacity calculated in Step
4.
(6) If your vehicle will be towing a
trailer, load from your trailer will be
transferred to your vehicle. Consult
this manual to determine how this
reduces the available cargo and lug-
gage load capacity of your vehicle.
( P.141)
Lexus does not recommend towing a
trailer with your vehicle. Your vehicle is not
designed for trailer towing.
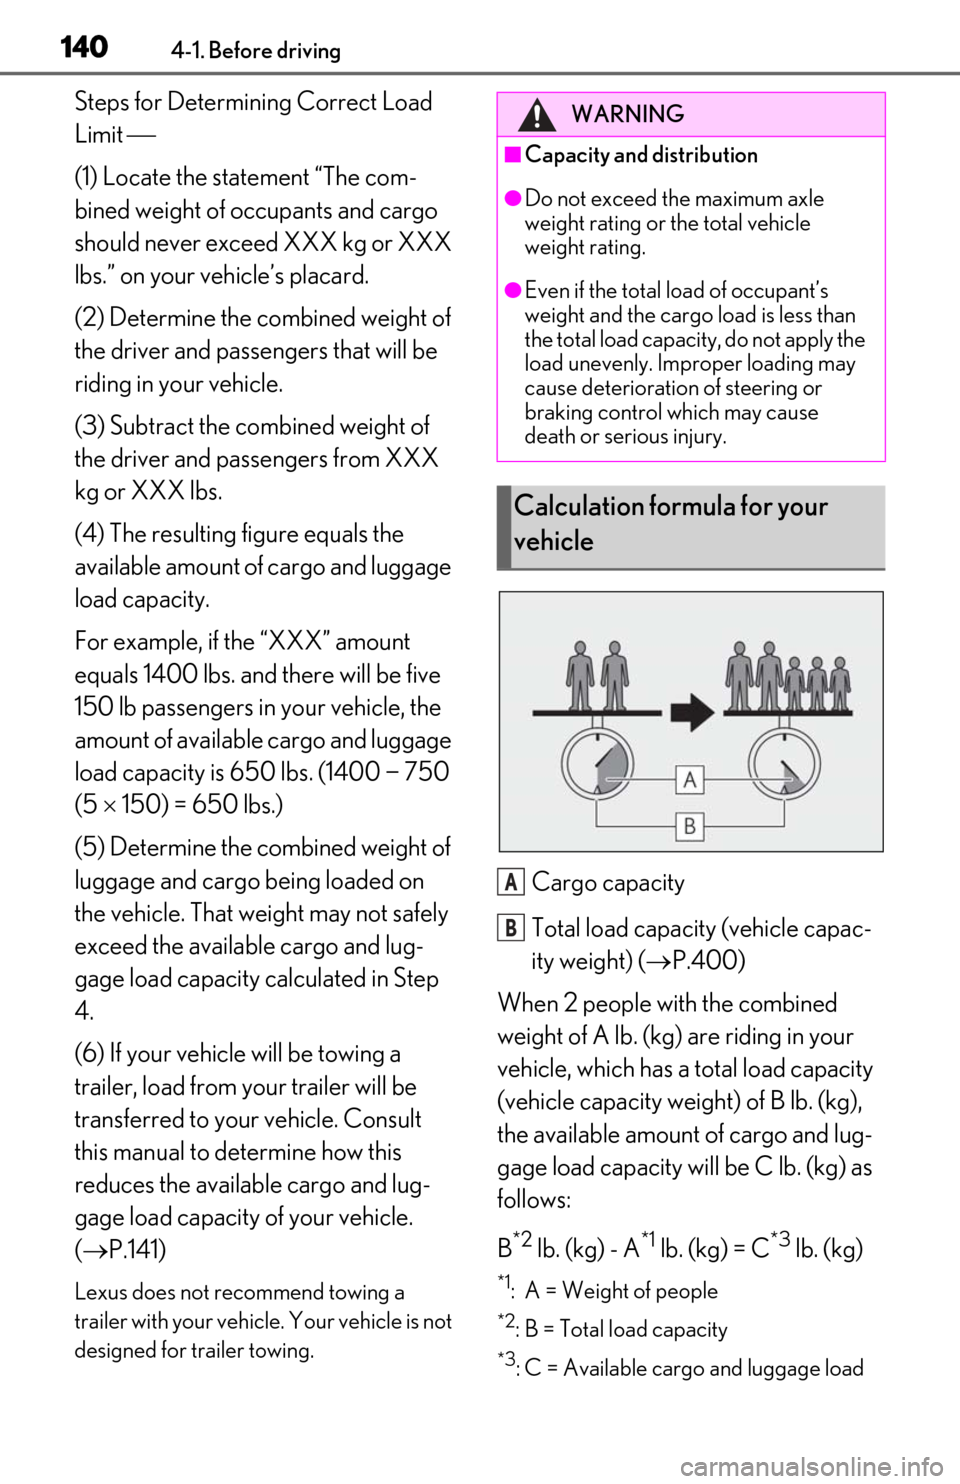
Cargo capacity
Total load capacity (vehicle capac-
ity weight) ( P.400)
When 2 people with the combined
weight of A lb. (kg) are riding in your
vehicle, which has a total load capacity
(vehicle capacity weight) of B lb. (kg),
the available amount of cargo and lug-
gage load capacity will be C lb. (kg) as
follows:
B
*2 lb. (kg) - A*1 lb. (kg) = C*3 lb. (kg)
*1: A = Weight of people
*2: B = Total load capacity
*3: C = Available cargo and luggage load
WARNING
■Capacity and distribution
●Do not exceed the maximum axle
weight rating or the total vehicle
weight rating.
●Even if the total load of occupant’s
weight and the cargo load is less than
the total load capacity, do not apply the
load unevenly. Improper loading may
cause deterioration of steering or
braking control which may cause
death or serious injury.
Calculation formula for your
vehicle
A
B
Page 143 of 462
1414-1. Before driving
4
Driving
In this condition, if 3 more passengers with
the combined weight of D lb. (kg) get on,
the available cargo and luggage load will
be reduced E lb. (kg) as follows:
C lb. (kg) - D*4 lb. (kg) = E*5 lb. (kg)
*4: D = Additional weight of people
*5: E = Available cargo and luggage load
As shown in the example above, if the
number of occupants increases, the
cargo and luggage load will be
reduced by an amount that equals the
increased weight due to the additional
occupants. In other words, if an
increase in the number of occupants
causes an excess of the total load
capacity (combined weight of occu-
pants plus cargo and luggage load),
you must reduce the cargo and lug-
gage on your vehicle.
■Total load capacity and seating capacity
These details are also described on the tire
and loading information label. ( P.338)
Vehicle load limits
Vehicle load limits include total
load capacity, seating capacity,
towing capacity and cargo capac-
ity.
Total load capacity (vehicle
capacity weight): P.400
Total load capacity means the com-
bined weight of occupants, cargo
and luggage.
Seating capacity: 5 occupants
(Front 2, Rear 3)
Seating capacity means the maxi-
mum number of occupants whose
estimated average weight is 150 lb.
(68 kg) per person.
Towing capacity
Lexus does not recommend towing
a trailer with your vehicle.
Cargo capacity
Cargo capacity may increase or
decrease depending on the weight
and the number of occupants.
WARNING
■Overloading the vehicle
Do not overload the vehicle.
It may not only cause damage to the tires,
but also degrade steering and braking
ability, resulting in an accident.
Page 144 of 462

1424-1. Before driving
Trailer towing
Lexus does not recommend towing
a trailer with your vehicle. Lexus
also does not recommend the
installation of a tow hitch or the use
of a tow hitch carrier for a wheel-
chair, scooter, bicycle, etc. Your
vehicle is not designed for trailer
towing or for the use of tow hitch
mounted carriers.
Dinghy towing
Your vehicle is not designed to be
dinghy towed (with 4 wheels on the
ground) behind a motor home.
NOTICE
■To avoid serious damage to your vehi-
cle
Do not tow your vehicle with the four
wheels on the ground.
Page 155 of 462

1534-2. Driving procedures
4
Driving
The selected shift range, from D1 to D6,
will be displaye d in the meter.
■When the “-” paddle shift switch is oper-
ated with the shift le ver in the D position
The shift range is do wnshifted to a range
that enables engine br aking force that is
suitable to driv ing conditions.
■Automatic deactivation of shift range
selection in the D position
Shift range selection in the D position will
be deactivated in the following situations:
●The “+” paddle shift switch is held down
for a period of time
●When the vehicle comes to a stop
●If the accelerator pedal is depressed for
more than a certain period of time
●When the shift lever is shifted to a posi-
tion other than D
■Downshifting restriction warning
buzzer
To help ensure safety and driving perfor-
mance, downshifting operation may some-
times be restricted. In some circumstances,
downshifting may not be possible even
when the shift lever or paddle shift switch is
operated. (A buzzer will sound twice.)
To enter S mode, shift the shift lever to
S. Shift ranges can be selected by
operating the shift lever or paddle shift
switches, allowing you to drive in the
shift range of your choosing. 1
Upshifting
2 Downshifting
The selected shift range, from S1 to S6, will
be displayed in the meter.
The initial shift range in S mode is set
automatically to S5 or S4 according to
vehicle’s speed.
■Shift ranges and their functions
You can choose from 6 levels of
accelerating force and engine brak-
ing force.
A lower shift range will provide
greater accelerating force and
engine braking force than a higher
shift range, and the engine revolu-
tions will also increase.
If you accelerate while in ranges 1 to
4, the shift range may automatically
increase in accordance with the
vehicle’s speed.
■S mode
●When the shift range is S4 or lower, hold-
ing the shift lever toward “+” sets the shift
range to S6.
●To prevent the engine from over-revving,
upshifting may automatically occur.
Selecting shift ranges in S mode
Page 163 of 462
1614-3. Operating the lights and wipers
4
Driving
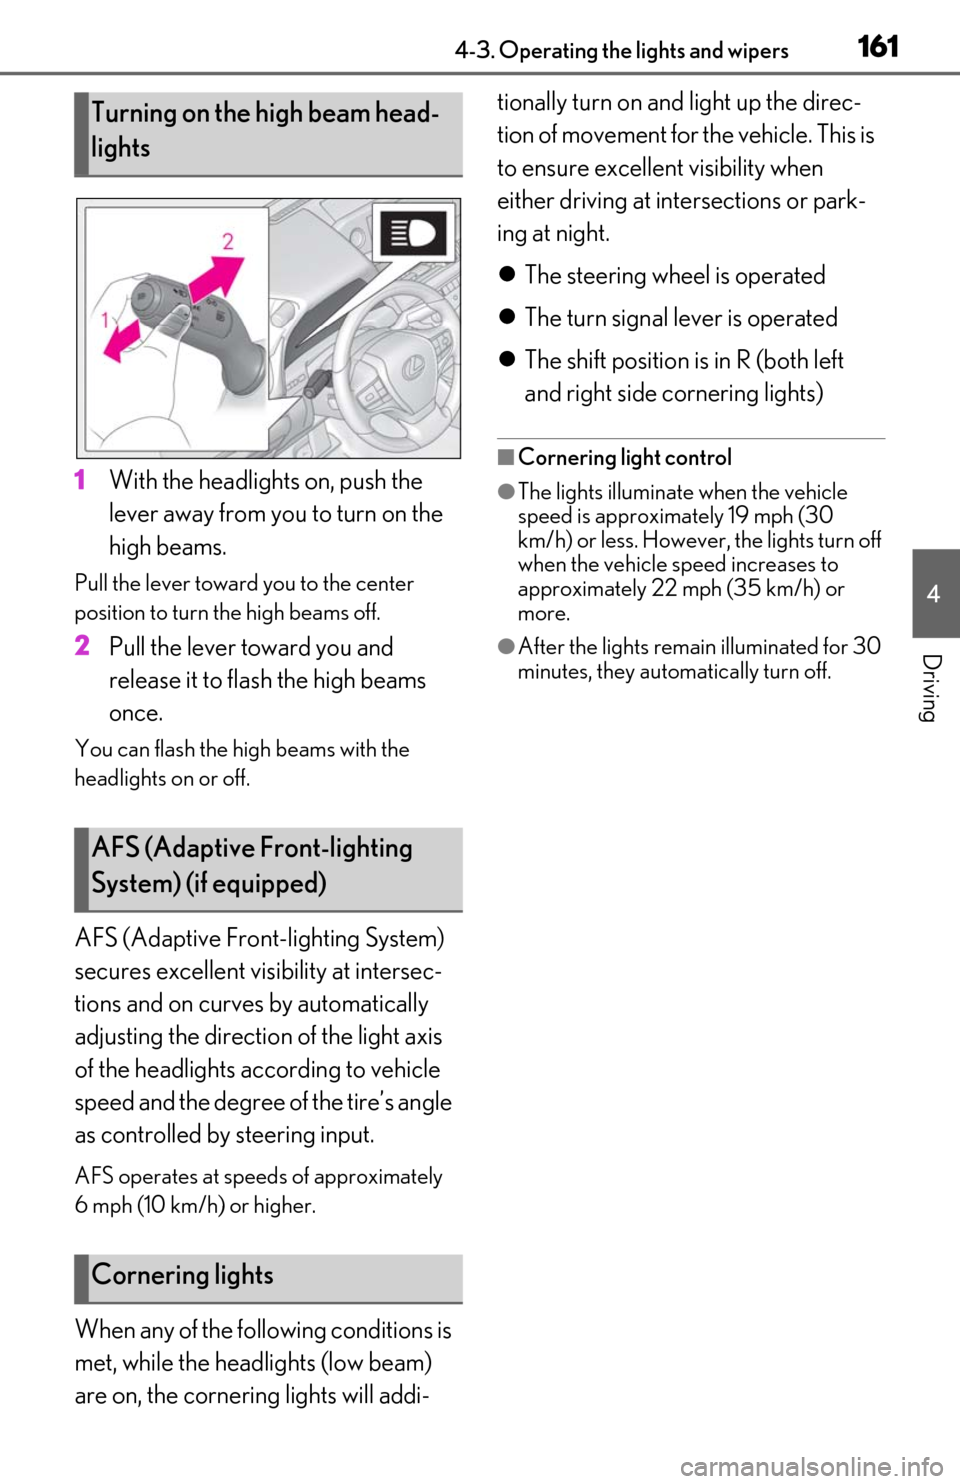
1With the headlights on, push the
lever away from you to turn on the
high beams.
Pull the lever toward you to the center
position to turn the high beams off.
2Pull the lever toward you and
release it to flash the high beams
once.
You can flash the high beams with the
headlights on or off.
AFS (Adaptive Front-lighting System)
secures excellent visibility at intersec-
tions and on curves by automatically
adjusting the direction of the light axis
of the headlights according to vehicle
speed and the degree of the tire’s angle
as controlled by steering input.
AFS operates at speed s of approximately
6 mph (10 km/h) or higher.
When any of the following conditions is
met, while the headlights (low beam)
are on, the cornering lights will addi- tionally turn on and light up the direc-
tion of movement for the vehicle. This is
to ensure excellent visibility when
either driving at intersections or park-
ing at night.
The steering wheel is operated
The turn signal lever is operated
The shift position is in R (both left
and right side cornering lights)
■Cornering light control
●The lights illuminate when the vehicle
speed is approximately 19 mph (30
km/h) or less. However, the lights turn off
when the vehicle speed increases to
approximately 22 mph (35 km/h) or
more.
●After the lights remain illuminated for 30
minutes, they automatically turn off.
Turning on the high beam head-
lights
AFS (Adaptive Front-lighting
System) (if equipped)
Cornering lights