reset Lexus ES350 2013 REMOTE TOUCH (WITH NAVIGATION SYSTEM) /
[x] Cancel search | Manufacturer: LEXUS, Model Year: 2013, Model line: ES350, Model: Lexus ES350 2013Pages: 110, PDF Size: 2.47 MB
Page 5 of 110

5
ES350_QG_OM33A11U_(U)
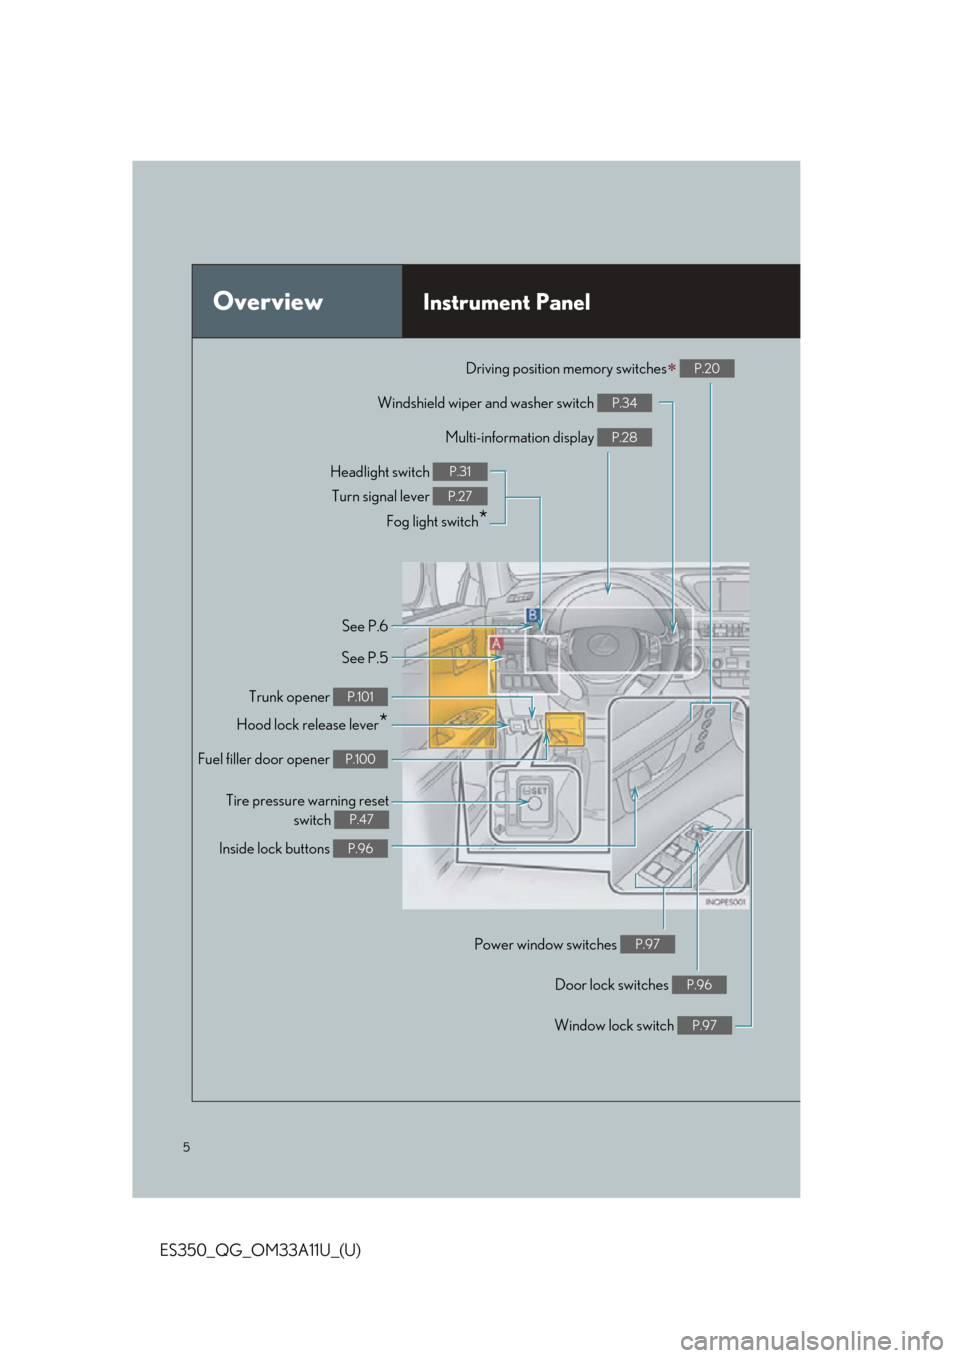
OverviewInstrument Panel
Windshield wiper and washer switch P.34
Multi-information display P.28
Headlight switch Turn signal lever
Fog light switch
*
P.31
P.27
Inside lock buttons P.96
Trunk opener P.101
Hood lock release lever*
Driving position memory switches P.20
See P.6
See P.5
Window lock switch P.97
Power window switches P.97
Door lock switches P.96
Tire pressure warning reset switch
P.47
Fuel filler door opener P.100
Page 7 of 110

7
ES350_QG_OM33A11U_(U)
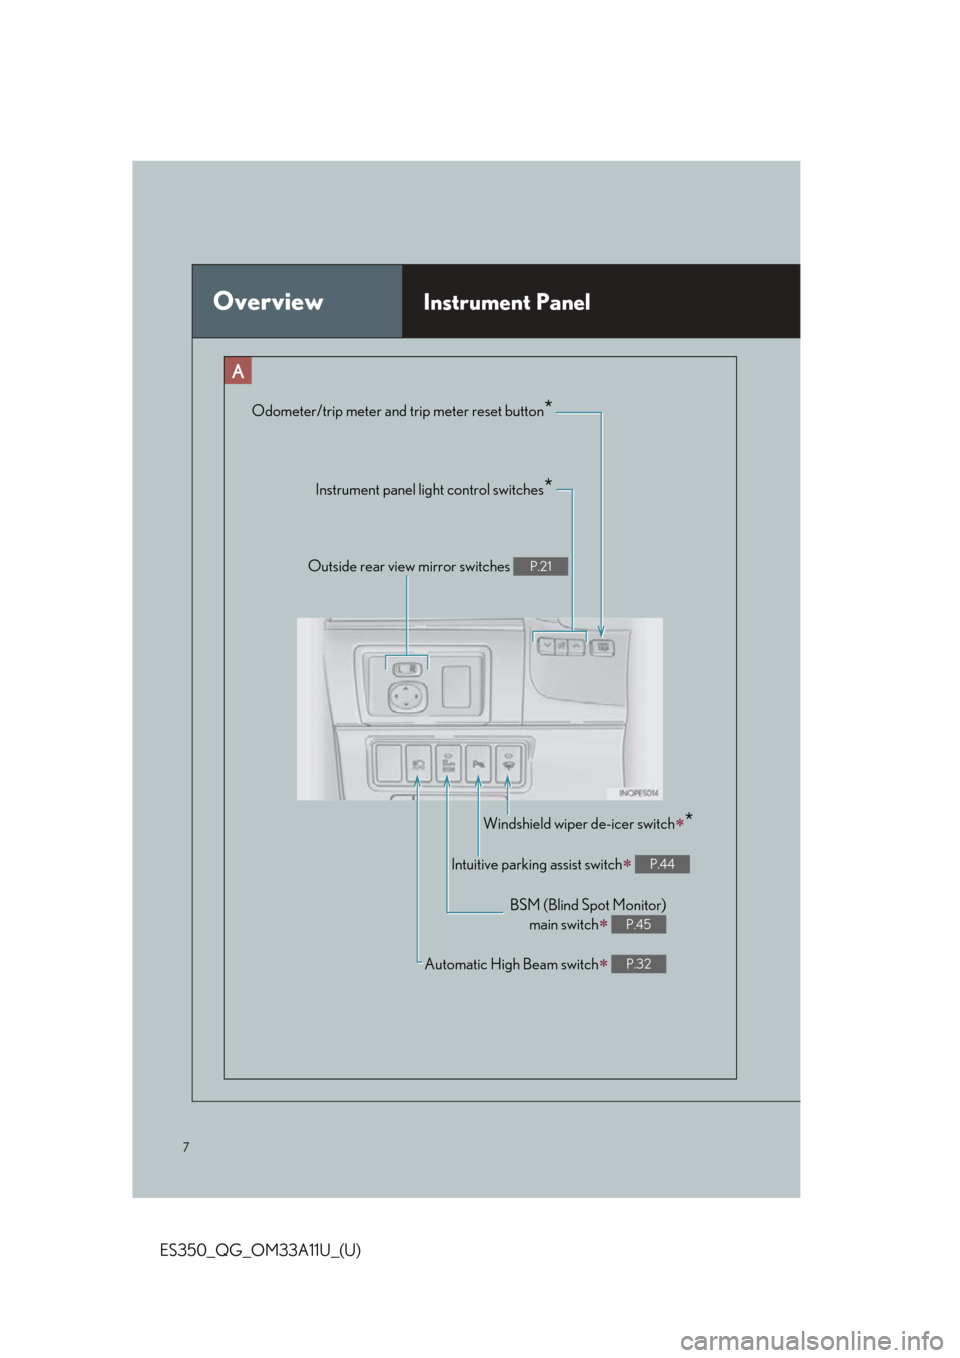
OverviewInstrument Panel
Odometer/trip meter and trip meter reset button*
Instrument panel light control switches*
Outside rear view mirror switches P.21
Windshield wiper de-icer switch*
Intuitive parking assist switch P.44
BSM (Blind Spot Monitor)
main switch
P.45
Automatic High Beam switch P.32
Page 11 of 110

11
ES350_QG_OM33A11U_(U)
Consumption Screen (if equipped)
■Displaying the consumption screen
Vehicles with a navigation system
Press the “MENU” button on the Remote Touch, then select “Info/Apps” on the “Menu”
screen.
Select “Fuel Consumption” on the “Information” screen.
Vehicles with Lexus Display Audio system
Press the “MENU” button on the Lexus Display Audio controller, then select “Car” on the
“Menu” screen.
● Trip information
If the “Trip Information” screen is not displayed, select “Trip Information”.
Vehicles with a navigation system
Current fuel consumption
Fuel consumption in the past 15 min-
utes
Regenerated energy in the past 15
minutes (if equipped)
Displays the average vehicle speed
since the engine was started.
Displays the elapsed time since the
engine was started.
Cruising range
Reset the consumption data
“Past Record” (Navigation system) or
“History” (Lexus Display Audio sys-
tem) screen appears
“Energy Monitor” screen appears (if
equipped)
Vehicles with Lexus Display Audio system
You can view the status of your vehicle on th
e navigation system screen or Lexus Display
Audio system screen.
1
2
1
2
3
4
5
6
7
8
9
Page 12 of 110

12
ES350_QG_OM33A11U_(U)
●Past record
If the “History” or “Past Record” screen is no t displayed, select “History” or “Past Record”.
Vehicles with a navigation system
Average fuel consumption
Previous fuel consumption record
Best recorded fuel consumption
Update the average fuel consumption
data
Reset the past record data
“Trip Information” screen appears
“Energy Monitor” screen appears (if
equipped)
Vehicles with Lexus Display Audio system
1
2
3
4
5
6
7
Page 40 of 110

40
ES350_QG_OM33A11U_(U)
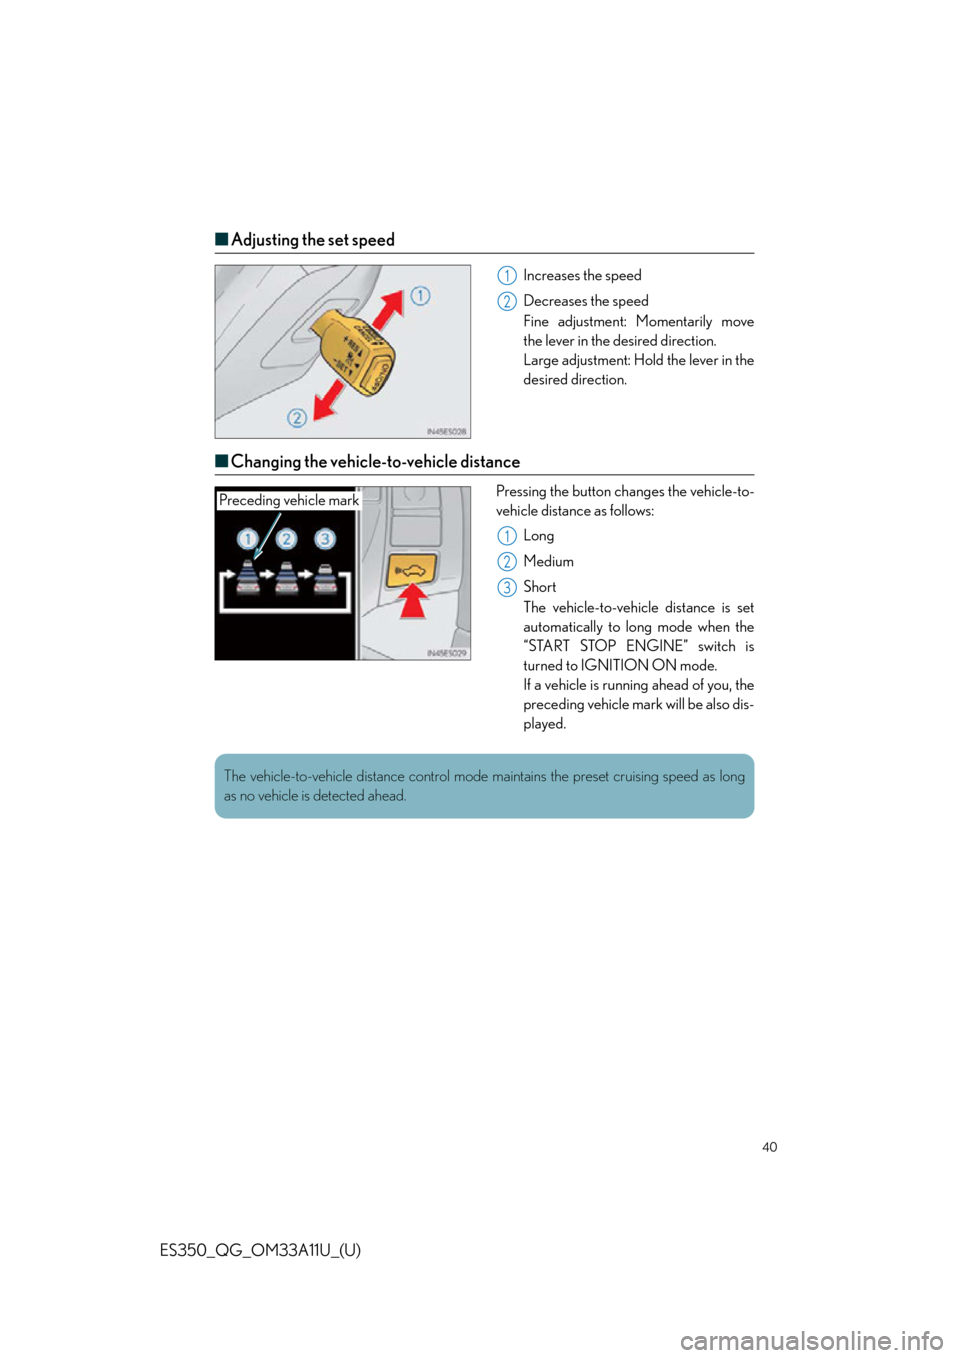
■Adjusting the set speed
Increases the speed
Decreases the speed
Fine adjustment: Momentarily move
the lever in the desired direction.
Large adjustment: Hold the lever in the
desired direction.
■ Changing the vehicle-to-vehicle distance
Pressing the button changes the vehicle-to-
vehicle distance as follows:
Long
Medium
Short
The vehicle-to-vehicle distance is set
automatically to long mode when the
“START STOP ENGINE” switch is
turned to IGNITION ON mode.
If a vehicle is running ahead of you, the
preceding vehicle mark will be also dis-
played.
1
2
Preceding vehicle mark
1
2
3
The vehicle-to-vehicle distance control mode maintains the preset cruising speed as long
as no vehicle is detected ahead.
Page 47 of 110

47
ES350_QG_OM33A11U_(U)
Tire Pressure Warning System
■The tire inflation pressure display function
The tire pressure detected by the tire pres-
sure warning system can be displayed on
the multi-information display.
■Initializing the tire pressure warning system
Press and hold the tire pressure warning
reset switch until the tire pressure warning
light blinks slowly 3 times.
Your vehicle is equipped with a tire pressure warning system that uses tire pressure warn-
ing valves and transmitters to detect low tire inflation pressure before serious problems
arise.
Page 61 of 110

61
ES350_QG_OM33A11U_(U)
■Radio
Station selector
Scanning for receivable stations
Using HD Radio
TM Te c h n o l o g y ( i f
equipped)
Adjusting the frequency
Preset turning/seeking the frequency
■Entering station presets
Select the desired station by using the tune, the seek or the scan function.
Using the Remote Touch, select one of the left side screen buttons (1-6) and hold it until
a beep is heard, indicating that the station has been set.
There are 6 sets of 6 presets. There is a total of 36 presets.
1
2
3
4
5
1
2
Page 73 of 110

73
ES350_QG_OM33A11U_(U)
Audio System (with Lexus Display Audio )
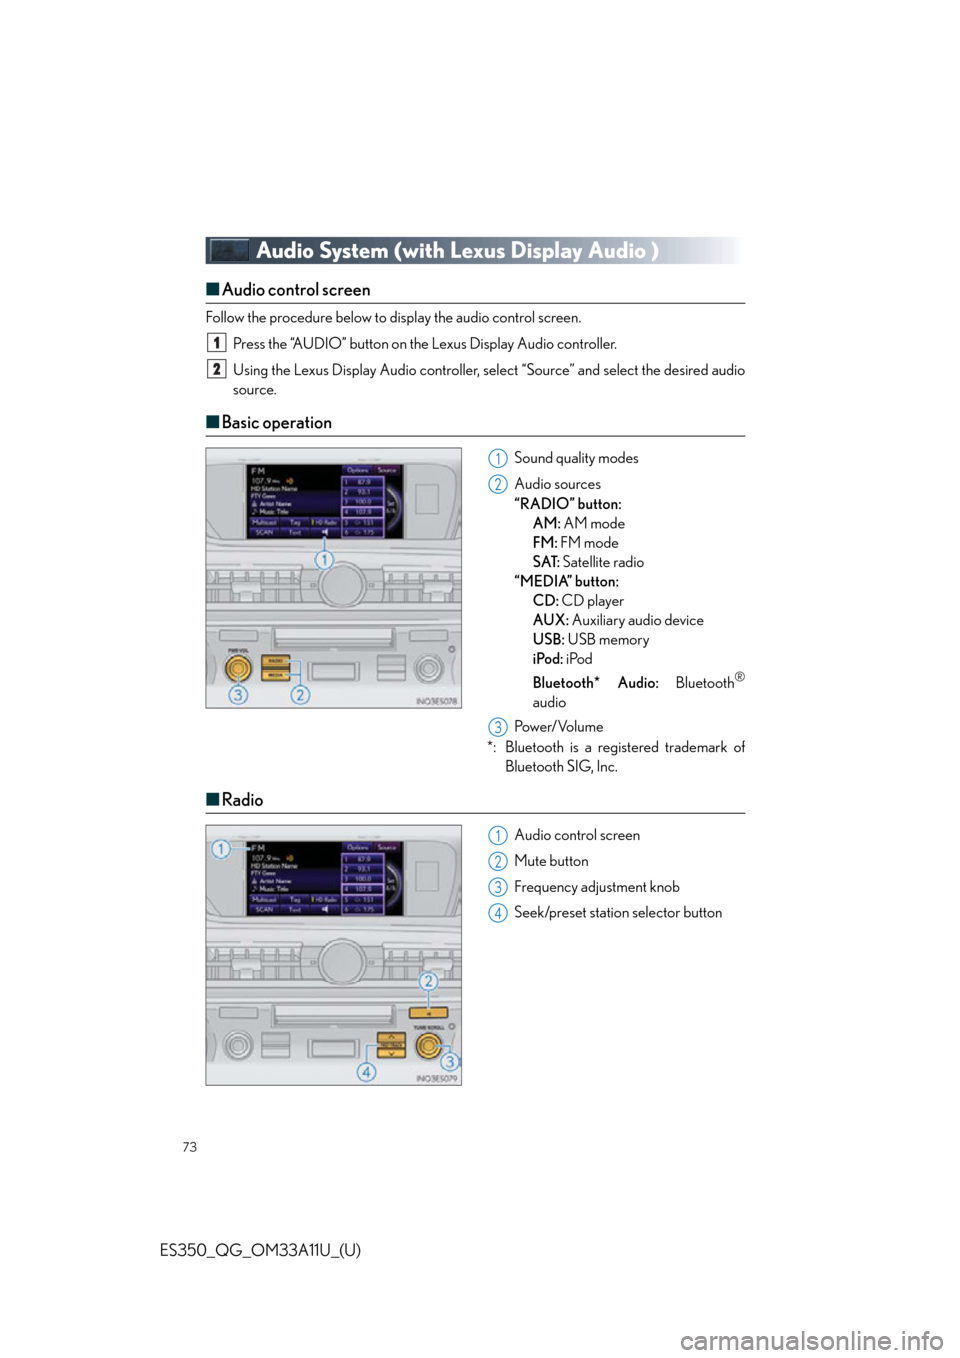
■Audio control screen
Follow the procedure below to display the audio control screen.
Press the “AUDIO” button on the Lexus Display Audio controller.
Using the Lexus Display Audio controller, sele ct “Source” and select the desired audio
source.
■ Basic operation
Sound quality modes
Audio sources
“RADIO” button:
AM: AM mode
FM: FM mode
SAT: Satellite radio
“MEDIA” button: CD: CD player
AUX: Auxiliary audio device
USB: USB memory
iPod: iPod
Bluetooth* Audio: Bluetooth
®
audio
Pow e r/ Vo l u m e
*: Bluetooth is a registered trademark of Bluetooth SIG, Inc.
■Radio
Audio control screen
Mute button
Frequency adjustment knob
Seek/preset station selector button
1
2
1
2
3
1
2
3
4
Page 74 of 110

74
ES350_QG_OM33A11U_(U)
■Audio control screen
“Presets” screen“Options” screen appears
Audio source selection screen appears
Changing the Multicast Ch
Information in the music under broad-
casting is memorized
Selecting HD Radio™ technology
Setting the sound
Displaying text messages
Scanning for receivable station
Preset stations
“Presets” screen appears
Selecting program type or channel
category
RBDS message display on/off
Displaying traffic messages
Options” screen
■Entering station presets
Select the desired stat
ion by using the tune or the seek function.
Using the Remote Touch, select one of the pr eset buttons (1-6) and hold it until a beep
is heard, indicating that the station has been set.
1
2
3
4
5
6
7
8
9
10
11
12
13
1
2
Page 80 of 110

80
ES350_QG_OM33A11U_(U)
■Dialing by inputting a number
Press the talk switch and say “Dial by
number”.
Press the talk switch and say the phone
number.
Dial by one of the following methods:
a. Press the off-hook switch.
b. Press the talk switch and say “Dial”.
c. Select “Dial” using .
■ Dialing by inputting a name
Press the talk switch and say “Dial by
name”.
Select a registered name to be input by
either of the following methods:
a. Press the talk switch and say a regis-
tered name.
b. Press the talk switch and say “List Names”. Press the talk switch when
the desired name is read aloud.
Dial by one of the following methods:
a. Press the off-hook switch.
b. Press the talk switch and say “Dial”.
c. Select “Dial” using .
■ Speed dial
Press the off-hook switch.
Press the preset button in which the
desired number is registered.
Press the off-hook switch.
1
2
3
1
2
3
1
2
3