Lexus ES350 2014 REMOTE TOUCH (WITH NAVIGATION SYSTEM)
Manufacturer: LEXUS, Model Year: 2014, Model line: ES350, Model: Lexus ES350 2014Pages: 48, PDF Size: 5.01 MB
Page 1 of 48
50
ES350_QG_OM33A70U_(U)
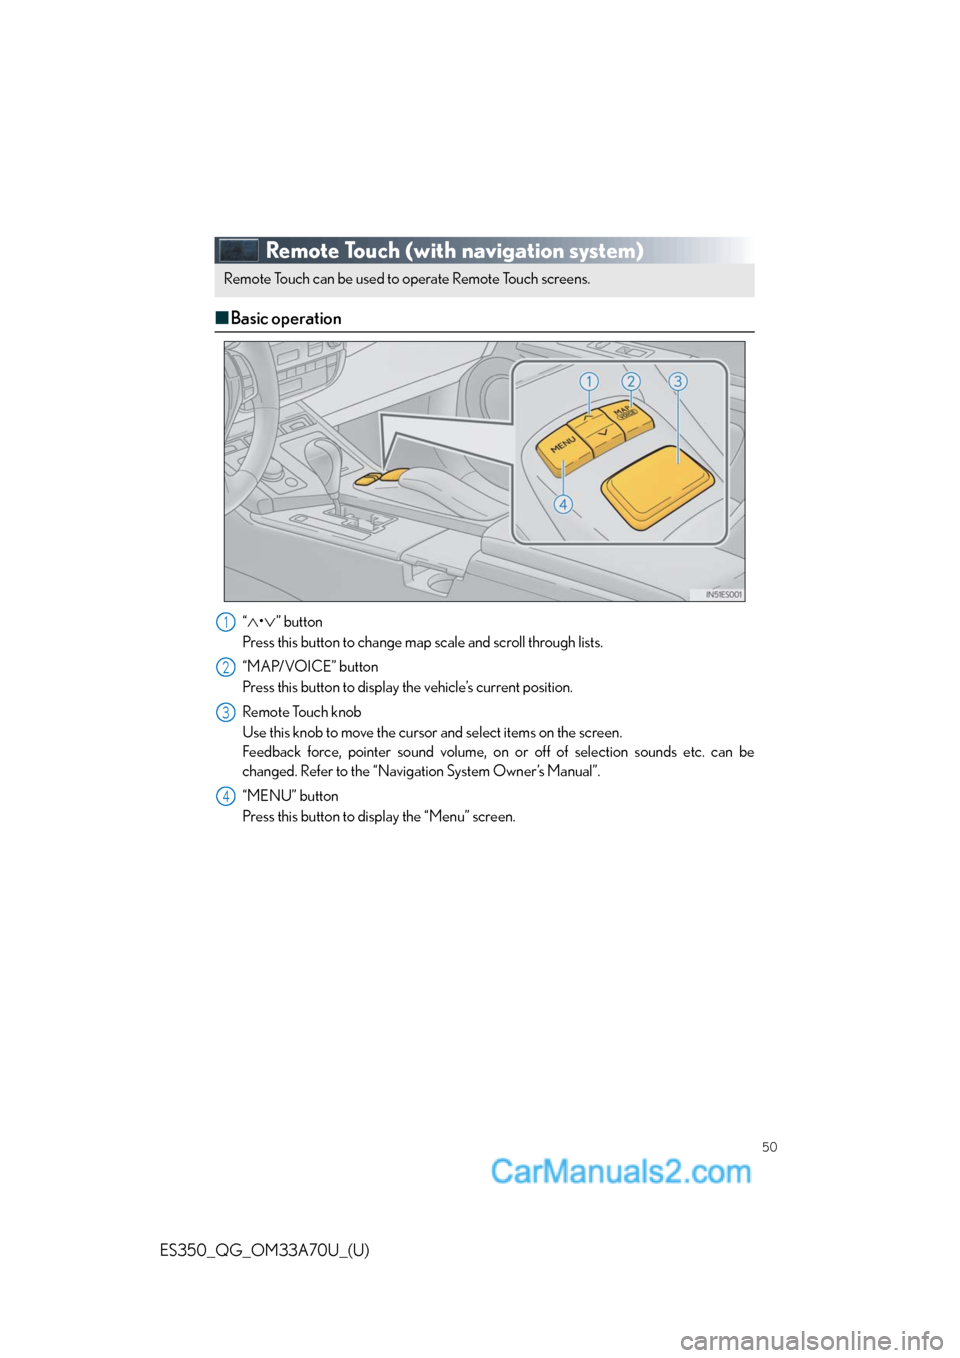
Remote Touch (with navigation system)
■Basic operation
“∧•∨” button
Press this button to change map scale and scroll through lists.
“MAP/VOICE” button
Press this button to display the vehicle’s current position.
Remote Touch knob
Use this knob to move the cursor and select items on the screen.
Feedback force, pointer sound volume, on or off of selection sounds etc. can be
changed. Refer to the “Navigation System Owner’s Manual”.
“MENU” button
Press this button to display the “Menu” screen.
Remote Touch can be used to operate Remote Touch screens.
1
2
3
4
Page 2 of 48
51
ES350_QG_OM33A70U_(U)
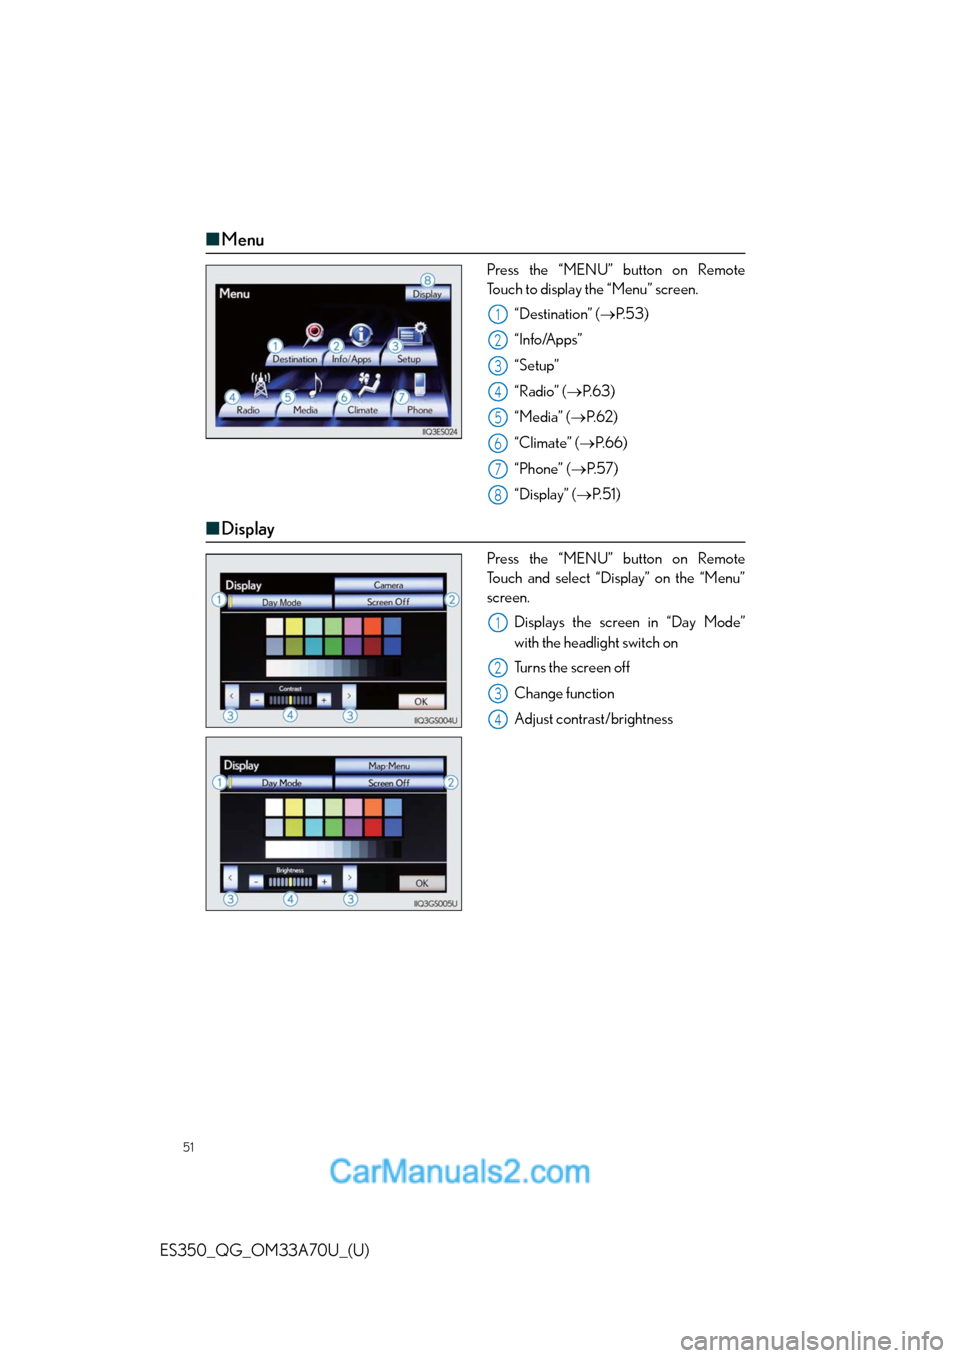
■Menu
Press the “MENU” button on Remote
Touch to display the “Menu” screen.
“Destination” (→P. 5 3 )
“Info/Apps”
“Setup”
“Radio” (→P. 6 3 )
“Media” (→P. 6 2 )
“Climate” (→P.66)
“Phone” (→P. 5 7 )
“Display” (→P. 5 1 )
■Display
Press the “MENU” button on Remote
Touch and select “Display” on the “Menu”
screen.
Displays the screen in “Day Mode”
with the headlight switch on
Turns the screen off
Change function
Adjust contrast/brightness
1
2
3
4
5
6
7
8
1
2
3
4
Page 3 of 48
52
ES350_QG_OM33A70U_(U)
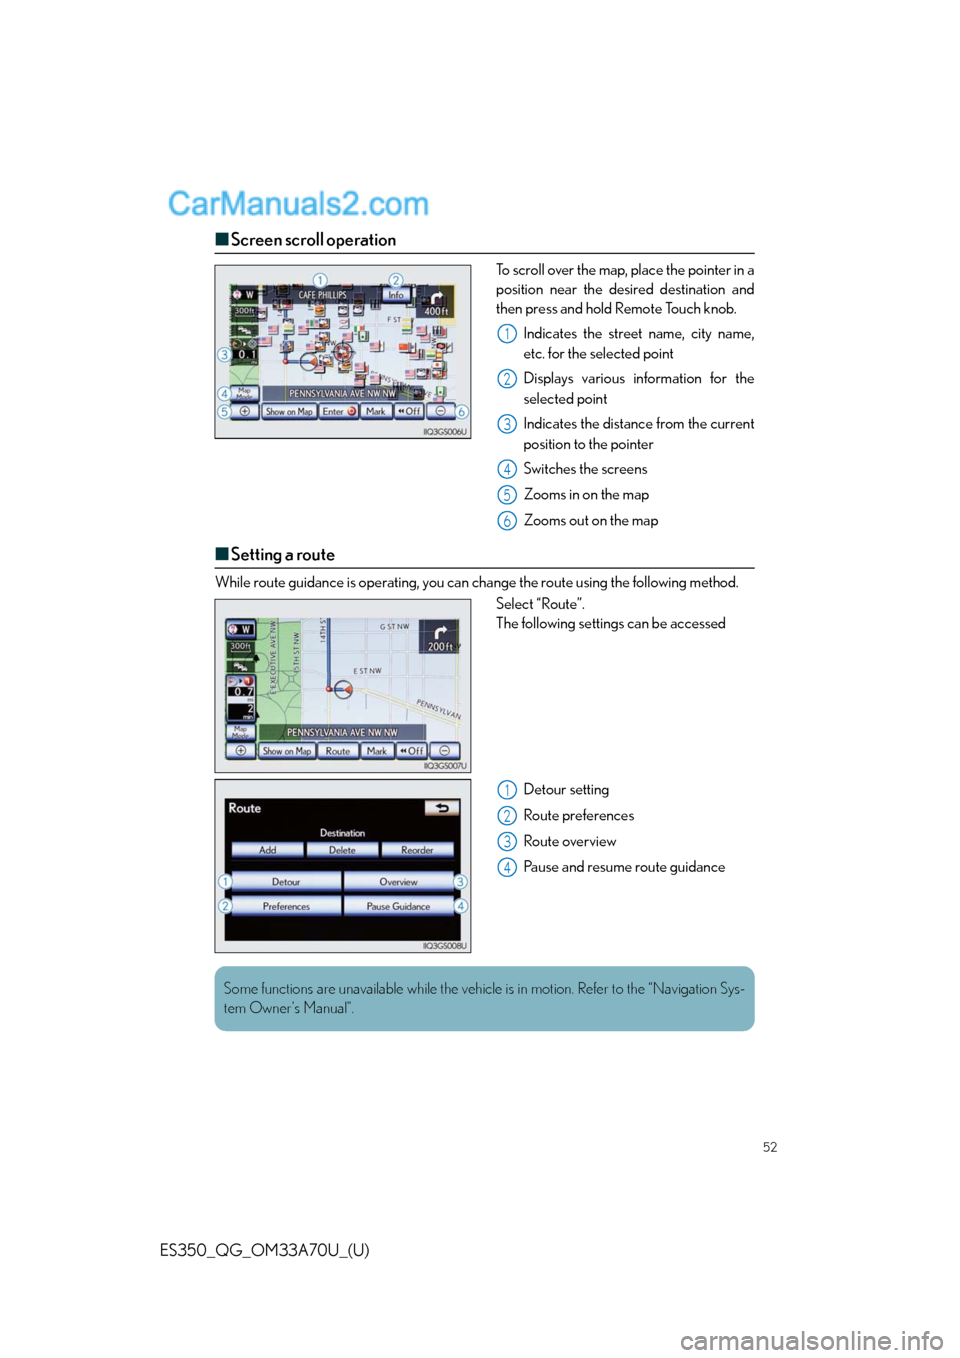
■Screen scroll operation
To scroll over the map, place the pointer in a
position near the desired destination and
then press and hold Remote Touch knob.
Indicates the street name, city name,
etc. for the selected point
Displays various information for the
selected point
Indicates the distance from the current
position to the pointer
Switches the screens
Zooms in on the map
Zooms out on the map
■Setting a route
While route guidance is operating, you can change the route using the following method.
Select “Route”.
The following settings can be accessed
Detour setting
Route preferences
Route overview
Pause and resume route guidance
1
2
3
4
5
6
1
2
3
4
Some functions are unavailable while the vehicle is in motion. Refer to the “Navigation Sys-
tem Owner’s Manual”.
Page 4 of 48
53
ES350_QG_OM33A70U_(U)
Navigation System (if equipped)
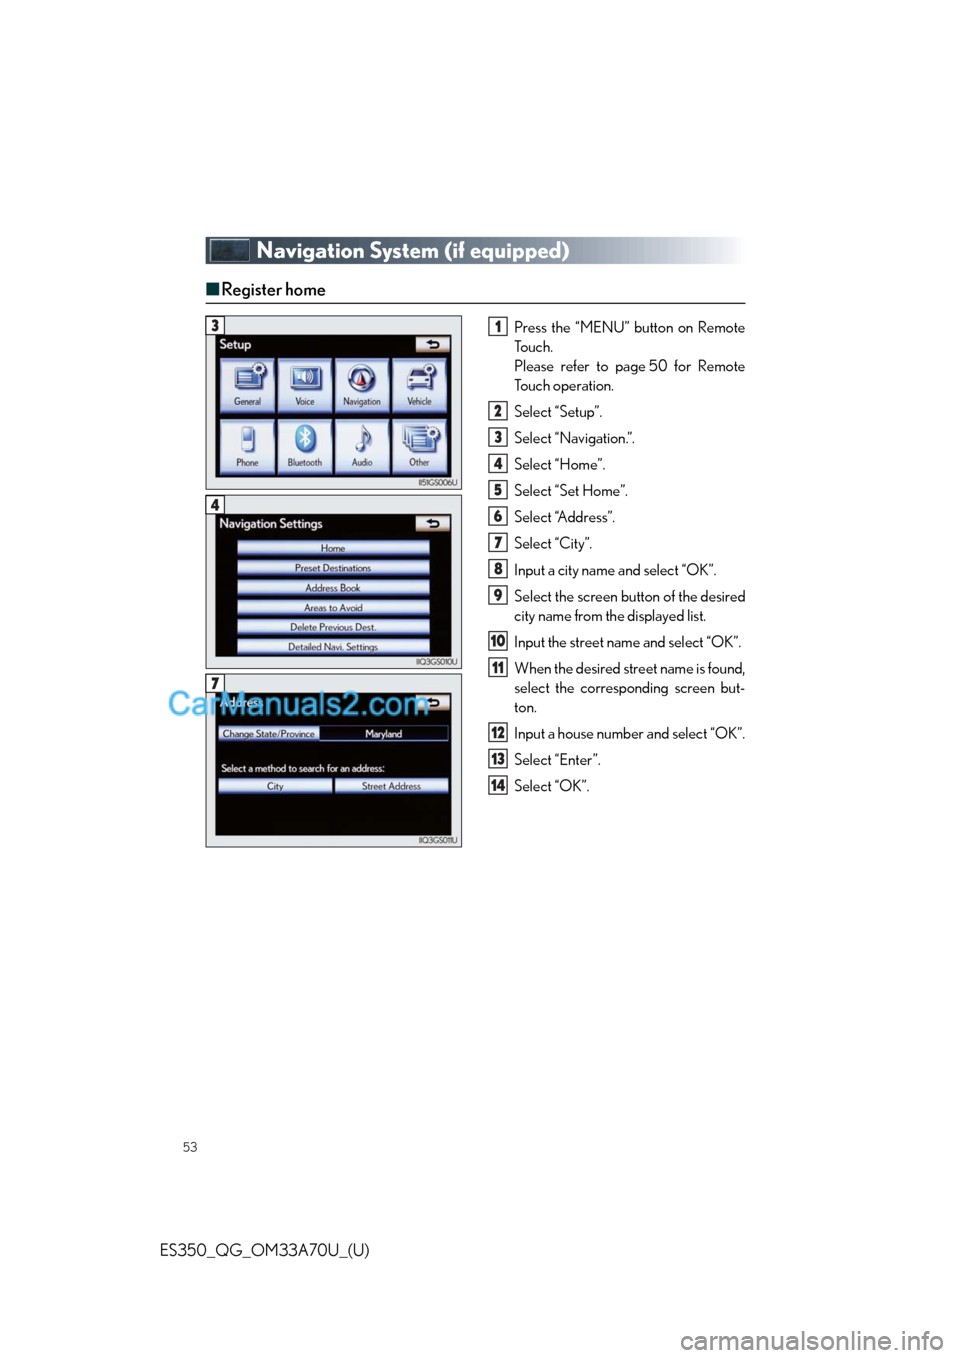
■Register home
Press the “MENU” button on Remote
To u c h .
Please refer to page 50 for Remote
To u c h o p e r a t i o n .
Select “Setup”.
Select “Navigation.”.
Select “Home”.
Select “Set Home”.
Select “Address”.
Select “City”.
Input a city name and select “OK”.
Select the screen button of the desired
city name from the displayed list.
Input the street name and select “OK”.
When the desired street name is found,
select the corresponding screen but-
ton.
Input a house number and select “OK”.
Select “Enter”.
Select “OK”.31
2
3
4
5
6
7
8
9
10
11
12
13
14
4
7
Page 5 of 48
54
ES350_QG_OM33A70U_(U)
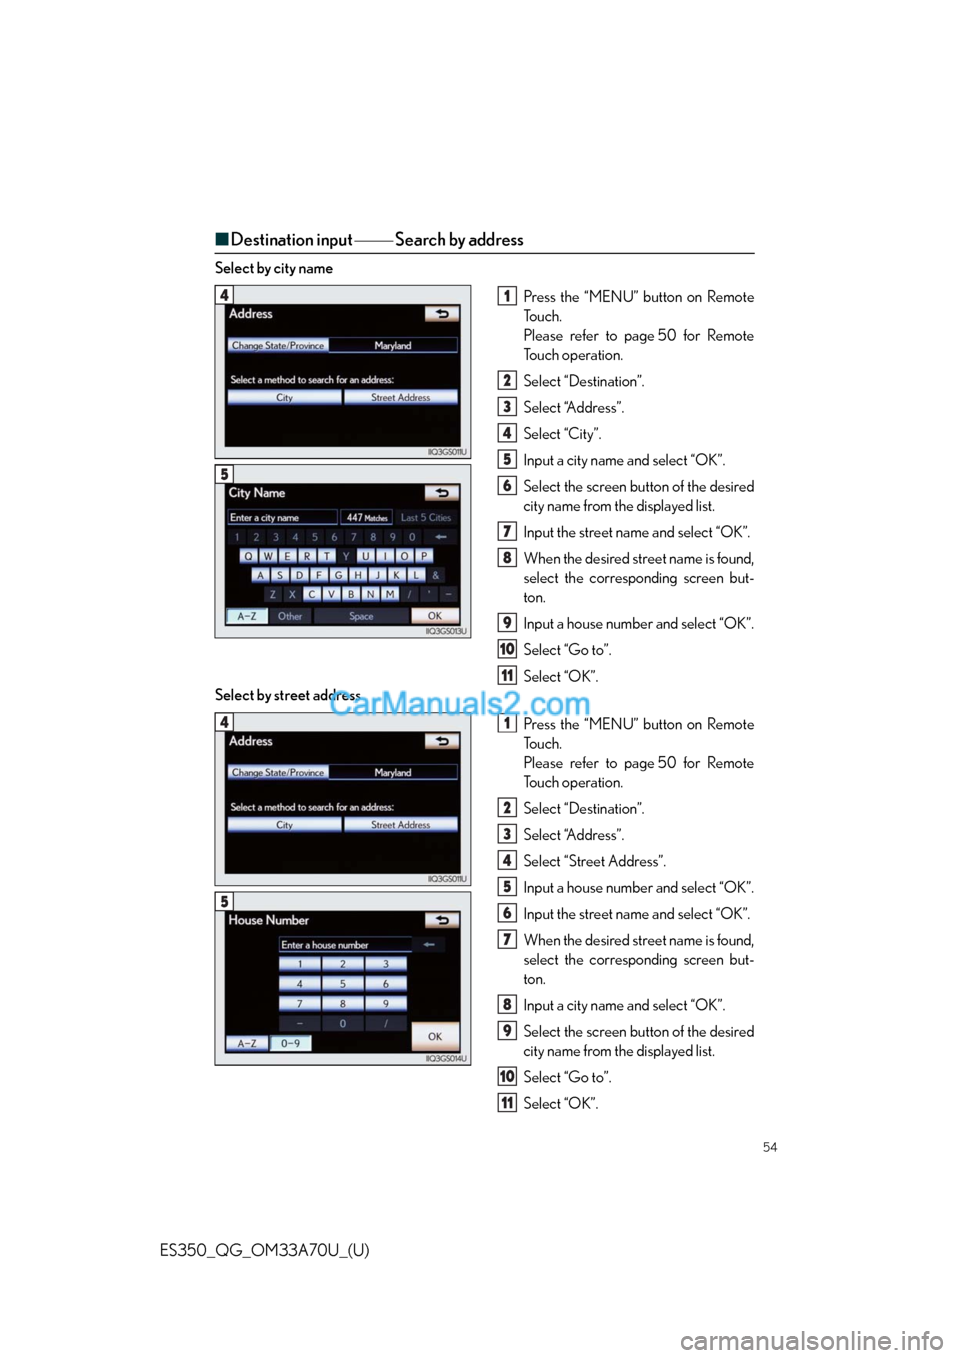
■Destination input ⎯⎯ Search by address
Select by city name
Press the “MENU” button on Remote
To u c h .
Please refer to page 50 for Remote
To u c h o p e r a t i o n .
Select “Destination”.
Select “Address”.
Select “City”.
Input a city name and select “OK”.
Select the screen button of the desired
city name from the displayed list.
Input the street name and select “OK”.
When the desired street name is found,
select the corresponding screen but-
ton.
Input a house number and select “OK”.
Select “Go to”.
Select “OK”.
Select by street address
Press the “MENU” button on Remote
To u c h .
Please refer to page 50 for Remote
To u c h o p e r a t i o n .
Select “Destination”.
Select “Address”.
Select “Street Address”.
Input a house number and select “OK”.
Input the street name and select “OK”.
When the desired street name is found,
select the corresponding screen but-
ton.
Input a city name and select “OK”.
Select the screen button of the desired
city name from the displayed list.
Select “Go to”.
Select “OK”.
41
2
3
4
5
6
7
8
9
10
11
5
41
2
3
4
5
6
7
8
9
10
11
5
Page 6 of 48
55
ES350_QG_OM33A70U_(U)
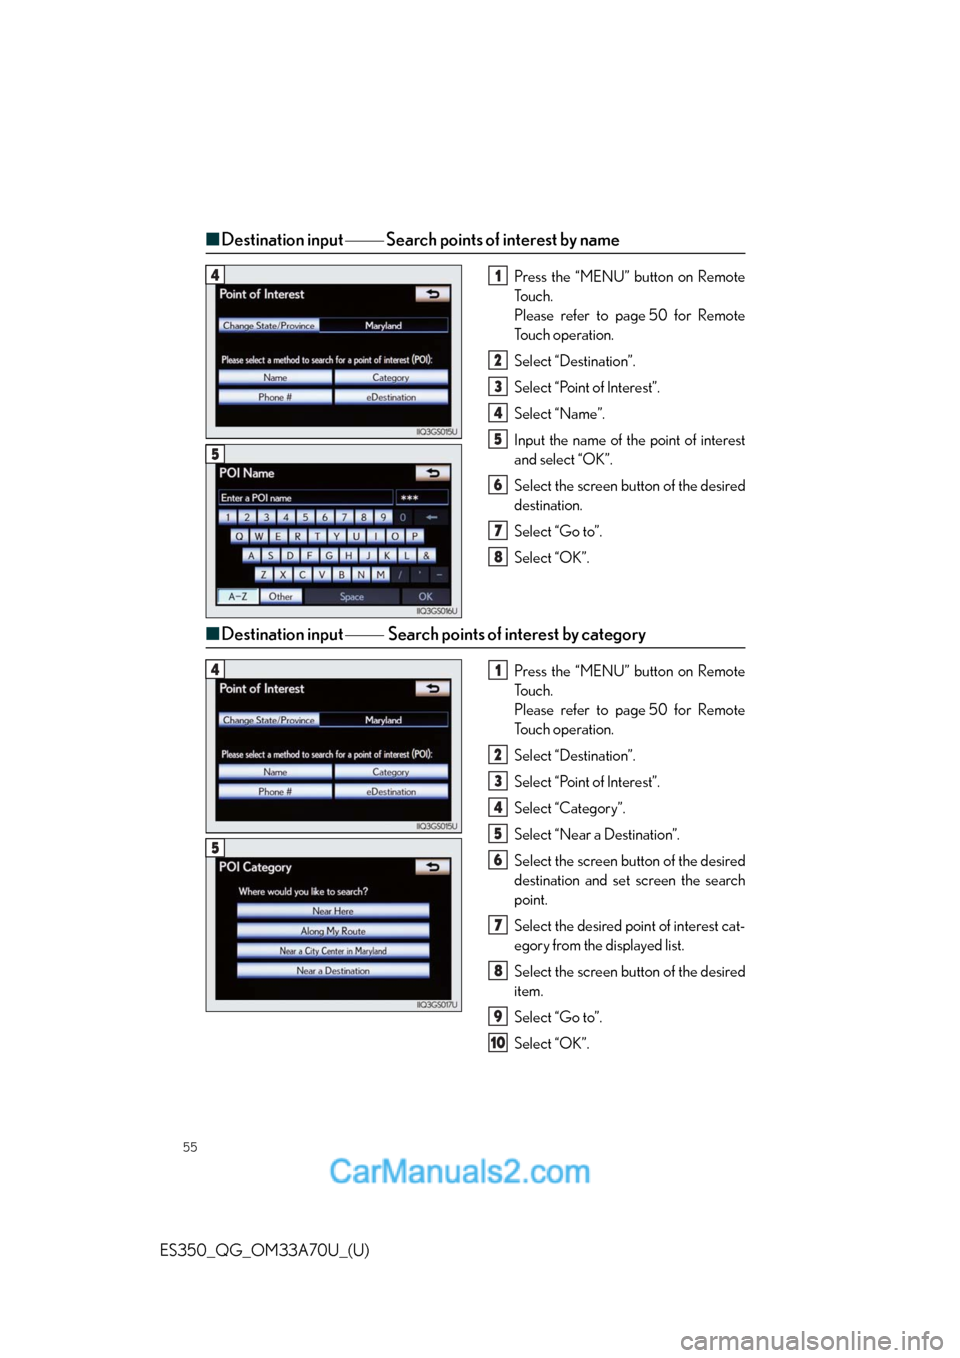
■Destination input ⎯⎯ Search points of interest by name
Press the “MENU” button on Remote
To u c h .
Please refer to page 50 for Remote
To u c h o p e r a t i o n .
Select “Destination”.
Select “Point of Interest”.
Select “Name”.
Input the name of the point of interest
and select “OK”.
Select the screen button of the desired
destination.
Select “Go to”.
Select “OK”.
■Destination input ⎯⎯ Search points of interest by category
Press the “MENU” button on Remote
To u c h .
Please refer to page 50 for Remote
To u c h o p e r a t i o n .
Select “Destination”.
Select “Point of Interest”.
Select “Category”.
Select “Near a Destination”.
Select the screen button of the desired
destination and set screen the search
point.
Select the desired point of interest cat-
egory from the displayed list.
Select the screen button of the desired
item.
Select “Go to”.
Select “OK”.
41
2
3
4
5
6
7
8
5
41
2
3
4
5
6
7
8
9
10
5
Page 7 of 48
56
ES350_QG_OM33A70U_(U)
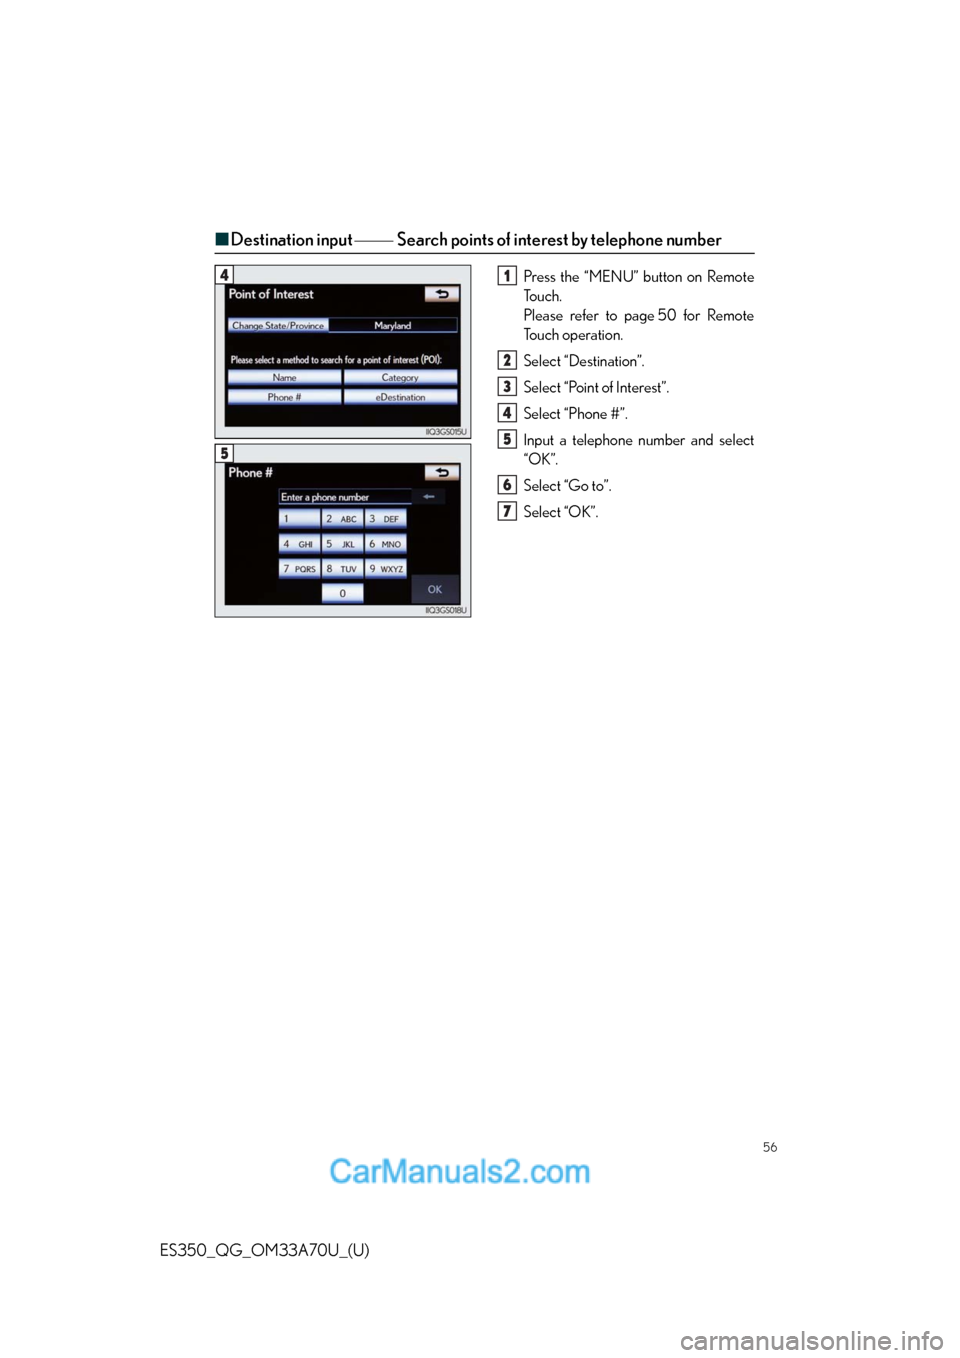
■Destination input ⎯⎯ Search points of interest by telephone number
Press the “MENU” button on Remote
To u c h .
Please refer to page 50 for Remote
To u c h o p e r a t i o n .
Select “Destination”.
Select “Point of Interest”.
Select “Phone #”.
Input a telephone number and select
“OK”.
Select “Go to”.
Select “OK”.41
2
3
4
5
6
7
5
Page 8 of 48
57
ES350_QG_OM33A70U_(U)
Hands-free System For Cellular Phone
(with navigation system)
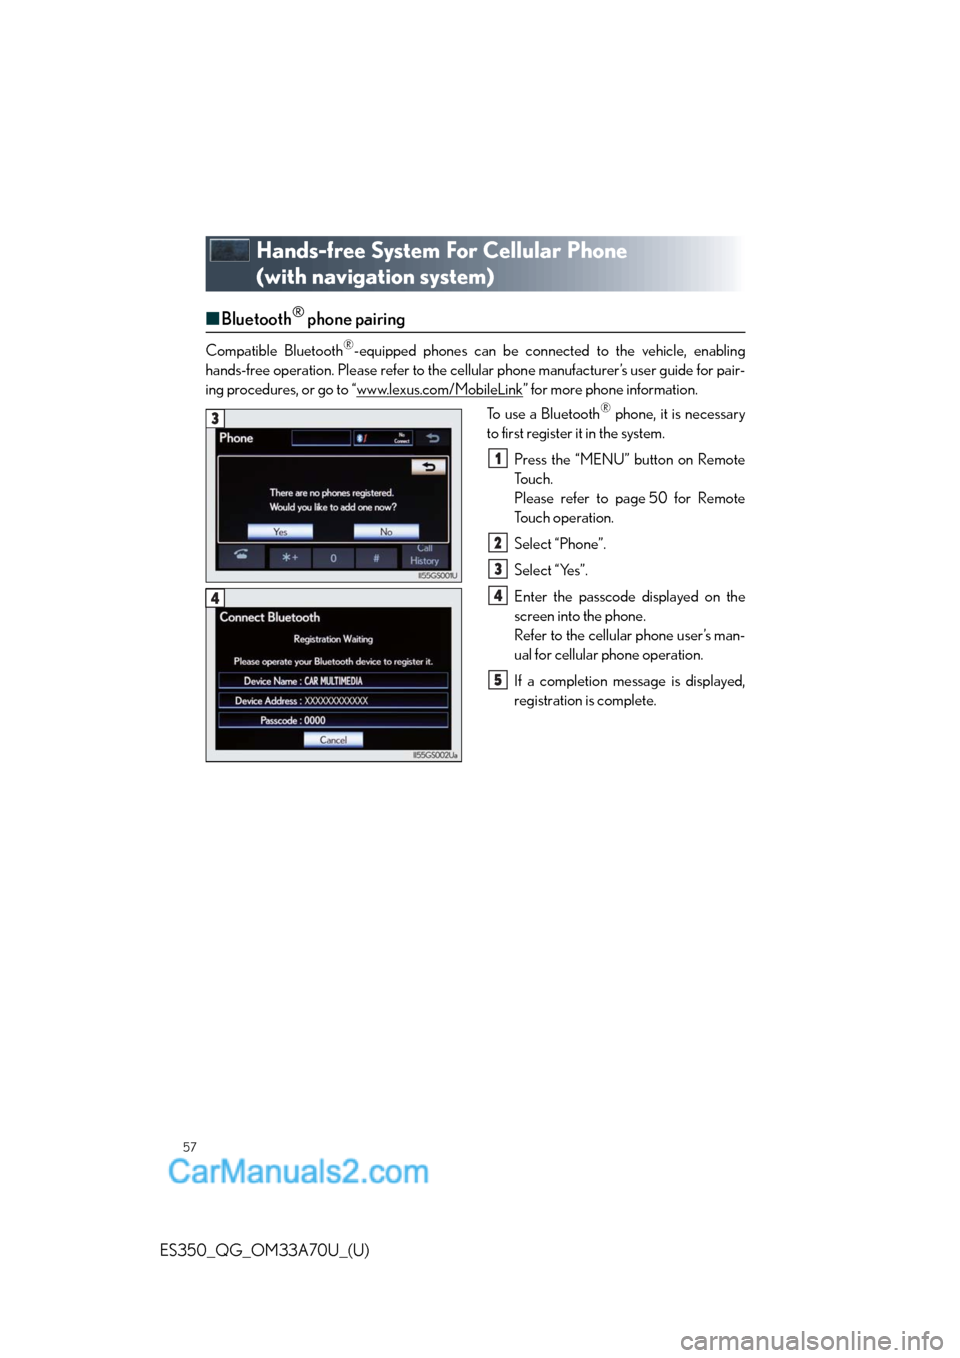
■Bluetooth® phone pairing
Compatible Bluetooth®-equipped phones can be connected to the vehicle, enabling
hands-free operation. Please refer to the cellular phone manufacturer’s user guide for pair-
ing procedures, or go to “www.lexus.com/MobileLink
” for more phone information.
To use a Bluetooth
® phone, it is necessary
to first register it in the system.
Press the “MENU” button on Remote
To u c h .
Please refer to page 50 for Remote
To u c h o p e r a t i o n .
Select “Phone”.
Select “Yes”.
Enter the passcode displayed on the
screen into the phone.
Refer to the cellular phone user’s man-
ual for cellular phone operation.
If a completion message is displayed,
registration is complete.3
1
2
3
4
5
4
Page 9 of 48
58
ES350_QG_OM33A70U_(U)
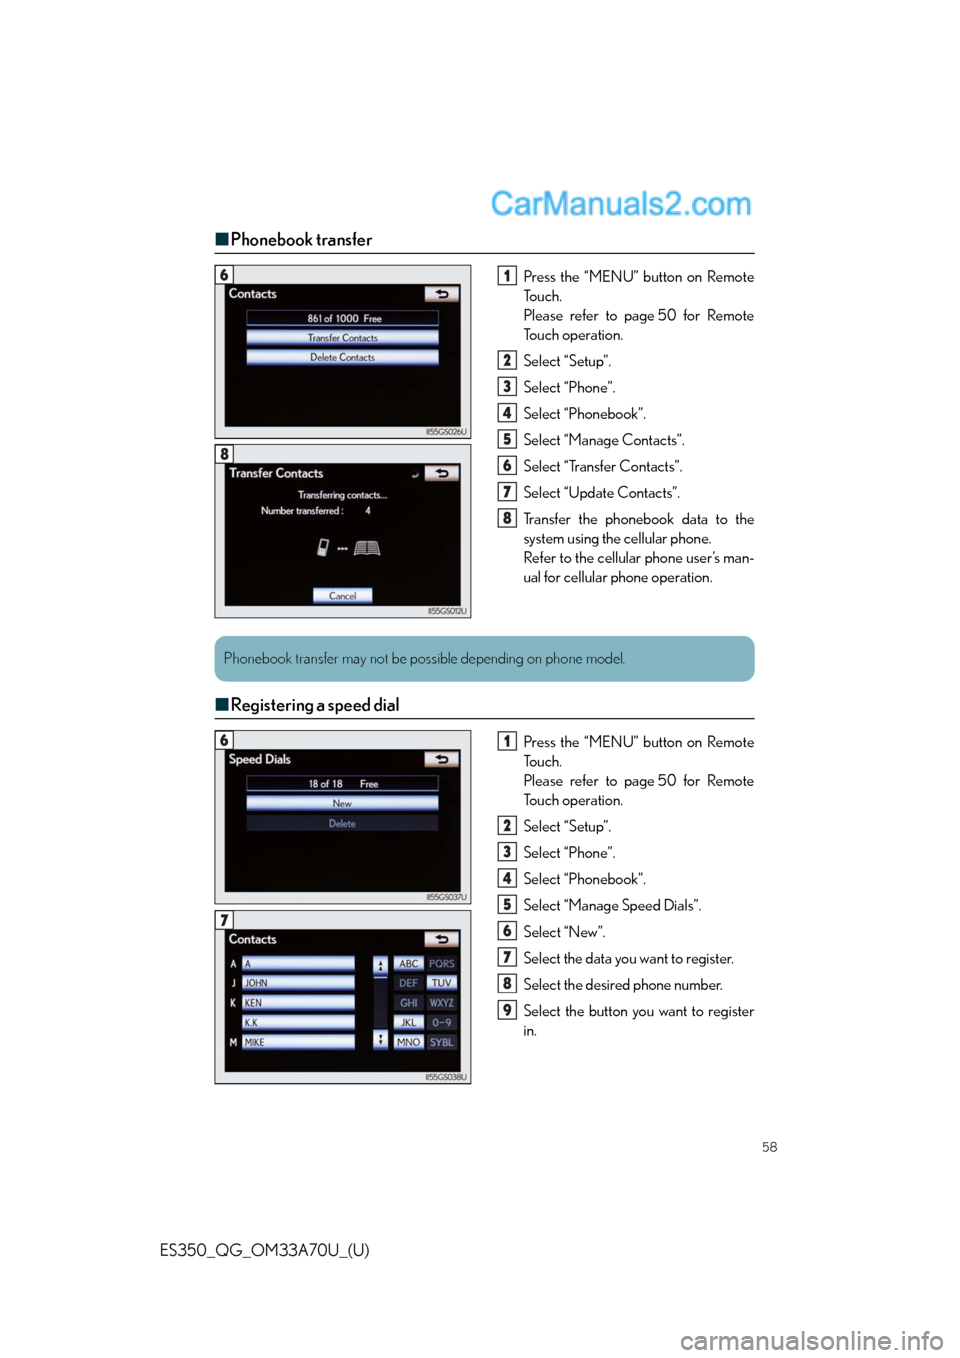
■Phonebook transfer
Press the “MENU” button on Remote
To u c h .
Please refer to page 50 for Remote
To u c h o p e r a t i o n .
Select “Setup”.
Select “Phone”.
Select “Phonebook”.
Select “Manage Contacts”.
Select “Transfer Contacts”.
Select “Update Contacts”.
Transfer the phonebook data to the
system using the cellular phone.
Refer to the cellular phone user’s man-
ual for cellular phone operation.
■Registering a speed dial
Press the “MENU” button on Remote
To u c h .
Please refer to page 50 for Remote
To u c h o p e r a t i o n .
Select “Setup”.
Select “Phone”.
Select “Phonebook”.
Select “Manage Speed Dials”.
Select “New”.
Select the data you want to register.
Select the desired phone number.
Select the button you want to register
in.
61
2
3
4
5
6
7
8
8
Phonebook transfer may not be possible depending on phone model.
61
2
3
4
5
6
7
8
9
7
Page 10 of 48
59
ES350_QG_OM33A70U_(U)
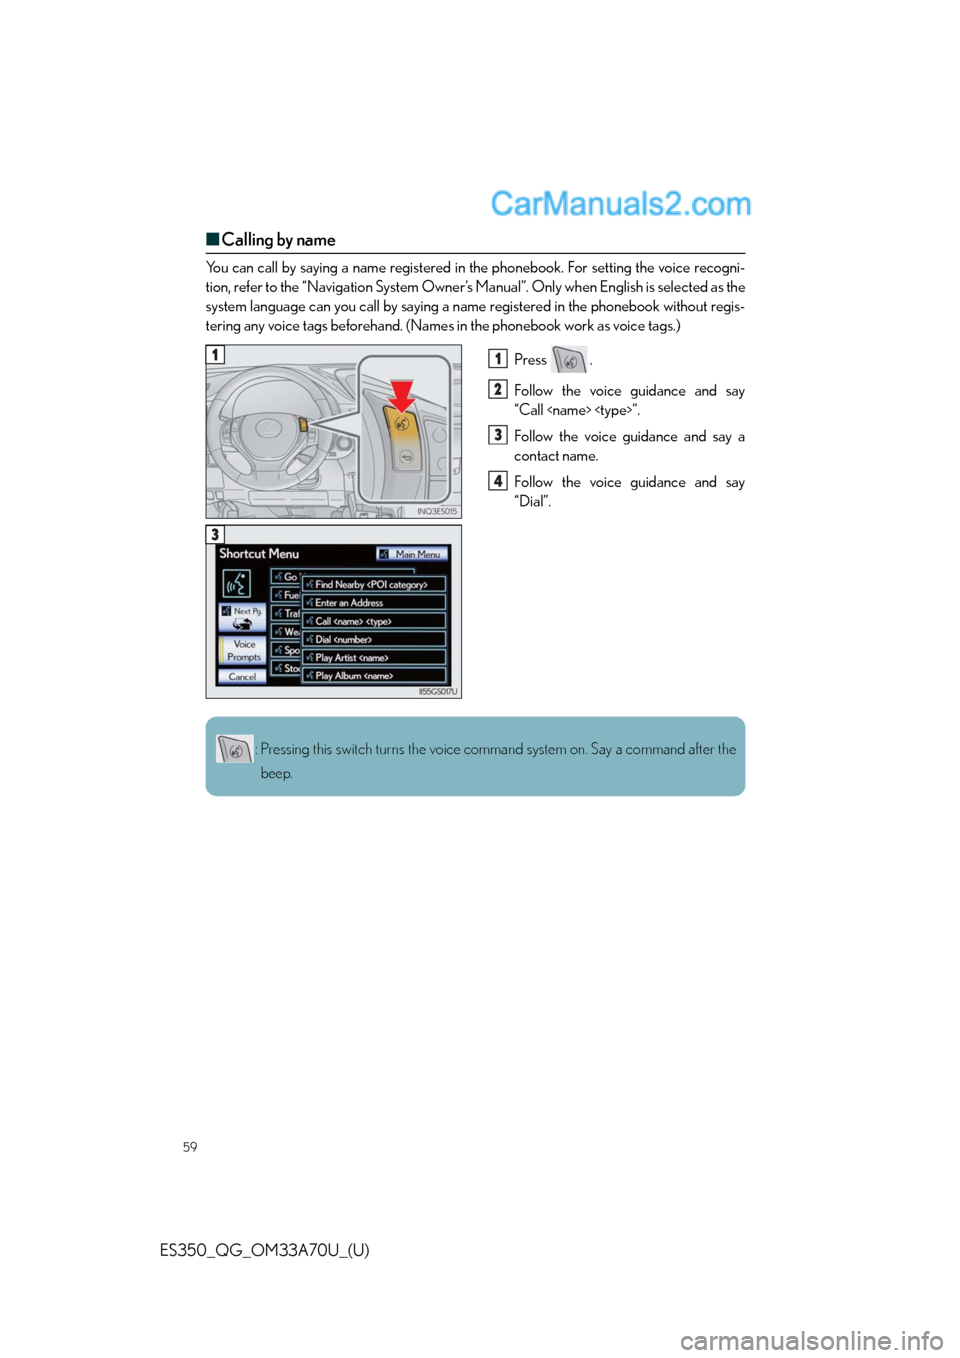
■Calling by name
You can call by saying a name registered in the phonebook. For setting the voice recogni-
tion, refer to the “Navigation System Owner’s Manual”. Only when English is selected as the
system language can you call by saying a name registered in the phonebook without regis-
tering any voice tags beforehand. (Names in the phonebook work as voice tags.)
Press .
Follow the voice guidance and say
“Call
Follow the voice guidance and say a
contact name.
Follow the voice guidance and say
“Dial”.
11
2
3
4
3
: Pressing this switch turns the voice command system on. Say a command after the
beep.