Lexus ES350 2016 Owner's Manuals / LEXUS 2016 ES350 OWNERS MANUAL (OM33B64U)
Manufacturer: LEXUS, Model Year: 2016, Model line: ES350, Model: Lexus ES350 2016Pages: 576, PDF Size: 8.3 MB
Page 481 of 576
4818-2. Steps to take in an emergency
ES350_OM_OM33B64U_(U)
8
When trouble arises
WA R N I N G
■Maintenance of the tires
Each tire, including the spare (if provided), should be checked monthly when cold and
inflated to the inflation pressure recomm ended by the vehicle manufacturer on the
vehicle placard or tire inflation pressure la bel (tire and load information label). (If your
vehicle has tires of a different size than the size indicated on the vehicle placard or tire
inflation pressure label [tire and load in formation label], you should determine the
proper tire inflation pressure for those tires.)
As an added safety feature, your vehicle has been equipped with a tire pressure moni-
toring system (TPMS-tire pressure warning system) that illuminates a low tire pressure
telltale (tire pressure warning light) when on e or more of your tires is significantly
under-inflated. Accordingly, when the low ti re pressure telltale (tire pressure warning
light) illuminates, you should stop and check your tires as soon as possible, and inflate
them to the proper pressure. Driving on a significantly under-inflated tire causes the
tire to overheat and can lead to tire failure. Under-inflation also reduces fuel efficiency
and tire tread life, and ma y affect the vehicle’s handling and stopping ability.
Please note that the TPMS (tire pressure wa rning system) is not a substitute for proper
tire maintenance, and it is the driver’s resp onsibility to maintain correct tire pressure,
even if under-inflation has no t reached the level to trigger illumination of the TPMS low
tire pressure telltale (tire pressure warning light).
Your vehicle has also been equipped with a TPMS (tire pressure warning system) mal-
function indicator to indicate when the system is not operating properly. The TPMS
(tire pressure warning system) malfunction indi cator is combined with the low tire pres-
sure telltale (tire pressure warning light). When the system detects a malfunction, the
telltale will flash for approximately one minu te and then remain continuously illumi-
nated. This sequence will cont inue upon subsequent vehicle start-ups as long as the
malfunction exists. When the malfunction indicator is illuminated, the system may not
be able to detect or signal low tire pressure as intended.
TPMS (tire pressure warning system) malfun ctions may occur for a variety of reasons,
including the installation of replacement or alternate tires or wheels on the vehicle that
prevent the TPMS (tire pressure warning system) from functioning properly. Always
check the TPMS (tire pressure warning syst em) malfunction telltale after replacing one
or more tires or wheels on your vehicle to ensure that the replacement or alternate
tires and wheels allow the TPMS (tire pressure warning system) to continue to function
properly.
NOTICE
■To ensure the tire pressure warning system operates properly
Do not install tires with different specificatio ns or makers, as the tire pressure warning
system may not operate properly.
Page 482 of 576
482
ES350_OM_OM33B64U_(U)8-2. Steps to take in an emergency
If a warning message is displayed
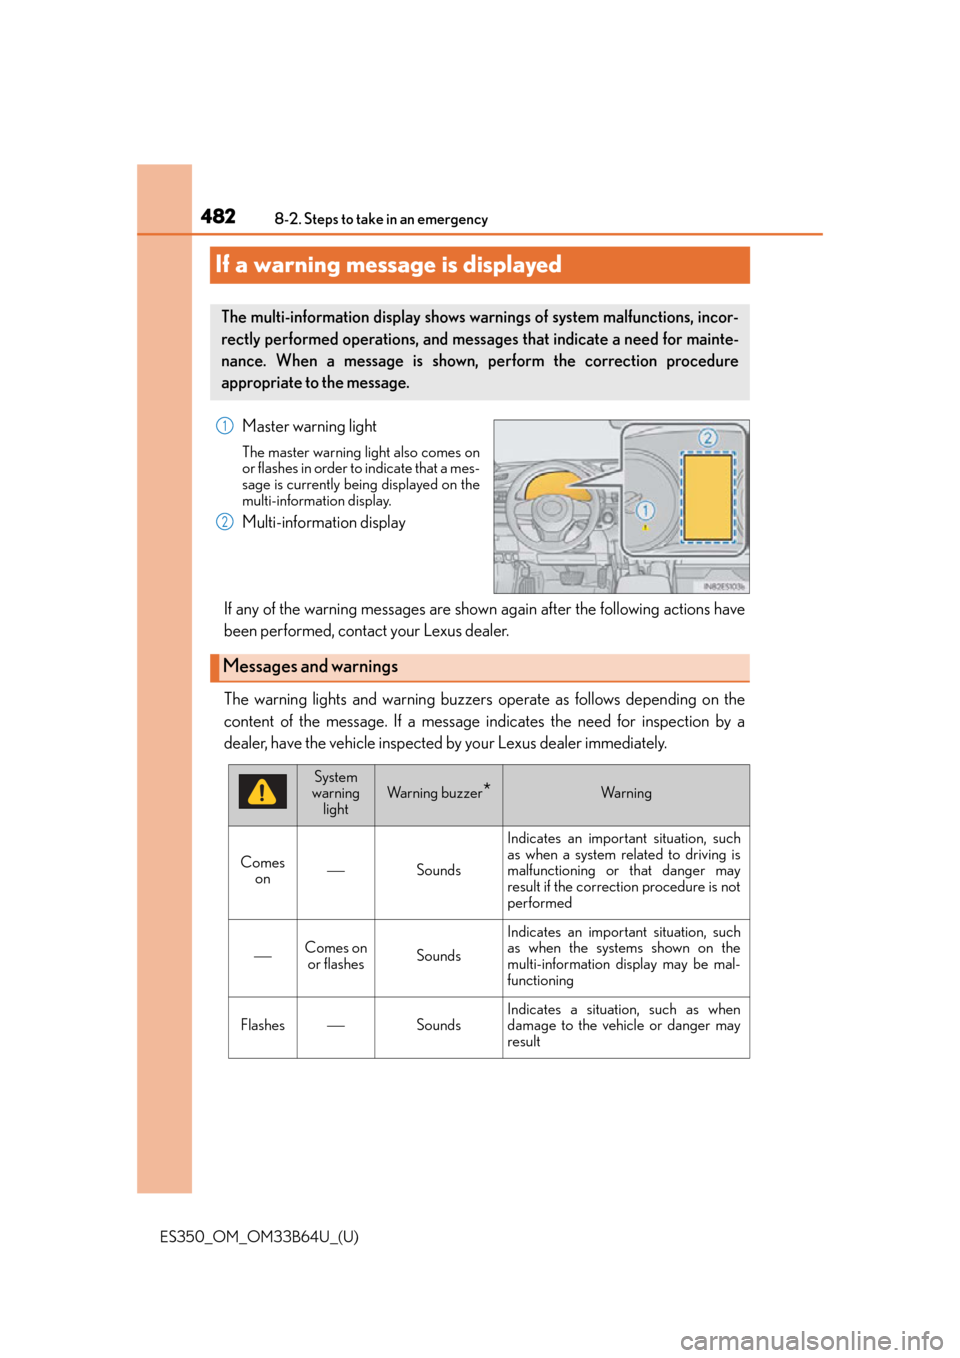
Master warning light
The master warning light also comes on
or flashes in order to indicate that a mes-
sage is currently being displayed on the
multi-information display.
Multi-information display
If any of the warning messages are show n again after the following actions have
been performed, contact your Lexus dealer.
The warning lights and warning buzzers operate as follows depending on the
content of the message. If a message in dicates the need for inspection by a
dealer, have the vehicle inspected by your Lexus dealer immediately.
The multi-information display shows warnings of system malfunctions, incor-
rectly performed operations, and messages that indicate a need for mainte-
nance. When a message is shown, perform the correction procedure
appropriate to the message.
1
2
Messages and warnings
System
warning light
Wa r n i n g b u z z e r*Wa r n i n g
Comes on
Sounds Indicates an important situation, such
as when a system related to driving is
malfunctioning or that danger may
result if the correction procedure is not
performed
Comes on
or flashesSounds
Indicates an important situation, such
as when the systems shown on the
multi-information display may be mal-
functioning
FlashesSounds
Indicates a situation, such as when
damage to the vehicle or danger may
result
Page 483 of 576
4838-2. Steps to take in an emergency
ES350_OM_OM33B64U_(U)
8
When trouble arises
*: A buzzer sounds the first time a message is shown on the multi-information display.
■If “Maintenance Required Soon” is shown (U.S.A. only)
Indicates that all maintenance according to the driven distance on the maintenance
schedule
* should be performed soon.
Comes on approximately 4500 miles (7200 km) after the message has been reset.
If necessary, perform maintenance.
*: Refer to the separate “Scheduled Maintenance” or “Owner’s Manual Supplement” for the maintenance interval applicable to your vehicle.
■If “Maintenance Required Visit Your Dealer” is shown (U.S.A. only)
Indicates that all maintenance is required to correspond to the driven distance on the
maintenance schedule
*.
Comes on approximately 5000 miles (80 00 km) after the message has been reset.
(The indicator will not work properly unless the message has been reset.)
Perform the necessary maintenance. Please reset the message after the maintenance is
performed ( P. 4 1 5 )
*: Refer to the separate “Scheduled Maintenance” or “Owner’s Manual Supplement” for
the maintenance interval applicable to your vehicle.
■If “Oil Maintenance Required Soon” is shown
Indicates that the engine oil is scheduled to be changed. (The indicator will not work
properly unless the oil maintenance data has been reset.)
Check the engine oil, and change if necessar y. After changing the engine oil, the oil
change system should be reset. ( P. 4 2 9 )
■If “Oil Maintenance Required Visit Your Dealer” is shown
Indicates that the engine oil should be changed. (After the engine oil is changed and the
oil maintenance data has been reset.)
Check and change the engine oil, and oil filt er by your Lexus dealer. After changing the
engine oil, the oil change system should be reset. ( P. 4 2 9 )
Comes
onDoes not sound
Indicates a condition, such as malfunc-
tion of electrical components, their
condition, or indicates the need for
maintenance
FlashesDoes not sound
Indicates a situation, such as when an
operation has been performed incor-
rectly, or indicates how to perform an
operation correctly
System
warning
lightWa r n i n g b u z z e r*Wa r n i n g
Page 484 of 576

4848-2. Steps to take in an emergency
ES350_OM_OM33B64U_(U)
■If “Power Turned Off to Save Battery” is shown
Power was turned off due to the automatic power off function.
Next time when starting the engine, increase the engine speed slightly and maintain that
level for approximately 5 minutes to recharge the battery.
■When a message that indicates the need for the shift lever operation is shown
To prevent the shift lever from being operated incorrectly or the vehicle from moving
unexpectedly, a message that requires shifting the shift lever may be shown on the multi-
information display. In that case, follow the instruction of the message and shift the shift
lever.
■If “Visit Your Dealer” is shown
The system or part shown on the multi-info rmation display is malfunctioning. Have the
vehicle inspected by your Lexus dealer immediately.
■If “See Owner’s Manual” is shown
●If the following message is shown, fo llowing the instructions, accordingly.
• “Engine Coolant Temp High” ( P. 5 0 5 )
●If the following message is show n, there may be a malfunction.
Immediately have the vehicle inspected by your Lexus dealer.
• “Check Access System with Elec. Key”
●If the following messages are sh own, there may be a malfunction.
Immediately stop the vehicle in a safe place and contact your Lexus dealer. Continuing
to drive the vehicle may be dangerous.
• “Braking Power Low Stop in a Safe Place”
• “Charging System Malfunction”
• “Oil Pressure Low Stop in a Safe Place”
■Warning buzzer
In some cases, the buzzer may not be heard because of noisy place or an audio sound.
Page 485 of 576
485
ES350_OM_OM33B64U_(U)8-2. Steps to take in an emergency
8
When trouble arises
If you have a flat tire
●Stop the vehicle on a hard, flat surface.
●Set the parking brake.
●Shift the shift lever to P.
●Stop the engine.
●Turn on the emergency flashers. (
P. 4 6 8 )
Your vehicle is equipped with a spare ti re. The flat tire can be replaced with
the spare tire.
For details about tires: P. 4 3 6
WA R N I N G
■If you have a flat tire
Do not continue driving with a flat tire.
Driving even a short distance with a flat ti re can damage the tire and the wheel beyond
repair, which could result in an accident.
Before jacking up the vehicle
Page 486 of 576
4868-2. Steps to take in an emergency
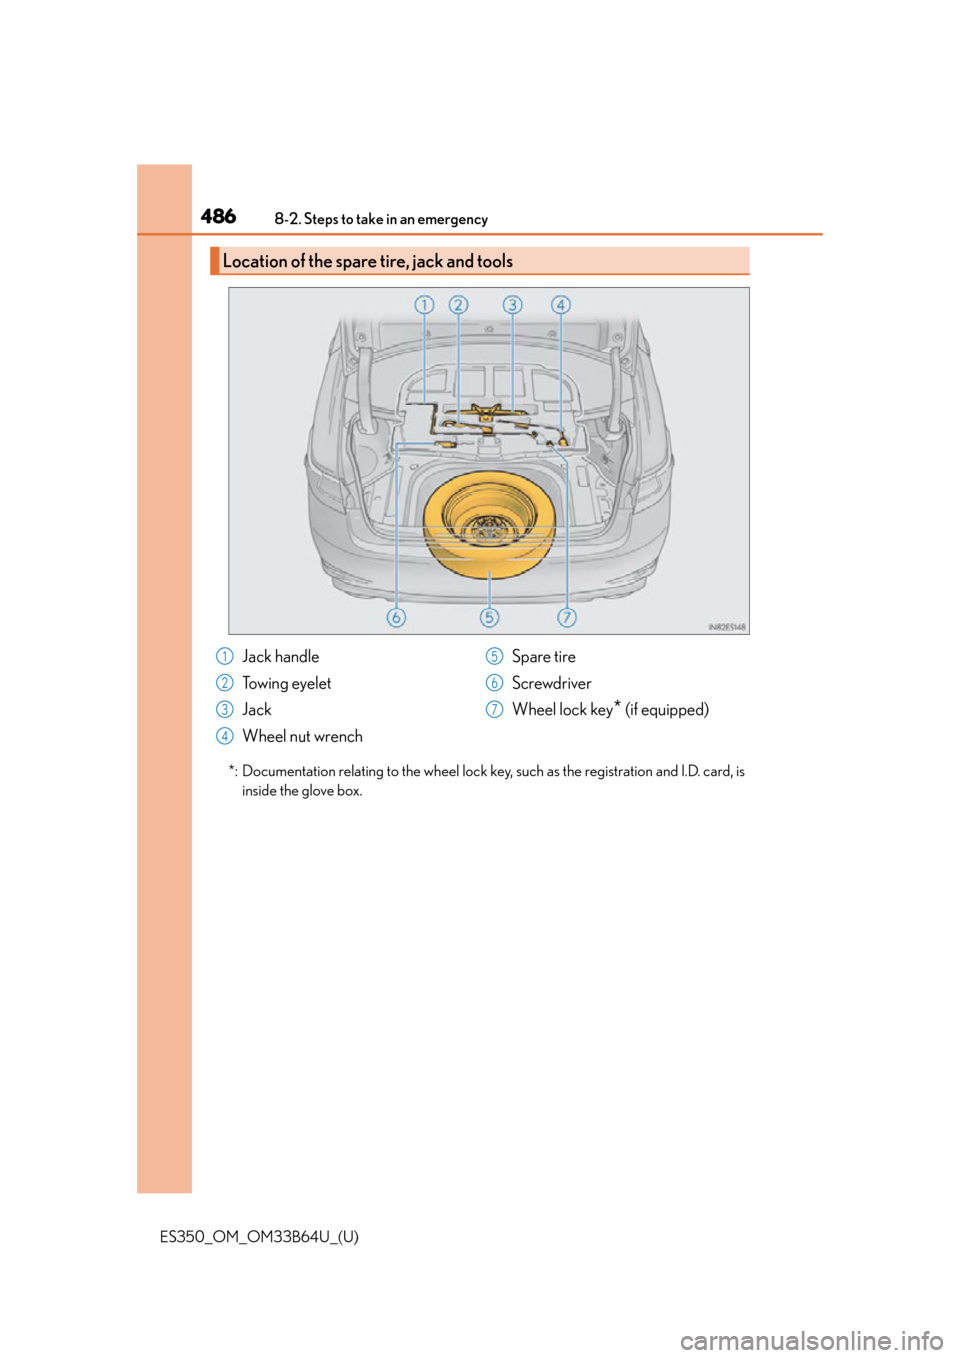
ES350_OM_OM33B64U_(U)*: Documentation relating to the wheel lock key, such as the registration and I.D. card, is
inside the glove box.
Location of the spare tire, jack and tools
Jack handle
Towing eyelet
Jack
Wheel nut wrench Spare tire
Screwdriver
Wheel lock key
* (if equipped)
1
2
3
4
5
6
7
Page 487 of 576

4878-2. Steps to take in an emergency
ES350_OM_OM33B64U_(U)
8
When trouble arises
WA R N I N G
■Using the tire jack
Observe the following precautions.
Improper use of the tire jack may cause the vehicle to suddenly fall off the jack, leading
to death or serious injury.
●Do not use the tire jack for any purpose ot her than replacing tires or installing and
removing tire chains.
●Only use the tire jack that comes with this vehicle for replacing a flat tire.
Do not use it on other vehicles, and do not use other tire jacks for replacing tires on
this vehicle.
●Put the jack properly in its jack point.
●Do not put any part of your body under the vehicle while it is supported by the jack.
●Do not start the engine or drive the vehicle while the vehicle is supported by the jack.
●Do not raise the vehicle while someone is inside.
●When raising the vehicle, do not put an object on or under the jack.
●Do not raise the vehicle to a height greater than that required to replace the tire.
●Use a jack stand if it is necessary to get under the vehicle.
●When lowering the vehicle, make sure that there is no-one near the vehicle. If there
are people nearby, warn them vocally before lowering.
Page 488 of 576
4888-2. Steps to take in an emergency
ES350_OM_OM33B64U_(U)
When replacing tires on a vehicle with wheel lock nuts, use the following proce-
dures to remove and install the wheel lock nuts. The wheel lock key is stored in
the tray inside the luggage compartment. Always return the wheel lock key to its
original position after use, so that it does not get lost.
■Removal
For ease of removal, the wheel lock nut should always be the first one loos-
ened.
Place the wheel lock key on top of the wheel lock nut, turning until the wheel
lock key and wheel lock nut patterns engage.
Place the wheel nut wrench on the wheel lock key, and while applying pres-
sure on the wheel lock key, loosen the wheel lock nut.
■Installation
For ease of installation, the wheel lock nut should always be the last one tight-
ened.
By hand, install a wheel lock nut on each wheel.
Place the wheel lock key on top of the wheel lock nut, turning until the wheel
lock key and wheel lock nut patterns engage.
Place the wheel nut wrench on the wheel lock key, and while applying pres-
sure on the wheel lock key, tighten the wheel lock nut to the recommended
torque.
Wheel lock nut (if equipped)
NOTICE
Do not use an impact wrench. Using an impact wrench may cause permanent damage
to wheel lock nut and wheel lock key. If in doubt about wheel lock application, contact
your Lexus dealer.
1
2
1
2
3
Page 489 of 576
4898-2. Steps to take in an emergency
ES350_OM_OM33B64U_(U)
8
When trouble arises
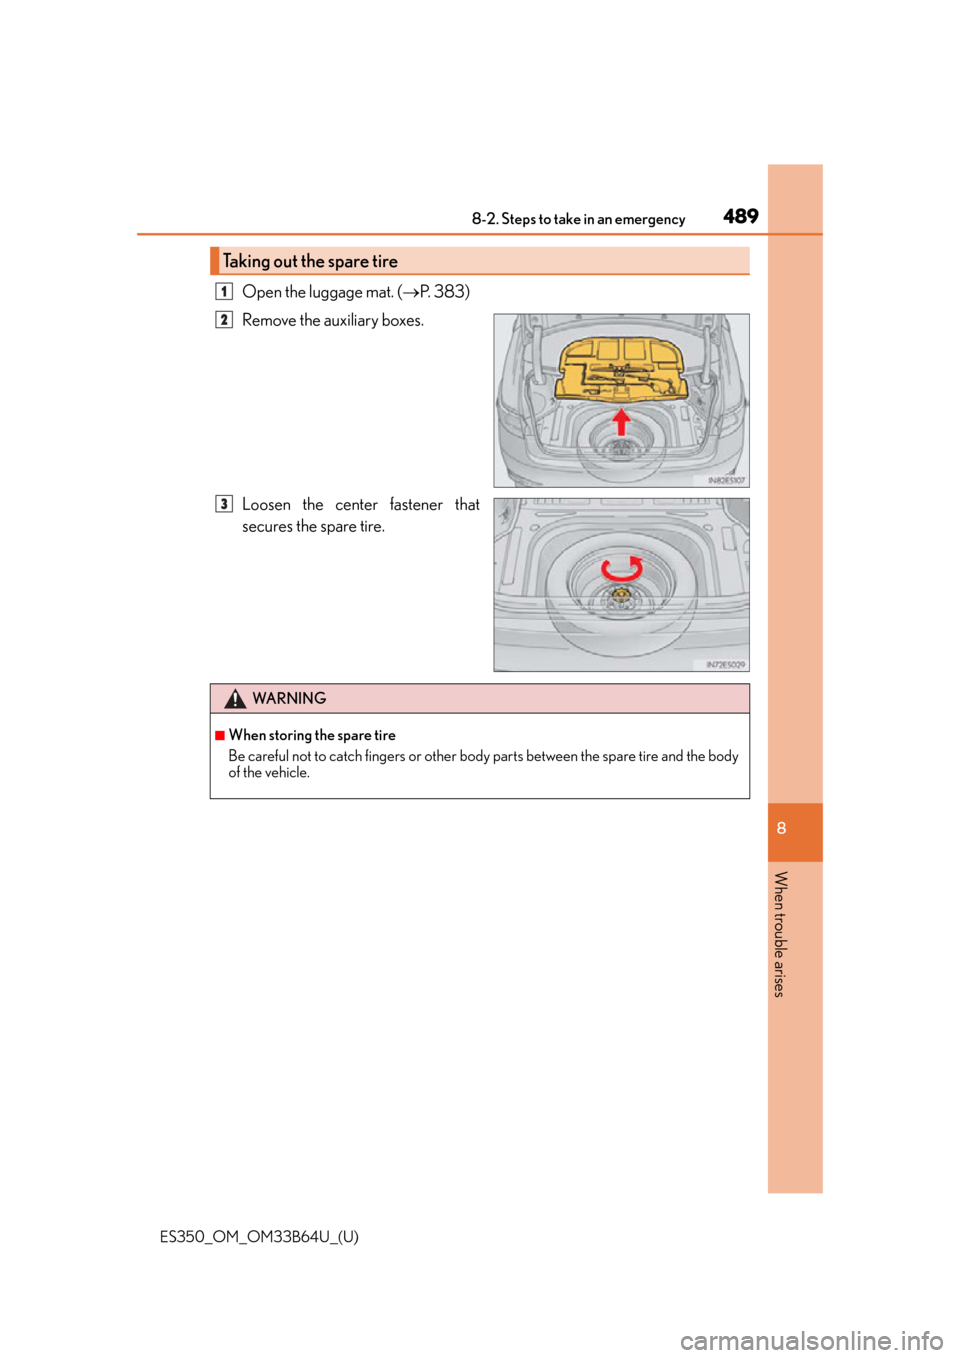
Open the luggage mat. ( P. 3 8 3 )
Remove the auxiliary boxes.
Loosen the center fastener that
secures the spare tire.
Taking out the spare tire
1
2
3
WA R N I N G
■When storing the spare tire
Be careful not to catch fingers or other body parts between the spare tire and the body
of the vehicle.
Page 490 of 576
4908-2. Steps to take in an emergency
ES350_OM_OM33B64U_(U)
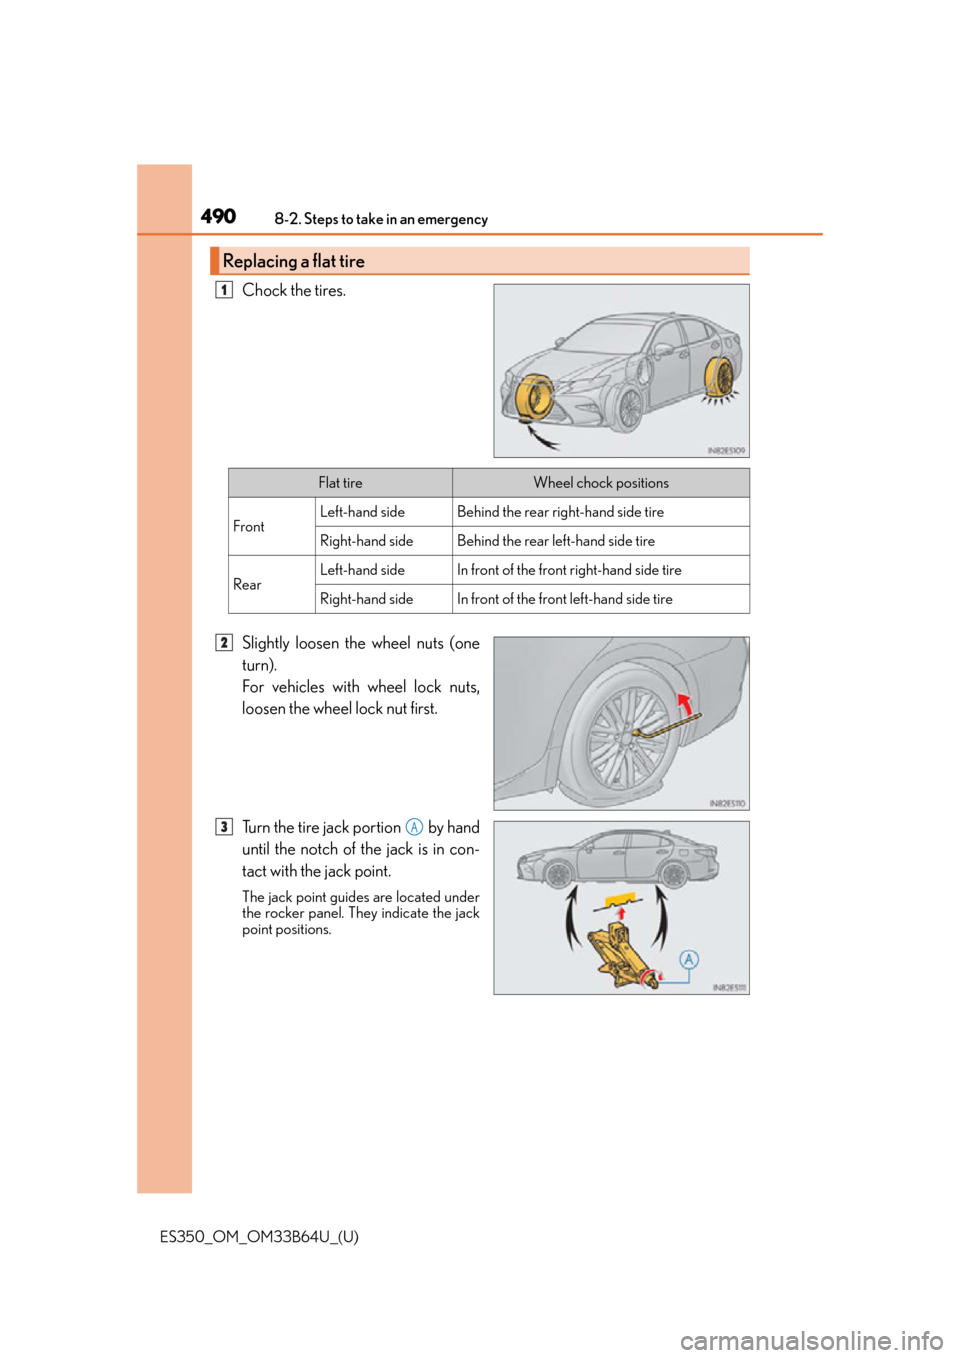
Chock the tires.
Slightly loosen the wheel nuts (one
turn).
For vehicles with wheel lock nuts,
loosen the wheel lock nut first.
Turn the tire jack portion by hand
until the notch of the jack is in con-
tact with the jack point.
The jack point guides are located under
the rocker panel. They indicate the jack
point positions.
Replacing a flat tire
1
Flat tireWheel chock positions
FrontLeft-hand sideBehind the rear right-hand side tire
Right-hand sideBehind the rear left-hand side tire
RearLeft-hand sideIn front of the front right-hand side tire
Right-hand sideIn front of the front left-hand side tire
2
3A