Lexus ES350 2016 Quick Guide / LEXUS 2016 ES350 OWNERS MANUAL (OM33B64U)
Manufacturer: LEXUS, Model Year: 2016,
Model line: ES350,
Model: Lexus ES350 2016
Pages: 576, PDF Size: 8.3 MB
Lexus ES350 2016 Quick Guide / LEXUS 2016 ES350 OWNERS MANUAL (OM33B64U)
ES350 2016
Lexus
Lexus
https://www.carmanualsonline.info/img/36/12944/w960_12944-0.png
Lexus ES350 2016 Quick Guide / LEXUS 2016 ES350 OWNERS MANUAL (OM33B64U)
Trending: traction control, load capacity, service, length, turn signal bulb, change language, wiring
Page 461 of 576
ES350_OM_OM33B64U_(U)
4617-3. Do-it-yourself maintenance
7
Maintenance and care
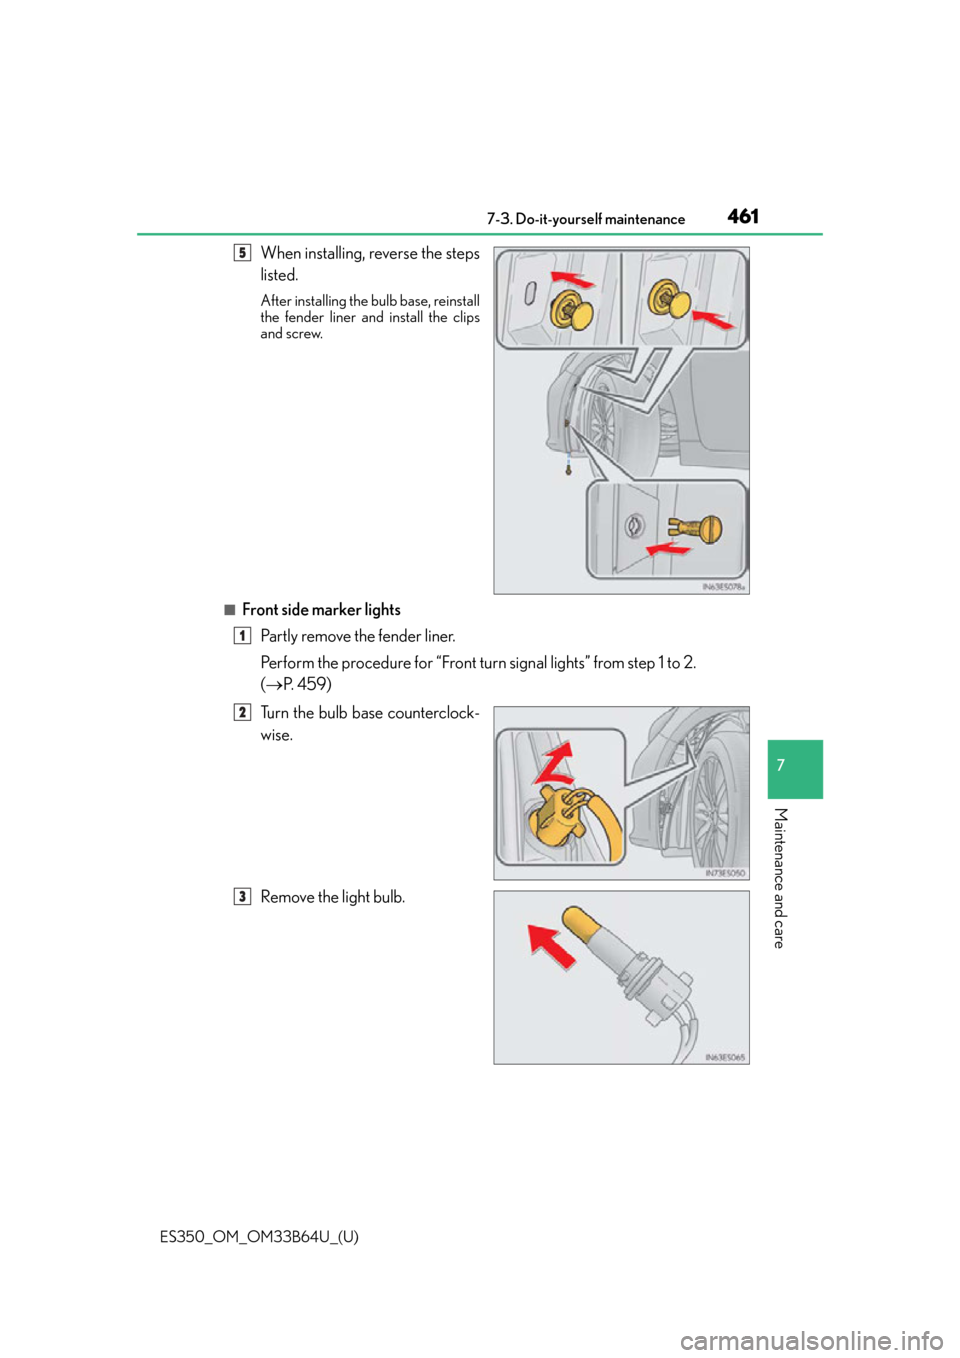
When installing, reverse the steps
listed.
After installing the bulb base, reinstall
the fender liner and install the clips
and screw.
■Front side marker lights
Partly remove the fender liner.
Perform the procedure for “Front turn signal lights” from step 1 to 2.
( P. 4 5 9 )
Turn the bulb base counterclock-
wise.
Remove the light bulb.
5
1
2
3
Page 462 of 576
462
ES350_OM_OM33B64U_(U)7-3. Do-it-yourself maintenance
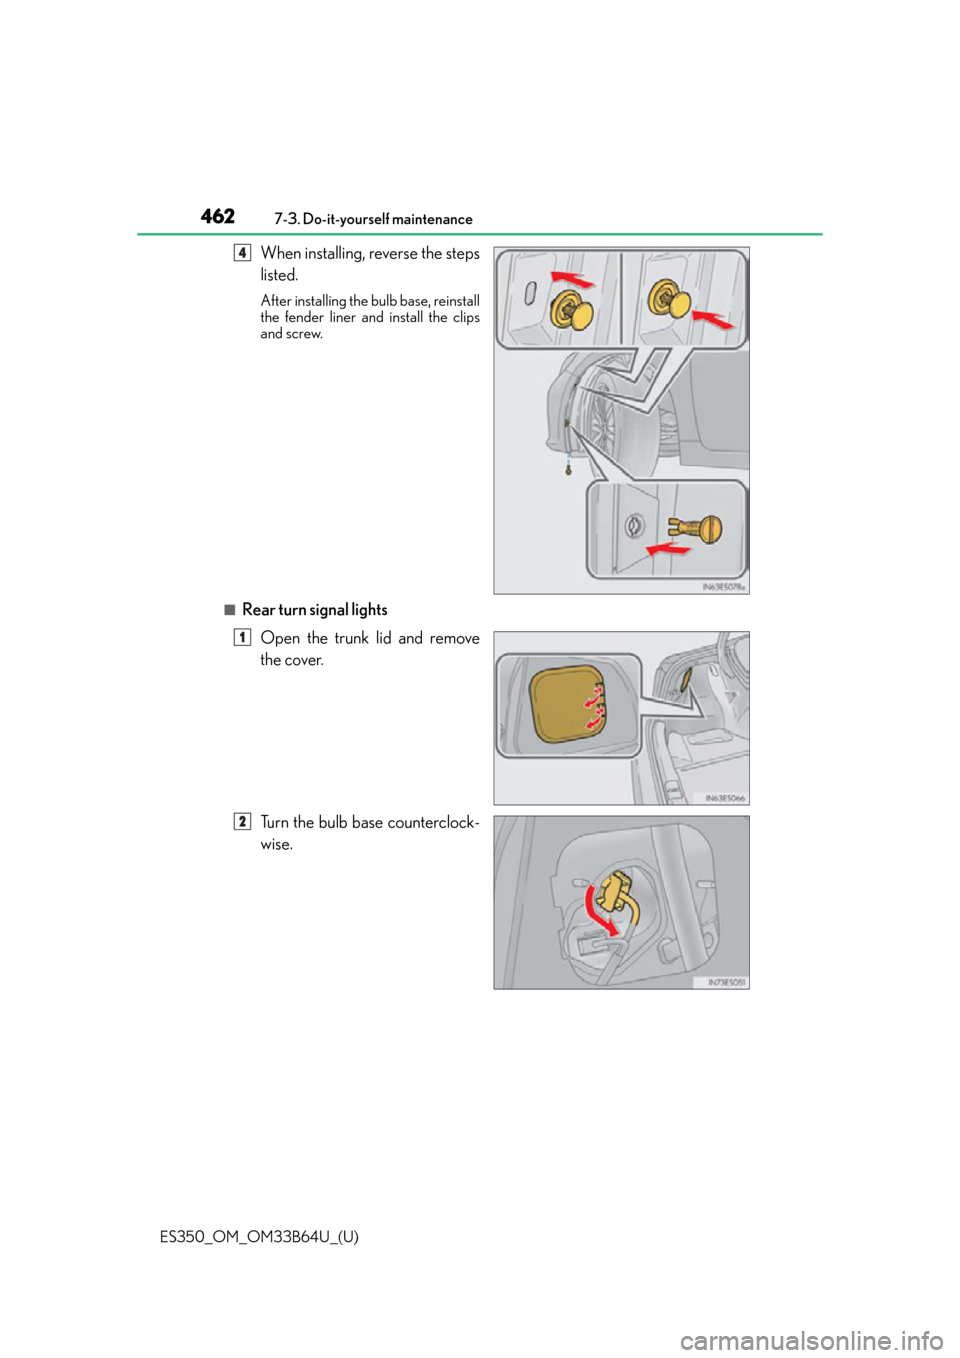
When installing, reverse the steps
listed.
After installing the bulb base, reinstall
the fender liner an
d install the clips
and screw.
■Rear turn signal lights
Open the trunk lid and remove
the cover.
Turn the bulb base counterclock-
wise.
4
1
2
Page 463 of 576
ES350_OM_OM33B64U_(U)
4637-3. Do-it-yourself maintenance
7
Maintenance and care
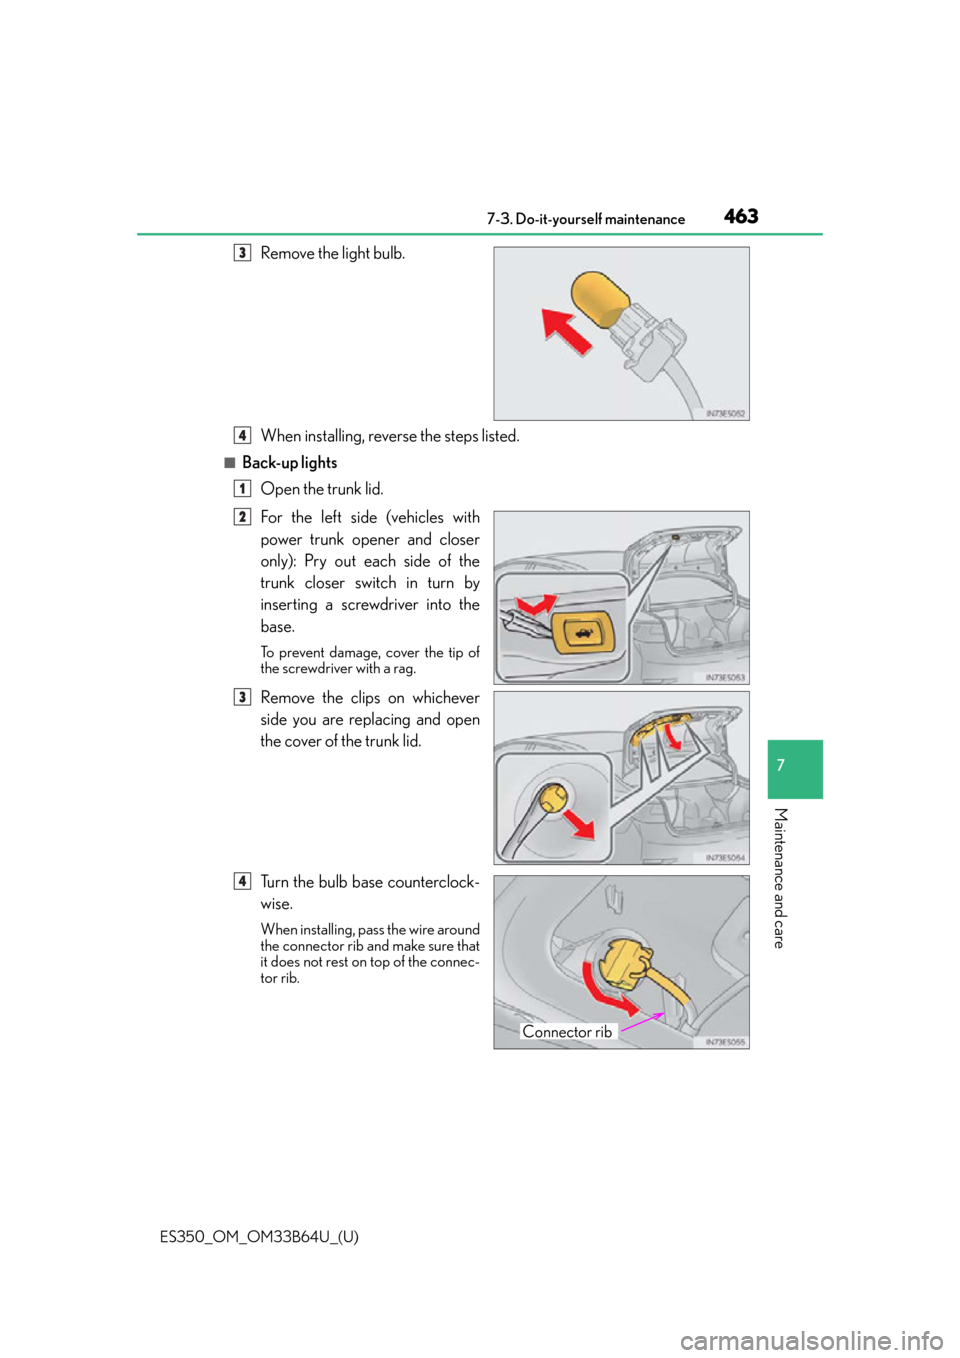
Remove the light bulb.
When installing, reverse the steps listed.
■Back-up lightsOpen the trunk lid.
For the left side (vehicles with
power trunk opener and closer
only): Pry out each side of the
trunk closer switch in turn by
inserting a screwdriver into the
base.
To prevent damage, cover the tip of
the screwdriver with a rag.
Remove the clips on whichever
side you are replacing and open
the cover of the trunk lid.
Turn the bulb base counterclock-
wise.
When installing, pass the wire around
the connector rib and make sure that
it does not rest on top of the connec-
tor rib.
3
4
1
2
3
Connector rib
4
Page 464 of 576
464
ES350_OM_OM33B64U_(U)7-3. Do-it-yourself maintenance
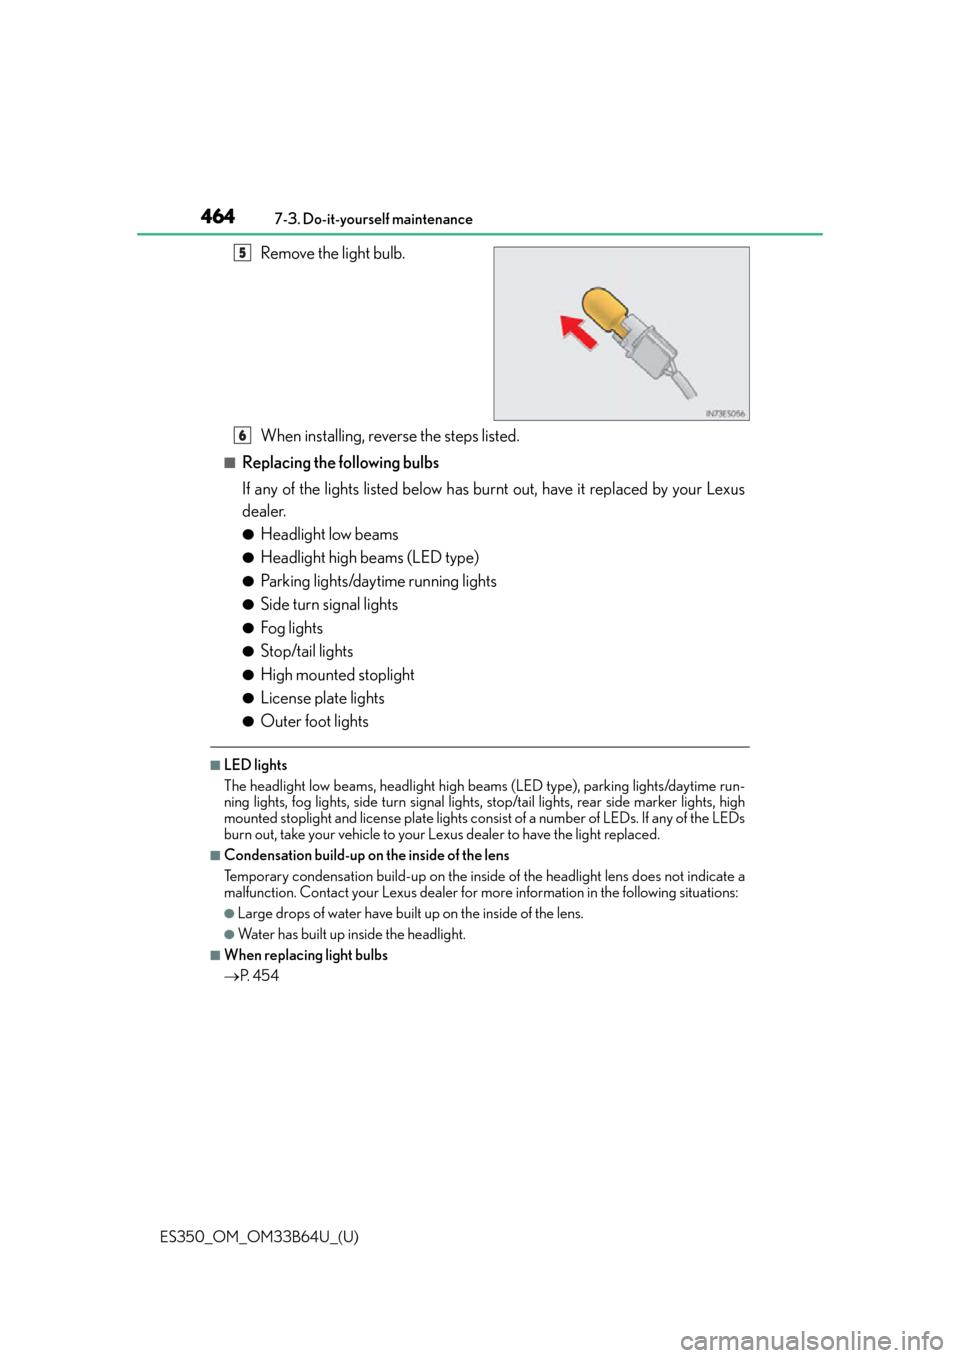
Remove the light bulb.
When installing, reverse the steps listed.
■Replacing the following bulbs
If any of the lights listed below has burnt out, have it replaced by your Lexus
dealer.
●Headlight low beams
●Headlight high beams (LED type)
●Parking lights/daytime running lights
●Side turn signal lights
●Fog lights
●Stop/tail lights
●High mounted stoplight
●License plate lights
●Outer foot lights
■LED lights
The headlight low beams, headlight high be
ams (LED type), parking lights/daytime run-
ning lights, fog lights, side turn signal lights, stop/tail lights, rear side marker lights, high
mounted stoplight and license plate lights cons ist of a number of LEDs. If any of the LEDs
burn out, take your vehicle to your Le xus dealer to have the light replaced.
■Condensation build-up on the inside of the lens
Temporary condensation build-up on the inside of the headlight lens does not indicate a
malfunction. Contact your Lexus dealer for mo re information in the following situations:
●Large drops of water have built up on the inside of the lens.
●Wa t e r h a s b u i l t u p i nside the headlight.
■When replacing light bulbs
P. 4 5 4
5
6
Page 465 of 576
ES350_OM_OM33B64U_(U)
4657-3. Do-it-yourself maintenance
7
Maintenance and care
WA R N I N G
■Replacing light bulbs
●Turn off the lights. Do not attempt to replace the bulb immediately after turning off the
lights.
The bulbs become very hot and may cause burns.
●Do not touch the glass portion of the light bulb with bare hands. When it is unavoid-
able to hold the glass portion, use and hold with a clean dry cloth to avoid getting
moisture and oils on the bulb.
Also, if the bulb is scratched or dropped, it may blow out or crack.
●Fully install light bulbs and any parts used to secure them. Failure to do so may result
in heat damage, fire, or water entering the headlight unit. This may damage the head-
lights or cause condensation to build up on the lens.
■To prevent damage or fire
●Make sure bulbs are fully seated and locked.
●Check the wattage of the bulb before installin g to prevent heat damage.
Page 466 of 576
466
ES350_OM_OM33B64U_(U)7-3. Do-it-yourself maintenance
Page 467 of 576
467
ES350_OM_OM33B64U_(U)
8When trouble arises
8-1. Essential informationEmergency flashers ..................468
If your vehicle has to be stopped in an emergency .... 469
8-2. Steps to take in an emergency If your vehicle needs to be towed ................................ 470
If you think something is wrong ................. 474
Fuel pump shut off system ...... 475
If a warning light turns on or a warning buzzer sounds ...... 476
If a warning message is displayed ................................ 482
If you have a flat tire...................485
If the engine will not start ........ 496
If the shift lever cannot be shifted from P ..................... 498
If the electronic key does not operate properly ..................... 499
If the battery is discharged ...... 501
If your vehicle overheats ........ 505
If the vehicle becomes stuck ............................................ 508
Page 468 of 576
468
ES350_OM_OM33B64U_(U)8-1. Essential information
Emergency flashers
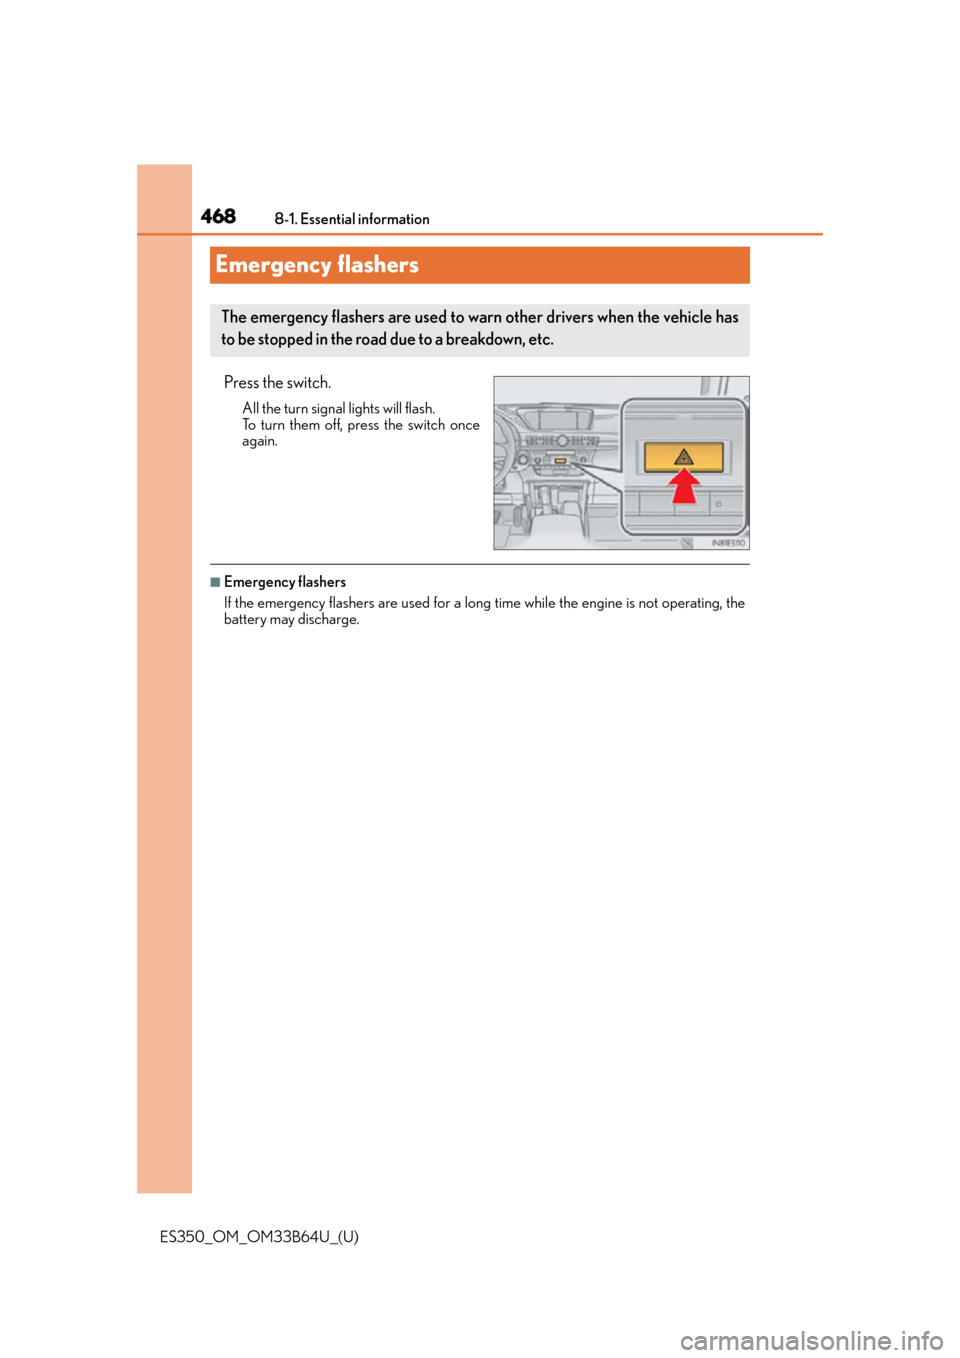
Press the switch.
All the turn signal lights will flash.
To turn them off, press the switch once
again.
■Emergency flashers
If the emergency flashers are used for a long time while the engine is not operating, the
battery may discharge.
The emergency flashers are used to warn other drivers when the vehicle has
to be stopped in the road due to a breakdown, etc.
Page 469 of 576
469
ES350_OM_OM33B64U_(U)8-1. Essential information
8
When trouble arises
If your vehicle has to be
stopped in an emergency
Steadily step on the brake pedal with both feet and firmly depress it.
Do not pump the brake pedal repeatedly as this will increase the effort required to
slow the vehicle.
Shift the shift lever to N.
If the shift lever is shifted to N
After slowing down, stop the vehicle in a safe place by the road.
Stop the engine.
If the shift lever cannot be shifted to N
Keep depressing the brake pedal with both feet to reduce vehicle speed as
much as possible.
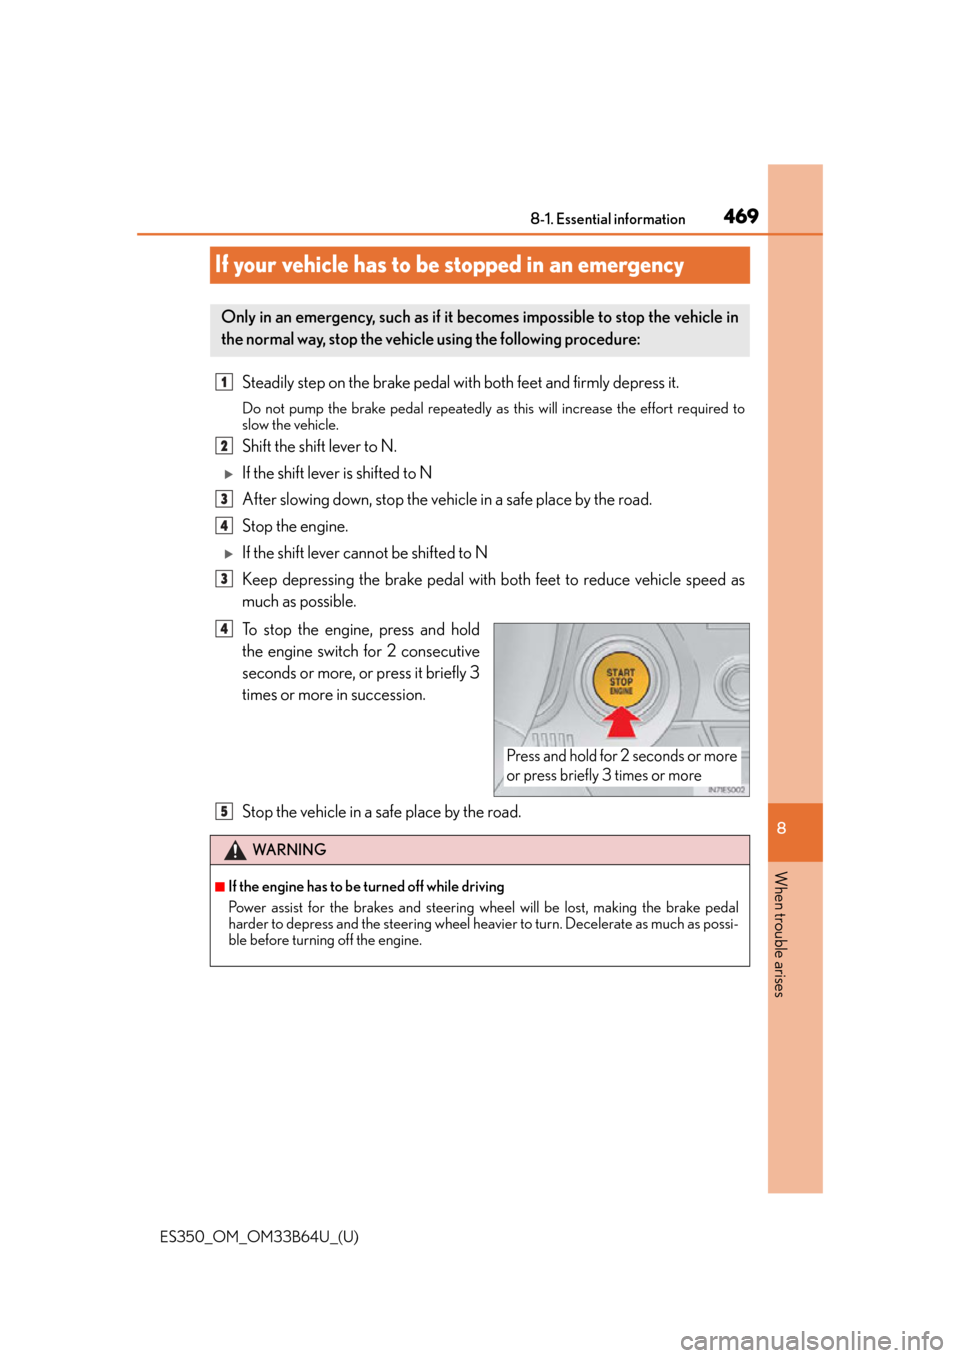
To stop the engine, press and hold
the engine switch for 2 consecutive
seconds or more, or press it briefly 3
times or more in succession.
Stop the vehicle in a safe place by the road.
Only in an emergency, such as if it becomes impossible to stop the vehicle in
the normal way, stop the vehicle using the following procedure:
1
2
3
4
3
Press and hold for 2 seconds or more
or press briefly 3 times or more
4
WA R N I N G
■If the engine has to be turned off while driving
Power assist for the brakes and steering wheel will be lost, making the brake pedal
harder to depress and the steering wheel heavier to turn. Decelerate as much as possi-
ble before turning off the engine.
5
Page 470 of 576
470
ES350_OM_OM33B64U_(U)8-2. Steps to take in an emergency
If your vehicle needs to be towed
The following may indicate a problem with your transmission. Contact your
Lexus dealer or commercial towing service before towing.
●The engine is running but the vehicle does not move.
●The vehicle makes an abnormal sound.
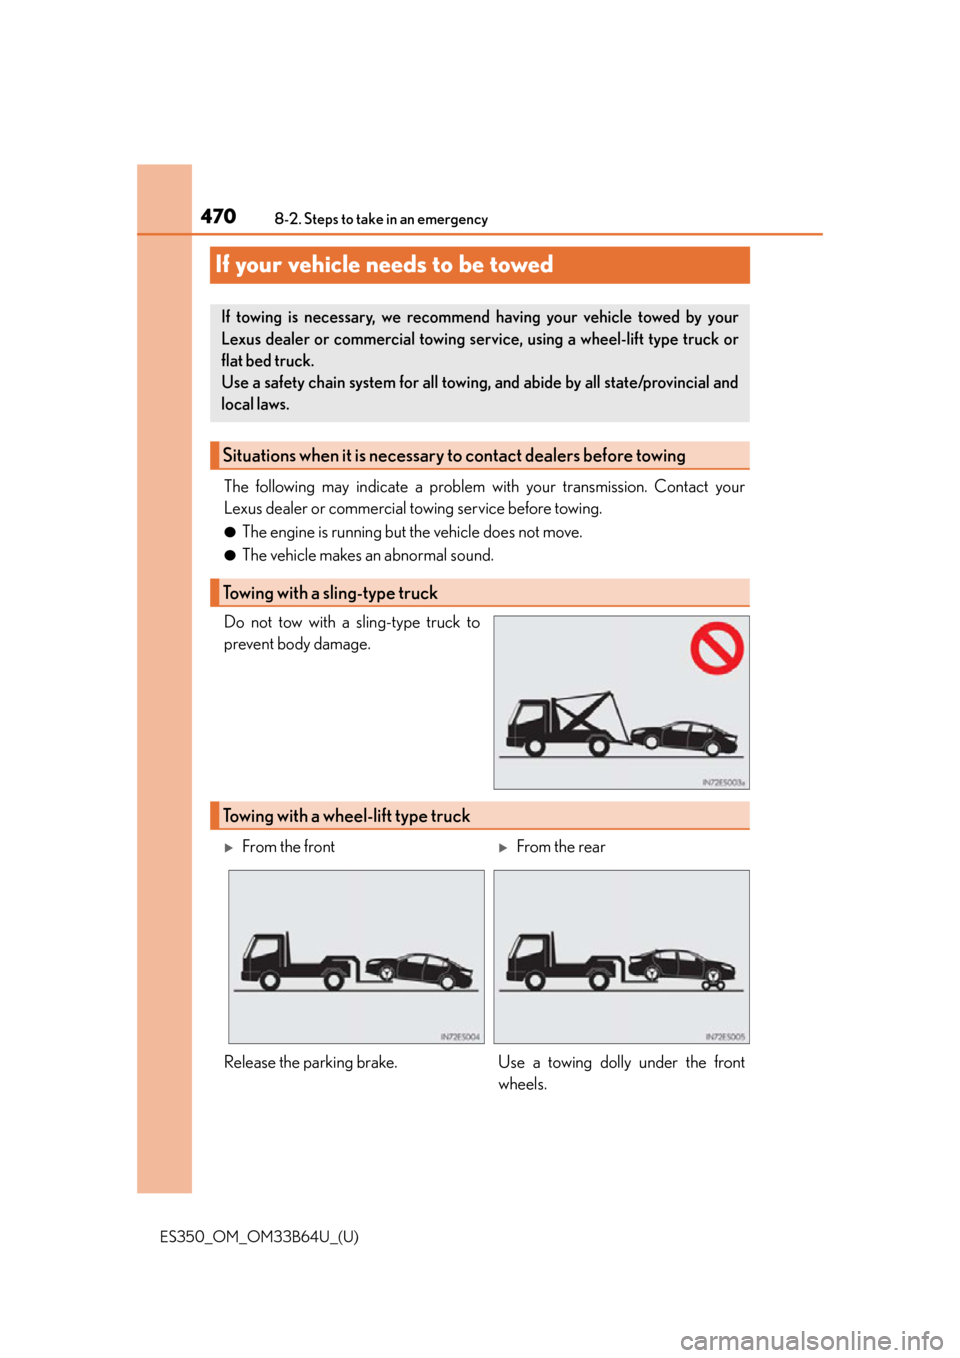
Do not tow with a sling-type truck to
prevent body damage.
If towing is necessary, we recommend having your vehicle towed by your
Lexus dealer or commercial towing se rvice, using a wheel-lift type truck or
flat bed truck.
Use a safety chain system for all towing, and abide by all state/provincial and
local laws.
Situations when it is necessary to contact dealers before towing
Towing with a sling-type truck
Towing with a wheel-lift type truck
From the frontFrom the rear
Release the parking brake. Use a towing dolly under the front wheels.
Trending: ABS, reset sun roof, fuel filter, fuse, traction control, ignition, wiper size
