ECU Lexus ES350 2019 / LEXUS 2019 ES350 (OM06130U) Service Manual
[x] Cancel search | Manufacturer: LEXUS, Model Year: 2019, Model line: ES350, Model: Lexus ES350 2019Pages: 444, PDF Size: 14.22 MB
Page 202 of 444
2024-5. Using the driving support systems
object may increase in the following situ-
ations:
• When the sensor is misaligned due to a strong impact to the sensor or its sur-
rounding area
• When the distance between your vehicle and a guardrail, wall, etc. that enters the
detection area is short
• When driving up an d down consecutive
steep inclines, such as hills, dips in the
road, etc.
• When vehicle lanes are narrow, or when driving on the edge of a lane, and a vehi-
cle traveling in a lane other than the adja-
cent lanes enters the detection area
• When driving on roads with sharp bends,
consecutive curves, or uneven surfaces
• When the tires are slipping or spinning
• When the distance between your vehicle and a following vehicle is short
• When an accessory (such as a bicycle carrier) or towing eyel et is installed to the
rear of the vehicle
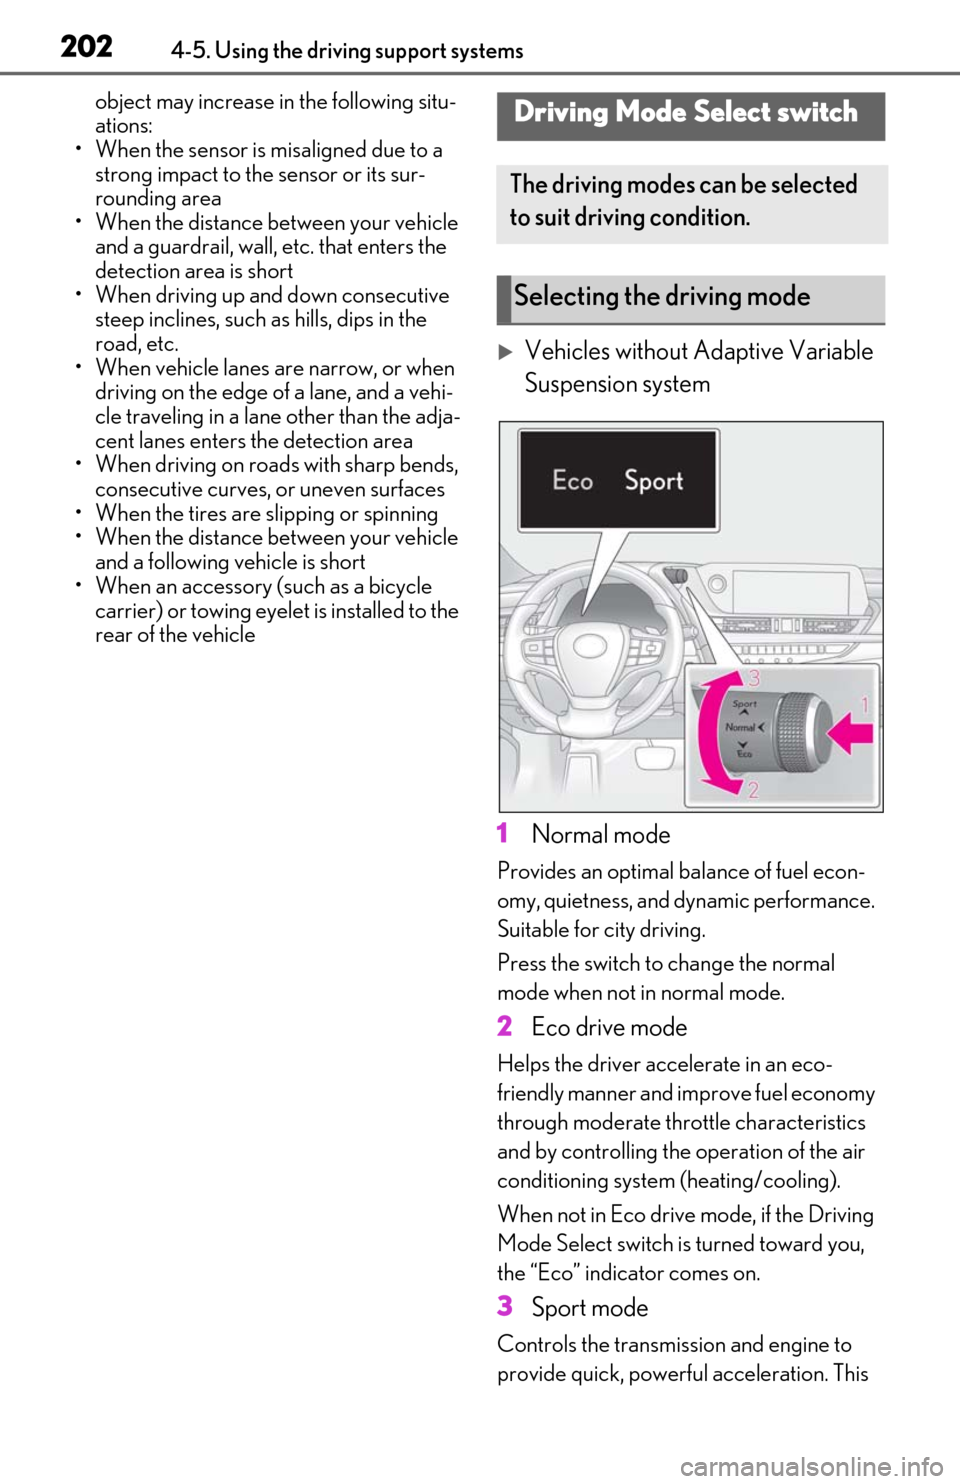
Vehicles without Adaptive Variable
Suspension system
1 Normal mode
Provides an optimal ba lance of fuel econ-
omy, quietness, and dynamic performance.
Suitable for city driving.
Press the switch to change the normal
mode when not in normal mode.
2 Eco drive mode
Helps the driver acce lerate in an eco-
friendly manner and improve fuel economy
through moderate thro ttle characteristics
and by controlling the operation of the air
conditioning system (heating/cooling).
When not in Eco drive mode, if the Driving
Mode Select switch is turned toward you,
the “Eco” indicator comes on.
3 Sport mode
Controls the transmission and engine to
provide quick, powerful acceleration. This
Driving Mode Select switch
The driving modes can be selected
to suit driving condition.
Selecting the driving mode
Page 268 of 444
2685-5. Using the storage features
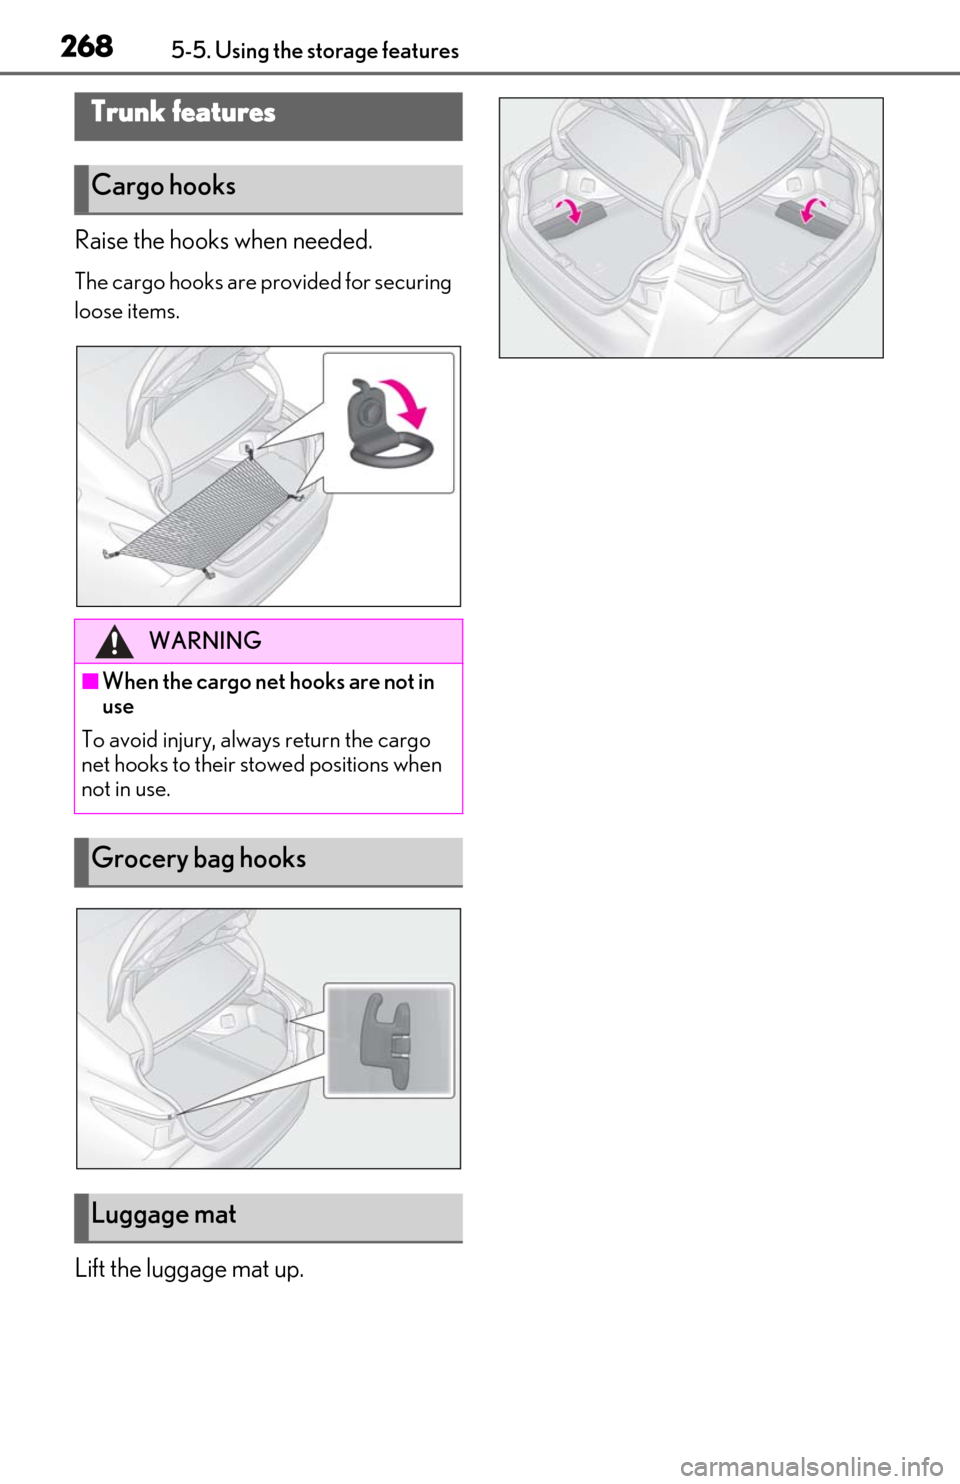
Raise the hooks when needed.
The cargo hooks are provided for securing
loose items.
Lift the luggage mat up.
Trunk features
Cargo hooks
WARNING
■When the cargo net hooks are not in
use
To avoid injury, always return the cargo
net hooks to their stowed positions when
not in use.
Grocery bag hooks
Luggage mat
Page 281 of 444
2815-6. Using the other interior features
5
Interior features
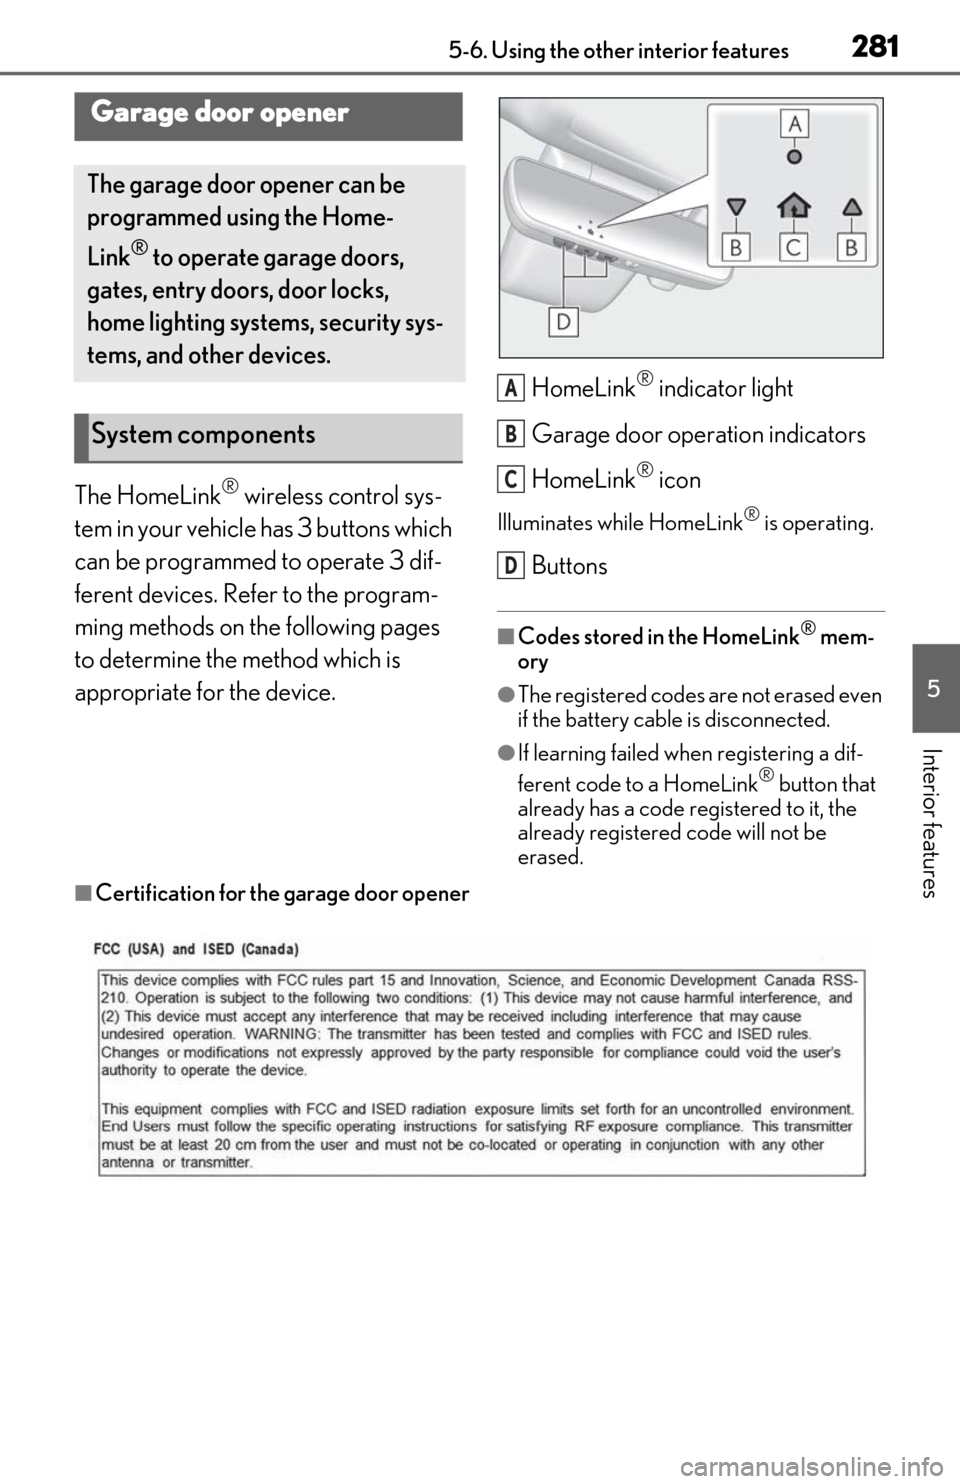
The HomeLink® wireless control sys-
tem in your vehicle has 3 buttons which
can be programmed to operate 3 dif-
ferent devices. Refer to the program-
ming methods on the following pages
to determine the method which is
appropriate for the device. HomeLink
® indicator light
Garage door operation indicators
HomeLink
® icon
Illuminates while HomeLink® is operating.
Buttons
■Codes stored in the HomeLink® mem-
ory
●The registered codes are not erased even
if the battery cable is disconnected.
●If learning failed when registering a dif-
ferent code to a HomeLink® button that
already has a code registered to it, the
already registered code will not be
erased.
■Certification for the garage door opener
Garage door opener
The garage door opener can be
programmed using the Home-
Link
® to operate garage doors,
gates, entry doors, door locks,
home lighting systems, security sys-
tems, and other devices.
System components
A
B
C
D
Page 288 of 444
2885-6. Using the other interior features
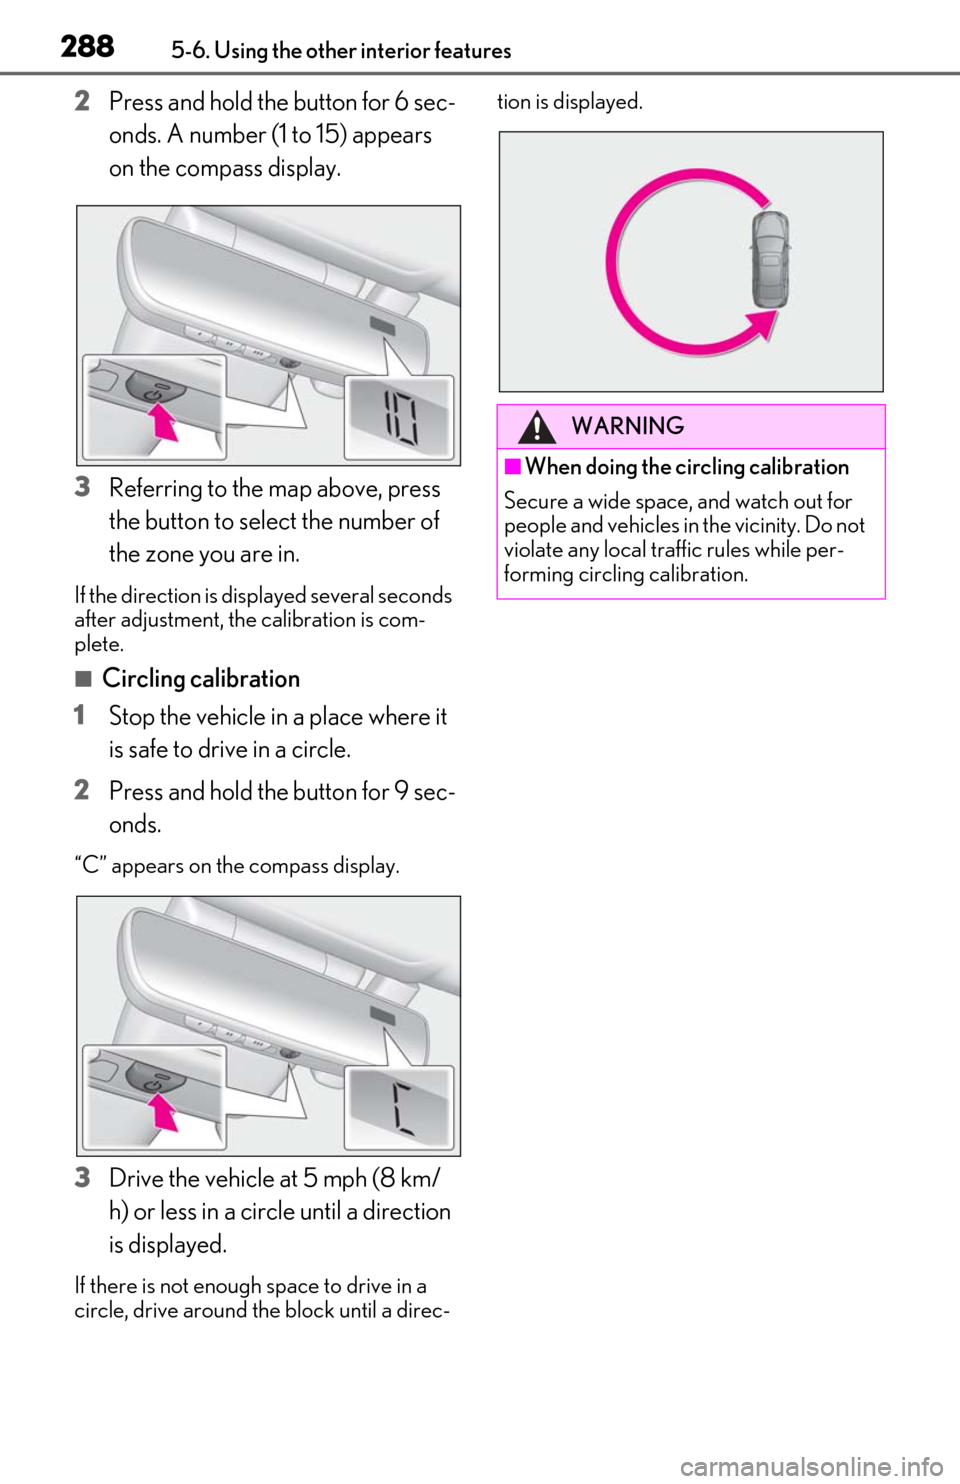
2Press and hold the button for 6 sec-
onds. A number (1 to 15) appears
on the compass display.
3 Referring to the map above, press
the button to select the number of
the zone you are in.
If the direction is di splayed several seconds
after adjustment, the calibration is com-
plete.
■Circling calibration
1 Stop the vehicle in a place where it
is safe to drive in a circle.
2 Press and hold the button for 9 sec-
onds.
“C” appears on th e compass display.
3Drive the vehicle at 5 mph (8 km/
h) or less in a circle until a direction
is displayed.
If there is not enough space to drive in a
circle, drive around the block until a direc- tion is displayed.
WARNING
■When doing the circling calibration
Secure a wide space, and watch out for
people and vehicles in the vicinity. Do not
violate any local traffic rules while per-
forming circling calibration.
Page 289 of 444
2895-6. Using the other interior features
5
Interior features
*:If equipped
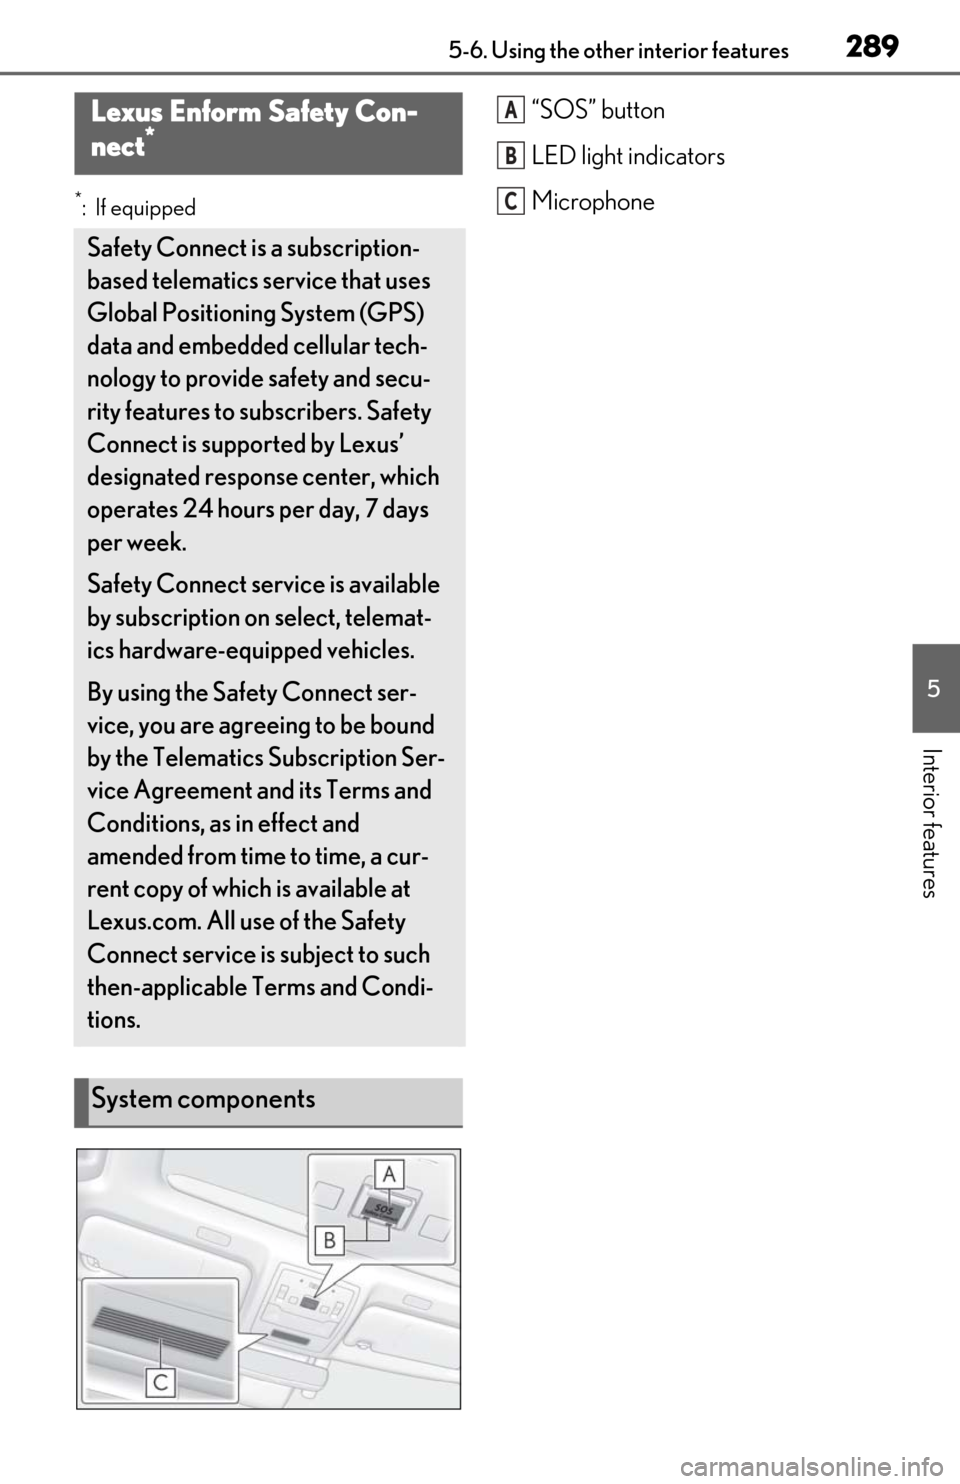
“SOS” button
LED light indicators
MicrophoneLexus Enform Safety Con-
nect*
Safety Connect is a subscription-
based telematics service that uses
Global Positioning System (GPS)
data and embedded cellular tech-
nology to provide safety and secu-
rity features to subscribers. Safety
Connect is supported by Lexus’
designated response center, which
operates 24 hours per day, 7 days
per week.
Safety Connect service is available
by subscription on select, telemat-
ics hardware-equipped vehicles.
By using the Safety Connect ser-
vice, you are agreeing to be bound
by the Telematics Subscription Ser-
vice Agreement and its Terms and
Conditions, as in effect and
amended from time to time, a cur-
rent copy of which is available at
Lexus.com. All use of the Safety
Connect service is subject to such
then-applicable Terms and Condi-
tions.
System components
A
B
C
Page 303 of 444
3036-2. Maintenance
6
Maintenance and care
Radiator/con-
denser
The radiator and con-
denser should be free
from foreign objects.
( P.313)
Washer fluid
Is there sufficient
washer fluid?
( P.315)
Vehicle interior
ItemsCheck points
Accelerator
pedal
• The accelerator
pedal should move
smoothly (without
uneven pedal effort
or catching).
Automatic trans-
mission “Park”
mechanism
•When parked on a slope and the shift
lever is in P, is the
vehicle securely
stopped?
Brake pedal
•Does the brake pedal move
smoothly?
•Does the brake pedal have appro-
priate clearance
from the floor?
•Does the brake pedal have the cor-
rect amount of free
play?
ItemsCheck points
Brakes
•The vehicle should not pull to one side
when the brakes are
applied.
• The brakes should work effectively.
• The brake pedal should not feel
spongy.
• The brake pedal should not get too
close to the floor
when the brakes are
applied.
Head restraints
•Do the head restraints move
smoothly and lock
securely?
Indicators/buzz-
ers•Do the indicators and buzzers function
properly?
Lights
• Do all the lights come on?
• Are the headlights aimed correctly?
Parking brake
• Does the parking brake operate nor-
mally?
• When parked on a slope and the park-
ing brake is on, is the
vehicle securely
stopped?
Seat belts
• Do the seat belts operate smoothly?
• The seat belts should not be damaged.
ItemsCheck points
Page 332 of 444
3326-3. Do-it-yourself maintenance
Make sure to push the tab in during
removal or installation.
3Remove the fuse with the pullout
tool.
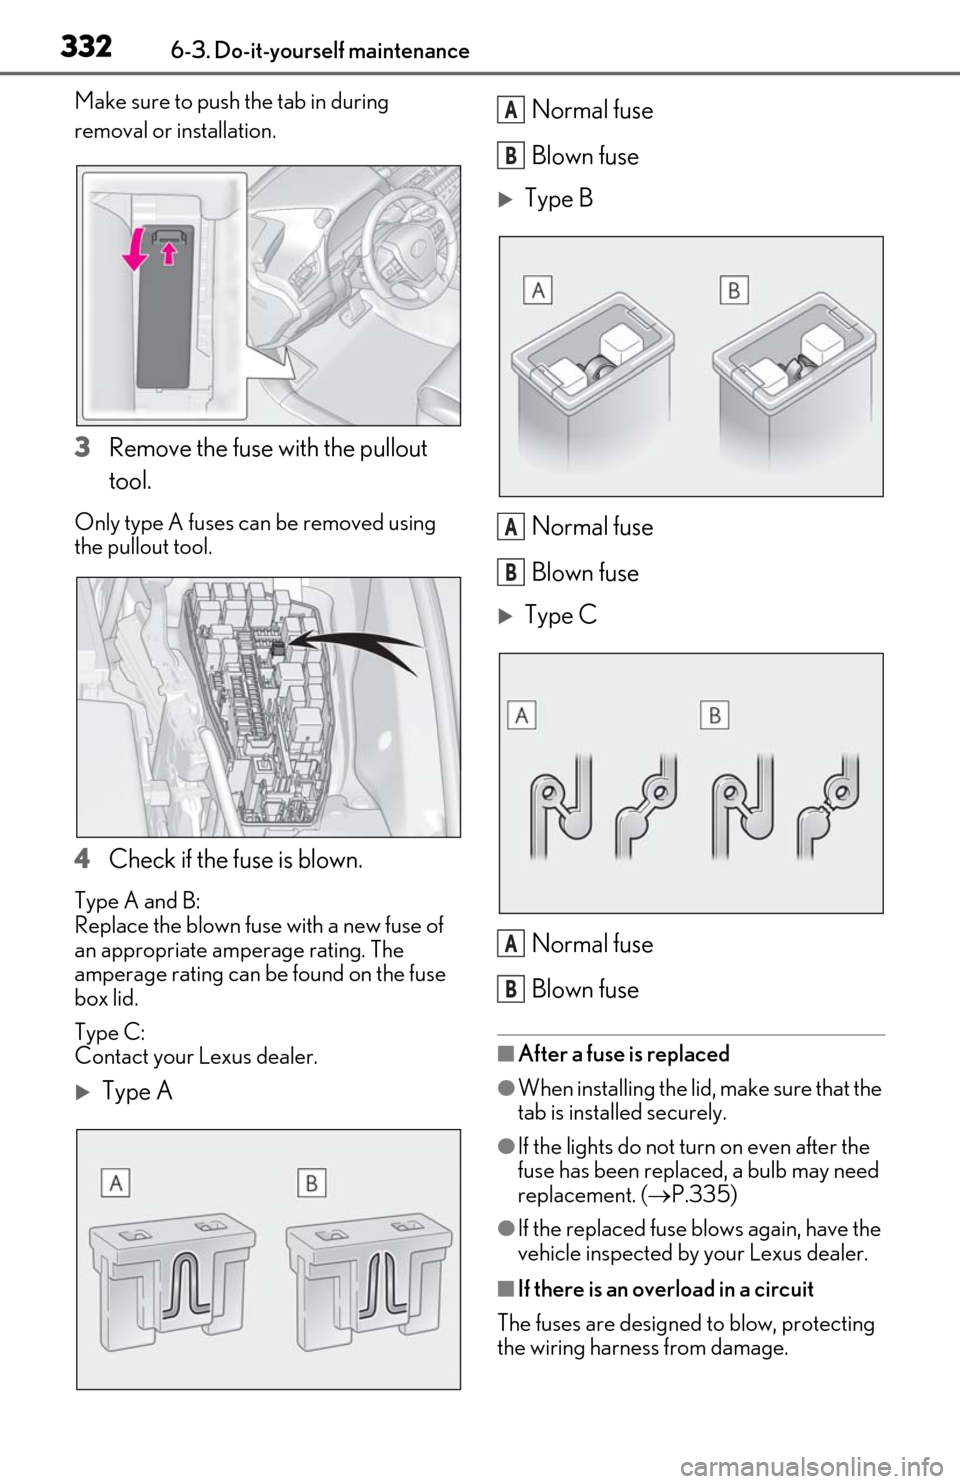
Only type A fuses can be removed using
the pullout tool.
4Check if the fuse is blown.
Type A and B:
Replace the blown fuse with a new fuse of
an appropriate amperage rating. The
amperage rating can be found on the fuse
box lid.
Type C:
Contact your Lexus dealer.
Type A Normal fuse
Blown fuse
Type B
Normal fuse
Blown fuse
Type CNormal fuse
Blown fuse
■After a fuse is replaced
●When installing the lid, make sure that the
tab is installed securely.
●If the lights do not turn on even after the
fuse has been replaced, a bulb may need
replacement. ( P.335)
●If the replaced fuse blows again, have the
vehicle inspected by your Lexus dealer.
■If there is an overload in a circuit
The fuses are designed to blow, protecting
the wiring harness from damage.
A
B
A
B
A
B
Page 338 of 444

3386-3. Do-it-yourself maintenance
WARNING
●Do not touch the glass portion of the
light bulb with bare hands. When it is
unavoidable to hold the glass portion,
use and hold with a clean dry cloth to
avoid getting moisture and oils on the
bulb.
Also, if the bulb is scratched or
dropped, it may blow out or crack.
●Fully install light bulb and any parts
used to secure it. Failure to do so may
result in heat damage, fire, or water
entering the light unit. This may dam-
age the light or cause condensation to
build up on the lens.
■To prevent damage or fire
●Make sure bulb is fully seated and
locked.
●Check the wattage of the bulb before
installing to prevent heat damage.
Page 340 of 444
3407-1. Essential information
7-1.Essential information
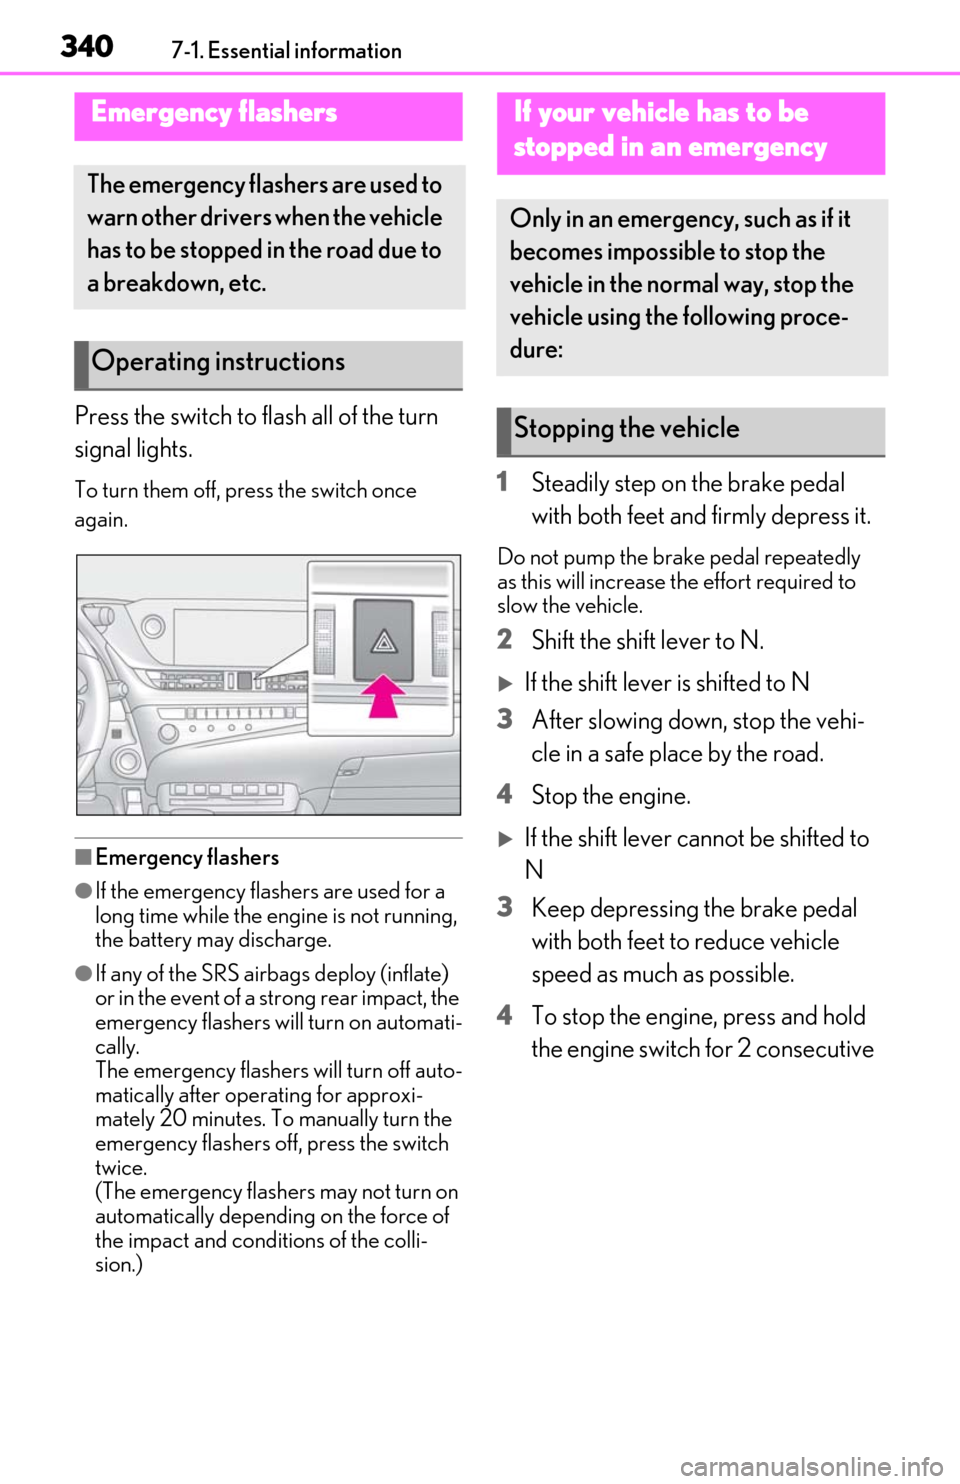
Press the switch to flash all of the turn
signal lights.
To turn them off, press the switch once
again.
■Emergency flashers
●If the emergency flashers are used for a
long time while the engine is not running,
the battery may discharge.
●If any of the SRS airbags deploy (inflate)
or in the event of a strong rear impact, the
emergency flashers will turn on automati-
cally.
The emergency flashers will turn off auto-
matically after operating for approxi-
mately 20 minutes. To manually turn the
emergency flashers off, press the switch
twice.
(The emergency flashers may not turn on
automatically dependin g on the force of
the impact and conditions of the colli-
sion.)
1 Steadily step on the brake pedal
with both feet and firmly depress it.
Do not pump the brake pedal repeatedly
as this will increase the effort required to
slow the vehicle.
2Shift the shift lever to N.
If the shift lever is shifted to N
3 After slowing down, stop the vehi-
cle in a safe place by the road.
4 Stop the engine.
If the shift lever cannot be shifted to
N
3 Keep depressing the brake pedal
with both feet to reduce vehicle
speed as much as possible.
4 To stop the engine, press and hold
the engine switch for 2 consecutive
Emergency flashers
The emergency flashers are used to
warn other drivers when the vehicle
has to be stopped in the road due to
a breakdown, etc.
Operating instructions
If your vehicle has to be
stopped in an emergency
Only in an emergency, such as if it
becomes impossible to stop the
vehicle in the normal way, stop the
vehicle using the following proce-
dure:
Stopping the vehicle
Page 343 of 444
3437-2. Steps to take in an emergency
7
When trouble arises
7-2.Steps to take in an emergency
The following may indicate a problem
with your transmission. Contact your
Lexus dealer or commercial towing
service before towing.
If your vehicle needs to be
towed
If towing is necessary, we recom-
mend having your vehicle towed by
your Lexus dealer or commercial
towing service, using a wheel-lift
type truck or flatbed truck.
Use a safety chain system for all
towing, and abide by all state/pro-
vincial and local laws.
WARNING
Observe the following precautions.
Failure to do so may result in death or
serious injury.
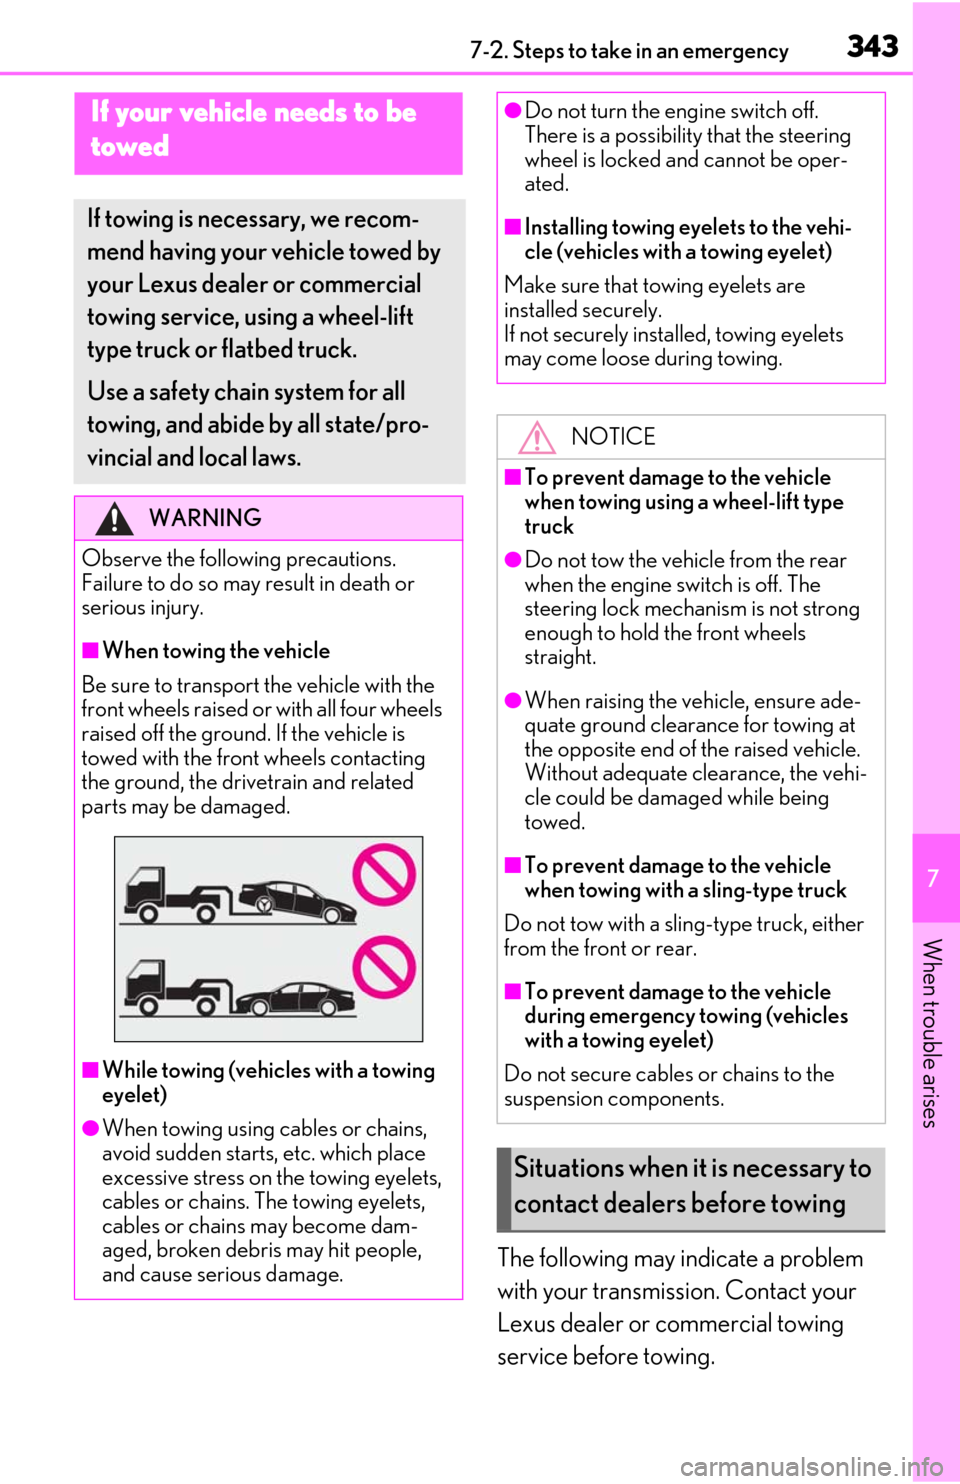
■When towing the vehicle
Be sure to transport the vehicle with the
front wheels raised or with all four wheels
raised off the ground. If the vehicle is
towed with the front wheels contacting
the ground, the drivetrain and related
parts may be damaged.
■While towing (vehicles with a towing
eyelet)
●When towing using cables or chains,
avoid sudden starts, etc. which place
excessive stress on the towing eyelets,
cables or chains. The towing eyelets,
cables or chains may become dam-
aged, broken debris may hit people,
and cause serious damage.
●Do not turn the engine switch off.
There is a possibility that the steering
wheel is locked and cannot be oper-
ated.
■Installing towing eyelets to the vehi-
cle (vehicles with a towing eyelet)
Make sure that towing eyelets are
installed securely.
If not securely installed, towing eyelets
may come loose during towing.
NOTICE
■To prevent damage to the vehicle
when towing using a wheel-lift type
truck
●Do not tow the vehicle from the rear
when the engine switch is off. The
steering lock mechanism is not strong
enough to hold the front wheels
straight.
●When raising the vehicle, ensure ade-
quate ground clearance for towing at
the opposite end of the raised vehicle.
Without adequate clearance, the vehi-
cle could be damaged while being
towed.
■To prevent damage to the vehicle
when towing with a sling-type truck
Do not tow with a sling-type truck, either
from the front or rear.
■To prevent damage to the vehicle
during emergency towing (vehicles
with a towing eyelet)
Do not secure cables or chains to the
suspension components.
Situations when it is necessary to
contact dealers before towing