sensor LEXUS ES350 2022 User Guide
[x] Cancel search | Manufacturer: LEXUS, Model Year: 2022, Model line: ES350, Model: LEXUS ES350 2022Pages: 468, PDF Size: 26.96 MB
Page 112 of 468

1103-2. Opening, closing and locking the doors and trunk
effective range (detection areas), the sys-
tem may not operate properly in the fol-
lowing cases:
• The electronic key is too close to the win- dow or outside door handle, near the
ground, or in a high place when the doors
are locked or unlocked.
• The electronic key is near the ground or in a high place, or too close to the center
of the rear bumper when the trunk is
opened.
• The electronic key is on the instrument
panel, rear package tray or floor, or in the
door pockets or glove box when the
engine is started or engine switch modes
are changed.
●Do not leave the electronic key on top of
the instrument panel or near the door
pockets when exiting the vehicle.
Depending on the radio wave reception
conditions, it may be detected by the
antenna outside the cabin and the doors
will become lockable from the outside,
possibly trapping the electronic key
inside the vehicle.
●As long as the electronic key is within the
effective range, the doors may be locked
or unlocked by anyone. However, only
the doors detecting the electronic key
can be used to unlock the vehicle.
●Even if the electronic key is not inside the
vehicle, it may be possible to start the
engine if the electronic key is near the
window.
●The doors may unlock or lock if a large
amount of water splashes on the door
handle, such as in the rain or in a car
wash, when the electronic key is within
the effective range. (The doors will auto-
matically be locked after approximately
60 seconds if the doors are not opened
and closed.)
●If the wireless remote control is used to
lock the doors when the electronic key is
near the vehicle, there is a possibility that
the door may not be unlocked by the
entry function. (Use the wireless remote
control to unlock the doors.)
●Touching the door lock sensor while
wearing gloves may delay or prevent
lock operation. Remove the gloves and
touch the lock sensor again.
●When the lock operation is performed
using the lock sensor, recognition signals
will be shown up to two consecutive
times. After this, no recognition signals
will be given.
●Unlocking the vehicle may take more
time if another electronic key is within the
effective range.
●If the door handle becomes wet while the
electronic key is within the effective
range, the door may lock and unlock
repeatedly. In this case, follow the follow-
ing correction procedures to wash the
vehicle:
• Place the electronic key in a location 6 ft. (2 m) or more away from the vehicle.
(Take care to ensure that the key is not
stolen.)
• Set the electronic key to battery-saving
mode to disable the smart access system
with push-button start. ( P.109)
●If the electronic key is inside the vehicle
and a door handle becomes wet during a
car wash, a message may be shown on
the multi-information display and a
buzzer will sound outside the vehicle. To
turn off the alarm, lock all the doors.
●The lock sensor may not work properly if
it comes into contact with ice, snow, mud,
etc.
Clean the lock sensor and attempt to
operate it again.
●A sudden approach to the effective
range or door handle may prevent the
doors from being unlocked. In this case,
return the door handle to the original
position and check that the doors unlock
before pulling the door handle again.
■When the vehicle is not driven for
extended periods
●To prevent theft of the vehicle, do not
leave the electronic key within 6 ft. (2 m)
of the vehicle.
●The smart access system with push-but-
ton start can be deactivated in advance.
●Battery-saving mode can reduce the
power consumption of electronic keys.
( P.109)
Page 122 of 468
1203-4. Adjusting the steering wheel and mirrors
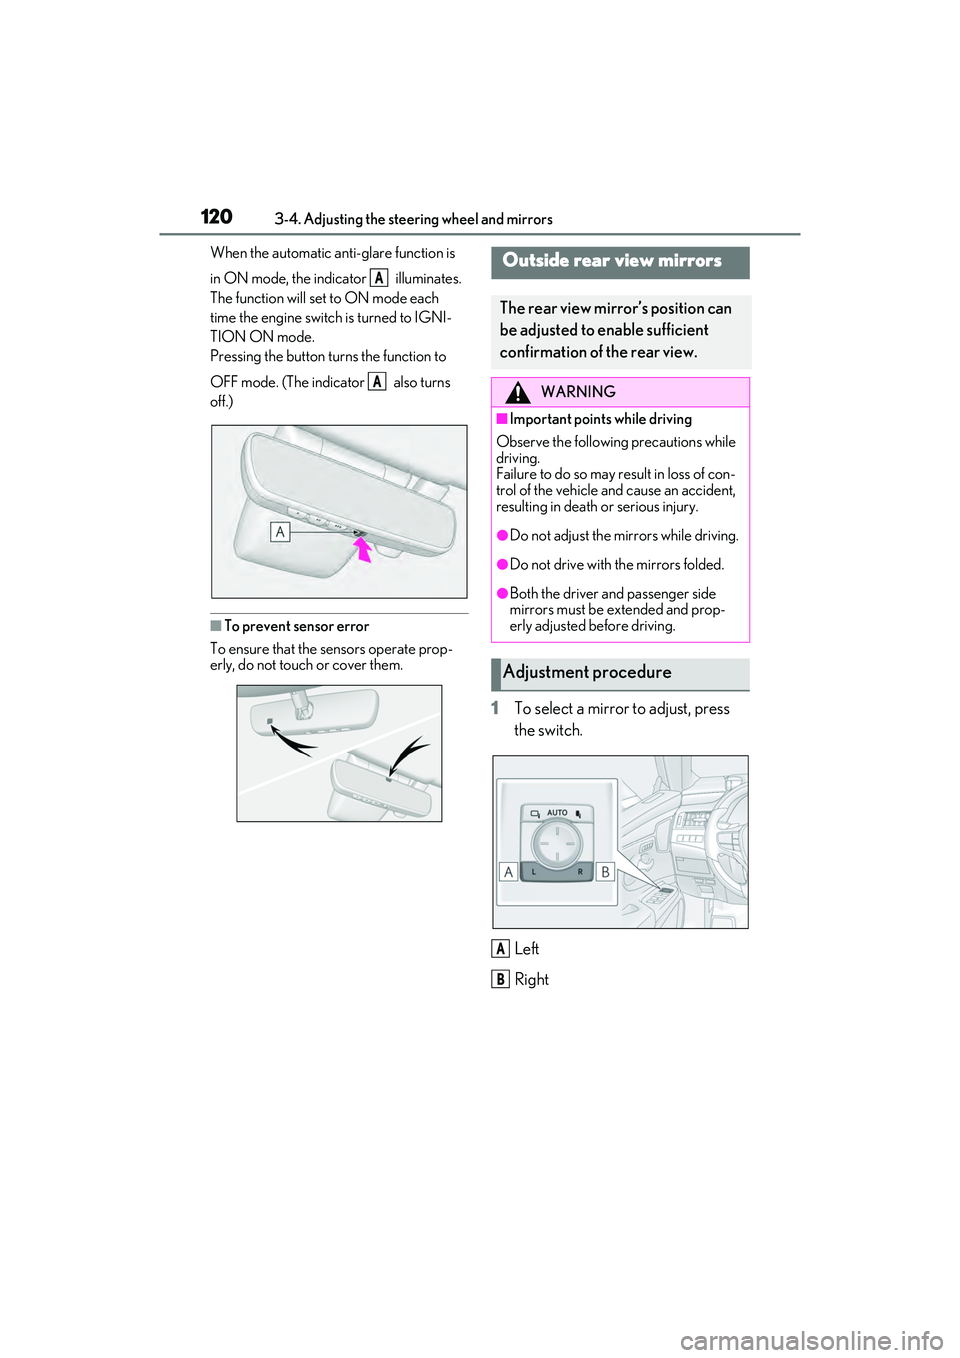
When the automatic anti-glare function is
in ON mode, the indicator illuminates.
The function will set to ON mode each
time the engine switch is turned to IGNI-
TION ON mode.
Pressing the button turns the function to
OFF mode. (The indicator also turns
off.)
■To prevent sensor error
To ensure that the sensors operate prop-
erly, do not touch or cover them.
1 To select a mirror to adjust, press
the switch.
Left
Right
A
A
Outside rear view mirrors
The rear view mirror’s position can
be adjusted to enable sufficient
confirmation of the rear view.
WARNING
■Important points while driving
Observe the following precautions while
driving.
Failure to do so may result in loss of con-
trol of the vehicle and cause an accident,
resulting in death or serious injury.
●Do not adjust the mirrors while driving.
●Do not drive with the mirrors folded.
●Both the driver and passenger side
mirrors must be extended and prop-
erly adjusted before driving.
Adjustment procedure
A
B
Page 160 of 468
1584-3. Operating the lights and wipers
4-3.Op erating the lights and wipers
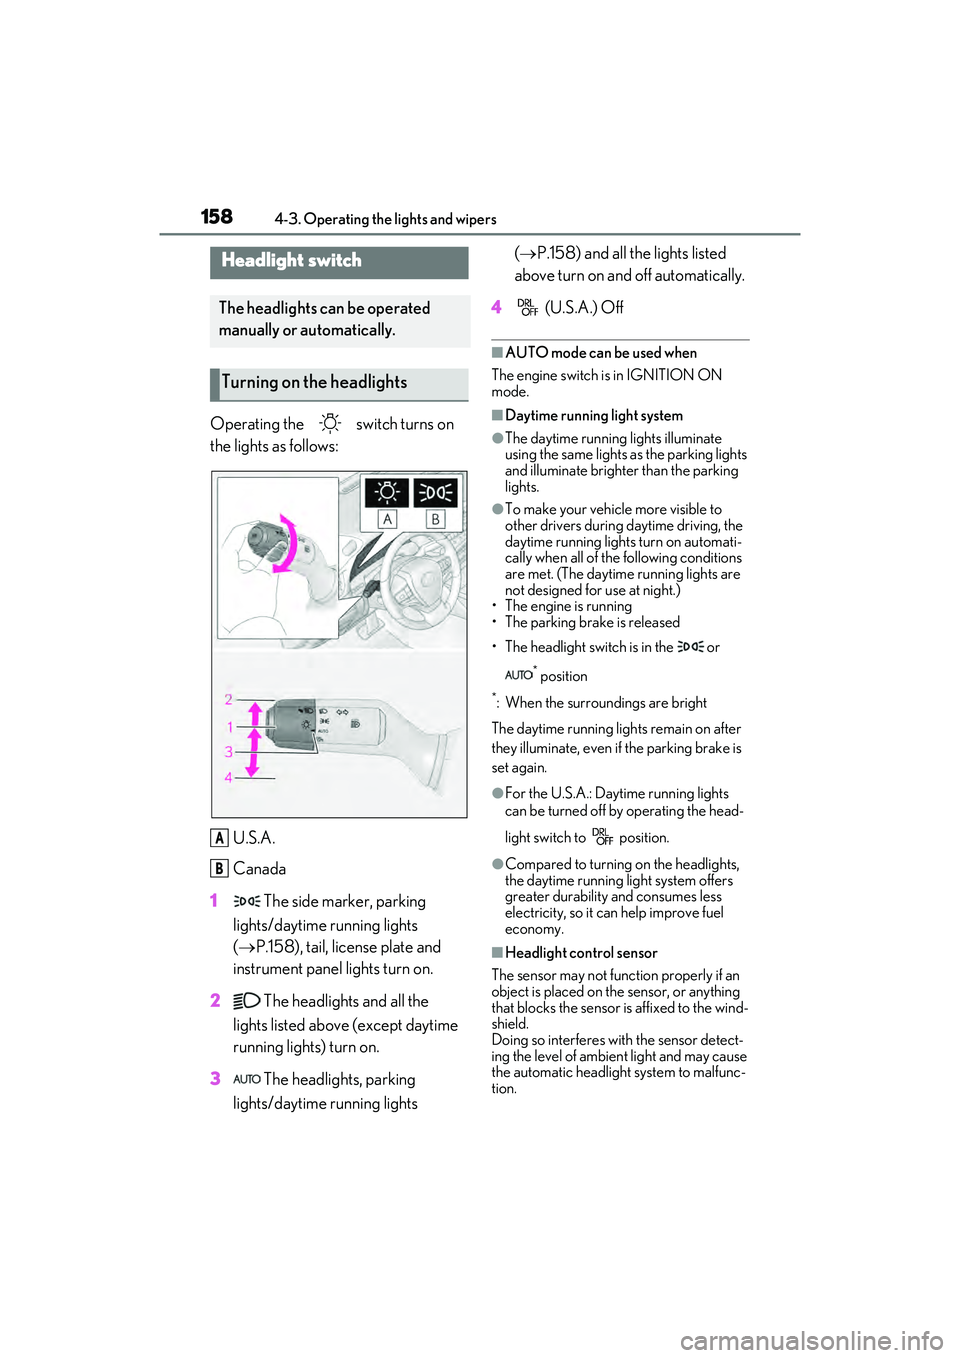
Operating the switch turns on
the lights as follows:U.S.A.
Canada
1 The side marker, parking
lights/daytime running lights
( P.158), tail, license plate and
instrument panel lights turn on.
2 The headlights and all the
lights listed above (except daytime
running lights) turn on.
3 The headlights, parking
lights/daytime running lights (
P.158) and all the lights listed
above turn on and off automatically.
4 (U.S.A.) Off
■AUTO mode can be used when
The engine switch is in IGNITION ON
mode.
■Daytime running light system
●The daytime running lights illuminate
using the same lights as the parking lights
and illuminate brighter than the parking
lights.
●To make your vehicle more visible to
other drivers during daytime driving, the
daytime running lights turn on automati-
cally when all of the following conditions
are met. (The daytime running lights are
not designed for use at night.)
• The engine is running
• The parking brake is released
• The headlight switch is in the or
* position
*: When the surroundings are bright
The daytime running lights remain on after
they illuminate, even if the parking brake is
set again.
●For the U.S.A.: Daytime running lights
can be turned off by operating the head-
light switch to position.
●Compared to turning on the headlights,
the daytime running light system offers
greater durability and consumes less
electricity, so it can help improve fuel
economy.
■Headlight control sensor
The sensor may not function properly if an
object is placed on the sensor, or anything
that blocks the sensor is affixed to the wind-
shield.
Doing so interferes with the sensor detect-
ing the level of ambient light and may cause
the automatic headlight system to malfunc-
tion.
Headlight switch
The headlights can be operated
manually or automatically.
Turning on the headlights
A
B
Page 161 of 468

1594-3. Operating the lights and wipers
4
Driving
■Automatic light off system
●When the headlights come on: The head-
lights and tail lights turn off 30 seconds
after the driver’s door is opened and
closed if the engine switch is turned to
ACCESSORY mode or turned off. (The
lights turn off immediately if on
the key is pressed after all the doors are
locked.)
●When only the tail lights come on: The tail
lights turn off automatically if the engine
switch is turned to ACCESSORY mode
or turned off and the driver’s door is
opened.
For the U.S.A.: To turn the lights on again,
turn the engine switch to IGNITION ON
mode, or turn the ligh t switch off once and
then back to or .
For Canada: To turn the lights on again, turn
the engine switch to IGNITION ON mode,
or turn the light switch to position once
and then back to or .
■Light reminder buzzer
A buzzer sounds when the engine switch is
turned off or turned to ACCESSORY
mode and the driver’s door is opened while
the lights are turned on.
■Automatic headlight leveling system (if
equipped)
The level of the headlights is automatically
adjusted according to the number of pas-
sengers and the loading condition of the
vehicle to ensure that the headlights do not
interfere with other road users.
■Windshield wiper linked headlight illu-
mination
When driving during daytime with the
headlight switch turned to , if the wind-
shield wipers are used, the headlights will
turn on automatically after several seconds
to help enhance the visibility of your vehicle.
■Battery-saving function
In order to prevent the battery of the vehi-
cle from discharging, if the headlights
and/or tail lights are on when the engine
switch is turned off the battery saving func-
tion will operate and automatically turn off
all the lights after approximately 20 min-
utes.
When the engine switch is turned to IGNI-
TION ON mode, the battery-saving func-
tion will be disabled.
When any of the following are performed,
the battery-saving function is canceled
once and then reactivat ed. All the lights will
turn off automatically 20 minutes after the
battery-saving function has been reacti-
vated:
●When the headlight switch is operated
●When a door is opened or closed
■Welcome light illumination control
The parking lights, tail lights and license
plate lights automatically turn on at night
when the doors are unlocked using the
entry function or wireless remote control if
the light switch is in the position.
■If “Headlight System Malfunction Visit
Your Dealer” is displayed
P.363
■Customization
Settings (e.g. light sensor sensitivity) can be
changed.
(Customizable features: P.408)
Page 164 of 468
1624-3. Operating the lights and wipers
●House lights, street lights, traffic signals,
and illuminated billboards or signs may
cause the high beam to switch to the low
beams, or the low beams to remain on.
●The following factors may affect the
amount of time taken to turn the high
beam on or off:
• The brightness of headlights, fog lights,
and tail lights of vehicles ahead
• The movement and direction of vehicles ahead
• When a vehicle ahead only has opera- tional lights on one side
• When a vehicle ahead is a two-wheeled
vehicle
• The condition of the road (gradient, curve, condition of the road surface etc.)
• The number of passengers and amount of luggage
●The high beam may be turned on or off
when the driver does not expect it.
●Bicycles or similar objects may not be
detected.
●In the situations shown below, the system
may not be able to accurately detect sur-
rounding brightness levels. This may
cause the low beams to remain on or the
high beams to cause problems for pedes-
trians, vehicles ahead or other parties. In
these cases, manually switch between the
high and low beams.
• In bad weather (rain, snow, fog, sand-
storms etc.)
• The windshield is obscured by fog, mist, ice, dirt etc.
• The windshield is cracked or damaged
• The front camera is deformed or dirty
• When the temperature of the front cam- era is extremely high
• Surrounding brightness levels are equal to those of headlights, tail lights or fog
lights
• When headlights or tail lights of vehicles ahead are turned off, dirty, changing
color, or not aimed properly
• When the vehicle is hit by water, snow,
dust, etc. from a preceding vehicle
• When driving through an area of inter- mittently changing brightness and dark-
ness
• When frequently and repeatedly driving ascending/descending roads, or roads with rough, bumpy or uneven surfaces
(such as stone-paved roads, gravel roads
etc.)
• When frequently and repeatedly taking curves or driving on a winding road
• There is a highly reflective object ahead
of the vehicle, such as a sign or a mirror
• The back of a vehicle ahead is highly reflective, such as a container on a truck
• The vehicle’s headlights are damaged or dirty
• The vehicle is listing or tilting, due to a flat
tire, a trailer being towed etc.
• The high beam and low beam are repeat- edly being switched between in an
abnormal manner
• The driver believes that the high beam may be causing problems or distress to
other drivers or pedestrians nearby
■Temporarily lowering sensor sensitivity
The sensitivity of the sensor can be tempo-
rarily lowered.
1 Turn the engine switch off while the fol-
lowing conditions are met.
• The headlight switch is in or .
• The headlight switch lever is in low beam position.
• Automatic High Beam switch is on.
2 Turn the engine switch to IGNITION
ON mode.
3 Within 60 seconds after 2, repeat pull-
ing the headlight switch lever to the
original position then pushing it to the
high beam position quickly 10 times,
then leave the lever in high beam posi-
tion.
4 If the sensitivity is changed, the Auto-
matic High Beam indicator turns on and
off 3 times.
Automatic High Beam (headlights) may
turn on even the vehicle is stopped.
■If “Headlight System Malfunction Visit
Your Dealer” is displayed
P.363
Page 167 of 468
1654-3. Operating the lights and wipers
4
Driving
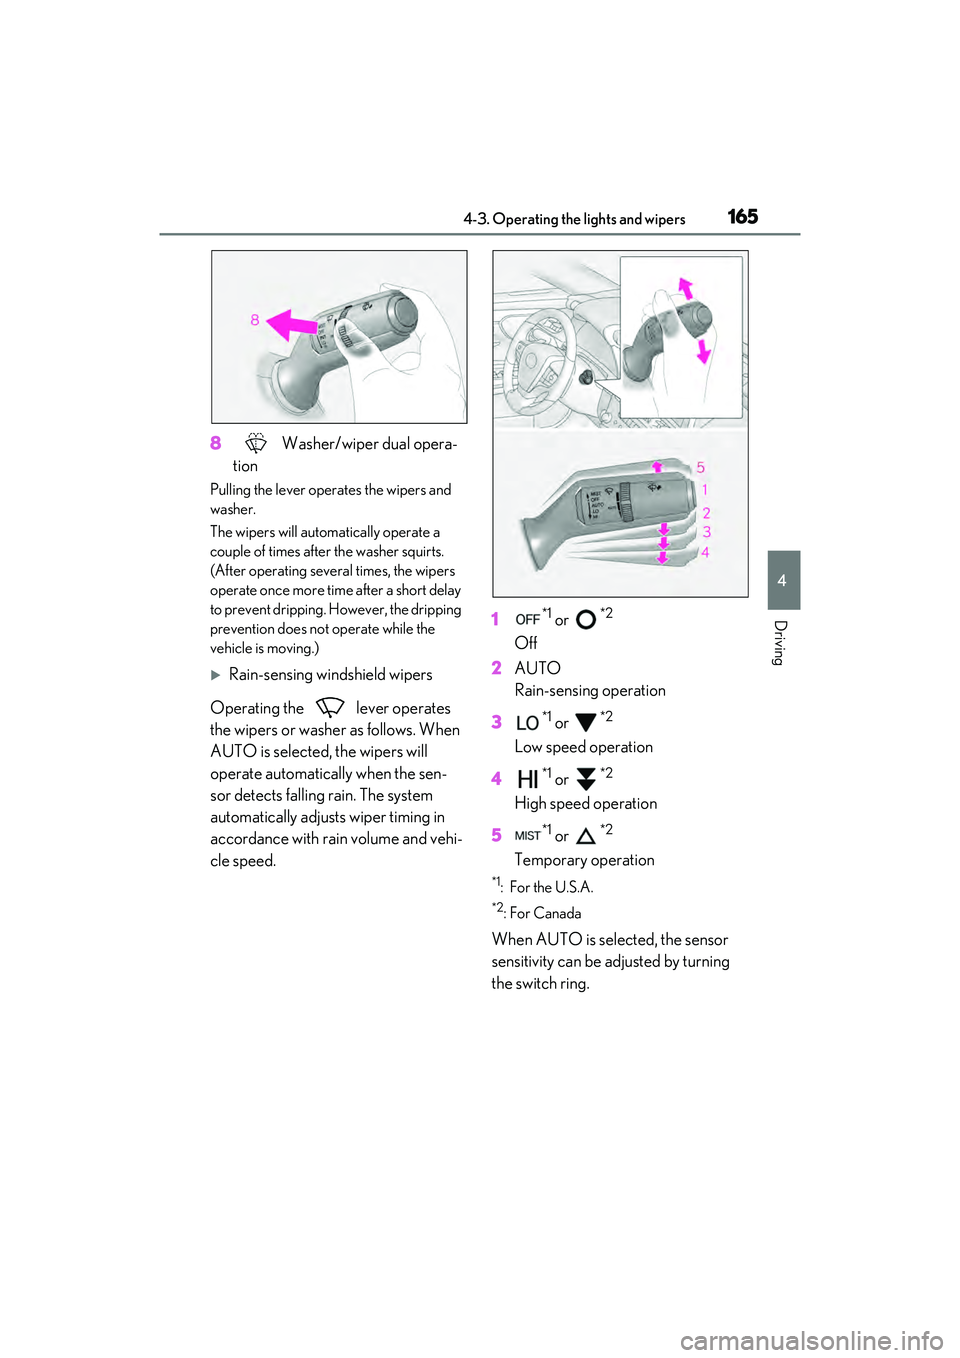
8 Washer/wiper dual opera-
tion
Pulling the lever operates the wipers and
washer.
The wipers will automatically operate a
couple of times after the washer squirts.
(After operating several times, the wipers
operate once more time after a short delay
to prevent dripping. However, the dripping
prevention does not operate while the
vehicle is moving.)
Rain-sensing windshield wipers
Operating the lever operates
the wipers or washer as follows. When
AUTO is selected, the wipers will
operate automatically when the sen-
sor detects falling rain. The system
automatically adjusts wiper timing in
accordance with rain volume and vehi-
cle speed. 1
*1 or *2
Off
2 AUTO
Rain-sensing operation
3
*1 or *2
Low speed operation
4
*1 or *2
High speed operation
5
*1 or *2
Temporary operation
*1:For the U.S.A.
*2:For Canada
When AUTO is selected, the sensor
sensitivity can be adjusted by turning
the switch ring.
Page 168 of 468
1664-3. Operating the lights and wipers
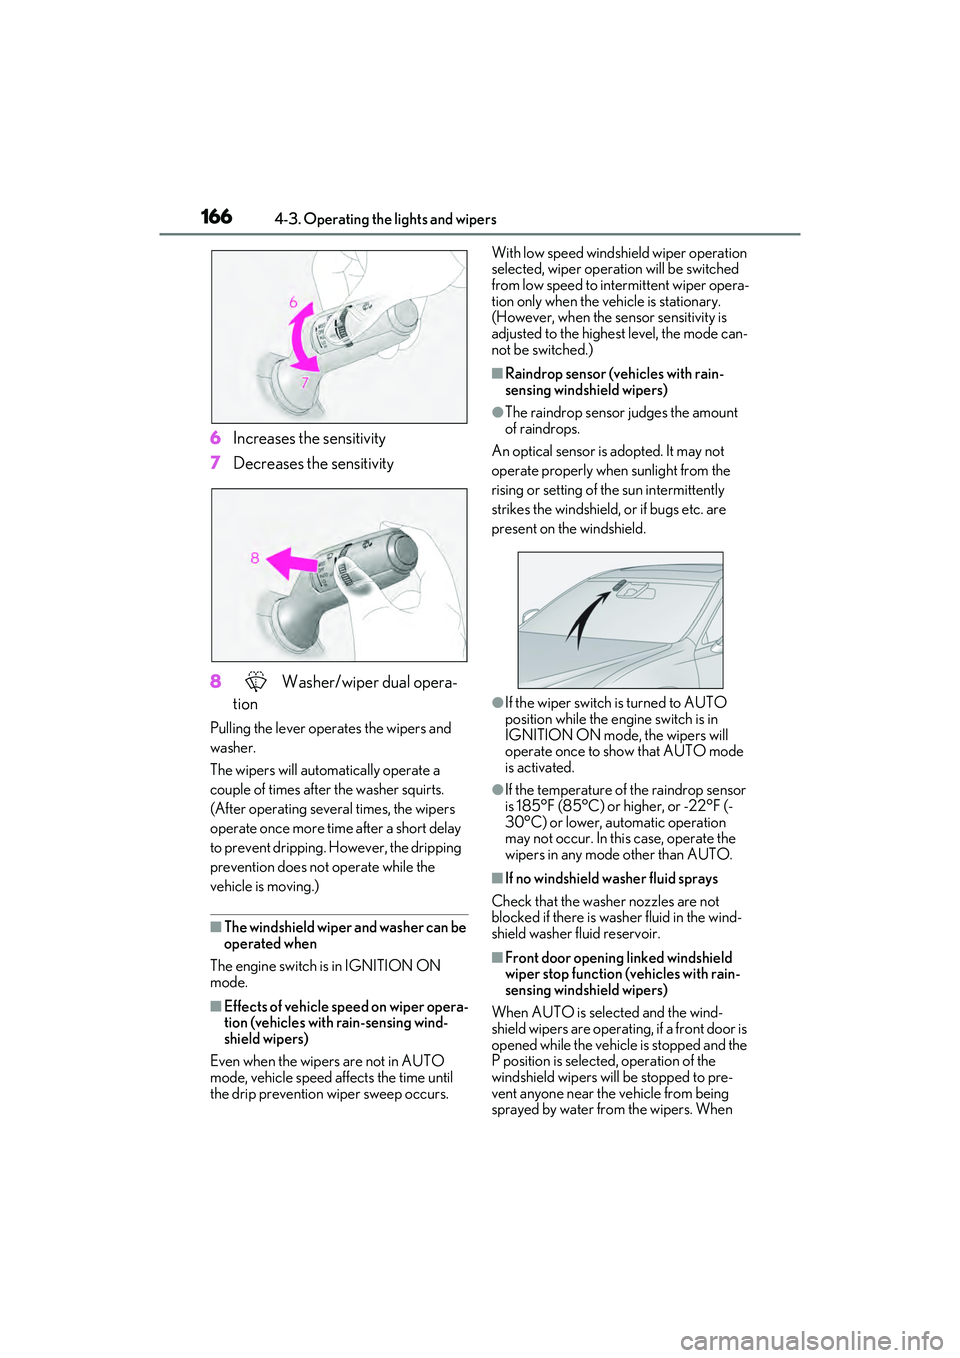
6Increases the sensitivity
7 Decreases the sensitivity
8 Washer/wiper dual opera-
tion
Pulling the lever operates the wipers and
washer.
The wipers will automatically operate a
couple of times after the washer squirts.
(After operating several times, the wipers
operate once more time after a short delay
to prevent dripping. However, the dripping
prevention does not operate while the
vehicle is moving.)
■The windshield wiper and washer can be
operated when
The engine switch is in IGNITION ON
mode.
■Effects of vehicle speed on wiper opera-
tion (vehicles with rain-sensing wind-
shield wipers)
Even when the wipers are not in AUTO
mode, vehicle speed affects the time until
the drip prevention wiper sweep occurs. With low speed windshield wiper operation
selected, wiper operation will be switched
from low speed to intermittent wiper opera-
tion only when the vehicle is stationary.
(However, when the sensor sensitivity is
adjusted to the highest level, the mode can-
not be switched.)
■Raindrop sensor (vehicles with rain-
sensing windshield wipers)
●The raindrop sensor judges the amount
of raindrops.
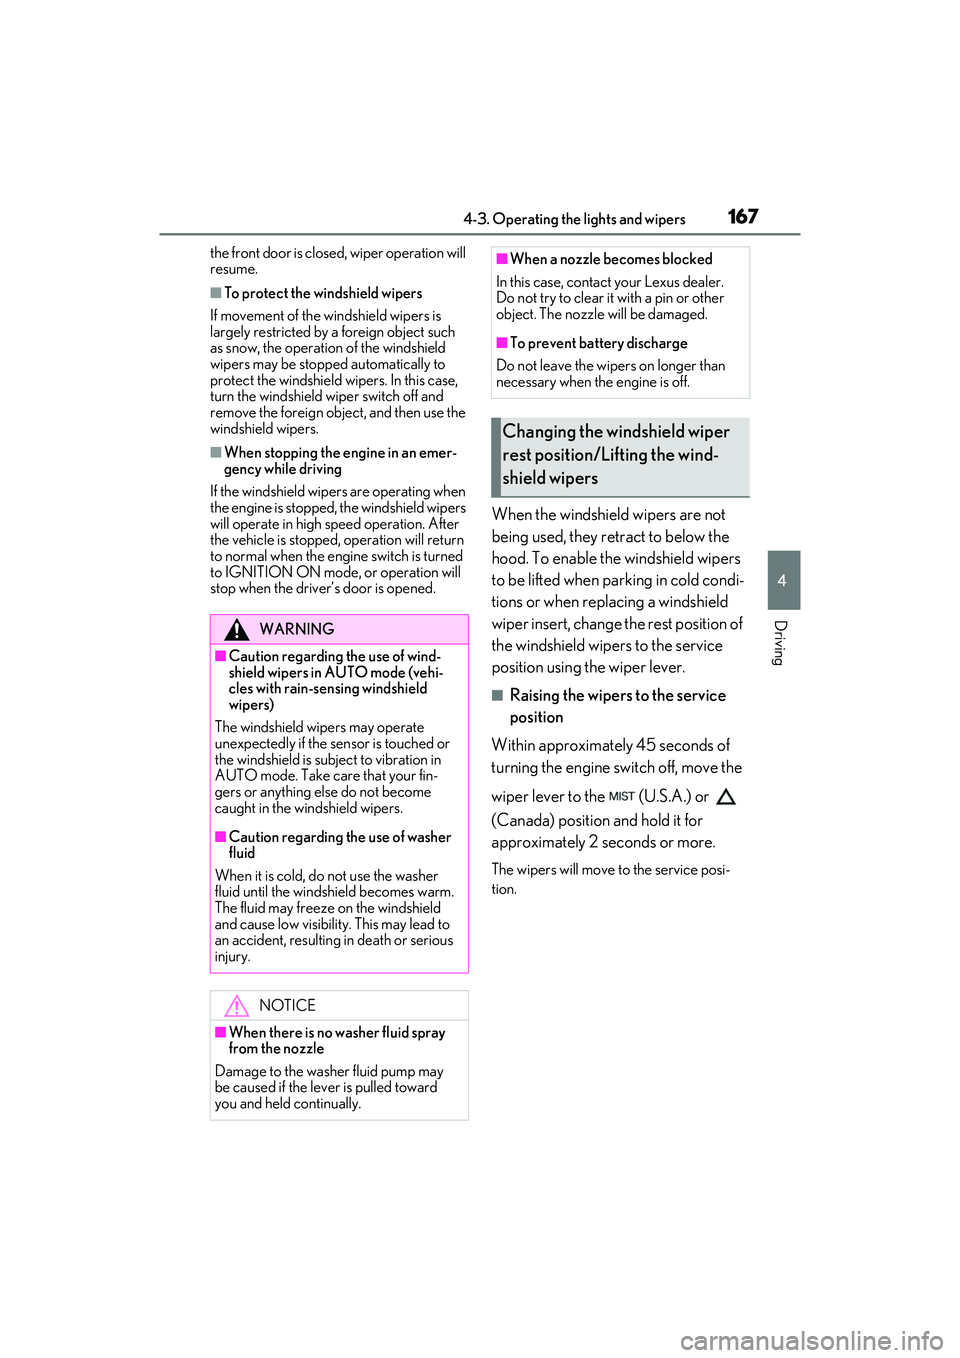
An optical sensor is adopted. It may not
operate properly when sunlight from the
rising or setting of the sun intermittently
strikes the windshield, or if bugs etc. are
present on the windshield.
●If the wiper switch is turned to AUTO
position while the engine switch is in
IGNITION ON mode, the wipers will
operate once to show that AUTO mode
is activated.
●If the temperature of the raindrop sensor
is 185°F (85°C) or higher, or -22°F (-
30°C) or lower, automatic operation
may not occur. In this case, operate the
wipers in any mode other than AUTO.
■If no windshield washer fluid sprays
Check that the washer nozzles are not
blocked if there is washer fluid in the wind-
shield washer fluid reservoir.
■Front door opening linked windshield
wiper stop function (vehicles with rain-
sensing windshield wipers)
When AUTO is selected and the wind-
shield wipers are operating, if a front door is
opened while the vehicle is stopped and the
P position is selected, operation of the
windshield wipers will be stopped to pre-
vent anyone near the vehicle from being
sprayed by water from the wipers. When
Page 169 of 468
1674-3. Operating the lights and wipers
4
Driving
the front door is closed, wiper operation will
resume.
■To protect the windshield wipers
If movement of the windshield wipers is
largely restricted by a foreign object such
as snow, the operation of the windshield
wipers may be stopped automatically to
protect the windshield wipers. In this case,
turn the windshield wiper switch off and
remove the foreign object, and then use the
windshield wipers.
■When stopping the engine in an emer-
gency while driving
If the windshield wipers are operating when
the engine is stopped, the windshield wipers
will operate in high speed operation. After
the vehicle is stopped, operation will return
to normal when the engine switch is turned
to IGNITION ON mode, or operation will
stop when the driver’s door is opened.
When the windshield wipers are not
being used, they retract to below the
hood. To enable the windshield wipers
to be lifted when parking in cold condi-
tions or when replacing a windshield
wiper insert, change the rest position of
the windshield wipers to the service
position using the wiper lever.
■Raising the wipers to the service
position
Within approximately 45 seconds of
turning the engine switch off, move the
wiper lever to the (U.S.A.) or
(Canada) position and hold it for
approximately 2 seconds or more.
The wipers will move to the service posi-
tion.
WARNING
■Caution regarding the use of wind-
shield wipers in AUTO mode (vehi-
cles with rain-sensing windshield
wipers)
The windshield wipers may operate
unexpectedly if the sensor is touched or
the windshield is subject to vibration in
AUTO mode. Take care that your fin-
gers or anything else do not become
caught in the windshield wipers.
■Caution regarding the use of washer
fluid
When it is cold, do not use the washer
fluid until the windshield becomes warm.
The fluid may freeze on the windshield
and cause low visibility. This may lead to
an accident, resulting in death or serious
injury.
NOTICE
■When there is no washer fluid spray
from the nozzle
Damage to the washer fluid pump may
be caused if the lever is pulled toward
you and held continually.
■When a nozzle becomes blocked
In this case, contact your Lexus dealer.
Do not try to clear it with a pin or other
object. The nozzle will be damaged.
■To prevent battery discharge
Do not leave the wipers on longer than
necessary when the engine is off.
Changing the windshield wiper
rest position/Lifting the wind-
shield wipers
Page 173 of 468
1714-5. Using the driving support systems
4
Driving
4-5.Using the driving support s yste ms
■PCS (Pre-Collision System)
P.176
■LTA (Lane Tracing Assist)
P.186
■AHB (Automatic High Beam)
P.161
■RSA (Road Sign Assist) (if
equipped)
P.195
■Dynamic radar cruise control with
full-speed range
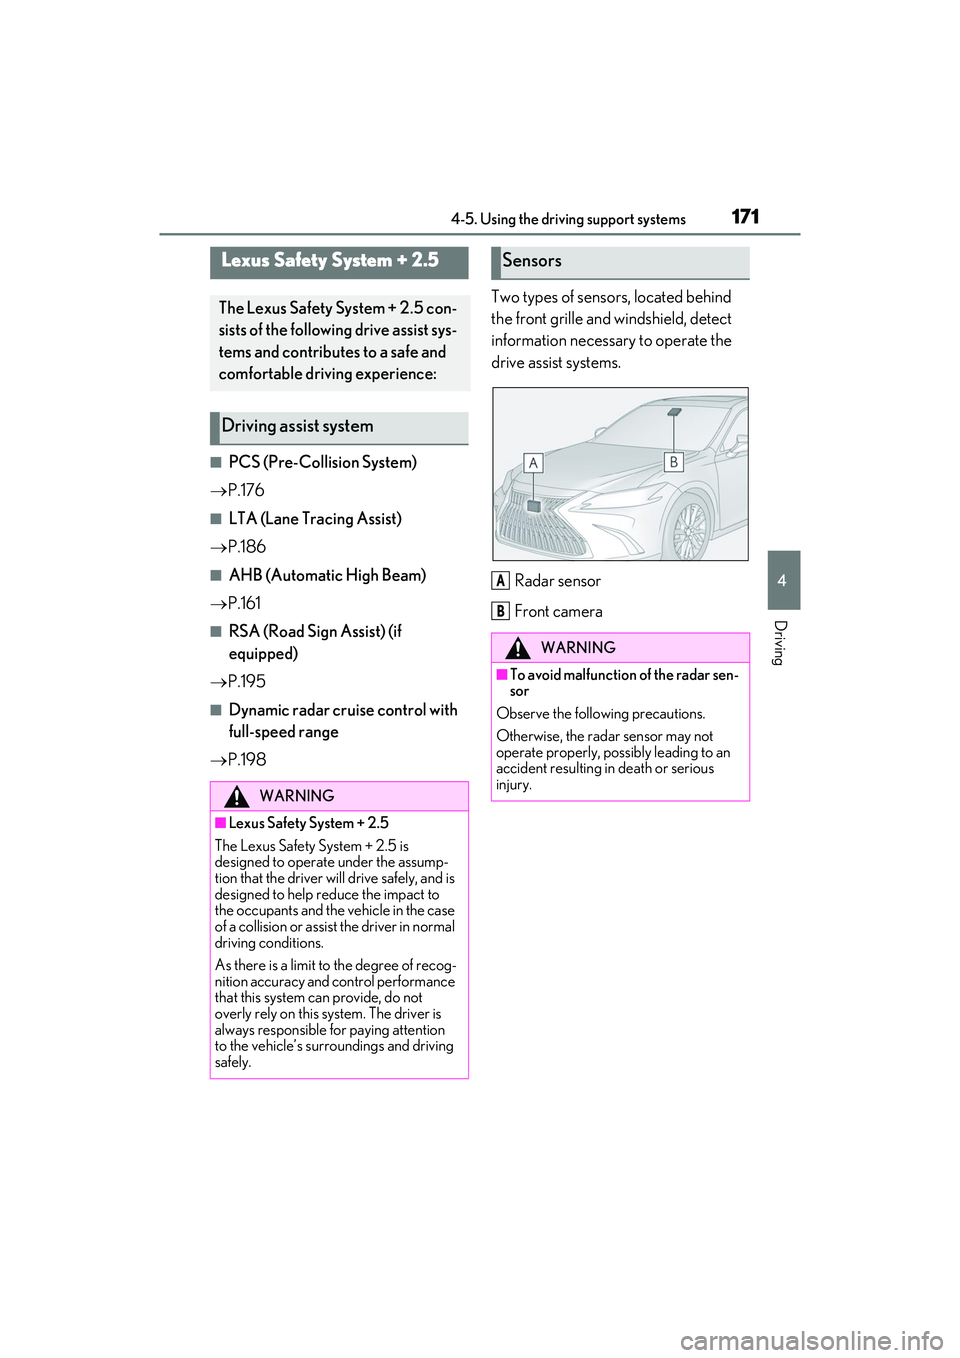
P.198 Two types of sensors, located behind
the front grille and windshield, detect
information necessary to operate the
drive assist systems.
Radar sensor
Front camera
Lexus Safety System + 2.5
The Lexus Safety System + 2.5 con-
sists of the following drive assist sys-
tems and contributes to a safe and
comfortable driving experience:
Driving assist system
WARNING
■Lexus Safety System + 2.5
The Lexus Safety System + 2.5 is
designed to operate under the assump-
tion that the driver will drive safely, and is
designed to help reduce the impact to
the occupants and the vehicle in the case
of a collision or assist the driver in normal
driving conditions.
As there is a limit to the degree of recog-
nition accuracy and control performance
that this system can provide, do not
overly rely on this system. The driver is
always responsible for paying attention
to the vehicle’s surroundings and driving
safely.
Sensors
WARNING
■To avoid malfunction of the radar sen-
sor
Observe the following precautions.
Otherwise, the radar sensor may not
operate properly, possibly leading to an
accident resulting in death or serious
injury.
A
B
Page 174 of 468
1724-5. Using the driving support systems
WARNING
●Keep the radar sensor and the radar
sensor cover clean at all times.Radar sensor
Radar sensor cover
If the front of the rada r sensor or the front
or back of the radar sensor cover is dirty
or covered with water droplets, snow,
etc., clean it.
Clean the radar sensor and radar sensor
cover with a soft cloth to avoid damaging
them.
●Do not attach accessories, stickers
(including transparent stickers) or
other items to the radar sensor, radar
sensor cover or surrounding area.
●Do not subject the radar sensor or its
surrounding area to a strong impact.
If the radar sensor, front grille, or front
bumper has been subjected to a
strong impact, have the vehicle
inspected by your Lexus dealer.
●Do not disassemble the radar sensor.
●Do not modify or paint the radar sen-
sor or radar sensor cover.
●In the following cases, the radar sensor
must be recalibrated. Contact your
Lexus dealer for details.
• When the radar sensor or front grille are removed and installed, or replaced
• When the front bumper is replaced
A
B
■To avoid malfunction of the front
camera
Observe the following precautions.
Otherwise, the front camera may not
operate properly, possibly leading to an
accident resulting in death or serious
injury.
●Keep the windshield clean at all times.
• If the windshield is dirty or covered with an oily film, water droplets, snow,
etc., clean the windshield.
• If a glass coating agent is applied to the windshield, it will still be necessary to
use the windshield wipers to remove
water droplets, etc. from the area of
the windshield in front of the front
camera.
• If the inner side of the windshield where the front camera is installed is
dirty, contact your Lexus dealer.
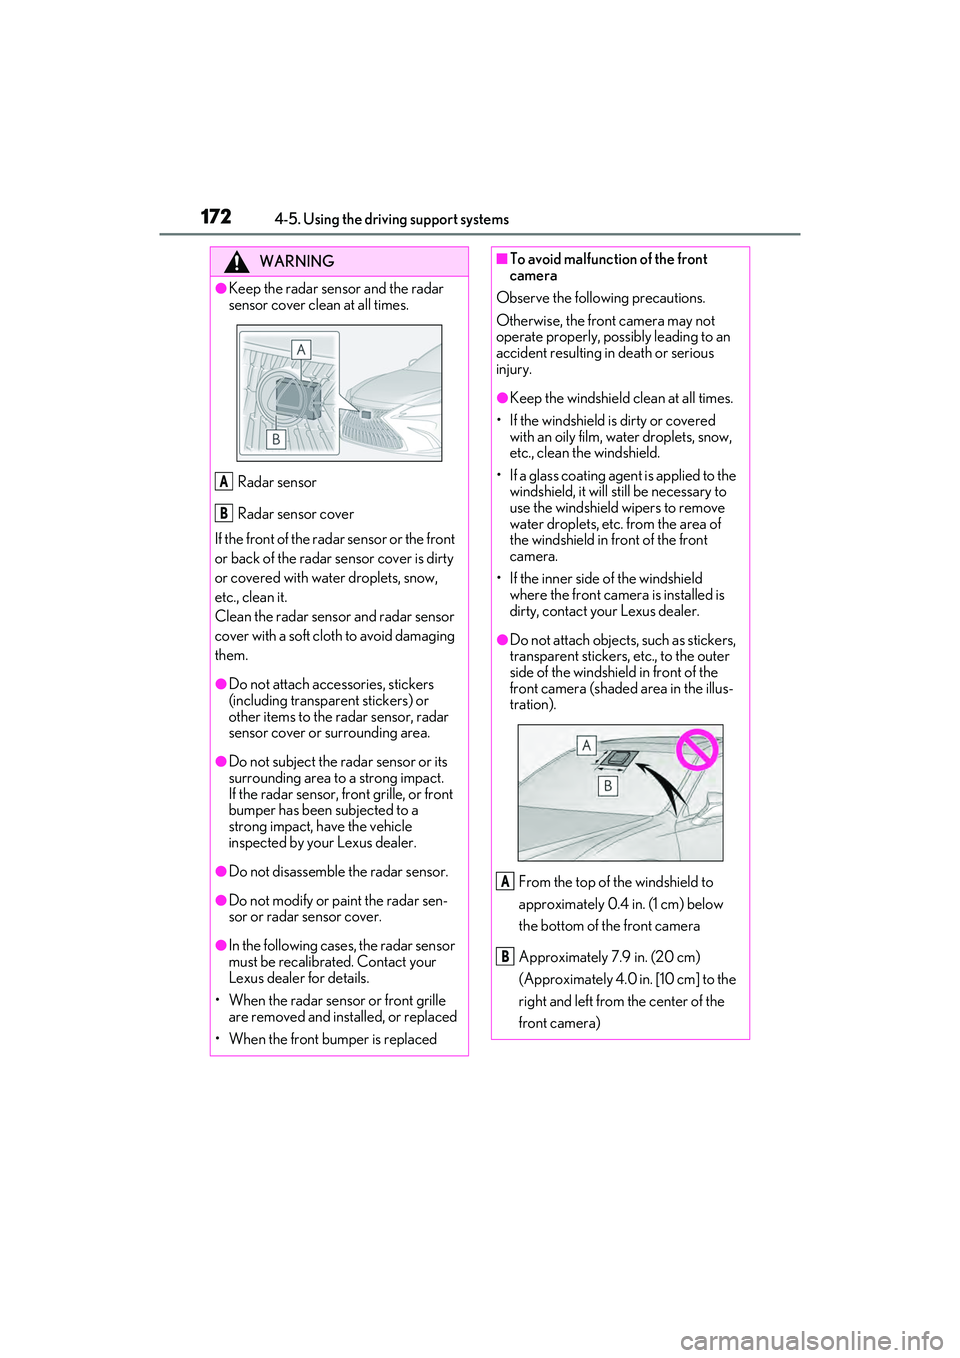
●Do not attach objects, such as stickers,
transparent stickers, etc., to the outer
side of the windshield in front of the
front camera (shaded area in the illus-
tration).
From the top of the windshield to
approximately 0.4 in. (1 cm) below
the bottom of the front camera
Approximately 7.9 in. (20 cm)
(Approximately 4.0 in. [10 cm] to the
right and left from the center of the
front camera)
A
B