Lexus GS350 2007 Using the front audio system / LEXUS 2007 GS430/350 OWNER'S MANUAL (OM30A04U)
Manufacturer: LEXUS, Model Year: 2007, Model line: GS350, Model: Lexus GS350 2007Pages: 562, PDF Size: 17.95 MB
Page 271 of 562
251
3-3. Using the audio system
3
Interior features
DVD player and DVD video disc information
■DVD video discs
The DVD player conforms to NT
SC color TV formats.
Region code: Some DVD video discs hav
e a region code indicating
the region in which you can use the DVD video disc. If the DVD video
disc is not labeled as “ALL” or “1”, you cannot use it on this DVD player.
If you attempt to play an inappropriate DVD video disc on this player,
“Region Code Error” appears on the screen. Even if the DVD video
disc does not have a region code , you may not be able to use it.
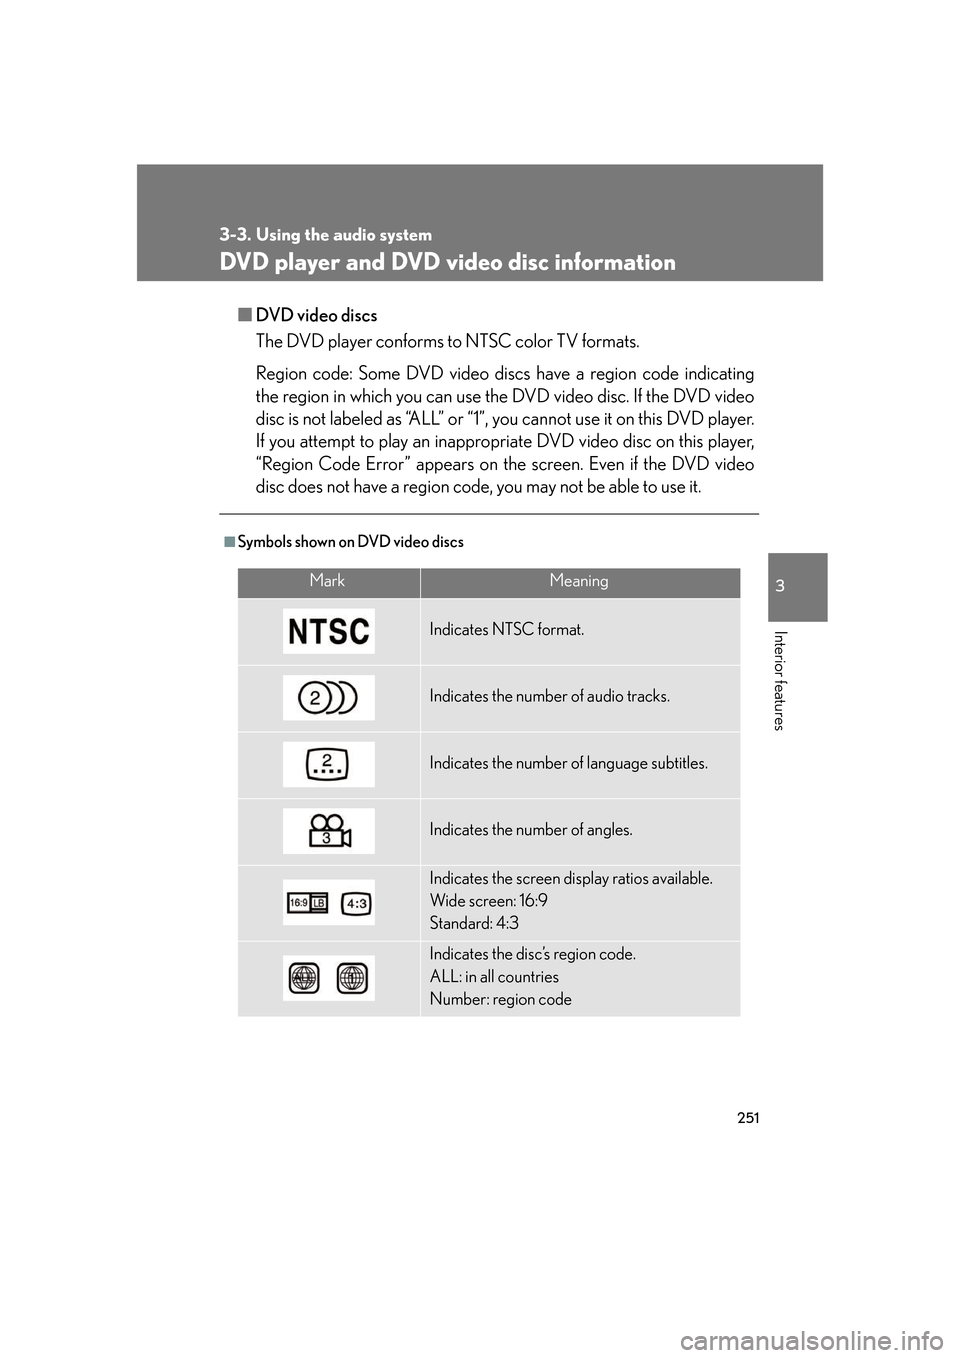
■Symbols shown on DVD video discs
MarkMeaning
Indicates NTSC format.
Indicates the number of audio tracks.
Indicates the number of language subtitles.
Indicates the number of angles.
Indicates the screen display ratios available.
Wide screen: 16:9
Standard: 4:3
Indicates the disc’s region code.
ALL: in all countries
Number: region code
Page 272 of 562
252
3-3. Using the audio system
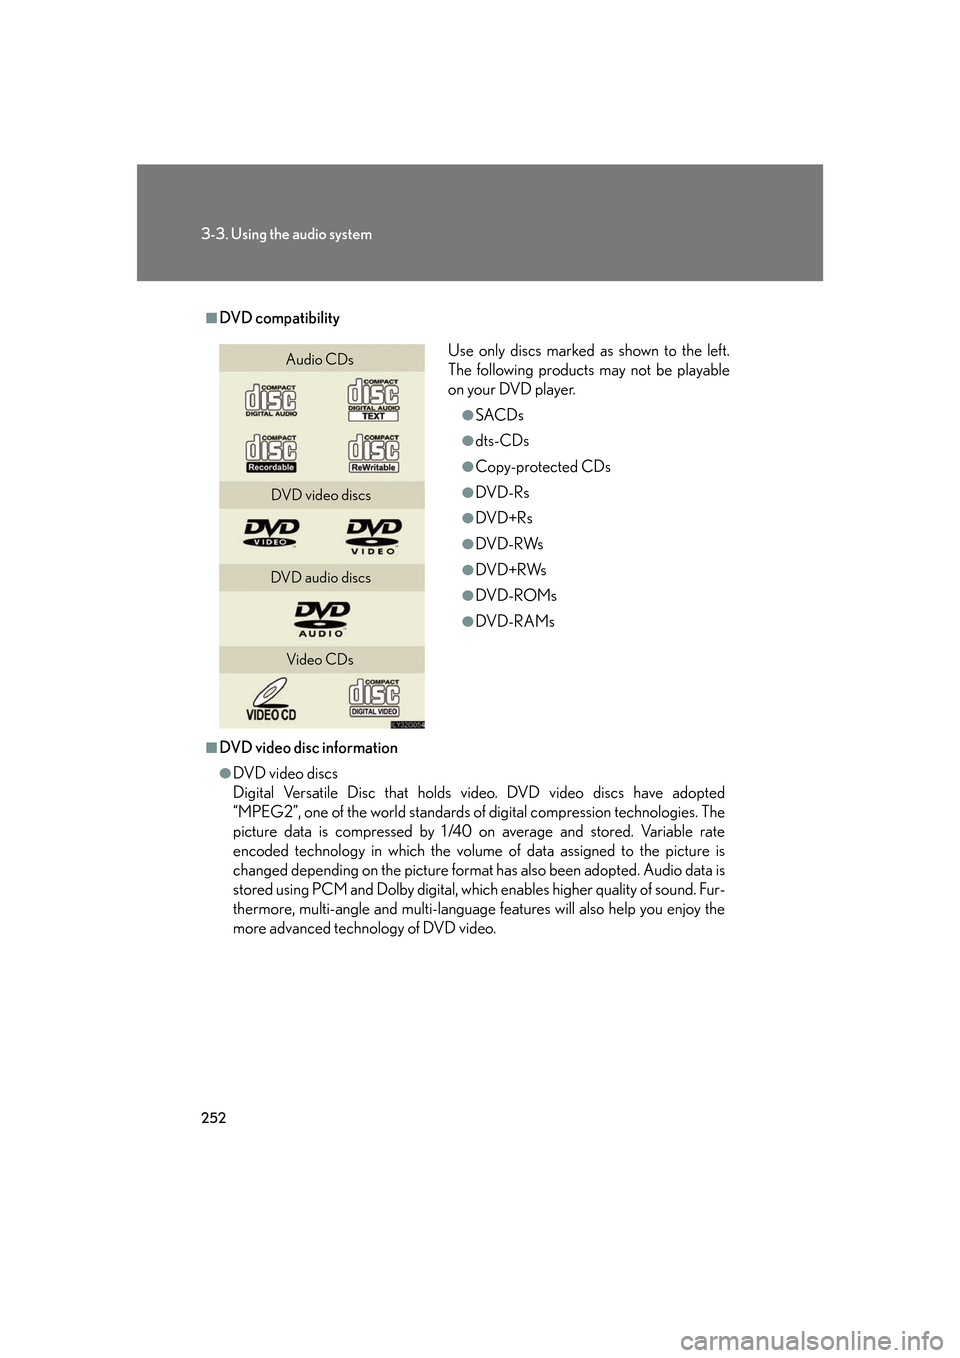
■DVD compatibility
■DVD video disc information
●DVD video discs
Digital Versatile Disc that holds vi deo. DVD video discs have adopted
“MPEG2”, one of the world standards of digital compression technologies. The
picture data is compressed by 1/40 on average and stored. Variable rate
encoded technology in which the volume of data assigned to the picture is
changed depending on the picture format has also been adopted. Audio data is
stored using PCM and Dolby digital, whic h enables higher quality of sound. Fur-
thermore, multi-angle and multi-language features will also help you enjoy the
more advanced technology of DVD video.
Use only discs marked as shown to the left.
The following products may not be playable
on your DVD player.
●SACDs
●dts-CDs
●Copy-protected CDs
●DVD-Rs
●DVD+Rs
●DVD-RWs
●DVD+RWs
●DVD-ROMs
●DVD-R AMs
Audio CDs
DVD video discs
DVD audio discs Video CDs
Page 273 of 562
253
3-3. Using the audio system
3
Interior features
●Viewer restrictions
This feature limits what can be viewed in conformity with the level of restrictions
of the country. The level of restrictions varies depending on the DVD video disc.
Some DVD video discs cannot be played at all, or violent scenes are skipped or
replaced with other scenes.
Level 1: DVD video discs for children can be played.
Level 2-7: DVD video discs for children and G-rated movies can be played.
Level 8: All types of DVD video discs can be played.
●Multi-angle option
You can enjoy the same scene from different angles.
●Multi-language option
You can select the subtitle and audio languages.
●Region codes
The region codes are provided on DVD players and DVD discs. If the DVD
video disc does not have the same regi on code as the DVD player, you cannot
play the disc on the DVD player. ( P. 2 5 4 )
●Audio
This DVD player can play linear PCM, Dolby Digital and MPEG audio format
DVD. Other decoded types cannot be played.
●Title and chapter
Video and audio programs stored in DVD video discs are divided into parts by
title and chapter.
Title: The largest unit of the video and au dio programs stored on DVD video discs.
Usually, one movie, one album, or one audio program is assigned as a title.
Chapter: A title is comprised of one or more chapters.
Page 274 of 562
254
3-3. Using the audio system
■Sound
●Dolby Digital
Manufactured under license from Dolby Laboratories.
“Dolby”, “Pro Logic”, and the double-D symbol are trademarks of Dolby Labo-
ratories. Confidential unpublished works.
©1992-1997 Dolby Laboratories. All rights reserved.
This product incorporates copyright protec tion technology that is protected by
method claims of certain U. S. patents and other intellectual property rights
owned by Macrovision Corporation and ot her rights owners. Use of this copy-
right protection technology must be authorized by Macrovision Corporation,
and is intended for home and other limit ed viewing uses only unless otherwise
authorized by Macrovision Corporation.
Reverse engineering or disassembly is prohibited.
●DTS
“DTS” and “DTS Digital Surround” are regi stered trademarks of Digital Theater
System, Inc.
■Unsuitable discs, and player precautions
P. 2 2 2
CAUTION
■DVD video precaution
Conversational speech on some DVDs is recorded at a low volume to emphasize
the impact of sound effects. If you adjust the volume assuming that the conversa-
tions represent the maximum volume level that the DVD will play, you may be star-
tled by louder sound effects or when you change to a different audio source.
Loud sounds may have a significant impact on the human body or pose a driving
hazard. Keep this in mind when you adjust the volume.
Page 275 of 562
255
3-3. Using the audio system
3
Interior features
Optimal use of the audio/video system
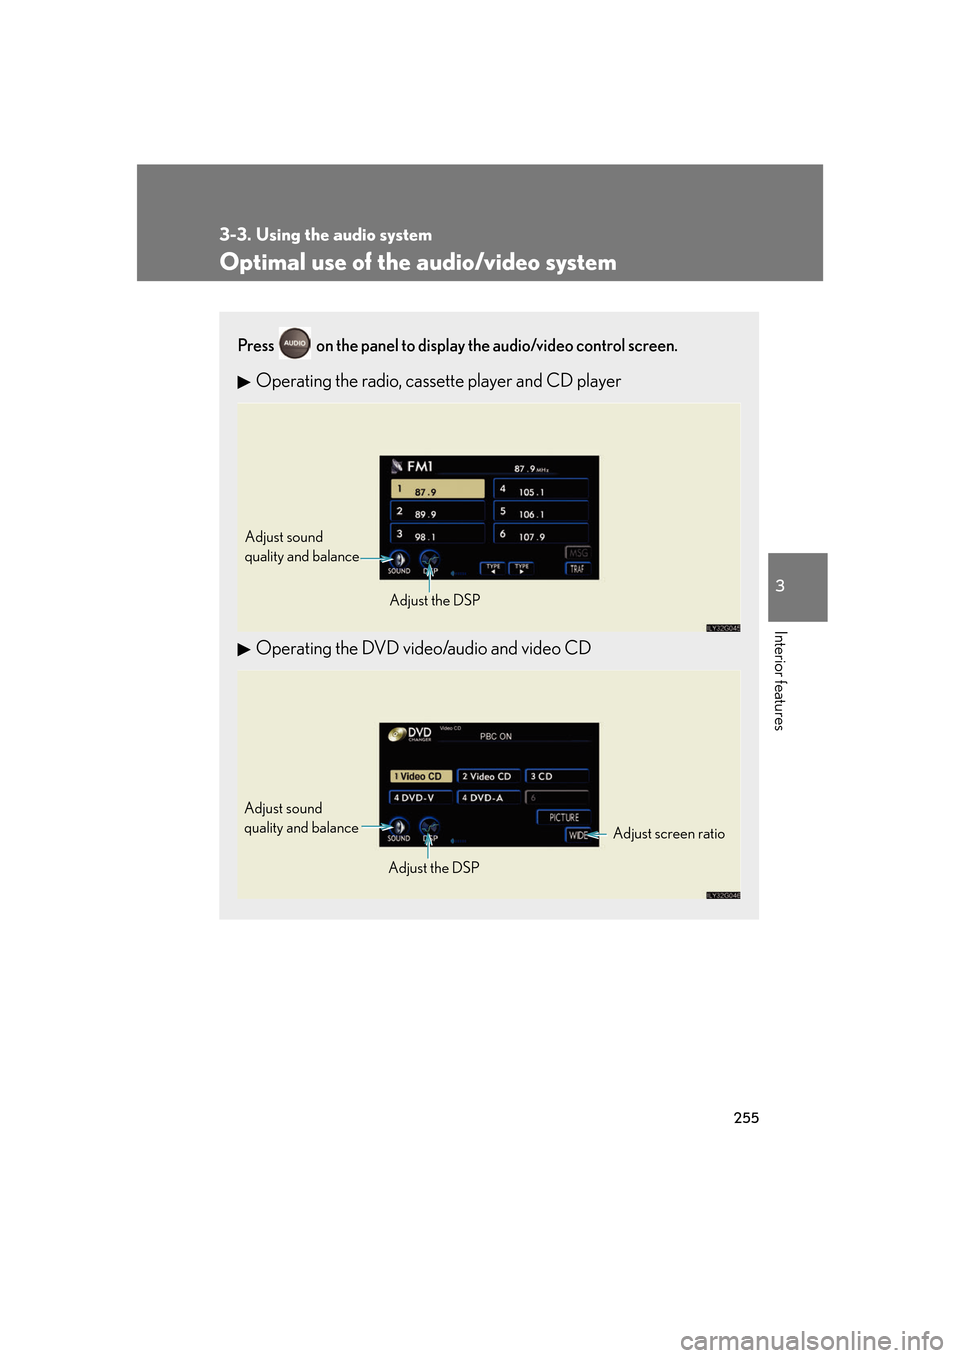
Press on the panel to display the audio/video control screen.
Operating the radio, cassette player and CD player
Operating the DVD video/audio and video CD
Adjust sound
quality and balance
Adjust the DSP
Adjust screen ratio
Adjust sound
quality and balance
Adjust the DSP
Page 276 of 562
256
3-3. Using the audio system
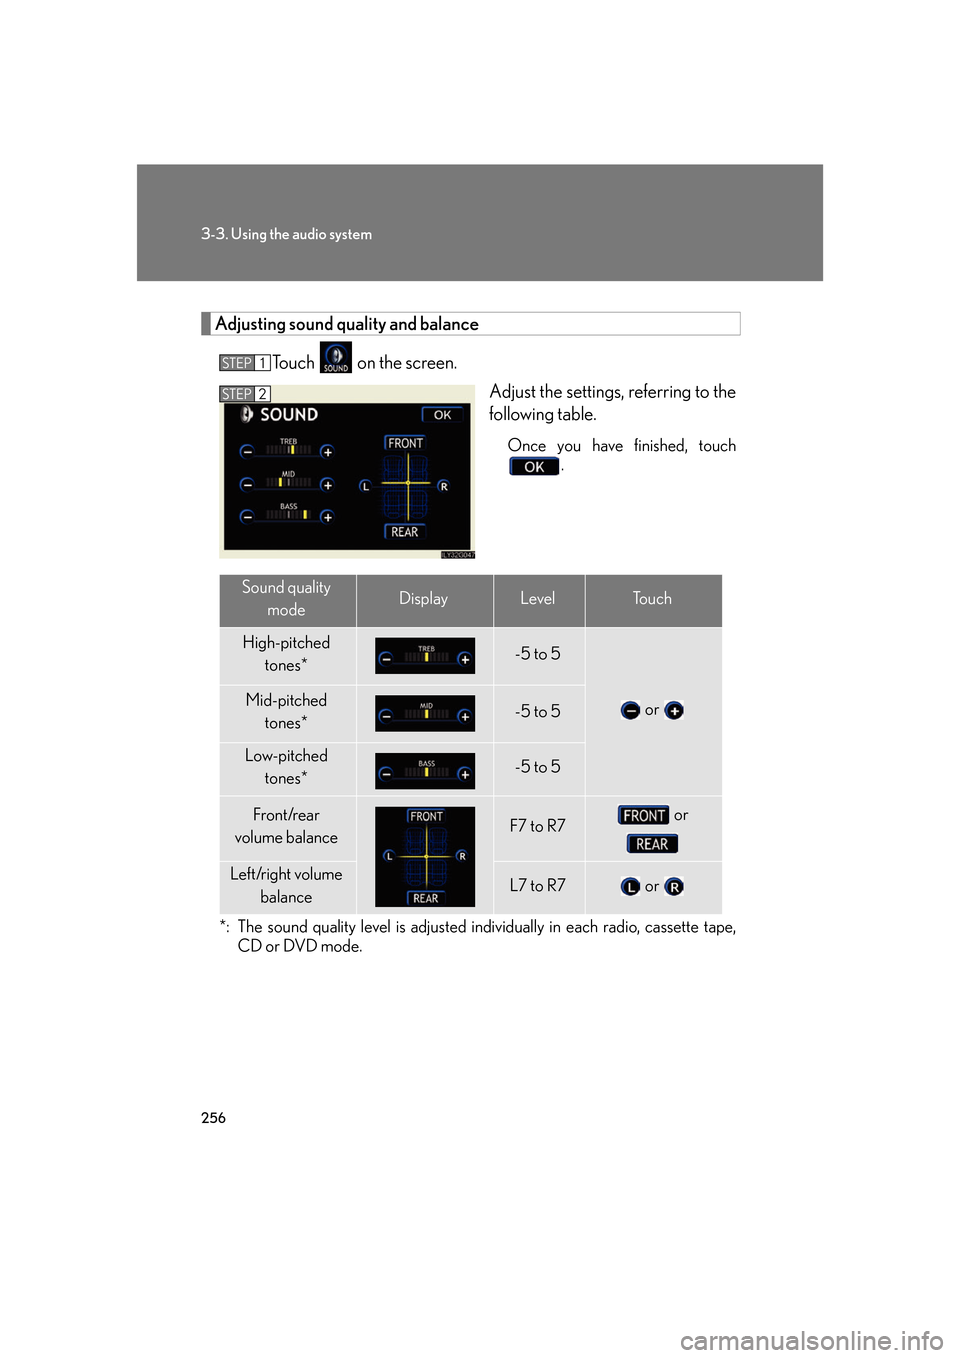
Adjusting sound quality and balance
To u c h on the screen.
Adjust the settings, referring to the
follo
wing table.
Once you have finished, touch .
*: The sound quality level is adjusted individually in each radio, cassette tape, CD or DVD mode.
STEP1
STEP2
Sound quality
modeDisplayLevelTo u c h
High-pitched tones*-5 to 5
or Mid-pitched
tones*-5 to 5
Low-pitched tones*-5 to 5
Front/rear
volume balanceF7 to R7 or
Left/right volume
balanceL7 to R7 or
Page 277 of 562
257
3-3. Using the audio system
3
Interior features
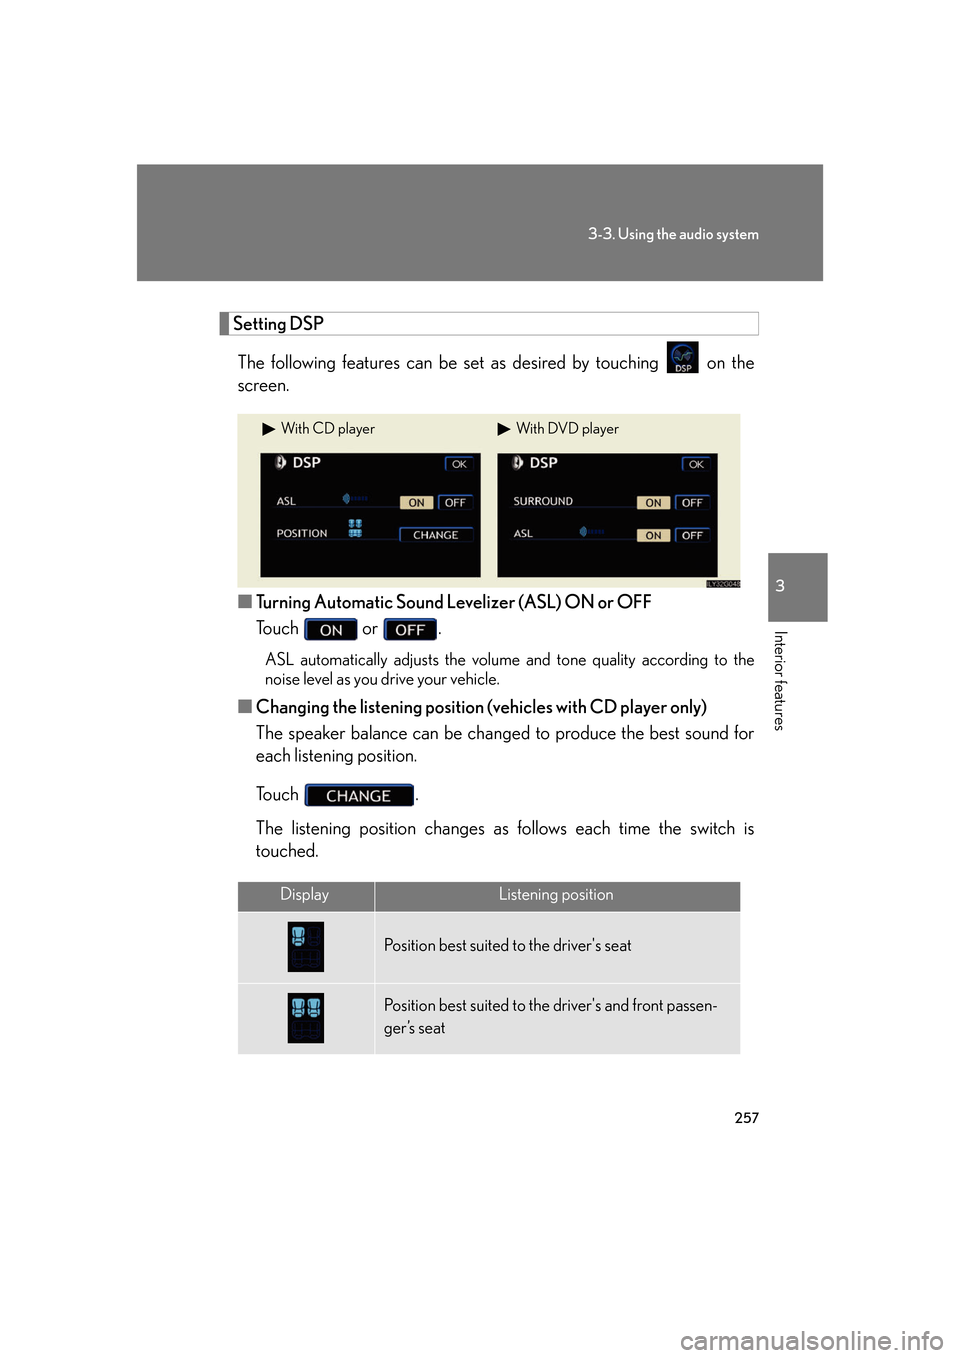
Setting DSP
The following features can be set as desired by touching on the
screen.
■ Turning Automatic Sound Levelizer (ASL) ON or OFF
To u c h or .
ASL automatically adjusts the volume and tone quality according to the
noise level as you drive your vehicle.
■ Changing the listening position (vehicles with CD player only)
The speaker balance can be change d to pr
oduce the best sound for
each listening position.
To u c h .
The listening position changes as follo
ws each time the switch is
touched.
With CD playerWith DVD player
DisplayListening position
Position best suited to the driver's seat
Position best suited to th e driver's and front passen-
ger’s seat
Page 278 of 562
258
3-3. Using the audio system
■Turning the surround ON or OFF (with DVD player only)
To u c h or .
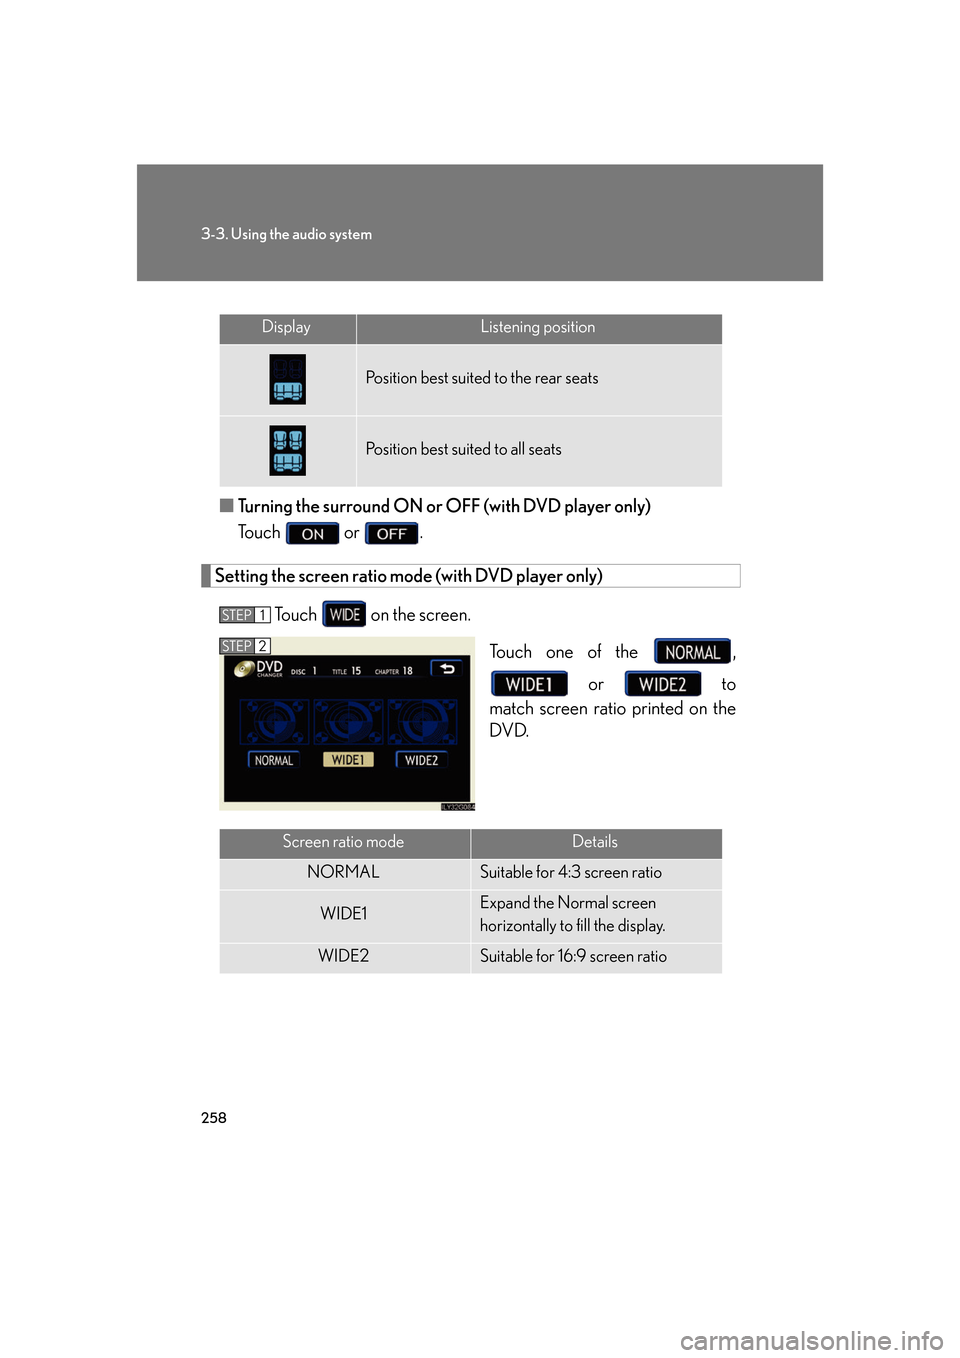
Setting the screen ratio mode (with DVD player only)
To u c h on the screen.
Touch one of the ,
or to
match screen ratio printed on the
DV
D.
DisplayListening position
Position best suited to the rear seats
Position best suited to all seats
STEP1
STEP2
Screen ratio modeDetails
NORMALSuitable for 4:3 screen ratio
WIDE1Expand the Normal screen
horizontally to fill the display.
WIDE2Suitable for 16:9 screen ratio
Page 279 of 562
259
3-3. Using the audio system
3
Interior features
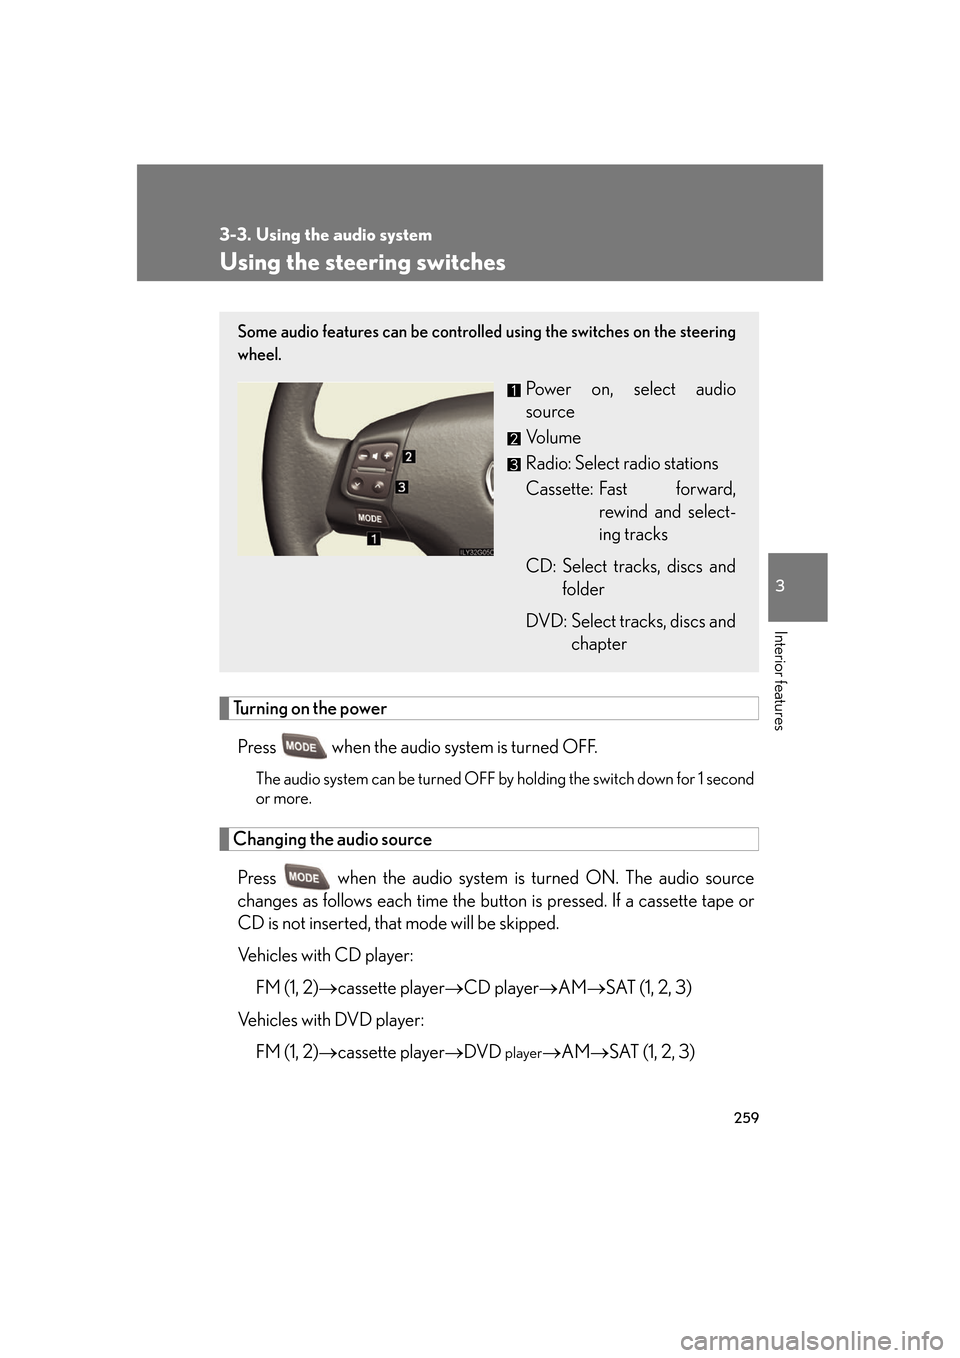
Using the steering switches
Turning on the power
Press when the audio system is turned OFF.
The audio system can be turned OFF by holding the switch down for 1 second
or more.
Changing the audio source
Press when the audio system is tu rned ON. The audio sour ce
changes as follows each time the button is pr
essed. If a cassette tape or
CD is not inserted, that mode will be skipped.
Vehicles with CD player:
FM (1, 2) cassette player CD player AM SAT (1, 2, 3)
Vehicles with DVD player: FM (1, 2) cas
sette playerDVD playerAM SAT (1, 2, 3)
Some audio features can be controlled using the switches on the steering
wheel.
Power on, select audio
source
Vo l u m e
Radio: Select radio stations
Cassette: Fast forward, r
ewind and select -
ing tracks
CD: Select tracks, discs and folder
DVD: Select tracks, discs and chapter
Page 280 of 562
260
3-3. Using the audio system
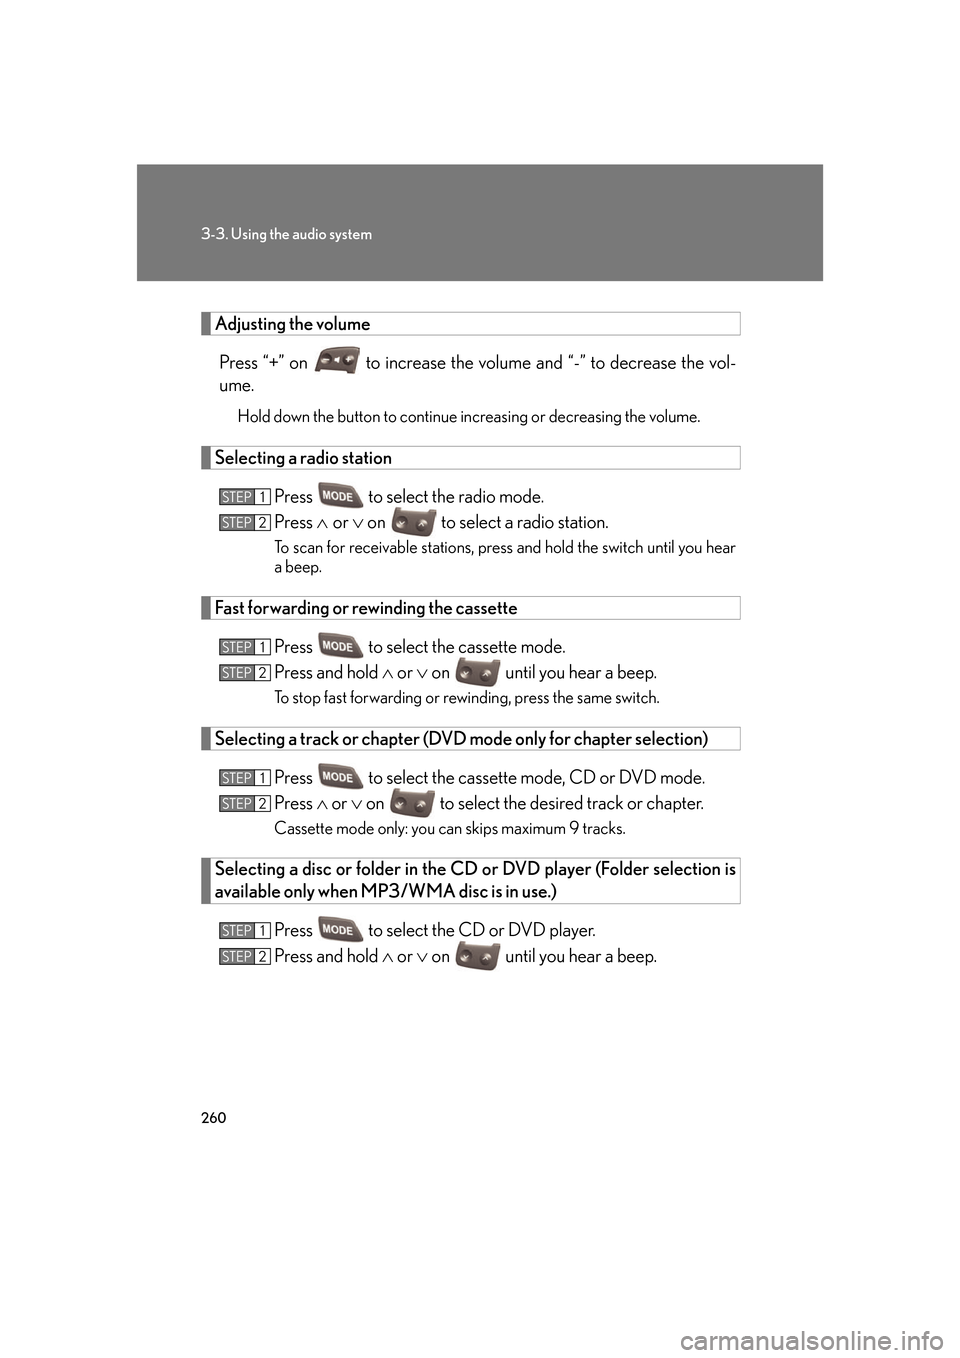
Adjusting the volume
Press “+” on to increase the volume and “-” to decr ease the vol-
ume.
Hold down the button to continue increasing or decreasing the volume.
Selecting a radio station
Press to select the radio mode.
Press or on to select a radio station.
To scan for receivable stations, press and hold the switch until you hear
a beep.
Fast forwarding or rewinding the cassette
Press to select the cassette mode.
Press and hold or on until you hear a beep.
To stop fast forwarding or rewinding, press the same switch.
Selecting a track or chapter (DVD mode only for chapter selection)
Press to select the cassette mode, CD or DVD mode.
Press or on to select the desired track or chapter.
Cassette mode only: you can skips maximum 9 tracks.
Selecting a disc or folder in the CD or DVD player (Folder selection is
available only when MP3/WMA disc is in use.)
Press to select the CD or DVD player.
Press and hold or on until you hear a beep.
STEP1
STEP2
STEP1
STEP2
STEP1
STEP2
STEP1
STEP2