steering Lexus GS350 2013 User Guide
[x] Cancel search | Manufacturer: LEXUS, Model Year: 2013, Model line: GS350, Model: Lexus GS350 2013Pages: 830, PDF Size: 9.71 MB
Page 47 of 830
461-1. For safe use
GS350_U (OM30C34U)
â– When to contact your Lexus dealer
In the following cases, the vehicle will require inspection and/or repair. Contact your
Lexus dealer as soon as possible.
â—ŹAny of the SRS airbags have been inflated.
â—ŹThe front of the vehicle is damaged or
deformed, or was involved in an accident
that was not severe enough to cause the
SRS airbags to inflate.
â—ŹA portion of a door is damaged or
deformed, or the vehicle was involved in an
accident that was not severe enough to
cause the SRS side and curtain shield air-
bags to inflate.
â—ŹThe pad section of the steering wheel, dash-
board near the front passenger airbag,
lower portion of the instrument panel or
door of the glove box is scratched, cracked,
or otherwise damaged.
â—ŹThe surface of the seats with the side airbag
is scratched, cracked, or otherwise dam-
aged.
â—ŹThe portion of the front pillars, rear pillars or
roof side rail garnishes (padding) containing
the curtain shield airbags inside is scratched,
cracked, or otherwise damaged.
Page 76 of 830
GS350_U (OM30C34U)
752. Instrument cluster
2
Instrument cluster
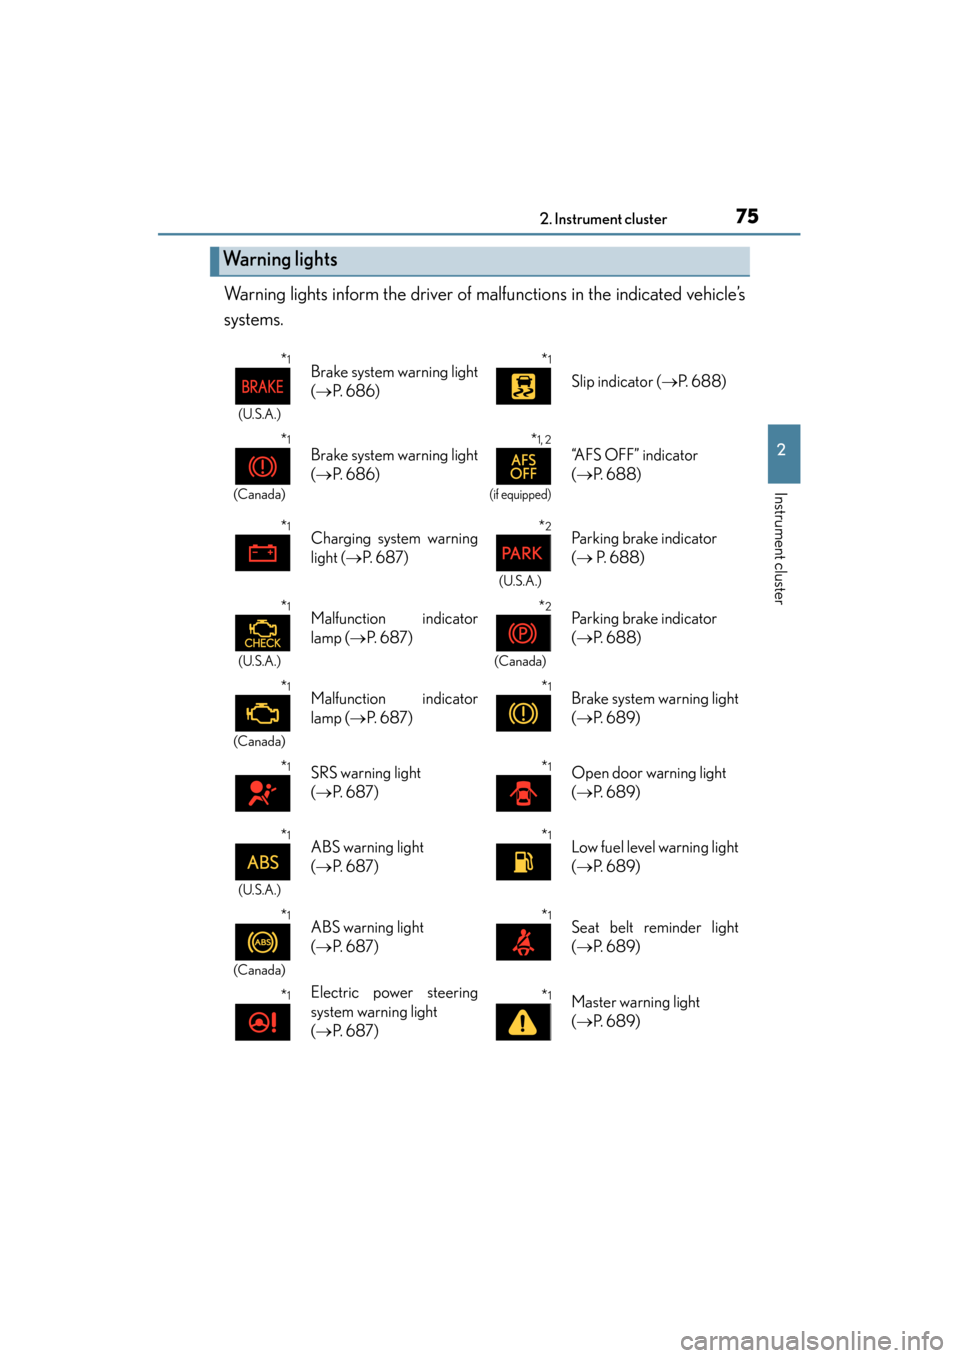
Warning lights inform the driver of malfunctions in the indicated vehicle’s
systems.
Warning lights
*1
(U.S.A.)
Brake system warning light
(→ P. 686)*1
Slip indicator ( →P. 6 8 8 )
*1
(Canada)
Brake system warning light
(→ P. 686)*1, 2
(if equipped)
“AFS OFF” indicator
(→ P. 6 8 8 )
*1Charging system warning
light ( →P. 6 8 7 )*2
(U.S.A.)
Parking brake indicator
(→ P. 6 8 8 )
*1
(U.S.A.)
Malfunction indicator
lamp ( →P. 6 8 7 )*2
(Canada)
Parking brake indicator
(→ P. 6 8 8 )
*1
(Canada)
Malfunction indicator
lamp ( →P. 6 8 7 )*1Brake system warning light
(→ P. 6 8 9 )
*1SRS warning light
(→ P. 6 8 7 )*1Open door warning light
(→ P. 6 8 9 )
*1
(U.S.A.)
ABS warning light
(→ P. 6 8 7 )*1Low fuel level warning light
(→ P. 6 8 9 )
*1
(Canada)
ABS warning light
(→ P. 6 8 7 )*1Seat belt reminder light
(→ P. 6 8 9 )
*1Electric power steering
system warning light
(→ P. 6 8 7 )*1Master warning light
(→ P. 6 8 9 )
Page 98 of 830
97
GS350_U (OM30C34U)
Operation of each component3
3-1. Key information Keys ....................................................98
3-2. Opening, closing and locking the doors and trunk
Smart access system with push-button start ..............101
Wireless remote control ............ 114
Doors ................................................. 117
Trunk ................................................... 121
3-3. Adjusting the seats Front seats...................................... 128
Driving position memory ......... 130
Head restraints ............................ 136
3-4. Adjusting the steering wheel and mirrors
Steering wheel ............................. 139
Inside rear view mirror.............. 140
Outside rear view mirrors ........142
3-5. Opening, closing the windows and moon roof
Power windows .............................145
Moon roof ...................................... 148
Page 130 of 830
GS350_U (OM30C34U)
1293-3. Adjusting the seats
3
Operation of each component
â– Power easy access system
The driver’s seat and steering wheel move in accordance with engine switch mode
and the driver’s seat belt condition. The passenger’s seat moves when the passen-
ger’s door is opened. (→P. 1 3 3 )
CAUTION
â– When adjusting the seat position
â—ŹTake care when adjusting the seat position to ensure that other passengers are
not injured by the moving seat.
â—ŹDo not put your hands under the seat or near the moving parts to avoid injury.
Fingers or hands may become jammed in the seat mechanism.
â– Seat adjustment
To reduce the risk of sliding under the lap belt during a collision, do not recline the
seat more than necessary.
If the seat is too reclined, the lap belt may slide past the hips and apply restraint
forces directly to the abdomen, or your neck may contact the shoulder belt,
increasing the risk of death or serious injury in the event of an accident.
Adjustments should not be made while driving as the seat may unexpectedly move
and cause the driver to lose control of the vehicle.
â– When adjusting the seat positions
Make sure to leave enough space around the feet so they do not get stuck.
Page 131 of 830
130
GS350_U (OM30C34U)
3-3. Adjusting the seats
Driving position memory
Check that the shift lever is in P.
Turn the engine switch to IGNITION ON mode.
Adjust the driver’s seat, steering wheel, and outside rear view mirrors to
the desired positions. (When memori zing the front passenger’s seat,
adjust the front passenger’s seat to the desired positions.)
While pressing the “SET” button,
or within 3 seconds after the
“SET” button is pressed, press
button “1”, “2” or “3” until the sig-
nal beeps.
If the selected button has already
been preset, the previously recorded
position will be overwritten.
Your preferred driving po sition (the position of the driver’s seat, steer-
ing wheel and outside rear view mirrors) can be memorized and
recalled by pressing a button. It is also possible to set this function to
activate automatically when the doors are unlocked.
Three different driving position s can be entered into memory.
The same buttons are found on the front passenger’s side, allowing the
position of the front passenger’s se at to be memorized (if equipped).
Entering a position to memory
1
2
3
4
Page 134 of 830
GS350_U (OM30C34U)
1333-3. Adjusting the seats
3
Operation of each component
â– Cancelation procedure
Carry only the key for which you want to cancel the linked door unlock
operation.
If 2 or more keys are in the vehicle, the driving position cannot be can-
celed properly.Turn the engine switch to IGNITION ON mode.
While pressing the “SET” button, press the driver’s door lock switch
(either lock or unlock) until the signal beeps.
The auto away/return function
enables easy access by activating
when the driver or front passenger
attempts to enter or exit the vehicle.
■Auto away function when exiting the vehicle (driver’s/front passen-
ger’s seat)
�XDriver’s seat
When all of the following actions have been performed, the steering
wheel will move up and back to the point farthest away from the driver
and the seat will move backward: • The shift lever has been shifted to P.
• The engine switch has been turned off.
• The driver seat belt has been unfastened.
�XFront passenger’s seat (if equipped)
If the lumbar support, side support (if equipped), etc. of the front pas-
senger’s seat has been adjusted, the seat will return to its original state if
the front passenger’s door is opened while the vehicle is stopped to
allow easy exit from the vehicle.
Power easy access system
1
2
Page 135 of 830
134
GS350_U (OM30C34U)
3-3. Adjusting the seats
■Auto return function when entering the vehicle (driver’s seat only)
When either of the following actions has been performed, the steering
wheel will move toward the driver and seat will move forward: • The engine switch has been turned to ACCESSORY mode.
• The driver’s seat belt has been fastened.
â– When driving position memory is linked with door unlock operation
If the driver’s door is opened, the driver’s seat will move toward the memorized posi-
tion but stop slightly beforehand to allow easy access to the vehicle.
Turning the engine switch to ACCESSORY or IGNITION ON mode, or fastening
the driver’s seat belt moves the seat fully into the memorized position.
â– Operating the driving position memory after turning the engine switch off
Driver’s seat:
Memorized seat positions can be activated up to 180 seconds after the driver’s door
is opened and another 60 seconds after it is closed again. Memorized steering
wheel position can be activated by pressing the engine switch.
Front passenger’s seat:
Memorized positions can be activated up to 180 seconds after the front passenger’s
door is opened by pressing button “1”, “2” or “3”.
â– Correct seat position
When the seat is in the most forward or most backward position, and the seat is
being moved in those directions, the system may not correctly recognize the current
position and the memorized positi on will not be correctly recalled.
■The auto away function for exiting the driver’s seat
If the seat is already close to the rearmost position, the auto away function may not
operate when the driver exits the vehicle.
â– Customization
The distance that the driver’s seat moves backward during the auto away function
can be changed. (Customizable features: →P. 777)
Page 136 of 830
GS350_U (OM30C34U)
1353-3. Adjusting the seats
3
Operation of each component
CAUTION
â– Seat adjustment caution
Take care during seat adjustment so that the seat does not strike the rear passen-
ger or squeeze your body against the steering wheel.
Page 140 of 830
1393-4. Adjusting the steering wheel and mirrors
3
Operation of each component
GS350_U (OM30C34U)
Steering wheel
Operating the switch moves the steering wheel in the following directions:
Up
Down
Toward the driver
Away from the driver
â– The steering wheel can be adjusted when
The engine switch is in ACCESSORY or IGNITION ON mode
*.
*: If the driver’s seat belt is fastened, the steering wheel can be adjusted regardless of engine switch mode.
â– Automatic adjustment of the steering position
A desired steering position can be entered to memory and recalled automatically by
the driving position memory system. ( →P. 1 3 0 )
â– Power easy access system
The steering wheel and driver’s seat move in accordance with engine switch mode
and the driver’s seat belt condition. ( →P. 1 3 3 )
Adjustment procedure
1
2
3
4
CAUTION
Do not adjust the steering wheel while driving.
Doing so may cause the driver to mishandle the vehicle and cause an accident,
resulting in death or serious injury.
Page 141 of 830
1403-4. Adjusting the steering wheel and mirrors
GS350_U (OM30C34U)
Inside rear view mirror
The height of the rear view mirror can be adjusted to suit your driving pos-
ture.
Adjust the height of the rear view
mirror by moving it up and down.
Responding to the level of brightness of the headlights of vehicles behind,
the reflected light is automatically reduced.
Changing automatic anti-glare
function modeON
OFF
When the automatic anti-glare func-
tion is in ON mode, the indicator illu-
minates.
The function will set to ON mode
each time the engine switch is turned
to IGNITION ON mode.
Pressing the button turns the function
to OFF mode. (The indicator also
turns off.)
The rear view mirror’s position ca n be adjusted to enable sufficient
confirmation of the rear view.
Adjusting the height of rear view mirror
Anti-glare function
Indicator
1
2