buttons Lexus GS350 2014 Using the air conditioning system and defogger / LEXUS 2014 GS350 (OM30D41U) User Guide
[x] Cancel search | Manufacturer: LEXUS, Model Year: 2014, Model line: GS350, Model: Lexus GS350 2014Pages: 844, PDF Size: 10.59 MB
Page 327 of 844
GS350_OM_OM30D41U_(U)
3275-1. Remote Touch screen
5
Interior features
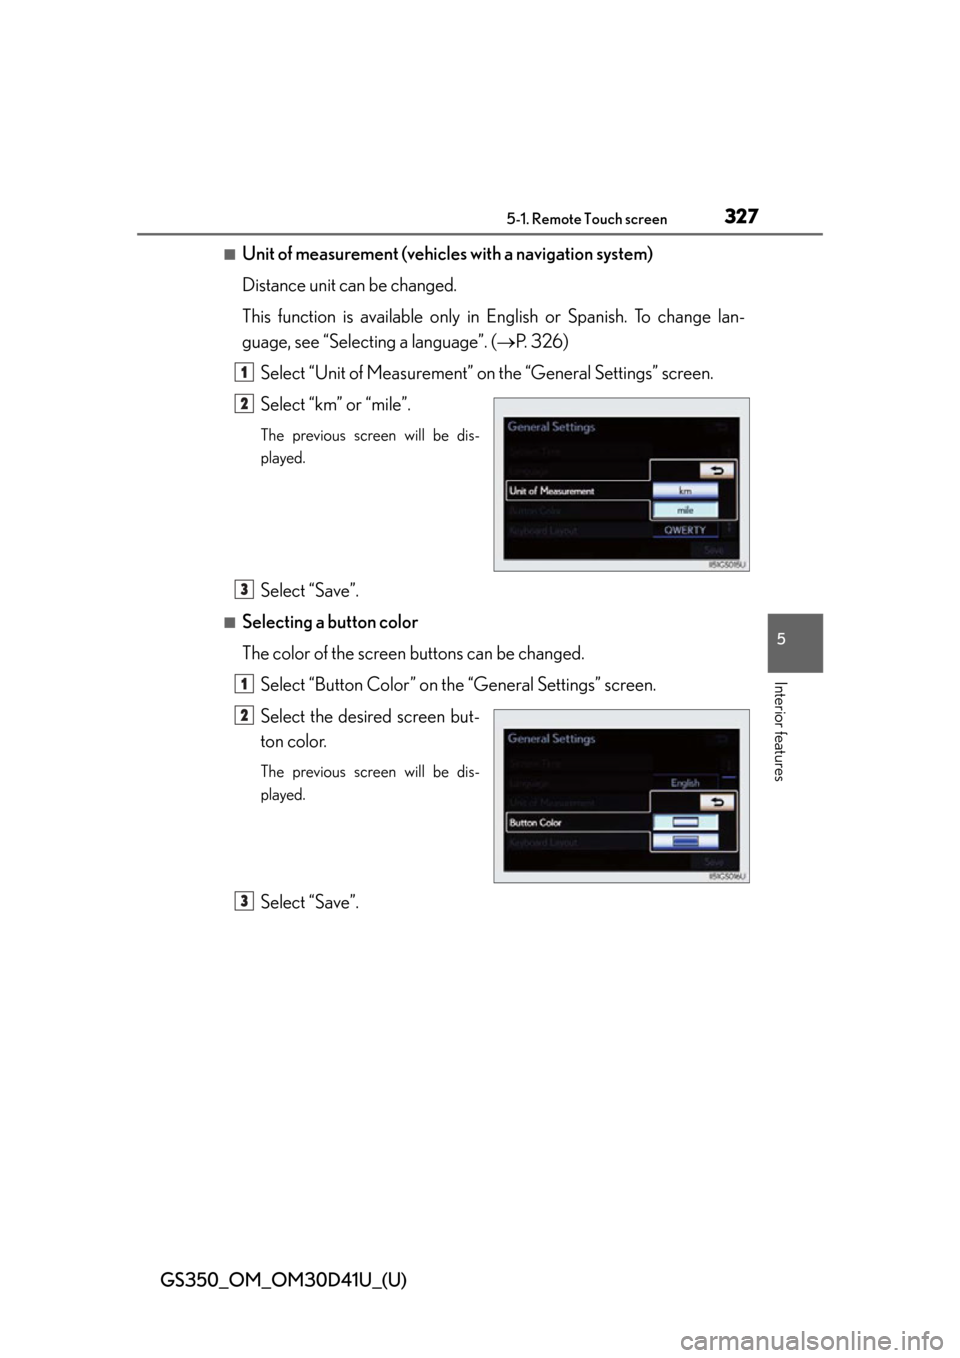
■Unit of measurement (vehicles with a navigation system)
Distance unit can be changed.
This function is available only in English or Spanish. To change lan-
guage, see “Selecting a language”. ( P. 326)
Select “Unit of Measurement” on the “General Settings” screen.
Select “km” or “mile”.
The previous screen will be dis-
played.
Select “Save”.
■Selecting a button color
The color of the screen buttons can be changed. Select “Button Color” on the “General Settings” screen.
Select the desired screen but-
ton color.
The previous screen will be dis-
played.
Select “Save”.
1
2
3
1
2
3
Page 373 of 844
GS350_OM_OM30D41U_(U)
3735-2. Using the air conditioning system and defogger
5
Interior features
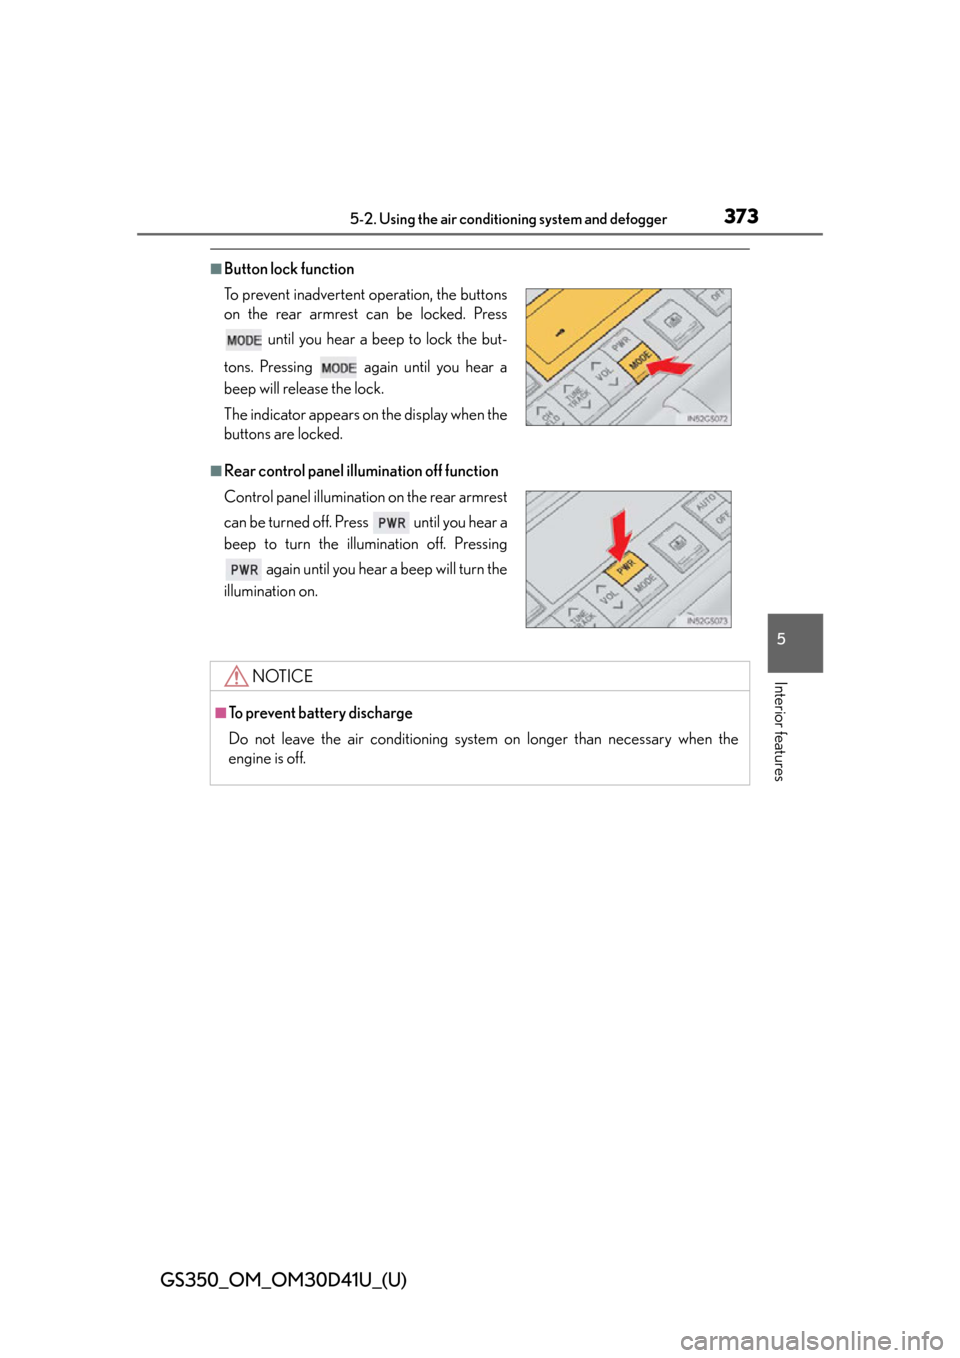
■Button lock function
■Rear control panel illumination off function To prevent inadvertent operation, the buttons
on the rear armrest can be locked. Press
until you hear a beep to lock the but-
tons. Pressing again until you hear a
beep will release the lock.
The indicator appears on the display when the
buttons are locked.
Control panel illumination on the rear armrest
can be turned off. Press until you hear a
beep to turn the illumination off. Pressing again until you hear a beep will turn the
illumination on.
NOTICE
■To prevent battery discharge
Do not leave the air conditioning system on longer than necessary when the
engine is off.
Page 379 of 844

GS350_OM_OM30D41U_(U)
3795-3. Using the audio system
5
Interior features
■Using cellular phones
Interference may be heard through the audio system’s speakers if a cellular phone is
being used inside or close to the vehicle while the audio system is operating.
■When using the Remote Touch screen
Dimmed screen buttons cannot be operated.
■Ta b
Select or , located either side of the screen tabs, to display tabs from the pre-
vious or next page.
■About Dolby
Manufactured under license from Dolby Laboratories. Dolby and the double-D sym-
bol are trademarks of Dolby Laboratories.
CAUTION
■For vehicles sold in the U.S.A. and Canada
●Pa r t 1 5 o f t h e F CC Ru l e s
FCC Warning:
Changes or modifications no t expressly approved by the party responsible for
compliance could void the user’s authority to operate the equipment.
●Laser products
• USE OF CONTROL OR ADJUSTMENT OR PERFORMANCE OF PRO-
CEDURES OTHER THAN THOSE SPEC IFIED HEREIN MAY RESULT IN
HAZARDOUS RADIATION EXPOSURE.
• THE USE OF OPTICAL INSTRUMENTS WITH THIS PRODUCT WILL INCREASE EYE HAZARD.
NOTICE
■To prevent battery discharge
Do not leave the audio system on longer than necessary when the engine is off.
■To avoid damaging the audio system
Take care not to spill drinks or other fluids on the audio system.
Page 401 of 844
GS350_OM_OM30D41U_(U)
4015-3. Using the audio system
5
Interior features
■Seek tuning
Press and hold “<” or “>” on the “PRST•TRACK” button.
■Manual tuning
Turn the “TUNE/SCROLL” knob.
■Preset stations
Select the desired preset stations (1 - 6).
Change the page by using “” or “ ” on the screen.
Press “<” or “>” on the “PRST•TRACK” button.
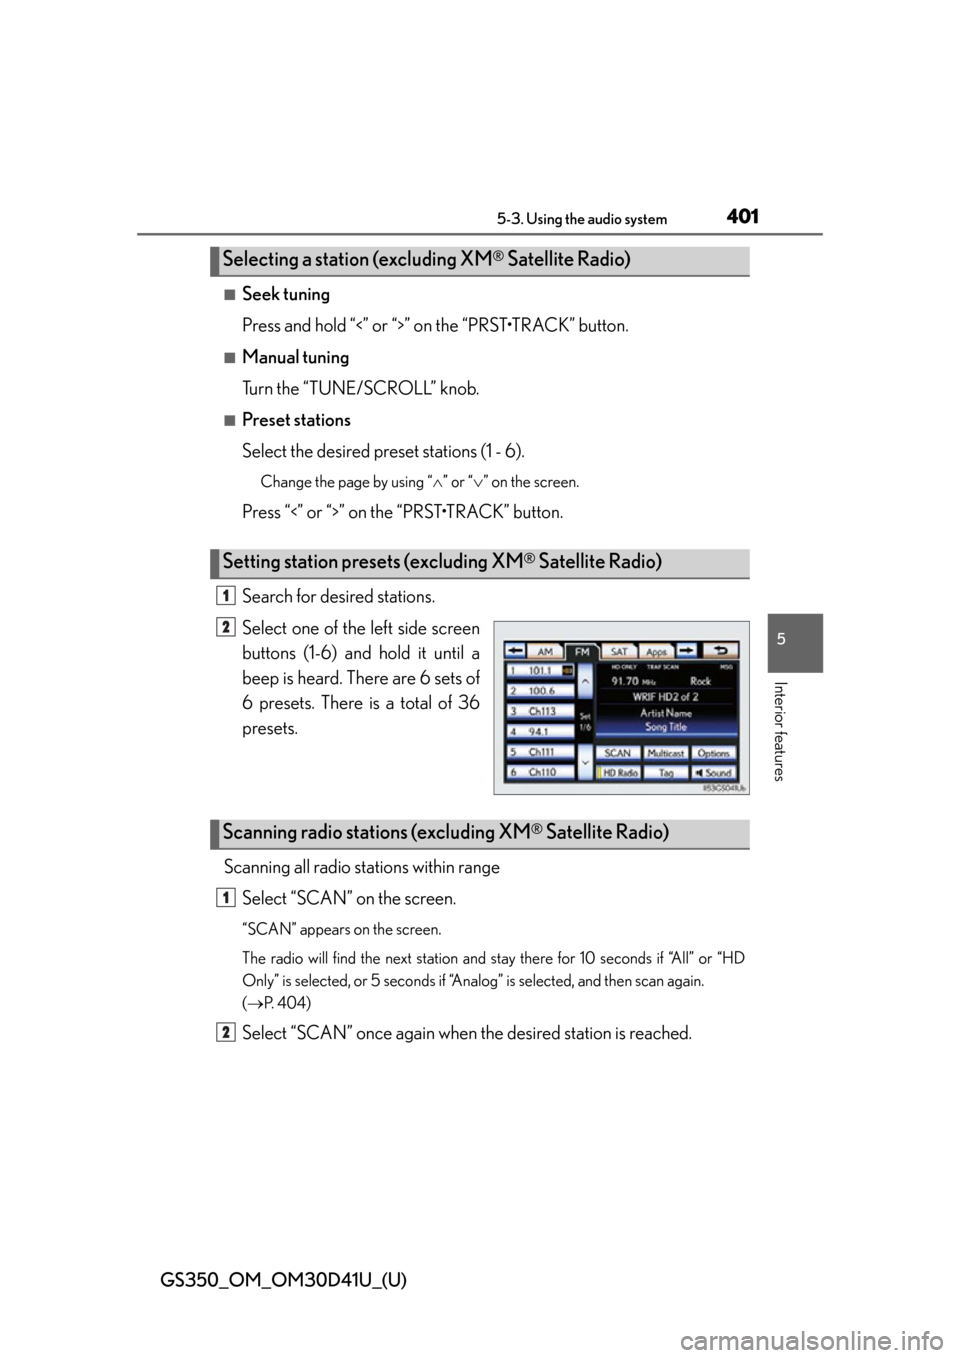
Search for desired stations.
Select one of the left side screen
buttons (1-6) and hold it until a
beep is heard. There are 6 sets of
6 presets. There is a total of 36
presets.
Scanning all radio stations within range Select “SCAN” on the screen.
“SCAN” appears on the screen.
The radio will find the next station and st ay there for 10 seconds if “All” or “HD
Only” is selected, or 5 seconds if “Analo g” is selected, and then scan again.
( P. 404)
Select “SCAN” once again when the desired station is reached.
Selecting a station (excluding XM® Satellite Radio)
Setting station presets (excluding XM® Satellite Radio)
1
2
Scanning radio stations (excluding XM® Satellite Radio)
1
2
Page 408 of 844
408
GS350_OM_OM30D41U_(U)
5-3. Using the audio system
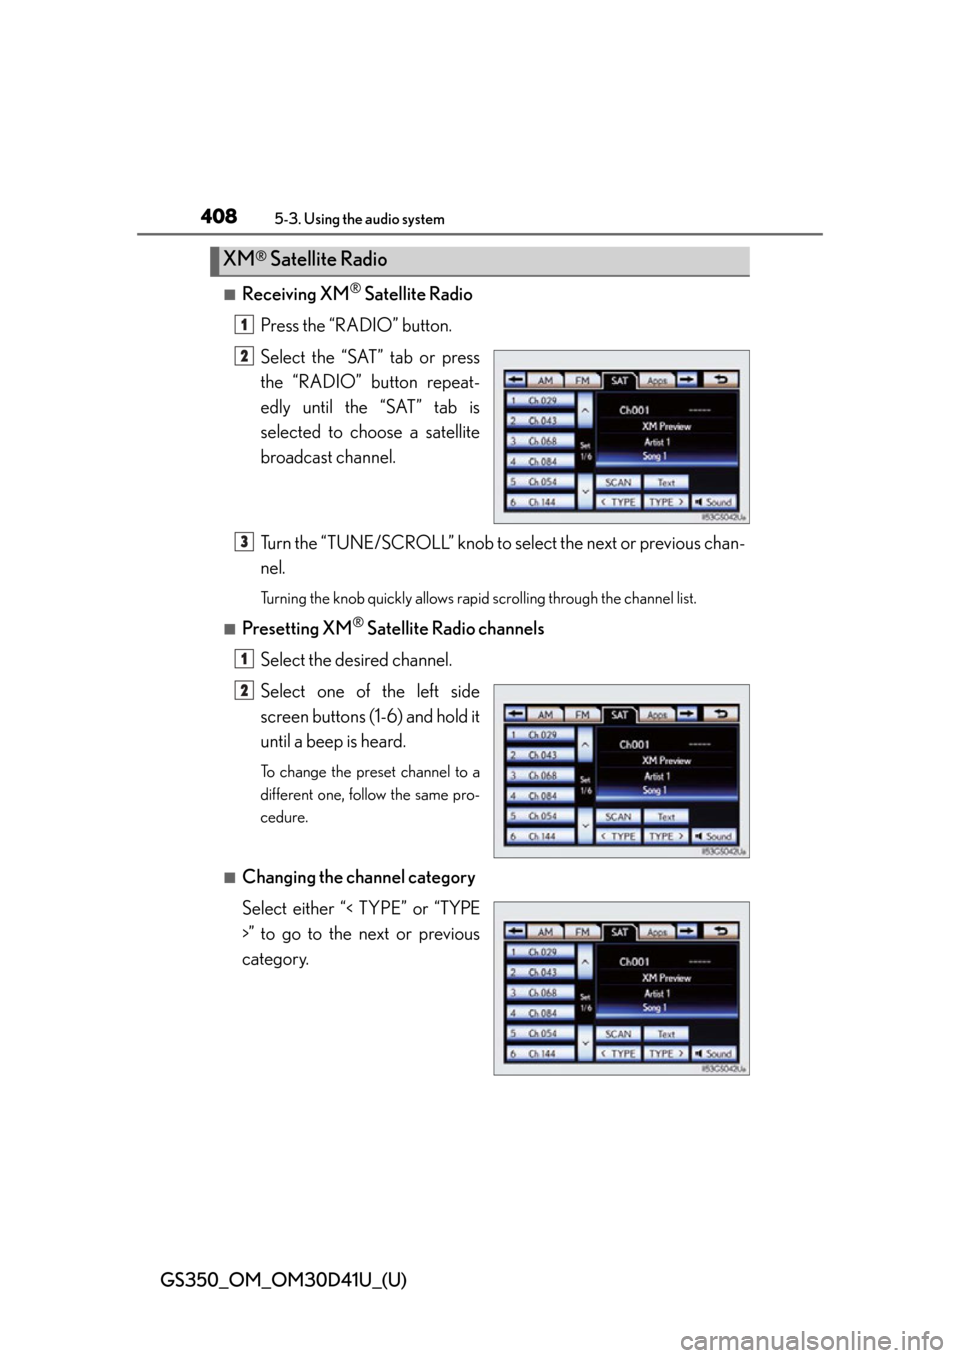
■Receiving XM® Satellite Radio
Press the “RADIO” button.
Select the “SAT” tab or press
the “RADIO” button repeat-
edly until the “SAT” tab is
selected to choo se a satellite
broadcast channel.
Turn the “TUNE/SCROLL” knob to select the next or previous chan-
nel.
Turning the knob quickly allows rapid scrolling through the channel list.
■Presetting XM® Satellite Radio channels
Select the desired channel.
Select one of the left side
screen buttons (1-6) and hold it
until a beep is heard.
To change the preset channel to a
different one, follow the same pro-
cedure.
■Changing the channel category
Select either “< TYPE” or “TYPE
>” to go to the next or previous
category.
XM® Satellite Radio
1
2
3
1
2
Page 466 of 844
466
GS350_OM_OM30D41U_(U)
5-3. Using the audio system
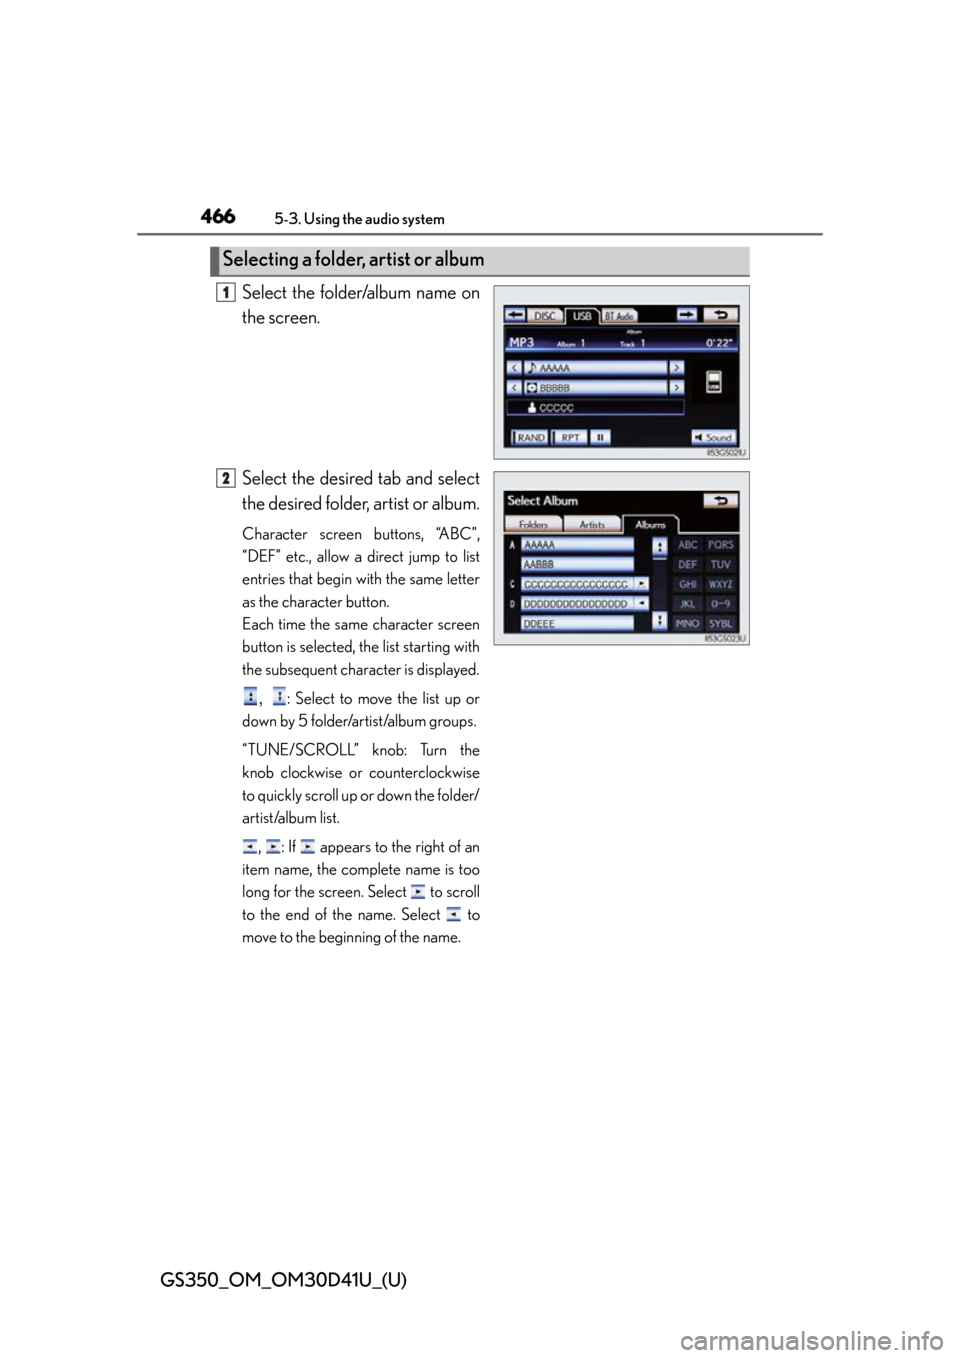
Select the folder/album name on
the screen.
Select the desired tab and select
the desired folder, artist or album.
Character screen buttons, “ABC”,
“DEF” etc., allow a direct jump to list
entries that begin with the same letter
as the character button.
Each time the same character screen
button is selected, the list starting with
the subsequent character is displayed.
, : Select to move the list up or
down by 5 folder/artist/album groups.
“TUNE/SCROLL” knob: Turn the
knob clockwise or counterclockwise
to quickly scroll up or down the folder/
artist/album list.
, : If appears to the right of an
item name, the complete name is too
long for the screen. Select to scroll
to the end of the name. Select to
move to the beginning of the name.
Selecting a folder , artist or album
1
2
Page 491 of 844

GS350_OM_OM30D41U_(U)
4915-3. Using the audio system
5
Interior features
■Fast forwarding or rewinding a chapter or file
Press and hold “” or “ ” on .
■Button lock function
To prevent inadvertent operation, some buttons on the rear armrest can be locked.
( P. 3 7 3 )
■Rear control panel illumination off function
Control panel illumination on the rear armrest can be turned off. ( P. 3 7 3 )
■When “ERROR”, “WAIT” or “NO MUSIC” is shown on the display
Refer to the following and take the appropriate measures. If the problem is not recti-
fied, take the vehicle to your Lexus dealer.
“ERROR”: This indicates a trouble either in the disc or inside the player. The disc
may be dirty, damaged, or inserted up-side down.
“WAIT”: Operation is stopped due to a high temperature inside the player. Eject the
disc and allow the player to cool down.
“NO MUSIC”: This indicates that an MP3/WMA file is not included in the disc.
Page 525 of 844
GS350_OM_OM30D41U_(U)
5255-4. Using the hands-free phone system (for cellular phone)
5
Interior features
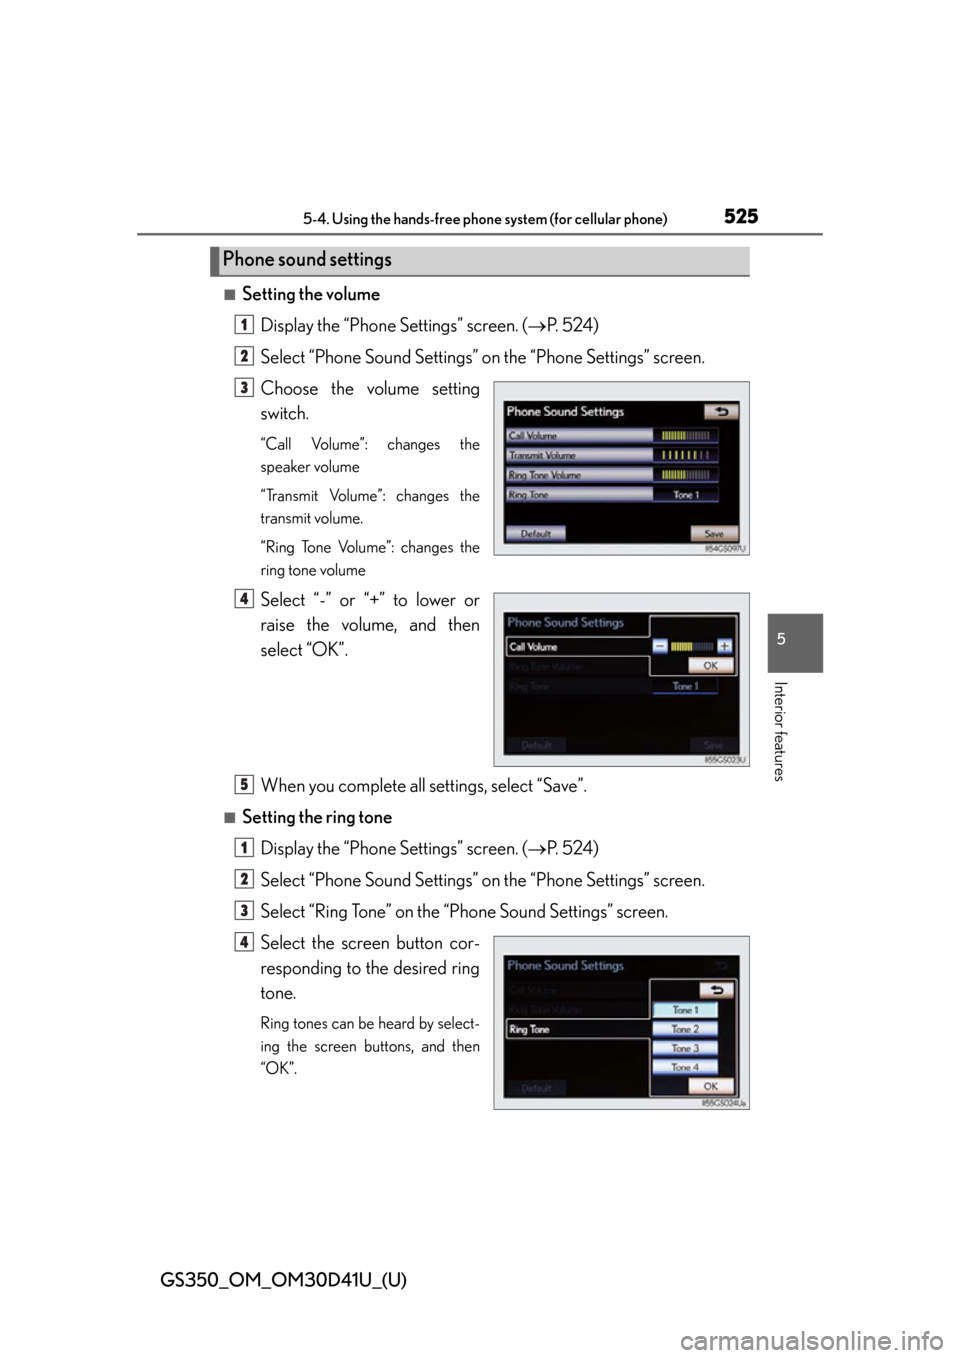
■Setting the volumeDisplay the “Phone Settings” screen. ( P. 5 2 4 )
Select “Phone Sound Settings” on the “Phone Settings” screen.
Choose the volume setting
switch.
“Call Volume”: changes the
speaker volume
“Transmit Volume”: changes the
transmit volume.
“Ring Tone Volume”: changes the
ring tone volume
Select “-” or “+” to lower or
raise the volume, and then
select “OK”.
When you complete all settings, select “Save”.
■Setting the ring tone Display the “Phone Settings” screen. ( P. 5 2 4 )
Select “Phone Sound Settings” on the “Phone Settings” screen.
Select “Ring Tone” on the “Phone Sound Settings” screen.
Select the screen button cor-
responding to the desired ring
tone.
Ring tones can be heard by select-
ing the screen buttons, and then
“OK”.
Phone sound settings
1
2
3
4
5
1
2
3
4
Page 542 of 844

542
GS350_OM_OM30D41U_(U)
5-4. Using the hands-free phone system (for cellular phone)
■Changing the new message notification volume
Display the “Messaging Settings” screen. ( P. 541)
Select “New Message Notification Volume” on the “Messaging Set-
tings” screen.
Select “-” or “+” to lower or
raise the volume, and then
“OK”.
When you complete setting, select “Save”.
■Changing the new message notification tone
Display the “Messaging Settings” screen. ( P. 541)
Select “New Message Notificatio n Tone” on the “Messaging Set-
tings” screen.
Select the desired new mes-
sage notification tone.
New message notification tones
can be heard by selecting the
screen buttons, and then “OK”.
When you complete setting, select “Save”.
1
2
3
4
1
2
3
4
Page 575 of 844
575
GS350_OM_OM30D41U_(U)5-7. Other interior features
5
Interior features
Clock
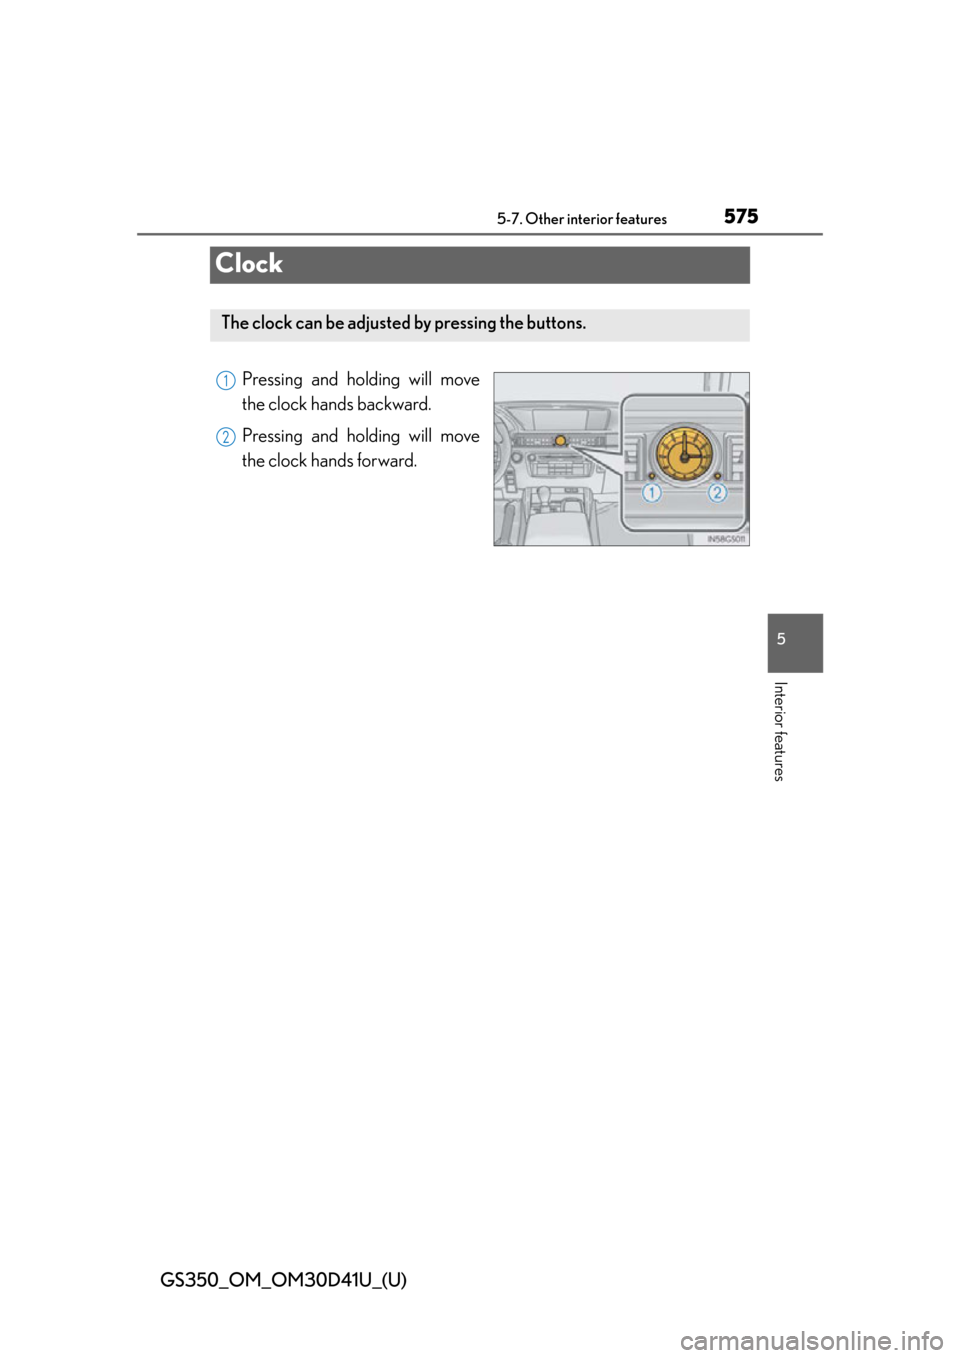
Pressing and holding will move
the clock hands backward.
Pressing and holding will move
the clock hands forward.
The clock can be adjusted by pressing the buttons.
1
2