buttons Lexus GS350 2014 Using the air conditioning system and defogger / LEXUS 2014 GS350 OWNERS MANUAL (OM30D41U)
[x] Cancel search | Manufacturer: LEXUS, Model Year: 2014, Model line: GS350, Model: Lexus GS350 2014Pages: 844, PDF Size: 10.59 MB
Page 22 of 844

22Pictorial index
GS350_OM_OM30D41U_(U)
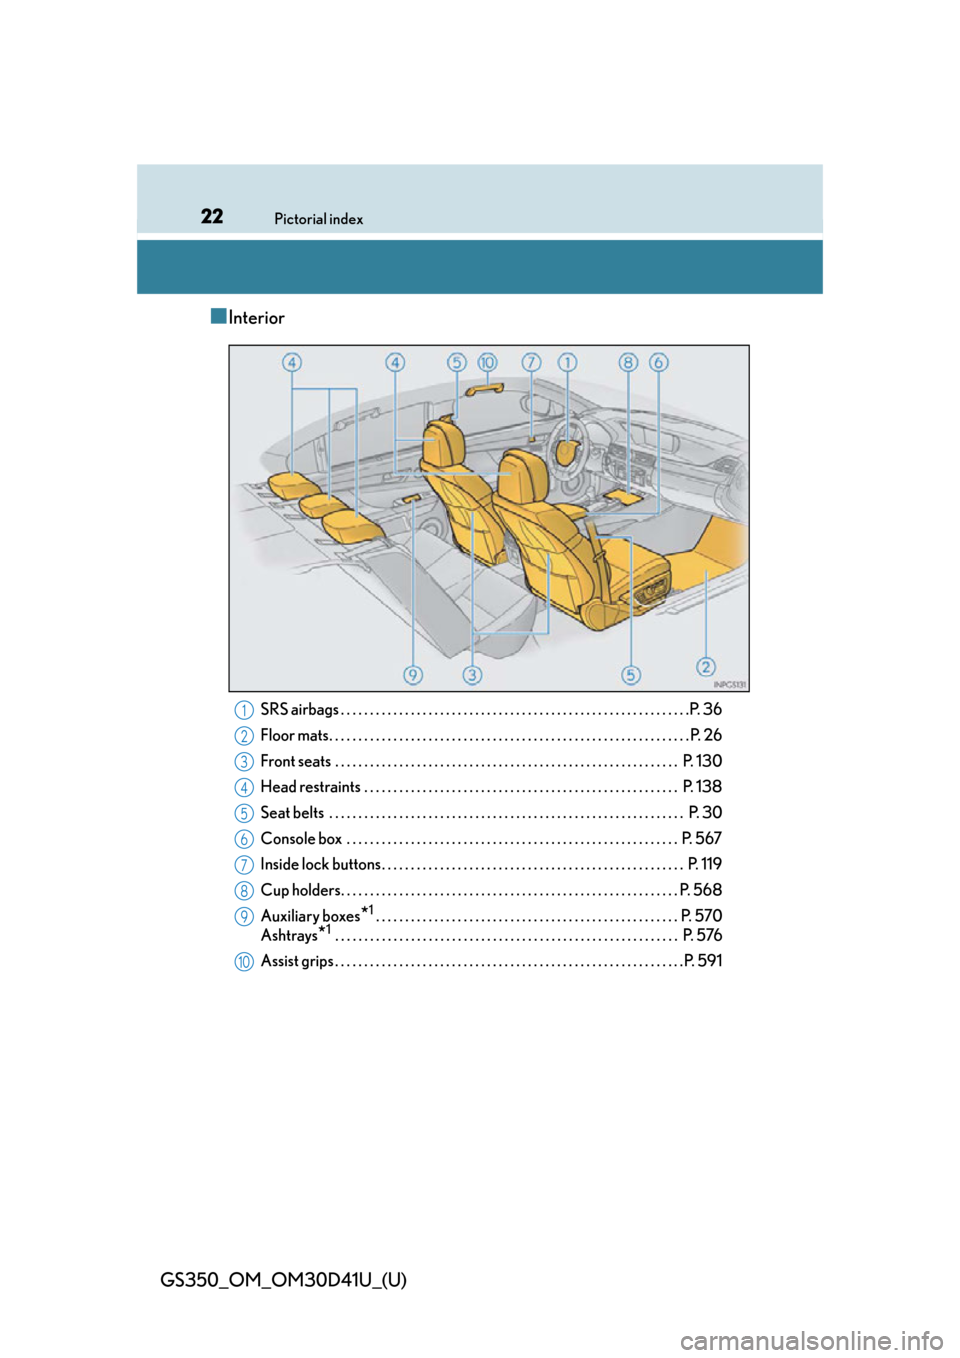
■Interior
SRS airbags . . . . . . . . . . . . . . . . . . . . . . . . . . . . . . . . . . . . . . . . . . . . . . . . . . . . . . . . . . . .P. 36
Floor mats. . . . . . . . . . . . . . . . . . . . . . . . . . . . . . . . . . . . . . . . . . . . . . . . . . . . . . . . . . . . . . P. 26
Front seats . . . . . . . . . . . . . . . . . . . . . . . . . . . . . . . . . . . . . . . . . . . . . . . . . . . . . . . . . . . P. 130
Head restraints . . . . . . . . . . . . . . . . . . . . . . . . . . . . . . . . . . . . . . . . . . . . . . . . . . . . . . P. 138
Seat belts . . . . . . . . . . . . . . . . . . . . . . . . . . . . . . . . . . . . . . . . . . . . . . . . . . . . . . . . . . . . . P. 30
Console box . . . . . . . . . . . . . . . . . . . . . . . . . . . . . . . . . . . . . . . . . . . . . . . . . . . . . . . . . P . 567
Inside lock buttons . . . . . . . . . . . . . . . . . . . . . . . . . . . . . . . . . . . . . . . . . . . . . . . . . . . . P. 1 19
Cup holders. . . . . . . . . . . . . . . . . . . . . . . . . . . . . . . . . . . . . . . . . . . . . . . . . . . . . . . . . . P. 568
Auxiliary boxes
*1 . . . . . . . . . . . . . . . . . . . . . . . . . . . . . . . . . . . . . . . . . . . . . . . . . . . . P. 570
Ashtrays
*1 . . . . . . . . . . . . . . . . . . . . . . . . . . . . . . . . . . . . . . . . . . . . . . . . . . . . . . . . . . . P. 576
Assist grips . . . . . . . . . . . . . . . . . . . . . . . . . . . . . . . . . . . . . . . . . . . . . . . . . . . . . . . . . . . .P. 591
1
2
3
4
5
6
7
8
9
10
Page 59 of 844

591-1. For safe use
GS350_OM_OM30D41U_(U)
1
For safety and security
Installing child restraints
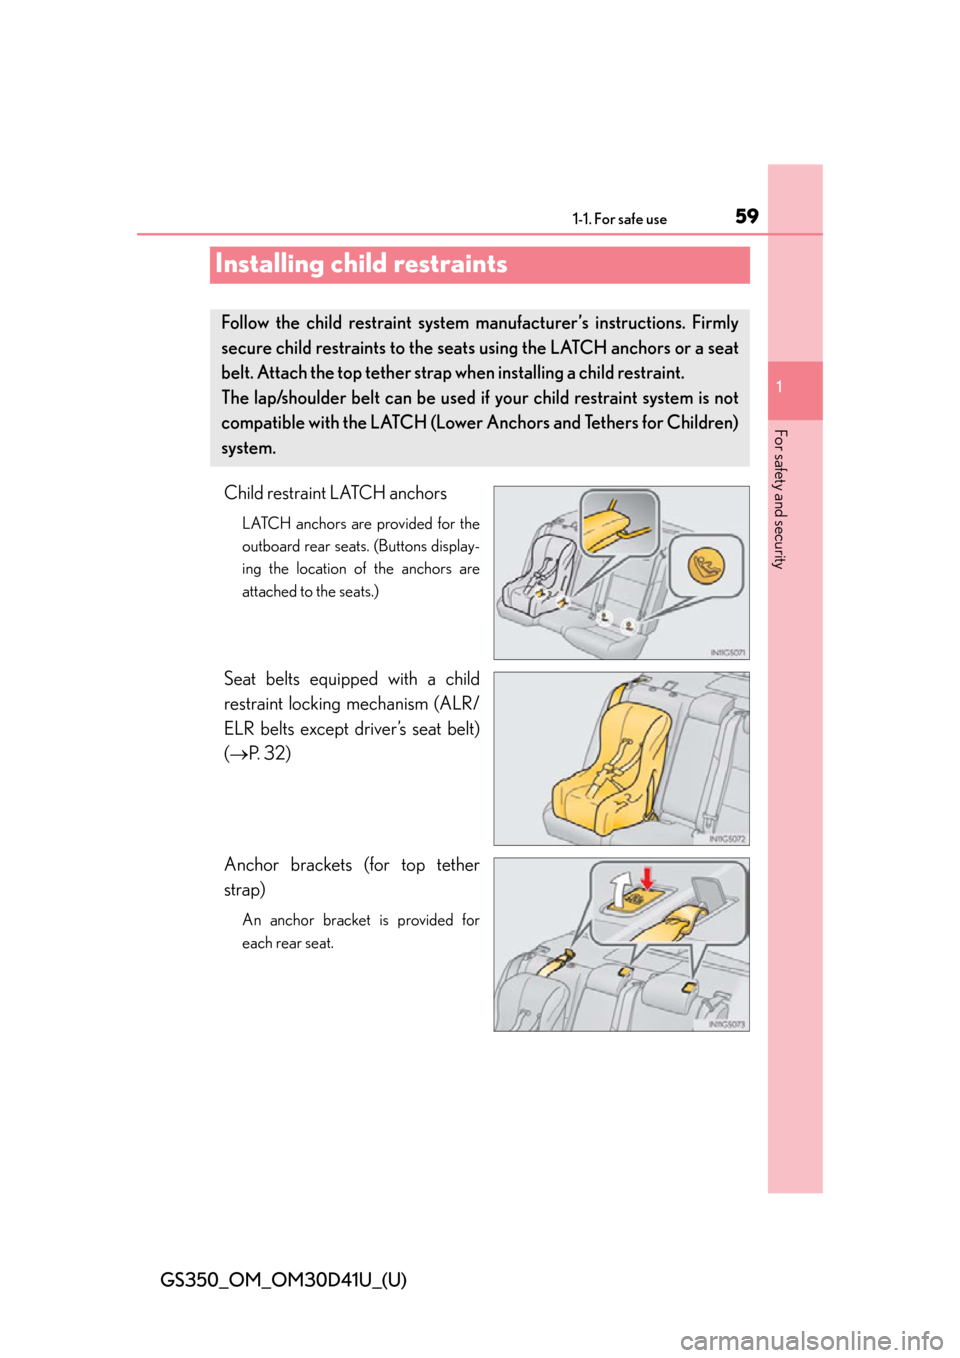
Child restraint LATCH anchors
LATCH anchors are provided for the
outboard rear seats. (Buttons display-
ing the location of the anchors are
attached to the seats.)
Seat belts equipped with a child
restraint locking mechanism (ALR/
ELR belts except driver’s seat belt)
(P. 32)
Anchor brackets (for top tether
strap)
An anchor bracket is provided for
each rear seat.
Follow the child restraint system manufacturer’s instructions. Firmly
secure child restraints to the se ats using the LATCH anchors or a seat
belt. Attach the top tether strap when installing a child restraint.
The lap/shoulder belt can be used if your child restraint system is not
compatible with the LATCH (Lower Anchors and Tethers for Children)
system.
Page 101 of 844

GS350_OM_OM30D41U_(U)
1013-1. Key information
3
Operation of each component
■When required to leave the vehicle’s key with a parking attendant
Turn the trunk opener main switch off, lock the glove box and armrest door as cir-
cumstances demand. (P. 124, 566, 589)
Remove the mechanical key for your own use and provide the attendant with the
electronic key only.
■If you lose your mechanical keys
New genuine mechanical keys can be made by your Lexus dealer using the other
mechanical key and the key number stamped on your key number plate. Keep the
plate in a safe place such as your wallet, not in the vehicle.
■When riding in an aircraft
When bringing an electronic key onto an aircraft, make sure you do not press any
buttons on the electronic key while inside the aircraft cabin. If you are carrying an
electronic key in your bag etc., ensure that the buttons are not likely to be pressed
accidentally. Pressing a button may cause the electronic key to emit radio waves that
could interfere with the operation of the aircraft.
Page 108 of 844

108
GS350_OM_OM30D41U_(U)
3-2. Opening, closing and locking the doors and trunk
■Switching the door unlock function
It is possible to set which doors the entry function unlocks using the wireless remote
control. Turn the engine switch off.
When the indicator light on the key surface is not on, press and hold ,
or for approximately 5 seconds while pressing and holding .
The setting changes each time an operation is performed, as shown below. (When
changing the setting continuously, release the buttons, wait for at least 5 seconds,
and repeat step .)
To prevent unintended triggering of the alarm, unlock the doors using the wireless
remote control and open and close a do or once after the settings have been
changed. (If a door is not opened within 60 seconds after is pressed, the
doors will be locked again and the alarm will automatically be set.)
In case that the alarm is triggered, immediately stop the alarm. ( P. 7 2 )
1
2
2
Multi-information
displayUnlocking functionBeep
Holding the driver’s door han-
dle unlocks only the driver’s
door.
Exterior: Beeps 3 times
Interior: Pings once
Holding a passenger’s door
handle unlocks all the doors.
Holding a door handle unlocks
all the doors.Exterior: Beeps twice
Interior: Pings once
Page 109 of 844

GS350_OM_OM30D41U_(U)
1093-2. Opening, closing and locking the doors and trunk
3
Operation of each component
■Battery-saving function
The battery-saving function will be activated in order to prevent the electronic key
battery and the vehicle batte ry from being discharged while the vehicle is not in
operation for a long time.
●In the following situations, the smart acce ss system with push-button start may take
some time to unlock the doors.
• The electronic key has been left in an area of approximately 6 ft. (2 m) of the outside of the vehicle for 10 minutes or longer.
• The smart access system with push-butto n start has not been used for 5 days or
longer.
●If the smart access system with push-butto n start has not been used for 14 days or
longer, the doors cannot be unlocked at an y doors except the driver’s door. In this
case, take hold of the driver’s door handle, or use the wireless remote control or the
mechanical key, to unlock the doors.
■Electronic Key Battery-Saving Function
When battery-saving mode is set, battery depletion is minimized by stopping the
electronic key from receiving radio waves.
Press twice while pressing and holding
. Confirm that the electronic key indi-
cator flashes 4 times.
While the battery-saving mode is set, the
smart access system wi th push-button start
cannot be used. To cancel the function, press
any of the electronic key buttons.
Page 119 of 844

119
GS350_OM_OM30D41U_(U)3-2. Opening, closing and locking the doors and trunk
3
Operation of each component
Doors
The vehicle can be locked and unlock ed using the entry function, wireless
remote control or door lock switches.
◆Entry function
P. 1 0 3
◆Wireless remote control
P. 116
◆Door lock switches
Locks all the doors
Unlocks all the doors
◆Inside lock buttonsLocks the door
Unlocks the door
The front doors can be opened by
pulling the inside handle even if the
lock buttons are in the lock posi-
tion.
Unlocking and locking the doors
1
2
1
2
Page 122 of 844

122
GS350_OM_OM30D41U_(U)
3-2. Opening, closing and locking the doors and trunk
CAUTION
■To prevent an accident
Observe the following precautions while driving the vehicle.
Failure to do so may result in a door opening and an occupant throwing out of the
vehicle, resulting in death or serious injury.
●Ensure that all doors are properly closed and locked.
●Do not pull the inside handle of the doors while driving.
Be especially careful for the front doors, as the doors may be opened even if the
inside lock buttons are in locked position.
●Set the rear door child-protector locks when children are seated in the rear seats.
Page 133 of 844

GS350_OM_OM30D41U_(U)
1333-3. Adjusting the seats
3
Operation of each component
■Operation of the power easy access system
When exiting the vehicle, the power easy access system may not operate if the seat
is already close to the rearmost position, etc.
■Customization
The seat movement amount settings of the power easy access system can be cus-
tomized. (Customizable features: P. 7 9 3 )
Your preferred driving position (the po sition of the driver’s seat, steering
wheel and outside rear view mirrors) can be recorded and recalled by
pressing a button.
Three different driving positions can be recorded into memory.
■Recording procedure
Check that the shift lever is in P.
Turn the engine switch to IGNITION ON mode.
Adjust the driver’s seat, steering wheel, and outside rear view mirrors
to the desired positions.
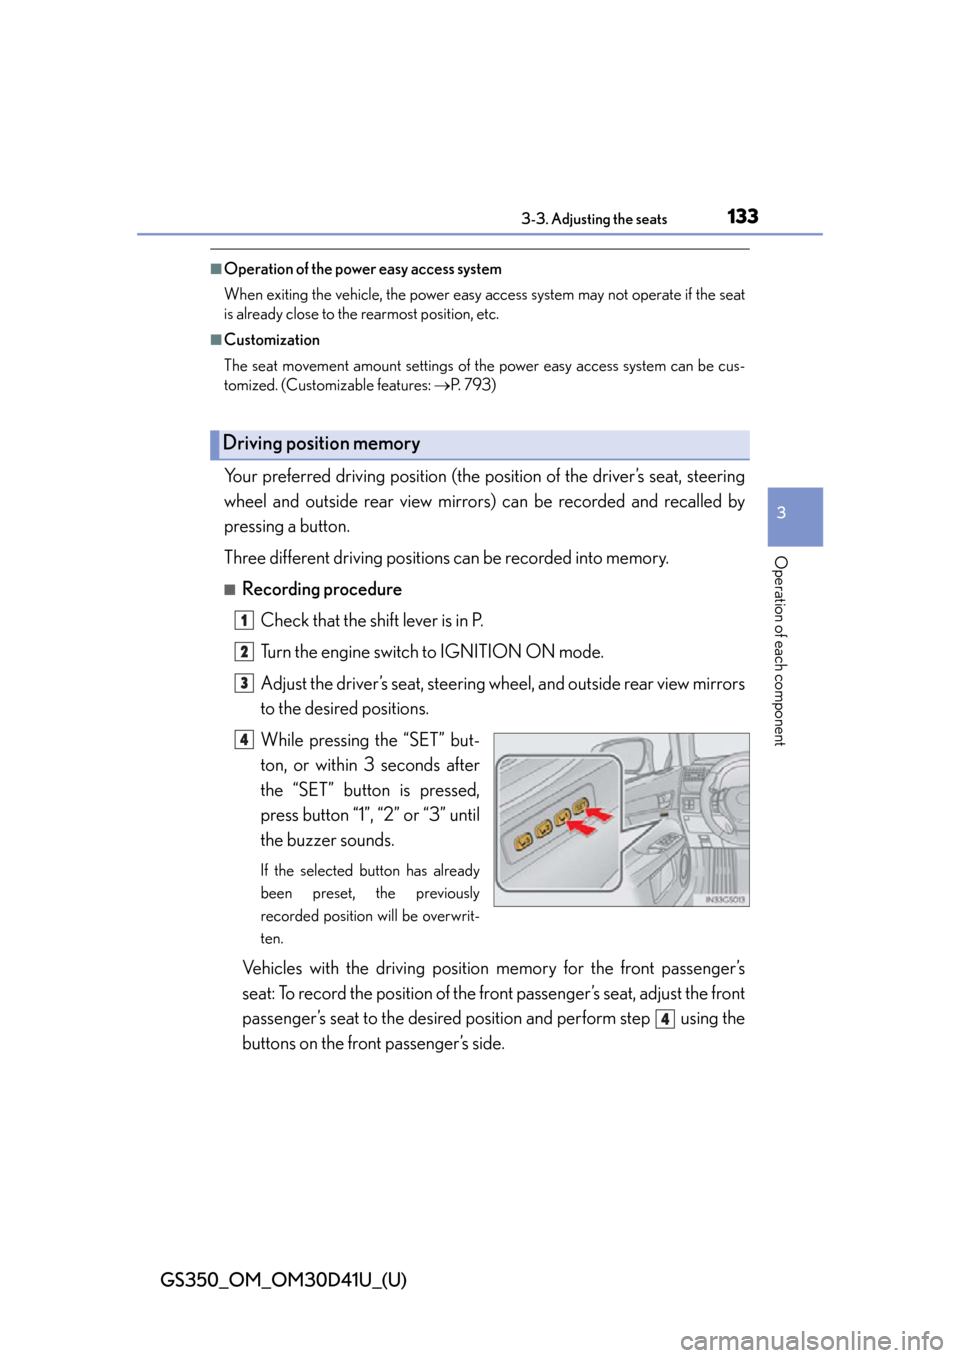
While pressing the “SET” but-
ton, or within 3 seconds after
the “SET” button is pressed,
press button “1”, “2” or “3” until
the buzzer sounds.
If the selected button has already
been preset, the previously
recorded position will be overwrit-
ten.
Vehicles with the driving position memory for the front passenger’s
seat: To record the position of the fr ont passenger’s seat, adjust the front
passenger’s seat to the desired po sition and perform step using the
buttons on the front passenger’s side.
Driving position memory
1
2
3
4
4
Page 134 of 844

134
GS350_OM_OM30D41U_(U)
3-3. Adjusting the seats
■Recall procedureCheck that the shift lever is in P.
Turn the engine switch to IGNITION ON mode.
Press one of the buttons for the
driving position you want to
recall until the buzzer sounds.
■To stop the position recall operation part-way through
Perform any of the following:
●Press the “SET” button.
●Press button “1”, “2” or “3”.
●Operate any of the seat adju stment switches (only cancels seat position recall).
●Operate the tilt and telescopic steering co ntrol switch (only cancels steering wheel
position recall).
■Seat positions that can be memorized ( P. 1 3 0 )
Vehicles without seatback si de support adjustment switch
The adjusted positions other than the position adjusted by lumbar support switch can
be recorded.
Vehicles with seatback side support adjustment switch
All adjusted positions can be recorded.
1
2
3
Page 317 of 844

GS350_OM_OM30D41U_(U)
3175-1. Remote Touch screen
5
Interior features
■When using the Remote Touch screen
●If the screen is cold, the display may be dark, or the system may seem to be operat-
ing slightly slower than normal.
●When the screen is viewed through polarized sunglasses, a rainbow pattern may
appear on the screen due to optical characteristics of the screen. If this is disturb-
ing, please operate the screen without polarized sunglasses.
●Dimmed screen buttons cannot be operated.
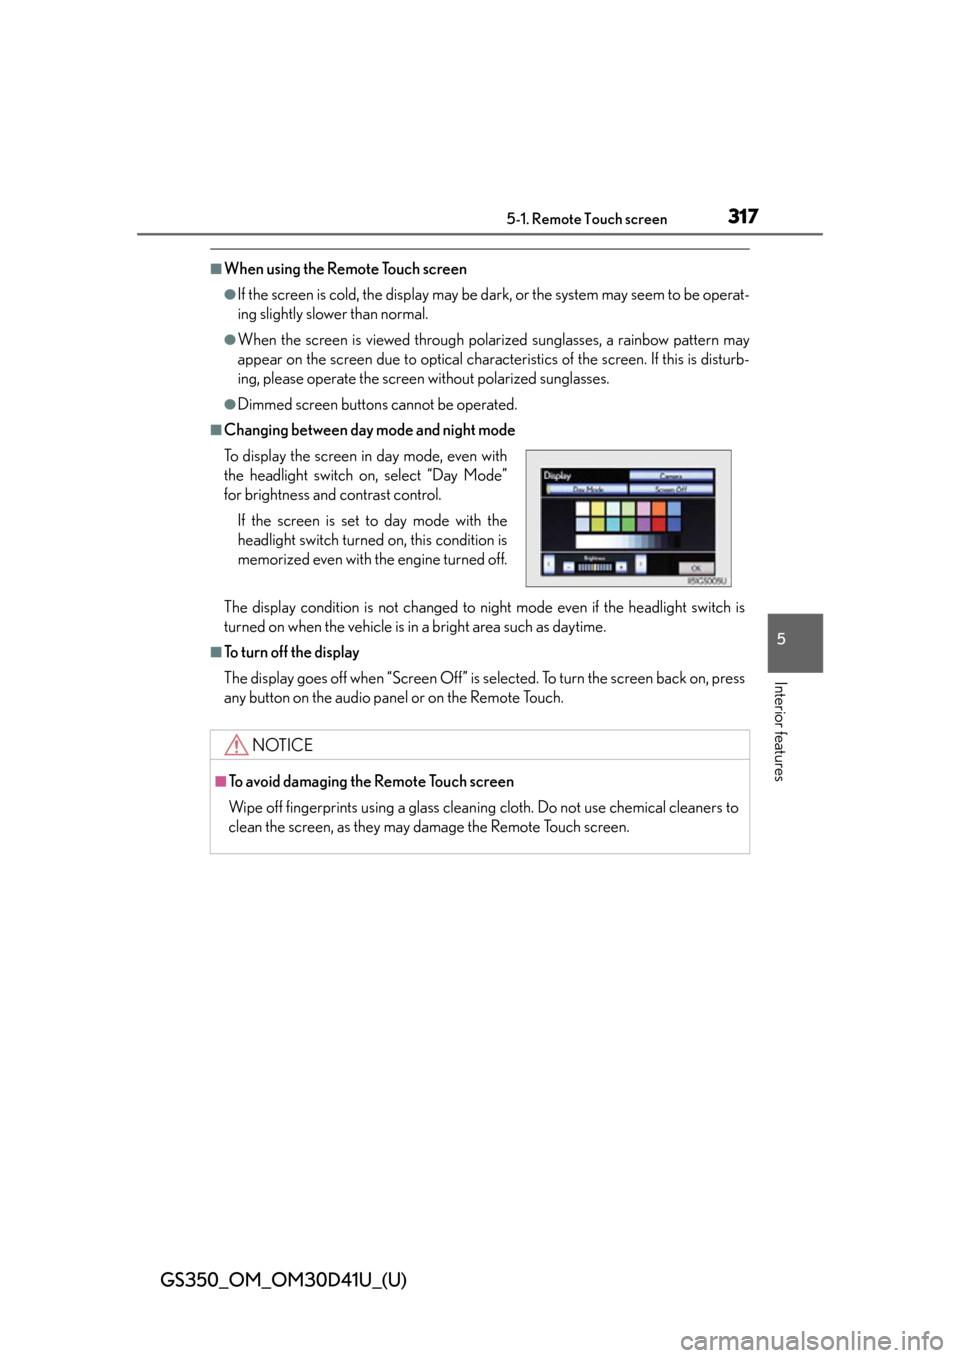
■Changing between day mode and night mode
The display condition is not changed to night mode even if the headlight switch is
turned on when the vehicle is in a bright area such as daytime.
■To turn off the display
The display goes off when “Screen Off” is se lected. To turn the screen back on, press
any button on the audio panel or on the Remote Touch. To display the screen in day mode, even with
the headlight switch on, select “Day Mode”
for brightness and contrast control.
If the screen is set to day mode with the
headlight switch turned on, this condition is
memorized even with the engine turned off.
NOTICE
■To avoid damaging the Remote Touch screen
Wipe off fingerprints using a glass cleaning cloth. Do not use chemical cleaners to
clean the screen, as they may damage the Remote Touch screen.