Lexus GS450h 2008 Using the audio system / LEXUS 2008 GS450H OWNER'S MANUAL (OM30A96U)
Manufacturer: LEXUS, Model Year: 2008,
Model line: GS450h,
Model: Lexus GS450h 2008
Pages: 596, PDF Size: 9.36 MB
Lexus GS450h 2008 Using the audio system / LEXUS 2008 GS450H OWNER'S MANUAL (OM30A96U)
GS450h 2008
Lexus
Lexus
https://www.carmanualsonline.info/img/36/15365/w960_15365-0.png
Lexus GS450h 2008 Using the audio system / LEXUS 2008 GS450H OWNER'S MANUAL (OM30A96U)
Trending: transmission fluid, light, warning lights, coolant reservoir, towing capacity, remote start, automatic transmission
Page 141 of 596

141
2-1. Driving procedures
2
When driving
GS_HV_U
May 13, 2008 3:11 pm
■When the electronic key battery is discharged
P. 4 5 4
■Conditions affecting operation
P. 3 9
■Leak detection pump
Several hours after the hybrid system is turned off, you may hear a sound coming
from underneath the luggage compartment for several minutes. This is normal
operation and does not indicate a malfunction.
CAUTION
■When starting the hybrid system
Always start the hybrid system while sitting in the driver’s seat. Do not press the
accelerator pedal while starting the hybrid system under any circumstances.
Doing so may cause an accident resu lting in death or serious injury.
■Stopping the hybrid system in an emergency
If you want to stop the hybrid system in an emergency while driving the vehicle,
push and hold the “POWER” switch for more than 3 seconds.
However, do not touch the “POWER” switch while driving except in an emergency.
If the hybrid system stops while the vehicle is being driven, this could lead to an
unexpected accident.
NOTICE
■To prevent 12 volt battery discharge
Do not leave the “POWER” switch in ACCESSORY or ON mode for long periods
without the hybrid system on.
■When starting the hybrid system
●Do not race the hybrid system.
●If the hybrid system becomes difficult to st art or stalls frequently, have the hybrid
system checked immediately.
Page 142 of 596
142
2-1. Driving procedures
GS_HV_U
May 13, 2008 3:11 pm
Transmission
Select a shift position appropriate for the driving conditions.
■Shifting the shift lever
While the “POWER” sw itch is in ON mode, depress the brake
pedal and move the shift lever.
■ Shift position uses
*1: To improve fuel consumption and reduce noises, set the shift lever in the
“D” position for normal driving.
*
2: By selecting shift ranges using “S” mode, you can control engine braking
forces.
Shift positionFunction
PParking the vehicle or starting the hybrid system
RReversing
NNeutral
DNormal driving*1
S“S” mode driving*2 ( P. 1 4 4 )
Page 143 of 596
143
2-1. Driving procedures
2
When driving
GS_HV_U
May 13, 2008 3:11 pm
■Selecting a driving mode
The following patterns can be selec ted to suit current driving and
operating conditions.
Power mode
For powerful acceleration and
driving in mountainous regions.
Normal mode
Snow mode
For accelerating and driving on
slippery road surfaces, such as
on snow.
Press “SNOW” to return to nor-
mal mode.
Page 144 of 596
144
2-1. Driving procedures
GS_HV_U
May 13, 2008 3:11 pm
Changing shift ranges in “S” modeShift the shift lever to the “S” position and operate the shift lever. Upshifting
Downshifting
The initial shift range in “S” mo de is automatically set to “5”.
■ Shift ranges and their functions
●You can choose from 6 levels of engine braking force.
● A lower shift range will provide gr eater engine braking force than a
higher shift range, and the engine revolutions will also increase.
● If you accelerate while in ranges “1” to “5”, the shift range may auto-
matically range up in accordance with the vehicle’s speed.
Page 145 of 596

145
2-1. Driving procedures
2
When driving
GS_HV_U
May 13, 2008 3:11 pm
■Downshifting restrictions warning buzzer (in the “S” mode)
To help ensure safety and driving perfor mance, downshifting operation may some-
times be restricted. In some circumstances, downshifting may not be possible even
when the shift lever is operated. (The warning buzzer will sound twice.)
■When driving with the cruise control syst em (or dynamic radar cruise control sys-
tem)
The engine brake will not operate in the “S” mode, even when downshifting to “5” or
“4”. ( P. 1 6 9 )
■Snow mode automatic deactivation
Snow mode is automatically deactivated if the “POWER” switch is turned to
ACCESSORY or ON mode after driving in snow mode.
■If the shift lever cannot be shifted from “P”
P. 5 2 9
■If the indicator does not come on even after shifting the shift lever to “S”
This may indicate a malfunction in the transmission. Have the vehicle inspected by
your Lexus dealer immediately.
(In this situation, the vehicle will operate as if the shift lever is in “D”.)
■When in heavy traffic
To avoid running the hybrid battery (traction battery) down, leave the shift lever in
“D” or “S”.
Page 146 of 596
146
2-1. Driving procedures
GS_HV_U
May 13, 2008 3:11 pm
Turn signal lever
■Turn signals can be operated when
The “POWER” switch is in ON mode.
■If the indicators flash faster than usual
Check that a light bulb in the front or rear turn signal lights has not burned out.
Left turn
Right turn
Move and hold the lever part-
way to signal a lane change
The left hand signal will flash
until you release the lever.
Move and hold the lever part-
way to signal a lane change
The right hand signal will flash
until you release the lever.
Page 147 of 596
147
2-1. Driving procedures
2
When driving
GS_HV_U
May 13, 2008 3:11 pm
Parking brake
NOTICE
■Before driving
Fully release the parking brake.
Driving the vehicle with the parking brake set will lead to brake components over-
heating, which may affect braking performance and increase brake wear.
Sets the parking brake*
(Depressing the pedal again
releases the parking brake.)
*: Fully depress the parking
brake pedal with your left
foot while depressing the
brake pedal with your right
foot.
CanadaU.S.A.
Page 148 of 596
148
GS_HV_U
December 12, 2007 3:50 pm
2-2. Instrument cluster
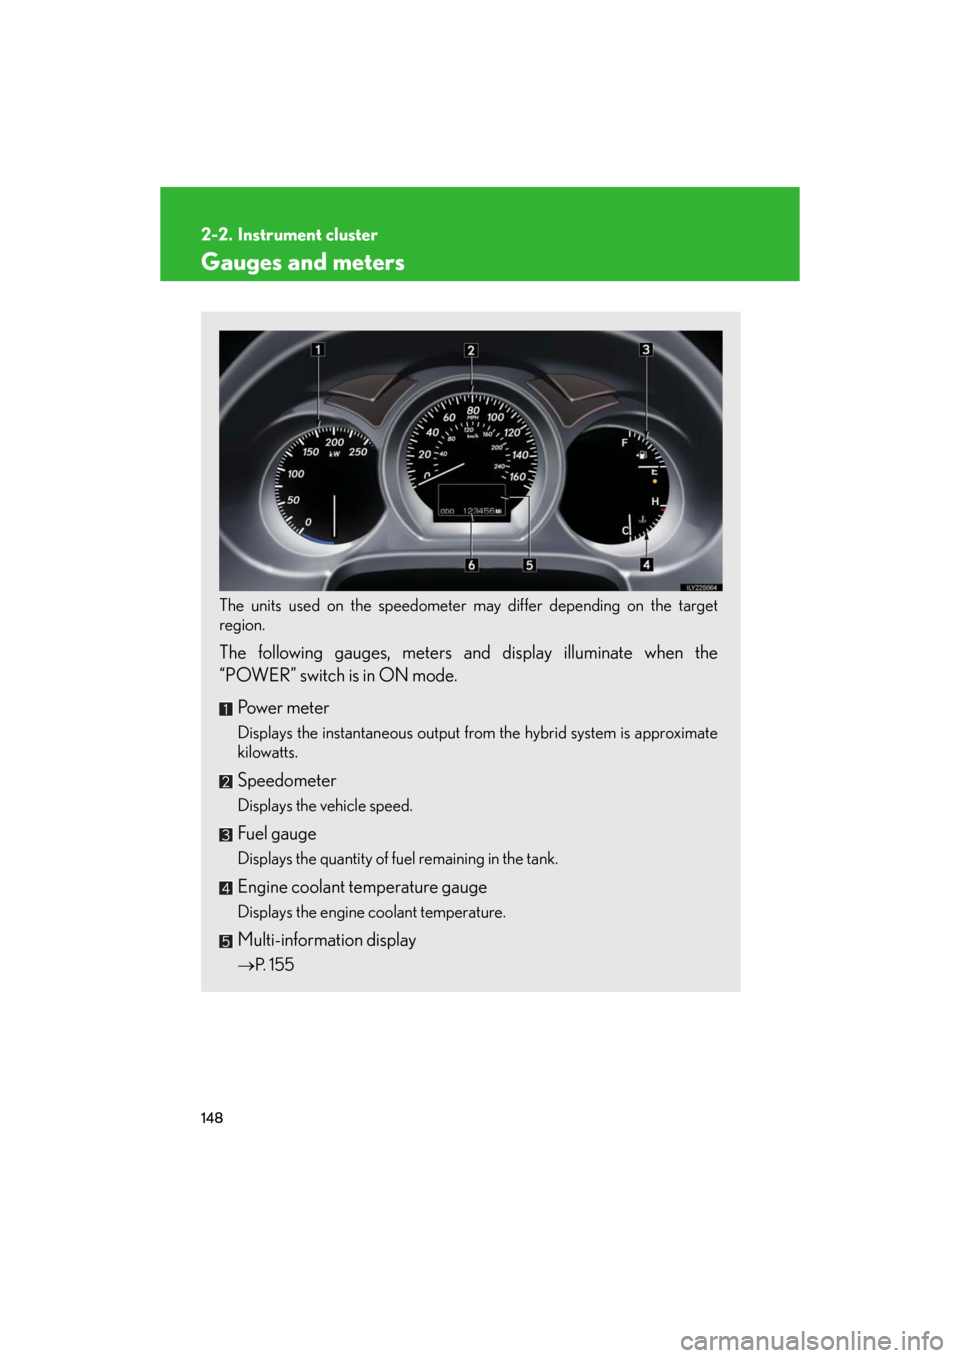
Gauges and meters
The units used on the speedometer may differ depending on the target
region.
The following gauges, meters and display illuminate when the
“POWER” switch is in ON mode.
Power meter
Displays the instantaneous output from the hybrid system is approximate
kilowatts.
Speedometer
Displays the vehicle speed.
Fuel gauge
Displays the quantity of fuel remaining in the tank.
Engine coolant temperature gauge
Displays the engine coolant temperature.
Multi-information display
P. 1 5 5
Page 149 of 596
149
2-2. Instrument cluster
2
When driving
GS_HV_U
December 12, 2007 3:50 pm
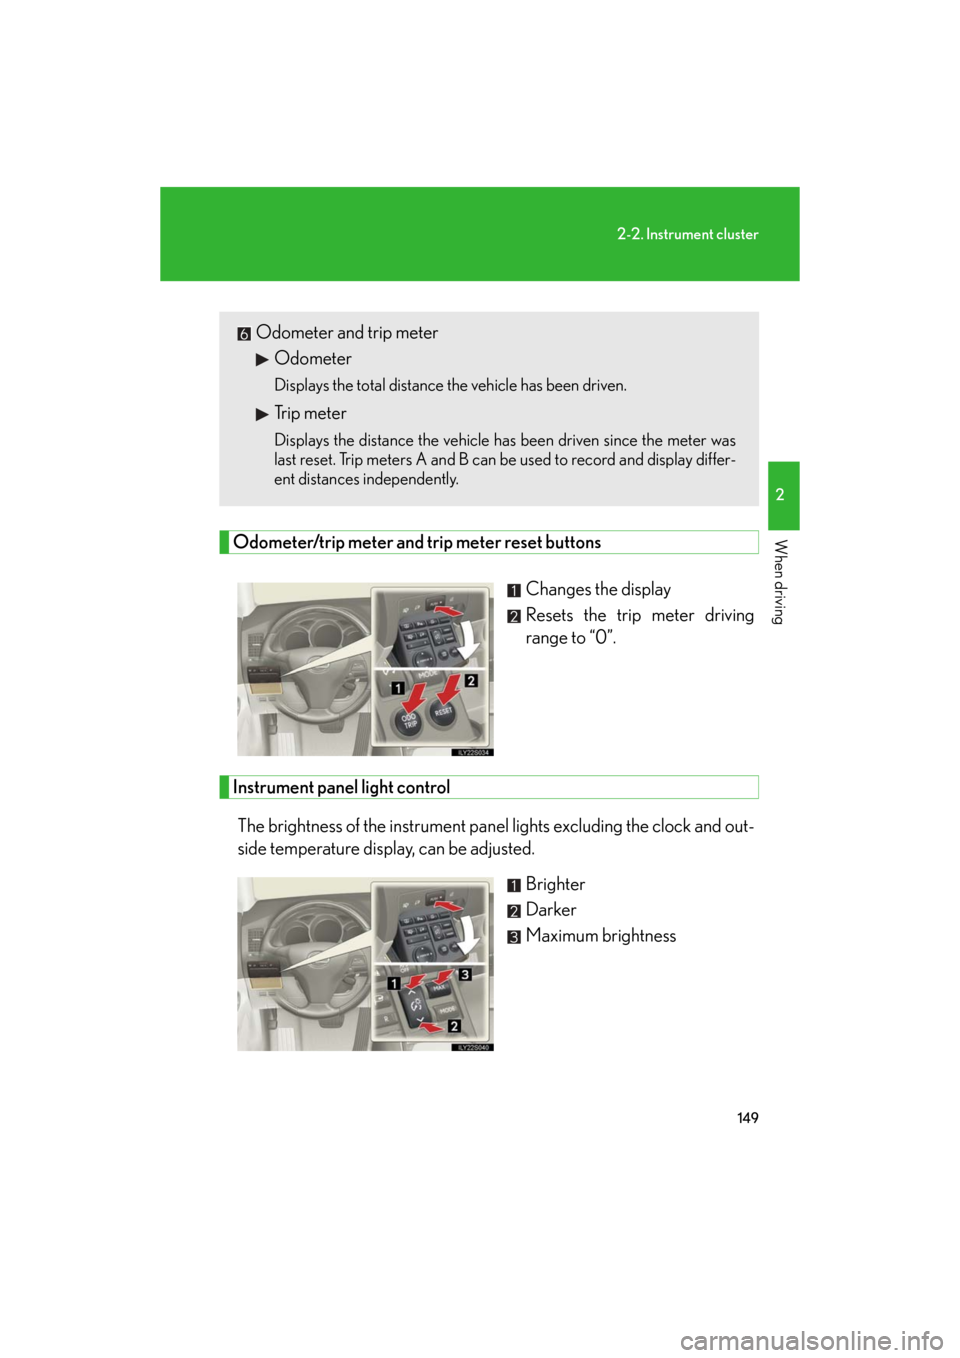
Odometer/trip meter and trip meter reset buttonsChanges the display
Resets the trip meter driving
range to “0”.
Instrument panel light controlThe brightness of the instrument panel lights excluding the clock and out-
side temperature display, can be adjusted. Brighter
Darker
Maximum brightness
Odometer and trip meterOdometer
Displays the total distance the vehicle has been driven.
Trip meter
Displays the distance the vehicle has been driven since the meter was
last reset. Trip meters A and B can be used to record and display differ-
ent distances independently.
Page 150 of 596
150
2-2. Instrument cluster
GS_HV_U
December 12, 2007 3:50 pm
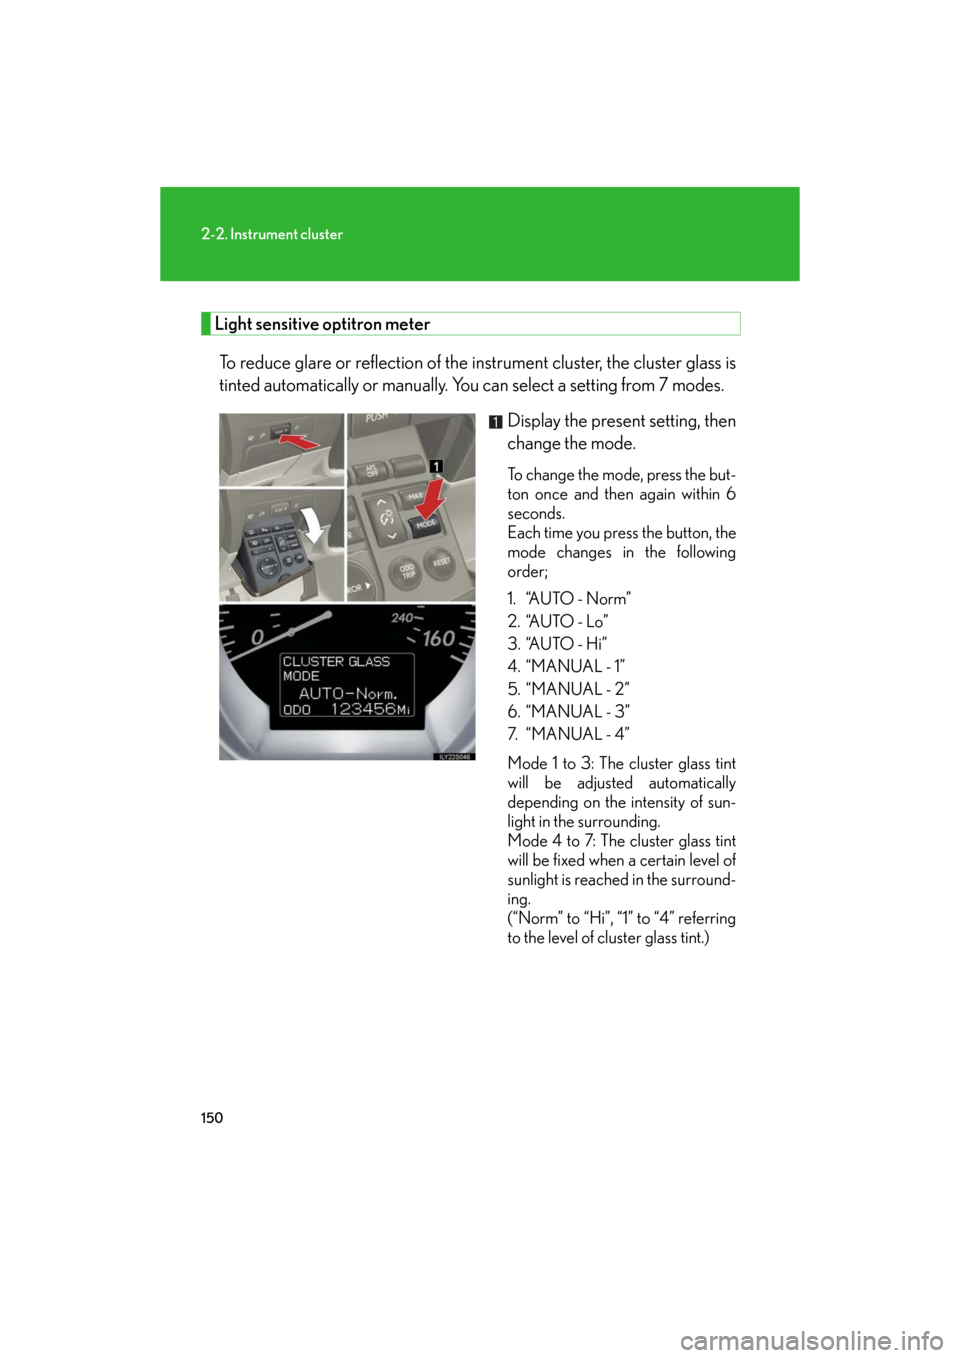
Light sensitive optitron meterTo reduce glare or reflection of th e instrument cluster, the cluster glass is
tinted automatically or manually. You can select a setting from 7 modes.
Display the present setting, then
change the mode.
To change the mode, press the but-
ton once and then again within 6
seconds.
Each time you press the button, the
mode changes in the following
order;
1. “AUTO - Norm”
2. “AUTO - Lo”
3. “AUTO - Hi”
4. “MANUAL - 1”
5. “MANUAL - 2”
6. “MANUAL - 3”
7. “ M A N U A L - 4 ”
Mode 1 to 3: The cluster glass tint
will be adjusted automatically
depending on the intensity of sun-
light in the surrounding.
Mode 4 to 7: The cluster glass tint
will be fixed when a certain level of
sunlight is reached in the surround-
ing.
(“Norm” to “Hi”, “1” to “4” referring
to the level of cluster glass tint.)
Trending: steering wheel, wiring, battery, key, coolant temperature, heating, radio antenna


