reset Lexus GS450h 2010 Using The Audio System / LEXUS 2010 GS450H OWNERS MANUAL (OM30C81U)
[x] Cancel search | Manufacturer: LEXUS, Model Year: 2010, Model line: GS450h, Model: Lexus GS450h 2010Pages: 644, PDF Size: 15.8 MB
Page 17 of 644
17
GS_HV_U (OM30C81U)
January 28, 2010 10:42 am
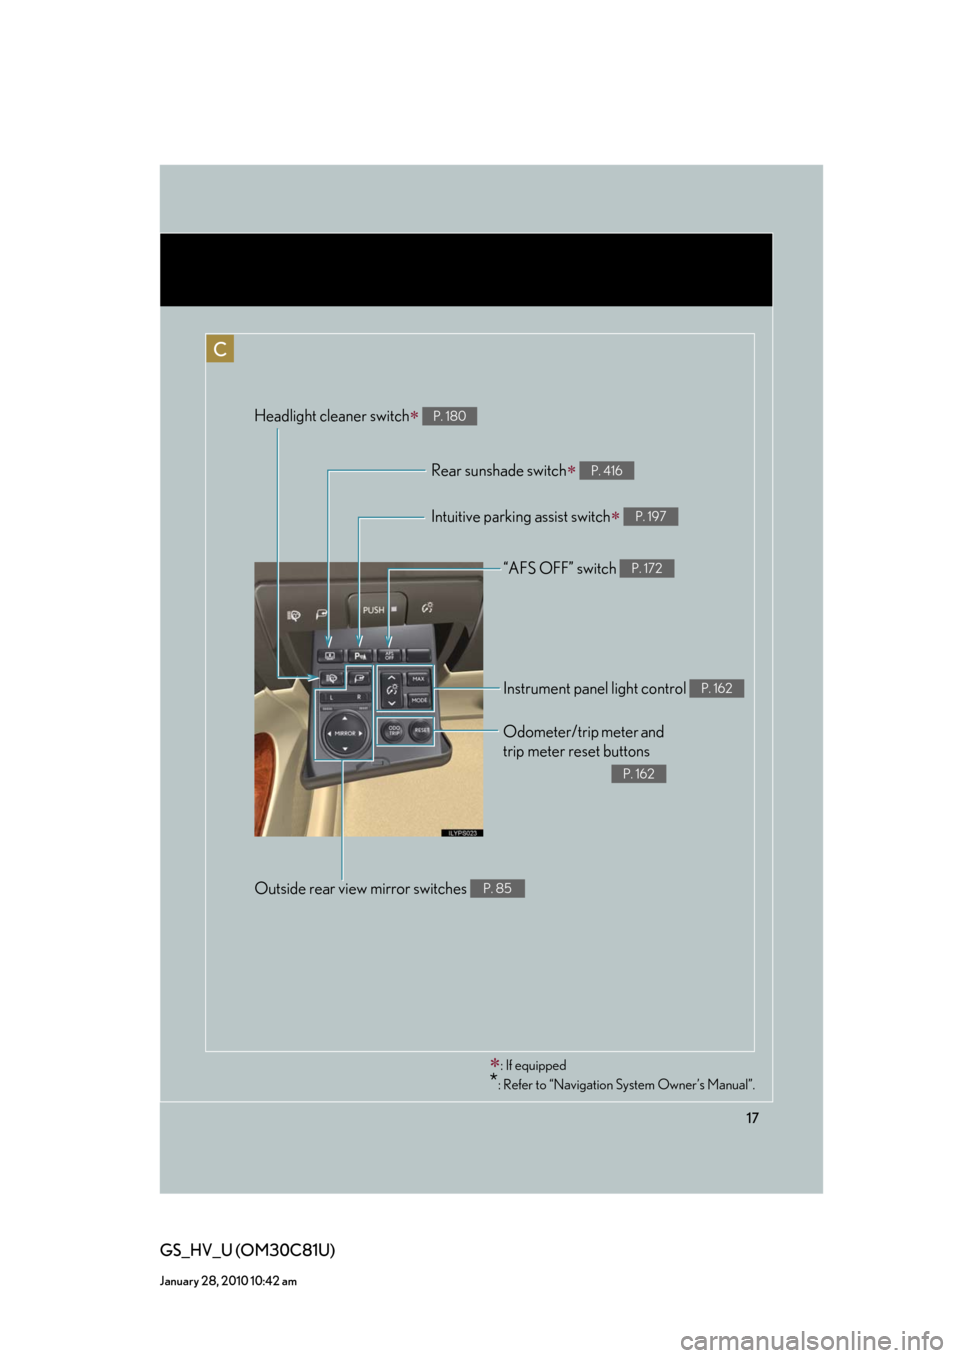
“AFS OFF” switch P. 172
Rear sunshade switch P. 416
Headlight cleaner switch P. 180
Intuitive parking assist switch P. 197
Odometer/trip meter and
trip meter reset buttons
P. 162
Instrument panel light control P. 162
Outside rear view mirror switches P. 85
: If equipped
*: Refer to “Navigation System Owner’s Manual”.
C
Page 31 of 644
31
1-1. Hybrid system
1
Before driving
GS_HV_U (OM30C81U)
February 12, 2010 8:52 am
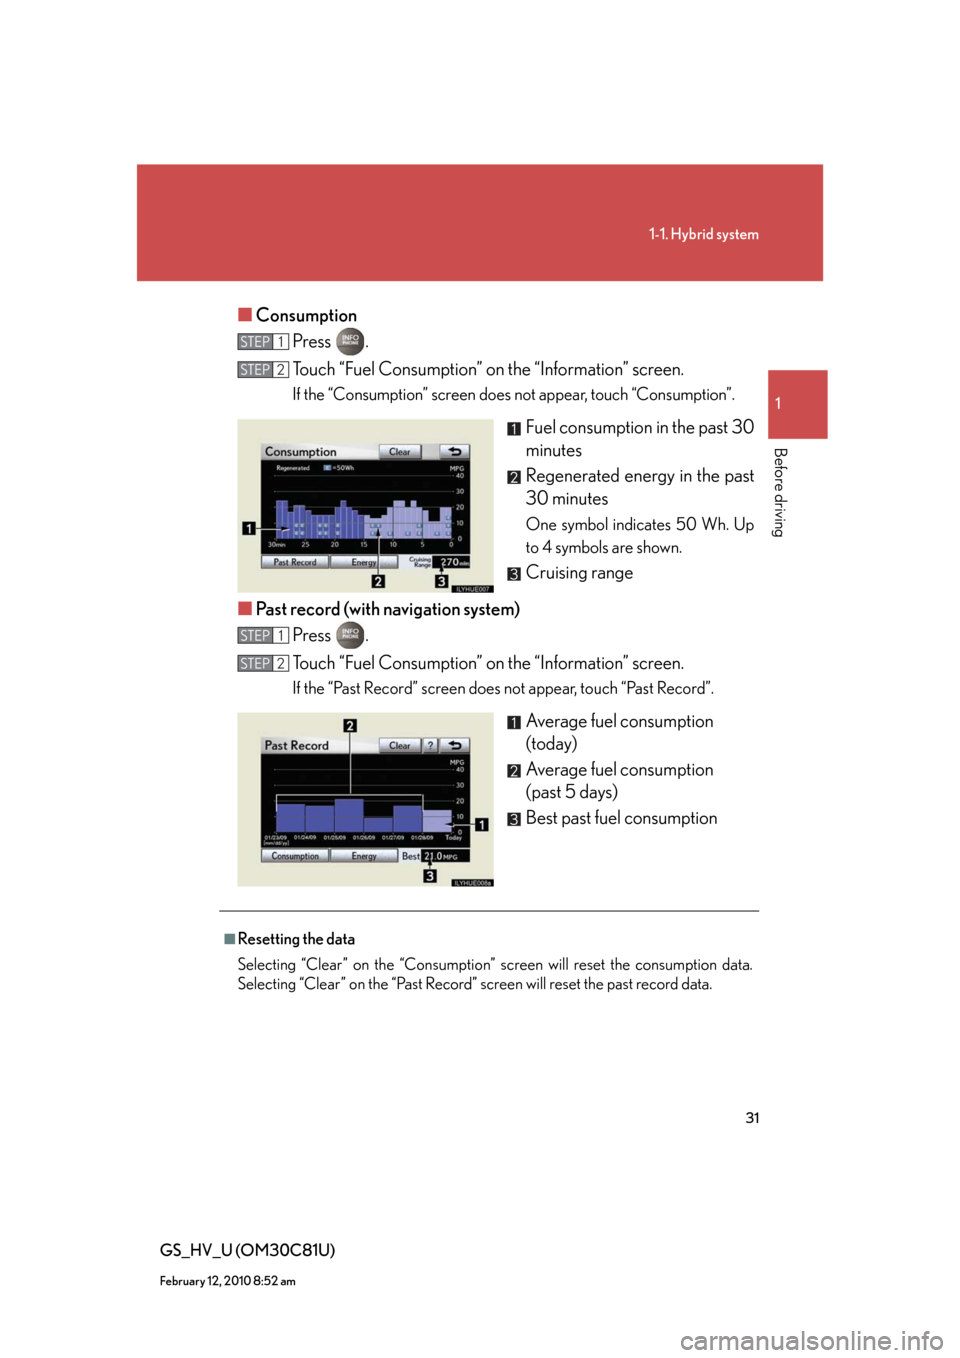
■Consumption
Press .
Touch “Fuel Consumption” on the “Information” screen.
If the “Consumption” screen does not appear, touch “Consumption”.
Fuel consumption in the past 30
minutes
Regenerated energy in the past
30 minutes
One symbol indicates 50 Wh. Up
to 4 symbols are shown.
Cruising range
■Past record (with navigation system)
Press .
Touch “Fuel Consumption” on the “Information” screen.
If the “Past Record” screen does not appear, touch “Past Record”.
Average fuel consumption
(today)
Average fuel consumption
(past 5 days)
Best past fuel consumption
STEP1
STEP2
STEP1
STEP2
■Resetting the data
Selecting “Clear” on the “Consumption” screen will reset the consumption data.
Selecting “Clear” on the “Past Record” screen will reset the past record data.
Page 67 of 644
67
1
1-4. Adjustable components (seats, mirrors, steering wheel)
Before driving
GS_HV_U (OM30C81U)
February 1, 2010 11:00 am
Driving position memory system
Your preferred driving position (the position of the driver’s seat, steering
wheel and outside rear view mirrors) can be entered into the computer’s
memory and recalled with the touch of a button. It is also possible to set this
function to activate automatically when the doors are unlocked.
Three different driving positions can be entered into memory.
The same buttons are found on the front passenger’s side, allowing the
position of the front passenger’s seat to be memorized. (if equipped)
■Entering a position to memory
Turn the “POWER” switch to ON mode.
Adjust the driver’s seat, steering wheel, and outside rear view
mirrors to the desired positions.
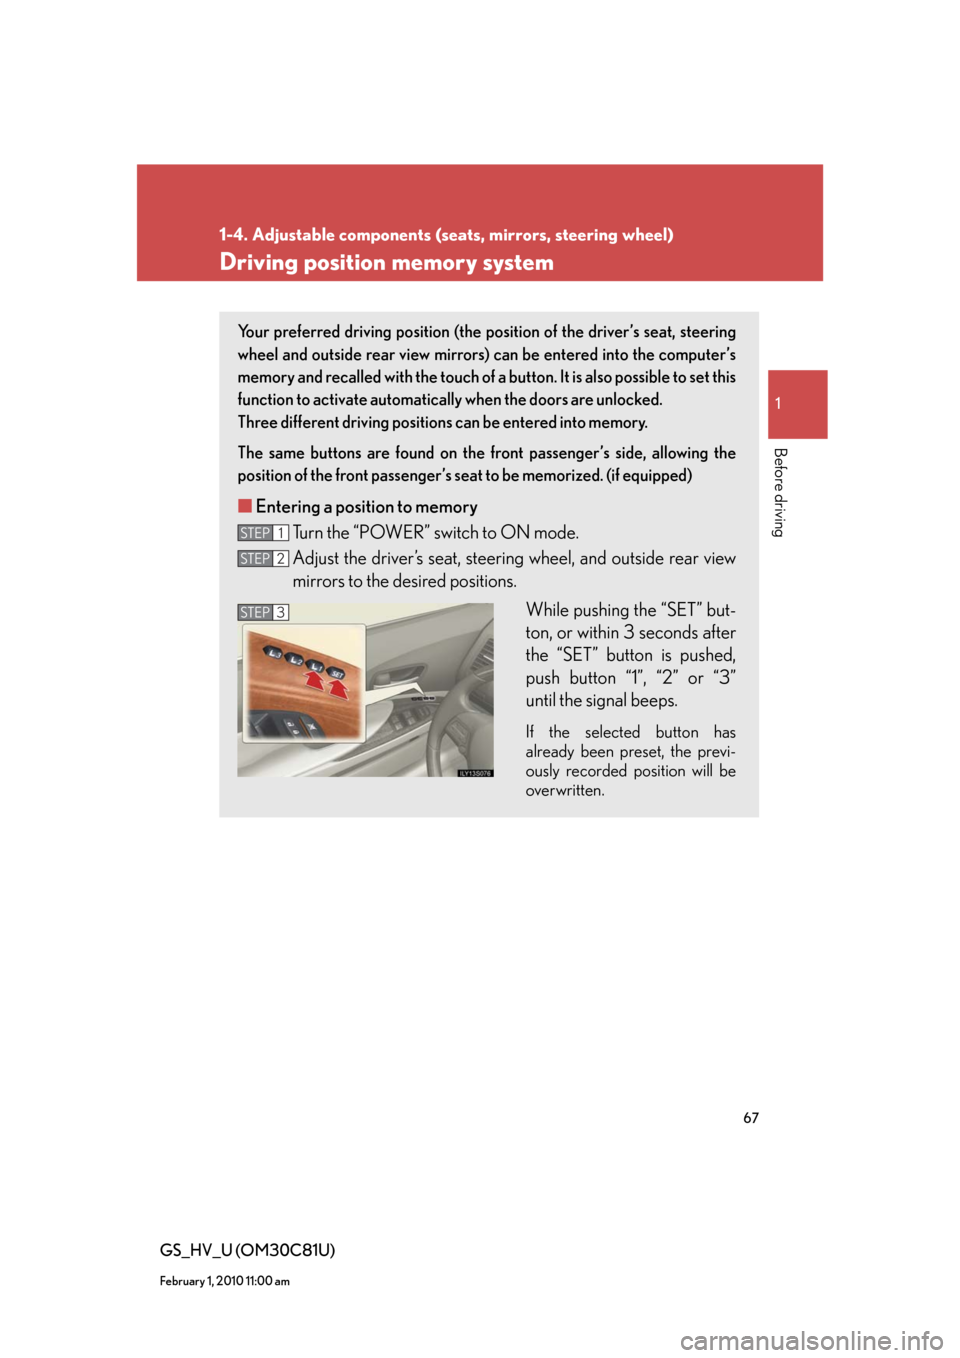
While pushing the “SET” but-
ton, or within 3 seconds after
the “SET” button is pushed,
push button “1”, “2” or “3”
until the signal beeps.
If the selected button has
already been preset, the previ-
ously recorded position will be
overwritten.
STEP1
STEP2
STEP3
Page 70 of 644

70
1-4. Adjustable components (seats, mirrors, steering wheel)
GS_HV_U (OM30C81U)
February 1, 2010 11:00 am
■Canceling the linked door unlock operation
Close the driver’s door with the “POWER” switch set to the OFF.
Push the “SET” button and the button on the wireless remote control
at the same time for about 1 second until you hear 2 beeps.
■Retained accessory power
With front passenger’s seat memory
●Each memorized position (except for the tilt and telescopic steering column)
can be recalled within 3 minutes after the corresponding side door is opened,
even if the “POWER” switch is turned to OFF.
●Driver’s side: Each memorized position (except for the tilt and telescopic steer-
ing column) can be recalled within 60 seconds after the driver’s door is closed,
even if the “POWER” switch is turned to OFF.
Without front passenger’s seat memory
●Each memorized position (except for the tilt and telescopic steering column)
can be recalled within 3 minutes after the driver’s door is opened, even if the
“POWER” switch is turned to OFF.
●Each memorized position (except for the tilt and telescopic steering column)
can be recalled within 60 seconds after the driver’s door is closed, even if the
“POWER” switch is turned to OFF.
■If any position memory button is pushed while the adjustments are being made
The operation will stop. To reactivate the system, push the desired button (“1”, “2” or
“3”) again.
■If the 12 volt battery is disconnected
The memorized positions must be reset because the computer’s memory is erased
when the battery is disconnected.
STEP1
STEP2
Page 162 of 644
162
2-2. Instrument cluster
GS_HV_U (OM30C81U)
February 1, 2010 11:03 am
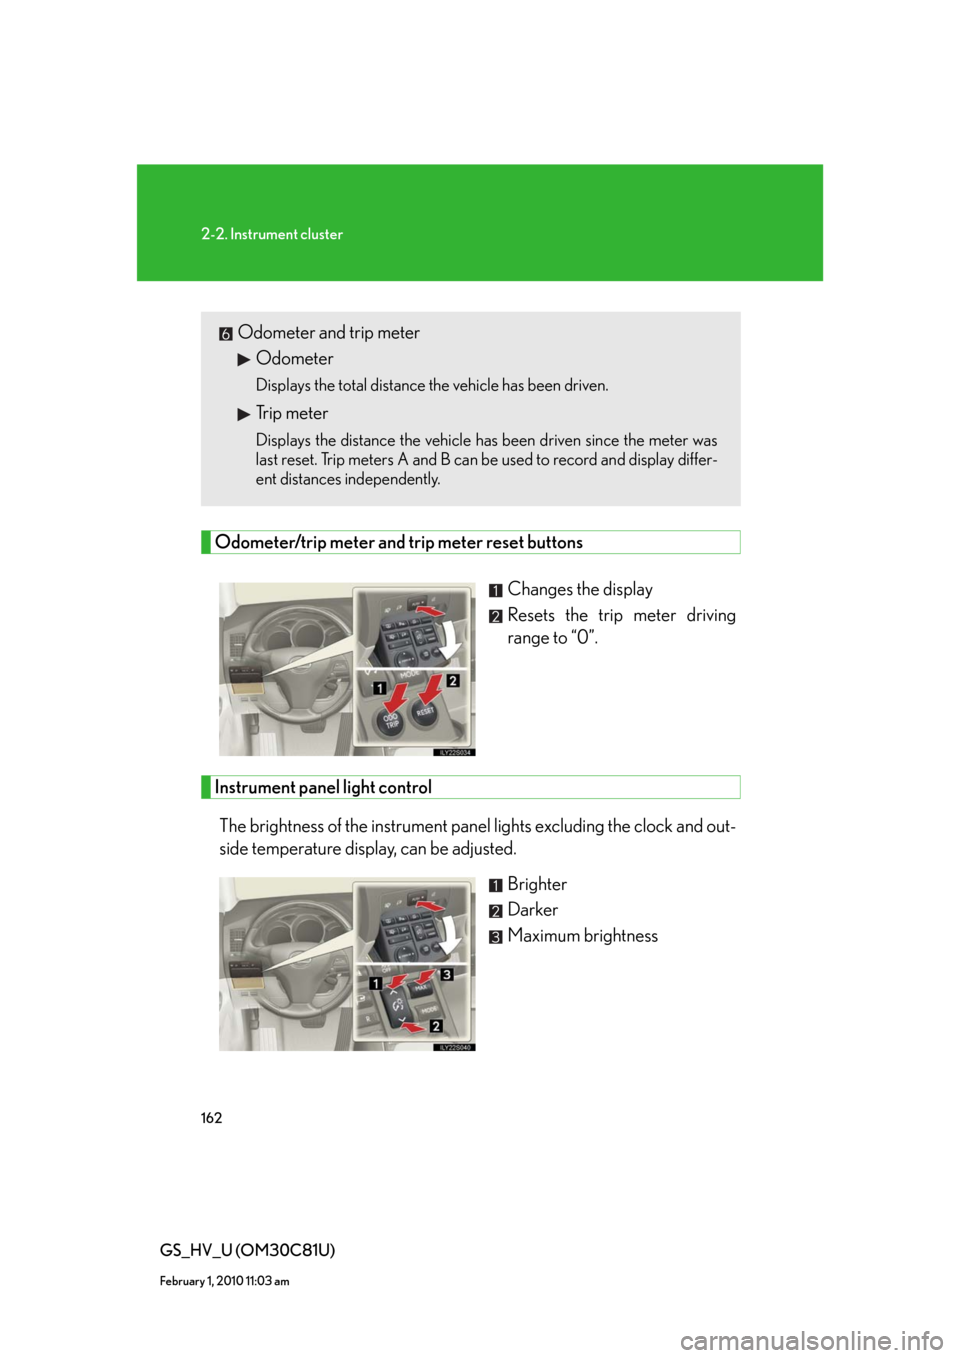
Odometer/trip meter and trip meter reset buttons
Changes the display
Resets the trip meter driving
range to “0”.
Instrument panel light control
The brightness of the instrument panel lights excluding the clock and out-
side temperature display, can be adjusted.
Brighter
Darker
Maximum brightness
Odometer and trip meter
Odometer
Displays the total distance the vehicle has been driven.
Trip meter
Displays the distance the vehicle has been driven since the meter was
last reset. Trip meters A and B can be used to record and display differ-
ent distances independently.
Page 169 of 644
169
2-2. Instrument cluster
2
When driving
GS_HV_U (OM30C81U)
February 1, 2010 11:03 am
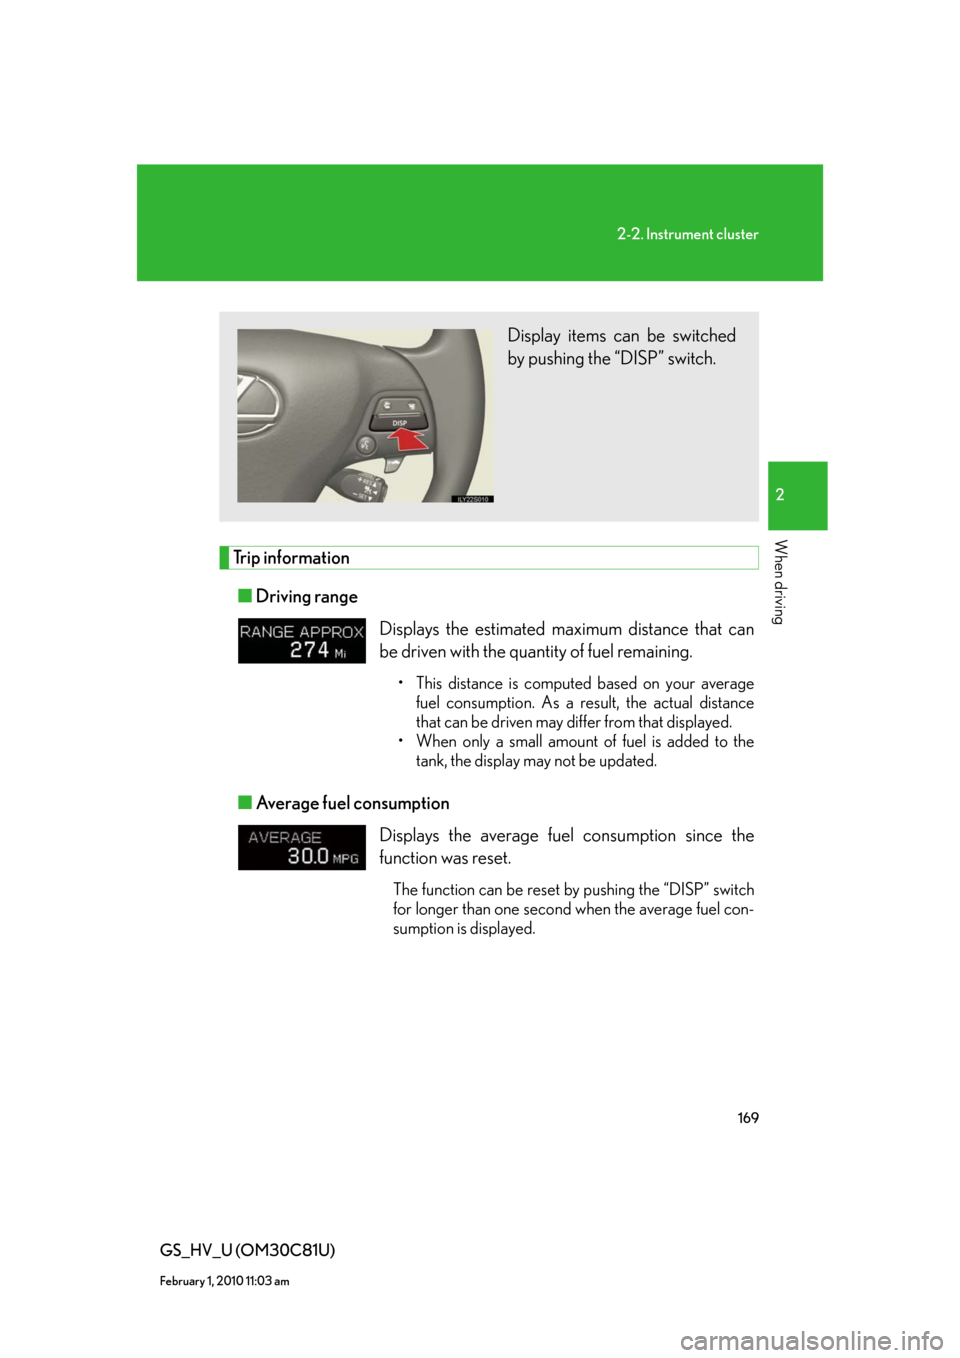
Trip information
■Driving range
■Average fuel consumption
Displays the estimated maximum distance that can
be driven with the quantity of fuel remaining.
• This distance is computed based on your average
fuel consumption. As a result, the actual distance
that can be driven may differ from that displayed.
• When only a small amount of fuel is added to the
tank, the display may not be updated.
Displays the average fuel consumption since the
function was reset.
The function can be reset by pushing the “DISP” switch
for longer than one second when the average fuel con-
sumption is displayed.
Display items can be switched
by pushing the “DISP” switch.
Page 183 of 644
183
2-4. Using other driving systems
2
When driving
GS_HV_U (OM30C81U)
October 13, 2015 12:41 pm
■Automatic cruise control cancelation
The set speed is automatically canceled in any of the following situations.
●Actual vehicle speed falls more than 10 mph (16 km/h) below the preset vehicle
speed
At this time, the memorized set speed is not retained.
●Actual vehicle speed is below 25 mph (40 km/h)
●Enhanced VSC is activated
■If the cruise control indicator light flashes
Press the “ON-OFF” button off once, and then reactivate the system.
If the cruise control speed cannot be set or if the cruise control cancels immediately
after being activated, there may be a malfunction in the cruise control system. Have
the vehicle inspected by your Lexus dealer.
CAUTION
■To avoid operating the cruise control by mistake
Keep the “ON-OFF” button off when not in use.
■Situations unsuitable for cruise control
Do not use cruise control in any of the following situations.
Doing so may result in control of the vehicle being lost and could cause an accident
resulting in death or serious injury.
●In heavy traffic
●On roads with sharp bends
●On slippery roads, such as those covered with rain, ice or snow
●On steep hills
Vehicle speed may exceed the set speed when driving down a steep hill.
●On winding roads
●When emergency towing
Page 251 of 644
251
3-1. Using the touch screen
3
Interior features
GS_HV_U (OM30C81U)
January 28, 2010 10:42 am
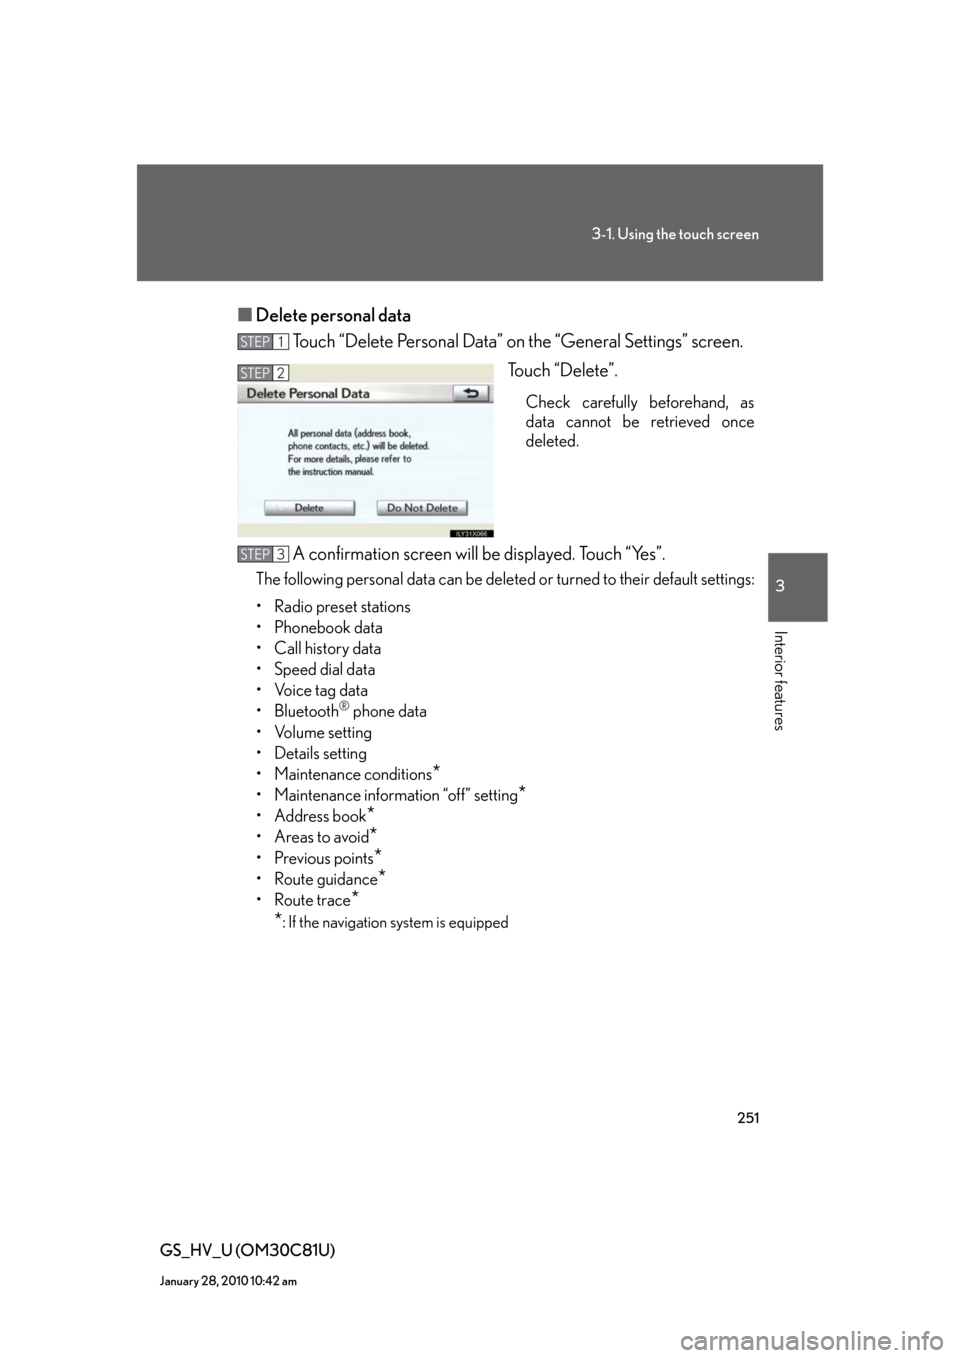
■Delete personal data
Touch “Delete Personal Data” on the “General Settings” screen.
Touch “Delete”.
Check carefully beforehand, as
data cannot be retrieved once
deleted.
A confirmation screen will be displayed. Touch “Yes”.
The following personal data can be deleted or turned to their default settings:
• Radio preset stations
• Phonebook data
• Call history data
• Speed dial data
• Voice tag data
•Bluetooth
® phone data
•Volume setting
• Details setting
• Maintenance conditions
*
• Maintenance information “off” setting*
• Address book*
•Areas to avoid*
•Previous points*
• Route guidance*
• Route trace*
*
: If the navigation system is equipped
STEP1
STEP2
STEP3
Page 273 of 644
273
3-3. Using the audio system
3
Interior features
GS_HV_U (OM30C81U)
January 28, 2010 1:22 pm
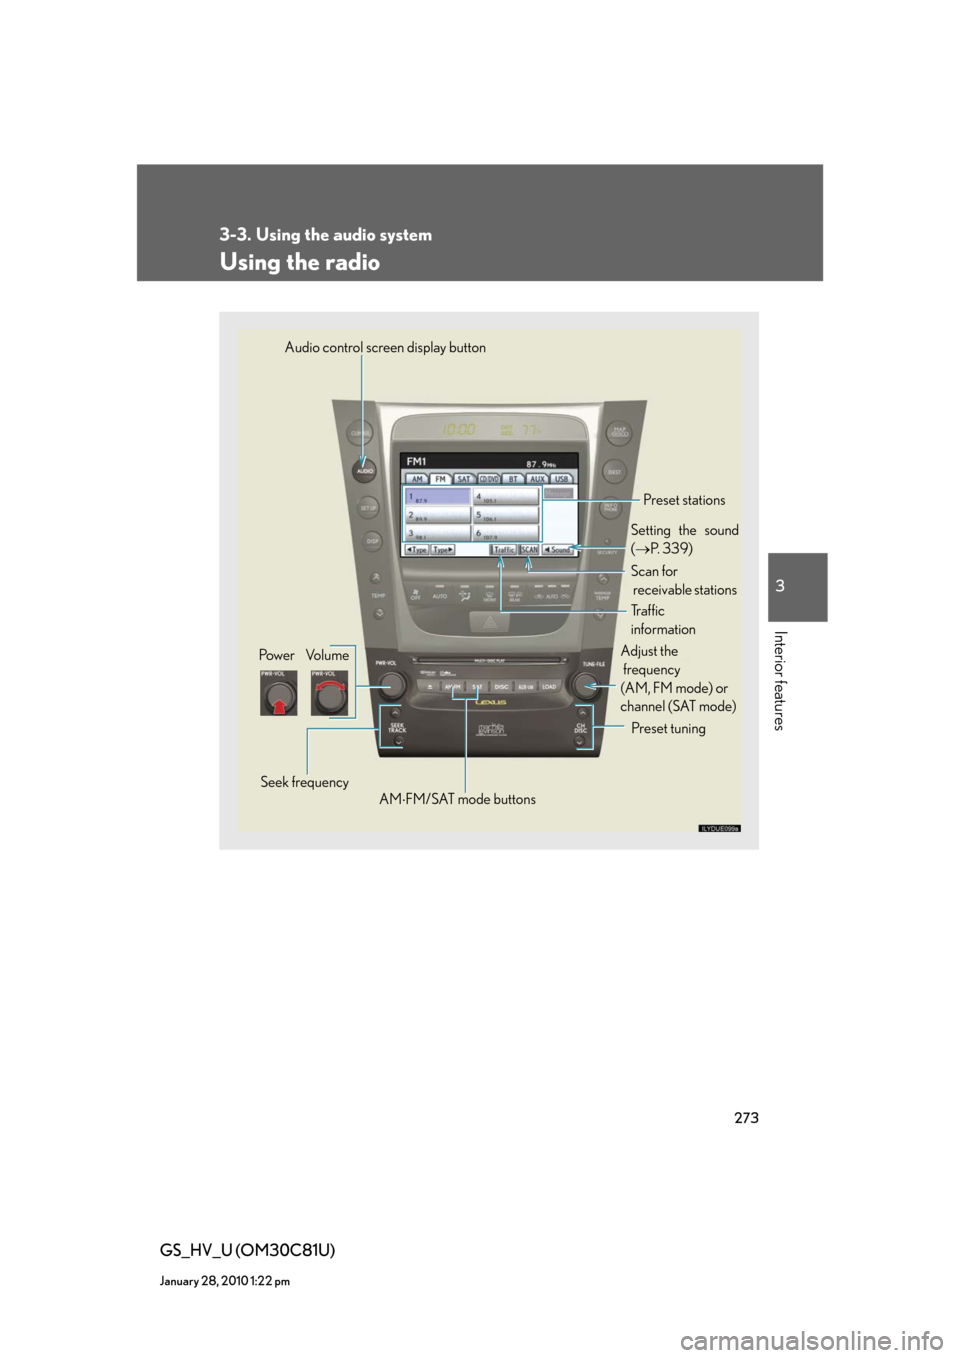
Using the radio
Audio control screen display button
Pow e r Vo l u m e
Seek frequencyPreset tuning Adjust the
frequency
(AM, FM mode) or
channel (SAT mode)
AMFM/SAT mode buttonsPreset stations
Setting the sound
(P. 3 3 9 )
Scan for
receivable stations
Tr a f f i c
information
Page 274 of 644
274
3-3. Using the audio system
GS_HV_U (OM30C81U)
January 28, 2010 1:22 pm
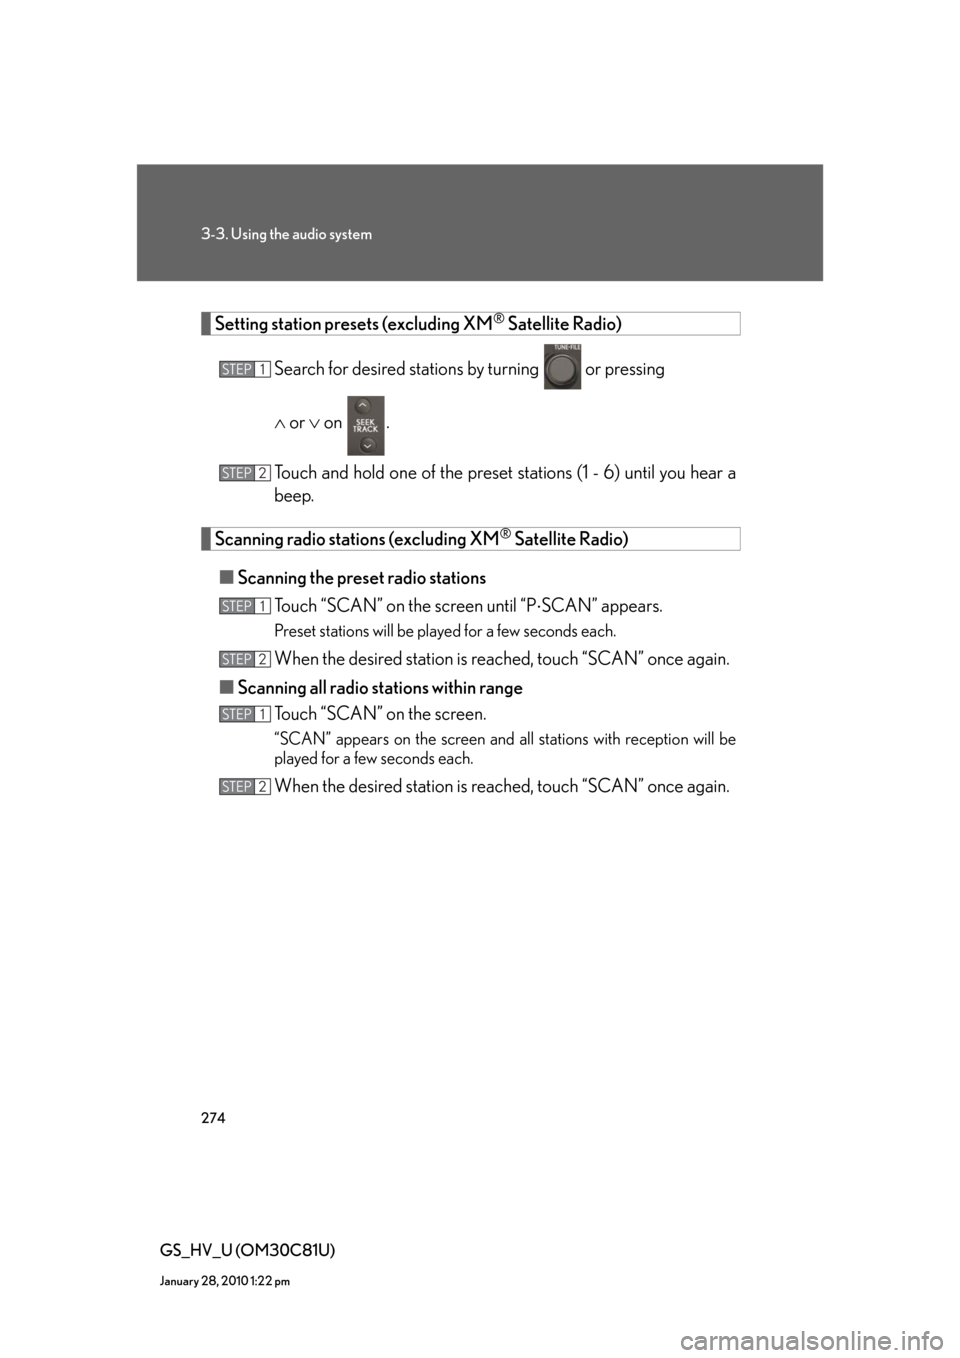
Setting station presets (excluding XM® Satellite Radio)
Search for desired stations by turning
or pressing
or on .
Touch and hold one of the preset stations (1 - 6) until you hear a
beep.
Scanning radio stations (excluding XM® Satellite Radio)
■Scanning the preset radio stations
Touch “SCAN” on the screen until “PSCAN” appears.
Preset stations will be played for a few seconds each.
When the desired station is reached, touch “SCAN” once again.
■Scanning all radio stations within range
Touch “SCAN” on the screen.
“SCAN” appears on the screen and all stations with reception will be
played for a few seconds each.
When the desired station is reached, touch “SCAN” once again.
STEP1
STEP2
STEP1
STEP2
STEP1
STEP2