navigation system Lexus GS450h 2012 Navigation manual
[x] Cancel search | Manufacturer: LEXUS, Model Year: 2012, Model line: GS450h, Model: Lexus GS450h 2012Pages: 257, PDF Size: 30.79 MB
Page 122 of 257
121
2. ROUTE GUIDANCE
GS450h/250 (EE) NAVI 30C48E
13.12.17 15:42
3
NAVIGATION SYSTEM
By selecting the desired POI category
and then selecting “OK”, the selected
POI icons are displayed on the map
screen.
To turn off the POI icons on the map
screen, select “All off”.
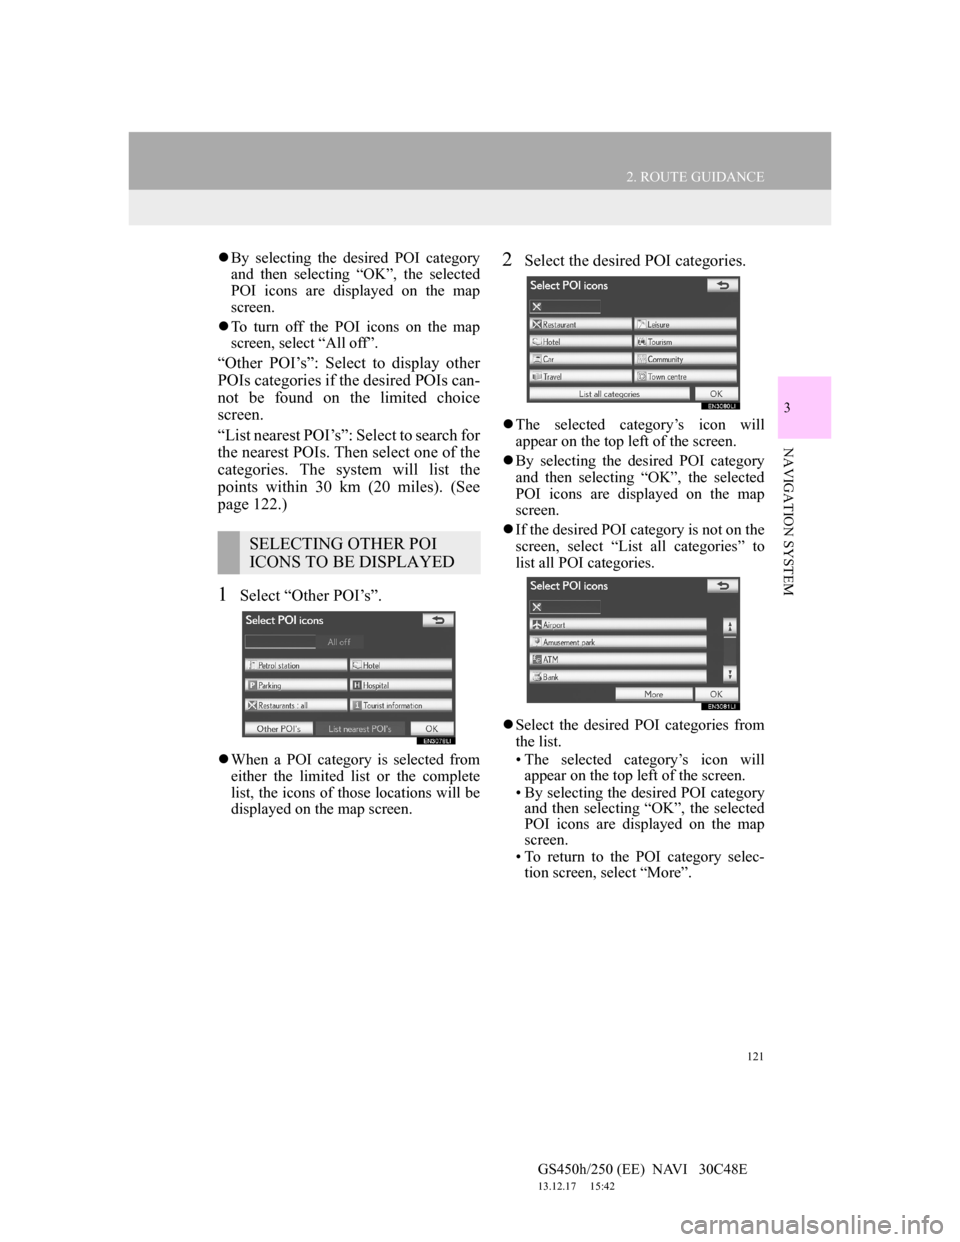
“Other POI’s”: Select to display other
POIs categories if the desired POIs can-
not be found on the limited choice
screen.
“List nearest POI’s”: Select to search for
the nearest POIs. Then select one of the
categories. The system will list the
points within 30 km (20 miles). (See
page 122.)
1Select “Other POI’s”.
When a POI category is selected from
either the limited list or the complete
list, the icons of those locations will be
displayed on the map screen.
2Select the desired POI categories.
The selected category’s icon will
appear on the top left of the screen.
By selecting the desired POI category
and then selecting “OK”, the selected
POI icons are displayed on the map
screen.
If the desired POI category is not on the
screen, select “List all categories” to
list all POI categories.
Select the desired POI categories from
the list.
• The selected category’s icon will
appear on the top left of the screen.
• By selecting the desired POI category
and then selecting “OK”, the selected
POI icons are displayed on the map
screen.
• To return to the POI category selec-
tion screen, select “More”.
SELECTING OTHER POI
ICONS TO BE DISPLAYED
Page 124 of 257
123
GS450h/250 (EE) NAVI 30C48E
13.12.17 15:42
3
NAVIGATION SYSTEM
3. MEMORY POINTS
1. MEMORY POINT SETTINGS
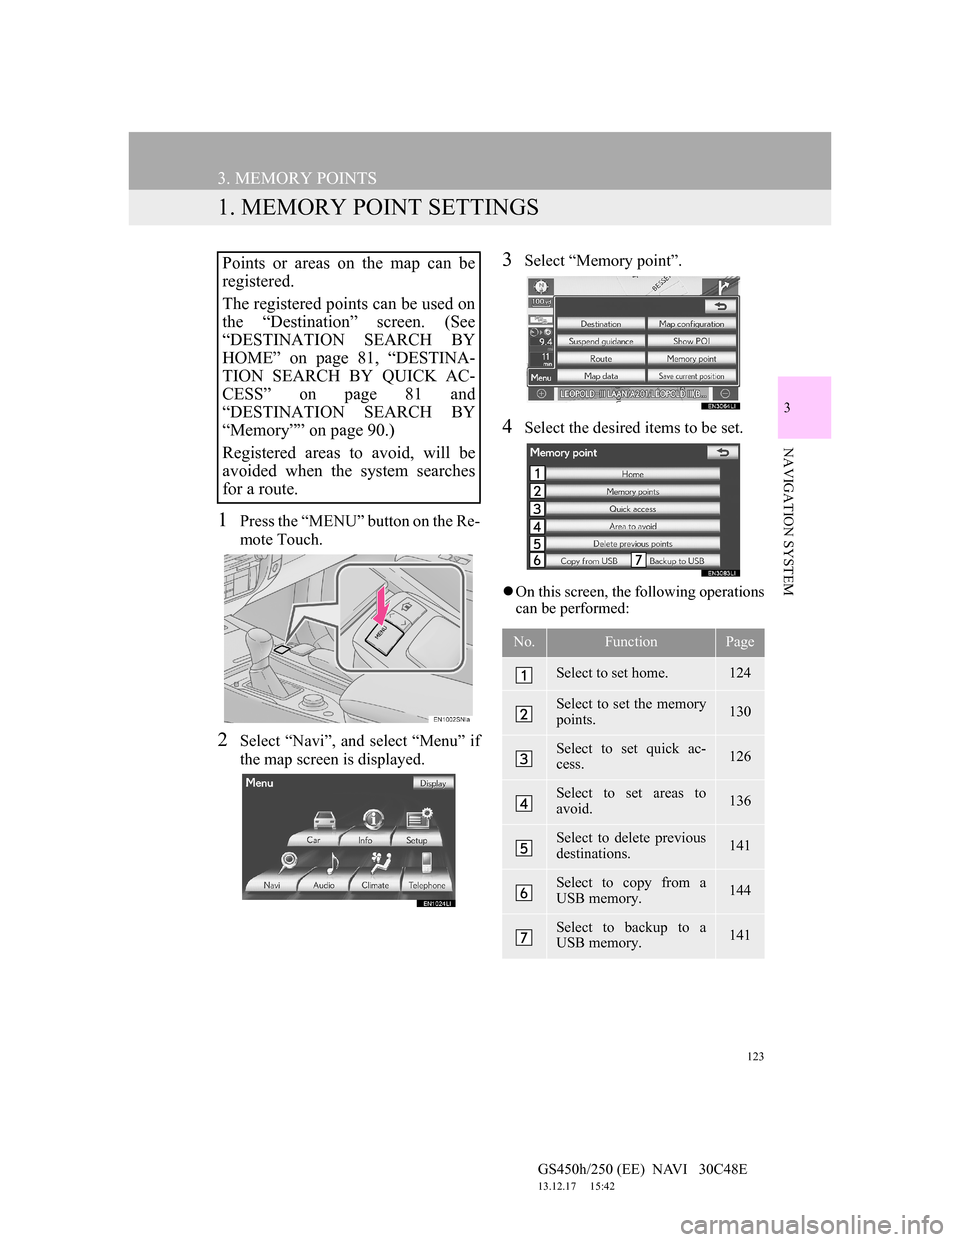
1Press the “MENU” button on the Re-
mote Touch.
2Select “Navi”, and select “Menu” if
the map screen is displayed.
3Select “Memory point”.
4Select the desired items to be set.
On this screen, the following operations
can be performed:
Points or areas on the map can be
registered.
The registered points can be used on
the “Destination” screen. (See
“DESTINATION SEARCH BY
HOME” on page 81, “DESTINA-
TION SEARCH BY QUICK AC-
CESS” on page 81 and
“DESTINATION SEARCH BY
“Memory”” on page 90.)
Registered areas to avoid, will be
avoided when the system searches
for a route.
No.FunctionPage
Select to set home.124
Select to set the memory
points.130
Select to set quick ac-
cess.126
Select to set areas to
avoid.136
Select to delete previous
destinations.141
Select to copy from a
USB memory.144
Select to backup to a
USB memory.141
Page 126 of 257
125
3. MEMORY POINTS
GS450h/250 (EE) NAVI 30C48E
13.12.17 15:42
3
NAVIGATION SYSTEM
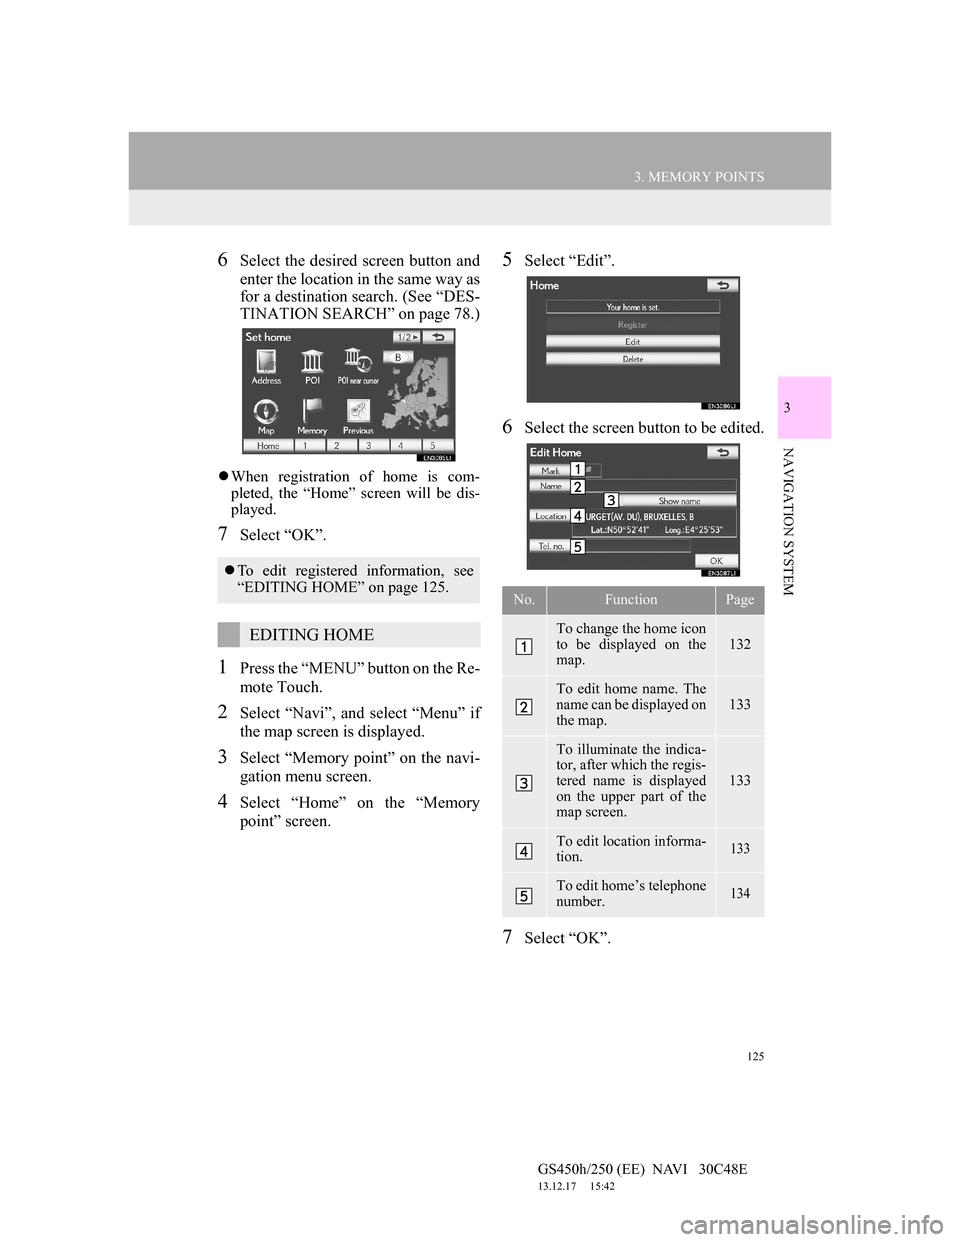
6Select the desired screen button and
enter the location in the same way as
for a destination search. (See “DES-
TINATION SEARCH” on page 78.)
When registration of home is com-
pleted, the “Home” screen will be dis-
played.
7Select “OK”.
1Press the “MENU” button on the Re-
mote Touch.
2Select “Navi”, and select “Menu” if
the map screen is displayed.
3Select “Memory point” on the navi-
gation menu screen.
4Select “Home” on the “Memory
point” screen.
5Select “Edit”.
6Select the screen button to be edited.
7Select “OK”.
To edit registered information, see
“EDITING HOME” on page 125.
EDITING HOME
No.FunctionPage
To change the home icon
to be displayed on the
map.
132
To edit home name. The
name can be displayed on
the map.
133
To illuminate the indica-
tor, after which the regis-
tered name is displayed
on the upper part of the
map screen.
133
To edit location informa-
tion. 133
To edit home’s telephone
number. 134
Page 128 of 257
127
3. MEMORY POINTS
GS450h/250 (EE) NAVI 30C48E
13.12.17 15:42
3
NAVIGATION SYSTEM
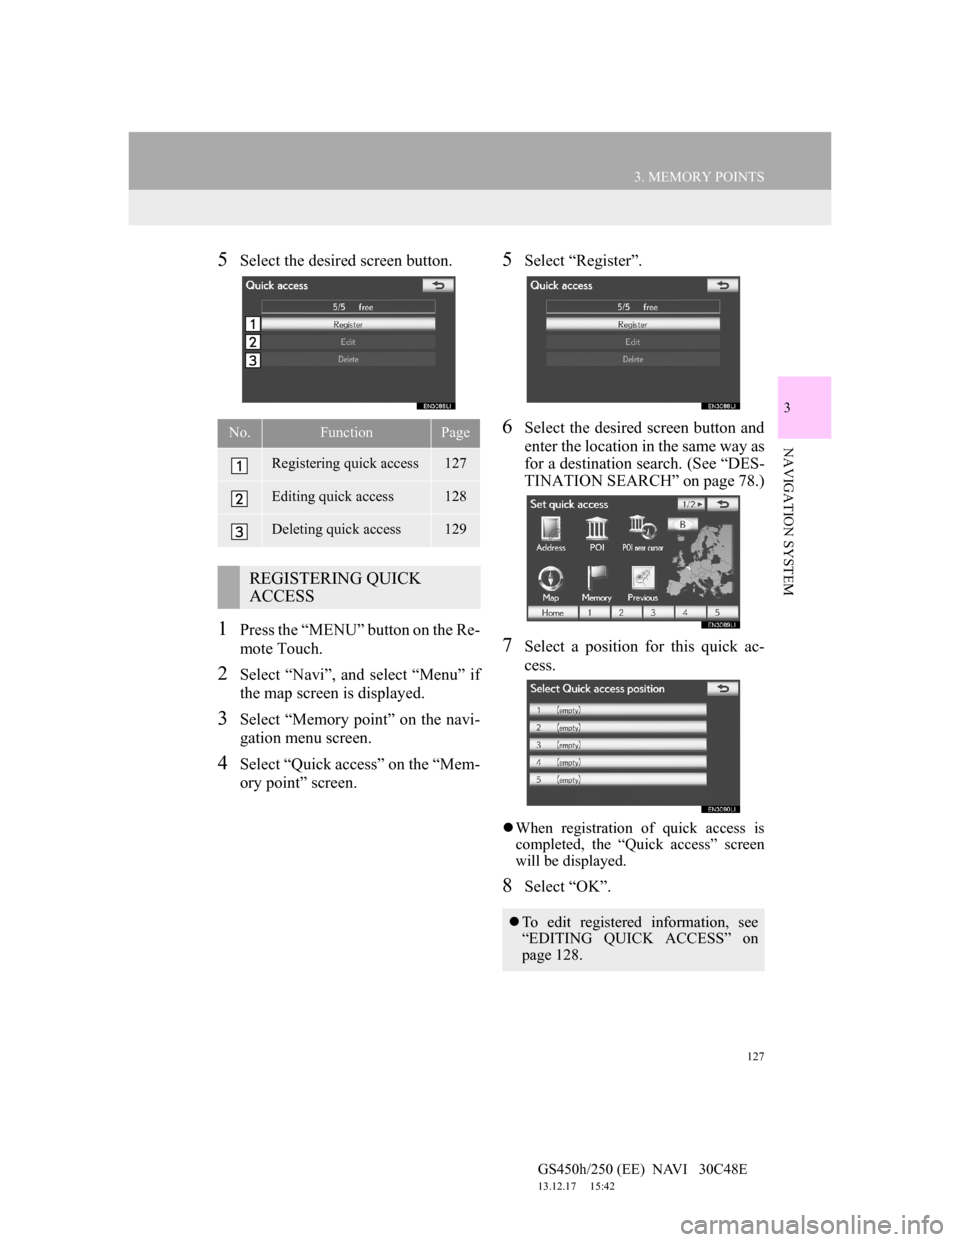
5Select the desired screen button.
1Press the “MENU” button on the Re-
mote Touch.
2Select “Navi”, and select “Menu” if
the map screen is displayed.
3Select “Memory point” on the navi-
gation menu screen.
4Select “Quick access” on the “Mem-
ory point” screen.
5Select “Register”.
6Select the desired screen button and
enter the location in the same way as
for a destination search. (See “DES-
TINATION SEARCH” on page 78.)
7Select a position for this quick ac-
cess.
When registration of quick access is
completed, the “Quick access” screen
will be displayed.
8Select “OK”.
No.FunctionPage
Registering quick access127
Editing quick access128
Deleting quick access129
REGISTERING QUICK
ACCESS
To edit registered information, see
“EDITING QUICK ACCESS” on
page 128.
Page 130 of 257
129
3. MEMORY POINTS
GS450h/250 (EE) NAVI 30C48E
13.12.17 15:42
3
NAVIGATION SYSTEM
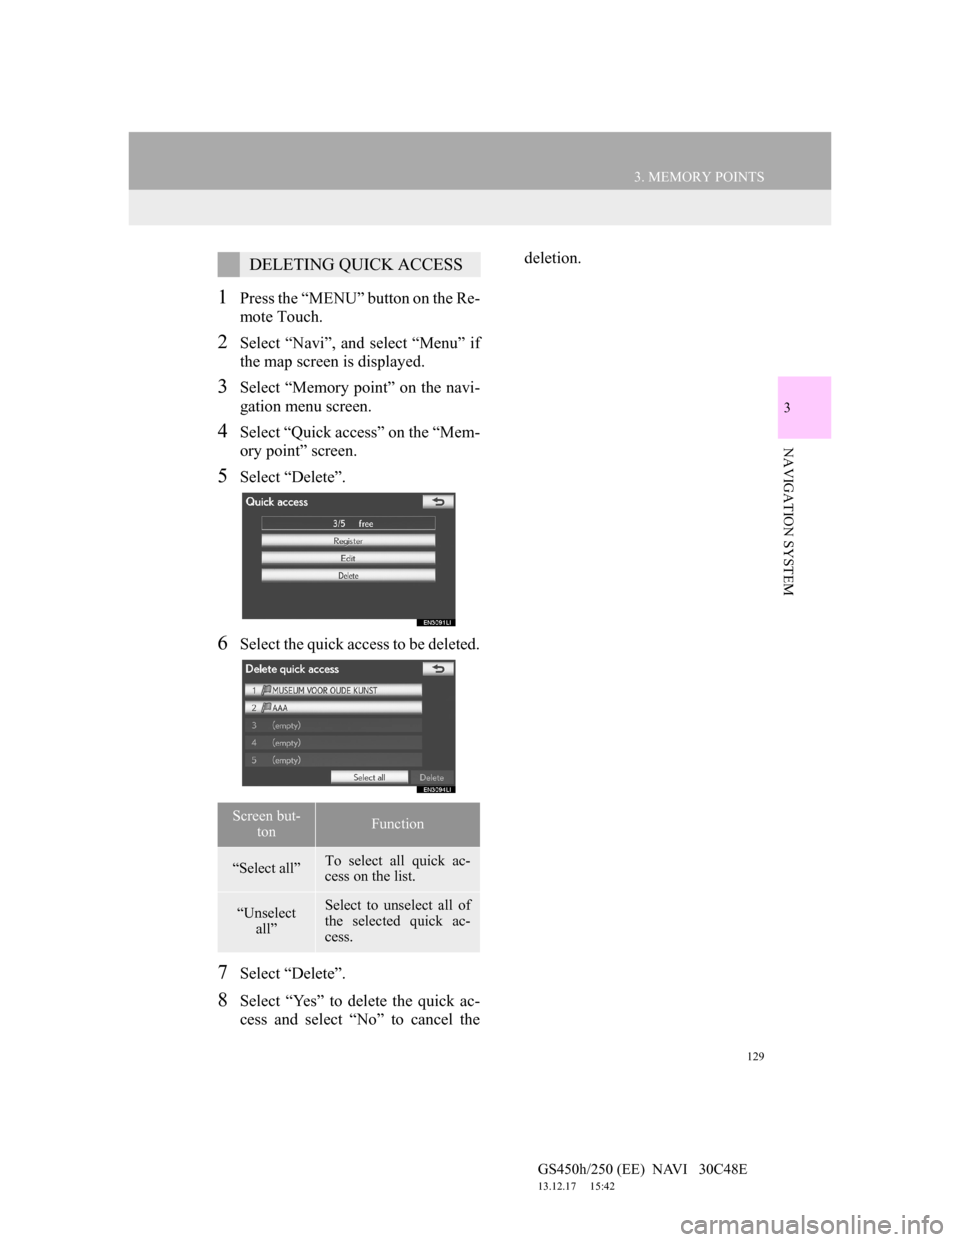
1Press the “MENU” button on the Re-
mote Touch.
2Select “Navi”, and select “Menu” if
the map screen is displayed.
3Select “Memory point” on the navi-
gation menu screen.
4Select “Quick access” on the “Mem-
ory point” screen.
5Select “Delete”.
6Select the quick access to be deleted.
7Select “Delete”.
8Select “Yes” to delete the quick ac-
cess and select “No” to cancel thedeletion.
DELETING QUICK ACCESS
Screen but-
tonFunction
“Select all”To select all quick ac-
cess on the list.
“Unselect
all”Select to unselect all of
the selected quick ac-
cess.
Page 132 of 257
131
3. MEMORY POINTS
GS450h/250 (EE) NAVI 30C48E
13.12.17 15:42
3
NAVIGATION SYSTEM
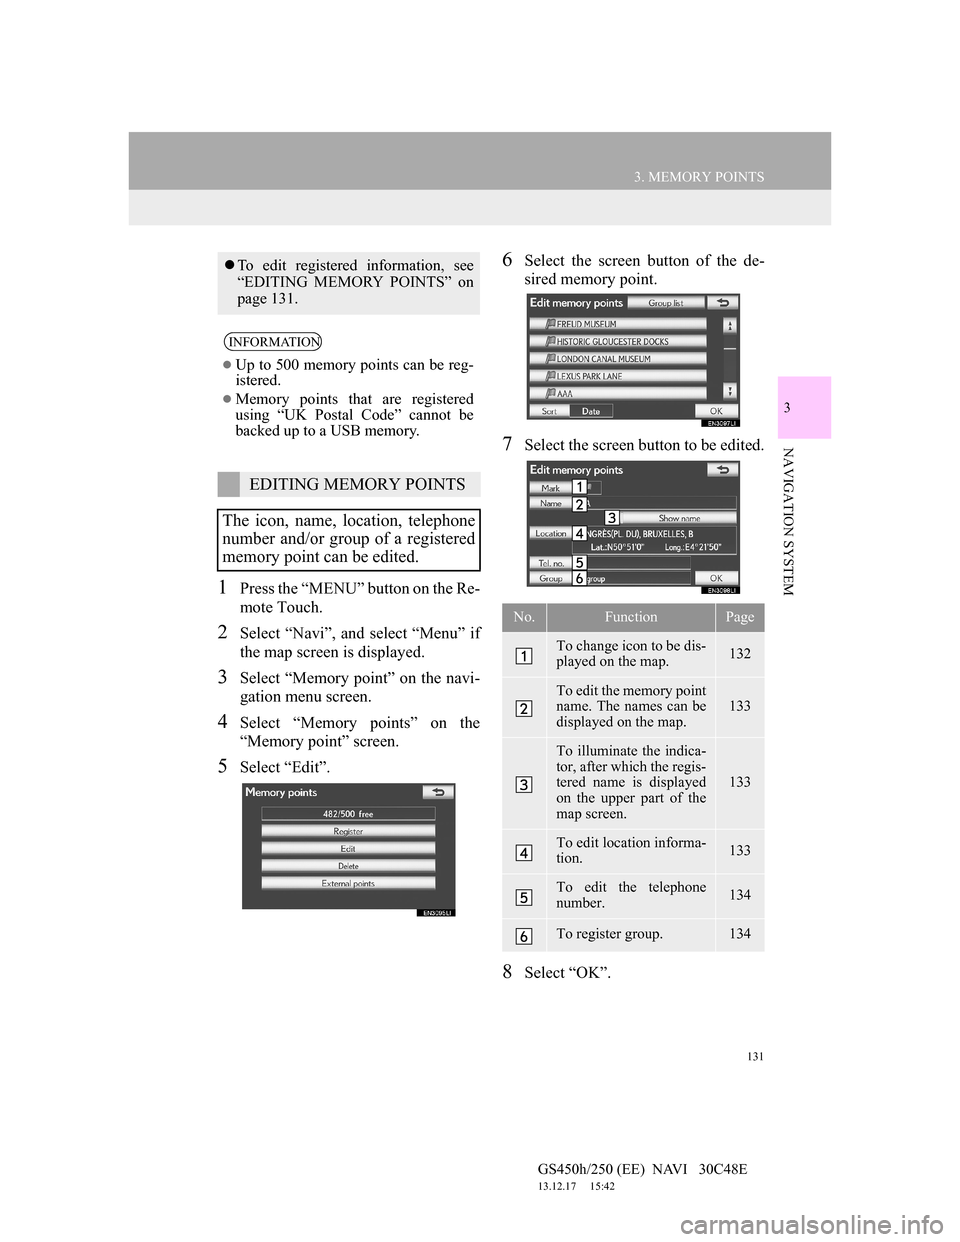
1Press the “MENU” button on the Re-
mote Touch.
2Select “Navi”, and select “Menu” if
the map screen is displayed.
3Select “Memory point” on the navi-
gation menu screen.
4Select “Memory points” on the
“Memory point” screen.
5Select “Edit”.
6Select the screen button of the de-
sired memory point.
7Select the screen button to be edited.
8Select “OK”.
To edit registered information, see
“EDITING MEMORY POINTS” on
page 131.
INFORMATION
Up to 500 memory points can be reg-
istered.
Memory points that are registered
using “UK Postal Code” cannot be
backed up to a USB memory.
EDITING MEMORY POINTS
The icon, name, location, telephone
number and/or group of a registered
memory point can be edited.
No.FunctionPage
To change icon to be dis-
played on the map. 132
To edit the memory point
name. The names can be
displayed on the map. 133
To illuminate the indica-
tor, after which the regis-
tered name is displayed
on the upper part of the
map screen.
133
To edit location informa-
tion. 133
To edit the telephone
number. 134
To register group. 134
Page 134 of 257
133
3. MEMORY POINTS
GS450h/250 (EE) NAVI 30C48E
13.12.17 15:42
3
NAVIGATION SYSTEM
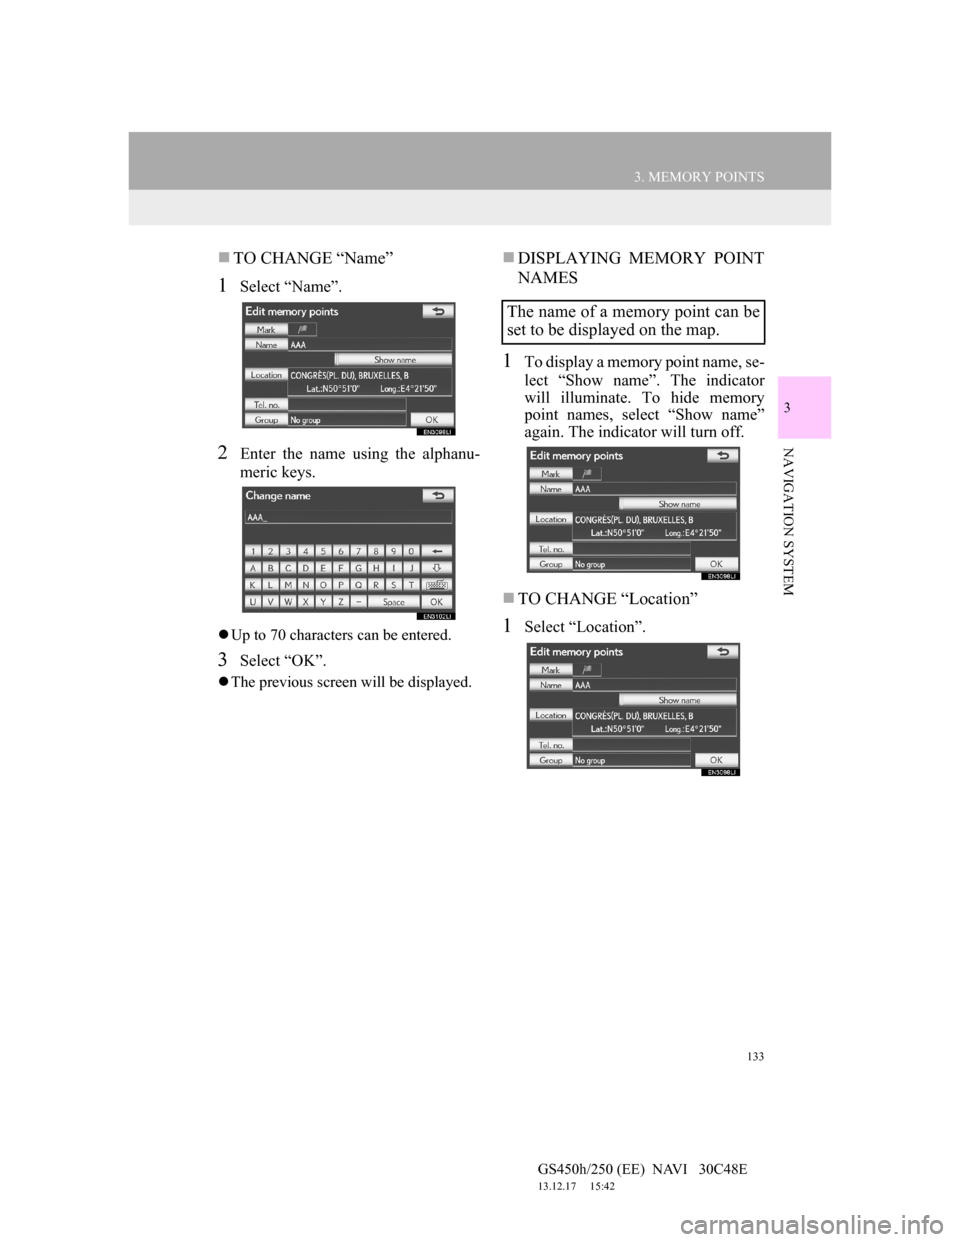
TO CHANGE “Name”
1Select “Name”.
2Enter the name using the alphanu-
meric keys.
Up to 70 characters can be entered.
3Select “OK”.
The previous screen will be displayed.
DISPLAYING MEMORY POINT
NAMES
1To display a memory point name, se-
lect “Show name”. The indicator
will illuminate. To hide memory
point names, select “Show name”
again. The indicator will turn off.
TO CHANGE “Location”
1Select “Location”.
The name of a memory point can be
set to be displayed on the map.
Page 136 of 257
135
3. MEMORY POINTS
GS450h/250 (EE) NAVI 30C48E
13.12.17 15:42
3
NAVIGATION SYSTEM
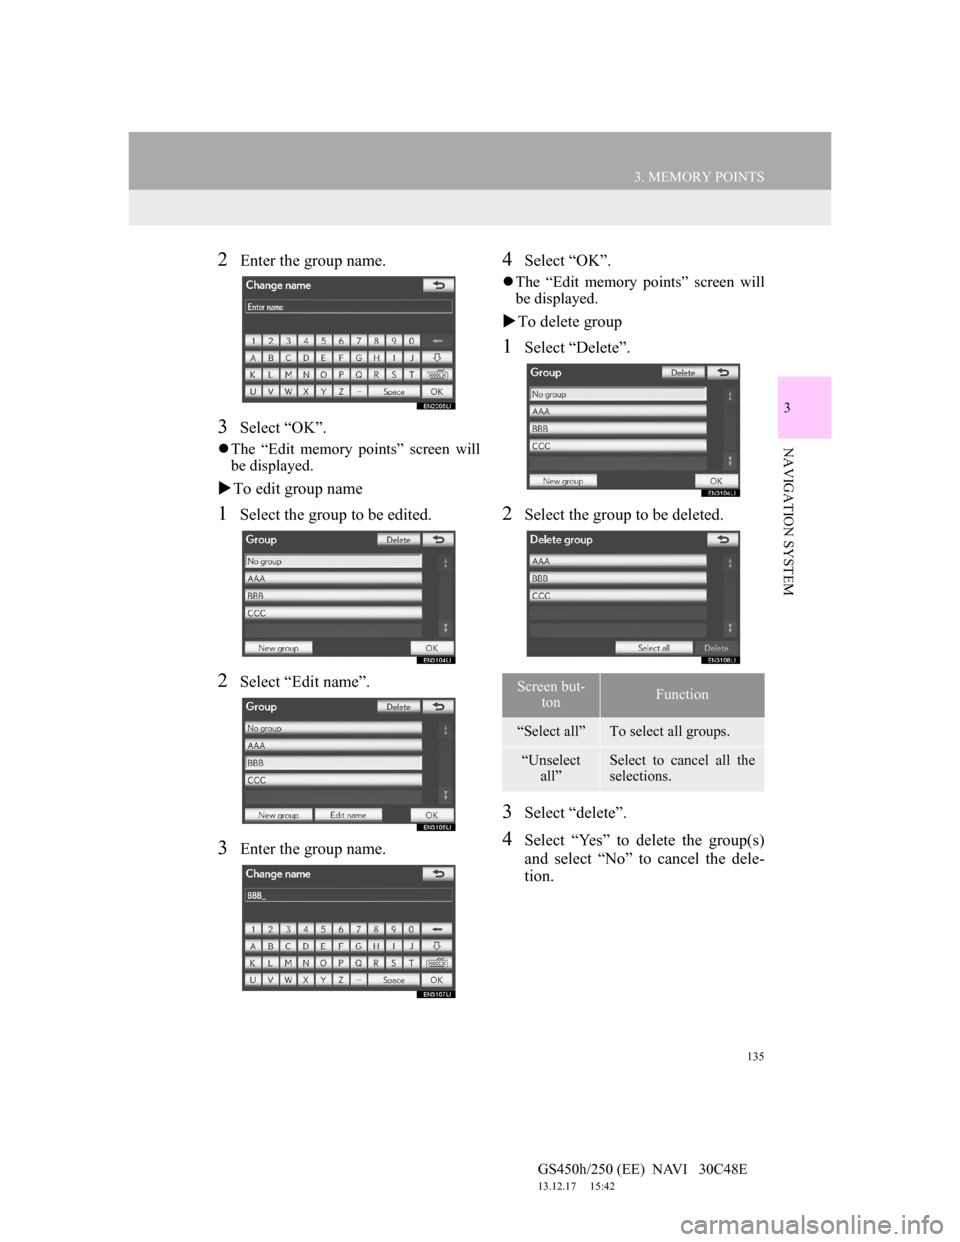
2Enter the group name.
3Select “OK”.
The “Edit memory points” screen will
be displayed.
To edit group name
1Select the group to be edited.
2Select “Edit name”.
3Enter the group name.
4Select “OK”.
The “Edit memory points” screen will
be displayed.
To delete group
1Select “Delete”.
2Select the group to be deleted.
3Select “delete”.
4Select “Yes” to delete the group(s)
and select “No” to cancel the dele-
tion.
Screen but-
tonFunction
“Select all”To select all groups.
“Unselect
all”Select to cancel all the
selections.
Page 138 of 257
137
3. MEMORY POINTS
GS450h/250 (EE) NAVI 30C48E
13.12.17 15:42
3
NAVIGATION SYSTEM
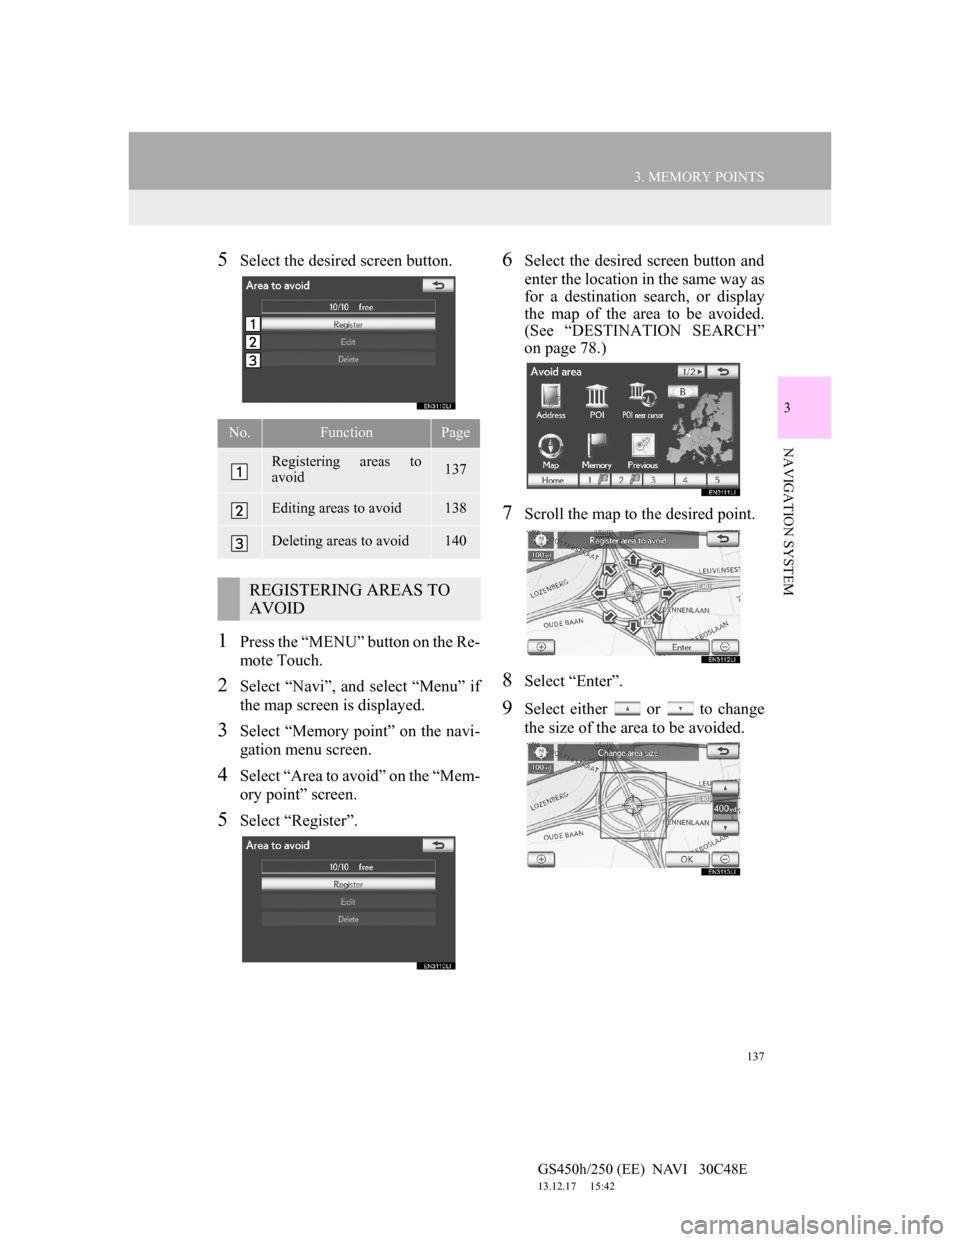
5Select the desired screen button.
1Press the “MENU” button on the Re-
mote Touch.
2Select “Navi”, and select “Menu” if
the map screen is displayed.
3Select “Memory point” on the navi-
gation menu screen.
4Select “Area to avoid” on the “Mem-
ory point” screen.
5Select “Register”.
6Select the desired screen button and
enter the location in the same way as
for a destination search, or display
the map of the area to be avoided.
(See “DESTINATION SEARCH”
on page 78.)
7Scroll the map to the desired point.
8Select “Enter”.
9Select either or to change
the size of the area to be avoided.
No.FunctionPage
Registering areas to
avoid137
Editing areas to avoid138
Deleting areas to avoid140
REGISTERING AREAS TO
AVOID
Page 140 of 257
139
3. MEMORY POINTS
GS450h/250 (EE) NAVI 30C48E
13.12.17 15:42
3
NAVIGATION SYSTEM
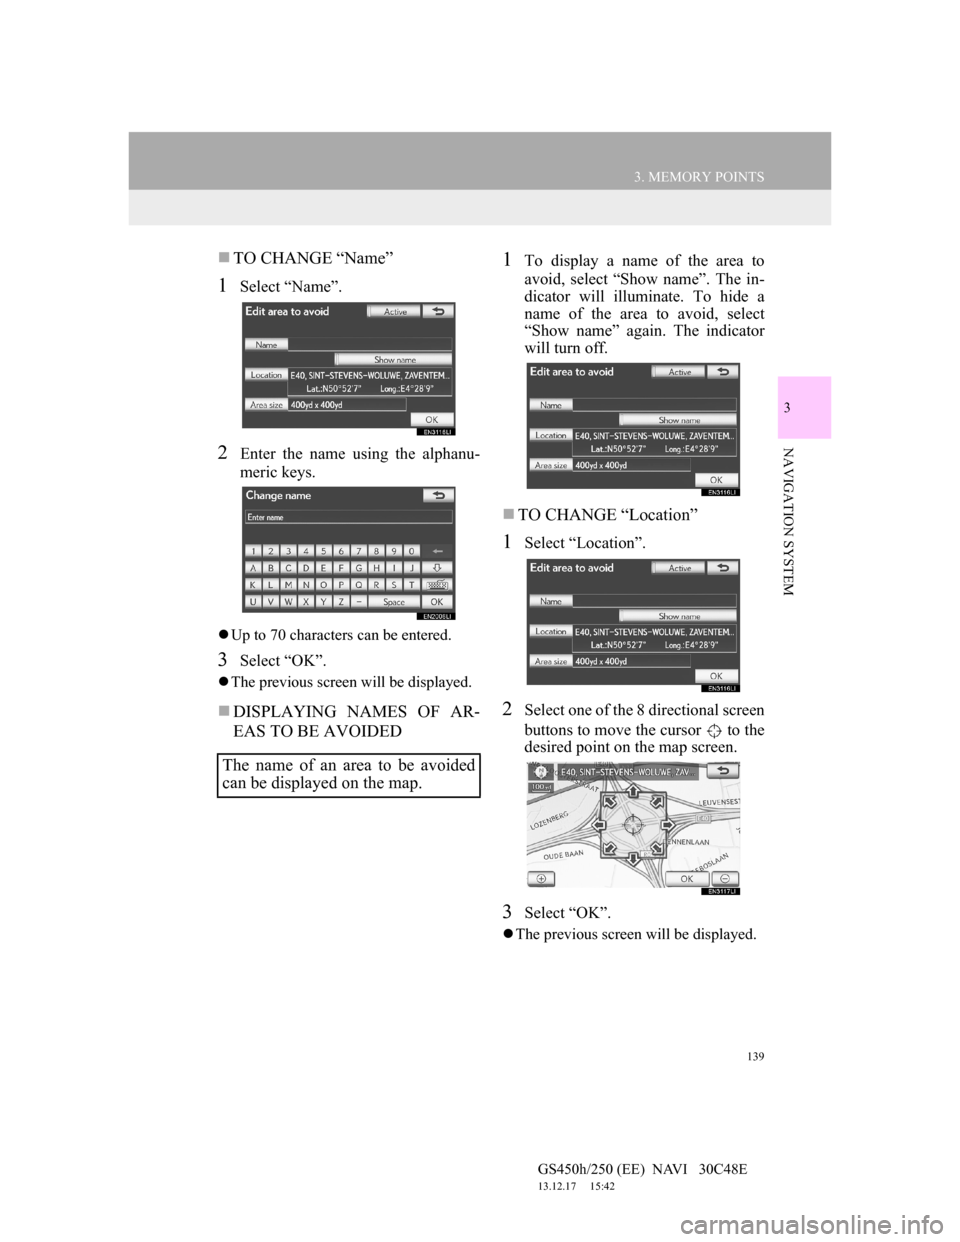
TO CHANGE “Name”
1Select “Name”.
2Enter the name using the alphanu-
meric keys.
Up to 70 characters can be entered.
3Select “OK”.
The previous screen will be displayed.
DISPLAYING NAMES OF AR-
EAS TO BE AVOIDED
1To display a name of the area to
avoid, select “Show name”. The in-
dicator will illuminate. To hide a
name of the area to avoid, select
“Show name” again. The indicator
will turn off.
TO CHANGE “Location”
1Select “Location”.
2Select one of the 8 directional screen
buttons to move the cursor to the
desired point on the map screen.
3Select “OK”.
The previous screen will be displayed.
The name of an area to be avoided
can be displayed on the map.