wheel Lexus GS450h 2016 Owner's Manual / LEXUS 2016 GS450H (OM30E99U) Manual Online
[x] Cancel search | Manufacturer: LEXUS, Model Year: 2016, Model line: GS450h, Model: Lexus GS450h 2016Pages: 544, PDF Size: 11.6 MB
Page 405 of 544
4057-2. Steps to take in an emergency
GS450h_OM_OM30E99U_(U)
7
When trouble arises
WA R N I N G
■Maintenance of the tires
Each tire, including the spare (if provided), should be checked monthly when cold and
inflated to the inflation pressure recomm ended by the vehicle manufacturer on the
vehicle placard or tire inflation pressure la bel (tire and load information label). (If your
vehicle has tires of a different size than the size indicated on the vehicle placard or tire
inflation pressure label [tire and load in formation label], you should determine the
proper tire inflation pressure for those tires.)
As an added safety feature, your vehicle has been equipped with a tire pressure moni-
toring system (TPMS-tire pressure warning system) that illuminates a low tire pressure
telltale (tire pressure warning light) when on e or more of your tires is significantly
under-inflated. Accordingly, when the low ti re pressure telltale (tire pressure warning
light) illuminates, you should stop and check your tires as soon as possible, and inflate
them to the proper pressure. Driving on a significantly under-inflated tire causes the
tire to overheat and can lead to tire failure. Under-inflation also reduces fuel efficiency
and tire tread life, and ma y affect the vehicle’s handling and stopping ability.
Please note that the TPMS (tire pressure wa rning system) is not a substitute for proper
tire maintenance, and it is the driver’s resp onsibility to maintain correct tire pressure,
even if under-inflation has no t reached the level to trigger illumination of the TPMS low
tire pressure telltale (tire pressure warning light).
Your vehicle has also been equipped with a TPMS (tire pressure warning system) mal-
function indicator to indicate when the system is not operating properly. The TPMS
(tire pressure warning system) malfunction indi cator is combined with the low tire pres-
sure telltale (tire pressure warning light). When the system detects a malfunction, the
telltale will flash for approximately one minu te and then remain continuously illumi-
nated. This sequence will cont inue upon subsequent vehicle start-ups as long as the
malfunction exists. When the malfunction indicator is illuminated, the system may not
be able to detect or signal low tire pressure as intended.
TPMS (tire pressure warning system) malfun ctions may occur for a variety of reasons,
including the installation of replacement or alternate tires or wheels on the vehicle that
prevent the TPMS (tire pressure warning system) from functioning properly. Always
check the TPMS (tire pressure warning syst em) malfunction telltale after replacing one
or more tires or wheels on your vehicle to ensure that the replacement or alternate
tires and wheels allow the TPMS (tire pressure warning system) to continue to function
properly.
NOTICE
■To ensure the tire pressure warning system operates properly
Do not install tires with different specificatio ns or markers, as the tire pressure warning
system may not operate properly.
Page 413 of 544
4137-2. Steps to take in an emergency
GS450h_OM_OM30E99U_(U)
7
When trouble arises
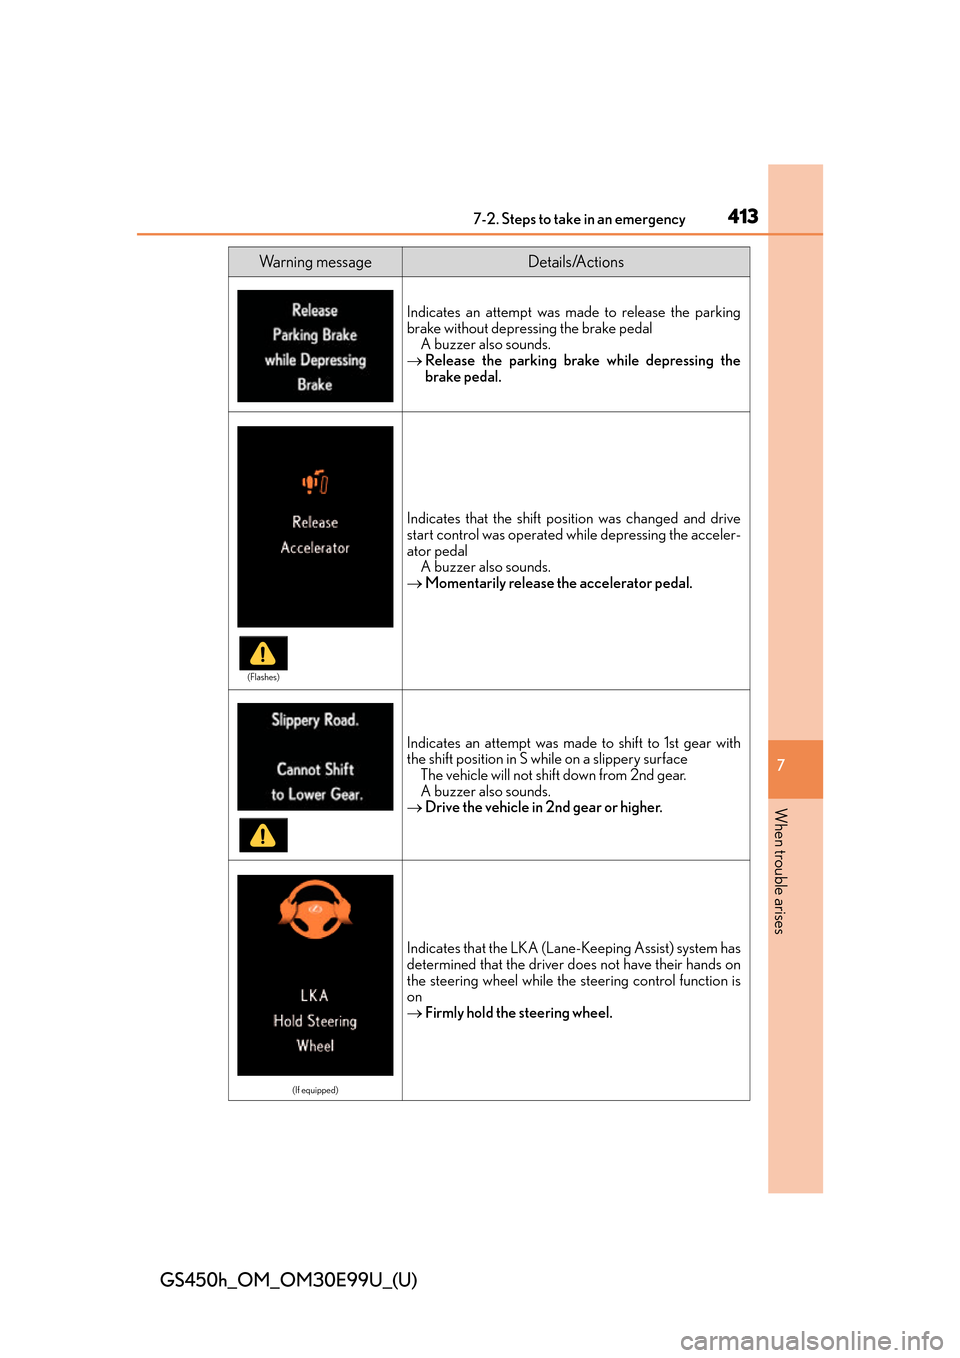
Indicates an attempt was made to release the parking
brake without depressing the brake pedalA buzzer also sounds.
Release the parking brake while depressing the
brake pedal.
Indicates that the shift position was changed and drive
start control was operated while depressing the acceler-
ator pedal
A buzzer also sounds.
Momentarily release th e accelerator pedal.
Indicates an attempt was made to shift to 1st gear with
the shift position in S while on a slippery surface
The vehicle will not shift down from 2nd gear.
A buzzer also sounds.
Drive the vehicle in 2nd gear or higher.
(If equipped)
Indicates that the LKA (Lane- Keeping Assist) system has
determined that the driver does not have their hands on
the steering wheel while the steering control function is
on
Firmly hold the steering wheel.
Wa r n i n g m e s s a g eDetails/Actions
(Flashes)
Page 435 of 544
4357-2. Steps to take in an emergency
GS450h_OM_OM30E99U_(U)
7
When trouble arises
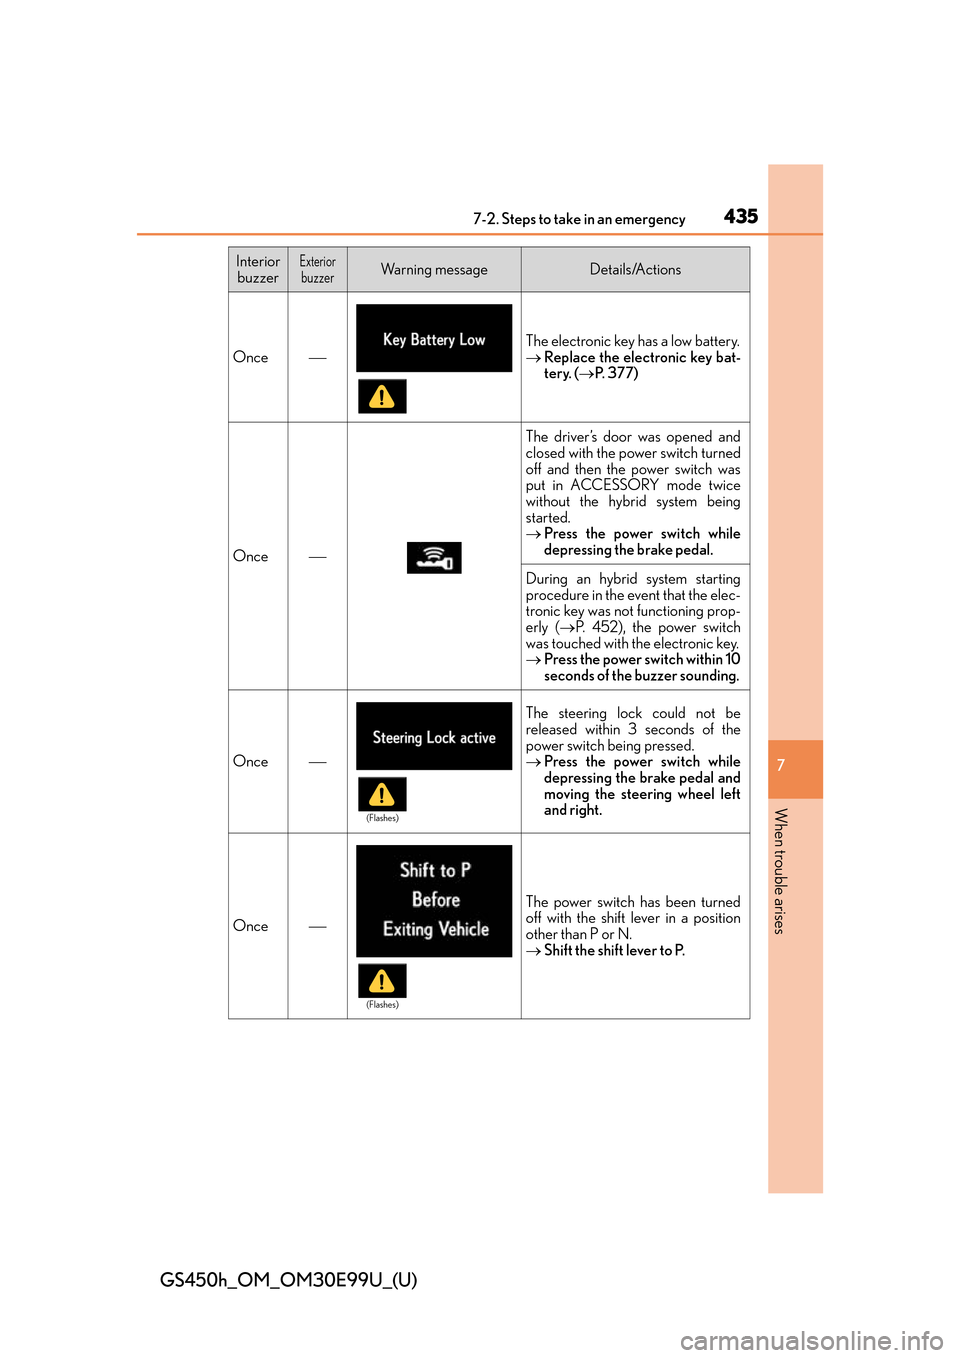
Once
The electronic key has a low battery.
Replace the electronic key bat-
tery. ( P. 3 7 7 )
Once
The driver’s door was opened and
closed with the power switch turned
off and then the power switch was
put in ACCESSORY mode twice
without the hybrid system being
started.
Press the power switch while
depressing the brake pedal.
During an hybrid system starting
procedure in the event that the elec-
tronic key was not functioning prop-
erly ( P. 4 5 2 ) , t h e p o w e r s w i t c h
was touched with the electronic key.
Press the power switch within 10
seconds of the buzzer sounding.
Once
The steering lock could not be
released within 3 seconds of the
power switch being pressed.
Press the power switch while
depressing the brake pedal and
moving the steering wheel left
and right.
Once
The power switch has been turned
off with the shift lever in a position
other than P or N.
Shift the shift lever to P.
Interior
buzzerExteriorbuzzerWa r n i n g m e s s a g eDetails/Actions
(Flashes)
(Flashes)
Page 437 of 544
437
GS450h_OM_OM30E99U_(U)
7
When trouble arises
7-2. Steps to take in an emergency
If you have a flat tire
●Stop the vehicle on a hard, flat surface.
●Set the parking brake.
●Shift the shift lever to P.
●Stop the hybrid system.
●Turn on the emergency flashers. ( P. 3 9 2 )
Your vehicle is equipped with a spare ti re. The flat tire can be replaced with
the spare tire.
For details about tires: P. 3 6 1
WA R N I N G
■If you have a flat tire
Do not continue driving with a flat tire.
Driving even a short distance with a flat ti re can damage the tire and the wheel beyond
repair, which could result in an accident.
Before jacking up the vehicle
Page 438 of 544
4387-2. Steps to take in an emergency
GS450h_OM_OM30E99U_(U)
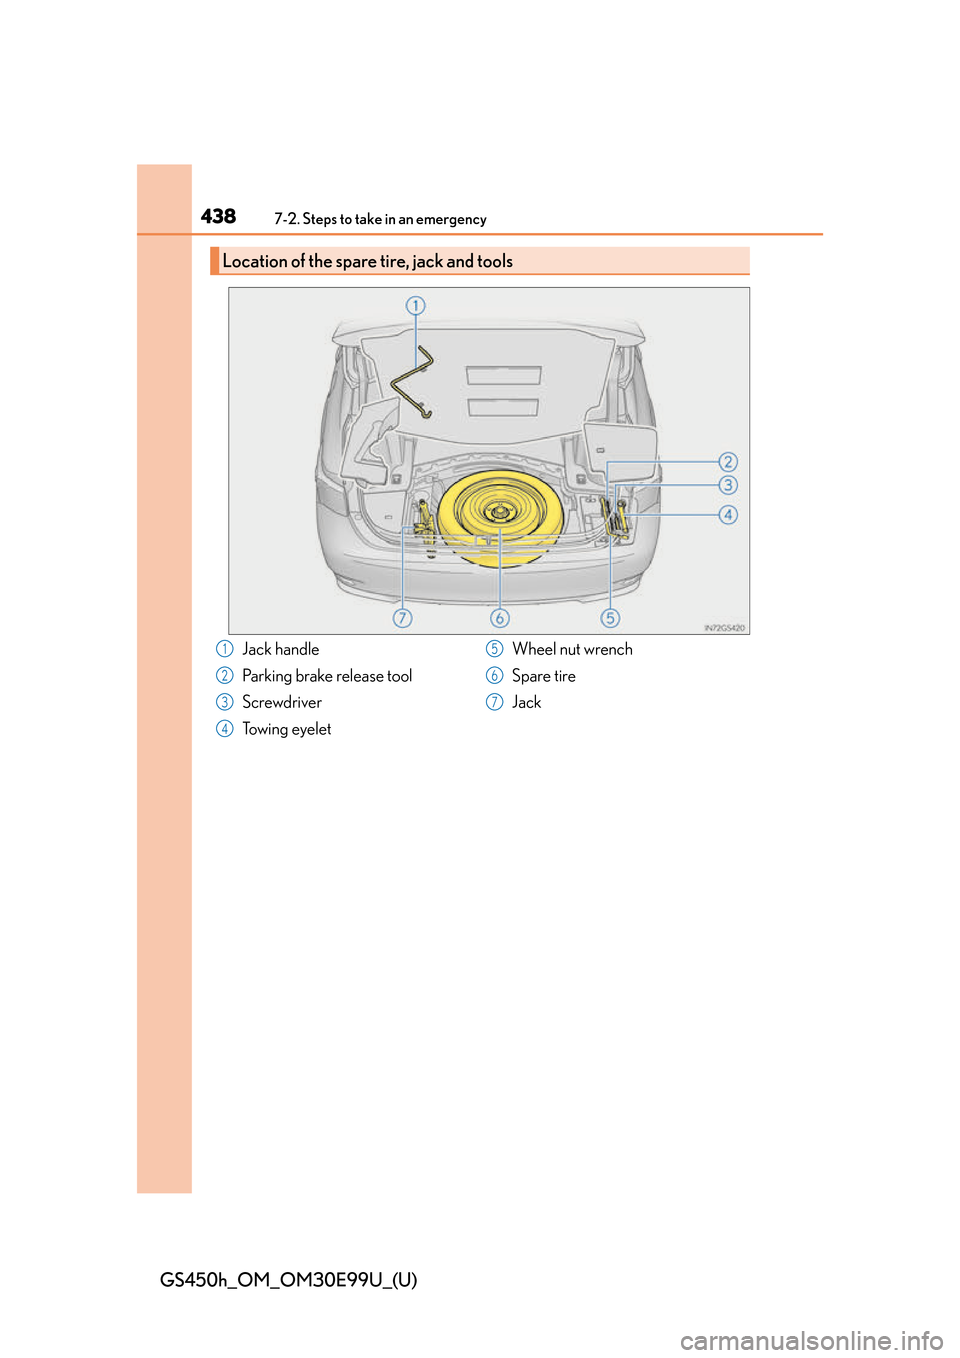
Location of the spare tire, jack and tools
Jack handle
Parking brake release tool
Screwdriver
Towing eyeletWheel nut wrench
Spare tire
Jack1
2
3
4
5
6
7
Page 441 of 544
4417-2. Steps to take in an emergency
GS450h_OM_OM30E99U_(U)
7
When trouble arises
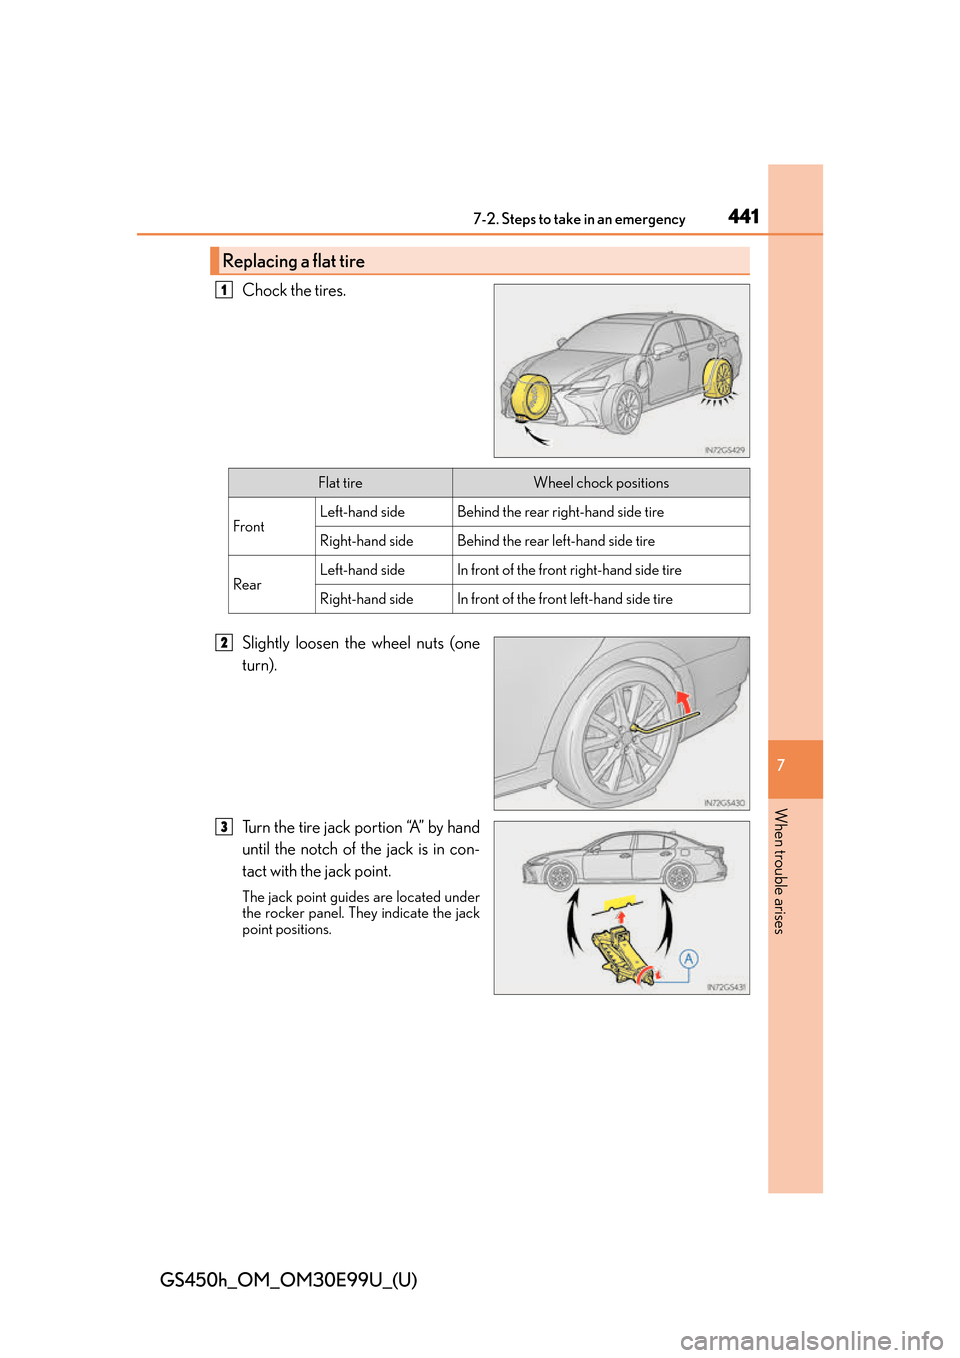
Chock the tires.
Slightly loosen the wheel nuts (one
turn).
Turn the tire jack portion “A” by hand
until the notch of the jack is in con-
tact with the jack point.
The jack point guides are located under
the rocker panel. They indicate the jack
point positions.
Replacing a flat tire
1
Flat tireWheel chock positions
FrontLeft-hand sideBehind the rear right-hand side tire
Right-hand sideBehind the rear left-hand side tire
RearLeft-hand sideIn front of the front right-hand side tire
Right-hand sideIn front of the front left-hand side tire
2
3
Page 442 of 544
4427-2. Steps to take in an emergency
GS450h_OM_OM30E99U_(U)
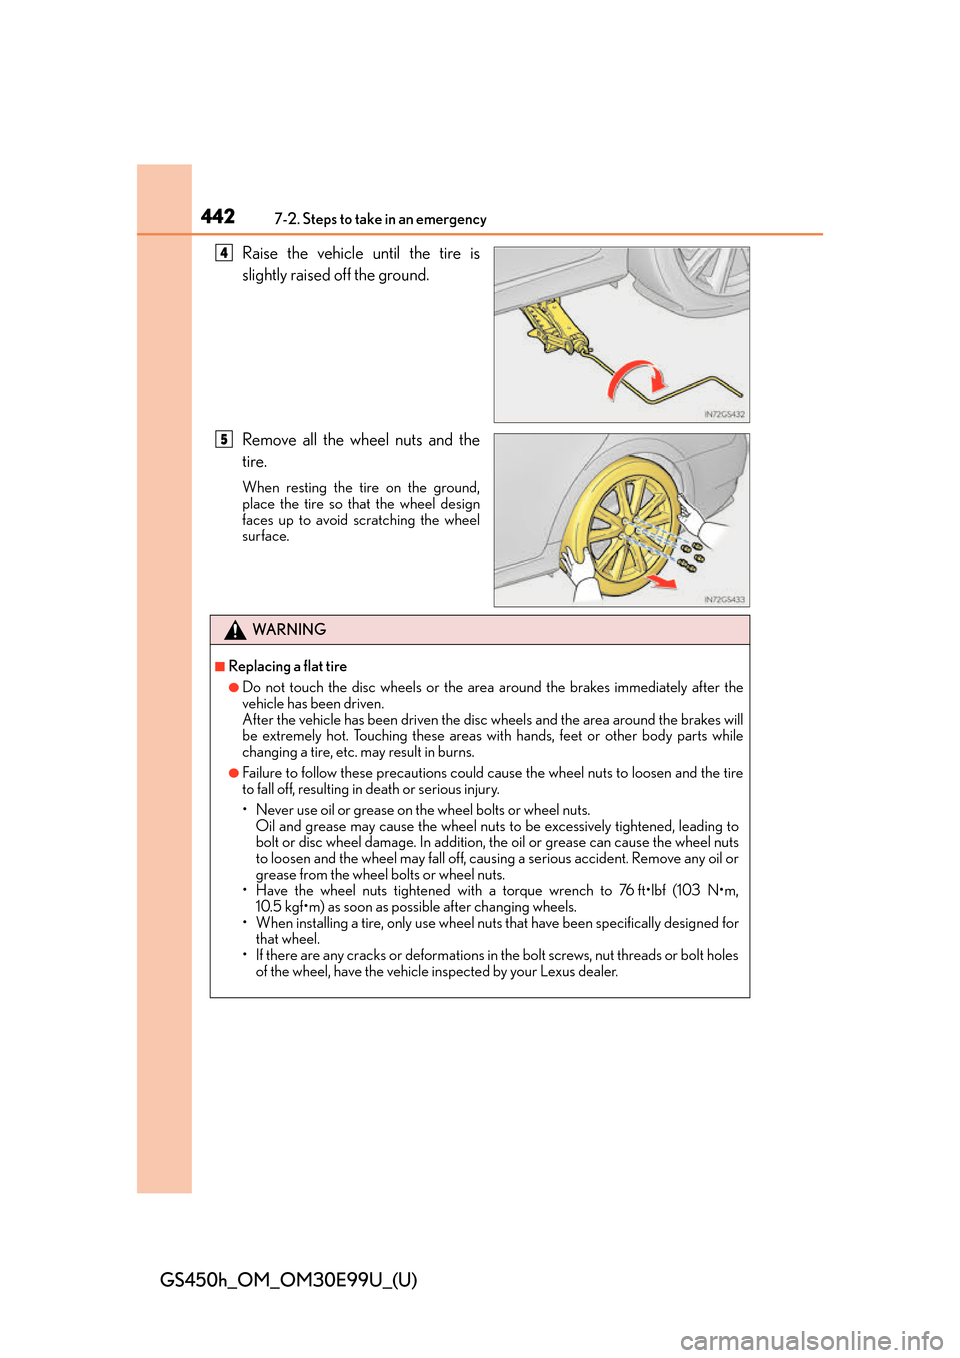
Raise the vehicle until the tire is
slightly raised off the ground.
Remove all the wheel nuts and the
tire.
When resting the tire on the ground,
place the tire so that the wheel design
faces up to avoid scratching the wheel
surface.
4
5
WA R N I N G
■Replacing a flat tire
●Do not touch the disc wheels or the area around the brakes immediately after the
vehicle has been driven.
After the vehicle has been driven the disc wheels and the area around the brakes will
be extremely hot. Touching these areas with hands, feet or other body parts while
changing a tire, etc. may result in burns.
●Failure to follow these precautions could cause the wheel nuts to loosen and the tire
to fall off, resulting in death or serious injury.
• Never use oil or grease on the wheel bolts or wheel nuts. Oil and grease may cause the wheel nuts to be excessively tightened, leading to
bolt or disc wheel damage. In addition, the oil or grease can cause the wheel nuts
to loosen and the wheel may fall off, caus ing a serious accident. Remove any oil or
grease from the wheel bolts or wheel nuts.
• Have the wheel nuts tightened with a torque wrench to 76 ft•lbf (103 N•m,
10.5 kgf•m) as soon as possible after changing wheels.
• When installing a tire, only use wheel nuts that have been specifically designed for
that wheel.
• If there are any cracks or deformations in the bolt screws, nut threads or bolt holes of the wheel, have the vehicle inspected by your Lexus dealer.
Page 443 of 544
4437-2. Steps to take in an emergency
GS450h_OM_OM30E99U_(U)
7
When trouble arises
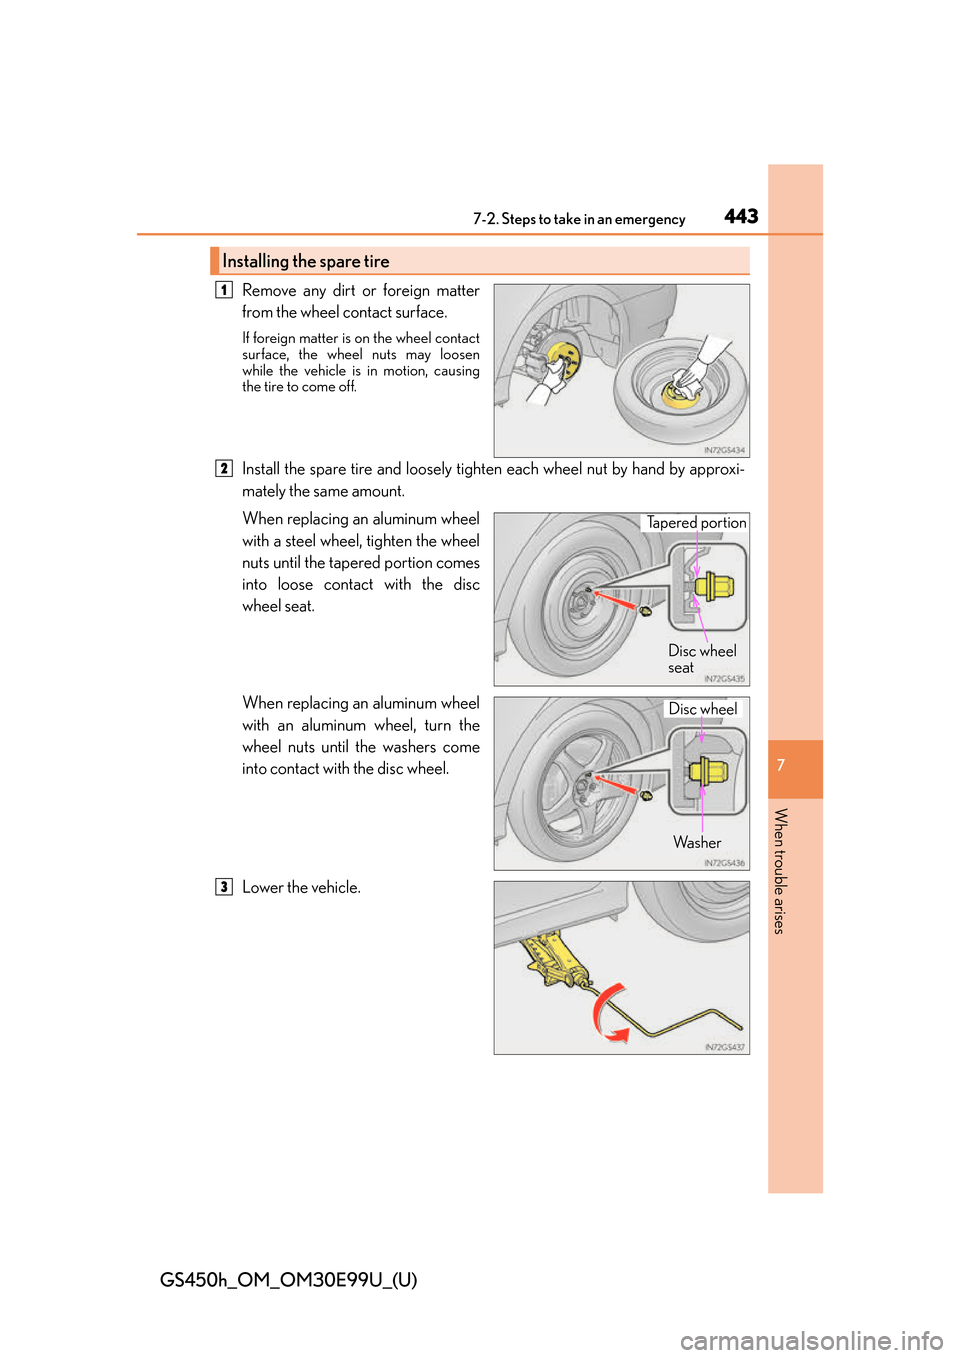
Remove any dirt or foreign matter
from the wheel contact surface.
If foreign matter is on the wheel contact
surface, the wheel nuts may loosen
while the vehicle is in motion, causing
the tire to come off.
Install the spare tire and loosely tighten each wheel nut by hand by approxi-
mately the same amount.
When replacing an aluminum wheel
with a steel wheel, tighten the wheel
nuts until the tapered portion comes
into loose contact with the disc
wheel seat.
When replacing an aluminum wheel
with an aluminum wheel, turn the
wheel nuts until the washers come
into contact with the disc wheel.
Lower the vehicle.
Installing the spare tire
1
2
Tapered portionDisc wheel
seat
Wa s h e r
Disc wheel
3
Page 444 of 544
4447-2. Steps to take in an emergency
GS450h_OM_OM30E99U_(U)
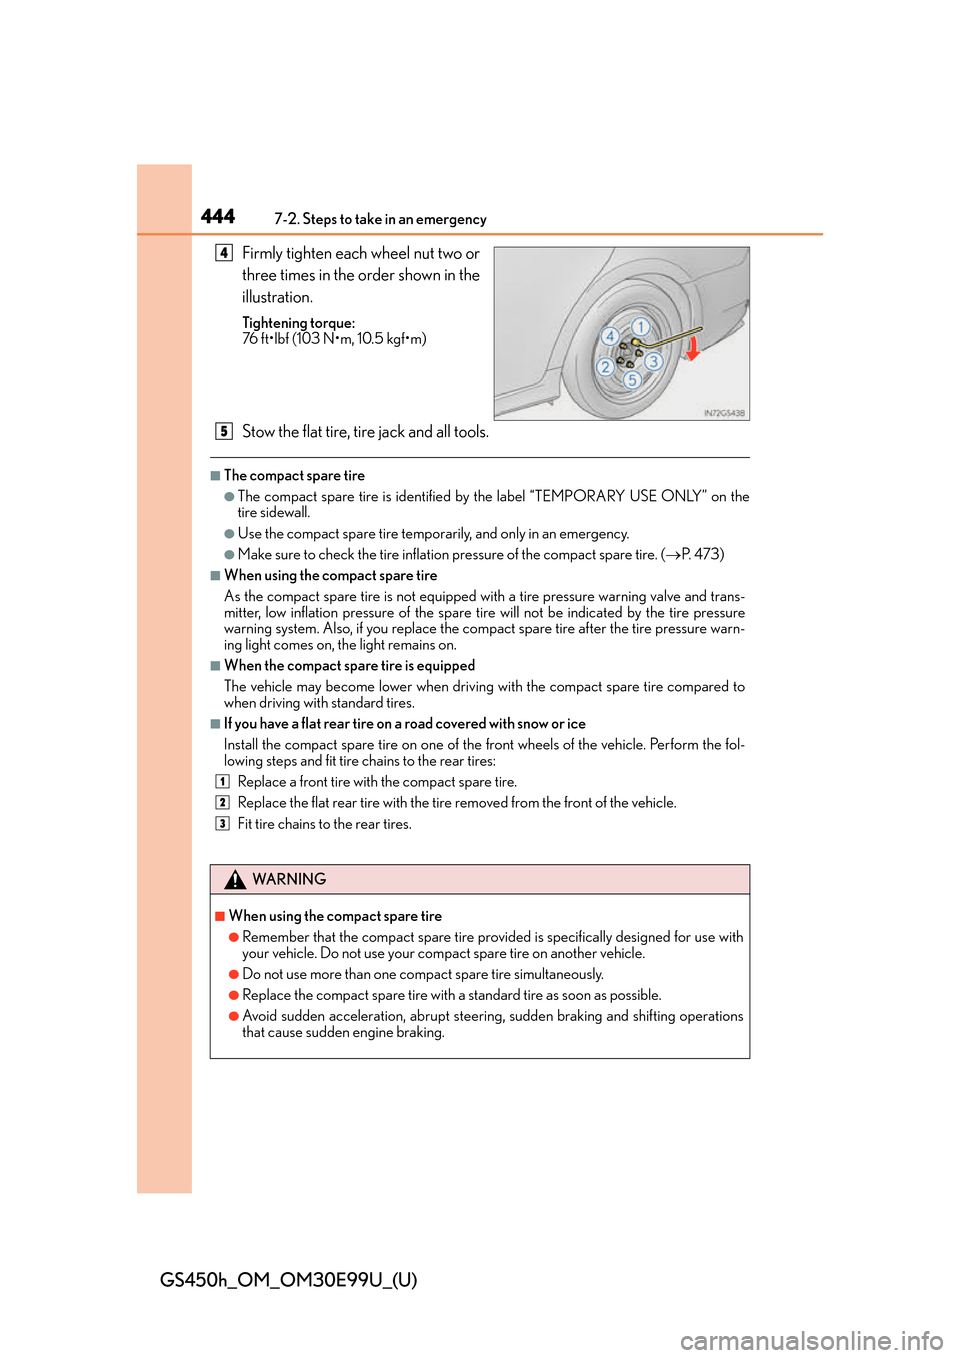
Firmly tighten each wheel nut two or
three times in the order shown in the
illustration.
Tightening torque:
76 ft•lbf (103 N•m, 10.5 kgf•m)
Stow the flat tire, tire jack and all tools.
■The compact spare tire
●The compact spare tire is identified by the label “TEMPORARY USE ONLY” on the
tire sidewall.
●Use the compact spare tire temporarily, and only in an emergency.
●Make sure to check the tire inflation pressure of the compact spare tire. ( P. 4 7 3 )
■When using the compact spare tire
As the compact spare tire is not equipped wi th a tire pressure warning valve and trans-
mitter, low inflation pressure of the spare ti re will not be indicated by the tire pressure
warning system. Also, if you replace the compact spare tire after the tire pressure warn-
ing light comes on, th e light remains on.
■When the compact spare tire is equipped
The vehicle may become lower when driving with the compact spare tire compared to
when driving with standard tires.
■If you have a flat rear tire on a road covered with snow or ice
Install the compact spare tire on one of the front wheels of the vehicle. Perform the fol-
lowing steps and fit tire chains to the rear tires:
Replace a front tire with the compact spare tire.
Replace the flat rear tire with the tire removed from the front of the vehicle.
Fit tire chains to the rear tires.
4
5
1
2
3
WA R N I N G
■When using the compact spare tire
●Remember that the compact spare tire provid ed is specifically designed for use with
your vehicle. Do not use your compact spare tire on another vehicle.
●Do not use more than one compact spare tire simultaneously.
●Replace the compact spare tire with a standard tire as soon as possible.
●Avoid sudden acceleration, ab rupt steering, sudden braking and shifting operations
that cause sudden engine braking.
Page 445 of 544
4457-2. Steps to take in an emergency
GS450h_OM_OM30E99U_(U)
7
When trouble arises
WA R N I N G
■When the compact spare tire is attached
The vehicle speed may not be correctly detected, and the following systems may not
operate correctly:
■Speed limit when using the compact spare tire
Do not drive at speeds in excess of 50 mph (80 km/h) when a compact spare tire is
installed on the vehicle.
The compact spare tire is not designed for driving at high speeds. Failure to observe
this precaution may lead to an accident causing death or serious injury.
■After using the tools and jack
Before driving, make sure all the tools and jack are securely in place in their storage
location to reduce the possibility of personal injury during a collision or sudden brak-
ing.
NOTICE
■Be careful when driving over bumps with the compact spare tire installed on the vehi-
cle.
The vehicle may become lower when driving with the compact spare tire compared to
when driving with standard ti res. Be careful when driving over uneven road surfaces.
■Driving with tire chains and the compact spare tire
Do not fit tire chains to the compact spare tire.
Tire chains may damage the vehicle body and adversely affect driving performance.
■When replacing the tires
When removing or fitting the wheels, tires or the tire pressure warning valve and trans-
mitter, contact your Lexus dealer as the tire pressure warning valve and transmitter
may be damaged if not handled correctly.
• ABS & Brake assist
•VSC
•TRAC
•Cruise control
• Dynamic radar cruise control with full-
speed range (if equipped)
• PCS (Pre-Collision System)
(if equipped)
•EPS
•AFS (if equipped)
• Adaptive Variable Suspension system • LKA (Lane-Keeping Assist)
(if equipped)
• Tire pressure warning system
•VDIM
• Lexus parking assist monitor
• Intuitive parking assist (if equipped)
• Navigation system (if equipped)
• DRS (if equipped)
• VGRS (if equipped)
• LDH (if equipped)