key Lexus GX460 2010 Navigation Manual
[x] Cancel search | Manufacturer: LEXUS, Model Year: 2010, Model line: GX460, Model: Lexus GX460 2010Pages: 428, PDF Size: 6.27 MB
Page 233 of 428
AUDIO/VIDEO SYSTEM
232
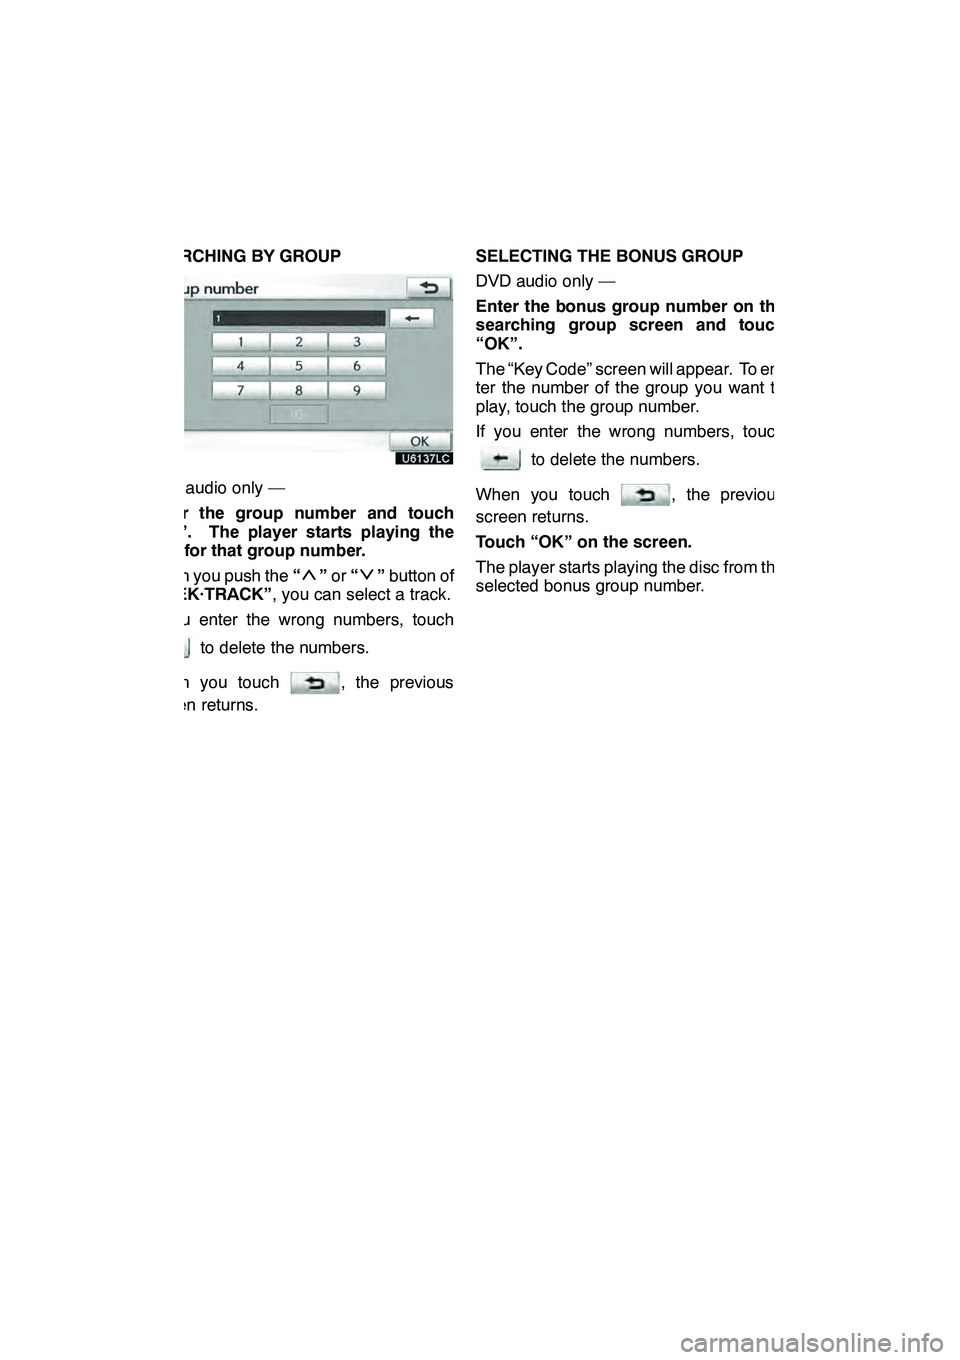
SEARCHING BY GROUP
DVD audio only —
Enter the group number and touch
“OK”. The player starts playing the
disc for that group number.
When you push the“
”or “”button of
“SEEK·TRACK” , you can select a track.
If you enter the wrong numbers, touch
to delete the numbers.
When you touch
, the previous
screen returns. SELECTING THE BONUS GROUP
DVD audio only —
Enter the bonus group number on the
searching group screen and touch
“OK”.
The “Key Code” screen will appear. To en-
ter the number of the group you want to
play, touch the group number.
If you enter the wrong numbers, touch
to delete the numbers.
When you touch
, the previous
screen returns.
Touch “OK” on the screen.
The player starts playing the disc from the
selected bonus group number.
GX460 Navi (U)
OM60E73U
Finish
09.09.24
Page 237 of 428
AUDIO/VIDEO SYSTEM
236 D
Audio language (DVD video only)
You can change the audio language.
1. Touch “Audio Language”.
2. Touch the language you want to
hear on the “Audio Language” screen.
If you cannot find the language you want to
hear on this screen, touch “Other”and
enter a language code. For the entry of
language code, see the following “ENTER
AUDIO LANGUAGE CODE”.
To return to the “Setup Menu” screen,
touch
.
DSubtitle language
You can change the subtitle language.
1. Touch “Subtitle Language”.
2. Touch a language you want to read
on the “Subtitle Language” screen.
If you cannot find the language you want to
read on this screen, touch “Other”and
enter a language code. For the entry of
language code, see the following “ENTER
AUDIO LANGUAGE CODE”.
To return to the “Setup Menu” screen,
touch
.
DDVD language
You can change the language on the
DVD video menu.
1. Touch “DVD Language”.
2. Touch the language you want to
read on the “DVD Language” screen.
If you cannot find the language you want to
read on this screen, touch “Other”and
enter a language code. For the entry of
language code, see the following “ENTER
AUDIO LANGUAGE CODE”.
To return to the “Setup Menu” screen,
touch
.
DAngle mark
The multi− angle mark can be turned on
or off on the screen while the disc
which is multi −angle compatible is be-
ing played.
1. Touch “Angle Mark”.
2. Touch “On” or “Off”.
DParental lock (DVD video only)
The level of viewer restrictions can be
changed.
1. Touch “Parental Lock”.
2. Enter the 4− digit personal code on
the “Key code” screen.
If you enter the wrong numbers, touch
to delete the numbers.
To return to the “Setup Menu” screen,
touch
.
3. Touch a parental level (1 — 8) on the
“Select Restriction Level”. Touch
to return to the “Setup Menu”
screen.
DAuto start
Discs that are inserted while the vehicle is
in motion will automatically start playing.
Certain discs may not play.
1. Touch “Auto Start”.
2. Touch “On” or “Off”.
DSound dynamic range
(DVD video only)
The difference between the lowest volume
and the highest volume can be adjusted.
1. Touch “Sound Dynamic Range”.
2. Touch “MAX”, “STD” or “MIN”.
GX460 Navi (U)
OM60E73U
Finish
09.09.24
Page 277 of 428
AUDIO/VIDEO SYSTEM
276
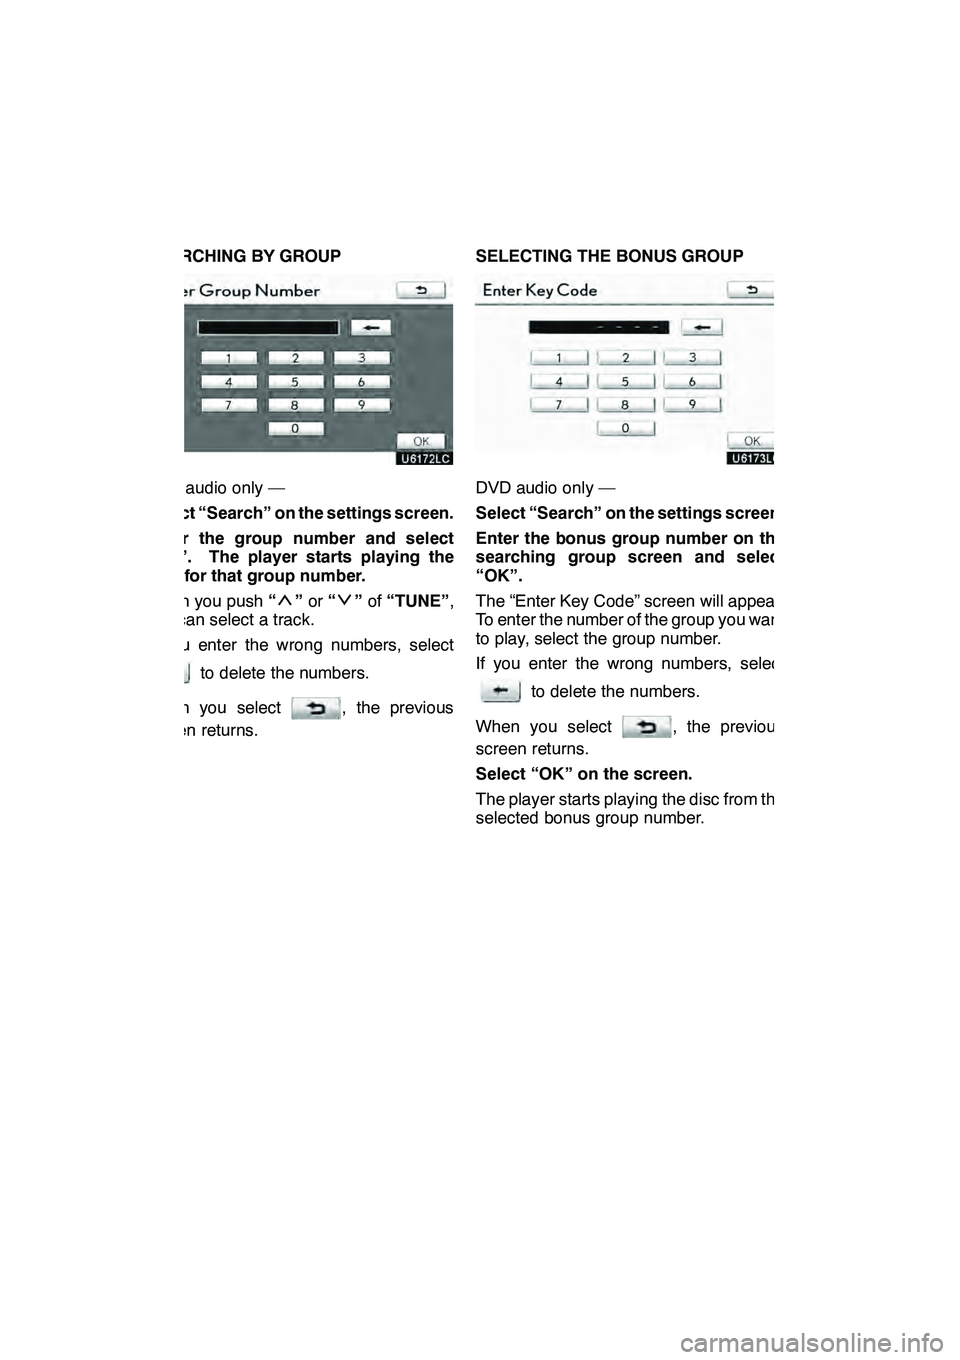
SEARCHING BY GROUP
DVD audio only —
Select “Search” on the settings screen.
Enter the group number and select
“OK”. The player starts playing the
disc for that group number.
When you push“
”or “”of “TUNE” ,
you can select a track.
If you enter the wrong numbers, select
to delete the numbers.
When you select
, the previous
screen returns. SELECTING THE BONUS GROUP
DVD audio only —
Select “Search” on the settings screen.
Enter the bonus group number on the
searching group screen and select
“OK”.
The “Enter Key Code” screen will appear.
To enter the number of the group you want
to play, select the group number.
If you enter the wrong numbers, select
to delete the numbers.
When you select
, the previous
screen returns.
Select “OK” on the screen.
The player starts playing the disc from the
selected bonus group number.
GX460 Navi (U)
OM60E73U
Finish
09.09.24
Page 281 of 428
AUDIO/VIDEO SYSTEM
280 D
Audio language (DVD video only)
You can change the audio language.
1. Select “Audio Language”.
2. Select the language you want to
hear on the “Audio Language” screen.
If you cannot find the language you want to
hear on this screen, select “Other”and
enter a language code. For the entry of
language code, see the following “ENTER
AUDIO LANGUAGE CODE”.
To return to the “Setup Menu” screen, se-
lect
.
DSubtitle language
You can change the subtitle language.
1. Select “Subtitle Language”.
2. Select a language you want to read
on the “Subtitle Language” screen.
If you cannot find the language you want to
read on this screen, select “Other”and
enter a language code. For the entry of
language code, see the following “ENTER
AUDIO LANGUAGE CODE”.
To return to the “Setup Menu” screen, se-
lect
.
DDVD language
You can change the language on the
DVD video menu.
1. Select “DVD Language”.
2. Select the language you want to
read on the “DVD Language” screen.
If you cannot find the language you want to
read on this screen, select “Other”and
enter a language code. For the entry of
language code, see the following “ENTER
AUDIO LANGUAGE CODE”.
To return to the “Setup Menu” screen, se-
lect
.
DAngle mark
The multi− angle mark can be turned on
or off on the screen while the disc
which is multi −angle compatible is be-
ing played.
1. Select “Angle Mark”.
2. Select “ON” or “OFF”.
DParental lock (DVD video only)
The level of viewer restrictions can be
changed.
1. Select “Parental Lock”.
2. Enter the 4− digit personal code on
the “Key code” screen.
If you enter the wrong numbers, select
to delete the numbers.
To return to the “Setup Menu” screen, se-
lect
.
3. Select a parental level (1 — 8) on the
“Select Restriction Level”. Select
to return to the “Setup Menu”
screen.
DSound dynamic range
(DVD video only)
The difference between the lowest volume
and the highest volume can be adjusted.
1. Select “Sound Dynamic Range”.
2. Select “MAX”, “STD” or “MIN”.
GX460 Navi (U)
OM60E73U
Finish
09.09.24
Page 300 of 428

AIR CONDITIONING
299
17“TEMP” buttons
(Driver side temperature control but-
ton)301, 303
...................
18Passenger side temperature dis-
play
(In degrees Fahrenheit or Centi-
grade)
19Driver side temperature display
(In degrees Fahrenheit or Centi-
grade) (a) Climate control
Air outlets and fan speed are automati-
cally adjusted according to the temper-
ature setting.
The “ENGINE START STOP” switch must
be in IGNITION ON mode.
Push the “CLIMATE” button to display
the air conditioning control screen.
INFORMATION
When the “ENGINE START STOP”
switch is turn on, the air conditioning
system settings will be set to those
that were in use the last time the “EN-
GINE START STOP” switch was
turned off. Air conditioning system
settings are memorized individually
on each electronic key, so the set-
tings reproduced will be specific to
the key that is used.
NOTICE
To prevent the battery from being dis-
charged, do not leave the air condi-
tioning on longer than necessary
when the engine is not running.
GX460 Navi (U)
OM60E73U
Finish
09.09.24
8
Page 307 of 428

AIR CONDITIONING
306
(d) Rear air conditioning controls
(With rear air conditioning system)
1“REAR OFF” button
2Temperature control
3Fan speed control
4“REAR AUTO” button
Touch the “REAR AUTO” button.
The air conditioning system will operate,
and air outlets and fan speed will be ad-
justed automatically.
To adjust the temperature setting, push the
“
” button on “TEMP” to increase the
temperature and push the “”button to
decrease the temperature.
The fan speed can be set to your desired
speed by touching the appropriate fan
speed control button.
Touch “REAR OFF” to turn the fan off.
INFORMATION
When the “ENGINE START STOP”
switch is turn on, the air conditioning
system settings will be set to those
that were in use the last time the “EN-
GINE START STOP” switch was
turned off. Air conditioning system
settings are memorized individually
on each electronic key, so the set-
tings reproduced will be specific to
the key that is used.
(e) Defogging the windshield
The air conditioning system operates
automatically.
Recirculated air mode will automatically
switch to outside air mode. It is not pos-
sible to return to recirculated air mode
when the switch is on.
CAUTION
To prevent the windshield from fog-
ging up
Do not use the windshield air flow
button during cool air operation in
extremely humid weather. The differ-
ence between the temperature of the
outside air and that of the windshield
can cause the outer surface of the
windshield to fog up, blocking your
vision.
GX460 Navi (U)
OM60E73U
Finish
09.09.24
Page 332 of 428
SETUP
331
No.Function
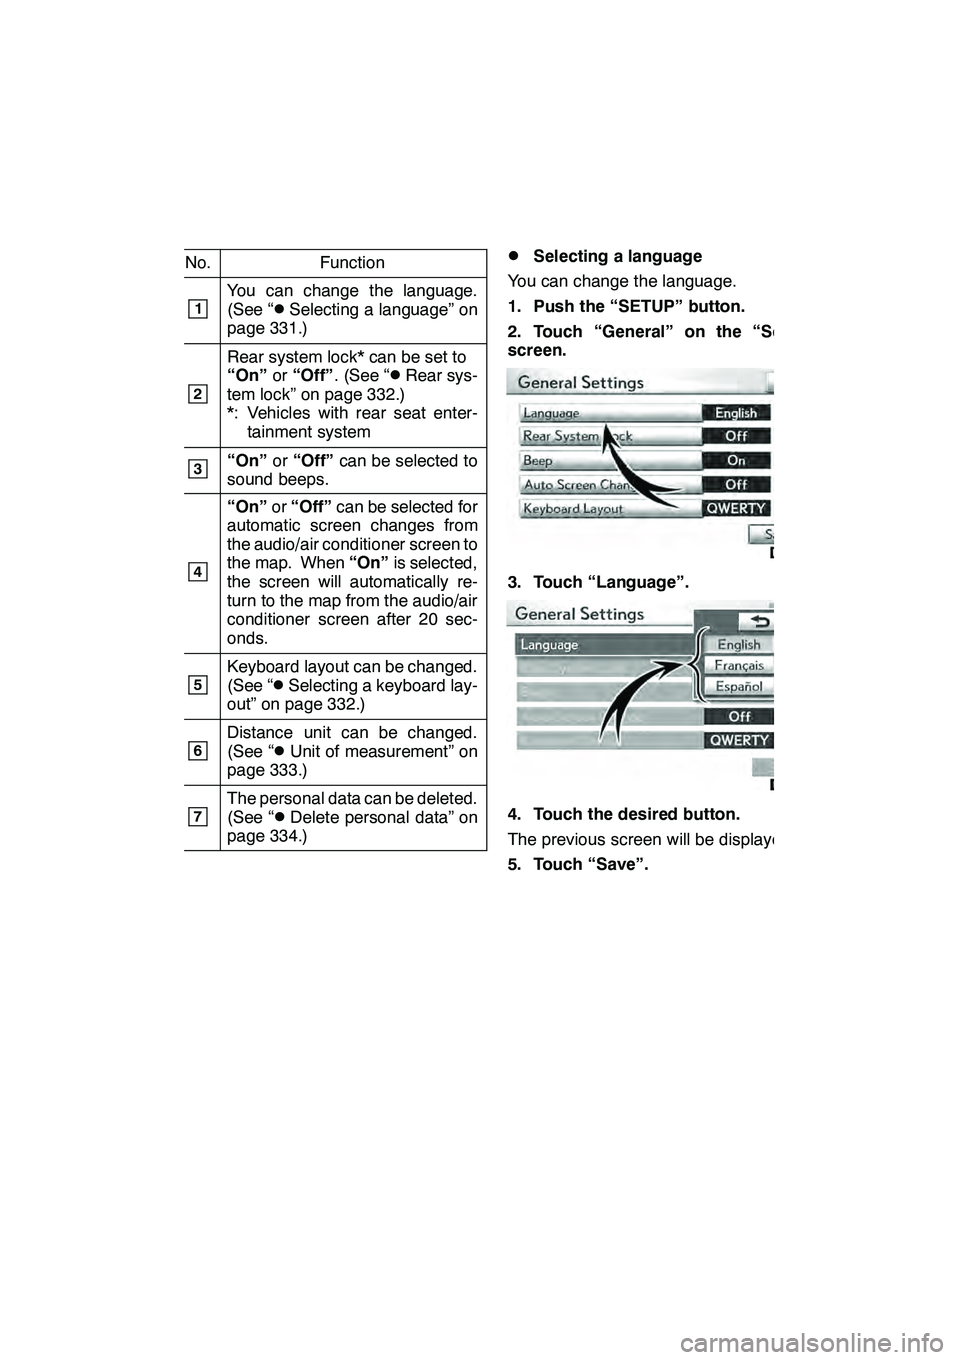
1You can change the language.
(See “DSelecting a language” on
page 331.)
2
Rear system lock* can be set to
“On” or“Off” . (See “DRear sys-
tem lock” on page 332.)
*: Vehicles with rear seat enter- tainment system
3“On” or“Off” can be selected to
sound beeps.
4
“On” or“Off” can be selected for
automatic screen changes from
the audio/air conditioner screen to
the map. When “On”is selected,
the screen will automatically re-
turn to the map from the audio/air
conditioner screen after 20 sec-
onds.
5Keyboard layout can be changed.
(See “DSelecting a keyboard lay-
out” on page 332.)
6Distance unit can be changed.
(See “DUnit of measurement” on
page 333.)
7The personal data can be deleted.
(See “DDelete personal data” on
page 334.)
DSelecting a language
You can change the language.
1. Push the “SETUP” button.
2. Touch “General” on the “Setup”
screen.
3. Touch “Language”.
4. Touch the desired button.
The previous screen will be displayed.
5. Touch “Save”.
GX460 Navi (U)
OM60E73U
Finish
09.09.24
11
Page 333 of 428
SETUP
332 D
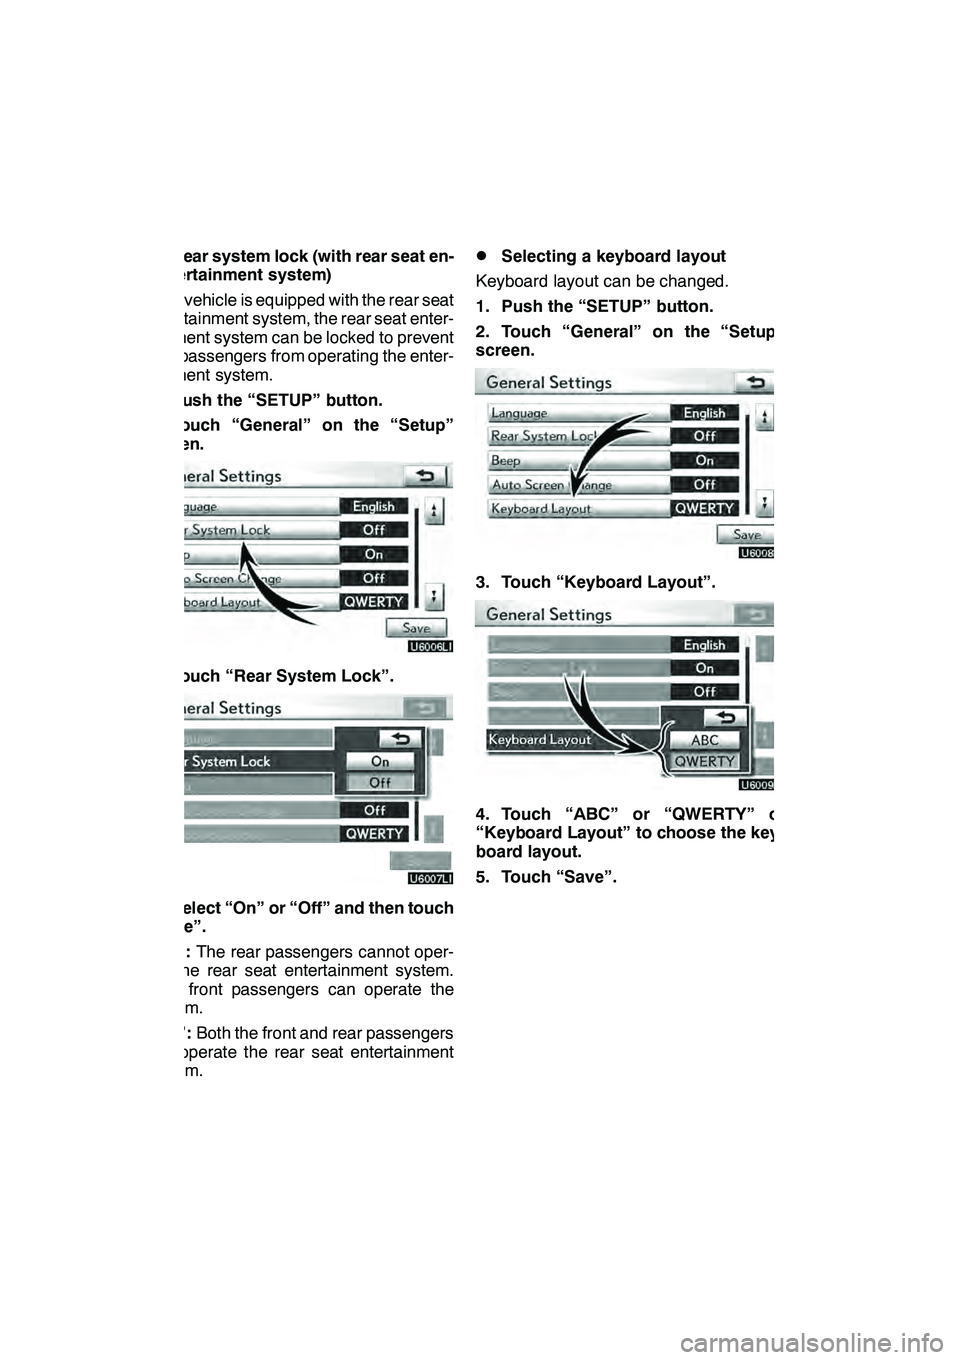
Rear system lock (with rear seat en-
tertainment system)
If the vehicle is equipped with the rear seat
entertainment system, the rear seat enter-
tainment system can be locked to prevent
rear passengers from operating the enter-
tainment system.
1. Push the “SETUP” button.
2. Touch “General” on the “Setup”
screen.
3. Touch “Rear System Lock”.
4. Select “On” or “Off” and then touch
“Save”.
“On”: The rear passengers cannot oper-
ate the rear seat entertainment system.
Only front passengers can operate the
system.
“Off”: Both the front and rear passengers
can operate the rear seat entertainment
system.
DSelecting a keyboard layout
Keyboard layout can be changed.
1. Push the “SETUP” button.
2. Touch “General” on the “Setup”
screen.
3. Touch “Keyboard Layout”.
4. Touch “ABC” or “QWERTY” of
“Keyboard Layout” to choose the key-
board layout.
5. Touch “Save”.
GX460 Navi (U)
OM60E73U
Finish
09.09.24
Page 358 of 428

SETUP
357
3. Select the phone to edit.
4. This screen is displayed.
If you want to change the device name,
touch “Edit”.
5. Use the software keyboard to input
the device name.
6. Confirm the device name and touch
“OK”.
GX460 Navi (U)
OM60E73U
Finish
09.09.24
11
Page 364 of 428

SETUP
363
D
Registering the phonebook data
You can register the phonebook data.
Up to 3 numbers per person can be reg-
istered.
1. Touch “New Contact”.
2. Use the software keyboard to input
the name and touch “OK”.
3. Input the phone number and touch
“OK”.
If you want to use the tone signal after
the phone number, input the tone signal
too.
4. Select the phone type.
GX460 Navi (U)
OM60E73U
Finish
09.09.24
11