start stop button Lexus GX460 2010 Navigation Manual
[x] Cancel search | Manufacturer: LEXUS, Model Year: 2010, Model line: GX460, Model: Lexus GX460 2010Pages: 428, PDF Size: 6.27 MB
Page 27 of 428

NAVIGATION SYSTEM: BASIC FUNCTIONS
26
When the “ENGINE START STOP” switch
is in ACCESSORY or IGNITION ON
mode, the initial screen will be displayed
and the system will begin operating.
CAUTION
When the vehicle is stopped with the
engine running, always apply the
parking brake for safety.
After a few seconds, the “CAUTION”
screen will be displayed.
After about 5 seconds, the “CAUTION”
screen automatically switches to the map
screen. When touching“Show Map”or
pushing the “MAP/VOICE” button, the
map screen is displayed.
While the “CAUTION” screen is displayed,
the “DEST” or“SETUP” button cannot be
operated. And if the “Calendar”button on
the “Information” screen is touched, the
screen will change back to the “CAUTION”
screen. In about 5 seconds, or when the
“MAP/VOICE” button is pushed or the
“Show Map” is touched, the “CAUTION”
screen will change to the map screen.
GX460 Navi (U)
OM60E73U
Finish
09.09.24
Initial screen
Page 77 of 428
NAVIGATION SYSTEM: DESTINATION SEARCH
76
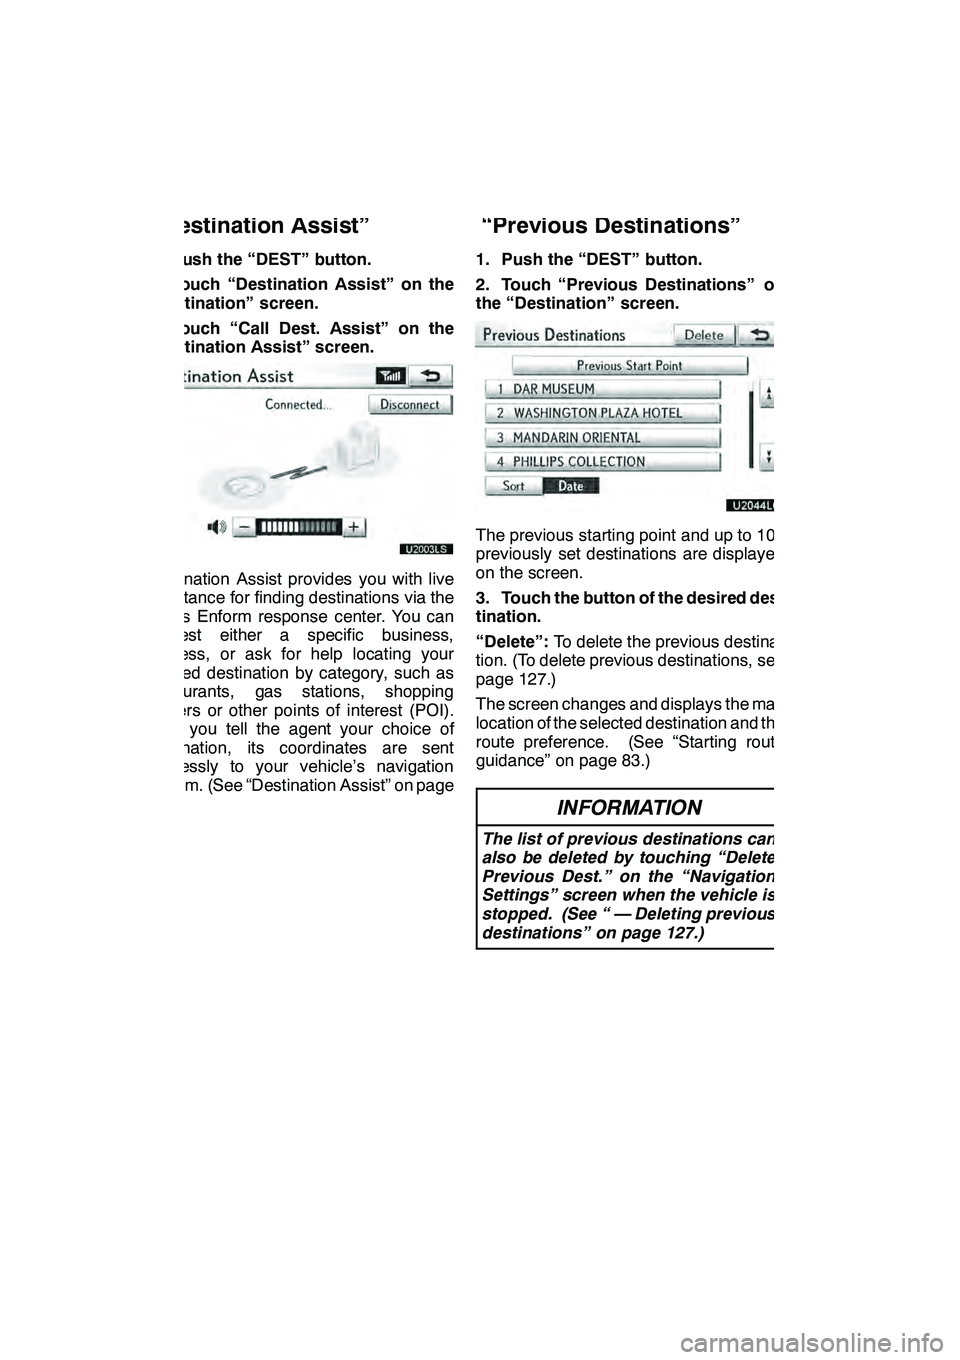
1. Push the “DEST” button.
2. Touch “Destination Assist” on the
“Destination” screen.
3. Touch “Call Dest. Assist” on the
“Destination Assist” screen.
U2003LS
Destination Assist provides you with live
assistance for finding destinations via the
Lexus Enform response center. You can
request either a specific business,
address, or ask for help locating your
desired destination by category, such as
restaurants, gas stations, shopping
centers or other points of interest (POI).
After you tell the agent your choice of
destination, its coordinates are sent
wirelessly to your vehicle’s navigation
system. (See “Destination Assist” on page
157.)1. Push the “DEST” button.
2. Touch “Previous Destinations” on
the “Destination” screen.
The previous starting point and up to 100
previously set destinations are displayed
on the screen.
3. Touch the button of the desired des-
tination.
“Delete”:
To delete the previous destina-
tion. (To delete previous destinations, see
page 127.)
The screen changes and displays the map
location of the selected destination and the
route preference. (See “Starting route
guidance” on page 83.)
INFORMATION
The list of previous destinations can
also be deleted by touching “Delete
Previous Dest.” on the “Navigation
Settings” screen when the vehicle is
stopped. (See “ — Deleting previous
destinations” on page 127.)
GX460 Navi (U)
OM60E73U
Finish
09.09.24
— Destination search by
“Destination Assist” — Destination search by
“Previous Destinations”
Page 84 of 428
NAVIGATION SYSTEM: DESTINATION SEARCH
83
The system searches for the guidance
route again, and displays the entire route.
INFORMATION
Set destinations can also be deleted
by touching “Route”. (See “ — Delet-
ing destinations” on page 95.)
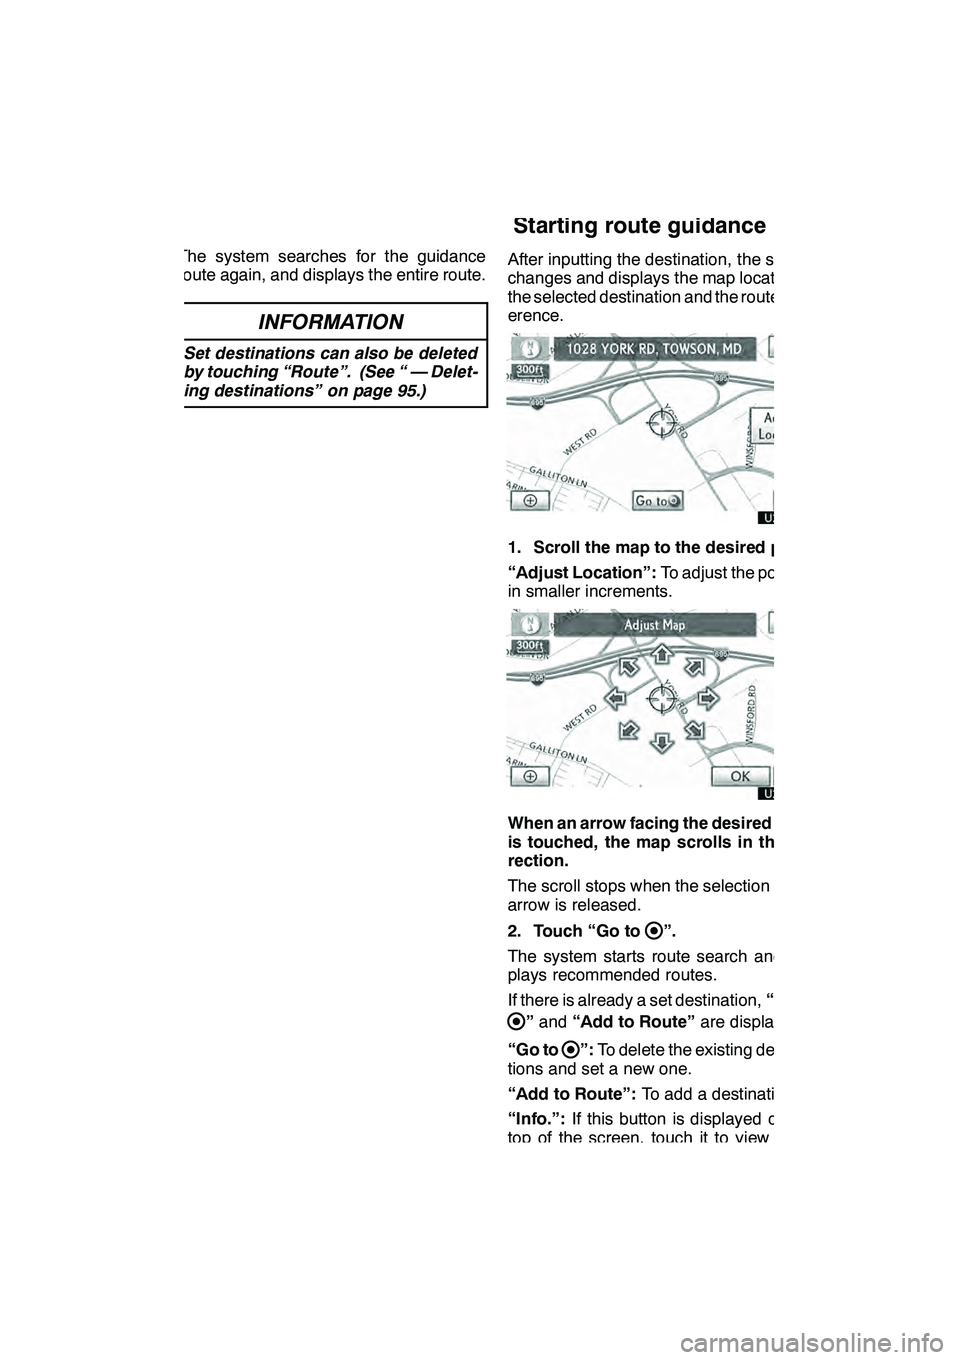
After inputting the destination, the screen
changes and displays the map location of
the selected destination and the route pref-
erence.
1. Scroll the map to the desired point.
“Adjust Location”:To adjust the position
in smaller increments.
When an arrow facing the desired point
is touched, the map scrolls in that di-
rection.
The scroll stops when the selection of the
arrow is released.
2. Touch “Go to
”.
The system starts route search and dis-
plays recommended routes.
If there is already a set destination, “Go to
”and “Add to Route” are displayed.
“Go to
”: To delete the existing destina-
tions and set a new one.
“Add to Route”: To add a destination.
“Info.”: If this button is displayed on the
top of the screen, touch it to view items
such as name, address, and phone num-
ber.
GX460 Navi (U)
OM60E73U
Finish
09.09.24
Starting route guidance
2
Page 151 of 428
TELEPHONE AND INFORMATION
150
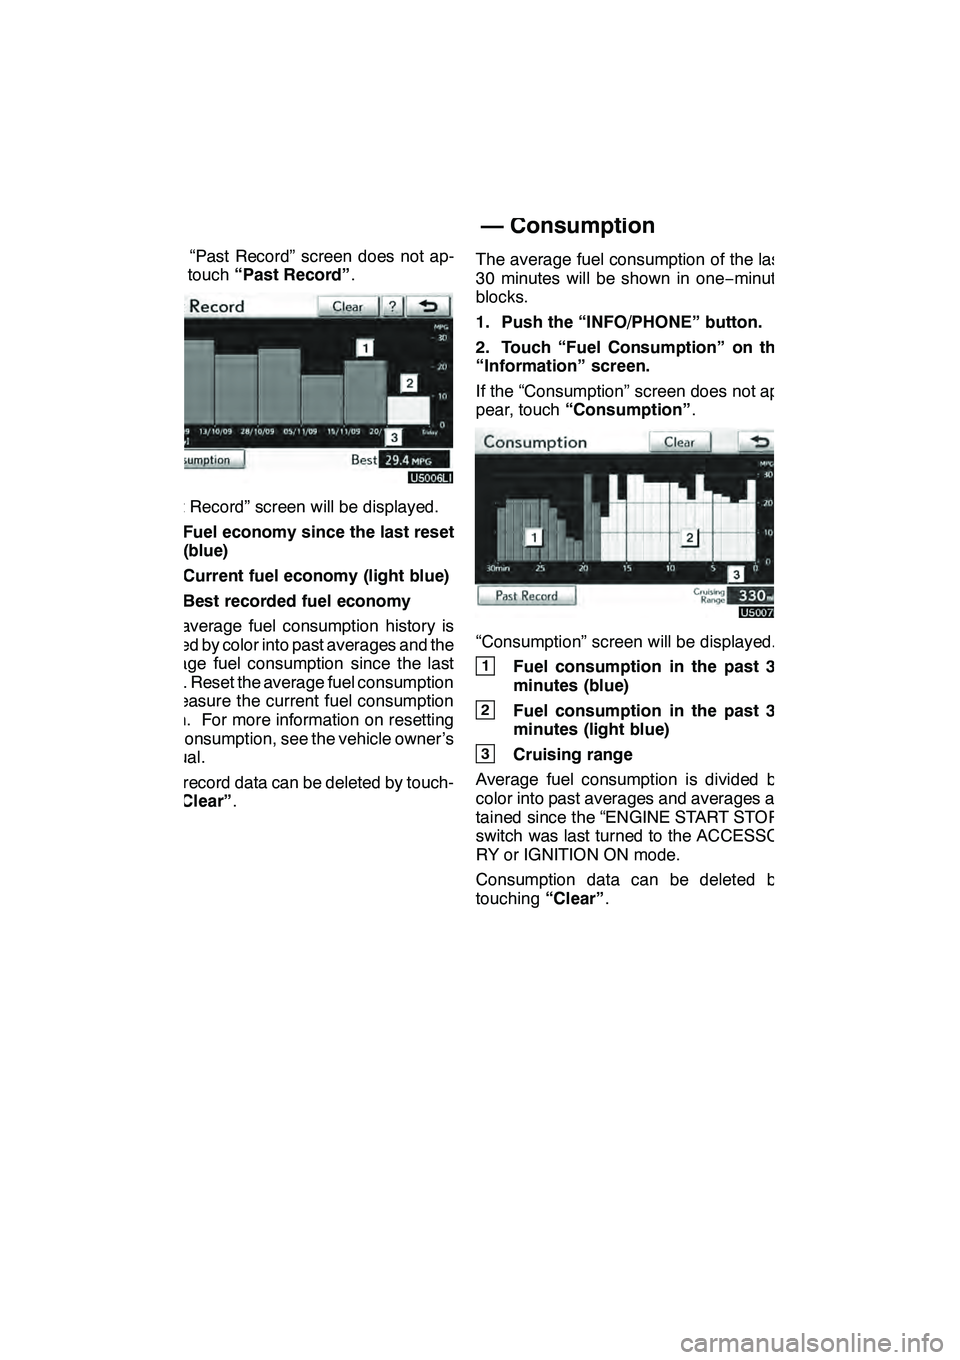
If the “Past Record” screen does not ap-
pear, touch“Past Record” .
“Past Record” screen will be displayed.
1Fuel economy since the last reset
(blue)
2Current fuel economy (light blue)
3Best recorded fuel economy
The average fuel consumption history is
divided by color into past averages and the
average fuel consumption since the last
reset. Reset the average fuel consumption
to measure the current fuel consumption
again. For more information on resetting
fuel consumption, see the vehicle owner’s
manual.
Past record data can be deleted by touch-
ing “Clear” . The average fuel consumption of the last
30 minutes will be shown in one
−minute
blocks.
1. Push the “INFO/PHONE” button.
2. Touch “Fuel Consumption” on the
“Information” screen.
If the “Consumption” screen does not ap-
pear, touch “Consumption” .
“Consumption” screen will be displayed.
1Fuel consumption in the past 30
minutes (blue)
2Fuel consumption in the past 30
minutes (light blue)
3Cruising range
Average fuel consumption is divided by
color into past averages and averages at-
tained since the “ENGINE START STOP”
switch was last turned to the ACCESSO-
RY or IGNITION ON mode.
Consumption data can be deleted by
touching “Clear”.
GX460 Navi (U)
OM60E73U
Finish
09.09.24
— Consumption
Page 188 of 428
AUDIO/VIDEO SYSTEM
187
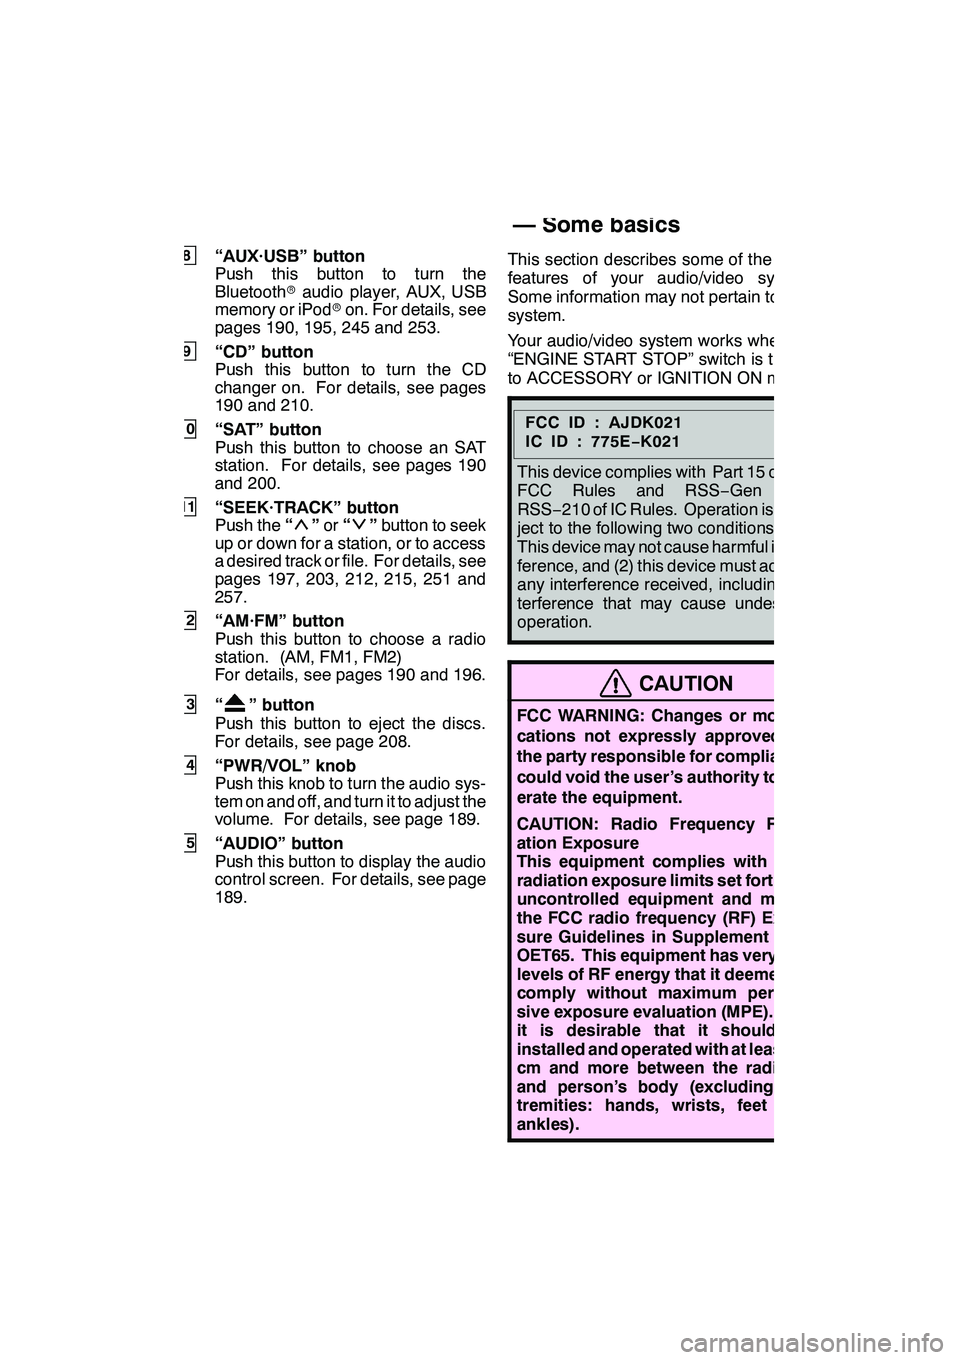
8“AUX·USB” button
Push this button to turn the
Bluetoothraudio player, AUX, USB
memory or iPod ron. For details, see
pages 190, 195, 245 and 253.
9“CD” button
Push this button to turn the CD
changer on. For details, see pages
190 and 210.
10“SAT” button
Push this button to choose an SAT
station. For details, see pages 190
and 200.
11“SEEK·TRACK” button
Push the “”or “”button to seek
up or down for a station, or to access
a desired track or file. For details, see
pages 197, 203, 212, 215, 251 and
257.
12“AM·FM” button
Push this button to choose a radio
station. (AM, FM1, FM2)
For details, see pages 190 and 196.
13“” button
Push this button to eject the discs.
For details, see page 208.
14“PWR/VOL” knob
Push this knob to turn the audio sys-
tem on and off, and turn it to adjust the
volume. For details, see page 189.
15“AUDIO” button
Push this button to display the audio
control screen. For details, see page
189. This section describes some of the basic
features of your audio/video system.
Some information may not pertain to your
system.
Your audio/video system works when the
“ENGINE START STOP” switch is turned
to ACCESSORY or IGNITION ON mode.
FCCID:AJDK021
IC ID : 775E
−K021
This device complies with Part 15 of the
FCC Rules and RSS −Gen and
RSS− 210 of IC Rules. Operation is sub-
ject to the following two conditions : (1)
This device may not cause harmful inter-
ference, and (2) this device must accept
any interference received, including in-
terference that may cause undesired
operation.
CAUTION
FCC WARNING: Changes or modifi-
cations not expressly approved by
the party responsible for compliance
could void the user’s authority to op-
erate the equipment.
CAUTION: Radio Frequency Radi-
ation Exposure
This equipment complies with FCC
radiation exposure limits set forth for
uncontrolled equipment and meets
the FCC radio frequency (RF) Expo-
sure Guidelines in Supplement C to
OET65. This equipment has very low
levels of RF energy that it deemed to
comply without maximum permis-
sive exposure evaluation (MPE). But
it is desirable that it should be
installed and operated with at least 20
cm and more between the radiator
and person’s body (excluding ex-
tremities: hands, wrists, feet and
ankles).
GX460 Navi (U)
OM60E73U
Finish
09.09.24
7
Using your audio/video
system —
— Some basics
Page 207 of 428
AUDIO/VIDEO SYSTEM
206
(a) Inserting discs
The “ENGINE START STOP” switch must
be in ACCESSORY or IGNITION ON
mode.
Your CD changer can store up to 6 discs.
You can set a disc at the lowest empty disc
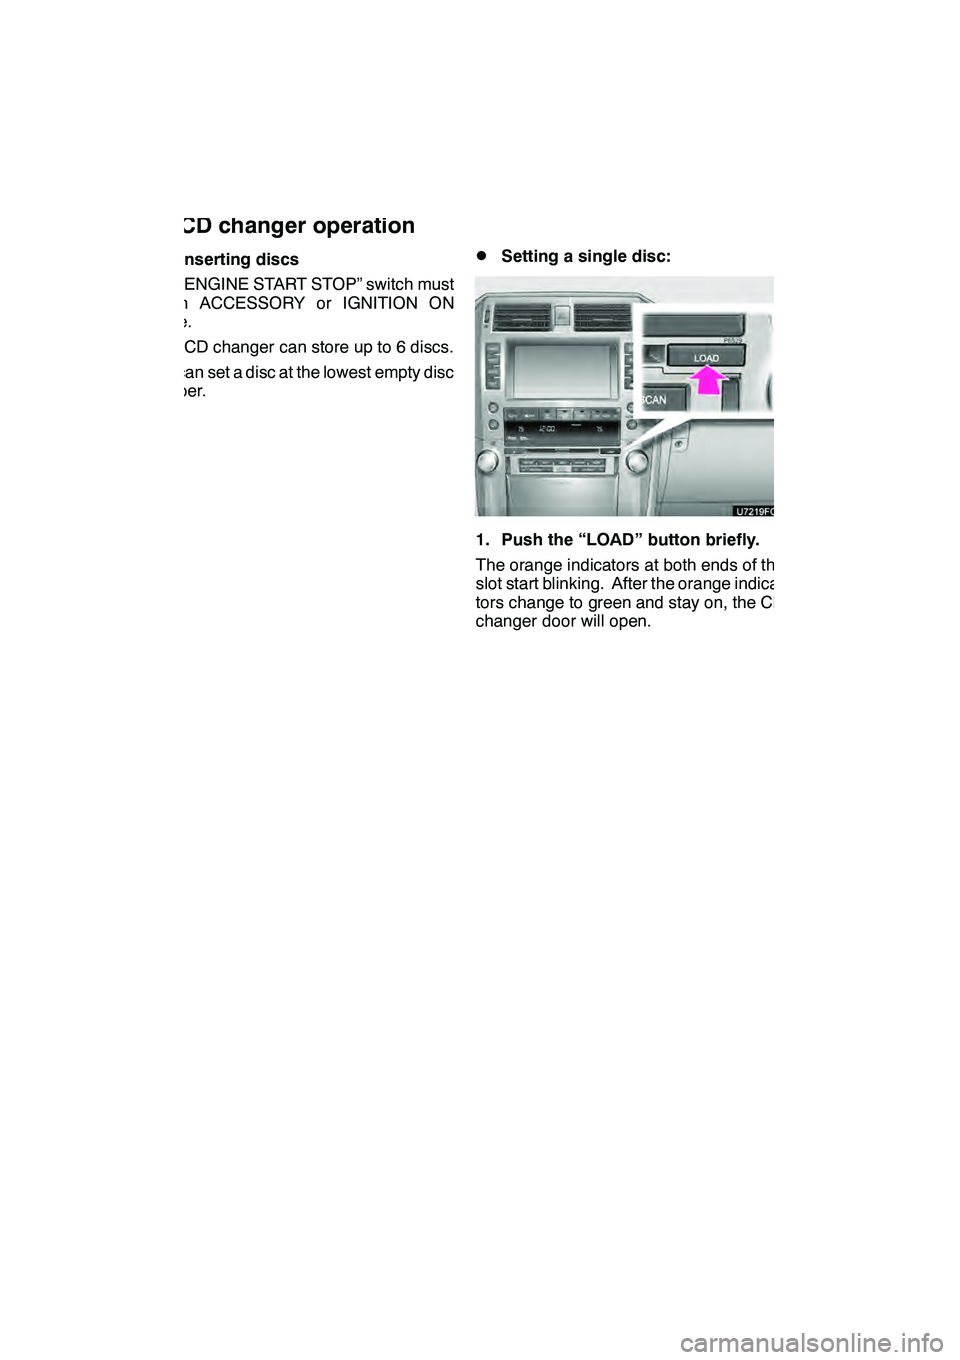
number.DSetting a single disc:
1. Push the “LOAD” button briefly.
The orange indicators at both ends of the
slot start blinking. After the orange indica-
tors change to green and stay on, the CD
changer door will open.
GX460 Navi (U)
OM60E73U
Finish
09.09.24— CD changer operation
Page 243 of 428
AUDIO/VIDEO SYSTEM
242
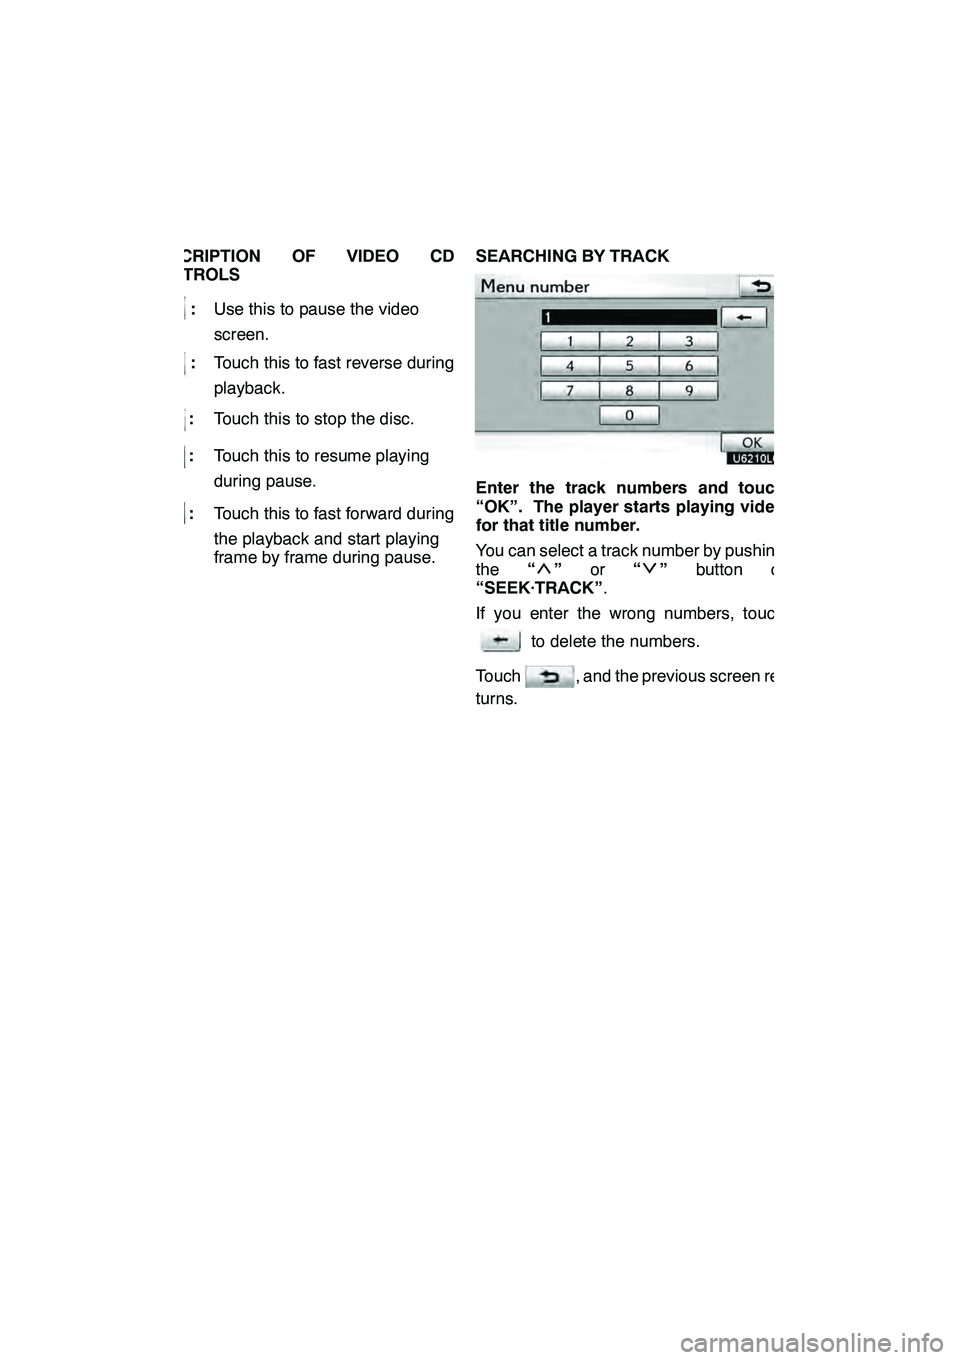
DESCRIPTION OF VIDEO CD
CONTROLS
:Use this to pause the video
screen.
:Touch this to fast reverse during
playback.
: Touch this to stop the disc.
:Touch this to resume playing
during pause.
:Touch this to fast forward during
the playback and start playing
frame by frame during pause. SEARCHING BY TRACK
Enter the track numbers and touch
“OK”. The player starts playing video
for that title number.
You can select a track number by pushing
the
“
”or “”button of
“SEEK·TRACK” .
If you enter the wrong numbers, touch
to delete the numbers.
Touch
, and the previous screen re-
turns.
GX460 Navi (U)
OM60E73U
Finish
09.09.24
Page 265 of 428
AUDIO/VIDEO SYSTEM
264
The rear seat entertainment system can
be used when the “ENGINE START
STOP” switch is in ACCESSORY or IGNI-
TION ON mode.
DDisplays
A display is installed in the back of each
front seat. When audio−video equipment
is connected to the A/V input adapter, rear
passengers can enjoy different audio
sources on each display. See “—Using the
video mode” on page 284.
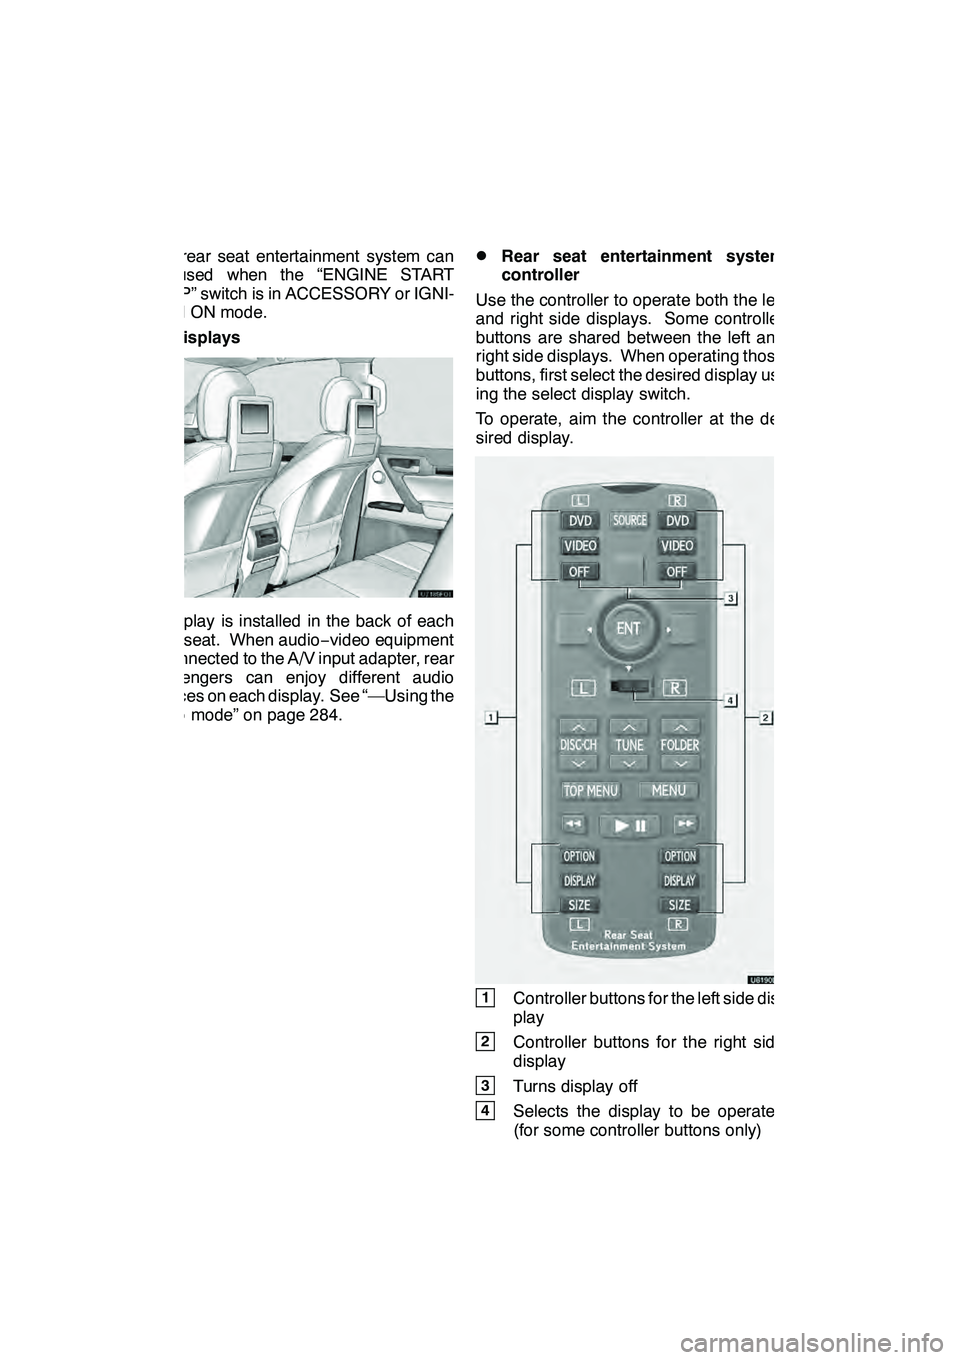
DRear seat entertainment system
controller
Use the controller to operate both the left
and right side displays. Some controller
buttons are shared between the left and
right side displays. When operating those
buttons, first select the desired display us-
ing the select display switch.
To operate, aim the controller at the de-
sired display.
1Controller buttons for the left side dis-
play
2Controller buttons for the right side
display
3Turns display off
4Selects the display to be operated
(for some controller buttons only)
GX460 Navi (U)
OM60E73U
Finish
09.09.24
Page 300 of 428

AIR CONDITIONING
299
17“TEMP” buttons
(Driver side temperature control but-
ton)301, 303
...................
18Passenger side temperature dis-
play
(In degrees Fahrenheit or Centi-
grade)
19Driver side temperature display
(In degrees Fahrenheit or Centi-
grade) (a) Climate control
Air outlets and fan speed are automati-
cally adjusted according to the temper-
ature setting.
The “ENGINE START STOP” switch must
be in IGNITION ON mode.
Push the “CLIMATE” button to display
the air conditioning control screen.
INFORMATION
When the “ENGINE START STOP”
switch is turn on, the air conditioning
system settings will be set to those
that were in use the last time the “EN-
GINE START STOP” switch was
turned off. Air conditioning system
settings are memorized individually
on each electronic key, so the set-
tings reproduced will be specific to
the key that is used.
NOTICE
To prevent the battery from being dis-
charged, do not leave the air condi-
tioning on longer than necessary
when the engine is not running.
GX460 Navi (U)
OM60E73U
Finish
09.09.24
8
Page 307 of 428

AIR CONDITIONING
306
(d) Rear air conditioning controls
(With rear air conditioning system)
1“REAR OFF” button
2Temperature control
3Fan speed control
4“REAR AUTO” button
Touch the “REAR AUTO” button.
The air conditioning system will operate,
and air outlets and fan speed will be ad-
justed automatically.
To adjust the temperature setting, push the
“
” button on “TEMP” to increase the
temperature and push the “”button to
decrease the temperature.
The fan speed can be set to your desired
speed by touching the appropriate fan
speed control button.
Touch “REAR OFF” to turn the fan off.
INFORMATION
When the “ENGINE START STOP”
switch is turn on, the air conditioning
system settings will be set to those
that were in use the last time the “EN-
GINE START STOP” switch was
turned off. Air conditioning system
settings are memorized individually
on each electronic key, so the set-
tings reproduced will be specific to
the key that is used.
(e) Defogging the windshield
The air conditioning system operates
automatically.
Recirculated air mode will automatically
switch to outside air mode. It is not pos-
sible to return to recirculated air mode
when the switch is on.
CAUTION
To prevent the windshield from fog-
ging up
Do not use the windshield air flow
button during cool air operation in
extremely humid weather. The differ-
ence between the temperature of the
outside air and that of the windshield
can cause the outer surface of the
windshield to fog up, blocking your
vision.
GX460 Navi (U)
OM60E73U
Finish
09.09.24