Track Lexus GX460 2010 Scheduled Maintenance Guide / LEXUS 2010 GX460 (OM60E69U) User Guide
[x] Cancel search | Manufacturer: LEXUS, Model Year: 2010, Model line: GX460, Model: Lexus GX460 2010Pages: 825, PDF Size: 9.27 MB
Page 427 of 825
426
3-2. Using the audio system
GX460_U.S.A. (OM60E69U)
Fast-forwarding and reversing filesTo fast-forward or reverse, press and hold “ ” or “ ” on the
“SEEK•TRACK” button until you hear a beep.
Selecting and scanning files
■ Selecting a file
Turn the “TUNE/SEL” knob or press “ ” or “ ” on the “SEEK•TRACK”
button to select the desired file.
■ Scanning the files in a folder
Press the “SCAN” button.
The first ten seconds of each file will be played.
To cancel, press the “SCAN” button again.
When the desired file is reached, press the “SCAN” button again.
Playing and pausing files
To play or pause a file, press the 3 ( ) button.
Page 428 of 825
427
3-2. Using the audio system
3
Interior features
GX460_U.S.A. (OM60E69U)
Random playback■ Playing files from a folder in random order
Press the 1 (RAND) button.
To cancel, press the 1 (RAND) button again.
■Playing all the files from a disc in random order
Press and hold the 1 (RAND) button until you hear a beep.
To cancel, press the 1 (RAND) button again.
Repeat play
■ Repeating a file
Press the 2 (RPT) button.
To cancel, press the 2 (RPT) button again.
■Repeating all the files in a folder
Press and hold the 2 (RPT) bu tton until you hear a beep.
To cancel, press the 2 (RPT) button again.
Switching the display
Press the “TEXT” button.
Each time the button is pressed, the display changes in the following order:
Folder no./File no./Elapsed time Folder name File name
Album title (MP3 only) Track title Artist name
Page 432 of 825
431
3-2. Using the audio system
3
Interior features
GX460_U.S.A. (OM60E69U)
●Discs containing multi-session recordings
As the audio system is compatible with multi-sessions, it is possible to play discs
that contain MP3 and WMA files. However, only the first session can be played.
●ID3 and WMA tags
ID3 tags can be added to MP3 files, making it possible to record the track title,
artist name, etc.
The system is compatible with ID3 Ver. 1. 0, 1.1, and Ver. 2.2, 2.3 ID3 tags. (The
number of characters is based on ID3 Ver. 1.0 and 1.1.)
WMA tags can be added to WMA files, ma king it possible to record the track
title and artist name in the same way as with ID3 tags.
●MP3 and WMA playback
When a disc containing MP3 or WMA files is inserted, all files on the disc are first
checked. Once the file check is finished, the first MP3 or WMA file is played. To
make the file check finish more quickly, we recommend you do not write in any
files other than MP3 or WMA files or create any unnecessary folders.
Discs that contain a mixture of music data and MP3 or WMA format data cannot
be played.
●Extensions
If the file extensions .mp3 and .wma are used for files other than MP3 and WMA
files, they will be mistakenly recognized and played as MP3 and WMA files. This
may result in large amounts of interference and damage to the speakers.
Page 437 of 825
436
3-2. Using the audio system
GX460_U.S.A. (OM60E69U)■
Selecting a list
Turn the “TUNE/SEL” knob to display the first selection list.
Press the “TUNE/SEL” knob to select the desired item.
Pressing the knob changes to the second selection list.
Repeat the same procedure to select the desired song name.
To return to the previous selection list, select “GO BACK” or press the
4 ( ) button.
Selecting songs
Turn the “TUNE/SEL” knob or press “ ” or “ ” on the “SEEK•TRACK”
button to select the desired song.
Playing and pausing songs
To play or pause a song, press the 3 ( ) button.
Fast-forwarding and rewinding songsTo fast-forward or rewind, press and hold “ ” or “” on the
“SEEK•TRACK” button until you hear a beep.
STEP1
STEP2
STEP3
Page 443 of 825
442
3-2. Using the audio system
GX460_U.S.A. (OM60E69U)
Selecting and scanning a folder■ Selecting folders one at a time
Press the 6 ( ) or 5 ( ) button to select the desired folder.
■ Returning to the first folder
Press and hold the 5 ( ) button until you hear a beep.
■ Scanning the first file of all the folders
Press and hold the “SCAN” button until you hear a beep.
The first ten seconds of the first file in each folder will be played.
When the desired folder is reached, press the “SCAN” button
again.
Selecting and scanning files
■ Selecting a file
Turn the “TUNE/SEL” knob or press “ ” or “ ” on the “SEEK•TRACK”
button to select the desired file.
■ Scanning the files in a folder
Press the “SCAN” button.
The first ten seconds of each file will be played.
To cancel, press the “SCAN” button again.
When the desired file is reached, press the “SCAN” button again.
STEP1
STEP2
Page 444 of 825
443
3-2. Using the audio system
3
Interior features
GX460_U.S.A. (OM60E69U)
Playing and pausing filesTo play or pause a file, press the 3 ( ) button.
Fast-forwarding and rewinding filesTo fast-forward or rewind, press and hold “ ” or “ ” on the
“SEEK•TRACK” button until you hear a beep.
Random playback
■ Playing files from a folder in random order
Press the 1 (RAND) button.
To cancel, press the 1 (RAND) button again.
■Playing all the files from a USB memory in random order
Press and hold the 1 (RAND) button until you hear a beep.
To cancel, press the 1 (RAND) button again.
Repeat play
■ Repeating a file
Press the 2 (RPT) button.
To cancel, press the 2 (RPT) button again.
■Repeating all the files in a folder
Press and hold the 2 (RPT) bu tton until you hear a beep.
To cancel, press the 2 (RPT) button again.
Page 445 of 825

444
3-2. Using the audio system
GX460_U.S.A. (OM60E69U)
Switching the displayPress the “TEXT” button.
Each time the button is pressed, the display changes in the following order:
Elapsed time Folder name File name Album title (MP3 only)
Track title Artist name
■USB memory functions
Depending on the USB memory that is connected to the system, certain functions
may not be available. Disconnecting the de vice and reconnecting it once again may
resolve some malfunctions.
■Display
P. 4 2 0
■Error messages
“ERROR”: This indicates a problem in the USB memory or its connection.
“NO MUSIC”: This indicates that no MP 3/WMA files are included in the USB
memory.
Page 448 of 825

447
3-2. Using the audio system
3
Interior features
GX460_U.S.A. (OM60E69U)
●ID3 and WMA tags
ID3 tags can be added to MP3 files, making it possible to record the track title,
artist name, etc.
The system is compatible with ID3 Ver. 1.0, 1.1, and Ver. 2.2, 2.3, 2.4 ID3 tags.
(The number of characters is based on ID3 Ver. 1.0 and 1.1.)
WMA tags can be added to WMA files, ma king it possible to record the track
title and artist name in the same way as with ID3 tags.
●MP3 and WMA playback
• When a device containing MP3 or WMA files is connected, all files in the
USB memory device are checked. Once the file check is finished, the first
MP3 or WMA file is played. To make th e file check finish more quickly, we
recommend that you do not include an y files other than MP3 or WMA files
or create any unnecessary folders.
• When the USB device is connected and the audio source is changed to
USB memory mode, the USB device will start playing the first file in the first
folder. If the same device is removed and reinserted (and the contents have
not been changed), the USB device will resume play from the same point in
which it was last used.
●Extensions
If the file extensions .mp3 and .wma are used for files other than MP3 and WMA
files, they will be mistakenly recognized and played as MP3 and WMA files. This
may result in large amounts of interference and damage to the speakers.
Page 453 of 825
452
3-2. Using the audio system
GX460_U.S.A. (OM60E69U)
Using the steering wheel audio switches
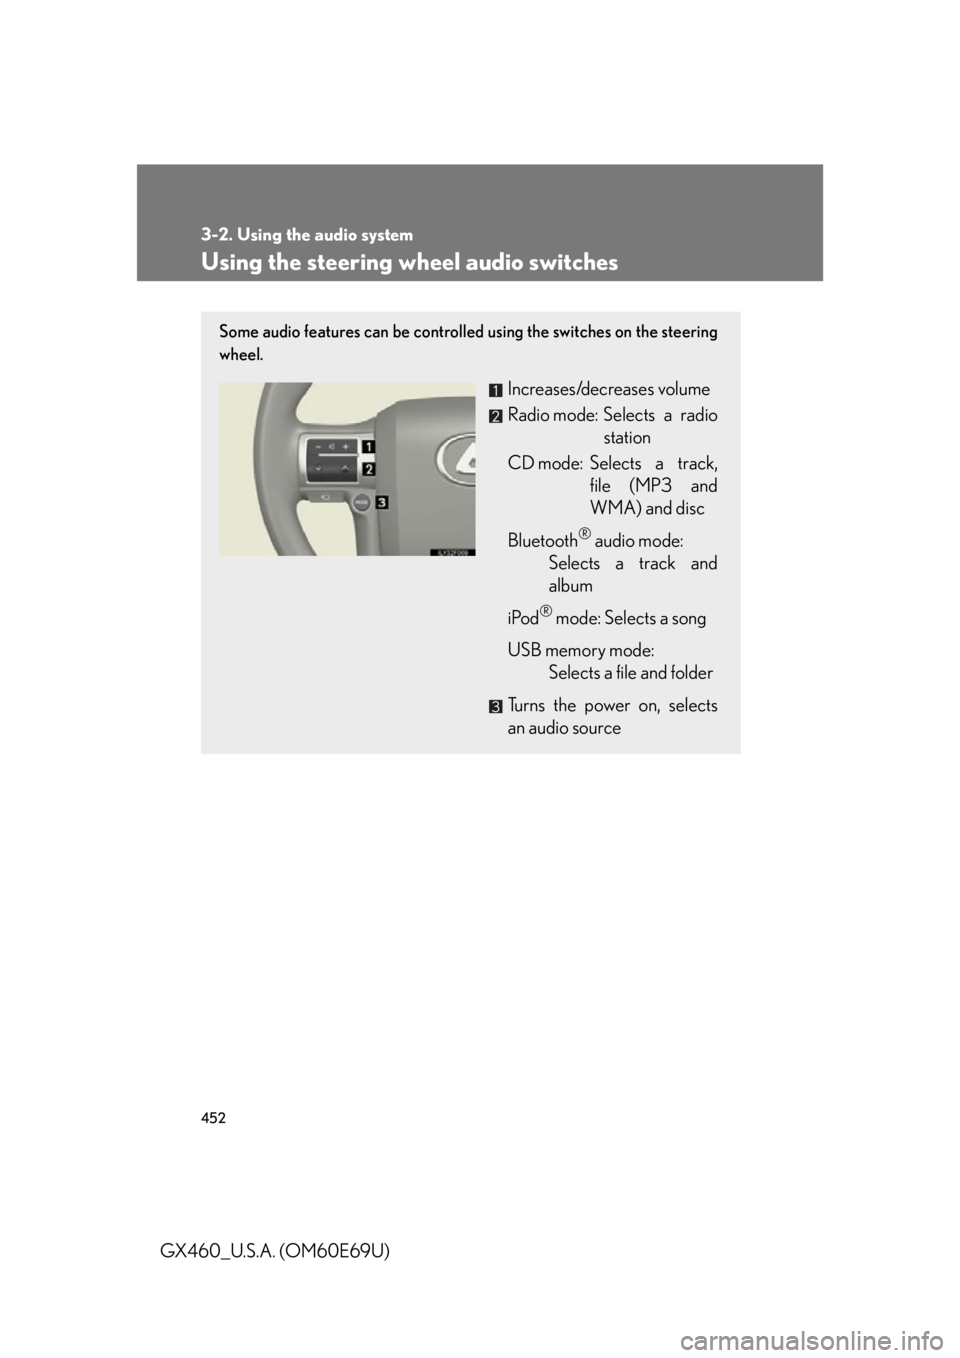
Some audio features can be controlled using the switches on the steering
wheel.
Increases/decreases volume
Radio mode: Selects a radio station
CD mode: Selects a track, file (MP3 and
WMA) and disc
Bluetooth
® audio mode:
Selects a track and
album
iPod
® mode: Selects a song
USB memory mode:
Selects a file and folder
Turns the power on, selects
an audio source
Page 455 of 825
454
3-2. Using the audio system
GX460_U.S.A. (OM60E69U)
Selecting a track/file or songPress the “MODE” button to select CD, Bluetooth
® audio, iPod®
or USB memory mode.
Press “” or “ ” on to select the desired track/file or
song.
Selecting an album
Press the “MODE” button to select Bluetooth
® audio mode.
Press and hold “ ” or “ ” on until you hear a beep.
Selecting a folder
Press the “MODE” button to select USB memory mode.
Press and hold “ ” or “ ” on until you hear a beep.
Selecting a disc in the CD player
Press the “MODE” button to select CD mode.
Press and hold “ ” or “ ” on until you hear a beep.
STEP1
STEP2
STEP1
STEP2
STEP1
STEP2
STEP1
STEP2