Lexus GX460 2010 Using The Bluetooth Audio System /
Manufacturer: LEXUS, Model Year: 2010,
Model line: GX460,
Model: Lexus GX460 2010
Pages: 825, PDF Size: 9.27 MB
Lexus GX460 2010 Using The Bluetooth Audio System /
GX460 2010
Lexus
Lexus
https://www.carmanualsonline.info/img/36/29563/w960_29563-0.png
Lexus GX460 2010 Using The Bluetooth Audio System /
Trending: engine coolant, garage door opener, automatic transmission fluid, steering, fog light bulb, warning light, ESP
Page 721 of 825
720
5-2. Steps to take in an emergency
GX460_U.S.A. (OM60E69U)
If you have a flat tire
Remove the flat tire and replace it with the spare provided.
■Before jacking up the vehicle
●Stop the vehicle on a hard, flat surface.
● Set the parking brake.
● Shift the shift lever to P.
● Vehicles with rear height cont rol air suspension: Turn off the
height control. ( P. 310)
● Stop the engine.
● Turn on the emergency flashers. ( P. 6 74 )
■ Location of the spare tire, jack and tools
Spare tire
Jack
To o l b o x
Page 722 of 825
5
When trouble arises
721
5-2. Steps to take in an emergency
GX460_U.S.A. (OM60E69U)
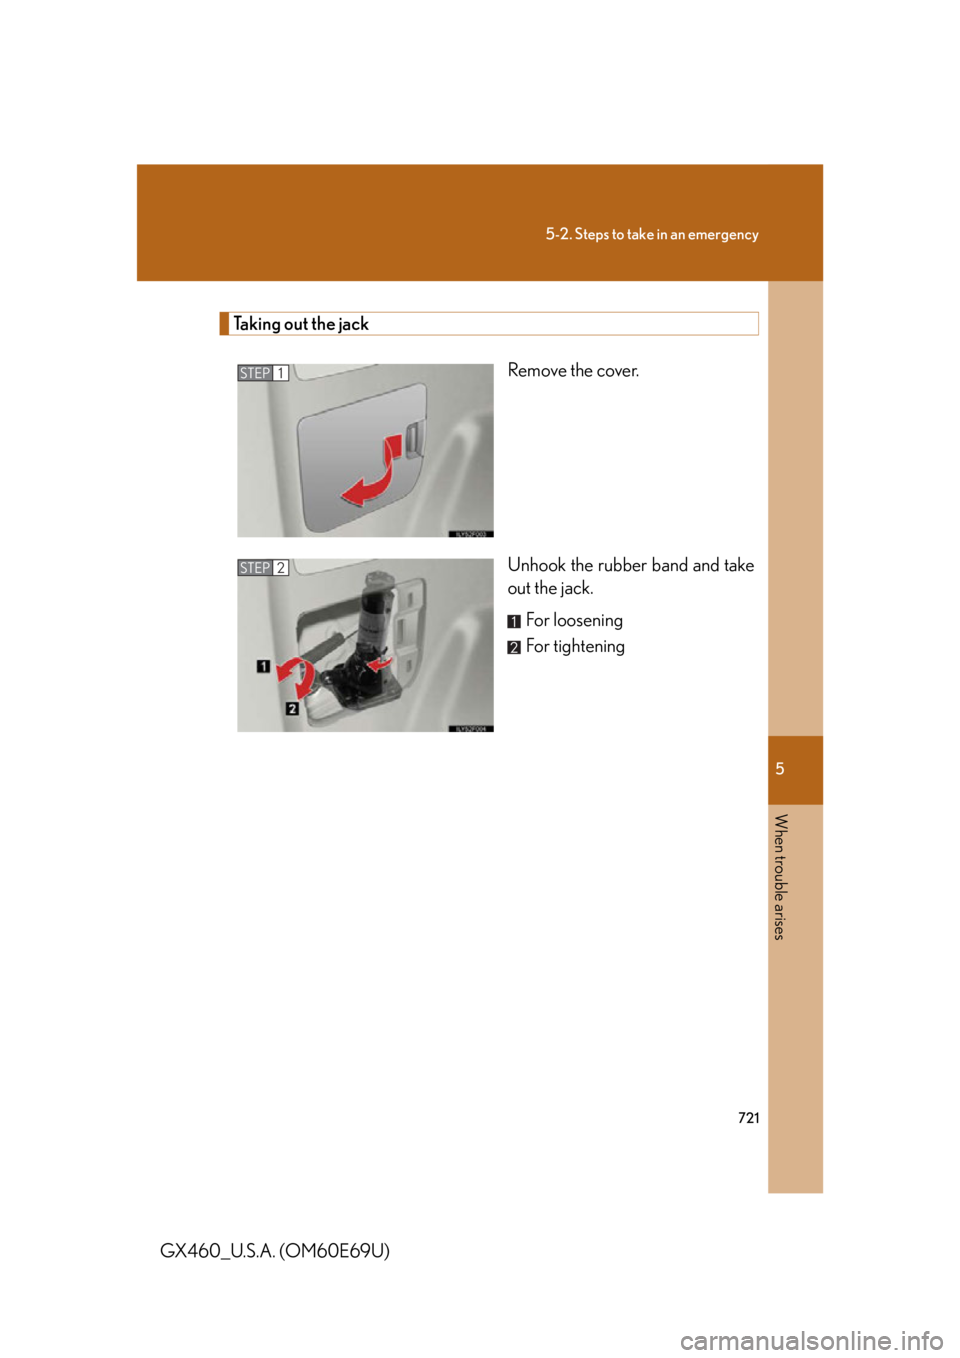
Taking out the jackRemove the cover.
Unhook the rubber band and take
out the jack.For loosening
For tightening
STEP1
STEP2
Page 723 of 825
722
5-2. Steps to take in an emergency
GX460_U.S.A. (OM60E69U)
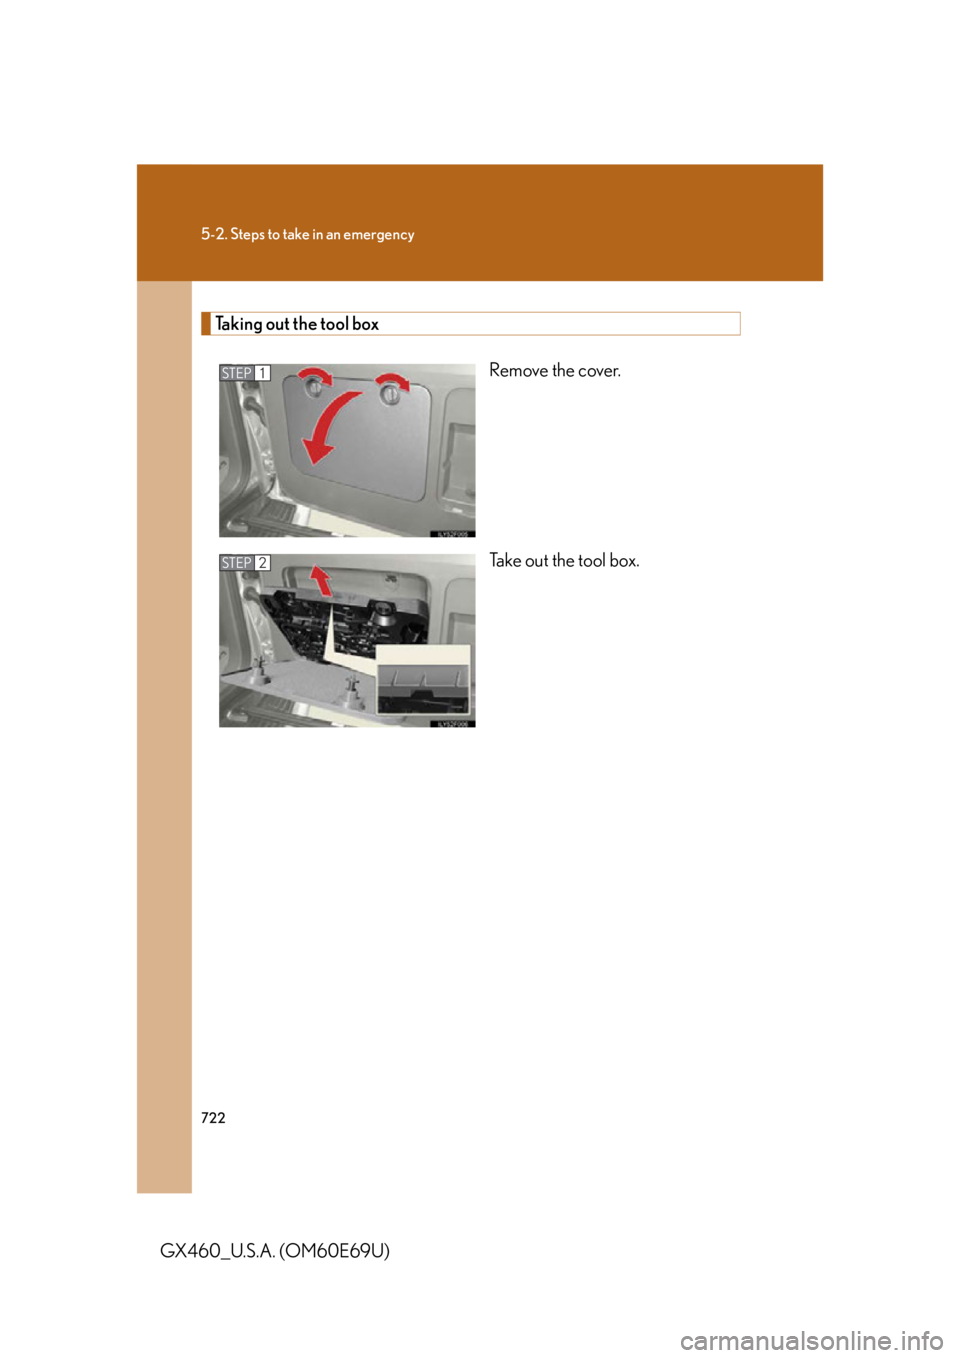
Taking out the tool boxRemove the cover.
Take out the tool box.
STEP1
STEP2
Page 724 of 825
5
When trouble arises
723
5-2. Steps to take in an emergency
GX460_U.S.A. (OM60E69U)
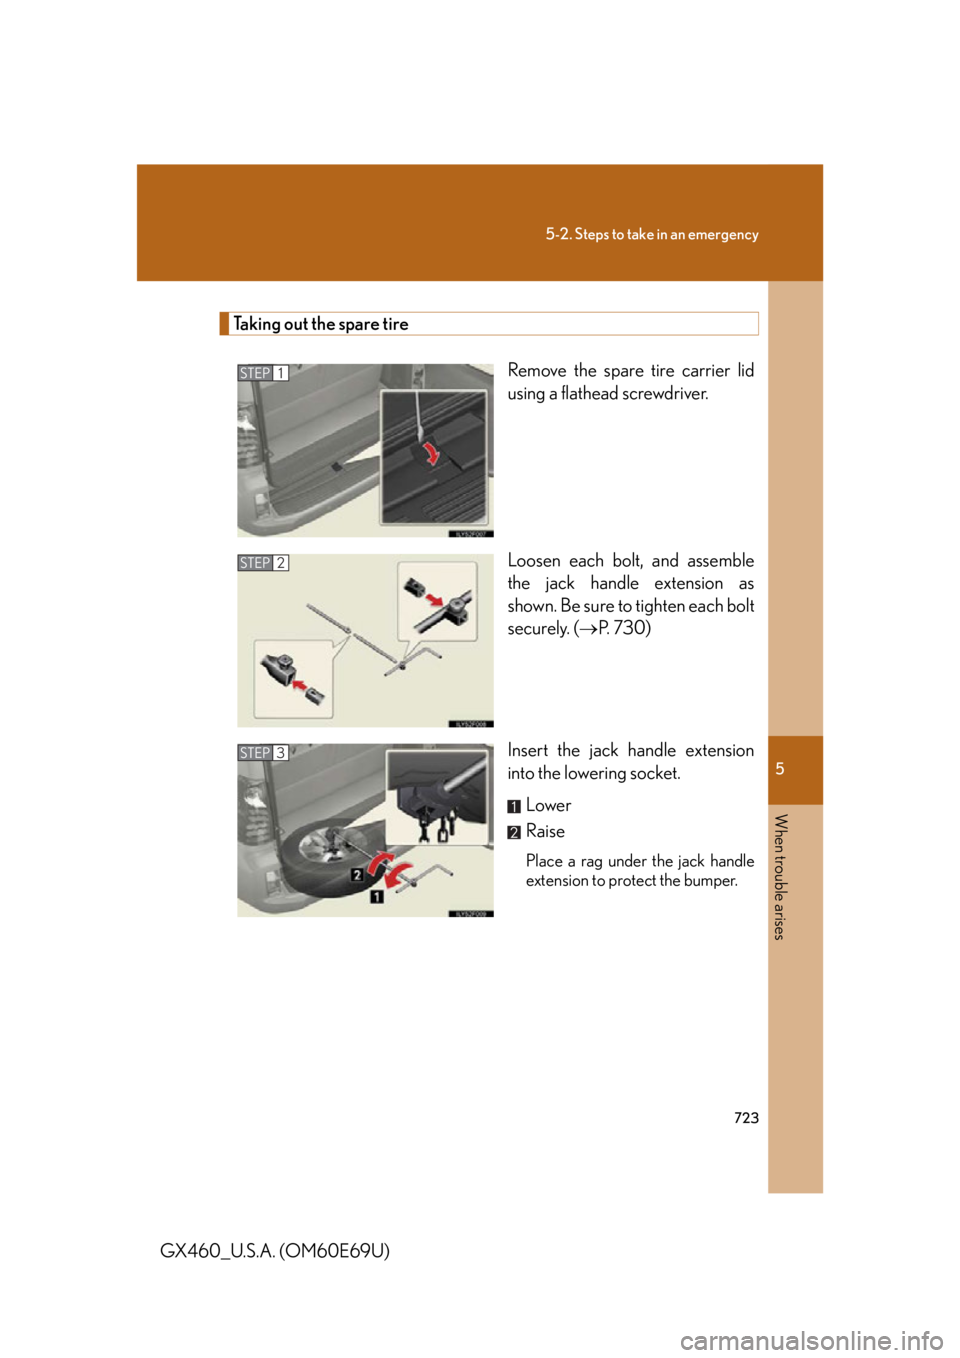
Taking out the spare tireRemove the spare tire carrier lid
using a flathead screwdriver.
Loosen each bolt, and assemble
the jack handle extension as
shown. Be sure to tighten each bolt
securely. ( P. 730)
Insert the jack handle extension
into the lowering socket. Lower
Raise
Place a rag under the jack handle
extension to protect the bumper.
STEP1
STEP2
STEP3
Page 725 of 825
724
5-2. Steps to take in an emergency
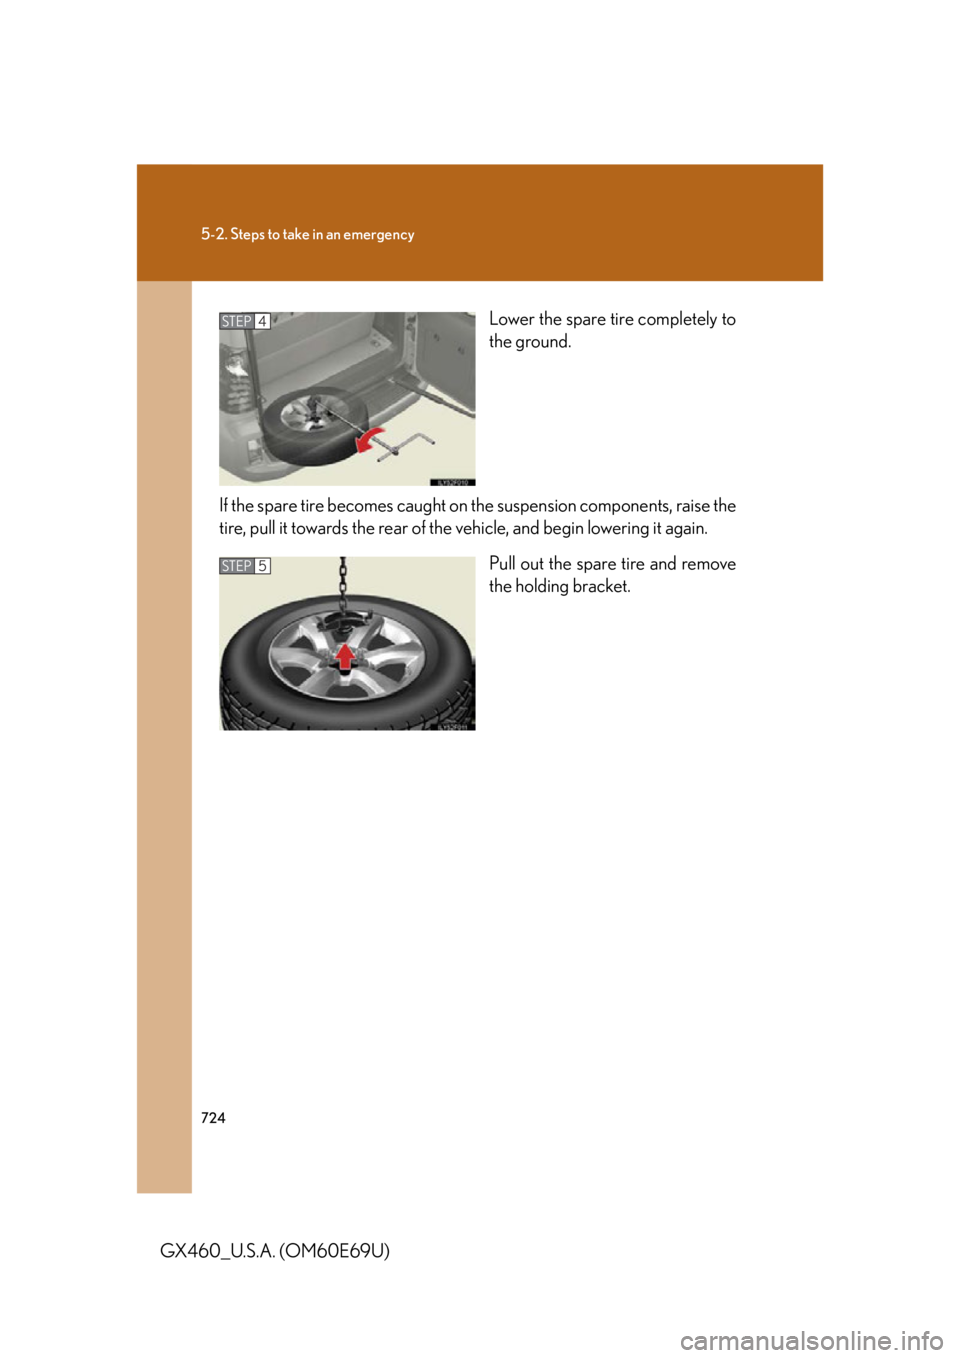
GX460_U.S.A. (OM60E69U)Lower the spare tire completely to
the ground.
If the spare tire becomes caught on the suspension components, raise the
tire, pull it towards the rear of the vehicle, and begin lowering it again. Pull out the spare tire and remove
the holding bracket.
STEP4
STEP5
Page 726 of 825
5
When trouble arises
725
5-2. Steps to take in an emergency
GX460_U.S.A. (OM60E69U)
Replacing a flat tireChock the tires.
Pry off the wheel ornament, using
the beveled end of the wheel orna-
ment remover as shown.
STEP1
Flat tireWheel chock position
FrontLeft-hand sideBehind the rear right-hand side tire
Right-hand sideBehind the rear left-hand side tire
Rear
Left-hand sideIn front of the front right-hand side tire
Right-hand sideIn front of the front left-hand side tire
STEP2
Page 727 of 825
726
5-2. Steps to take in an emergency
GX460_U.S.A. (OM60E69U)Slightly loosen the wheel nuts (one
turn).
Position the jack at the jack points
as shown.
Front - Under the chassis frame
side rail
Rear - Under the rear axle housing
STEP3
STEP4
Page 728 of 825
5
When trouble arises
727
5-2. Steps to take in an emergency
GX460_U.S.A. (OM60E69U)Loosen each bolt, and assemble
the jack handle extension as
shown. Be sure to
tighten each bolt
securely. ( P. 730)
Raise the vehicle until the tire is
slightly raised off the ground.
Remove all the wh eel nuts and the
tire.
When resting the tire on the
ground, place the tire so that the
wheel design faces up to avoid
scratching the wheel surface.
STEP5
STEP6
STEP7
Page 729 of 825
728
5-2. Steps to take in an emergency
GX460_U.S.A. (OM60E69U)
Installing the spare tireRemove any dirt or foreign matter
from the wheel contact surface.
If foreign matter is on the wheel
contact surface, the wheel nuts
may loosen while the vehicle is in
motion, and the tire may come off
the vehicle.
Install the spare tire and loosely
tighten each nut by hand to
approximately the same amount.
Turn the lug nuts until the washers
come into contact with the disc
wheel.
Lower the vehicle.
STEP1
STEP2
Wheel nut
Wa s h e r
Disc wheel
STEP3
Page 730 of 825
5
When trouble arises
729
5-2. Steps to take in an emergency
GX460_U.S.A. (OM60E69U)Firmly tighten each nut two or
three times in the order shown in
the illustration.
Tightening torque:
83 ft•lbf (112 N•m, 11.5 kgf•m)
Reinstall the wheel ornament.
Stowing the flat/spare tire, jack and tools
Lay down the tire with the outer
side facing up, and install the hold-
ing bracket.
Raise the tire.
Pull the tire towards the rear of the vehicle when raising. After
raising, visually check that the tire is not interfering with suspen-
sion components.
Stow the tools and jack securely, and replace all covers.
STEP4
STEP5
STEP1
STEP5STEP2
STEP5STEP3
Trending: steering, change wheel, fuel pressure, coolant, MPG, low oil pressure, power steering


