lock Lexus GX460 2014 Using the air conditioning system and defogger / LEXUS 2014 GX460 OWNERS MANUAL (OM60K80U)
[x] Cancel search | Manufacturer: LEXUS, Model Year: 2014, Model line: GX460, Model: Lexus GX460 2014Pages: 622, PDF Size: 8.61 MB
Page 412 of 622
412
GX460_OM_OM60K80U_(U)5-4. Using the other interior features
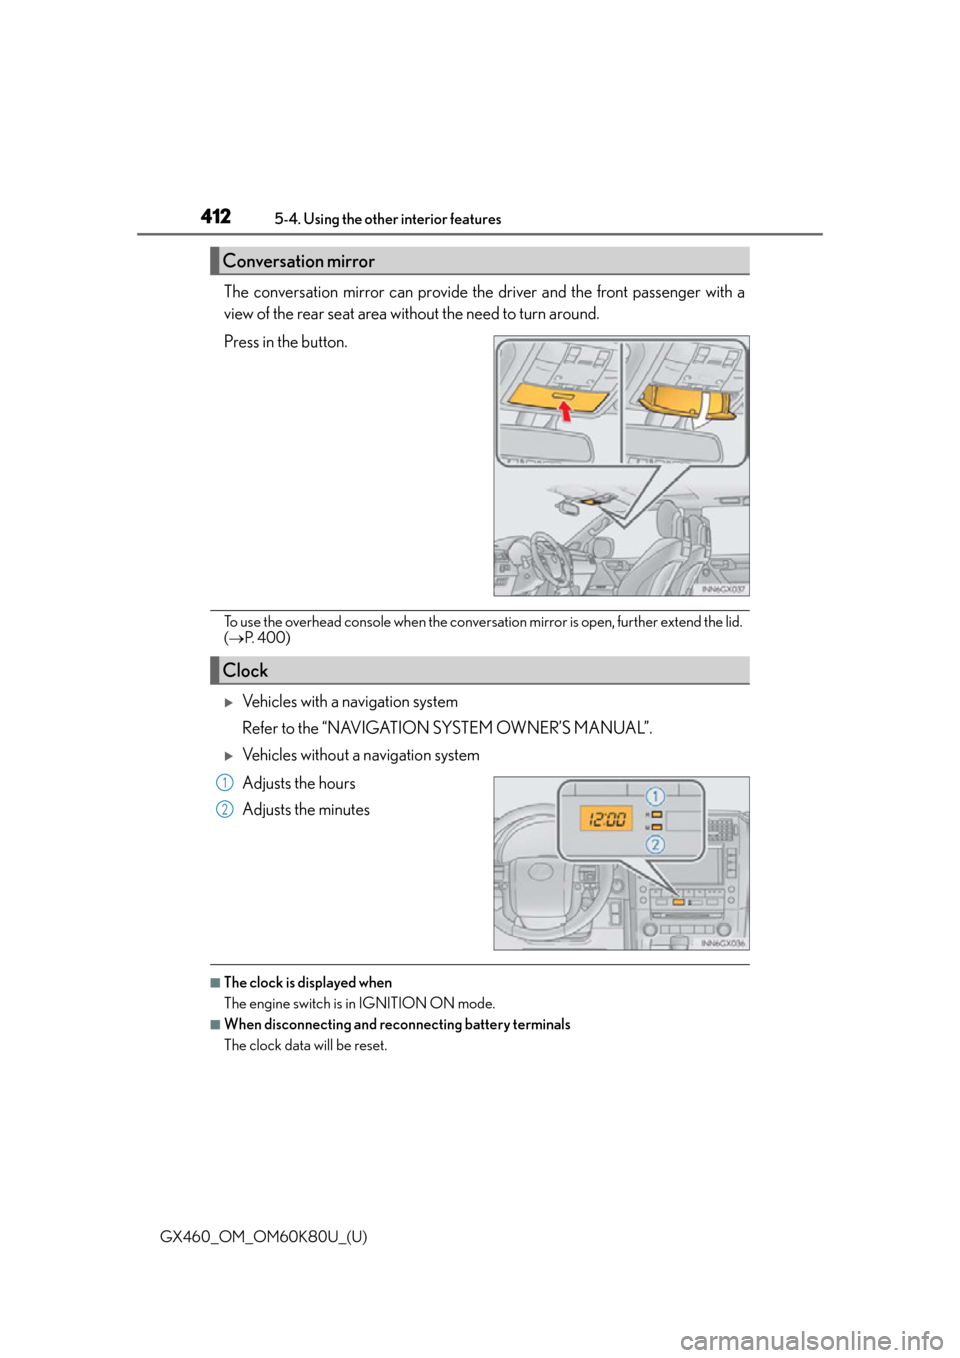
The conversation mirror can provide the driver and the front passenger with a
view of the rear seat area without the need to turn around.
Press in the button.
To use the overhead console when the conversation mirror is open, further extend the lid.
(
P. 400)
Vehicles with a navigation system
Refer to the “NAVIGATION SYSTEM OWNER’S MANUAL”.
Vehicles without a navigation system
Adjusts the hours
Adjusts the minutes
■The clock is displayed when
The engine switch is in IGNITION ON mode.
■When disconnecting and reco nnecting battery terminals
The clock data will be reset.
Conversation mirror
Clock
1
2
Page 421 of 622

GX460_OM_OM60K80U_(U)
4215-4. Using the other interior features
5
Interior features
◆Deviation calibrationStop the vehicle in a place where it is safe to drive in a circle.
Press the switch until a number (1
to 15) appears on the compass
display.
Press the switch and referring to the map above, select the number of the
zone where you are.
If the direction is displayed several se conds after adjustment, the calibration is
complete.
◆Circling calibration
When “C” appears on the display,
drive the vehicle at 5 mph (8 km/h)
or less in a circle until a direction is
displayed.
If there is not enough space to drive
in a circle, drive around the block
until the direction is displayed.
1
2
3
Page 423 of 622

423
GX460_OM_OM60K80U_(U)5-4. Using the other interior features
5
Interior features
Garage door opener
The garage door opener (HomeLink® Universal Transceiver) is manufactured
under license from HomeLink®.
The HomeLink
® compatible transceiver in your vehicle has 3 buttons which can
be programmed to operate 3 different devices. Refer to the programming
method below appropriate for the device.
Indicator light
Buttons
■Before programming HomeLink®
●During programming, it is possible that garage doors, gates, or other devices
may operate. For this reason, make sure that people and objects are clear of
the garage door or other devices to pr event injury or other potential harm.
●It is recommended that a new battery be placed in the remote control trans-
mitter for more accurate programming.
●Garage door openers manufactured after 1995 may be equipped with rolling
code protection . If this is the case, you will need a stepladder or other sturdy,
safe device to reach the “Learn” or “S mart” button on the garage door opener
motor.
The garage door opener can be programmed to operate garage doors, gates,
entry doors, door locks, home lighting systems, security systems, and other
devices.
Programming the HomeLink®
1
2
Page 444 of 622
444
GX460_OM_OM60K80U_(U)6-2. Maintenance
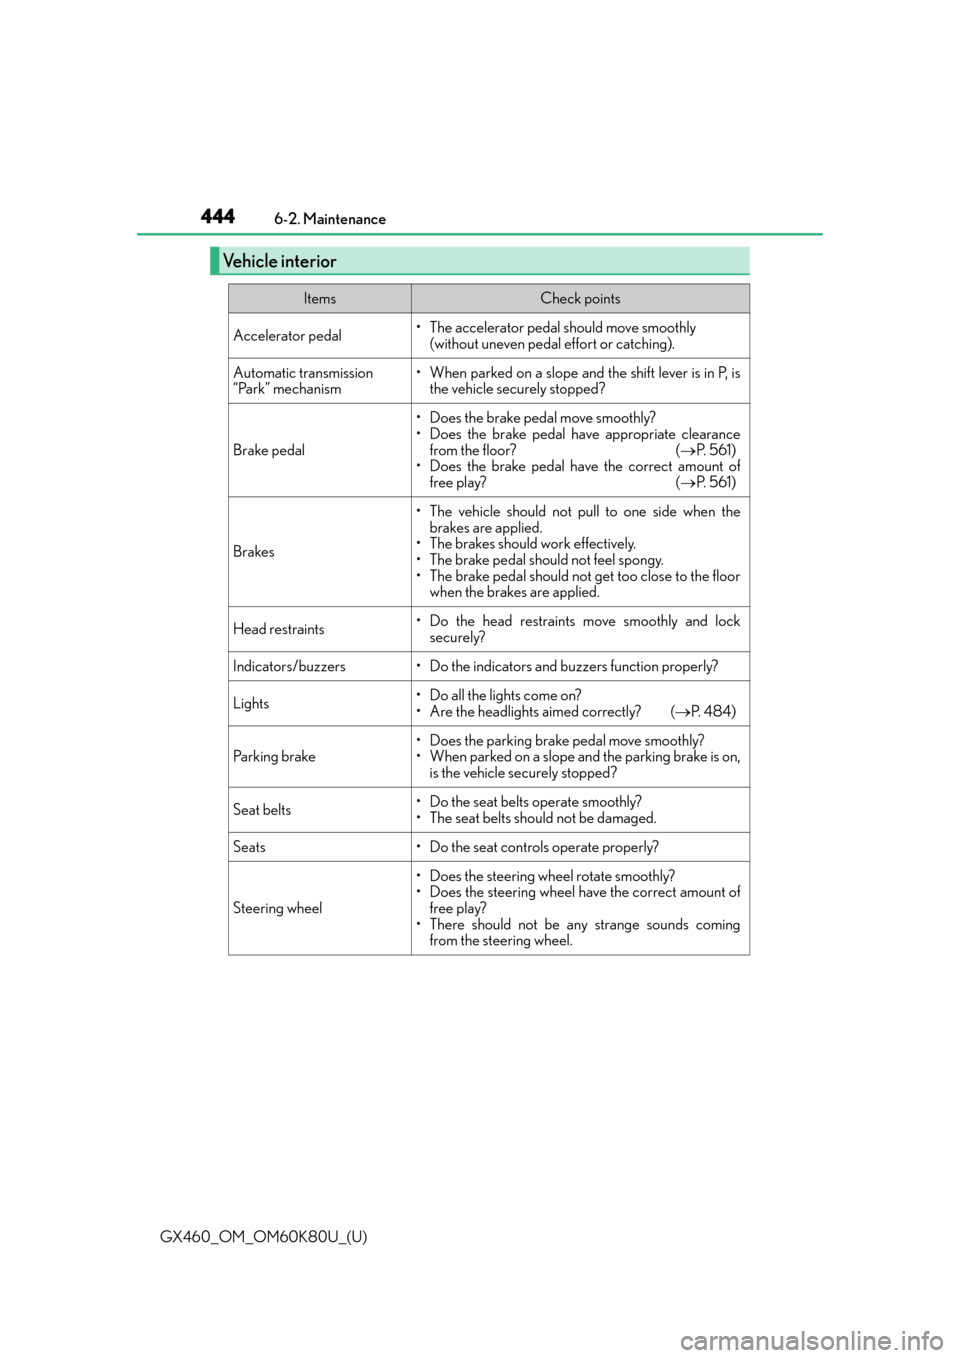
Vehicle interior
ItemsCheck points
Accelerator pedal• The accelerator pedal should move smoothly
(without uneven pedal effort or catching).
Automatic transmission
“Park” mechanism• When parked on a slope and the shift lever is in P, isthe vehicle securely stopped?
Brake pedal
• Does the brake pedal move smoothly?
• Does the brake pedal have appropriate clearance
from the floor? ( P. 5 6 1 )
• Does the brake pedal have the correct amount of
free play? ( P. 5 6 1 )
Brakes
• The vehicle should not pull to one side when the
brakes are applied.
• The brakes should work effectively.
• The brake pedal should not feel spongy.
• The brake pedal should not get too close to the floor when the brakes are applied.
Head restraints• Do the head restraints move smoothly and lock
securely?
Indicators/buzzers• Do the indicators and buzzers function properly?
Lights• Do all the lights come on?
• Are the headlights aimed correctly? ( P. 484)
Parking brake• Does the parking brake pedal move smoothly?
• When parked on a slope and the parking brake is on,
is the vehicle securely stopped?
Seat belts•Do the seat belt s operate smoothly?
• The seat belts should not be damaged.
Seats• Do the seat controls operate properly?
Steering wheel
• Does the steering wheel rotate smoothly?
• Does the steering wheel have the correct amount of free play?
• There should not be an y strange sounds coming
from the steering wheel.
Page 445 of 622
GX460_OM_OM60K80U_(U)
4456-2. Maintenance
6
Maintenance and care
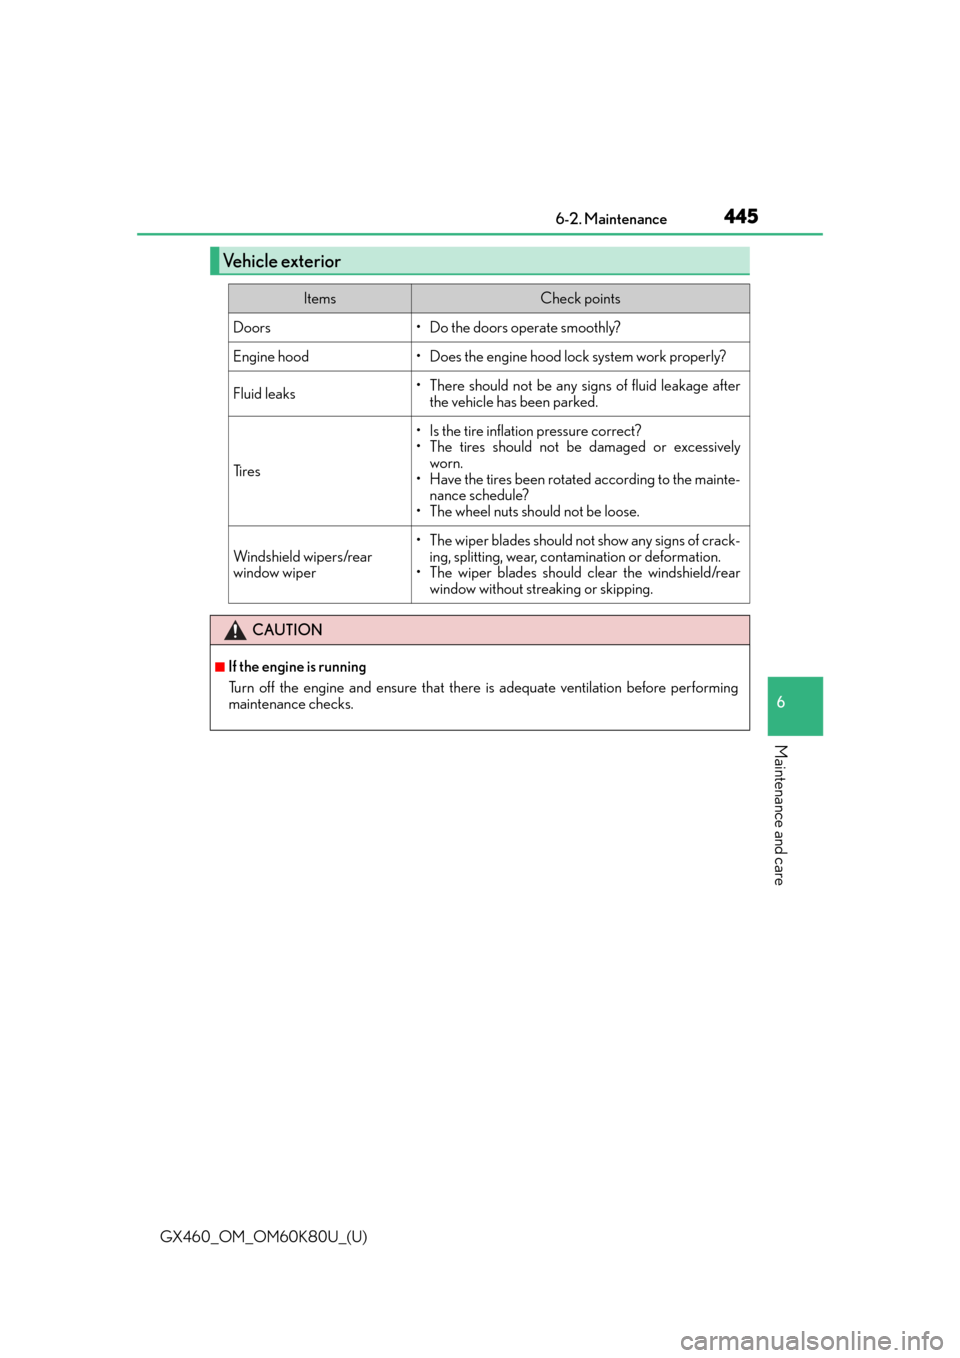
Vehicle exterior
ItemsCheck points
Doors• Do the doors operate smoothly?
Engine hood• Does the engine hood lock system work properly?
Fluid leaks• There should not be any signs of fluid leakage afterthe vehicle has been parked.
Ti r e s
• Is the tire inflation pressure correct?
• The tires should not be damaged or excessivelyworn.
• Have the tires been rotated according to the mainte- nance schedule?
• The wheel nuts should not be loose.
Windshield wipers/rear
window wiper
• The wiper blades should no t show any signs of crack-
ing, splitting, wear, contamination or deformation.
• The wiper blades should clear the windshield/rear
window without streaking or skipping.
CAUTION
■If the engine is running
Turn off the engine and ensure that there is adequate ventilation before performing
maintenance checks.
Page 450 of 622

450
GX460_OM_OM60K80U_(U)6-3. Do-it-yourself maintenance
Hood
Pull the hood lock release lever.
The hood will pop up slightly.
Move the auxiliary catch lever to
side direction and lift the hood.
Release the lock from the inside of the vehicle to open the hood.
1
2
CAUTION
■Pre-driving check
Check that the hood is fully closed and locked.
If the hood is not locked properly, it may open while the vehicle is in motion and cause
an accident, which may result in death or serious injury.
Page 454 of 622
454
GX460_OM_OM60K80U_(U)6-3. Do-it-yourself maintenance
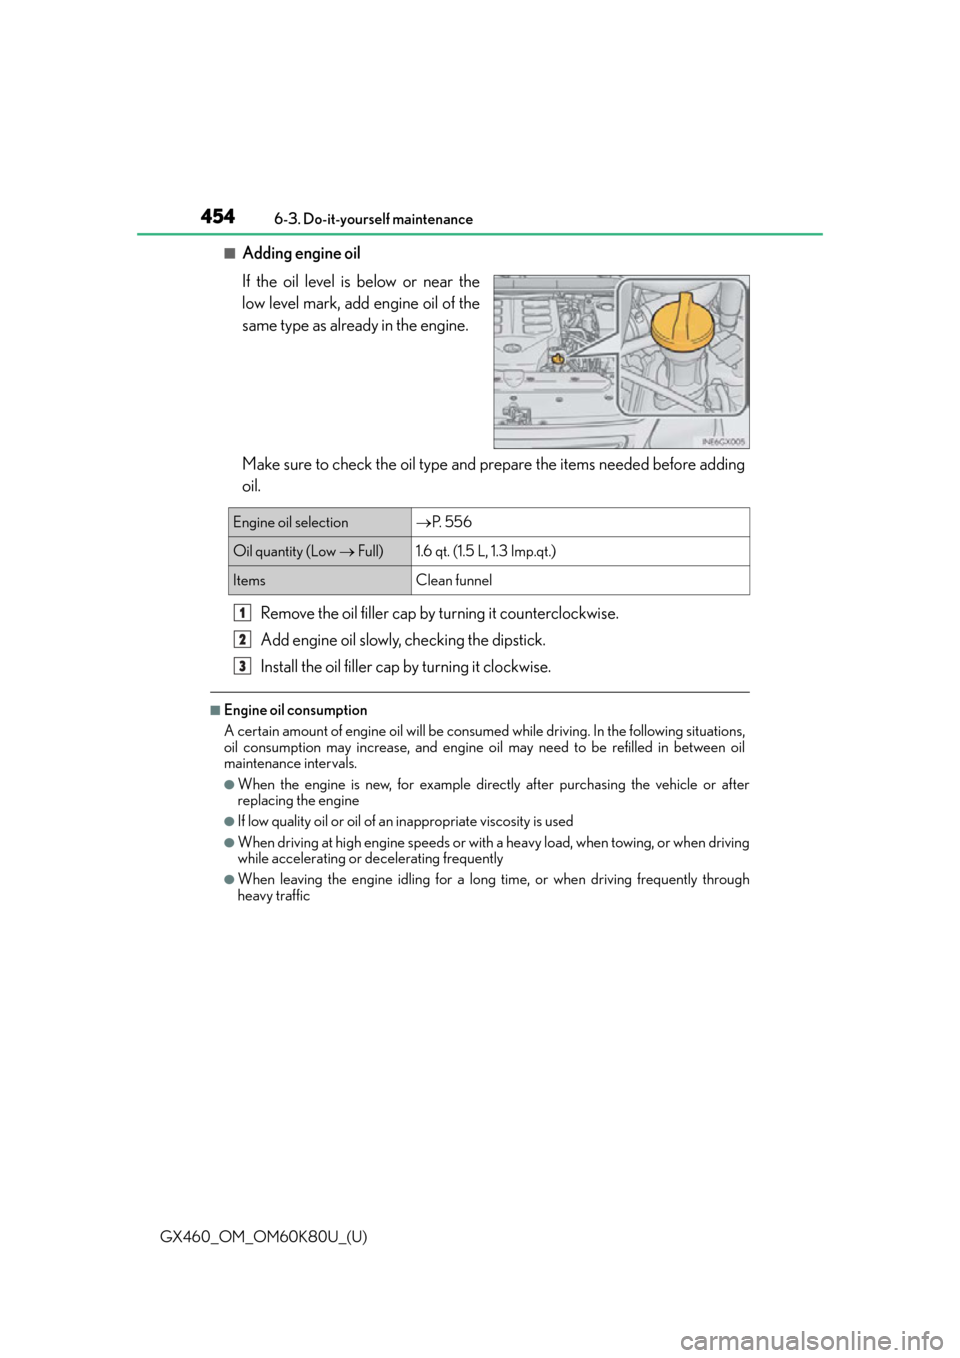
■Adding engine oil
If the oil level is below or near the
low level mark, add engine oil of the
same type as already in the engine.
Make sure to check the oil type and prepare the items needed before adding
oil.
Remove the oil filler cap by turning it counterclockwise.
Add engine oil slowly, checking the dipstick.
Install the oil filler cap by turning it clockwise.
■Engine oil consumption
A certain amount of engine oil will be consum ed while driving. In the following situations,
oil consumption may increase, and engine o il may need to be refilled in between oil
maintenance intervals.
●When the engine is new, for example directly after purchasing the vehicle or after
replacing the engine
●If low quality oil or oil of an inappropriate viscosity is used
●When driving at high engine speeds or with a heavy load, when towing, or when driving
while accelerating or de celerating frequently
●When leaving the engine idling for a long time, or when driving frequently through
heavy traffic
Engine oil selection P. 5 5 6
Oil quantity (Low Full)1.6 qt. (1.5 L, 1.3 Imp.qt.)
ItemsClean funnel
1
2
3
Page 459 of 622
GX460_OM_OM60K80U_(U)
4596-3. Do-it-yourself maintenance
6
Maintenance and care
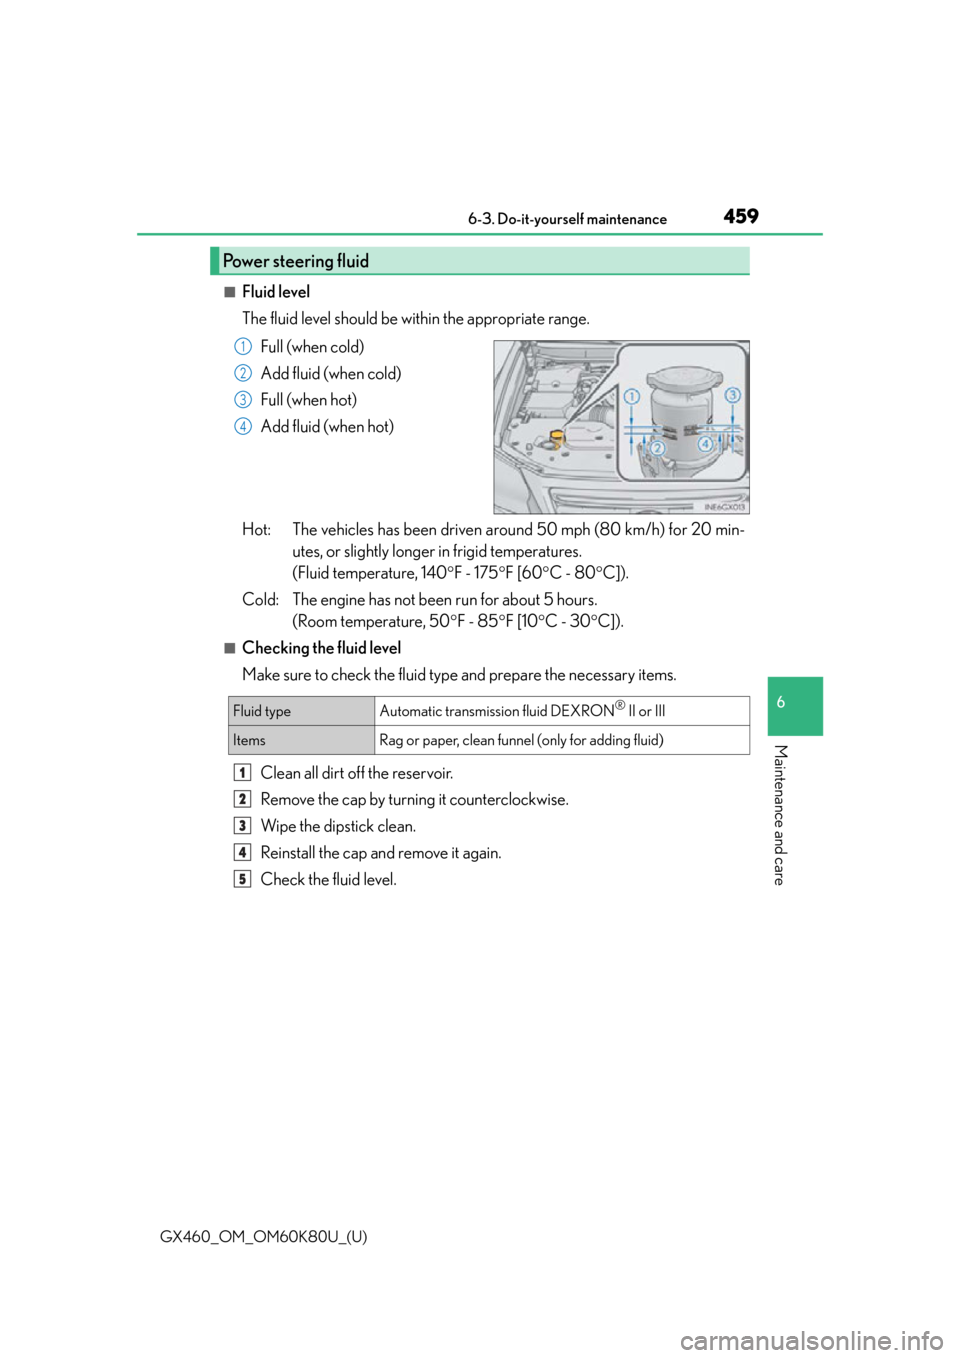
■Fluid level
The fluid level should be within the appropriate range.Full (when cold)
Add fluid (when cold)
Full (when hot)
Add fluid (when hot)
Hot: The vehicles has been driven around 50 mph (80 km/h) for 20 min- utes, or slightly longer in frigid temperatures.
(Fluid temperature, 140 F - 175 F [60 C - 80 C]).
Cold: The engine has not been run for about 5 hours. (Room temperature, 50 F - 85 F [10 C - 30 C]).
■Checking the fluid level
Make sure to check the fluid type and prepare the necessary items.
Clean all dirt off the reservoir.
Remove the cap by turnin g it counterclockwise.
Wipe the dipstick clean.
Reinstall the cap and remove it again.
Check the fluid level.
Power steering fluid
1
2
3
4
Fluid typeAutomatic transmission fluid DEXRON® II or III
ItemsRag or paper, clean funnel (only for adding fluid)
1
2
3
4
5
Page 461 of 622

GX460_OM_OM60K80U_(U)
4616-3. Do-it-yourself maintenance
6
Maintenance and care
■Before recharging
When recharging, the battery produces hydrogen gas which is flammable and explosive.
Therefore, observe the following before recharging:
●If recharging with the battery installed on the vehicle, be sure to disconnect the ground
cable.
●Make sure the power switch on the charger is off when connecting and disconnecting
the charger cables to the battery.
■After recharging/reconnecting the battery
The engine may not start. Follow the procedure below to initialize the system.
Shift the shift lever to P
Open and close any of the doors.
Restart the engine.
●Unlocking the doors using the smart access system with push-button start may not be
possible immediately after reconnecting the battery. If this happens, use the wireless
remote control or the mechanical key to lock/unlock the doors.
●Start the engine with the engine switch in ACCESSORY mode. The engine may not
start with the engine switch turned off. However, the engine will operate normally from
the second attempt.
●The engine switch mode is recorded by the vehicle. If the battery is reconnected, the
vehicle will return the engine switch mode to the status it was in before the battery was
disconnected. Make sure to turn off the en gine before disconnect the battery. Take
extra care when connecting the battery if the engine switch mode prior to discharge is
unknown.
If the system will not start even after multiple attempts, contact your Lexus dealer.
CAUTION
■Chemicals in the battery
Batteries contain poisonous and corrosive sulfuric acid and may produce hydrogen
gas which is flammable and explosive. To reduce the risk of death or serious injury, take
the following precautions while working on or near battery:
●Do not cause sparks by touching the battery terminals with tools.
●Do not smoke or light a match near the battery.
●Avoid contact with eyes, skin and clothes.
●Never inhale or swallow electrolyte.
●Wear protective safety glasses when working near the battery.
●Keep children away from the battery.
■Where to safely charge the battery
Always charge the battery in an open area. Do not charge the battery in a garage or
closed room where there is not sufficient ventilation.
1
2
3
Page 468 of 622

468
GX460_OM_OM60K80U_(U)6-3. Do-it-yourself maintenance
■If the tread on snow tires wears down below 0.16 in. (4 mm)
The effectiveness of the tires as snow tires is lost.
■Situations in which the tire pressure warning system may not operate properly
●In the following cases, the tire pressure warning system may not operate properly.
• If non-genuine Lexus wheels are used.
• A tire has been replaced with a tire that is not an OE (Original Equipment) tire.
• A tire has been replaced with a tire that is not of the specified size.
• Tire chains etc. are equipped.
• Lock nuts are equipped.
• An auxiliary-supported run-flat tire is equipped.
• If a window tint that affects the radio wave signals is installed.
• If there is a lot of snow or ice on the vehicle, particularly around the wheels or wheel
housings.
• If the tire inflation pressure is extremely higher than the specified level.
• If the spare tire is in a location subject to poor radio wave signal reception.
• If a large metallic object wh ich can interfere with signal reception is put near the
spare tire.
• If tires not equipped with the tire pressure warning valves and transmitters are used.
• If the ID code on the tire pressure warning valves and transmitters is not registered
in the tire pressure warning computer.
●Performance may be affected in the following situations.
• Near a TV tower, electric power plant, gas station, radio station, large display, air-
port or other facility th at generates strong radio waves or electrical noise
• When carrying a portable radio, cellular phone, cordless phone or other wireless
communication device
●When the vehicle is parked, the time taken for the warning to start or go off could be
extended.
●When tire inflation pressure declines rapidly for example when a tire has burst, the
warning may not function.