seats Lexus GX460 2014 Using the air conditioning system and defogger / LEXUS 2014 GX460 (OM60K80U) User Guide
[x] Cancel search | Manufacturer: LEXUS, Model Year: 2014, Model line: GX460, Model: Lexus GX460 2014Pages: 622, PDF Size: 8.61 MB
Page 50 of 622
501-1. For safe use
GX460_OM_OM60K80U_(U)
CAUTION
■Front passenger occupant classification system precautions
●Do not recline the front passenger seatback so far that it touches the rear seat. This
may cause the “AIR BAG OFF” indicator light to be illuminated, which indicates that
the SRS airbags for the front passenger will no t activate in the event of a severe acci-
dent. If the seatback touches the rear seat, return the seatback to a position where it
does not touch the rear seat. Keep the fron t passenger seatback as upright as possi-
ble when the vehicle is moving. Reclining the seatback excessively may lessen the
effectiveness of the seat belt system.
●If an adult sits in the front passenger seat , the “AIR BAG ON” indicator light is illumi-
nated. If the “AIR BAG OFF” indicator is illuminated, ask the passenger to sit up
straight, well back in the seat, feet on the floor, and with the seat belt worn correctly. If
the “AIR BAG OFF” indicator still remains illuminated, either ask the passenger to
move to the rear seat, or if that is not possible, move the front passenger seat fully
rearward.
●When it is unavoidable to install a forward- facing child restraint system on the front
passenger seat, install the child restraint sy stem on the front passenger seat in the
proper order. ( P. 5 6 )
●Do not modify or remove the front seats.
●Do not kick the front passenger seat or subj ect it to severe impact. Otherwise, the
SRS warning light may come on to indicat e a malfunction of the front passenger
occupant classification system. In this ca se, contact your Lexus dealer immediately.
●Child restraint systems installed on the rear seat should not contact the front seat-
backs.
●Do not use a seat accessory, such as a cu shion and seat cover, that covers the seat
cushion surface.
●Do not modify or replace the upholstery of the front seat.
Page 51 of 622
511-1. For safe use
GX460_OM_OM60K80U_(U)
1
For safety and security
Safety information for children
●It is recommended that children sit in the rear seats to avoid accidental con-
tact with the shift lever, wiper switch etc.
●Use the rear door child-protector lock or the window lock switch to avoid
children opening the door while driving or operating the power window acci-
dentally.
●Do not let small children operate equi pment which may catch or pinch body
parts, such as the power window, hood, trunk, seats etc.
Observe the following precautions when children are in the vehicle.
Use a child restraint system appropriate for the child, until the child becomes
large enough to properly wear the vehicle’s seat belt.
CAUTION
Never leave children unattended in the vehicle, and never allow children to have or use
the key.
Children may be able to start the vehicle or sh ift the vehicle into neutral. There is also a
danger that children may injure themselves by playing with the windows, the moon roof
(if equipped) or other features of the vehicle. In addition, heat build-up or extremely
cold temperatures inside the vehicle can be fatal to children.
Page 56 of 622

561-1. For safe use
GX460_OM_OM60K80U_(U)
Installing child restraints
Child restraint LATCH anchors
LATCH anchors are provided for the
right side second seat and between the
center and left side second seats. (But-
tons displaying the location of the
anchors are attached to the seats.)
Seat belts equipped with a child
restraint locking mechanism (ALR/
ELR belts except driver’s seat belt)
(P. 3 0 )
Anchor brackets (for top tether strap)
An anchor bracket is provided for each
second seat.
Follow the child restraint system manu facturer’s instructions. Firmly secure
child restraints to the seats using the LATCH anchors or a seat belt. Attach the
top tether strap when installing a child restraint.
The lap/shoulder belt can be used if yo ur child restraint system is not compati-
ble with the LATCH (Lower Anchor s and Tethers for Children) system.
Page 57 of 622

571-1. For safe use
GX460_OM_OM60K80U_(U)
1
For safety and security
Fold the seatback forward. Then
return the seatback and secure it at
the first lock position (most upright
position). ( P. 1 1 7 )
Ty p e A
Flip the cover (vehicles with third
seats), and latch the hooks of the
lower straps onto the LATCH
anchors. If the child restraint has a
top tether strap, the top tether strap
should be latched onto the top
tether strap anchor. ( P. 6 2 )
For owners in Canada:
The symbol on a child restraint sys-
tem indicates the presence of a
lower connector system.
Installation with LATCH system
1
Canada only
2
Page 58 of 622

581-1. For safe use
GX460_OM_OM60K80U_(U)
Ty p e B
Flip the cover (vehicles with third
seats), and latch the buckles onto the
LATCH anchors. If the child restraint
has a top tether strap, the top tether
strap should be latched onto the top
tether strap anchor. (P. 6 2 )
For owners in Canada:
The symbol on a child restraint sys-
tem indicates the presence of a
lower connector system.
■Rear-facing Infant seat/convertible seat
Fold the seatback forward. Then
return the seatback and secure it
at the first lock position (most
upright position). ( P. 1 1 7 )
Place the child restraint system
on the seat facing the rear of the
vehicle.
Canada only
2
Installing child restraints using a se at belt (child restraint lock function
belt)
1
2
Page 87 of 622

87
GX460_OM_OM60K80U_(U)
3
Operation of
each component
3-1. Key information
Keys ....................................................88
3-2. Opening, closing and locking the doors and trunk
Side doors ........................................ 92
Back door......................................... 99
Glass hatch .................................... 104
Smart access system with push-button start...................... 108
3-3. Adjusting the seats Front seats ........................................ 115
Rear seats ......................................... 117
Driving position memory ......... 128
Head restraints ............................ 132
3-4. Adjusting the steering wheel and mirrors
Steering wheel ............................. 135
Inside rear view mirror............... 137
Outside rear view mirrors ....... 139
3-5. Opening, closing the windows and moon roof
Power windows .............................142
Moon roof .......................................145
Page 98 of 622

98
GX460_OM_OM60K80U_(U)3-2. Opening, closing and locking the doors and trunk
■Impact detection door lock release system
In the event that the vehicle is subject to a strong impact, all the doors are unlocked.
Depending on the force of the
impact or the type of accident, however, the system may
not operate.
■Using the mechanical key
The doors can also be locked and unlocked with the mechanical key. ( P. 5 4 3 )
■Conditions affecting the operation of the sm art access system with push-button start
or wireless remote control
P. 1 1 0
■Customization
Settings (e.g. unlocking function using a key) can be changed.
(Customizable features: P. 5 7 8 )
CAUTION
■To prevent an accident
Observe the following precautions while driving the vehicle.
Failure to do so may result in a door opening and an occupant being thrown out of the
vehicle, resulting in death or serious injury.
●Ensure that all doors are properly closed and locked.
●Do not pull the inside handle of the doors while driving.
Be especially careful for the front doors, as the doors may be opened even if the
inside lock buttons ar e in locked position.
●Set the rear door child-protector locks when children are seated in the rear seats.
Page 115 of 622
115
GX460_OM_OM60K80U_(U)3-3. Adjusting the seats
3
Operation of each component
Front seats
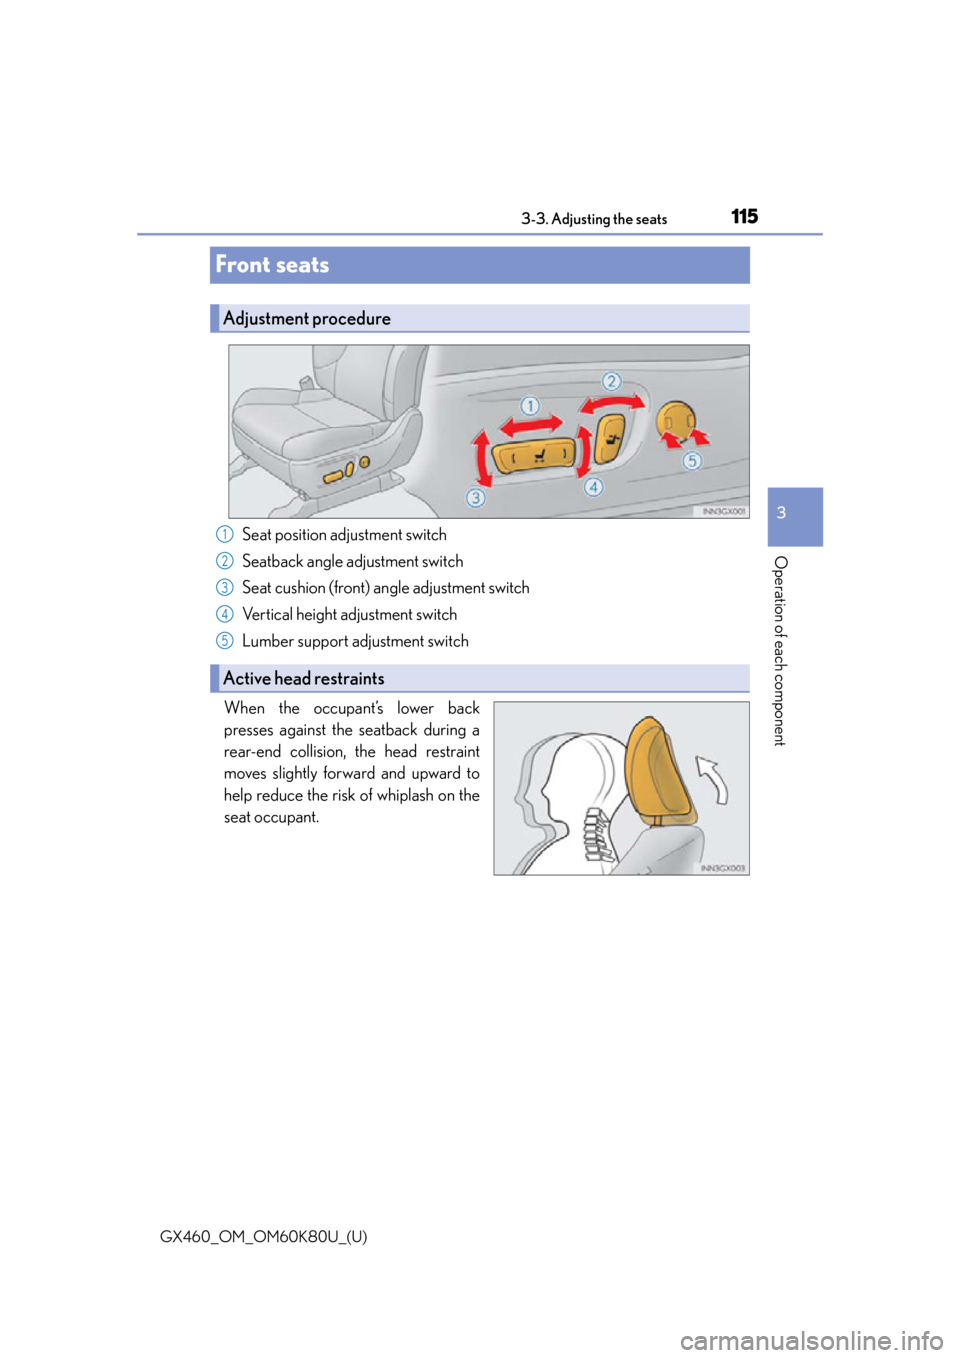
Seat position adjustment switch
Seatback angle adjustment switch
Seat cushion (front) angle adjustment switch
Vertical height adjustment switch
Lumber support adjustment switch
When the occupant’s lower back
presses against the seatback during a
rear-end collision, the head restraint
moves slightly forward and upward to
help reduce the risk of whiplash on the
seat occupant.
Adjustment procedure
Active head restraints
1
2
3
4
5
Page 116 of 622
116
GX460_OM_OM60K80U_(U)3-3. Adjusting the seats
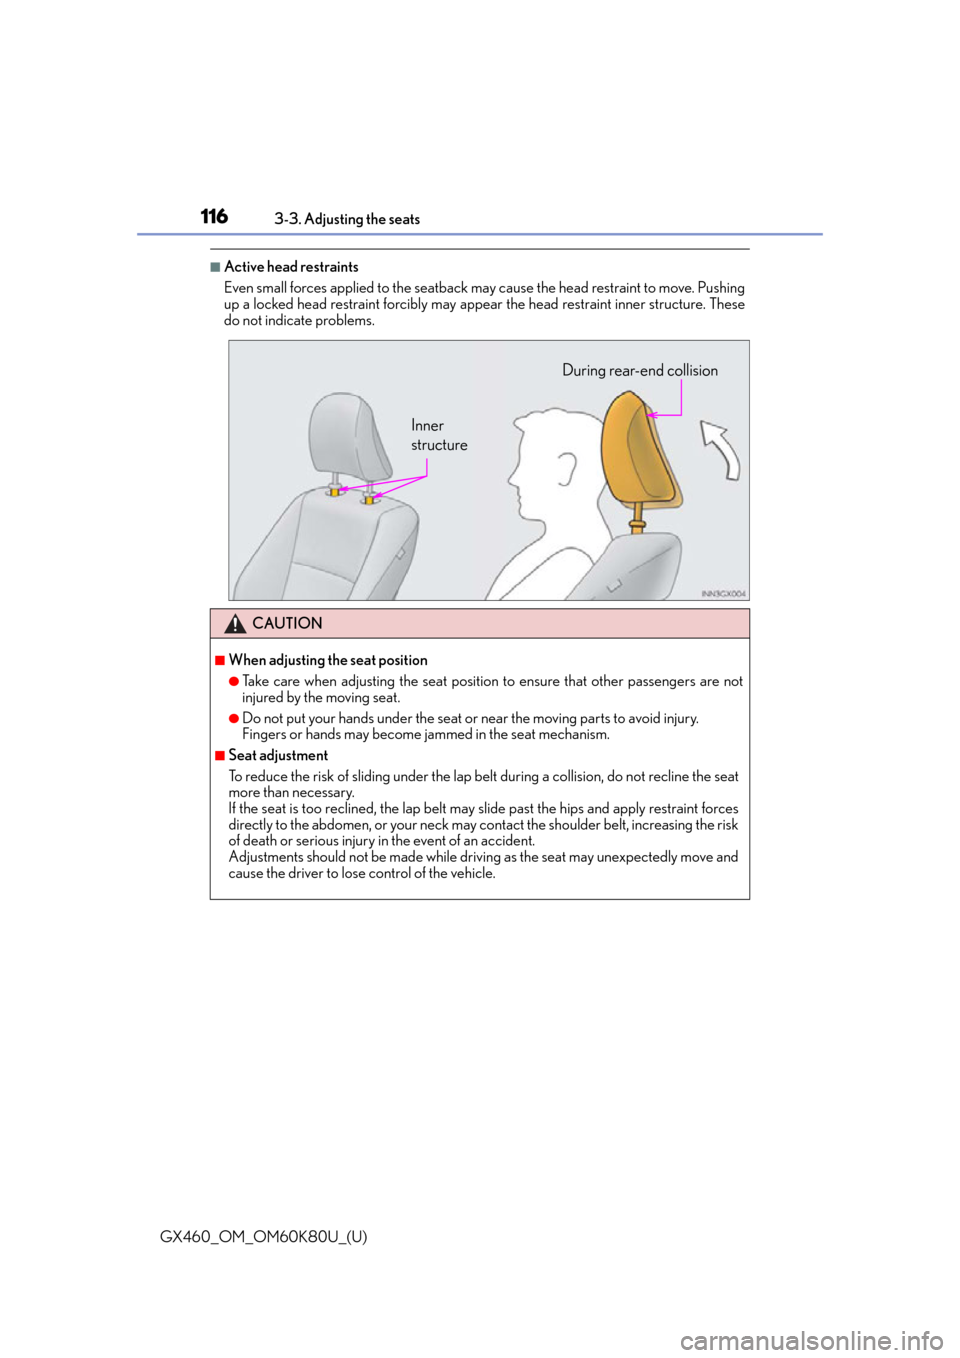
■Active head restraints
Even small forces applied to the seatback may cause the head restraint to move. Pushing
up a locked head restraint forcibly may appe
ar the head restraint inner structure. These
do not indicate problems.
CAUTION
■When adjusting the seat position
●Take care when adjusting the seat position to ensure that other passengers are not
injured by the moving seat.
●Do not put your hands under the seat or near the moving parts to avoid injury.
Fingers or hands may become jammed in the se at mechanism.
■Seat adjustment
To reduce the risk of sliding under the lap belt during a collision, do not recline the seat
more than necessary.
If the seat is too rec lined, the lap belt may slide past the hips and apply restraint forces
directly to the abdomen, or your neck may contact the shoulder belt, increasing the risk
of death or serious injury in the event of an accident.
Adjustments should not be ma de while driving as the seat may unexpectedly move and
cause the driver to lose control of the vehicle.
Inner
structure During rear-end collision
Page 117 of 622
117
GX460_OM_OM60K80U_(U)3-3. Adjusting the seats
3
Operation of each component
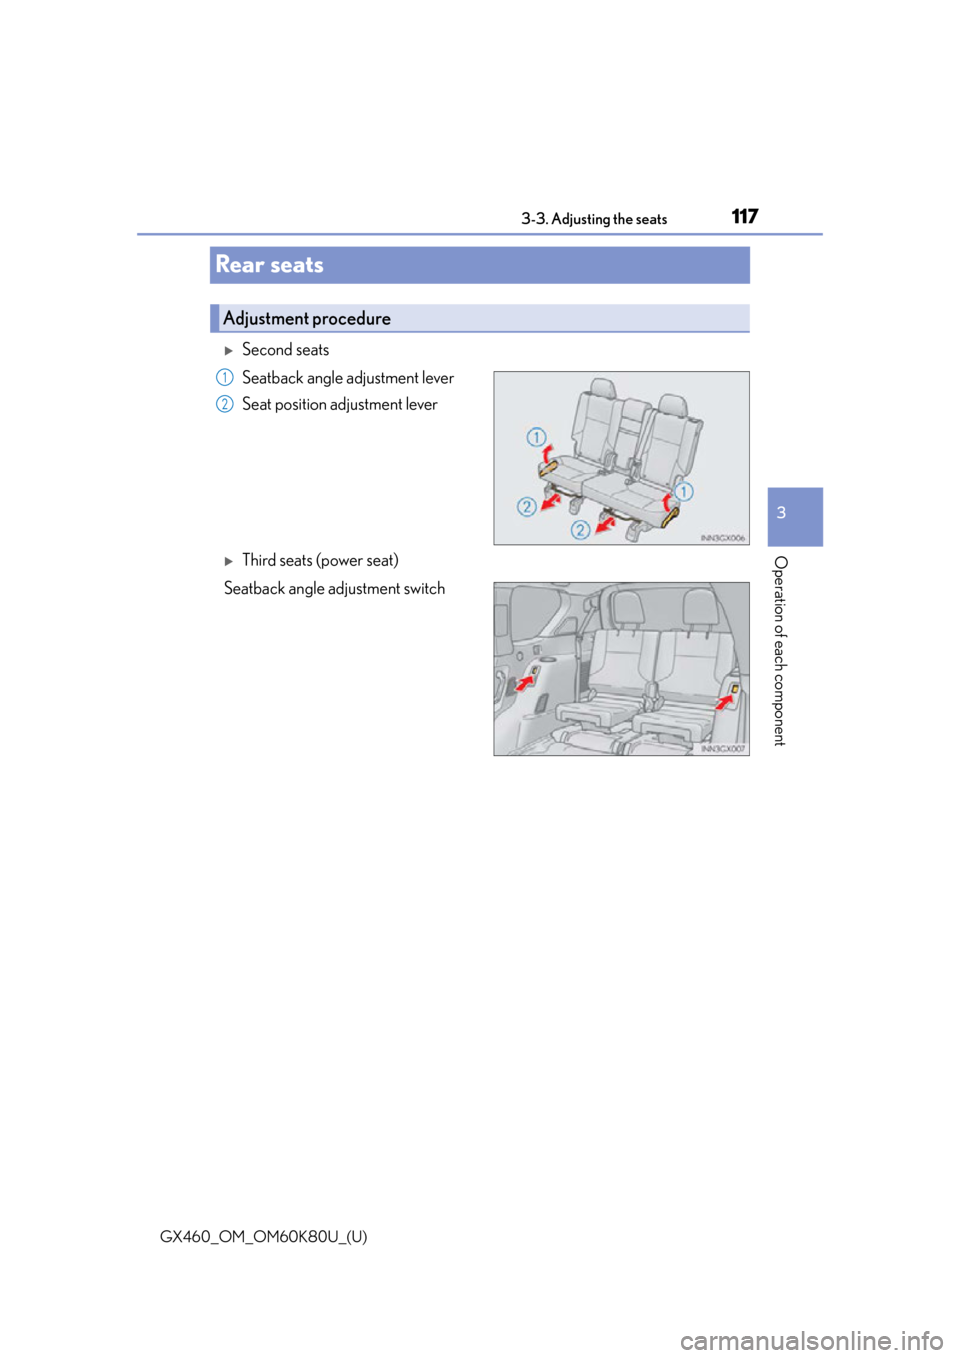
Rear seats
Second seats
Seatback angle adjustment lever
Seat position adjustment lever
Third seats (power seat)
Seatback angle adjustment switch
Adjustment procedure
1
2